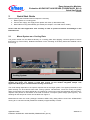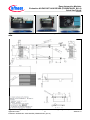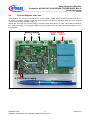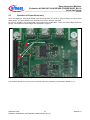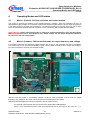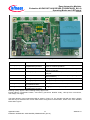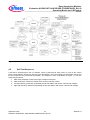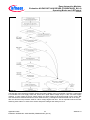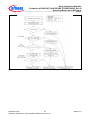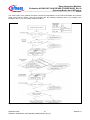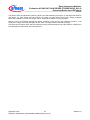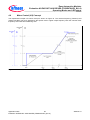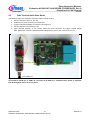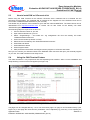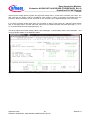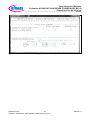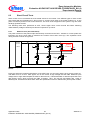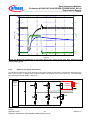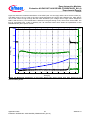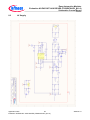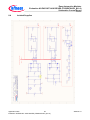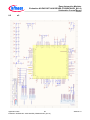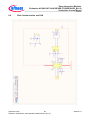
1
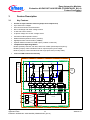
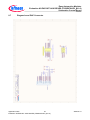
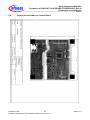
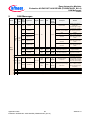
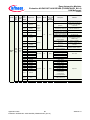
Eas y Aut omot ive Mo dules Applic atio n N ote Evaluation Kit EASYKIT AUX DRIVES (FS50R07W1E3_B11A) AN 201 2 -1 0 Revision 1.1 Elect ric D rive T rain Edition Revision 1.1 Published by Infineon Technologies AG 81726 Munich, Germany © 2013 Infineon Technologies AG All Rights Reserved. LEGAL DISCLAIMER THE INFORMATION GIVEN IN THIS DOCUMENT IS GIVEN AS A HINT FOR THE IMPLEMENTATION OF THE INFINEON TECHNOLOGIES COMPONENT ONLY AND SHALL NOT BE REGARDED AS ANY DESCRIPTION OR WARRANTY OF A CERTAIN FUNCTIONALITY, CONDITION OR QUALITY OF THE INFINEON TECHNOLOGIES COMPONENT. THE RECIPIENT OF THIS DOCUMENT MUST VERIFY ANY FUNCTION DESCRIBED HEREIN IN THE REAL APPLICATION. INFINEON TECHNOLOGIES HEREBY DISCLAIMS ANY AND ALL WARRANTIES AND LIABILITIES OF ANY KIND (INCLUDING WITHOUT LIMITATION WARRANTIES OF NON-INFRINGEMENT OF INTELLECTUAL PROPERTY RIGHTS OF ANY THIRD PARTY) WITH RESPECT TO ANY AND ALL INFORMATION GIVEN IN THIS DOCUMENT. Information For further information on technology, delivery terms and conditions and prices, please contact the nearest Infineon Technologies Office (www.infineon.com). Warnings Due to technical requirements, components may contain dangerous substances. For information on the types in question, please contact the nearest Infineon Technologies Office. Infineon Technologies components may be used in life-support devices or systems only with the express written approval of Infineon Technologies, if a failure of such components can reasonably be expected to cause the failure of that life-support device or system or to affect the safety or effectiveness of that device or system. Life support devices or systems are intended to be implanted in the human body or to support and/or maintain and sustain and/or protect human life. If they fail, it is reasonable to assume that the health of the user or other persons may be endangered. Easy Automotive Modules Evaluation Kit EASYKIT AUX DRIVES (FS50R07W1E3_B11A) Document Change History Date Version 09-2012 1.0 04-2013 1.1 Author T. Reiter T. Hoffmann T. Reiter T. Hoffmann Change Description Initial Version Added picture for CAN control more jumper position. Added information about terminal program with uConnect We Listen to Your Comments Is there any information in this document that you feel is wrong, unclear or missing? Your feedback will help us to continuously improve the quality of this document. Please send your proposal (including a reference to this document) to: [email protected] Trademarks of Infineon Technologies AG AURIX™, BlueMoon™, COMNEON™, C166™, CROSSAVE™, CanPAK™, CIPOS™, CoolMOS™, CoolSET™, CORECONTROL™, DAVE™, EasyPIM™, EconoBRIDGE™, EconoDUAL™, EconoPACK™, EconoPIM™, EiceDRIVER™, EUPEC™, FCOS™, HITFET™, HybridPACK™, ISOFACE™, I²RF™, IsoPACK™, MIPAQ™, ModSTACK™, my-d™, NovalithIC™, OmniTune™, OptiMOS™, ORIGA™, PROFET™, PRO-SIL™, PRIMARION™, PrimePACK™, RASIC™, ReverSave™, SatRIC™, SIEGET™, SINDRION™, SMARTi™, SmartLEWIS™, TEMPFET™, thinQ!™, TriCore™, TRENCHSTOP™, X-GOLD™, XMM™, X-PMU™, XPOSYS™. Application Note 3 Evaluation Kit EASYKIT AUX DRIVES (FS50R07W1E3_B11A) AN2012-10 Easy Automotive Modules Evaluation Kit EASYKIT AUX DRIVES (FS50R07W1E3_B11A) Table of Contents Page 1 1.1 1.2 Introduction ................................................................................................................................... 6 Safety Warning for Evaluation KIT .................................................................................................. 6 How to Order the Evaluation Kit ...................................................................................................... 6 2 2.1 2.2 2.3 2.3.1 2.4 Quick Start Guide .......................................................................................................................... 7 Mount System on a Cooling Plate ................................................................................................... 7 Connect Supplies and Load ............................................................................................................ 9 Operation of Power Board only .....................................................................................................10 Power Board Connector Description .............................................................................................11 Recommended Test Setup and Equipment ..................................................................................12 3 3.1 3.2 3.3 Feature Description ....................................................................................................................13 Key Features .................................................................................................................................13 Protection Features .......................................................................................................................14 Key Components BOM .................................................................................................................14 4 4.1 4.2 4.3 4.4 4.5 4.6 Operating Modes and LED status .............................................................................................15 Mode 1 (Default): Self test, soft start, and motor rotation .............................................................15 Mode 2 (Jumper): CAN controlled mode for output frequency and voltage .................................15 Mode 3 (Jumper): CAN controlled low side single pulse test .......................................................16 Status LEDs ..................................................................................................................................16 Self Test Sequence .......................................................................................................................18 Motor Control (U/f) Concept ..........................................................................................................25 5 5.1 5.2 5.3 5.4 Evaluation Kit CAN Terminal .....................................................................................................26 Introduction and Feature Description ............................................................................................26 CAN Terminal Quick Start Guide ..................................................................................................27 How to install SW on UConnect stick ............................................................................................28 Using the CAN Terminal Feature ..................................................................................................28 6 6.1 6.2 6.2.1 6.2.2 6.3 6.3.1 6.3.2 6.3.3 6.4 Experimental Results ..................................................................................................................31 Test sequence ...............................................................................................................................31 Short Circuit Tests .........................................................................................................................32 Short Circuit I (low inductance) .....................................................................................................32 Short Circuit II (high inductance) ...................................................................................................33 IGBT Turn-off (300V, 25A, 150°C) ................................................................................................35 IGBT Turn-on (300V, 25A, 150°C) ................................................................................................37 Diode Turn-off (300V, 25A, 150°C) ...............................................................................................39 IGBT Turn-off (450V, 100A, 25°C) ................................................................................................40 Motor run (Default Mode 1) ...........................................................................................................41 7 7.1 7.2 7.3 7.4 7.5 7.6 7.7 7.8 Schematics Power Board ...........................................................................................................43 Overview Inverter System .............................................................................................................43 Overview Power Board .................................................................................................................44 Connector on Power Board ...........................................................................................................45 Gate Driver ....................................................................................................................................46 Easy Module..................................................................................................................................47 Amplifier Stage ..............................................................................................................................48 Comparator Stage .........................................................................................................................49 Layout and Assembly Power Board ..............................................................................................50 8 8.1 8.2 8.3 8.4 8.5 8.6 8.7 8.8 Schematics Control Board .........................................................................................................51 Overview Control Board ................................................................................................................51 Connector from Power Board........................................................................................................52 LV Supply ......................................................................................................................................53 Isolated Supplies ...........................................................................................................................54 uC ..................................................................................................................................................55 CAN Communication and FAN .....................................................................................................56 Diagnosis and DAP Connector .....................................................................................................57 Layout and Assembly of Control Board ........................................................................................58 Application Note 4 Evaluation Kit EASYKIT AUX DRIVES (FS50R07W1E3_B11A) AN2012-10 Easy Automotive Modules Evaluation Kit EASYKIT AUX DRIVES (FS50R07W1E3_B11A) Table of Contents Page 9 CAN Messages ............................................................................................................................59 10 References ...................................................................................................................................63 Application Note 5 Evaluation Kit EASYKIT AUX DRIVES (FS50R07W1E3_B11A) AN2012-10 Easy Automotive Modules Evaluation Kit EASYKIT AUX DRIVES (FS50R07W1E3_B11A) Introduction 1 Introduction The Evaluation Kit “EASYKIT AUX DRIVES” was developed to support customers during their first steps in designing applications with the Easy 1B Automotive B6-Bridge power module. These modules are targeted for high voltage pumps and compressor applications within hybrid- and electric vehicles. The application note explains how to start with the Evaluation Kit and explains the design. The information is intended to enable the customers to re-use and modify the Evaluation Kit design for their own specific requirements. 1.1 Safety Warning for Evaluation KIT Please read and understand the manual and the following safety warnings. The design operates with unprotected high voltages. Therefore, the Evaluation Kit may only be handled by persons with sufficient electrical engineering training and experience. The customer assumes all responsibility and liability for its correct handling and/or use of the Evaluation Kit and undertakes to indemnify and hold Infineon Technologies harmless from any third party claim in connection with or arising out of the use and/or handling of the Evaluation Kit by the customer. The Evaluation Kit is a sample to be used by the customer solely for the purpose of evaluation and testing. It is not a commercialized product and shall not be used for series production.. The Evaluation Kit is thus not intended to meet any automotive qualifications. Due to the purpose of the system, it is not subjected to the same procedures regarding Returned Material Analysis (RMA), Process Change Notification (PCN) and Product Withdraw (PWD) as regular products. See Legal Disclaimer and Warnings for further restrictions on Infineon Technologies warranty and liability. European legislation in relation to inter alia the restriction of hazardous substances (RoHS), waste from electrical and electronic equipment (WEEE), electromagnetic compatibility, as well as duties to comply with CE, FCC or UL standards do not apply to the Evaluation Kit and the Evaluation Kit may not fulfill such requirements.. 1.2 How to Order the Evaluation Kit The Evaluation Kit has Infineon Technologies SAP number and can be ordered via Infineon Sales Partners. EASYKIT AUX DRIVES SAP Order Number: SP001020068 a) b) Figure 1 Pictures of the “EASYKIT AUX DRIVES” Evaluation Kit (typical appearance). Application Note 6 Evaluation Kit EASYKIT AUX DRIVES (FS50R07W1E3_B11A) AN2012-10 Easy Automotive Modules Evaluation Kit EASYKIT AUX DRIVES (FS50R07W1E3_B11A) Quick Start Guide 2 Quick Start Guide Before operating this Evaluation Kit two steps are necessary: 1. Mount system on a cooling plate 2. Connect aux supply, HV supply and a 3phase AC motor (or alternative load) 3. Motor starts running automatically per default (see chapter 4 for CAN control modes) Please read the entire application note carefully in order to prevent accidents and damage on the Evaluation Kit. 2.1 Mount System on a Cooling Plate The power module can be attached directly on a cooling plate after applying a thermal grease of 50 um thickness (e.g. Fischer WLP). Detailed information on the mounting of the Easy Automotive Module can be found in [2]. thermal grease Cooling System Figure 2 Mounting for quick start with the Evaluation Kit. Standard thermal grease is applied between module and cooler. The module is fixed with screws via the module integrated clamps. See Application Note [2] for recommended mounting instructions. The cooler design depends on the specific requirements of the target system. The highest performance and power density can be achieved with water cooling systems. Nevertheless, forced air cooling is typically easier for first tests in the high voltage lab. An example of a forced air cooler was designed, where the DCLcapacitor was placed on the bottom of the PCB to achieve a compact system design (see Figure 3). The drawings for the sample air cooler can be taken from Figure 4. Measurements with the cooler prototype Assmann WSW: ASS_1060_HSrev01 and FAN: AFB0612VHC running at 15 V showed an Rth (heatsink to ambient) of approximately 0.4 K/W. Application Note 7 Evaluation Kit EASYKIT AUX DRIVES (FS50R07W1E3_B11A) AN2012-10 Easy Automotive Modules Evaluation Kit EASYKIT AUX DRIVES (FS50R07W1E3_B11A) Quick Start Guide Figure 3 EASY AUX DRIVES Evaluation Kit mounted on a sample forced air cooler from Assmann WSW. Figure 4 Drawing of a sample forced air cooler (Assmann WSW: ASS_1060_HSrev01). Application Note 8 Evaluation Kit EASYKIT AUX DRIVES (FS50R07W1E3_B11A) AN2012-10 Easy Automotive Modules Evaluation Kit EASYKIT AUX DRIVES (FS50R07W1E3_B11A) Quick Start Guide 2.2 Connect Supplies and Load The Evaluation KIT has to be connected to a 8..18V auxiliary supply, which can deliver at least 2A. On the HV power connectors a supply <450V and a 3ph induction machine (or equivalent load) has to be applied. The connections are illustrated in Figure 5. Please take note that only the aux supply is reverse polarity protected up to -20V. The power terminals for the <450V DCL supply is not protected against reverse polarity events and will lead to failed diodes if current is not limited. Motor Phases U V W <450V supply DCL- DCL+ 8..18V/2A aux supply Figure 5 Supply and load connections to operate the Evaluation Kit. Application Note 9 Evaluation Kit EASYKIT AUX DRIVES (FS50R07W1E3_B11A) AN2012-10 Easy Automotive Modules Evaluation Kit EASYKIT AUX DRIVES (FS50R07W1E3_B11A) Quick Start Guide 2.3 Operation of Power Board only Some investigations, like typical double pulse switching tests, are easier to perform without a control board and software. The pulse patterns are generated here from a function generator. For such an operation, the power board needs some minor modifications. Three zero ohm bridges has to be placed. The location for these bridges are illustrated in Figure 6. PIN1 0Ω bridges Figure 6 Three required 0Ω bridges if tests without control board has to be performed. The required signals on the connectors for power board only operation is described in Section 2.3.1. Application Note 10 Evaluation Kit EASYKIT AUX DRIVES (FS50R07W1E3_B11A) AN2012-10 Easy Automotive Modules Evaluation Kit EASYKIT AUX DRIVES (FS50R07W1E3_B11A) Quick Start Guide 2.3.1 Power Board Connector Description For Pin1 location please see Figure 6. No. Signal Description 1 +15V_HV +15V gate driver supply (required for power board only operation) +15V_HV +15V gate driver supply GND_DIG Digital Ground (required for power board only operation) GND_DIG Digital Ground PWM_UB PWM Input for Low-Side IGBT Phase U PWM_UT PWM Input for High-Side IGBT Phase U PWM_VB PWM Input for Low-Side IGBT Phase V PWM_VT PWM Input for High-Side IGBT Phase V PWM_WB PWM Input for Low-Side IGBT Phase W PWM_WT PWM Input for High-Side IGBT Phase W +5V_HV +5V logic supply HSflt_disable HighSide gate driver fault event hiding. Required to start bootstrap supply. Function is continuous on for power board only operation – no signal required. nRST_uC Not RESET input from the uC. (connect to +5V_HV Pin 6 for power board only operation) nFLT_uC Not FAULT output signal to the uC +5V_HV_ana +5V analog supply. (is connected to +5V_HV – Pin6 for power board only operation – no supply required) +5V_HV_ana +5V analog supply. (is connected to +5V_HV – Pin6 for power board only operation – no supply required) AnalogV_PHU Analog 0..5V output signal of phase U voltage Analog_NTC Analog 0..5V output signal of NTC temperature AnalogV_PHV Analog 0..5V output signal of phase V voltage AnalogI_PHU Analog 0..5V output signal of low side phase U current (ratiometric output) AnalogV_PHW Analog 0..5V output signal of phase W voltage AnalogI_PHV Analog 0..5V output signal of low side phase V current (ratiometric output) AnalogV_DCL Analog 0..5V output signal of DCL-voltage AnalogI_PHW Analog 0..5V output signal of low side phase W current (ratiometric output) GND_ANA Analog Ground (is connected to GND_DIG – Pin2 for power board only operation – no supply required) NC Not connected GND_ANA Analog Ground (is connected to GND_DIG – Pin2 for power board only operation – no supply required) GND_ANA Analog Ground (is connected to GND_DIG – Pin2 for power board only operation – no supply required) 15 2 16 3 17 4 18 5 19 6 20 7 21 8 22 9 23 10 24 11 25 12 26 13 27 14 28 Minimum required signals for power board only tests have indicated with bold font. Application Note 11 Evaluation Kit EASYKIT AUX DRIVES (FS50R07W1E3_B11A) AN2012-10 Easy Automotive Modules Evaluation Kit EASYKIT AUX DRIVES (FS50R07W1E3_B11A) Quick Start Guide 2.4 Recommended Test Setup and Equipment Minimum to operate the Evaluation Kit: 8-18V/2A DC source 450V 20A DC source Cooler plate and thermal grease (see section 2.1) 3ph induction machine or equivalent inductive load For diagnosis, control and SW updates additional: Infineon UConnect XC2xxxX for low cost CAN terminal functionality HighSpeed CAN toolset (1MBit/s) DAP miniWiggler (can be ordered in ISAR: SP001020068) Tasking VX toolset for C166 For investigations on the switching behavior additional: 4 channel scope (min. 100 MHz) Differential probes (capable for measuring 650V) Rogowski current probe (e.g. CWT1) For investigations on the efficiency additional: 4 channel power analyzer (range 400V/50A) Application Note 12 Evaluation Kit EASYKIT AUX DRIVES (FS50R07W1E3_B11A) AN2012-10 Easy Automotive Modules Evaluation Kit EASYKIT AUX DRIVES (FS50R07W1E3_B11A) Feature Description 3 Feature Description 3.1 Key Features Inverter for 3ph induction machine (pumps and compressors) Up to 450V DCL voltages Overcurrent and short circuit detection DCL overvoltage and under voltage lockout 3x low side current sensor 3x phase voltage and 1x DCL voltage sensor Controller PCB temperature sensor Module DCB temperature sensor (via NTC) HighSpeed CAN Communication (1MBit/s) Optional PWM controlled 15V FAN output (<400mA continuous) 3 Implemented Operating Modes: Mode1 (Default): Self test, soft start, and motor rotation (fixed output frequency). Mode2 (Jumper): CAN controlled mode for output frequency and voltage. Mode 3 (Jumper): CAN controlled low side single pulse test (1us step width). Low cost CAN terminal functionality EASYKIT AUX DRIVES EASY 1B Automotive FS50R07W1E3_B11A HV Supply System Power Board 25..420V Max 450V! 3ph Motor 2ED Driver Shunt AMPL 2ED Driver Shunt AMPL 2ED Driver Comp Comp Shunt AMPL Voltage Amplifiers Comp Comp 5V 15V iso uController CAN XC2768X FAN DC DC 8..18V DC DC DC DC Low Voltage High Voltage Control Board Isolation Figure 7 System architecture of the “EASYKIT AUX DRIVES” Evaluation Kit. Application Note 13 Evaluation Kit EASYKIT AUX DRIVES (FS50R07W1E3_B11A) AN2012-10 Easy Automotive Modules Evaluation Kit EASYKIT AUX DRIVES (FS50R07W1E3_B11A) Feature Description 3.2 Protection Features The protection features in this Evaluation KIT are limited. Please take note that testing beyond maximum rating may lead to device failures and damages. Infineon will not take any liability for failures on the Evaluation KIT as well as damage on lab equipments. The design is not protected against: X Overtemperature X DCL Overvoltage (>450V) X Reverse polarity. (Only on 8-18V LV supply) X Overcurrent, Overvoltage on FAN output Following protection features are implemented and activated: Overcurrent 8-18V supply with self restart (hiccup-mode) Reverse polarity protection 8-18V supply (up to -20V) Gate Driver Under voltage Lockout (UVLO) Gate Driver not Ready event locks all other Channels Shoot-through protection IGBT desaturation/short circuit (and overcurrent on low side IGBTs) DCL under- and overvoltage lockout (stop switching operation only) 3.3 Key Components BOM Part Description Manufacturer Status FS50R07W1E3_B11A Easy 1B Automotive B6-bridge with IGBT3 and Emitter Controlled Diode 3 650V/50A Infineon Productive 2ED020I12FA EiceDriver™ 2A Dual Channel Gate Driver Infineon Productive SAK-XC2768X 16/32-Bit Single-Chip Microcontroller Infineon Productive TLE8250G CAN Transceiver Infineon Productive BSO604NS2 Dual 55V, 35mΩ OptiMOS™ Infineon Productive TLE7274-2D 5V LDO linear voltage regulator Infineon Productive T7509 SMD Gate Driver Supply Transformers 1:1.1 5mm clearance/creepage TDK/Epcos * B32776G4406+000 450V 40uF MKP foil DCL Capacitor TDK/Epcos * * For status and datasheets of the passive TDK/Epcos components please ask [email protected]. Application Note 14 Evaluation Kit EASYKIT AUX DRIVES (FS50R07W1E3_B11A) AN2012-10 Easy Automotive Modules Evaluation Kit EASYKIT AUX DRIVES (FS50R07W1E3_B11A) Operating Modes and LED status 4 Operating Modes and LED status 4.1 Mode 1 (Default): Self test, soft start, and motor rotation This mode is selected per default in the standard delivery condition. After the Evaluation Kit has an appropriated supply voltage, first a self test is performed and after PASS result the phase output is ramped in a soft start function to a fixed output frequency. The induction machine is running open loop. All of these items are performed automatically and it requires no user interaction, which makes first test “Easy”. Safety Warning: Please note that the motor is starting to rotate automatically in this operating mode. Make sure that the motor is fixed properly and a motor rotation will not lead to dangerous situations for persons in the near environment. 4.2 Mode 2 (Jumper): CAN controlled mode for output frequency and voltage If a Jumper is placed on the diagnosis header between pin 12 and 13, the Evaluation Kit runs in CAN Mode. The easiest way to use the CAN functionality is given with the CAN terminal function. Please see chapter 5 for more information of this low cost terminal solution. JUMPER position for CAN control mode Figure 8 Required jumper position for enabling the CAN controlled mode. After the self test routine is successfully passed it waits for CAN messages. In this mode the output frequency and voltage for the motor can be programmed to adjust the motor speed. Following CAN Messages are minimum required to get the motor running: - The nominal output voltage (line to line) has to be applied with CAN Message: CAN-ID 11hex, Signal Name PVacNom, Data Type Unsigned, Bit Start 16, Bit Length 16, Unit V Q4 (16 ↔ 1 V) Application Note 15 Evaluation Kit EASYKIT AUX DRIVES (FS50R07W1E3_B11A) AN2012-10 Easy Automotive Modules Evaluation Kit EASYKIT AUX DRIVES (FS50R07W1E3_B11A) Operating Modes and LED status - The nominal output frequency has to be applied with CAN Message: CAN-ID 11hex, Signal Name PFacNom, Data Type Unsigned, Bit Start 0, Bit Length 16, Unit Hz Q6 (64 ↔ 1 Hz) - The target output frequency has to be applied with the CAN Message: CAN-ID 10hex, Signal Name DFacSet, Data Type Signed (negative value for change of rotation direction), Bit Start 16, Bit Length 16, Unit Hz Q6 (64 ↔ 1 Hz) - The motor starts to run after CAN Message: CAN-ID 10hex, Signal Name DEnable, Data Type Bit, Bit Start 0, Bit Length 1 - 4.3 The target frequency can now be continuously adjusted and will be slowly ramped to these new values. Mode 3 (Jumper): CAN controlled low side single pulse test The CAN controlled mode (required jumper position see Figure 8) allows single pulse switching tests on an arbitrary low side switch without the need of a function generator. The easiest way to use the CAN functionality is given with the CAN terminal function. Please see chapter 5 for more information of this low cost terminal solution. The single pulse test is a useful mode if you want to test turn-off overvoltages. For these tests a power inductor has to be connected between the phase output and DCL+ connection like in standard double pulse test benches (see Figure 22, Figure 24, Figure 26, Figure 28 for pulse test configurations). - This mode can be entered if a Jumper is placed on the diagnosis header between pin 12 and 13 (similar to Mode 2). Following CAN Message is required to enter single pulse testing: CAN-ID 10hex, Signal Name DSglPulse, Data Type Bit, Bit Start 2, Bit Length 1 - The switch has to be selected with CAN Message (multiple or a single switch can be selected): CAN-ID 10hex, Signal Name DSglPulseULs, Data Type Bit, Bit Start 3, Bit Length 1 CAN-ID 10hex, Signal Name DSglPulseVLs, Data Type Bit, Bit Start 4, Bit Length 1 CAN-ID 10hex, Signal Name DSglPulseWLs, Data Type Bit, Bit Start 5, Bit Length 1 - The pulse length has to be applied with CAN Message: CAN-ID 10hex, Signal Name DSglPulseLength, Data Type Unsigned, Bit Start 16, Bit Length 16, Unit µs Q0 (1 ↔ 1 µs, pulse length is limited to a maximum of 500 µs) - Toggling following CAN Message from 0 to 1 applies the programmed pulses to the output CAN-ID 10hex, Signal Name DEnable, Data Type Bit, Bit Start 0, Bit Length 1 4.4 Status LEDs The status led’s indicates to the operator in a very fast way several failure and operating mode conditions of the Evaluation Kit. Application Note 16 Evaluation Kit EASYKIT AUX DRIVES (FS50R07W1E3_B11A) AN2012-10 Easy Automotive Modules Evaluation Kit EASYKIT AUX DRIVES (FS50R07W1E3_B11A) Operating Modes and LED status LED1 LED2 Figure 9 Location of status leds. Led 1 is closer to the top edge of the control PCB. LED1 LED2 State Flashing quickly Flashing quickly Flashing quickly complementary to LED1 Off Off Flashing quickly On Off On Flashing slowly Self test, wait due to low DCL voltage. Increase >25V for continue operation. Self test, error due to problems in passive sequence test part Self test, error due to problems in active sequence test part Stop (DCL voltage out of operating range OR internal failures) Ready (waiting for enable in CAN mode) On Flashing quickly Run (PWM output active) Flashing slowly Flashing slowly synchronize to LED1 Flashing slowly complementary to LED1 Error (repetitive internal failures) Flashing slowly Single pulse mode (Mode 3) Flashing quickly: approx 10Hz; Flashing slowly: approx 2Hz Internal failures: temperature failure, overcurrent, gate driver fault/not ready, HW trip from overcurrent, overvoltage, uC supply. The state diagram of the implemented SW is shown in Figure 10. The operator has with the led’s a simple and fast way to determine the current state without using CAN communication, where much more detailed information is given. Application Note 17 Evaluation Kit EASYKIT AUX DRIVES (FS50R07W1E3_B11A) AN2012-10 Easy Automotive Modules Evaluation Kit EASYKIT AUX DRIVES (FS50R07W1E3_B11A) Operating Modes and LED status Figure 10 Control state machine of the Evaluation Kit. 4.5 Self Test Sequence A self test is implemented in the uC software, which is performed at each power up cycle of the control board. The Evaluation Kit will only start the normal operation, when the signals give reasonable values and the test sequence was performed successfully. The sequence, which is illustrated in Figure 11, has four major test procedures: 1. ADC value plausibility: Checks the supply voltages of the ADC 2. ADC value limits: Checks the offsets of the sensors and ADC values 3. Low side switching: Switches sequentially all low side IGBTs and checks currents and voltages 4. High side switching: Switches sequentially all high side IGBTs and checks currents and voltages Application Note 18 Evaluation Kit EASYKIT AUX DRIVES (FS50R07W1E3_B11A) AN2012-10 Easy Automotive Modules Evaluation Kit EASYKIT AUX DRIVES (FS50R07W1E3_B11A) Operating Modes and LED status Figure 11 Overview of self test sequence with the four major test procedures. The first part of the passive procedure checks the supply voltage of the uC and ADC. The ADC_1V95 signal is connected to the uC supply status led, which has a quite stable voltage drop of 1.95V over wide supply voltages. In case of drifts of the uC supply voltage, the ADC scaling of all sensors would not be correct. But such a drift will be detected because in such cases the ADC_1V95 signal is also distorted and out of range. After this test the test procedure waits for a DCL voltage higher than 20V. This is required because the later switching tests makes no sense if the switch and phase voltages has always 0V Vce. Application Note 19 Evaluation Kit EASYKIT AUX DRIVES (FS50R07W1E3_B11A) AN2012-10 Easy Automotive Modules Evaluation Kit EASYKIT AUX DRIVES (FS50R07W1E3_B11A) Operating Modes and LED status 25V Figure 12 Overview of the passive self test sequence. Part 1 to check ADC values on plausibility. Application Note 20 Evaluation Kit EASYKIT AUX DRIVES (FS50R07W1E3_B11A) AN2012-10 Easy Automotive Modules Evaluation Kit EASYKIT AUX DRIVES (FS50R07W1E3_B11A) Operating Modes and LED status The second part of the passive procedure checks the temperatures of the PCB and Module and cancels small current sensor offsets. The test procedure with the following switching test is only started if the Evaluation Kit is not in overvoltage lookout condition. Figure 13 Overview of the passive self test sequence. Part 2 to check ADC limit values. Application Note 21 Evaluation Kit EASYKIT AUX DRIVES (FS50R07W1E3_B11A) AN2012-10 Easy Automotive Modules Evaluation Kit EASYKIT AUX DRIVES (FS50R07W1E3_B11A) Operating Modes and LED status The passive tests are followed by switching tests of low side switches (see Figure 14) and high side switches (see Figure 15). Each switch is turned-on and Vce voltage, low side phase current, DCL voltage, and gate driver fault condition is checked for proper values. After this the switch is turned-off again. After the test is successfully passed the default condition is than all low side switches turned-on. This enables the supply of the high side gate drivers, which are implemented via bootstrap supply. The same test procedure of the low side switches is than performed with the high-side switches, whereby the corresponding low side switch is turned-off before. Application Note 22 Evaluation Kit EASYKIT AUX DRIVES (FS50R07W1E3_B11A) AN2012-10 Easy Automotive Modules Evaluation Kit EASYKIT AUX DRIVES (FS50R07W1E3_B11A) Operating Modes and LED status Figure 14 Overview of the active self test sequence. Part 1 to check the low-side switches. Application Note 23 Evaluation Kit EASYKIT AUX DRIVES (FS50R07W1E3_B11A) AN2012-10 Easy Automotive Modules Evaluation Kit EASYKIT AUX DRIVES (FS50R07W1E3_B11A) Operating Modes and LED status Figure 15 Overview of the active self test sequence. Part 2 to check the high-side switches. Application Note 24 Evaluation Kit EASYKIT AUX DRIVES (FS50R07W1E3_B11A) AN2012-10 Easy Automotive Modules Evaluation Kit EASYKIT AUX DRIVES (FS50R07W1E3_B11A) Operating Modes and LED status 4.6 Motor Control (U/f) Concept The implemented simple U/f control concept is shown in Figure 16. The nominal frequency (FacNom) and voltage (VacNom) has to be adjusted to the specific motor. Higher output frequency than the nominal motor frequency enters the field weakening area. Figure 16 Motor control with U/f. Application Note 25 Evaluation Kit EASYKIT AUX DRIVES (FS50R07W1E3_B11A) AN2012-10 Easy Automotive Modules Evaluation Kit EASYKIT AUX DRIVES (FS50R07W1E3_B11A) Evaluation Kit CAN Terminal 5 Evaluation Kit CAN Terminal 5.1 Introduction and Feature Description The Evaluation Kit has a CAN communication functionality, which can be used with all standard HighSpeed CAN toolsets (1MBit/s). This CAN communication is isolated from the high voltage potentials. The CAN Terminal option via the Infineon UConnect XC2xxxX hardware provides a low cost gateway from the EASYKIT CAN port to a standard USB port (virtual COM). With the CAN Terminal it is possible to control the EASYKIT in the CAN controlled mode with e.g. the following functionality: Adjust nominal motor parameters Adjust motor speed Monitor analog values and fault events from the EASYKIT Monitor communication states Perform single pulse tests The main advantage for the customer is the low cost of this CAN Terminal solution compared to standard CAN cards available on the market. No specific SW installations are required on the target PC only a standard terminal program is required, which are available free of charge on the internet (e.g. Tera Term, PUTTY,….). Please note that the update rate is limited compared to standard CAN communication interfaces. Application Note 26 Evaluation Kit EASYKIT AUX DRIVES (FS50R07W1E3_B11A) AN2012-10 Easy Automotive Modules Evaluation Kit EASYKIT AUX DRIVES (FS50R07W1E3_B11A) Evaluation Kit CAN Terminal 5.2 CAN Terminal Quick Start Guide The following steps are required to setup the CAN Terminal function: 1. Connect UConnect stick on your PC 2. Install SW on uConnect stick (see section 5.3) 3. Jumper CAN Control Mode on EASYKIT (see Figure 8) 4. Connect UConnect to EASYKIT CAN 5. Open terminal program on PC (select COM port from UConnect and apply 115200 Baud) Note: please use or install a standard terminal program on your PC like Tera Term, PUTTY,… to PC USB port Figure 17 EASYKIT AUX DRIVES with UConnect stick to use the CAN terminal function. CANL is connected to D-SUB pin 2; CANH is connected to D-SUB pin7. Communication status is indicated with blinking blue led on UConnect stick. Application Note 27 Evaluation Kit EASYKIT AUX DRIVES (FS50R07W1E3_B11A) AN2012-10 Easy Automotive Modules Evaluation Kit EASYKIT AUX DRIVES (FS50R07W1E3_B11A) Evaluation Kit CAN Terminal 5.3 How to install SW on UConnect stick Before using the CAN Terminal via the Infineon UConnect stick a software has to be flashed into the UConnect microcontroller. The prepared SW is included in the shipped CD of the EASYKIT and can be found under “Software\Interface\uConnect” (see .hex file). The easiest way to flash the microcontroller is given with the Infineon MEMTOOL. The latest version can be downloaded from http://www.infineon.com. A version can be also found on the delivery CD under “Software\Program\Memtool\”. Now following steps are required at the first use: 1. Connect UConnect stick on your PC 2. Open Infineon Memtool on your PC 3. Select “Target/Change…” and select the .cfg configuration file from the delivery CD under “Software\Interface\uConnect” 4. Press Connect button (at bottom on GUI) 5. Select hex file from delivery CD “Software\Interface\uConnect” 6. Press Select All button 7. Press Add Select button 8. Press Program button 9. After press Disconnect button and target reset the program in UConnect stick starts Now you can connect your UConnect stick to the EASYKIT CAN connector and open your terminal program on your PC. The CAN Terminal is now ready to use. 5.4 Using the CAN Terminal Feature The CAN Terminal is a very simple and near self explaining user interface. After a correct installation and setup following overview screen will appear (see Figure 18). Figure 18 CAN Terminal User Interface start-up screen “Overview”. The pages can be changed with Key 1 to 8. The motor drive page is on page 2 “AC Generation Setup” (see Figure 19). In this page the nominal motor parameters can be adjusted (e.g. press key “d” for adjusting the Application Note 28 Evaluation Kit EASYKIT AUX DRIVES (FS50R07W1E3_B11A) AN2012-10 Easy Automotive Modules Evaluation Kit EASYKIT AUX DRIVES (FS50R07W1E3_B11A) Evaluation Kit CAN Terminal nominal motor voltage phase to phase and type new voltage value – press enter to activate new value. The new value will be shown under the Feedback value column if value is accepted successfully from the EASYKIT. Other parameters, which are shown on the Terminal can be adjusted simply in the same way. If you want to perform single pulse tests you can switch to page 6 (see Figure 20). Adjust the pulse length (key “b” and type value in us) and select the switch were you want to perform the probe pulse (key “u” or “v” or “w”) and Activate low side single pulse (key “a”). The other pages show further analog values, fault messages, communication status, self test details… and can give deeper details on the EASYKIT status. Figure 19 CAN Terminal User Interface page 2 for motor control “AC Generation Setup”. Application Note 29 Evaluation Kit EASYKIT AUX DRIVES (FS50R07W1E3_B11A) AN2012-10 Easy Automotive Modules Evaluation Kit EASYKIT AUX DRIVES (FS50R07W1E3_B11A) Evaluation Kit CAN Terminal Figure 20 CAN Terminal User Interface page 6 “Single Pulse Setup”. Application Note 30 Evaluation Kit EASYKIT AUX DRIVES (FS50R07W1E3_B11A) AN2012-10 Easy Automotive Modules Evaluation Kit EASYKIT AUX DRIVES (FS50R07W1E3_B11A) Experimental Results 6 Experimental Results 6.1 Test sequence The test sequence concept was explained in Section 4.5. Figure 21 shows the measured waveforms from the mixed signal scope during the active switching part. The major events are numbered on the bottom of the screen shoot. Please take note that the phase voltages during switch turn-off phases can have different shapes depending on the connected load. However, when a switch is turned-on the Vce voltage of this switch has to be always low. Legend Complete test sequence A1 V_U A2 V_V A3 V_W A4 V_DCL D0 PWM_UT D1 PWM_UB D2 PWM_VT D3 PWM_VB D4 PWM_WT D5 PWM_WB D6 HSflt_disable D7 nFLT_uC D8 nRST_uC D10 toggle at PWM timer period D11 ADC ISR & ADC value read at self test routine D12 PWM ISR code for test pulse generation D13 DRIVER_U /RSTHS 1 2 3 4 5 6 7 8 Figure 21 Overview of the active self test sequence. Low side and high side switching. 1. 2. 3. 4. 5. 6. 7. 8. The low side phase U switch is turned-on and off The low side phase V switch is turned-on and off The low side phase W switch is turned-on and off The low side switching test is PASSED and all low side switches are turned-on (default wait state) The high side phase U switch is turned-on and off (after low side switch turn-off) The high side phase V switch is turned-on and off (after low side switch turn-off) The high side phase W switch is turned-on and off (after low side switch turn-off) The high side switching test is PASSED and all low side switches are turned-on (default wait state). The test sequence is successfully PASSED Application Note 31 Evaluation Kit EASYKIT AUX DRIVES (FS50R07W1E3_B11A) AN2012-10 Easy Automotive Modules Evaluation Kit EASYKIT AUX DRIVES (FS50R07W1E3_B11A) Experimental Results 6.2 Short Circuit Tests Short circuits can be considered as most critical events for an inverter. Two different types of short circuits were tested with the Evaluation KIT. Short circuit I is a short circuit close to the power module (e.g. on the power connectors) and thus has a low inductance. The short circuit II appears in the system if e.g. the motor windings generate a short. The following tests were performed at 25°C, where higher short circuit currents and faster switching characteristics (voltage overshoot) is achieved compared to Tj=150°C. 6.2.1 Short Circuit I (low inductance) The power terminal of the phase output was directly connected to the DCL+ terminal. A current probe was inserted in the short circuit cable to measure the currents of this short circuit (IL). The equivalent circuit during this test is shown in Figure 22. HV Supply System Short Circuit <450V Vge IL Vce Figure 22 Equivalent circuit of the short circuit I test. The device under test is the right low-side switch. Figure 23 shows the measured waveforms of the IGBT (see Vce and Vge) and the short circuit current (IL). The IGBT turns-on at 0 us. After approx 0.4 us the current is high enough that the IGBT desatures (Vce voltage rises to high values despite the IGBT is still turned on). This desaturation is detected quite fast in the gate driving circuit, which turns-off the IGBT at approx 1.5us. The turn-off overvoltage with <100V is relatively low. All measured values were within the specification of the F4-50R07W1E3_B11A power module. Application Note 32 Evaluation Kit EASYKIT AUX DRIVES (FS50R07W1E3_B11A) AN2012-10 Easy Automotive Modules Evaluation Kit EASYKIT AUX DRIVES (FS50R07W1E3_B11A) Experimental Results Tvj=25°C 30 500 25 400 20 300 15 200 10 100 5 0 0 -1 0 1 2 time [us] 3 4 Vge [V] Vce [V]; IL [A] 600 5 Figure 23 Measured waveforms of the DUT during the short circuit test. See Figure 22 for measurement points. 6.2.2 Short Circuit II (high inductance) An inductance between the power terminal of the phase output and the DCL+ terminal was inserted for the short circuit II tests. A current probe measures again the currents of this short circuit (IL). The equivalent circuit during this test is shown in Figure 24. HV Supply System Short Circuit <450V Vge 60uH IL Vce Figure 24 Equivalent circuit of the short circuit II test. The device under test is the right low-side switch. Application Note 33 Evaluation Kit EASYKIT AUX DRIVES (FS50R07W1E3_B11A) AN2012-10 Easy Automotive Modules Evaluation Kit EASYKIT AUX DRIVES (FS50R07W1E3_B11A) Experimental Results Figure 25 shows the measured waveforms of the IGBT (see Vce and Vge) and the short circuit current (IL). The IGBT turns-on at 0 us. Due to the short circuit inductance the current rises relatively low. After approx 16.5 us the current is high enough that the IGBT desatures (Vce voltage rises to high values despite the IGBT is still turned on). This desaturation is detected in the gate driving circuit, which turns-off the IGBT. The turn-off overvoltage with <100V is relatively low. All measured values were within the specification of the FS50R07W1E3_B11A power module. 600 30 500 25 400 20 300 15 200 10 100 5 0 0 0 2 4 6 8 10 time [us] 12 14 16 18 Vge [V] Vce [V]; IL [A] Tvj=25°C 20 Figure 25 Measured waveforms of the DUT during the short circuit test. See Figure 22 for measurement points. Application Note 34 Evaluation Kit EASYKIT AUX DRIVES (FS50R07W1E3_B11A) AN2012-10 Easy Automotive Modules Evaluation Kit EASYKIT AUX DRIVES (FS50R07W1E3_B11A) Experimental Results 6.3 IGBT Turn-off (300V, 25A, 150°C) The simplified circuit of the IGBT turn-off testbench is shown in Figure 26. Please note that the environmental conditions are different from a standard characterization testbench, where the maximum module performance is characterized. The gate driver has in this setup +15V/0V supply and Rg,off=2.2Ω. No booster stage is implemented. The gate driver achieves in this case ≈1.7A peak current. The IGBT module and gate driver circuit has no clamping circuits to limit Vce overshoot. HV Supply System <450V IL Vce Vge Ic Trigger Figure 26 Equivalent circuit of the IGBT turn-off testbench. DUT is the low right IGBT. The low side shunt is bridged and the current Ic is measured with a Rogowski current probe. Application Note 35 Evaluation Kit EASYKIT AUX DRIVES (FS50R07W1E3_B11A) AN2012-10 Easy Automotive Modules Evaluation Kit EASYKIT AUX DRIVES (FS50R07W1E3_B11A) Experimental Results 20 Vge [V] 15 10 5 0 50 500 40 400 30 300 20 200 10 100 0 Vce [V] IL [A]; Ic [A] -5 0 -10 -100 Eoff [uJ] 1500 1000 500 0 0 100 200 300 400 500 time [ns] 600 700 800 900 1000 Figure 27 IGBT turn-off at 300V, 25A and Tvj=150°C. Vge=+15V/0V with Rg,off=2.2Ω. Table 1 Measurement results during IGBT turn-off (300V, 25A, 150°C) Symbol Unit Value Description tdoff tf Eoff dV/dt di/dt dV ns ns mJ kV/us kA/us V 320 250 1.19 2.7 -0.49 37 Turn-off delay time: 90% Vge to 90% Ic Fall time: 90% Ic to 10% Ic Turn-off energy loss per pulse: 10% Vce to 2% Ic Voltage slew rate: 50% Vce to 90% Vce Current slew rate: 90% Ic to 50% Ic Voltage overshoot (Vce,max-Vce,high) Application Note 36 Evaluation Kit EASYKIT AUX DRIVES (FS50R07W1E3_B11A) AN2012-10 Easy Automotive Modules Evaluation Kit EASYKIT AUX DRIVES (FS50R07W1E3_B11A) Experimental Results 6.3.1 IGBT Turn-on (300V, 25A, 150°C) The simplified circuit of the IGBT turn-on testbench is shown in Figure 28. Please note that the environmental conditions are different from a standard characterization testbench, where the maximum module performance is characterized. The gate driver has in this setup +15V/0V supply and Rg,on=2.2Ω. No booster stage is implemented. The gate driver achieves in this case ≈0.7A peak current. HV Supply System <450V IL Vce Vge Ic Trigger Figure 28 Equivalent circuit of the IGBT turn-on testbench. DUT is the low right IGBT. The low side shunt is bridged and the current Ic is measured with a Rogowski current probe. The waveforms are measured during the second turn-on pulse. Application Note 37 Evaluation Kit EASYKIT AUX DRIVES (FS50R07W1E3_B11A) AN2012-10 Easy Automotive Modules Evaluation Kit EASYKIT AUX DRIVES (FS50R07W1E3_B11A) Experimental Results 20 Vge [V] 15 10 5 0 -5 500 100 400 80 60 200 40 Vce [V] IL [A]; Ic [A] 300 100 20 0 0 -100 1000 Eon [uJ] 800 600 400 200 0 0 100 200 time [ns] 300 400 500 Figure 29 IGBT turn-on at 300V, 25A and Tvj=150°C. Vge=+15V/0V with Rg,on=2.2Ω. Table 2 Measurement results during IGBT turn-on (300V, 25A, 150°C) Symbol Unit Value Description tdon tr Eon di/dt dV/dt dI Ls ns ns mJ kA/us kV/us A nH 35 45 0.83 1.08 3.01 29 30 Turn-on delay time: 10% Vge to 10% Ic Rise time: 10% Ic to 90% Ic Turn-on energy loss per pulse: 10% Ic to 2% Vce Current slew rate: 50% Ic to 90% Ic Voltage slew rate: 50% Vce to 10% Vce Current overshoot (Ic,max-Ic,high) System stray Inductance Application Note 38 Evaluation Kit EASYKIT AUX DRIVES (FS50R07W1E3_B11A) AN2012-10 Easy Automotive Modules Evaluation Kit EASYKIT AUX DRIVES (FS50R07W1E3_B11A) Experimental Results 6.3.2 Diode Turn-off (300V, 25A, 150°C) The simplified circuit of the Diode turn-off testbench is shown in Figure 30. Please note that the environmental conditions are different from a standard characterization testbench, where the maximum module performance is characterized. The gate driver has in this setup +15V/0V supply and Rg,on=2.2Ω. No booster stage is implemented. The gate driver achieves in this case ≈0.7A peak current. HV Supply System <450V Trigger Vf If IL Figure 30 Equivalent circuit of the Diode turn-off testbench. DUT is the low right Diode. The low side shunt is bridged and the current If is measured with a Rogowski current probe. The waveforms are measured during the second turn-on pulse. Application Note 39 Evaluation Kit EASYKIT AUX DRIVES (FS50R07W1E3_B11A) AN2012-10 Easy Automotive Modules Evaluation Kit EASYKIT AUX DRIVES (FS50R07W1E3_B11A) Experimental Results 500 40 400 300 0 200 -Vf [V] IL [A]; If [A] 20 -20 100 -40 0 -60 500 Erec [uJ] 400 300 200 100 0 -100 0 100 200 300 time [ns] 400 500 600 700 Figure 31 Diode turn-off at 300V, 25A and Tvj=150°C. Vge=+15V/0V with Rg,on=2.2Ω. Table 3 Measurement results during Diode turn-off (300V, 25A, 150°C) Symbol Unit Value Description Irm Erec di/dt Qrr trr A mJ kA/us uC ns 35 0.38 1.49 2.21 145 Reverse recovery peak current Turn-off energy loss per pulse: 10% Vf to 2% Irm Current slew rate: 50% If to 50% Irm Reverse recovery charge (int(Irm) min value to 2%Irm) Reverse recovery time 10% Irm to 10%Irm 6.3.3 IGBT Turn-off (450V, 100A, 25°C) The Evaluation Kit does not use anly clamping circuits to limit Vce overshoots. Therefore, an IGBT turn-off pulse at low temperature, max DCL voltage and collector current for switching operation has to be tested. Figure 32 shows the measured waveforms of this IGBT turn-off event. The voltage did not exceed 550V. The low current capability of the gate driving circuit and the unipolar supply had the disadvantage of higher switching energies. However, this test at high DCL voltage and collector current shows that active clamping measures to limit Vce voltage overshoots are not necessary in this Evaluation Kit. Please take note that the overshoot characteristics strongly depends on many system parameters (PCB layout, DCL-capacitor, gate driving circuits, temperature,…) . These results in the Evaluation Kit should not be regarded as a general recommendation against active clamping measures. Application Note 40 Evaluation Kit EASYKIT AUX DRIVES (FS50R07W1E3_B11A) AN2012-10 Easy Automotive Modules Evaluation Kit EASYKIT AUX DRIVES (FS50R07W1E3_B11A) Experimental Results 20 Vge [V] 15 10 5 0 120 600 100 500 80 400 60 300 40 200 20 100 0 Vce [V] IL [A]; Ic [A] -5 0 0 100 200 300 400 500 600 700 800 900 1000 time [ns] Figure 32 IGBT turn-off at 450V, 100A and Tvj=25°C. Vge=+15V/0V with Rg,off=2.2Ω. Vce clamping measures are not needed in this Evaluation Kit. 6.4 Motor run (Default Mode 1) Figure 33 shows a scope screenshoot with all phase voltages, one phase current and the PWM signals on the digital channels D0..D5. Application Note 41 Evaluation Kit EASYKIT AUX DRIVES (FS50R07W1E3_B11A) AN2012-10 Easy Automotive Modules Evaluation Kit EASYKIT AUX DRIVES (FS50R07W1E3_B11A) Experimental Results Figure 33 Evaluation Kit in motor run mode at 200V DCL voltage and 100Hz output frequency. Ch1-3 phase voltage U,V,W. Ch4 current phase U. D0: PWM_UB; D1: PWM_UT; D2: PWM_VB; D3: PWM_VT; D4: PWM_WB; D5: PWM_WT. Application Note 42 Evaluation Kit EASYKIT AUX DRIVES (FS50R07W1E3_B11A) AN2012-10 Easy Automotive Modules Evaluation Kit EASYKIT AUX DRIVES (FS50R07W1E3_B11A) Schematics Power Board 7 Schematics Power Board 7.1 Overview Inverter System Application Note 43 Evaluation Kit EASYKIT AUX DRIVES (FS50R07W1E3_B11A) AN2012-10 Easy Automotive Modules Evaluation Kit EASYKIT AUX DRIVES (FS50R07W1E3_B11A) Schematics Power Board 7.2 Overview Power Board Application Note 44 Evaluation Kit EASYKIT AUX DRIVES (FS50R07W1E3_B11A) AN2012-10 Easy Automotive Modules Evaluation Kit EASYKIT AUX DRIVES (FS50R07W1E3_B11A) Schematics Power Board 7.3 Connector on Power Board Application Note 45 Evaluation Kit EASYKIT AUX DRIVES (FS50R07W1E3_B11A) AN2012-10 Easy Automotive Modules Evaluation Kit EASYKIT AUX DRIVES (FS50R07W1E3_B11A) Schematics Power Board 7.4 Gate Driver Application Note 46 Evaluation Kit EASYKIT AUX DRIVES (FS50R07W1E3_B11A) AN2012-10 Easy Automotive Modules Evaluation Kit EASYKIT AUX DRIVES (FS50R07W1E3_B11A) Schematics Power Board 7.5 Easy Module Application Note 47 Evaluation Kit EASYKIT AUX DRIVES (FS50R07W1E3_B11A) AN2012-10 Easy Automotive Modules Evaluation Kit EASYKIT AUX DRIVES (FS50R07W1E3_B11A) Schematics Power Board 7.6 Amplifier Stage Application Note 48 Evaluation Kit EASYKIT AUX DRIVES (FS50R07W1E3_B11A) AN2012-10 Easy Automotive Modules Evaluation Kit EASYKIT AUX DRIVES (FS50R07W1E3_B11A) Schematics Power Board 7.7 Comparator Stage Application Note 49 Evaluation Kit EASYKIT AUX DRIVES (FS50R07W1E3_B11A) AN2012-10 Easy Automotive Modules Evaluation Kit EASYKIT AUX DRIVES (FS50R07W1E3_B11A) Schematics Power Board 7.8 Layout and Assembly Power Board Application Note 50 Evaluation Kit EASYKIT AUX DRIVES (FS50R07W1E3_B11A) AN2012-10 Easy Automotive Modules Evaluation Kit EASYKIT AUX DRIVES (FS50R07W1E3_B11A) Schematics Control Board 8 Schematics Control Board 8.1 Overview Control Board Application Note 51 Evaluation Kit EASYKIT AUX DRIVES (FS50R07W1E3_B11A) AN2012-10 Easy Automotive Modules Evaluation Kit EASYKIT AUX DRIVES (FS50R07W1E3_B11A) Schematics Control Board 8.2 Connector from Power Board Application Note 52 Evaluation Kit EASYKIT AUX DRIVES (FS50R07W1E3_B11A) AN2012-10 Easy Automotive Modules Evaluation Kit EASYKIT AUX DRIVES (FS50R07W1E3_B11A) Schematics Control Board 8.3 LV Supply Application Note 53 Evaluation Kit EASYKIT AUX DRIVES (FS50R07W1E3_B11A) AN2012-10 Easy Automotive Modules Evaluation Kit EASYKIT AUX DRIVES (FS50R07W1E3_B11A) Schematics Control Board 8.4 Isolated Supplies Application Note 54 Evaluation Kit EASYKIT AUX DRIVES (FS50R07W1E3_B11A) AN2012-10 Easy Automotive Modules Evaluation Kit EASYKIT AUX DRIVES (FS50R07W1E3_B11A) Schematics Control Board 8.5 uC Application Note 55 Evaluation Kit EASYKIT AUX DRIVES (FS50R07W1E3_B11A) AN2012-10 Easy Automotive Modules Evaluation Kit EASYKIT AUX DRIVES (FS50R07W1E3_B11A) Schematics Control Board 8.6 CAN Communication and FAN Application Note 56 Evaluation Kit EASYKIT AUX DRIVES (FS50R07W1E3_B11A) AN2012-10 Easy Automotive Modules Evaluation Kit EASYKIT AUX DRIVES (FS50R07W1E3_B11A) Schematics Control Board 8.7 Diagnosis and DAP Connector Application Note 57 Evaluation Kit EASYKIT AUX DRIVES (FS50R07W1E3_B11A) AN2012-10 Easy Automotive Modules Evaluation Kit EASYKIT AUX DRIVES (FS50R07W1E3_B11A) Schematics Control Board 8.8 Layout and Assembly of Control Board Application Note 58 Evaluation Kit EASYKIT AUX DRIVES (FS50R07W1E3_B11A) AN2012-10 Easy Automotive Modules Evaluation Kit EASYKIT AUX DRIVES (FS50R07W1E3_B11A) CAN Messages 9 Direction CAN Messages Msg.Bit name, Update offset | ID, cycle length DLC Signal name Categorie read cycle 1 ms Unit Possible range refer to unit [Min|Max] DEnable DC/AC enable 1|1 DSelftest 2|1 DSglPulse 3|1 DSglPulseULs low side switch phase U selection 4|1 DSglPulseVLs low side switch phase V selection 5|1 DSglPulseWLs low side switch phase W selection selftest demand with possibility to reset ERROR state single pulse mode bit [0|1] 6 |9 Can2 FsEasyKit 32|16 DFacSet analog set value unsigned short signed short µs Q0 [0|65535] Hz Q6 48|16 0|16 read cycle 1 ms PFacNom [-512| 511.98] not used signed short Hz Q6 [0| 1023.98] unsigned short V Q4 [0| 4095.94] parameter value 16|16 Reaction if active → run starts in Mode 2 OR on positive edge → single pulse activation in Mode 3 on positive edge → control state machine processes selftest if active → Mode 3 if active → single pulse will activate phase U low side switch if active → single pulse will activate phase V low side switch if active → single pulse will activate phase W low side switch not used 16|16 DSglPulseLength Param, 011h, 8 Description 0|1 command Demand, 010h, 8 Format PVacNom 32|32 single pulse duration target value for single pulse length in Mode 3 AC output frequency target value in Mode 2 nominal value for ramp up function in Mode 2 (a target value above will not further increase the output voltage) nominal value for ramp up nominal AC output voltage function in Mode 2 (will be line to line reached at nominal output frequency) nominal AC output frequency not used 012h, 8 prepared for later enhancements 013h, 8 prepared for later enhancements Application Note 59 Evaluation Kit EASYKIT AUX DRIVES (FS50R07W1E3_B11A) AN2012-10 Easy Automotive Modules Evaluation Kit EASYKIT AUX DRIVES (FS50R07W1E3_B11A) CAN Messages Direction Msg.Bit name, Update offset | ID, cycle length DLC 0|1 1|1 Fastwrite Binary, FsEasyKit cycle 1 020h, 2Can ms 8 Signal name Reaction SelfTest self test is active SglPulse single pulse mode is active (Mode 3) self test in progress single pulses on low side switches according CAN commands Ready 3|1 Run 4|1 Stop 5|1 Error 8|1 Enabled 9|1 Switch1 10|1 Switch2 11|1 CanInputActive 12|4 16|1 17|1 18|1 19|1 20|1 21|11 32|1 33|1 34|1 35|1 36|1 37|1 38|1 39|1 HwFault 40|1 Vaux 41|23 state (control state machine) bit general STestFailed VDclRepet IUVWHighRepet error event HwFltRepet VauxRepet TNtcMax TPcbMax VDclHigh VDclLow IUHigh IVHigh IWHigh Format Possible range refer to unit [Min|Max] Description 2|1 Categorie stop event bit bit all things okay and waiting for enable (in Mode 2) PWM output active DCL voltage out of operating range OR internal failure [0|1] repetitive internal failures Mode 1: every time active Mode 2 and 3: feedback of CAN command Switch1 µC input line is on high level Switch2 µC input line is on high level values received from CAN will be considered not used self test repetitive failed repetitive VDclHigh event [0|1] repetitive IxHigh event repetitive HwFault event repetitive Vaux event not used T_NTC > 110 °C T_PCB > 100 °C V_DCL > 420 V V_DCL < 25 V I_U_IGBT > 54 A I_V_IGBT > 54 A [0|1] I_W_IGBT > 54 A HW trip from supply voltage or overcurrent or overvoltage or overtemperature Ref_1V95 < 1.8 V or Ref_1V95 > 2.1 V not used Application Note 60 Evaluation Kit EASYKIT AUX DRIVES (FS50R07W1E3_B11A) low side switches on PWM output active low side switches on all switches off precondition for active PWM output if active → Mode 1 if passive → Mode 2 or 3 not used Mode 2 or Mode 3 active Error state Stop state AN2012-10 Easy Automotive Modules Evaluation Kit EASYKIT AUX DRIVES (FS50R07W1E3_B11A) CAN Messages Direction FsEasyKit 2Can Msg.name, ID, DLC SlowBinary, 021h, 8 Update cycle write cycle 100 ms Bit offset | length Signal name 0|1 VRef 1|1 2|1 3|1 4|1 5|1 6|1 7|1 TPcb TNtc IU IV IW VDclMax VDclMin 8|1 ProgFlt 9|1 10|6 WdReset 16|1 ULsFlt 17|1 ULsVce 18|1 ULsI 19|1 ULsVDcl 20|1 VLsFlt 21|1 VLsVce 22|1 VLsI 23|1 VLsVDcl 24|1 WLsFlt 25|1 WLsVce 26|1 WLsI 27|1 WLsVDcl 28|1 LsProgFlt Categorie Format Possible range refer to unit [Min|Max] Ref_1V95 < 1.85 V or Ref_1V95 > 2.05 V T_PCB > 105 °C T_NTC > 120 °C self test passive bit [0|1] self test active low side bit [0|1] self test active high side bit [0|1] 29|3 32|1 UHsFlt 33|1 UHsVce 34|1 UHsI 35|1 UHsVDcl 36|1 VHsFlt 37|1 VHsVce 38|1 VHsI 39|1 VHsVDcl 40|1 WHsFlt 41|1 WHsVce 42|1 WHsI 43|1 WHsVDcl 44|1 HsProgFlt Description Application Note 61 Evaluation Kit EASYKIT AUX DRIVES (FS50R07W1E3_B11A) Reaction normal operation is locked I_x mean value > 5 % measurement range V_DCL > 420 V V_DCL < 25 V wait for DCL voltage wait count overflow due to not responding normal operation ADC routine is locked last reset due to watchdog only CAN information not used HW trip due to phase U low side switch test pulse VU_IGBT > 7 V during phase U low side switch test pulse IU_IGBT < -5 A or IU_IGBT > 5 A during phase U low side switch test pulse delta V_DCL before pulse and V_DCL during phase U low side pulse > 10 V HW trip due to phase V low side switch test pulse VV_IGBT > 7 V during phase V low side switch test pulse normal operation IV_IGBT < -5 A or IV_IGBT > + 5 A during is locked phase V low side switch test pulse delta V_DCL before pulse and V_DCL during phase V low side pulse > 10 V HW trip due to phase W low side switch test pulse VW_IGBT > 7 V during phase W low side switch test pulse IW_IGBT < -5 A or IW_IGBT > 5 A during phase W low side switch test pulse delta V_DCL before pulse and V_DCL during phase W low side pulse > 10 V wait count overflow due to not responding PWM or ADC routine not used HW trip due to phase U low and high side switch test pulse pattern (V_DCL - VU_IGBT) > (7 V + 5% of V_DCL) during phase U high side switch pulse IU_IGBT < -5 A or IU_IGBT > 5 A during phase U high side switch test pulse delta V_DCL before pulse pattern and V_DCL during phase U high side pulse > 10 V HW trip due to phase V low and high side switch test pulse pattern (V_DCL - VV_IGBT) > (7 V + 5% of V_DCL) during phase V high side switch pulse normal operation IV_IGBT < -5 A or IV_IGBT > 5 A during phase is locked V high side switch test pulse delta V_DCL before pulse pattern and V_DCL during phase V high side pulse > 10 V HW trip due to phase V low and high side switch test pulse pattern (V_DCL - VW_IGBT) > (7 V + 5% of V_DCL) during phase W high side switch pulse IW_IGBT < -5 A or IW_IGBT > 5 A during phase W high side switch test pulse delta V_DCL before pulse pattern and V_DCL during phase W high side pulse > 10 wait count overflow due to not responding PWM or ADC routine AN2012-10 Easy Automotive Modules Evaluation Kit EASYKIT AUX DRIVES (FS50R07W1E3_B11A) CAN Messages Direction Msg.name, ID, DLC Update cycle De-bug1, write 022h, cycle 0.2 8 ms Bit offset | length Signal name 0|16 IU_IGBT_ 16|16 IV_IGBT_ 32|16 IW_IGBT_ 48|16 V_DCL_ Categorie analog measured value 023h, 8 FastAnalog2, 025h, 8 FastAnalog3, 026h, 8 write cycle 10 ms write cycle 10 ms write cycle 10 ms FsEasyKit 2Can FastAnalog4, 027h, 8 SlowAnalog1, 028h, 8 SlowAnalog2, 029h, 8 SlowAnalog3, 02Ah, 8 Unit signed short A Q6 unsigned short V Q4 -62 A 62 A low side phase U current - during LowSide IGBT on low side phase V current - during LowSide IGBT on low side phase W current - during LowSide IGBT on 0 V - 490 V DCL-voltage [-512| 511.98] [0| 4095.94] Description prepared for later enhancements 0|16 FastAnalog1, 024h, 8 Format Possible range refer Expected to unit range [Min|Max] write cycle 10 ms write cycle 100 ms write cycle 100 ms write cycle 100 ms 16|16 V_DCL MIdx 32|16 VacCalc 48|16 FacAct 0|16 IU_IGBT 16|16 IU_Diode 32|16 VU_IGBT 48|16 VU_Diode 0|16 IV_IGBT 16|16 IV_Diode 32|16 VV_IGBT 48|16 VV_Diode 0|16 IW_IGBT 16|16 IW_Diode 32|16 VW_IGBT 48|16 VW_Diode 0|16 FacNomSet_ POTI1 16|16 VacNom_ POTI2 32|16 48|16 T_NTC T_PCB 0|16 REF_1V95 16|16 F_AC_SET 32|16 F_AC_NOM 48|16 V_AC_NOM 0|8 8|8 16|8 24|8 32|8 40|8 48|16 analog measured value program generated value analog measured value analog measured value analog measured value V Q4 unsigned short V Q4 0V 490 V [0|200] [0| 4095.94] [-512| 511.98] 0 % - 94 % 0 V - 270 V PWM modulation index AC output voltage line to line RMS calculated Hz Q6 signed short A Q6 [-512| 511.98] -62 A 62 A unsigned short V Q4 [0| 4095.94] 0V 490 V signed short A Q6 [-512| 511.98] -62 A 62 A unsigned short V Q4 [0| 4095.94] 0V 490 V signed short A Q6 [-512| 511.98] -62 A 62 A unsigned short V Q4 [0| 4095.94] 0V 490 V Hz Q6 [-512| 511.98] -500 Hz 500 Hz V Q4 [0| 4095.94] 0V 300 V °C Q4 [-2048| 2047.94] -40 °C 200 °C AC output frequency set if Poti signal detected → scaled Poti signal; else → nominal value (SW defined) AC output voltage line to line RMS set if Poti signal detected → scaled Poti signal; else → nominal value (SW defined) NTC temperature PCB temperature V Q12 [0|16] 0V - 5V auxiliary supply reference voltage [-512| 511.98] [0| 1023.98] [0| 4095.94] -512 Hz 511.98 Hz 1 Hz 512 Hz 10 V 270 V [0|255] 0 - 99 1 - 12 1 - 31 0 - 23 0 - 59 0 - 59 unsigned short signed short program generated unsigned values short PrgBld_Year PrgBld_Month program unsigned PrgBld_Day building char PrgBld_Hour time stamp PrgBld_Minute PrgBld_Second Hz Q6 V Q4 h min sec Application Note 62 Evaluation Kit EASYKIT AUX DRIVES (FS50R07W1E3_B11A) -512 Hz 511.98 Hz DCL-voltage signed short analog signed measured short value / program unsigned generated short value analog signed measured short analog measured % [0| 4095.94] actual AC output frequency low side phase U current - during LowSide IGBT on - during LowSide IGBT off phase U voltage - during LowSide IGBT on - during LowSide IGBT off low side phase V current - during LowSide IGBT on - during LowSide IGBT off phase V voltage - during LowSide IGBT on - during LowSide IGBT off low side phase W current - during LowSide IGBT on - during LowSide IGBT off phase W voltage - during LowSide IGBT on - during LowSide IGBT off active AC output frequency set value active nominal AC output frequency value active nominal AC output line to line RMS value year without century month date hour minute second not used AN2012-10 Easy Automotive Modules Evaluation Kit EASYKIT AUX DRIVES (FS50R07W1E3_B11A) References 10 References The referenced application notes can be found at http://www.infineon.com Direct link to the Easy Automotive site: http://www.infineon.com/autoeasy [1] Infineon Application Note AN2010-09, “Explanation of Technical Information”. [2] Infineon Application Note AN2009-01, “Easy PressFIT Assembly Instructions”. [3] Infineon Application Note AN2011-11, “Explanation for Traceability of the Easy Automotive Modules”. Application Note 63 Evaluation Kit EASYKIT AUX DRIVES (FS50R07W1E3_B11A) AN2012-10 w w w . i n f i n e o n . c o m Published by Infineon Technologies AG