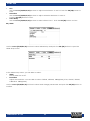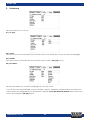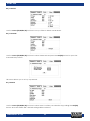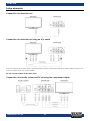
1
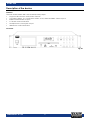
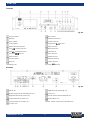
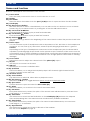
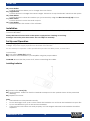
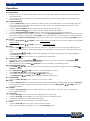
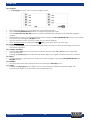
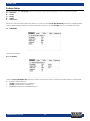
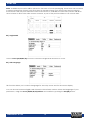
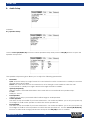
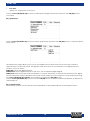
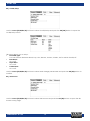
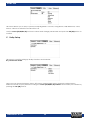
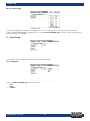
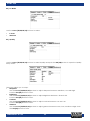
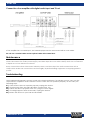
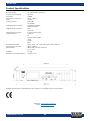
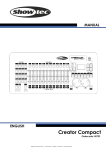
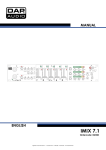
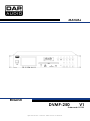
MANUAL ENGLISH DVMP-250 V1 Ordercode: D1133 Highlite International B.V. – Vestastraat 2 – 6468 EX – Kerkrade – the Netherlands DVMP-250 Table of contents Warning ...............................................................................................................................................................................2 Unpacking Instructions .............................................................................................................................................2 Safety Instructions ......................................................................................................................................................2 Operating Determinations .......................................................................................................................................3 Connection with the mains .....................................................................................................................................4 Return Procedure ......................................................................................................................................................4 Claims ..........................................................................................................................................................................4 Description of the device .................................................................................................................................................5 Overview .....................................................................................................................................................................5 Frontside ......................................................................................................................................................................6 Backside ......................................................................................................................................................................6 Remote control ..........................................................................................................................................................7 Names and functions ........................................................................................................................................................8 Installation .........................................................................................................................................................................10 Set Up and Operation .....................................................................................................................................................10 Operations ........................................................................................................................................................................11 01) Preparation .......................................................................................................................................................11 02) Normal Playback .............................................................................................................................................11 03) Pause .................................................................................................................................................................11 04) Stop ....................................................................................................................................................................11 05) Previous and next ............................................................................................................................................11 06) Fast Forward/Reverse .....................................................................................................................................11 07) Video Mode .....................................................................................................................................................11 08) Step ....................................................................................................................................................................11 09) Repeat...............................................................................................................................................................11 10) Loop play ..........................................................................................................................................................11 11) Slow ....................................................................................................................................................................11 12) Program.............................................................................................................................................................12 13) Zoom ..................................................................................................................................................................12 14) Volume and Mute ...........................................................................................................................................12 15) Menu ..................................................................................................................................................................12 16) Subtitles .............................................................................................................................................................12 17) Angle .................................................................................................................................................................12 Before switching off the power .....................................................................................................................................13 System Setup ....................................................................................................................................................................14 A. General .............................................................................................................................................................14 B. Audio Setup ......................................................................................................................................................17 C. Dolby Setup ......................................................................................................................................................20 D. Video Setup ......................................................................................................................................................21 E. Preference ........................................................................................................................................................24 Setup examples ...............................................................................................................................................................26 Connection of a television set ..............................................................................................................................26 Connection of a television set using an A/V-cable .........................................................................................26 Connection of an audio system and TV-set using the component outputs ...............................................26 Connection of an amplifier with digital audio input and TV-set....................................................................27 Maintenance ....................................................................................................................................................................27 Troubleshooting ...............................................................................................................................................................27 Product Specifications ....................................................................................................................................................28 Notes ..................................................................................................................................................................................29 Ordercode: D1133 1 DVMP-250 Warning Unpacking Instructions Immediately upon receiving this product, carefully unpack the carton and check the contents to ensure that all parts are present, and have been received in good condition. Notify the dealer immediately and retain packing material for inspection if any parts appear damaged from shipping or the carton itself shows signs of mishandling. Save the carton and all packing materials. In the event that a fixture must be returned to the factory, it is important that the fixture be returned in the original factory box and packing. Your shipment includes: • DAP DVMP-250 • User manual • IR remote control Safety Instructions Every person involved with the installation, operation and maintenance of this system has to: • be qualified • follow the instructions of this manual Before the initial start-up, please make sure that there is no damage caused by transportation. Should there be any, consult your dealer and do not use the system. To maintain perfect condition and to ensure a safe operation, it is absolutely necessary for the user to follow the safety instructions and warning notes written in this manual. Please consider that damages caused by manual modifications to the system are not subject to warranty. This system contains no user-serviceable parts. Refer servicing to qualified technicians only. Ordercode: D1133 2 DVMP-250 IMPORTANT: The manufacturer will not accept liability for any resulting damages caused by the non-observance of this manual or any unauthorized modification to the system. Never let the power cord come into contact with other cables! Handle the power-cord and all connections with the mains with particular caution! Never remove warning or informative labels from the unit. Never use anything to cover the ground contact. Never leave any cables lying around. Do not insert objects into air vents. Do not connect this system to a dimmerpack. Do not switch the system on and off in short intervals, as this would reduce the system’s life. Do not open the device and do not modify the device. Do not drive the inputs with a signal level bigger, than required to drive the equipment to full output. Only use system indoor, avoid contact with water or other liquids. Avoid flames and do not put close to flammable liquids or gases. Always disconnect power from the mains, when system is not used. Only handle the power-cord by the plug. Never pull out the plug by tugging the power-cord. Make sure you don’t use the wrong kind of cables or defective cables. Make sure that the available voltage is not higher than stated on the rear panel. Make sure that the power-cord is never crimped or damaged. Check the system and the powercord from time to time. Please turn off the power switch, when changing the power cord or signal cable, or select the input mode switch. Avoid ground loops! Always be sure to connect the power amps and the mixing console to the same electrical circuit to ensure the same phase! If system is dropped or struck, disconnect mains power supply immediately. Have a qualified engineer inspect for safety before operating. If the system has been exposed to drastic temperature fluctuation (e.g. after transportation), do not switch it on immediately. The arising condensation water might damage your system. Leave the system switched off until it has reached room temperature. If your Dap Audio device fails to work properly, discontinue use immediately. Pack the unit securely (preferably in the original packing material), and return it to your Dap Audio dealer for service. Repairs, servicing and electric connection must be carried out by a qualified technician. For replacement use fuses of same type and rating only. WARRANTY: Till one year after date of purchase. Operating Determinations This system is not designed for permanent operation. Consistent operation breaks will ensure that the system will serve you for a long time without defects. If this system is operated in any other way, than the one described in this manual, the product may suffer damages and the warranty becomes void. Any other operation may lead to dangers like short-circuit, burns, electric shock, etc. You endanger your own safety and the safety of others! Improper installation can cause serious injuries and damage of property ! Ordercode: D1133 3 DVMP-250 Connection with the mains Connect the device to the mains with the power-plug. Always pay attention, that the right color cable is connected to the right place. International L N EU Cable BROWN BLUE YELLOW/GREEN UK Cable RED BLACK GREEN US Cable YELLOW/COPPER SILVER GREEN Pin FASE NULL EARTH Make sure that the device is always connected properly to the earth! Improper installation can cause serious damage to people and property! Return Procedure Returned merchandise must be sent prepaid and in the original packing, call tags will not be issued. Package must be clearly labeled with a Return Authorization Number (RMA number). Products returned without an RMA number will be refused. Highlite will not accept the returned goods or any responsibility. Call Highlite 0031-455667723 or mail [email protected] and request an RMA prior to shipping the fixture. Be prepared to provide the model number, serial number and a brief description of the cause for the return. Be sure to properly pack fixture, any shipping damage resulting from inadequate packaging is the customer’s responsibility. Highlite reserves the right to use its own discretion to repair or replace product(s). As a suggestion, proper UPS packing or double-boxing is always a safe method to use. Note: If you are given an RMA number, please include the following information on a piece of paper inside the box: 01) Your name 02) Your address 03) Your phone number 04) A brief description of the symptoms Claims The client has the obligation to check the delivered goods immediately upon delivery for any shortcomings and/or visible defects, or perform this check after our announcement that the goods are at their disposal. Damage incurred in shipping is the responsibility of the shipper; therefore the damage must be reported to the carrier upon receipt of merchandise. It is the customer's responsibility to notify and submit claims with the shipper in the event that a fixture is damaged due to shipping. Transportation damage has to be reported to us within one day after receipt of the delivery. Any return shipment has to be made post-paid at all times. Return shipments must be accompanied with a letter defining the reason for return shipment. Non-prepaid return shipments will be refused, unless agreed otherwise in writing. Complaints against us must be made known in writing or by fax within 10 working days after receipt of the invoice. After this period complaints will not be handled anymore. Complaints will only then be considered if the client has so far complied with all parts of the agreement, regardless of the agreement of which the obligation is resulting. Ordercode: D1133 4 DVMP-250 Description of the device Features The DAP-audio DVMP-250 is a 2U Karaoke DVD player • Supports all common audio/video formats • Contains S-Video, TV, Component Video, VGA, HDMI and BNC video outputs • Balanced XLR audio outputs • 19” Rack mounts included • Headphones 6,3 mm jack output • IR Remote control included Overview Fig. 01 Ordercode: D1133 5 DVMP-250 Frontside Fig. 02 Power switch R/L button Display IR Remote sensor Disc holder Source button LCD Display Play/pause Direct access buttons Eject button Fast reverse button Return button Fast forward button Flat button Previous button button Time button Phone input Sharp button Level control Repeat button SD port Video button USB A port Next button Backside Fig. 03 HDMI out Digital audio (optical) out Audio stereo RCA unbalanced out VGA out Digital audio RCA (coax) out Audio stereo XLR balanced out Composite RCA video out Video BNC out Component RCA video out IEC Power connector 100-240V AC S-video out Ordercode: D1133 6 DVMP-250 Remote control Fig. 04 Source button Step button A-B button Sharp button (key control) Nor button (key control) Menu button N/P button OK button Eject button Cursor right button Flat button (key control) R/L button Cursor up button Return button Setup button Next button Cursor left button Previous button Time button Video out button Cursor down button Prog. Button Stop button Vol + button Play/pause button Vol – button Fast reverse button Zoom button Fast forward button Angle button Repeat button Clear button Title button Mute button Direct access buttons Copy button Slow button Ordercode: D1133 7 DVMP-250 Names and functions Below is a description of the functions of the controls. 01) Power switch This is the main power switch. Press to turn the device on or off. 02) Display 03) Disc holder Place the disc in the holder. Push the eject (17/40) button to open and close the disc holder. 04) LCD display 05/53) Direct access buttons Use these buttons to select a track directly. You can also use the 10+ button to move 10 tracks forward. E.g. if your current track is 5, pushing the +10 button will select track 15. 06/49) Fast reverse button Push and hold this button to play a track fast backwards. 07/50) Fast forward button Push and hold this button to play a track fast forwards. 08/63) Previous button Use this button to go back to the beginning of the current track or select the previous track to be played. 09) Phone output You can connect a pair of headphones with an impedance of 32 - 600 Ohm to the headphones connector. It is a 6,3 mm (1/4”) TRS socket, wired as Tip=left, Ring=right and sleeve = ground. Caution: Depending on the type of headphones connected to the Headphones jack, the DVMP-250 is capable of producing high output levels via the phones output. Therefore, make sure to turn the control all the way to the left (minimum setting) before connecting the headphones. Be aware of the fact that listening to loud sound pressure levels over a longer period of time leads to hearingdamage! 10) Level control This button is used to adjust the volume level of the phone (09) output. 11) SD port Use this port to connect an SD card. 12) USB port Use this port to connect a USB flash drive. 13/60) R/L button This button allows you to assign the DVD/MP3 player’s left channel, right channel or both (stereo) channels to the main mix. 14) IR remote sensor 15/36) Source button Tap this button to select SD, USB or Disc as playback source. 16/48) Play/Pause button This button allows you to toggle between pause mode and playback mode. 17/40) Eject button Push this button to open and close the disc holder (03). 18/61) Return This button allows you to return to the start of the current track. 19/41) Flat button Every time this button is pushed, the pitch of the current track will decrease by one semi tone. Total range is +/- 9 semitones. 20/45) Time button Use this button to switch the TIME indication on the LCD display (04) between the elapsed time and remaining time. The selected mode is indicated by ELAPSED or REMAIN. 21/56) Sharp button Every time this button is pushed, the pitch of a current track will increase by one semi tone. Total range is +/- 9 semitones. 22/51) Repeat button Use this button to repeat one track or all tracks of the medium. See the section Repeat on page 11. Ordercode: D1133 8 DVMP-250 23/64) Video button Pushing this button allows you to switch between YUV, VGA and S-Video modes. 24/62) Next button Use this button to skip to a following track. 25) HDMI out Connect the input of a HDMI monitor to this output. 26) Audio stereo RCA unbalanced out Connect an unbalanced line input of your mixer/ amplifier to this output. 27) RCA coax out Connect a digital audio input of your mixer/amplifier to this output. 28) RCA video out Connect the video input of your TV-set to this output. 29) Component RCA video out Connect the composite video input of your TV-set to these outputs. 30) S-Video out Connect the S-video input of your TV-set to this output. 31) Optical out Connect an optical (digital) audio input of your mixer/amplifier to this output. 32) VGA out Connect the input of a VGA monitor to this output. 33) Audio stereo XLR balanced out Connect a balanced line input of your mixer/ amplifier to this output. 34) Video BNC out Connect the coax video input of your TV-set to this output. 35) IEC Power connector 100-240V AC This connector is meant for the connection of the supplied power cord. Connect one end of the power cord to the connector, the other end to the mains, and turn on the power (01) switch to operate the unit. 37) A-B button Push this button once to set the start point (Repeat A will appear on screen). Push again to set the endpoint of a loop (Repeat B will appear on screen). As soon as the endpoint is set, loop play will start. Push for the third time to exit loop play. 38) Nor button This button allows you to return to normal pitch. 39) N/P button Use this button to select your TV system: PAL/NTSC 42/44/46/59) Arrow buttons Use these buttons to navigate through the onscreen menus. 43) Setup button Push this button to open the onscreen setup menu. 47) Stop button Push this button to stop playback. 52) Title button Push this button to choose a subtitling language. 54) Slow button Push this button to play a track at a lower speed. 55) Step button Push this button to step through your frames one frame at a time. 57) Menu button Push this button to open the onscreen DVD menu. 58) OK button Confirm your selection in the onscreen menu by pushing this button. 65) Prog. button Stop playback and push the PGM button, the player will enter the program mode. For more information, see the section Program on page 12. 66) Volume + button Pushing this button allows you to increase the volume level of the audio outputs. 67) Volume – button Pushing this button allows you to decrease the volume level of the audio outputs. Ordercode: D1133 9 DVMP-250 68) Zoom button Pushing this button allows you to change the zoom factor. 69) Angle button Push this button to change the camera angle. This button is only functional if a DVD has this option. 70) Clear button Push this button to clear the numbers you just entered by using the direct access (5/33) buttons. 71) Mute button Push this button to mute the audio outputs. 72) Copy button Not functional in this version of the software. Installation Remove all packing materials from the device. Check that all foam and plastic padding is removed. Connect all cables. Always disconnect from electric mains power supply before cleaning or servicing. Damages caused by non-observance are not subject to warranty. Set Up and Operation Before plugging the unit in, always make sure that the power supply matches the product specification voltage. The power supply is printed on the back of the device. Do not attempt to operate a 120V specification product on 230V power, or vice versa. Connections 01) Turn off the Power (01) switch. 02) Connect the DVMP-250 to your amplifier using the proper cables. CAUTION: Be sure that the power is off, when connecting the cables. Installing batteries 01) Remove the cover (73). 02) Insert batteries. Make sure that the terminals correspond to the symbols shown in the presented drawing. 03) Replace the cover. Note: • The batteries must be placed correctly. • Do not recharge, heat, open or short circuit the batteries. Do not throw the batteries into open fire. • Do not mix different types or old and new batteries. • If the remote control does not work properly, or if the range is reduced, both batteries should be replaced. Ordercode: D1133 10 DVMP-250 Operations 01) Preparation • When you want to watch a DVD film, turn the TV-set on and select the video input connected to the DVD player. • If you want to listen to audio via your audio installation, turn the audio system on and select the DVD player input. 02) Normal Playback • Push the power (01) switch on the front panel to switch the DVD player on. The start logo appears on the TV screen. If the disc drive already contains a disc, the playback will start as soon as the DVD player is switched on. • Push the eject (17/40) button to open the disc holder and insert a disc. • Push the eject (17/40) button to close the disc holder. Playback will start. • Push the play/pause (16/48) button if the playback does not start automatically. • Some discs will start by presenting a menu. Use the cursor (42/44/46/59) buttons to choose between the different options, then push the OK (58) button. Alternatively, you can select a function directly by using the direct access (05/53) buttons and confirm your choice by pushing the OK (58) button. 03) Pause • Push the play/pause (16/48) to enter pause mode (still picture). The sound will be muted while in pause mode. • Push the play/pause (16/48) to resume in playback mode. 04) Stop • Push the stop (47) button on the remote control to stop playback. The start logo will appear on the TV screen. Some discs offer the possibility of resuming from the same spot, e.g. DVDs and music CDs. • Push play/pause (16/48) to resume playback from where it stopped or from the beginning, depending on a DVD. • Push the stop (47) button twice to stop playback completely. 05) Previous and next • During playback, push previous (08/63) to return to the start of a track. Push previous (08/63) again to go back to a previous track. • Every time you push the next (24/62) button you will skip to a following track. 06) Fast Forward/Reverse • Push F.FWD (07/50) to play a DVD at a faster speed. The speed changes every time F.FWD (07/50) is pushed. • Push play/pause (16/48) to return to normal playback speed. • Push F.REV (06/49) play a DVD at a slower speed. The speed changes every time F.REV (06/49) is pushed. • Push play/pause (16/48) to return to normal playback speed. 07) Video Mode • Push the video (23/64) button to select: YUV, VGA, S-video. 08) Step • Push the step (55) button to step forward by a single frame/picture during playback. Push step (55) several times to step forward several frames/ pictures. Push the play/pause (16/48) button to resume playback. 09) Repeat • Push the repeat (22/51) button to select between: “repeat off”, “repeat 1 track”, “repeat all” (a complete DVD/CD). 10) Loop play • Push the A-B (37) button to set up the starting point of your loop. • Push the A-B (37) button again to set the stop point to complete setup. • The section between A and B will be repeated. • Push the button for the third time to cancel loop play. 11) Slow • Push the slow (54) button to play a disc slowly forwards. The speed changes every time you push the slow (54) button. Ordercode: D1133 11 DVMP-250 12) Program Push prog (65) to open the on screen program menu. • • • • • 13) • 14) • • 15) • 16) • 17) • The DVMP-250 allows you to program up to 16 tracks/chapters. Use the cursor (42/44/46/59) buttons to navigate through the menu. Use the direct access (05/53) buttons to insert a desired track/chapter in the selected program number. When finished, move to the onscreen play button using the cursor (42/44/46/59) buttons and confirm the choice by pushing the OK (58) button. Use the onscreen “clear” button to erase the complete program. Abort program play by pushing the Stop (47) button twice (pre stop and stop). Zoom Push the zoom (68) button to zoom the picture in/out. The size of the picture changes every time the button is pushed. Volume and Mute Push the vol + (66) button to increase the volume level and the vol – (67) button to decrease the volume level. Pushing the mute (71) button will mute the audio signal. Push again to cancel the mute function. Menu Push this button to open the DVD’s main menu and navigate using the cursor (42/44/46/59) and OK (58) buttons. Subtitles On some DVDs, title menu will appear when pushing the title (52) button. Angle Pushing the angle (69) button allows you to choose between different camera angles. This function only applies to DVDs which are recorded this way. Ordercode: D1133 12 DVMP-250 Before switching off the power When you have finished using the DVD player, before switching off the power, be sure that the disc holder (03) has been closed with the eject (17/40) button. CAUTION: • Do not forcibly close the disc holder when the power is off. • Do not switch off the power, when the disc holder (03) is open. • Switch off the power after the disc holder (03) has been closed with the eject (17/40) button. CD/DVDs 01) Precautions on handling CD/DVDs • Do not allow fingerprints, oil or dust to get on the surface of a disc. If a disc is dirty, wipe it with a soft dry cloth. • Do not use thinner, water, record spray, electrostatic-proof chemicals, or silicone-treated cloths to clean discs. • Always handle discs carefully to prevent damaging the surface; in particular when removing a disc from its case or returning it. • Do not bend discs. • Do not put DVDs near heat sources. • Do not enlarge the hole in the center of a disc. • Do not write on the label (printed side) with a hard-tipped implement such as pencil or ball point. • Condensation will form if a disc is brought into a warm area from a colder one, such as outdoors in winter. Do not attempt to dry the disc with a hair dryer, etc. 02) • • • Precaution on storage After playing a disc, always unload it from the player. Always store discs in a jewel case to protect from dirt or damage. Do not place discs in the following areas: 01) Areas exposed to face sunlight for a considerable time. 02) Areas subject to accumulation of dust or high humidity. 03) Areas that are affected by heat from indoor heaters, etc. Ordercode: D1133 13 DVMP-250 System Setup When you push the setup (43) button, the setup menu will be displayed. You can select five tabs: A. General B. Audio C. Dolby D. Video E. Preference When you have entered the setup menu you can use the cursor (42/44/46/59) buttons to navigate and select desired items. When you have selected an item, push the OK (58) button to confirm the entry. A. General This menu includes: 01) TV Display Use the cursor (42/44/46/59) buttons to select the format of the TV which the DVD player is connected to. You have three options: • 4:3/PS: Pan & Scan for a normal TV. • 4:3/LB: Letterbox for a normal TV. • 16:9: Wide screen for a widescreen TV. Ordercode: D1133 14 DVMP-250 Note: Available aspect ratios will be printed on the back of a DVD packaging. Some DVDs are recorded in cinema widescreen format (16:9) and others in standard format (4:3). Some DVDs are recorded in both formats and may thus feature the Pan Scan function. If available, the Pan Scan function will allow the 4:3 format to fill out the entire screen. However, a part of the picture will be cut off on both sides. 02) Angle Mark Use the cursor (42/44/46/59) buttons to switch the Angle Mark function On or Off. 03) OSD Language This function allows you to select a language for the setup menu and for the screen display. You can choose between English and Chinese in this software version. Select the language of your preference, using the cursor (42/44/46/59) buttons and confirm by pushing the OK (58) button. Ordercode: D1133 15 DVMP-250 04) Captions Use the cursor (42/44/46/59) buttons to switch the Captions function On or Off. 05) HDCD Use the cursor (42/44/46/59) buttons to set up the HDCD. Only works with HDCD media. Depending on the CD sound quality, there are three options which you can choose from: • Off: When this option is selected, you can play normal CDs. • 1X: When this option is selected, you can play 44.1K CDs. • 2X: When this option is selected, you can play 88.2K CDs. Ordercode: D1133 16 DVMP-250 B. Audio Setup Includes: 01) Speaker Setup Use the cursor (42/44/46/59) buttons to select Speaker Setup and push the OK (58) button to open the Speaker Setup menu. The speaker setupmenu gives allows you to adjust the following parameters: • • • • Downmix: LT/RT: A kind of Dolby Pro Logic format. It is used when the unit is connected to a Dolby Pro receiver through stereo RCA cables. Stereo: It is used when the unit is connected to a TV through a scart cable or when the unit is connected to a Dolby Pro Logic II receiver through stereo RCA cables. V(irtual) Surr(ound) With this option, the DVMP-250 widens the sound with a conventional two speaker setup. 5.1 CH Dolby 5.1 sound. Front Speaker It allows you to setup your DVMP-250 for either large or small speakers. Center Speaker This menu is only accessible if you have selected 5.1 CH mode and allows you to set your system up for a large or small center speaker or switch the center speaker off. Rear Speaker This menu is only accessible if you have selected 5.1 CH mode and allows you to set your system up for a large or small set of rear speakers or switch the rear speakers off. Use the cursor (42/44/46/59) buttons to select and change parameters and push the OK (58) button to confirm. Ordercode: D1133 17 DVMP-250 • Test Tone Allows you to generate a test tone. Use the cursor (42/44/46/59) buttons to select and change parameters and push the OK (58) button to confirm. 02) Spdif Setup Use the cursor (42/44/46/59) buttons to select Spdif Setup and push the OK (58) button to open the Spdif Setup menu. The Spdif setup page allows you to set up the digital sound format that comes from the coaxial or optical output on the rear panel. This signal is used when the unit is connected to a digital surround receiver. You can select: SPDIF/Off: Closes the digital outputs. SPDIFF/Raw: Opens digital outputs for the pure, non-modulated digital signal. SPDIF/Pcm: Stands for Pulse Code Modulation. It may be necessary to activate this function if the digital surround receiver cannot recognize the sound format. Select the sound format of your preference using the cursor (42/44/46/59) buttons and confirm by pushing the OK (58) button. Use the cursor (42/44/46/59) buttons and the OK (58) button to select between Spdif/Raw, Spdif/PCM or switch Spdif off. 03) Karaoke Setup The Karaoke setup is not functional on the DVMP-250, as the DVMP-250 has no microphone input. Ordercode: D1133 18 DVMP-250 04) CH EQ Setup Use the cursor (42/44/46/59) buttons to select CH EQ Setup and push the OK (58) button to open the CH EQ Setup menu. This menu allows you to setup: • Preset EQ Type You can choose between Rock, Pop, Live, Dance, Techno, Classic, Soft or switch the EQ off. • Bass Boost On or off. • Super Bass On or off. • Treble Boost On or off. Use the cursor (42/44/46/59) buttons to select and change parameters and push the OK (58) button to confirm. 05) 3D Process Use the cursor (42/44/46/59) buttons to select 3D Process and push the OK (58) button to open the 3D Process setup page. Ordercode: D1133 19 DVMP-250 This menu allows you to setup a preset reverb algorithm. Concert, Living Room, Hall, Bathroom, Cave, Arena, Church or switch the reverb effect off. Use the cursor (42/44/46/59) buttons to select and change parameters and push the OK (58) button to confirm. C. Dolby Setup This menu is used for setting up Dolby functions and includes: 01) Dual mono mode Here you can choose between stereo, left mono channel, right mono channel or mixed mono. Select the mode of your preference using the cursor (42/44/46/59) buttons and confirm your choice by pushing the OK (58) button. Ordercode: D1133 20 DVMP-250 02) Dynamic Range To avoid disturbing the neighbours at night, you can use this function to reduce the sound effects volume without changing the original tone. Use the cursor (42/44/46/59) buttons to adjust the dynamic range between off and full. D. Video Setup This menu is used for setting up Video functions and includes: 01) Component Use the cursor (42/44/46/59) buttons to select: • YUV • VGA • S-Video Ordercode: D1133 21 DVMP-250 02) TV Mode Use the cursor (42/44/46/59) buttons to select: • • P-Scan Interlace 03) Quality Use the cursor (42/44/46/59) buttons to select Quality and push the OK (58) button to open the Quality Setup menu. This menu allows you to setup: • Sharpness Use the cursor (42/44/46/59) buttons to adjust sharpness between Medium, Low and High. Push the OK (58) button to store. • Brightness Use the cursor (42/44/46/59) buttons to adjust brightness between -20 and +20. Push the OK (58) button to store. • Contrast Use the cursor (42/44/46/59) buttons to adjust contrast between -16 and +16. Push the OK (58) button to store. • Gamma Use the cursor (42/44/46/59) buttons to adjust gamma between none, low, medium or high. Push the OK (58) button to store. Ordercode: D1133 22 DVMP-250 • • • Hue Use the cursor (42/44/46/59) buttons to adjust hue between -9 and +9. Push the OK (58) button to store. Saturation Use the cursor (42/44/46/59) buttons to adjust saturation between -9 and +9. Push the OK (58) button to store. Luma Delay Use the cursor (42/44/46/59) buttons to select either 0T or 1T. Push the OK (58) button to store. 04) HDMI Use the cursor (42/44/46/59) buttons to select HDMI Setup and push the OK (58) button to open the HDMI Setup menu. In the HDMI setup menu, you are able to select: • HDMI Switch HDMI On or Off. • Resolution Adjust the resolution. You are able to select: 720P60, 1080160, 1080p(60Hz), 5761, 576P27, 720P50, 1080150 or 1080p(50Hz). Use the cursor (42/44/46/59) buttons to select and change parameters and push the OK (58) button to confirm. Ordercode: D1133 23 DVMP-250 E. Preference This menu allows you to set up: 01) TV Type 02) Audio This menu item is not functional in this software version. Use a DVD disc’s menu to setup the language. 03) Subtitle This menu item is not functional in this software version. Use the title (52) button. 04) Disc Menu This function allows you to select a language for the setup menu. You can choose between English, French, Spanish, Chinese, Japanese, Korean, Russian and Thai in this version. Select the language of your preference using the cursor (42/44/46/59) buttons and confirm your choice by pushing the OK (58) button. Ordercode: D1133 24 DVMP-250 05) Parental Use the cursor (42/44/46/59) buttons to set up a filter to block certain DVDs. 06) Password Use the cursor (42/44/46/59) buttons to select Password and push the OK (58) button to open the Password Setup menu. This menu allows you to set up a password. 07) Default Use the cursor (42/44/46/59) buttons to select reset. Confirm your selection by pushing the OK (58) button. Now the DVMP-250’s default settings will be restored. Ordercode: D1133 25 DVMP-250 Setup examples Connection of a television set Connection of a television set using an A/V-cable If your TV-set has an S-video input, the DVD-player can be connected with an S-video cable. If the TV set has no S-video input use an A/V cable. Do not use both cables at the same time! Connection of an audio system and TV-set using the component outputs Ordercode: D1133 26 DVMP-250 Connection of an amplifier with digital audio input and TV-set If the amplifier has a coaxial input, the karaoke player can be connected with a coax cable. Do not use a coaxial cable and an optical cable at the same time! Maintenance The DAP Audio-CD-Player DVMP-250 requires almost no maintenance. However, you should keep the unit clean. Disconnect the mains power supply, and then wipe the cover with a damp cloth. Do not immerse in liquid. Do not use alcohol or solvents. Keep connections clean. Disconnect electric power, and then wipe the audio connections with a damp cloth. Make sure connections are thoroughly dry before linking equipment or supplying electric power. Troubleshooting DAP Audio-CD-Player DVMP-250. This troubleshooting guide is meant to help solve simple problems. If a problem occurs, carry out the steps below in sequence until a solution is found. Once the unit operates properly, do not carry out following steps. 01) If the device does not operate properly, unplug the device. 02) Check power from the wall, all cables, connections, etc. 03) If all of the above appears to be O.K., plug the unit in again. 04) If nothing happens after 30 seconds, unplug the device. 05) Return the device to your DAP Audio dealer. Ordercode: D1133 27 DVMP-250 Product Specifications Power supply: Power consumption: S/N ratio: Frequency response: THD: Audio output: Analog audio outputs: Digital audio outputs: Headphones output: Video outputs: Accepted media: Frequency response: Dimensions: Weight: Remote control batteries: AC 100V-240V, 50/60 Hz 30 Watt >85dB 20Hz – 20kHz <0,01% XLR 6dBv RCA 0dB Unbalanced RCA Balanced XLR BNC Optical 6,3 mm stereo jack S-Video TV Component Video VGA HDMI BNC DVD, VCD, CD, CDR, MP3, MP4, RM, USB, SD 20Hz – 20kHz 482 x 224 x 89 mm (LxWxH) 19” x 2 HE 2,7 Kg AAA 2x 1,5V Design and product specifications are subject to change without prior notice. Website: www.Dap-audio.info Email: [email protected] Ordercode: D1133 28 DVMP-250 Notes Ordercode: D1133 29 DVMP-250 Ordercode: D1133 30 ©2014 DAP Audio