1
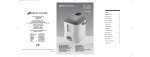
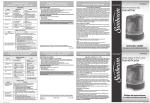
BWM401LA05307ESM1.qxd:BWM401LA05307ESM2.qxd
4/5/07
4:44 PM
Page 1
HUMIDIFIER SAFETY
Warm Mist Humidifier
MODEL
BWM401
Read instructions before operating.
Retain for future reference.
Instruction Leaflet
Troubleshooting
Trouble
• Water leaks
from tank.
• Crack in tank.
• Film on tank.
Solution
Probable Cause
* Tank rubber ring is
Remove tank cap
and replace or
reposition ring.
missing.
* Cap not tight
enough.
* Tank water is hot.
* Hot water will cause
tank to pressurize.
* Tanks will crack if hit
or dropped.
* Mineral deposits.
Tighten the cap.
Fill with cool water only.
Fill with cool water only.
Handle tank with care.
Clean/disinfect tank
as instructed in weekly
cleaning instructions.
Frequently Asked Questions
Question
Answer
The estimated run time for this humidifier is
based on average room conditions. The actual
run time of your humidifier is dependent on
numerous variables such as:
Air exchange in the room where the
humidifier is placed.
Room construction of the room where the
humidifier is placed.
Temperature of the room where the
humidifier is placed.
Humidity levels in the room where the
humidifier is placed.
Movement of occupants and the opening
and closing of doors in the room where the
humidifier is placed.
Home furnishings in the room where the
humidifier is placed.
• How do I remove film
See Daily Maintenance instructions.
on water tank?
Regular cleaning is recommended.
• What are the
variables that affect
run time?
• How can I extend
the run time?
Run your unit on the lowest setting.
If your unit has electronics, set it to your
desired humidity level. The unit will turn on
and off, which will extend the run time.
Fill the tank all the way full, place it on the
base, let the water empty into the base until
it stops bubbling, then refill the tank full
again. This ensures maximum water
capacity and will extend run time.
PLEASE READ AND SAVE
THESE IMPORTANT
SAFEGUARDS
IMPORTANT INSTRUCTIONS
When using electrical appliances, basic safety precautions
should always be followed to reduce the risk of fire, electric
shock, and injury to persons, including the following:
1. Read all instructions before using the appliance.
2. To avoid fire or shock hazard, plug the appliance
directly into an outlet of the same voltage as the one
indicated on the rating plate of your appliance.
3. Keep the cord out of heavy traffic areas. To avoid fire
hazard, NEVER put the cord under rugs or near heat
registers.
4. DO NOT place humidifier near heat sources such as
stoves, radiators, and heaters. Locate your humidifier
on an inside wall near an electrical outlet. The
humidifier should be at least 4” away from the wall for
best results.
5. NEVER place humidifier in an area where it is
accessible to children. NEVER use humidifier in a
closed room, particularly where a child may be
sleeping, resting, or playing (a closed room may result
in excessive humidity).
6. WARNING: Do not attempt to refill humidifier without
first unplugging the unit from its electrical outlet.
Failure to heed this warning may cause personal
injury. Be sure to unplug the unit by pulling on the
plug and not the cord.
7. Never place anything over moisture outlet when the
unit is running.
8. NEVER drop or insert any object into any openings.
9. DO NOT operate any appliance with a damaged cord
or plug, after the appliance malfunctions, or if it has
been dropped or damaged in any manner. Return
appliance to manufacturer for examination, electrical
or mechanical adjustment, or repair.
10.Use appliance only for intended household use as
described in this manual. Any other use not
recommended by the manufacturer may cause fire,
electric shock, or injury to persons. The use of
attachments not recommended or sold by the
manufacturer may cause hazards.
11.DO NOT use outdoors.
12.Always place humidifier on a firm, flat, level surface. A
waterproof mat or pad is recommended for use under
AUTO SAFETY SHUT OFF
This humidifier is equipped with a technologically
advanced, safety system that requires the user to reset
the humidifier if there is a potential overheat situation.
When a potential overheat temperature is reached, the
system will automatically shut the humidifier off. It can
only resume operation when the user resets the unit.
To reset the humidifier
1. Unplug unit, wait 15 minutes.
2. Press the reset button on the bottom of the unit.
HOW YOUR WARM MIST HUMIDIFIER WORKS
Your Bionaire® Warm Mist Humidifier is designed to allow
the proper amount of water to flow out of the tank and
into the Heating Chamber where the Electronic Thermal
Control Heating Element warms the water. Air is drawn in
through the grill openings located in the back of the unit
and mixed with steam in the misting chamber. The warm
mist is then dispersed out of the top of the misting
chamber through the outlet grill and into the room.
NOTE: A humidity level below 20% can be unhealthy and
uncomfortable. The recommended humidity level is
between 40%-50%.
the humidifier. NEVER place it on a rug or carpet, or
on a finished floor that may be damaged by exposure
to water or moisture.
13.DO NOT allow the Moisture Outlet to directly face the
wall. Moisture could cause damage, particularly to
wallpaper.
14.Humidifier should be unplugged when not in use.
15.NEVER tilt, move, or attempt to empty unit while it is
operating. Shut off and unplug before removing the
water tank and moving the unit.
16.This humidifier requires daily and weekly maintenance
to operate appropriately. Refer to daily and weekly
cleaning procedures. Use only cleaners and additives
recommended by the manufacturer.
17.NEVER use detergents, gasoline, glass cleaner,
furniture polish, and paint thinner, or other household
solvents to clean any part of the humidifier.
18.Excessive humidity in a room can cause water
condensation on windows and some furniture. If this
happens, turn the humidifier OFF.
19.DO NOT use humidifier in an area where humidity
level is in excess of 50%. Use a hygrometer, available
at your local retailer or through the manufacturer, to
measure the humidity.
20.DO NOT attempt to repair or adjust any electrical or
mechanical functions on this unit. Doing so will void
your warranty. The inside of the unit contains no user
serviceable parts. All servicing should be performed
by qualified personnel only.
21.NEVER place housing under water flow or immerse in
liquids.
22.DO NOT plug in the cord with wet hands: electric
shock could result.
23.DO NOT pour water in any openings other than the
water tank.
24.To prevent damage to surfaces, do not place
humidifier under overhanging surfaces.
25.NEVER operate unit without water in the tank.
26.DO NOT move unit while it is operating.
27.Use both hands when carrying full tank of water.
PLEASE READ AND SAVE
THESE IMPORTANT
SAFETY INSTRUCTIONS
NOTE: If moisture forms on the walls or windows of the
room, turn off the humidifier. The room already has plenty
of humidity and additional moisture may cause damage.
NOTE: DO NOT block air inlet or outlet.
CONSUMER SAFETY INFORMATION
This appliance has a polarized plug (one
blade is wider than the other). To reduce
the risk of electric shock, this plug is
intended to fit in a polarized outlet only
one way. If the plug does not fit fully in
the outlet, reverse the plug. If it still does
not fit, contact a qualified electrician to
install the proper outlet.
DO NOT ATTEMPT TO MODIFY THIS PLUG OR
DEFEAT THIS SAFETY FEATURE IN ANY WAY.
The length of cord used on this appliance was selected
to reduce the hazards of becoming tangled in, or tripping
over a longer cord. If a longer cord is necessary, an
approved extension cord may be used. The electrical
rating of the extension cord must be equal to or greater
than the rating of the humidifier.
Care must be taken to arrange the extension cord so that
it will not drape over the countertop or tabletop where it
can be pulled on by children or accidentally tripped over.
SETUP INSTRUCTIONS
1. Select a location for your humidifier, on a flat, level
surface about 4” away from the wall. DO NOT place
the humidifier on a finished floor or near furniture,
which can be damaged by too much moisture or
water. Place on a moisture-resistant surface.
2. Remove the tank from the base of the Humidifier.
3. Bring the tank to the sink, turn upside down and twist
off the tank cap by turning counter clockwise. Fill tank
with cool, fresh tap water. DO NOT fill with warm
water as this may cause leaking. Replace the cap on
tank FIRMLY.
4. Carefully bring the filled tank over to the humidifier,
holding it level to avoid sloshing or spilling of water.
5. Carefully place tank back onto the base to prevent
water from spilling. The tank will immediately begin to
flow into the base.
6. Plug the humidifier onto an outlet of the same voltage
as the one indicated on the rating plate of your
appliance.
CONSUMER SAFETY INFORMATION
NOTE: This is an electrical appliance and requires
attention when in use.
WEEKLY MAINTENANCE
To Remove Scale
1. Repeat steps 1-3 under Daily Maintenance section.
2. Clean all surfaces with a soft brush. Gently scrub the
heating element and the area around it with a soft
brush. Remove the scale by wiping the entire base
with a cloth dampened with undiluted white vinegar.
3. Rinse clean with warm water to remove cleaning
solution before disinfecting the tank.
To Disinfect Tank
1. Fill tank with 1 teaspoon of bleach and 3.5 litres of
water.
2. Let the solution stand for 20 minutes, shaking every
few minutes. Wet all surfaces.
3. Empty the tank after 20 minutes, and rinse well with
water until the bleach smell is gone. Leave to dry.
4. Refill the water tank with cool water; replace the water
tank. Repeat Operating Instructions.
STORAGE INSTRUCTIONS
When not using your humidifier for an extended period of
time:
1. Clean, rinse and thoroughly dry the humidifier as
directed in weekly maintenance. DO NOT leave any
water in the unit when storing. Leaving water in the
unit may render the unit inoperable for the next
season.
2. Place the humidifier in its original carton and store in a
cool, dry place.
SERVICE INSTRUCTIONS
Do NOT attempt to repair or adjust any electrical or
mechanical functions on this unit. Doing so will void the
warranty. The inside of the unit contains no user
serviceable parts. All servicing should be performed by
qualified personnel only.
CLEANING AND MAINTENANCE INSTRUCTIONS
Humidifiers provide comfort by adding moisture to dry,
heated indoor air. To benefit most from the humidifier and
avoid product misuse, follow all instructions carefully.
Please note that this is an electrical appliance and
requires attention when in use.
In addition, if you do not follow the recommended care
and maintenance guidelines, micro-organisms may be
able to grow in the water within the humidifier's tank and
become airbone. You must routinely follow the cleaning
and maintenance procedures in order to ensure proper,
efficient operation of your humidifier. Proper maintenance
and cleaning is essential to the continued performance of
your unit and the avoidance of algae or bacteria build-up.
DAILY MAINTENANCE
1. Be sure the unit is OFF by pressing the power button
so that the power light no longer illuminates. Unplug
the unit from the electrical outlet.
2. Remove the tank from the humidifier and carefully
bring to a sink or tub. Hold the base of unit level as
you carry it to prevent excess water from sloshing or
spilling.
3. Drain or sponge up any remaining water and rinse
thoroughly to remove any sediment or dirt. Wipe
clean and dry with a clean cloth or paper towel.
4. Refill with cool tap water. Do not overfill.
© 2007 Sunbeam Products, Inc. doing business as Jarden
Consumer Solutions. All Rights Reserved. Distributed by
Sunbeam Latin America, LLC, 5200 Blue Lagoon Drive,
Suite 470, Miami, Florida 33126.
Printed in China
OPERATING INSTRUCTIONS (SEE FIG.1 - 2)
Your Humidifier is equipped with a technologically
advanced AccuSetTM Digital Humidistat. You can set the
Humidifier to run continuously in manual mode or set the
AccuSetTM Digital Humidistat to your desired humidity
setting. The AccuSetTM Digital Humidistat will
automatically turn the humidifier ON or OFF, depending
on the preset comfort level. The comfort level ranges
from 35% to 65% relative humidity.
MANUAL MODE
NOTE: After starting the unit from cold, it will take 5–10
minutes before any noticeable steam is emitted from the
Outlet Grill.
1. When plugged in, the Display will show the current
room humidity.
2. To start the unit, press the MODE/OFF Button for the
HIGH (HI) manual setting.
3. Press the Button again for the LOW (LO) manual setting.
4. To stop the unit, keep pressing the Button until the
Display reads OFF (OF).
3. If you do not plan to use the Humidifier for two or
more days, make sure any residual water is drained
from the Water Tank and Base to prevent algae or
bacteria growth.
Fig. 1
C
A
B
D
F
E
E
TM
ACCUSET HUMIDISTAT MODE
To take advantage of the AccuSetTM Digital Humidistat:
1. Press the MODE/OFF button until you reach AU
(Automatic) AccuSetTM.
2. Adjust the set humidity by using the Humidity Set
Button. The Display will show a setting in the range
35% – 65% and the humidity can be
increased/decreased in increments of 5%. When the
room humidity level rises above the set humidity, the
Humidifier will stop. When the humidity level drops
below the set humidity, the Humidifier will turn on
automatically.
NOTE: The AccuSetTM Humidifier has memory. This
means that when you turn the unit back on to AccuSetTM
mode, it will remain at the setting the Humidifier was
previously set at, unless the unit has been unplugged.
REFILL PROCEDURE
NOTE: When the Water Tank is empty and the water in
the Heating Chamber is almost empty, the Red REFILL
light will illuminate, the panel will display "FILL" and the
Automatic Shut Off will activate.
The unit will not operate again until you refill the Water
Tank and reset the Humidifier as follows.
1. Remove and refill the Water Tank, being sure to follow
the Maintenance Instructions. Replace the Tank onto
the Base.
2. After 5 minutes, turn the unit on. The REFILL light
should now be off (if not repeat steps 1 through to 2).
In about 5 minutes, the Humidifier will begin to
produce moisture.
A
G
H
I
A.
B.
C.
D.
E.
Lid
Medication cup
Moisture Outlet
Handle
Water Tank
F.
G.
H.
I.
Air Inlet (Not Shown)
Control Panel
Base
Misting Chamber
Fig. 2
J
K
L
M
J.
K.
L.
M.
N.
Display Lens
Humidity Set Button
Mode/Off Button
Refill Light
Power Light
N
BWM401LA05307ESM1.qxd:BWM401LA05307ESM2.qxd
4/5/07
4:44 PM
Humidificador
de Vapor Caliente
MODELO
Page 2
LEA Y GUARDE ESTAS
IMPORTANTES
PRECAUCIONES DE
SEGURIDAD
BWM401
Lea las instrucciones antes de hacer funcionar la unidad.
Consérvelas para referencia futura.
Folleto de instrucciones
9100030004306
Guía de resolución de problemas
Problema
• El agua está
goteando del
tanque
• El tanque está
agrietado
• Hay residuos
en el tanque
Posible causa
* El aro de goma no
Solución
está colocado en el
tanque
* La tapa no está
suficientemente
apretada
* El agua del tanque
está caliente
* El agua caliente
causará presión en el
tanque
* El tanque se
agrietará si es
golpeado o está
goteando
* Hay depósitos
minerales
Remueva la tapa del tanque y
coloque el aro de goma
correctamente
Cierre la tapa
Llene con agua fría
solamente
Llene con agua fría
solamente
Maneje el tanque con
cuidado
Limpie/desinfecte el tanque
como se indica en las
instrucciones de limpieza
semanal
Preguntas usuales
Preguntas
• Cuáles son las
variables que afectan
el tiempo de
funcionamiento?
Respuesta
El tiempo estimado de funcionamiento de este
humidificador está basado en las condiciones de
humedad promedio del ambiente. El tiempo de
funcionamiento real de su humidificador depende
de muchas variables, tales como:
El intercambio de aire del ambiente
donde se coloca el humidificador.
Tipo de construcción del ambiente
donde se coloca el humidificador.
Temperatura del ambiente donde se
coloca el humidificador.
Niveles de humedad del ambiente
donde se coloca el humidificador.
El movimiento de las personas y
cuantas veces se abren y cierran las
puertas del ambiente donde se
encuentra el humidificador.
Vea las instrucciones de Mantenimiento
Diario.
• Cómo se saca la
película del tanque
de agua?
• Cómo se puede
extender el tiempo de
funcionamiento?
Se recomienda la limpieza periódica.
Use la unidad en su ajuste mínimo.
Si su unidad posee control electrónico,
ajústela a su nivel de humedad
deseado. La unidad se encenderá y
apagará, lo que extenderá el tiempo de
funcionamiento.
Llene completamente el tanque de
agua, colóquelo en la base, deje que el
agua entre en la base hasta que deje
de burbujear, luego vuelva a llenar el
tanque de agua.
Esto asegurará la máxima capacidad
de agua y extenderá el tiempo de
funcionamiento.
MEDIDAS PREVENTIVAS
Cuando se utiliza cualquier artefacto eléctrico siempre se
deben seguir precauciones básicas de seguridad para
evitar el riesgo de incendio, descarga eléctrica y/o
lesiones, incluyendo las siguientes:
1. Lea estas instrucciones por completo antes de utilizar
el artefacto.
2. Para protegerse contra una descarga eléctrica,
enchufe el cable en un tomacorriente que cuente con
el mismo voltaje que indica la placa del artefacto.
3. Mantenga el cable alejado de las áreas de alto tráfico.
Para evitar el riesgo de fuego o descarga eléctrica,
NUNCA coloque el cable debajo de alfombras o cerca
de salidas de calor.
4. NO coloque un humidificador cerca de fuentes de
calor, como hornos, radiadores y calentadores.
Coloque su humidificador sólo en una pared de
ambientes interiores, cerca de un tomacorriente
eléctrico. El humidificador debe estar por lo menos 4”
alejado de la pared para obtener mejores resultados.
5. NUNCA coloque el humidificador en un área donde
se encuentre accesible a niños. NUNCA utilice este
artefacto en una habitación cerrada, particularmente
donde un niño puede dormir, descansar o jugar (una
habitación cerrada podría resultar en un exceso de
humedad).
6. ADVERTENCIA: No intente volver a llenar su
humidificador sin antes desenchufar la unidad del
tomacorriente. El no tomar en cuenta esta indicación
podría causar daños personales. Asegúrese de
desenchufar su humidificador halando
cuidadosamente el enchufe, no el cable.
7. NO coloque nada encima de la salida de humedad
mientras la unidad esté operando
8. NUNCA deje caer ni introduzca ninguna pieza dentro
de las rejillas del humidificador
9. NUNCA opere ningún artefacto con el cable dañado;
NO opere ningún artefacto con un cable o enchufe
dañados, después de que el artefacto haya fallado o
si se cae al suelo o se daña de cualquier otra manera.
Regrese el artefacto al Centro de Servicio Autorizado
más cercano para examinarlo, repararlo o para
ajustarlo mecánica o eléctricamente.
2. Ajuste el control de humedad utilizando el botón de
control de humedad. El visor indicará un intervalo de
ajuste que oscila entre el 35 y 65% y la humedad
puede aumentarse/disminuirse en incrementos del
5%. Cuando el nivel de humedad exceda el valor
establecido, el humidificador se detendrá. Cuando el
nivel de humedad sea inferior al valor establecido, el
humidificador se encenderá automáticamente.
NOTA: El humidificador AccuSetTM dispone de memoria.
Esto significa que cuando vuelva a encender la unidad en
modo AccuSetTM, permanecerá con el ajuste previamente
establecido, a menos que se desenchufe la unidad.
PROCEDIMIENTO PARA RELLENAR
NOTA: Cuando el depósito de agua esté vacío y casi no
haya agua en el receptáculo de calentamiento, se
iluminará la luz roja de RELLENAR, el panel indicará
“FILL” (“LLENAR”) y se activará la desconexión
automática.
La unidad no volverá a funcionar hasta que esté lleno el
depósito de agua y el humidificador haya sido reajustado
como a continuación se indica:
1. Quite y vuelva a llenar el depósito de agua, siguiendo
atentamente las instrucciones de mantenimiento.
Vuelva a colocar el depósito sobre la base.
2. Después de 5 minutos, encienda la unidad. La luz de
RELLENAR deberá estar apagada ahora (si no es así,
repita los pasos del 1 al 2). En aproximadamente 5
minutos, el humidificador empezará a producir
humedad.
3. Si no va a usar el humidificador durante dos o más
días, debe eliminar el agua que quede en el depósito
y en la base para evitar el desarrollo de algas y de
bacterias.
DESCONEXIÓN AUTOMÁTICA DE SEGURIDAD
El humidificador está equipado con un sistema de
seguridad de tecnología punta que requiere que el
usuario reajuste el humidificador en caso de un potencial
sobrecalentamiento. Cuando se alcance una temperatura
potencial de sobrecalentamiento, el sistema
automáticamente desconectará el humidificador. No se
podrá reanudar su funcionamiento hasta que el usuario
haya reajustado la unidad.
Para reajustar el humidificador
1. Desenchufe la unidad y espere 15 minutos.
2. Pulse el botón de reposición que se encuentra en la
parte inferior de la unidad.
CÓMO FUNCIONA EL HUMIDIFICADOR DE VAPOR
CALIENTE
El humidificador de vapor caliente de Bionaire® está
diseñado para permitir que fluya la cantidad adecuada de
10.NO utilice este artefacto para otro propósito que no
sea para el que ha sido diseñado. Si el artefacto no
se utiliza como se recomienda podría causar el riesgo
de fuego, descarga eléctrica o daños personales. El
uso de accesorios no recomendados por el fabricante
podrían causar incendios, descargas eléctricas o
lesiones corporales.
11.NO utilice este artefacto al aire libre.
12.Coloque el humidificador sobre una superficie dura y
nivelada. Se recomienda colocar una almohadilla a
prueba de agua debajo del humidificador. NUNCA
coloque el artefacto encima de una alfombra o sobre
una superficie que se pueda dañar por estar expuesta
al agua o a la humedad
13.NO permita que las rejillas por donde sale la humedad
tengan contacto directo con una pared. La humedad
podría causar daños, especialmente al papel tapiz.
14.Desconecte su humidificador cuando no lo esté
utilizando.
15.NUNCA incline, mueva o intente vaciar el
humidificador cuando esté en uso. Apáguelo y
desconecte el cable antes de moverlo o remover el
tanque de agua.
16.Este artefacto requiere mantenimiento diario y/o
semanal para un mejor funcionamiento. Refiérase a
las instrucciones de limpieza descritas en este
manual. Utilice exclusivamente los limpiadores y
aditivos recomendados por el fabricante.
17.NUNCA utilice detergentes, gasolina, limpia vidrios,
removedor de pintura o cualquier otro solvente casero
para limpiar cualquier parte del humidificador.
18.La humedad excesiva en una habitación podría
causar condensación del agua en las ventanas y
algunos muebles. Si esto llegase a ocurrir, apague el
humidificador.
19.NO utilice el humidificador en un área que el nivel de
humedad sea más del 50%. Use un hidrómetro que
pueda adquirir en cualquier ferretería local para medir
la cantidad de humedad.
20.NUNCA intente reparar o ajustar ningún componente
eléctrico o mecánico de la unidad. En este caso la
garantía quedaría anulada. El humidificador cuenta
con partes internas que no se pueden reparar. Todos
los servicios de reparación deben de ser realizados
por una persona calificada.
21.NUNCA coloque este artefacto debajo del agua ni lo
sumerja en ningún otro líquido.
22.NO desconecte el cable con las manos mojadas, ya
que esto podría ocasionar una descarga eléctrica.
23.NO coloque agua en ninguna otra ranura que no sea
la del tanque de agua.
24.Para prevenir daños, no coloque el humidificador
debajo de superficies que tengas partes que
sobresalgan por encima del artefacto.
25.NUNCA opere la unidad sin agua en el tanque.
26.NO mueva la unidad mientras esté en uso.
27.Utilice las dos manos cuando cargue el tanque de
agua.
agua del depósito y pase por la cámara de calentamiento
en donde el elemento de calentamiento del control
electrónico térmico calienta el agua. El aire pasa a través
de las aperturas de la rejilla que se encuentra en la parte
trasera de la unidad y se mezcla con vapor en el
receptáculo nebulizador. El vapor caliente sale por la
parte superior del receptáculo nebulizador a través de la
rejilla de salida y penetra en la habitación.
NOTA: Un nivel de humedad por debajo del 20% puede
ser perjudicial e incómodo. El nivel de humedad
recomendado está entre el 40% y el 50%.
MANTENIMIENTO DIARIO DE SU HUMIDIFICADOR
1. Asegúrese de que la unidad esté APAGADA
presionando el botón de encendido para que se
apague la luz de encendido. Desenchufe la unidad.
2. Remueva el tanque de agua del humidificador y
colóquelo en el fregadero o tina.
3. Remueva cualquier residuo de agua o enjuague
generosamente para remover cualquier residuo o
sucio. Limpie y seque con un paño limpio o toallas de
papel.
4. Vuelva a llenar el tanque con agua fría. No llene de
más.
INTRUCCIONES PARA ALMACENAR
MANTENIMIENTO SEMANAL DE SU
HUMIDIFICADOR
Para Remover Residuos
1. Repita los pasos 1-3 bajo la sección de
mantenimiento diario.
2. Limpie todas las superficies con un cepillo suave.
Friegue suavemente el elemento calefactor y sus
alrededores con un cepillo suave. Remueva los
residuos limpiándolos con un paño mojado con
vinagre blanco sin diluir.
3. Drene cualquier residuo de agua y enjuague
generosamente para remover cualquier sedimento o
sucio. Limpie y seque con un paño limpio o toallas de
papel.
Para Desinfectar el Depósito
1. Llene el tanque con una cucharadita de blanqueador
y 3,5 litros de agua.
2. Deje que la mezcla repose 20 minutos, meneándola
varias veces. Humedezca todas las superficies.
3. Vacíe el depósito después de 20 minutos y
enjuáguelo bien con agua hasta que se elimine el olor
del blanqueador. Déjelo secar.
4. Vuelva a llenar el depósito con agua fría y a colocar el
depósito del agua. Repita las instrucciones de
funcionamiento.
CONSERVE ESTAS
INSTRUCCIONES
INFORMACION DE SEGURIDAD
NOTA: Este es un artefacto eléctrico y requiere de su
atención cuando esté en uso.
NOTA: Si se llegase a formar humedad en las paredes y
ventanas de la habitación donde se encuentra la unidad
apáguela. Si la habitación ya tiene suficiente humedad, el
exceso de ésta podría causar daños.
NOTA: No bloquee la entrada y salida del aire.
INFORMACION DE SEGURIDAD
ESTE ARTEFACTO TIENE UN
ENCHUFE POLARIZADO (una de las
patas es más ancha que la otra). Para
reducir el riesgo de una descarga
eléctrica, este enchufe entra de una sola
forma en un tomacorriente polarizado.
De no ser así, inviértalo, y si aún así no
entra completamente, llame a un electricista calificado
para que instale un tomacorriente apropiado.
NO INTENTE MODIFICAR ESTE ENCHUFE O
ALTERAR ESTE DISPOSITIVO DE SEGURIDAD DE
NINGUNA FORMA.
La longitud del cable eléctrico de este artefacto fue
seleccionada como medida de seguridad para prevenir el
riesgo de tropezar, tirar o enredarse con un cable más
largo. Puede utilizar cables de extensión si se observan
las precauciones adecuadas. Si se utilizan cables de
extensión, la capacidad nominal eléctrica del cable de
extensión debe ser el mismo del producto.
Coloque el cable de extensión de manera que no
cuelgue del borde del mostrador o mesa donde pueda
tirarlo un niño o pueda tropezar con él accidentalmente.
Cuando no esté utilizando su humidificador por un
tiempo prolongado:
1. Limpie, enjuague y seque el humidificador como se
indica en las instrucciones de mantenimiento
semanal. NO deje ningún residuo de agua dentro de
la unidad mientras esté guardado. El dejar agua
dentro de la unidad podría causar daños en su
funcionamiento para cuando desee volverlo a utilizar.
2. Coloque el humidificador en su empaque original y
guárdelo en un lugar fresco y seco.
Para obtener Servicio de Garantía: consulte el
inserto de la garantía correspondiente al país o
contacte al Centro de Servicio Autorizado más
cercano.
NO REGRESE ESTE PRODUCTO AL LUGAR DE LA
COMPRA.
© 2007 Sunbeam Products, Inc. operando bajo el nombre
de Jarden Consumer Solutions. Todos los derechos
reservados. Distribuido por Sunbeam Latin America, LLC,
5200 Blue Lagoon Drive, Suite 470, Miami Florida 33126.
BWM401LA07ESM1
Impreso en China
INSTRUCCIONES ANTES DE OPERAR SU
HUMIDIFICADOR
1. Seleccione una superficie plana alejada por lo menos
4” de la pared para colocar su humidificador. NUNCA
coloque el humidificador cerca de muebles o pisos
con acabados que puedan ser dañados por el
exceso de humedad o agua. Coloque la unidad en
una superficie resistente a la humedad.
2. Remueva el tanque de la base del humidificador.
3. Traiga el tanque al fregadero, colóquelo boca abajo y
abra la tapa del tanque girándola en contra de las
manecillas del reloj. Llene el tanque con agua fría y
fresca. NO lo llene con agua caliente, ya que podría
causar filtración. Coloque de nuevo la tapa
FIRMEMENTE.
4. Asegúrese de que el humidificador esté apagado
(apretando el botón de encendido en la base de la
unidad).
5. Ponga el tanque de nuevo en la base. El agua
inmediatamente empezará a fluir en la base.
6. Conecte el humidificador en un tomacorriente que
tenga la misma capacidad nominal que aparece en la
placa del artefacto.
INSTRUCCIONES ANTES DE USAR EL APARATO
(VER FIG.1 Y 2)
El humidificador está equipado con un humidistato digital
AccuSetTM de tecnología punta. Puede establecer que el
humidificador funcione continuamente en modo manual o
ajustar el humidistato digital AccuSetTM a la humedad
deseada. El humidistato digital AccuSetTM encenderá o
apagará automáticamente el humidificador, dependiendo
del nivel de confort prefijado. El nivel de confort puede
oscilar dentro de un margen entre el 35 y 65% de
humedad relativa.
MODO MANUAL
NOTA: Después de encender la unidad estando
completamente fría, transcurrirán de 5 a 10 minutos
antes de que empiece a salir vapor de la rejilla de salida.
1. Al enchufar el aparato, el visor indicará la humedad
ambiente actual.
2. Para activar la unidad, pulse el botón
MODO/APAGADO para establecer el ajuste manual
en modo HI (MÁXIMO).
3. Pulse el botón nuevamente para establecer el ajuste
manual en LO (MÍNIMO).
4. Para detener la unidad, mantenga pulsado el botón
hasta que el visor indique OFF (APAGADO).
MODO DEL HUMIDISTATO ACCUSETTM
Para utilizar el humidistato digital AccuSetTM.
1. Pulse el botón MODO/APAGADO hasta la posición
que indique Accuset AU (Automático).
Fig. 1
C
A
B
D
F
E
E
A
G
H
I
A.
B.
C.
D.
E.
Tapa
Dosificador
Salida de humedad
Asa
Depósito de agua
F. Entrada de aire (no
se visualiza)
G. Panel de control
H. Base
I. Receptáculo
nebulizador
Fig. 2
J
K
L
M
J.
K.
L.
M.
N.
N
Lente del visor
Botón de control de humedad
Botón modo/desconexión
Luz de reposición
Indicador de alimentación