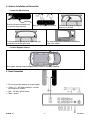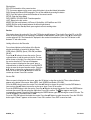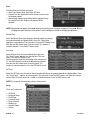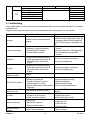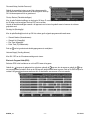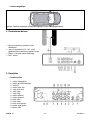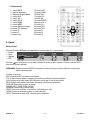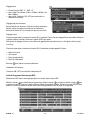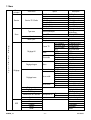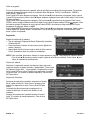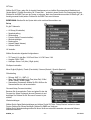
1
DVBTR6
DVB-T RECEIVER FOR MOBILE USE
DVB-T-ONTVANGER VOOR MOBIEL GEBRUIK
RÉCEPTEUR TNT POUR USAGE MOBILE
RECEPTOR DVB-T PARA EL USO MÓVIL
DVB-T-EMPFÄNGER FÜR MOBILE ANWENDUNG
USER MANUAL
GEBRUIKERSHANDLEIDING
NOTICE D’EMPLOI
MANUAL DEL USUARIO
BEDIENUNGSANLEITUNG
DVBTR6_v2
-2-
VELLEMAN
DVBTR6 – DVB-T RECEIVER FOR MOBILE USE
1. Introduction & Features
To all residents of the European Union
Important environmental information about this product
This symbol on the device or the package indicates that disposal of the device after its lifecycle could harm
the environment.
Do not dispose of the unit (or batteries) as unsorted municipal waste; it should be taken to a specialized
company for recycling.
This device should be returned to your distributor or to a local recycling service.
Respect the local environmental rules.
If in doubt, contact your local waste disposal authorities.
Thank you for choosing Velleman! Please read the manual thoroughly before bringing this device into service. If the
device was damaged in transit, don't install or use it and contact your dealer. Contents: 1 x DVB-T receiver, 1 x remote
control, 1 x button-cell battery, 1 x power cable, 1 x A/V cable, 1 x remote control cable, mounting accessories and this
manual.
Features:
•
•
•
•
•
•
•
•
•
•
•
•
•
•
•
MPEG-2/DVB-T compatible
true diversity receiver for an optimal reception while driving
optional 7MHz band width, 8MHz auto scan
auto recovery in case of power failure
multi-language subtitles (if supported by your local broadcaster)
manual/auto/NIT scan modes
OSD & VBI output
RCA A/V output
SCPC/MCPC compatible
EPG (if supported by your local broadcaster)
user-friendly interface
4 video output ports for simultaneous connection to 4 monitors
A/V input for VCD and DVD
hi-fi stereo output, numeral 32 bits processing
supports powered antenna (5VDC)
2. Safety Instructions
• Damage caused by disregard of certain guidelines in this manual is not covered by the warranty and the dealer
will not accept responsibility for any ensuing defects or problems.
• Do not open the DVB-T receiver to avoid electroshocks. There are no user-serviceable parts inside. Service shall
only be executed by a qualified technician.
• Keep the receiver away from rain and moisture, steam, gases and dust.
• Respect the voltages indicated in this manual.
• Do not watch or operate your monitor while driving.
• Switch off the unit when it is not being used.
• Never obstruct the ventilation slots. Allow proper airflow to the unit.
• Only use accessories recommended by the manufacturer.
• Switch off the unit and disconnect from any power source before servicing. Wipe the device regularly with a moist,
lint-free cloth. Do not use alcohol or solvents.
• Note that damage caused by user modifications to the device is not covered by the warranty.
• Keep the device away from children and unauthorised users.
DVBTR6_v2
-3-
VELLEMAN
3. Antenna Installation and Connection
• Interior On-Glass Antenna
Clean the two areas and make sure
they are dust and grease-free.
Apply the two strips to the antenna.
Clean the area where the on-glass
antenna is to be fixed.
The antenna can also be fixed on the side window
pane of the vehicle.
Fix the antennas in such way as to assure free sight
through the rear window (grey area).
• Exterior Magnetic Antenna
The magnetic antenna can be fixed onto different locations according to your car.
4. Basic Connection
• Do not connect the antennas to a power supply.
• Yellow = 12 ~ 24V fixed connection – can also
be connected to red wire.
• Red = 12V after ignition contact.
• Black = ground.
DVBTR6_v2
-4-
VELLEMAN
5. Description
• Rear Panel
1. power jack
2. remote control input
3. IR input
4. audio input right
5. audio output right
6. video output
7. video output
8. input antenna 1
9. input antenna 2
10. video output
11. video output
12. audio output left
13. audio input left
14. video input
• Remote Control
1. MUTE button
2. numpad
3. Electronic Program Guide
4. INFO button
5. VOL – button
6. A/V IN button
7. MENU button
8. MODE button
9. SUB button (subtitles)
10. TTX button (teletext)
11. F2 button
12. F1 button
13. power on/off
14. LAST button
15. AUDIO button
16. PAGE up
17. CH+ button
18. PAGE down
19. ENTER button
20. VOL + button
21. CH –
22. EXIT button
23. TV/R button
24. F5 button
25. F3 button
26. F4 button
6. Operation
Main Menu
Press the MENU button to show the Main Menu. There are 4 menu items:
• Service
• Scan
• Setup
• EPG
Press
to select a menu item, press the OK button to confirm and enter into the sub-menu. Press EXIT to return to
the Main Menu.
NOTE: Press the EXIT button to return to the previous level from the current menu. Press the button repeatedly to
exit the Main Menu.
DVBTR6_v2
-5-
VELLEMAN
Shortcut keys:
EPG: EPG information of the current service.
TTX: If no menu appears on the screen, press this button to show the teletext information.
SUB: Change the different OSD languages. Turn off the subtitles by pressing this button.
INFO: Press this button to show the information of the current service.
SETUP: Enter the Setup Menu.
RED, GREEN, YELLOW, BLUE: Function operation.
LAST: Return to the last service.
MODE: Shift the mode between 4:3/Frame, 4:3/LetterBox, 4:3/Pan&Scan and 16:9.
AUDIO: Shift the audio channel between the left and right channel.
STANDBY: Enter the Standby Mode, press again to return to working status.
Service
This window shows the service list. Press the TV/R button to shift between TV and radio. Press the PG- or the PG+
button to see the previous or the next page. A maximum of 600 channels can be stored. Press ▲▼to choose the
service and press OK. The information is displayed in the service information box. Press the TV/R button to shift
between TV and radio service.
Adding a Service to the Favourites
Four coloured buttons on the bottom of the Service
window are defined as favourite list buttons: News
(RED), Movie (GREEN), Sports (YELLOW) and Music
(BLUE).
Press the ▲▼button to choose the service. Press a
coloured button to add the service to the list. The icon
will be shown on the right. Press the button to remove
the service from the list. The icon will disappear.
When no menu is displayed on the screen, press a
coloured button to show the service. Press the WHITE
button to move the chosen favourite service. Press the
▲▼button to choose the service, press the WHITE
button to focus and use the ▲▼button to move the
service up or down. Press OK to confirm.
Service Edit
When no menu is displayed on the screen, press the OK button to show the service list. Three coloured buttons
appear on the button of the screen: Move (RED), Lock (GREEN) and Delete (YELLOW).
Press the RED button to move the service. Press the ▲▼button to choose the service. Press the RED button to
focus and use the ▲▼button to move the service up or down. Press OK to confirm.
Press the GREEN button to lock the service. Press the ▲▼button to choose the service. Press the GREEN button
and enter the correct PIN code using the digit button. Press OK to confirm. The icon appears next to the
corresponding channel. Cancel the lock by pressing the GREEN button again and entering the correct PIN code. The
icon will disappear. The default code is “0000”.
Press the YELLOW button to the delete the service. Press the ▲▼button to select the service. Press the YELLOW
button again. “Delete?” appears on the screen. Press OK to confirm. Press EXIT to cancel and exit.
DVBTR6_v2
-6-
VELLEMAN
Scan
Scan the channel in the Scan sub-menu:
• Scan Type: Manual Scan, Auto Scan, NIT Scan.
• Channel: Use the digital button on the remote control to enter
the channel number.
• Update Mode: Append (new channel will be appended to the
last channel in the list), Replace (all channels will be
replaced).
NOTE: When the ►icon appears, press the ►button on the remote control. An option box appears. Press the ▲▼button
to highlight the option and press OK to confirm. Press the ◄ button to exit without changing the option item.
Manual Scan
Select the Manual Scan, enter the proper channel number and choose
the proper bandwidth and Update Mode. Press OK. “Please Wait…”
appears in a message box. The scan starts. Press the EXIT button to exit.
After the scan the screen shows “N service found” (N = number of
scanned channels). Press the EXIT button to exit.
Auto Scan
Select the Auto Scan, choose an Update Mode and press
OK. “Scan Process” appears in a message box. The scan
starts. Press the EXIT button to exit.
The message box shows the percentage of the scan process.
TV and radio channels have been displayed in two columns.
After the scan the screen shows “N service found” (N =
number of scanned channels). Press the EXIT button to exit.
NIT Scan
Select the NIT Scan, enter the proper channel number and choose the proper bandwidth and Update Mode. Press
OK. “Please Wait…” appears in a message box. The scan starts. Press the EXIT button to exit. After the scan the
screen shows “N service found” (N = number of scanned channels). Press the EXIT button to exit.
NOTE: Do not power off immediately after the scan process.
Setup
There are 7 sub-menus:
•
•
•
•
•
•
•
•
AV Setup
Language Setup
Time Setup
Password Setup
Factory Restore
Booking List
Antenna Supply
Version
DVBTR6_v2
-7-
VELLEMAN
AV Setup
Choose between following setups:
• TV Shape: 4:3 Letter Box / 16:9 Pan & Scan / 4:3 Full Frame / 16:9
• Output: RGB / CVBS
• Audio Track: Stereo / Left / Right
Language Setup
Menu: English / French / German / Spanish
Time Setup
• Time Zone: GMT -11 ~ GMT +11
• Sleep Time: No Time / 5 Mins / 10 Mins / 20 Mins / 30 Mins /
60Mins
• Summertime: Choose ON / OFF to control summer time
Password Setup
Use the digital buttons to enter the old password. Enter a new
password, confirm the new password and press the OK button.
The new password has been enabled.
Factory Restore
Choose Factory Restore and press the OK button. “Factory Restore” appears in a message box. Press the OK
button to confirm. Press EXIT to exit.
Restore the Factory Setup if this unit is used for the first time or when the software has been upgraded.
Booking List
Choose Booking List and press the OK button. The screen shows programme information:
•
•
•
•
Channel Number
Channel List
Play Time
Event Time
Press
to remove the selected booking programme.
Antenna Supply
Choose ON / OFF to control the 5V antenna supply.
Electronic Program Guide (EPG)
To enter the EPG Menu, select EPG in the Main Menu.
button to select the event, use the button to browse and use the
button to book the programme.
Use the
Press the OK button to show the detail information. Press the EXIT button to exit. The booked programme will be
displayed in the Booking List in the Setup Menu.
DVBTR6_v2
-8-
VELLEMAN
7. Menu
Main
Menu
Main Menu
Service
Sub-Menu
TV Service / Radio Service
Scan Type
Scan
Channel
Update Mode
Option
TV / Radio
Lock
Move
News (Red)
Movie (Green)
Sports (Yellow)
Music (Blue)
Manual Scan
Auto Scan
NIT Scan
Channel
Append
Replace
Setup
TV Shape
AV Setup
Output
Audio Track
Language Setup
Menu
Time Zone
Time Setup
Sleep Time
Summer Time
Password Setup
Factory Restore
Booking List
Antenna Supply
DVBTR6_v2
5V Switch
-9-
4:3 Letter Box
4:3 Pan & Scan
4:3 Full Frame
16:9
RGB
CVBS
Stereo
Left
Track
English
French
German
Spanish
GMT-11~GMT+11
No Sleep
5 min.
10 min.
20 min.
30 min.
60 min.
On
Off
On
Description
TV / Radio
Lock the service
Move the service
Favor: News
Favor: Movie
Favor: Sports
Favor: Music
Manual Scan
Auto Scan
NIT Scan
Append
Replace
4:3 Letter Box
4:3 Pan & Scan
4:3 Full Frame
16:9 Full Frame
RGB
CVBS
Stereo
Left Track
Right Track
English
French
German
Spanish
Time Zone
No Sleep
5 min.
10 min.
20 min.
30 min.
60 min.
Summer Time On
Summer Time Off
Password Setup
Factory Restore
Booking List
Supply On
VELLEMAN
Off
EPG
Software Version
Events
Browse
Booking
Detail Info
Exit
Supply Off
Software Version
Events
Browse
Booking
Detail Info
Exit
8. Troubleshooting
Some simple checks or a minor adjustment may eliminate the problem and restore proper operation. Let a technician
maintain the unit.
Keep the device away from static electricity during maintenance as the video processor is very sensitive.
Trouble
Possible Cause
No power
Power cord has not been connected
properly
Can not scan program
• Antenna is not adjusted properly
• Parameter input is incorrect
• Use the antenna correctly
No picture
No colour
• Output cord incorrectly connected
• Video output mode of the unit is set
differently than the mode of the
monitor
• Output cord incorrectly connected
• Video output mode of the unit is set
differently than the mode of the
monitor
Image distortion from one
channel to another
Normal
The RCU is not working
• Batteries incorrectly inserted
• Batteries are exhausted
• Operation distance is too far or
operating angle is too large
• Remote control sensor is obstructed by
bright light
Audio sound and subtitle
cannot be chosen
Sound channel incorrectly chosen
No sound
• Mute button is pressed
• Volume is set at a low level
• Cable incorrectly connected
Sudden sound drop
• Short circuit
• Mute button is pressed
• Entering sleeping status
Seriously distorted
reception
Serious interferential status
DVBTR6_v2
- 10 -
Suggested Solution
Plug the power cord tightly into the power
outlet and switch on the power. If there still
is no power, switch off the unit again and
wait 5 to 10 min. before switching the unit
on
• Adjust the antenna or use an outdoor
antenna
• Use an antenna with a 75Ω impedance
• Set the frequency and bandwidth
correctly
• Connect the output cord correctly
• Reset the working mode
• Connect the output cord correctly
• Reset the working system
• Insert the batteries correctly
• Replace the batteries
• Operate within the range
• Place the unit in another place
Press the AUDIO button to shift the
channel
• Cancel the mute
• Augment the volume
• Connect the cable correctly
• Connect the output cable correctly and
reopen the unit
• Cancel the mute
• Reopen the unit
Adjust the antenna
VELLEMAN
9. Technical Specifications
Tuner
Input Frequency Range
IF Bandwidth
Input Signal Level
RF Input Connector
Input Impedance
De-module Mode
Waveform
Demodulation
Mode
Guard Interval
Code Rate
Video, Audio Code
Video Decode
Video Resolution
Video Code Rate
Teletext
Audio Decode
Audio Track
Audio Sample Rate
Power Specifications
Power Input
Power Consumption
Environment Requirements
Working Temperature Range
Working Humidity Range
Others
Weight
Dimensions
174 ~ 230MHz; 470 ~ 862MHz
7 or 8MHz
-72 ~ -20dBm
IEC169-2 type, female
75Ω
COFDM (Code Orthogonal Frequency Division Multiplexing)
QPSK, QAM16, QAM64, QAM32
2K, 8K
1/4, 1/8, 1/16, 1/32
1/2, 2/3, 3/4, 5/6, 7/8
ISO/IEC13818-2 MPEG2 compatible
720 x 576
max. 15Mbits/s
support DVB-TXTETSI/EN300472
ISO/IEC13818-3
stereo, left ch, right ch
32, 44.1, 48KHz
+12~+24VDC
≤ 15W
-15°C ~ 65°C
≤ 90%
< 1.5kg
330 x 83 x 215mm
For more info concerning this product, please visit our website www.velleman.eu.
The information in this manual is subject to change without prior notice.
DVBTR6 – DVB-T-ONTVANGER VOOR MOBIEL GEBRUIK
1. Inleiding en kenmerken
Aan alle ingezetenen van de Europese Unie
Belangrijke milieu-informatie betreffende dit product
Dit symbool op het toestel of de verpakking geeft aan dat, als het na zijn levenscyclus wordt weggeworpen,
dit toestel schade kan toebrengen aan het milieu.
Gooi dit toestel (en eventuele batterijen) niet bij het gewone huishoudelijke afval; het moet bij een
gespecialiseerd bedrijf terechtkomen voor recyclage.
U moet dit toestel naar uw verdeler of naar een lokaal recyclagepunt brengen.
Respecteer de plaatselijke milieuwetgeving.
Hebt u vragen, contacteer dan de plaatselijke autoriteiten inzake verwijdering.
Dank u voor uw aankoop! Lees deze handleiding grondig voor u het toestel in gebruik neemt. Werd het toestel
beschadigd tijdens het transport, installeer het dan niet en raadpleeg uw dealer. Inhoud: 1 x DVB-T-ontvanger, 1 x
afstandsbediening, 1 x knoopcelbatterij, 1 x voedingskabel, 1 x A/V-kabel, 1 x kabel voor afstandsbediening,
montageaccessoires en deze handleiding.
DVBTR6_v2
- 11 -
VELLEMAN
Kenmerken:
•
•
•
•
•
•
•
•
•
•
•
•
•
•
•
MPEG-2/DVB-T compatibel
true diversity-ontvanger voor een optimale ontvangst tijdens verplaatsing
optionele 7MHz bandbreedte, 8MHz autoscan
autoherstel bij stroomonderbreking
meertalige ondertiteling (indien ondersteund)
manuele/auto/NIT scanmodi
OSD- & VBI-uitgang
RCA A/V-uitgang
SCPC/MCPC compatibel
EPG (indien ondersteund)
gebruikersvriendelijke interface
4 video-uitgangen voor een simultane aansluiting naar 4 monitoren
A/V-ingang voor vcd en dvd
hifi stereo-uitgang, numerieke 32-bits processing
aanvaardt antenne met voeding (5VDC)
2. Veiligheidsinstructies
• De garantie geldt niet voor schade door het negeren van bepaalde richtlijnen in deze handleiding en uw dealer zal
de verantwoordelijkheid afwijzen voor defecten of problemen die hier rechtstreeks verband mee houden.
• Open de DVB-T-ontvanger niet om elektroshocks te vermijden. De gebruiker mag geen onderdelen vervangen.
Laat dit toestel onderhouden door een ervaren technicus.
• Bescherm de ontvanger tegen regen en vochtigheid, stoom, gas en stof.
• Overschrijd nooit de spanningen vermeld in deze handleiding.
• Gebruik dit toestel niet terwijl u het voertuig bestuurt.
• Schakel het toestel uit wanneer u het niet gebruikt.
• Laat de ventilatieopeningen vrij om een goede ventilatie te garanderen.
• Gebruik enkel accessoires die door de fabrikant zijn goedgekeurd.
• Schakel het toestel uit en ontkoppel elke voedingsbron alvorens onderhoudswerkzaamheden uit te voeren. Maak
het toestel geregeld schoon met een vochtige, niet pluizende doek. Gebruik geen alcohol of solvent.
• Schade door wijzigingen die de gebruiker heeft aangebracht aan het toestel vallen niet onder de garantie.
• Houd dit toestel uit de buurt van kinderen en onbevoegden.
3. Installatie en aansluiting van de antenne
• Binnenantenne
Reinig de twee gedeeltes en maak ze
Breng de twee strips op de antenne
vet- en stofvrij.
aan.
U kunt de antenne ook op een zijruit van het voertuig
aanbrengen.
Kleef de antenne zodat het grijze oppervlak van de
achterruit vrij blijft.
DVBTR6_v2
Reinig het gedeelte van de achterruit
waar u de antenne wenst aan te
brengen.
- 12 -
VELLEMAN
• Magnetische buitenantenne
De buitenantenne kan op verscheidene plaatsen worden aangebracht, afhankelijk van het type wagen.
4. Basisaansluiting
• Deze antennes moeten niet op een voeding
worden aangesloten.
• Geel = 12 ~ 24V vaste aansluiting – mag ook
aan rood verbonden worden.
• Rood = 12V na startcontact.
• Zwart = massa.
5. Omschrijving
• Achterpaneel
1. voedingsingang
2. ingang afstandbediening
3. IR-ingang
4. audio-ingang rechts
5. audio-uitgang rechts
6. video-uitgang
7. video-uitgang
8. ingang antenne 1
9. ingang antenne 2
10. video-uitgang
11. video-uitgang
12. audio-uitgang links
13. audio-ingang links
14. video-ingang
DVBTR6_v2
- 13 -
VELLEMAN
• Afstandsbediening
1. MUTE-toets
2. cijfertoetsen
3. Electronic Program Guide
4. INFO-toets
5. VOL –-toets
6. A/V IN-toets
7. MENU-toets
8. MODE-toets
9. SUB-toets (ondertiteling)
10. TTX-toets (teletekst)
11. F2-toets
12. F1-toets
13. power on/off
14. LAST-toets
15. AUDIO-toets
16. PAGE omhoog
17. CH+-toets
18. PAGE omlaag
19. ENTER-toets
20. VOL +-toets
21. CH –
22. EXIT-toets
23. TV/R-toets
24. F5-toets
25. F3-toets
26. F4-toets
6. Gebruik
Hoofdmenu (Main Menu)
Druk op de MENU toets om het hoofdmenu te laten verschijnen. Er zijn 4 submenu’s:
• Service
• Scan
• Setup
• EPG
Druk op
om een submenu te selecteren, druk op OK om te bevestigen. Druk op EXIT om naar het hoofdmenu
terug te keren.
OPMERKING: Druk op de EXIT knop om naar het vorige niveau terug te keren. Druk herhaaldelijk op de knop om
het hoofdmenu te verlaten.
Sneltoetsen:
EPG: EPG-informatie over het huidige kanaal.
TTX: Verschijnt er geen menu op het scherm, druk dan op deze knop om de teletekstinformatie weer te geven.
SUB: Kies een andere OSD-taal. Verwijder de ondertiteling met behulp van deze knop.
INFO: Druk op deze knop om informatie over het huidige kanaal weer te geven.
SETUP: Begeef u in het Set-upmenu.
ROOD, GROEN, GEEL, BLAUW: Functie.
LAST: Keer terug naar het laatste kanaal.
MODE: Kies tussen 4:3/Frame, 4:3/LetterBox, 4:3/Pan&Scan en 16:9.
AUDIO: Schakel tussen het linker en het rechter audiokanaal.
STANDBY: Schakel de stand-by in, druk opnieuw om deze uit te schakelen.
Service
Dit venster geeft een lijst met programma’s weer. Druk op de TV/R knop om te wisselen tussen televisie en radio.
Druk op de PG- of de PG+ knop om de vorige of de volgende pagina te bekijken. U kunt tot 600 kanalen opslaan.
Druk ▲▼om het programma te kiezen en druk daarna op OK. De informatie wordt in een informatievenstertje
weergegeven. Druk op de TV/R knop om van televisie naar radio over te schakelen.
DVBTR6_v2
- 14 -
VELLEMAN
Een programma toevoegen aan de favorieten
Er zijn vier gekleurde knoppen onderaan het scherm.
Deze zijn de favorieten: News (Nieuws - ROOD), Movie
(Film - GROEN), Sports (Sport - GEEL) and Music
(Muziek - BLAUW).
Druk op de ▲▼knop om het programma te kiezen.
Druk op een gekleurde knop om een programma aan
de lijst toe te voegen. Er verschijnt een icoontje rechts
op het scherm. Druk op de knop om het programma uit
de lijst te verwijderen. Het icoontje verdwijnt.
Verschijnt er geen menu op het scherm, druk dan op
een gekleurde knop om het programma weer te geven.
Druk op de WITTE knop om het gekozen favoriete
programma te verplaatsen. Druk ▲▼ om het
programma te selecteren, druk de WITTE knop om scherp te stellen en gebruik de ▲▼knop om het programma
naar boven of naar onderen te verplaatsen. Druk op OK om te bevestigen.
Een programma bewerken
Wanneer er geen menu op het scherm verschijnt, druk op de OK knop om de programmalijst weer te geven. Er
verschijnen drie gekleurde knoppen onderaan het scherm: Move (Verplaatsen - ROOD), Lock (Vergrendelen GROEN) and Delete (Verwijderen – GEEL).
Druk op de RODE knop om het programma te verplaatsen. Druk op de ▲▼knop om uw programma te selecteren.
Druk opnieuw op de RODE knop om scherp te stellen en gebruik de ▲▼knop om het programma naar boven of
naar onderen te verplaatsen. Druk op OK om te bevestigen.
Druk op de GROENE knop om het programma vast te zetten. Druk op de ▲▼knop om uw programma te selecteren.
Druk op de GROENE knop en geef de correcte pincode in door middel van de numerieke knop. Druk op OK om te
bevestigen. Er verschijnt een icoontje naast het desbetreffende kanaal. Verwijder de vergrendeling door opnieuw op
de GROENE knop en de correcte pincode in te geven. Het icoontje verdwijnt. De standaardcode is “0000”.
Druk op de GELE knop om het programma te verwijderen. Druk op de ▲▼knop om het programma te selecteren.
Druk opnieuw op de GELE knop. Er verschijnt “Delete?” op het scherm. Druk op OK om te bevestigen. Druk op EXIT
om te wissen en het scherm te verlaten.
Scan
Scan het kanaal vanaf het submenu:
• Scan Type: Manual Scan (manueel), Auto Scan (automatisch), en
NIT Scan.
• Channel: Geef het kanaalnummer in aan de hand van de
numerieke toetsen op de afstandsbediening.
• Update Mode: Append (het nieuwe kanaal wordt aan het laatste
kanaal in de lijst toegevoegd), Replace (alle kanalen worden
vervangen).
OPMERKING: Wanneer het ►icoon verschijnt, druk op de ► knop op de afstandsbediening. Er verschijnt een
optievenster. Druk op de ▲▼knop om de optie naar voren te halen en druk op OK om te bevestigen.
Druk op de ◄ knop om het venster te verlaten zonder wijzigingen.
Manual Scan (Manueel scanproces)
Selecteer het Manueel Scanproces, geef het correcte kanaalnummer in
en kies de aangepaste bandbreedte en “Update Mode”. Druk op OK.
“Please Wait…” verschijnt in een venster. Het scanproces begint. Druk op
de EXIT knop om te verlaten. Na het scanproces geeft het scherm “N
service found” (N = aantal gescande kanalen) weer. Druk op de EXIT
knop om te verlaten.
DVBTR6_v2
- 15 -
VELLEMAN
Auto Scan (Automatische scan)
Selecteer automatische scan, kies een “Update Mode” en
druk op OK. Er verschijnt “Scan Process” in een venster. Het
scanproces begint. Druk op de EXIT knop om te verlaten.
Het venster geeft het percentage van het scanproces weer.
De televisie- en radiokanalen worden in twee kolommen
weergegeven.
Na het scanproces geeft het scherm “N service found” (N =
aantal gescande kanalen) weer. Druk op de EXIT knop om te
verlaten.
NIT Scan
Selecteer NIT Scan, geef het correcte kanaalnummer in en selecteer de aangepaste bandbreedte en “Update Mode”.
Druk vervolgens op OK. “Please Wait…” verschijnt in een venster. Het scanproces begint. Druk op de EXIT knop om
het venster te verlaten. Na het scanproces verschijnt er “N service found” (N = aantal gescande kanalen) op het
scherm. Druk op de EXIT knop om te verlaten.
OPMERKING: Schakel het systeem niet uit onmiddellijk na het scanproces.
Set-up
Er zijn 7 submenu’s:
•
•
•
•
•
•
•
•
AV Setup (Instellen AV)
Language Setup (Instellen Taal)
Time Setup (Instellen Tijd)
Password Setup (Instellen Paswoord)
Factory Restore (Fabrieksinstellingen)
Booking List (Boekinglijst)
Antenna Supply (Antenne)
Version (Versie)
AV instellen
Kies tussen volgende set-ups:
• TV Shape: 4:3 Letter Box / 16:9 Pan & Scan / 4:3 Full Frame / 16:9
• Output (Uitgang): RGB / CVBS
• Audio Track: Stereo / Left (Links) / Right (Rechts)
De taal instellen
Menu: English (Engels) / French (Frans) / German (Duits) / Spanish (Spaans)
Time Setup (Instellen Tijd)
• Time Zone (Tijdzone): GMT -11 ~ GMT +11
• Sleep Time (Slaapfunctie): No Time (Geen Tijd) / 5 Mins / 10
Mins / 20 Mins / 30 Mins / 60Mins
• Summertime (Zomertijd): Kies ON / OFF om de zomerfunctie
in of uit te schakelen.
DVBTR6_v2
- 16 -
VELLEMAN
Password Setup (Instellen Paswoord)
Gebruik de numerieke toetsen en geef het oude paswoord in.
Geef daarna het nieuwe password in en bevestig deze. Druk op
OK. Het nieuwe paswoord is nu geactiveerd.
Factory Restore (Fabrieksinstellingen)
Kies de optie Fabrieksinstellingen en druk op de OK knop. Er verschijnt “Factory Restore” in een venstertje. Druk op
de OK knop om te bevestigen. Druk op EXIT om te verlaten.
Herstel de fabrieksinstellingen wanneer u dit apparaat voor het eerst in gebruik neemt of wanneer de software
geüpdatet werd.
Booking List (Boekinglijst)
Kies de optie Boekinglijst en druk op OK. Het scherm geeft volgende programma-informatie weer:
•
•
•
•
Channel Number (Kanaalnummer)
Channel List (Kanaallijst)
Play Time (Afspeeltijd)
Event Time (Tijd Gebeurtenis)
Druk op
om het geselecteerde boekingsprogramma te verwijderen.
Antenna Supply (Voeding Antenne)
Kies ON / OFF om de 5V antennevoeding aan te sturen.
Electronic Program Guide (EPG)
Selecteer EPG in het hoofdmenu om u in het EPG-menu te begeven.
knop om de gebeurtenis te selecteren, gebruik de knop om door te nemen en gebruik de knop
Gebruik de
om een programma te boeken. Druk op de OK knop om detailinformatie weer te geven. Druk op de EXIT knop om te
verlaten. Het geregistreerde programma wordt in de boekinglijst weergegeven in het set-upmenu.
DVBTR6_v2
- 17 -
VELLEMAN
7. Menu
Hoofdmenu
Service
Submenu
TV Service / Radio Service
Scan Type
Scan
Channel
Update Mode
Optie
TV / Radio
Lock
Move
News (Red)
Movie (Green)
Sports (Yellow)
Music (Blue)
Manual Scan
Auto Scan
NIT Scan
Channel
Append
Replace
TV Shape
Hoofdmenu
AV Setup
Output
Audio Track
Setup
Language Setup
Menu
Time Zone
Time Setup
Sleep Time
Summer Time
Setup
Password Setup
Factory Restore
Booking List
Antenna Supply
Hoofdmenu
EPG
DVBTR6_v2
4:3 Letter Box
4:3 Pan & Scan
4:3 Full Frame
16:9
RGB
CVBS
Stereo
Left
Track
English
French
German
Spanish
GMT-11~GMT+11
No Sleep
5 min.
10 min.
20 min.
30 min.
60 min.
On
Off
5V Switch
Software Version
Events
Browse
Booking
Detail Info
Exit
- 18 -
On
Off
Omschrijving
TV / Radio
Vergrendelen
Verplaatsen
Favoriet: Nieuws
Favoriet: Film
Favoriet: Sport
Favoriet: Muziek
Manueel scanproces
Automatische scan
NIT scan
Toevoegen
Vervangen
4:3 Letter Box
4:3 Pan & Scan
4:3 Full Frame
16:9 Full Frame
RGB
CVBS
Stereo
Linkerkanaal
Rechterkanaal
Engels
Frans
Duits
Spaans
Tijdzone
Geen slaapfunctie
5 min.
10 min.
20 min.
30 min.
60 min.
Zomertijd aan
Zomertijd uit
Set-up paswoord
Fabrieksinstelling
Boekinglijst
Voeding aan
Voeding uit
Softwareversie
Gebeurtenissen
Doornemen
Boeking
Detailinformatie
Verlaten
VELLEMAN
8. Problemen en oplossingen
Soms kan een eenvoudige controle of een kleine aanpassing het probleem uit de weg helpen en een juiste werking
herstellen. Laat het toestel nakijken door een geschoolde technicus.
Houd het toestel tijdens het onderhoud uit de buurt van statische elektriciteit. De videoprocessor is zeer gevoelig.
Probleem
Geen energie
Scant het programma niet
Geen beeld
Geen kleur
Mogelijke oorzaak
Oplossing
Sluit de kabel goed aan en schakel het
De voedingskabel is niet goed op het net toestel in. Is er nog steeds geen voeding,
aangesloten
schakel het toestel uit en wacht een 10-tal
minuten voor u het toestel terug inschakelt
• Regel de antenne of gebruik een
antenne voor buitenshuis gebruik
• Antenne is niet goed geregeld
• Gebruik een antenne met een
• Parameters niet correct ingesteld
impedantie van 75Ω
• Fout gebruik van de antenne
• Stel de frequentie en de brandbreedte
correct in
• Kabel niet goed aangesloten
• Sluit de kabel correct aan
• Video is niet in overeenstemming met
• Herstel het systeem
de monitor ingesteld
• Kabel is niet goed aangesloten
• Sluit de kabel correct aan
• Video is niet in overeenstemming met
• Herstel het systeem
de monitor ingesteld
Beeldvervorming van een
kanaal naar het andere
Normaal
Afstandsbediening werkt
niet
• Batterijen niet goed geplaatst
• Batterijen zijn opgebruikt
• Bereik is overschreden of hoek is te
groot
• De sensor wordt door fel licht
verhinderd
• Plaats de batterijen correct
• Vervang de batterijen
• Verklein de afstand tussen
afstandsbediening en toestel
• Verplaats het toestel
Audio en ondertiteling
kunnen niet geselecteerd
worden
Foute keuze bij het klankkanaal
Druk op de AUDIO knop om van kanaal te
schakelen
Geen klank
• Mute knop is ingedrukt
• Volume staat op een laag niveau
• Kabel niet goed aangesloten
Plotselinge daling van het
volume
• Kortsluiting
• Mute knop is ingedrukt
• Slaapfunctie wordt geactiveerd
Zwaar vervormde
ontvangst
Zware storing
• Druk op de mute knop
• Verhoog het volume
• Sluit de kabel goed aan
• Sluit de kabel correct aan en heropen
het toestel
• Druk op de mute knop
• Heropen het toestel
Regel de antenne
9. Technische specificaties
Ontvanger
Frequentie
IF bandbreedte
Niveau ingangssignaal
RF ingangsaansluiting
Impedantie ingang
DVBTR6_v2
174 ~ 230MHz; 470 ~ 862MHz
7 of 8MHz
-72 ~ -20dBm
IEC169-2 type, vrouwelijk
75Ω
- 19 -
VELLEMAN
Demodulatie
Golfvorm
Modulatiemethode
Modus
Frequentie-interval
Code rate
Video- en audiocode
Videodecodering
Videoresolutie
Video Code Rate
Teletekst
Audiodecodering
Audiospoor
Audio sample rate
Eigenschappen voeding
Voeding
Verbruik
Vereisten
Werktemperatuur
Vochtigheidsgraad
Andere
Gewicht
Afmetingen
COFDM (Code Orthogonal Frequency Division Multiplexing)
QPSK, QAM16, QAM64, QAM32
2K, 8K
1/4, 1/8, 1/16, 1/32
1/2, 2/3, 3/4, 5/6, 7/8
ISO/IEC13818-2 MPEG2 compatibel
720 x 576
max. 15Mbits/s
ondersteunt DVB-TXTETSI/EN300472
ISO/IEC13818-3
stereo, kanaal links, kanaal rechts
32, 44.1, 48KHz
+12~+24VDC
≤ 15W
-15°C ~ 65°C
≤ 90%
< 1.5kg
330 x 83 x 215mm
Voor meer informatie omtrent dit product, zie www.velleman.eu.
De informatie in deze handleiding kan te allen tijde worden gewijzigd zonder voorafgaande kennisgeving.
DVBTR6 – RÉCEPTEUR TNT POUR USAGE MOBILE
1. Introduction et caractéristiques
Aux résidents de l'Union européenne
Des informations environnementales importantes concernant ce produit
Ce symbole sur l'appareil ou l'emballage indique que l’élimination d’un appareil en fin de vie peut polluer
l'environnement.
Ne pas jeter un appareil électrique ou électronique (et des piles éventuelles) parmi les déchets municipaux
non sujets au tri sélectif ; une déchèterie traitera l’appareil en question.
Renvoyer les équipements usagés à votre fournisseur ou à un service de recyclage local.
Il convient de respecter la réglementation locale relative à la protection de l’environnement.
En cas de questions, contacter les autorités locales pour élimination.
Nous vous remercions de votre achat ! Lire la présente notice attentivement avant la mise en service de l’appareil. Si
l’appareil a été endommagé pendant le transport, ne pas l’installer et consulter votre revendeur. Contenu : 1 x
récepteur TNT, 1 x télécommande, 1 x pile bouton, 1 x cordon d’alimentation, 1 x câble A/V, 1 x câble de connexion
pour la télécommande, accessoires de montage et cette notice.
Caractéristiques :
•
•
•
•
•
•
•
compatible MPEG-2/DVB-T
récepteur « true diversity » assurant une réception optimale pendant le déplacement
largeur de bande 7MHz optionnelle, balayage automatique 8MHz
rétablissement automatique en cas de coupure de tension
sous-titrage multilingue (si disponible)
modes de balayage manuel/auto/NIT
sortie OSD & VBI
DVBTR6_v2
- 20 -
VELLEMAN
•
•
•
•
•
•
•
•
sortie A/V RCA
compatible SCPC/MCPC
EPG (si disponible)
interface conviviale
4 sorties vidéo pour un raccordement simultané de 4 moniteurs
entrée A/V pour VCD et DVD
sortie stéréo hi-fi, traitement numérique 32 bits
accepte une antenne alimentée (5VCC)
2. Prescriptions de sécurité
• La garantie ne s’applique pas aux dommages survenus en négligeant certaines directives de cette notice et votre
revendeur déclinera toute responsabilité pour les problèmes et les défauts qui en résultent.
• Ne pas ouvrir le récepteur TNT afin d’éviter les risques d’électrochocs. Il n’y a aucune pièce maintenable par
l’utilisateur. Confier la maintenance de l’appareil à un technicien qualifié.
• Protéger l’appareil de la pluie et de l’humidité, de la vapeur, de gaz et de la poussière.
• Respecter les tensions mentionnées dans cette notice.
• E pas utiliser le récepteur TNT pendant la conduite d’un véhicule.
• Éteindre l’appareil lorsqu’il n’est pas utilisé.
• Ne pas obstruer les fentes de ventilation. Garantir une ventilation adéquate.
• N’utiliser que des accessoires qui ont été recommandés par le fabricant.
• Éteindre l’appareil et déconnecter toute source d’alimentation avant la maintenance de l’appareil. Essuyer
l’appareil régulièrement avec un chiffon humide non pelucheux. Éviter l’usage d’alcool et de solvants.
• Les dommages occasionnés par des modifications à l’appareil par le client, ne tombent pas sous la garantie.
• Garder votre DVBTR6 hors de la portée de personnes non qualifiées et de jeunes enfants.
3. Installation et raccordement de l’antenne
• Antenne appliquée sur vitre
Nettoyer les deux parties et veiller à
ce qu’elles soient entièrement
propres.
Appliquer les deux bandes sur
l’antenne.
L’antenne peut également être appliquée sur une vitre
latérale.
Fixer l’antenne de manière à laisser le champ de vision
(gris) libre.
DVBTR6_v2
Nettoyer la vitre arrière là où
l’antenne sera appliquée.
- 21 -
VELLEMAN
• Antenne magnétique
Appliquer l’antenne magnétique sur un endroit approprié (selon le modèle de véhicule).
4. Raccordement de base
• Ne pas connecter ces antennes à une
alimentation.
• Jaune = connexion fixe 12 ~ 24V – peut
également être connecté au conducteur rouge.
• Rouge = 12V après contact d’allumage.
• Noir = masse.
5. Description
• Panneau arrière
1. entrée d’alimentation
2. entrée de la télécommande
3. entrée IR
4. entrée audio droit
5. sortie audio droit
6. sortie vidéo
7. sortie vidéo
8. entrée antenne 1
9. entrée antenne 2
10. sortie vidéo
11. sortie vidéo
12. sortie audio gauche
13. entrée audio gauche
14. entrée vidéo
DVBTR6_v2
- 22 -
VELLEMAN
• Télécommande
1. touche MUTE
2. touches numériques
3. Electronic Program Guide
4. touche INFO
5. touche VOL –
6. touche A/V IN
7. touche MENU
8. touche MODE
9. touche SUB (sous-titrage)
10. touche TTX (télétexte)
11. touche F2
12. touche F1
13. power on/off
14. touche LAST
15. touche AUDIO
16. PAGE haut
17. touche CH+
18. PAGE bas
19. touche ENTER
20. touche VOL +
21. touche CH –
22. touche EXIT
23. touche TV/R
24. touche F5
25. touche F3
26. touche F4
6. Emploi
Menu principal
Enfoncez la touche MENU pour faire apparaître le menu principal. Il y a 4 sous-menus:
• Service
• Scan
• Réglage
• GPE
Enfoncez
pour sélectionner un sous-menu, enfoncez la touche OK pour confirmer. Enfoncez la touche SORT
pour revenir au menu principal.
REMARQUE: Enfoncez la touche SORT pour remonter un niveau. Enfoncez la touche à plusieurs reprises pour
quitter le menu principal.
Touches de raccourci :
GPE: Information GPE concernant le canal actuel.
TTX: Si aucun menu n’apparaît, enfoncez cette touche pour afficher l’information télétexte.
SUB: Choisissez une autre langue OSD. Effacez le sous-titrage à l’aide de cette touche.
INFO: Enfoncez cette touche pour afficher l’information concernant le canal actuel.
REGLAGE: Entrez dans le menu de réglage.
ROUGE, VERT, JAUNE, BLEU: Fonction.
DERNIER: Revenez vers le dernier canal.
MODE: Choix entre 4:3/Frame, 4:3/LetterBox, 4:3/Pan&Scan en 16:9.
AUDIO: Passez du canal audio gauche au canal audio droit.
VEILLE: Enclenchez le mode veille, renfoncez pour le supprimer.
DVBTR6_v2
- 23 -
VELLEMAN
Service
Cette fenêtre affiche la liste des services. Enfoncez la touche TV/R pour passer de la télévision à la radio. Enfoncez
la touche PG- ou la touche PG+ pour visionner la page précédente ou la page suivante. Il est possible de
sauvegarder jusqu’à 600 canaux. Enfoncez la touche ▲▼pour choisir le service. Ensuite, enfoncez la touche OK.
L’information est affichée dans une fenêtre. Enfoncez la touche TV/R pour passer de la radio à la télévision.
Ajouter un service aux favoris
Il y a quatre boutons colorés situés en bas de l’écran.
Ces boutons représentent les favoris: Infos, (ROUGE),
Films (VERT), Sport (JAUNE) et Musique (BLEU).
Enfoncez la touche ▲▼pour choisir le service.
Enfoncez une touche colorée pour ajouter un service à
la liste. Un icône apparaît à la droite de l’écran.
Enfoncez la touche pour effacer le service de la liste.
L’icône disparaît.
Si aucun menu n’apparaît à l’écran, enfoncez une
touche colorée pour afficher le service. Enfoncez la
touche BLANCHE pour déplacer le service favori.
Enfoncez la touche ▲▼ pour sélectionner le service,
enfoncez la touche BLANCHE pour mettre au point et
utilisez la touche ▲▼pour déplacer le service vers le haut ou vers le bas. Enfoncez la touche OK pour confirmer.
Editer un service
Si aucun menu n’apparaît à l’écran, enfoncez la touche OK pour affiche rune liste des services. Trois boutons
colorés apparaissent en bas de l’écran: Déplacer (ROUGE), Verrouiller (VERT) et Supprimer (JAUNE).
Enfoncez la touche ROUGE pour déplacer le service. Enfoncez la touche ▲▼pour sélectionner le service.
Renfoncez la touche ROUGE pour mettre au point et utilisez la touche ▲▼pour déplacer le service vers le haut ou
vers la bas. Enfoncez la touche OK pour confirmer.
Enfoncez la touche VERTE pour verrouiller le service. Enfoncez la touche ▲▼pour sélectionner votre service
Enfoncez la touche VERTE et entrez le code confidentiel à l’aide de la touche numérique. Enfoncez la touche OK pour
confirmer. L’icône apparaît à côté du canal en question. Déverrouillez en renfonçant la touche VERTE et en entrant
le code confidentiel. L’icône disparaît. Le code par défaut est “0000”.
Enfoncez la touche JAUNE pour effacer le service. Enfoncez la touche ▲▼pour sélectionner le service. Renfoncez
la touche JAUNE. La mention “Supprimer?” apparaît à ‘écran. Enfoncez la touche OK pour confirmer. Enfoncez la
touche EXIT pour effacer et pour quitter l’écran.
Scan
Balayez le canal à partir du sous-menu:
• Type scan: Scan Manuel, Scan Automatique et Scan
NIT.
• Canal: Entrez le numéro du canal à l’aide des touches
numériques sur la commande à distance.
• Mise à jour: Ajouter (le nouveau canal est ajouté au
dernier canal dans la liste), Remplacer (tous les canaux
sont remplacés).
REMARQUE: Enfoncez la touche ► sur la commande à distance dès l’apparition de l’icône ►. Une fenêtre
d’options apparaît. Enfoncez la touche ▲▼pour mettre en exergue l’option et enfoncez la touche OK
pour confirmer. Enfoncez la touche ◄ pour quitter la fenêtre sans modifications.
DVBTR6_v2
- 24 -
VELLEMAN
Scan Manuel
Sélectionnez le balayage manuel, entrez le numéro du canal et
choisissez la largeur de bande appropriée et “Mise à jour”. Enfoncez la
touche OK. La mention “Patientez…” apparaît dans une fenêtre. Le
balayage se met en marche. Enfoncez la touche SORT pour quitter.
Après le balayage, l’écran affiche la mention “N svce trouvé” (N =
nombre de canaux balayés). Enfoncez la touche SORT pour quitter.
Scan Automatique
Sélectionnez le balayage automatique, choisissez un “Mise à
jour” et enfoncez la touche OK. La mention “Processus Scan”
apparaît dans une fenêtre. Le balayage se met en marche.
Enfoncez la touche SORT pour quitter.
La fenêtre affiche le pourcentage du balayage. Les canaux
de télévision ou de radio sont divisés en deux colonnes.
Après le balayage, l’écran affiche la mention “N svce trouvé”
(N = nombre de canaux balayés). Enfoncez la touche SORT
pour quitter.
Scan NIT
Sélectionnez le balayage NIT, entrez le numéro du canal et sélectionnez la largeur de bande et le “Mise à jour”.
Ensuite, enfoncez la touche OK. LA mention “Patientez…” apparaît dans une fenêtre. Le balayage se met en
marche. Enfoncez la touche SORT pour quitter la fenêtre. Après le balayage, l’écran affiche la mention “N svce
trouvé” (N = nombre de canaux balayés). Enfoncez la touche SORT pour quitter.
REMARQUE: Ne débranchez pas le système immédiatement après le balayage.
Réglage
Il y a 7 sous-menus:
•
•
•
•
•
•
•
•
Réglage AV
Réglage langue
Réglage heure
Réglage mdp
Réglage usine
Liste Prog.
Alimentation de l’antenne
Version
Réglage AV
Choix entre les configurations suivantes:
• Format TV: 4:3 LetterBox (Apparition de bandes noires) / 16:9 Pan & Scan / 4:3 Plein Ecran / 16:9
• Sortie: RGB / CVBS
• Piste Audio: Stéréo / Gauche / Droite
Réglage langue
Menu: Anglais / Français / Allemand / Espagnol
DVBTR6_v2
- 25 -
VELLEMAN
Réglage heure
• Fuseau Horaire: GMT -11 ~ GMT +11
• Heure veille: Pas d’heure / 5 Mins / 10 Mins / 20 Mins / 30
Mins / 60Mins
• Heure d’été: Choisissez ON / OFF pour enclencher ou
déclencher la fonction
Réglage mdp (mot de passe)
Entrez l’ancien mot de passe à l’aide des touches numériques.
Ensuite, entrez le nouveau mot de passé et confirmez-le.
Enfoncez la touche OK. Le nouveau mot de passe est activé.
Réglages usine
Choisissez cette option et enfoncez la touche OK. La mention “Factory Restore” apparaît dans une fenêtre. Enfoncez
la touche OK pour confirmer. Enfoncez la touche SORT pour quitter.
Réinstaurez les réglages d’usine si vous utilisez cet appareil pour la première fois ou si le logiciel a été mis à jour.
Liste Prog.
Choisissez cette option et enfoncez la touche OK. L’information suivante apparaît à l’écran:
•
•
•
•
Numéro du canal
Liste canaux
Durée de reproduction
Durée de l’évènement
Enfoncez
pour effacer le service sélectionné.
Alimentation de l’antenne
Choisissez ON / OFF pour contrôler l’alimentation 5V.
Guide de Programme Electronique (GPE)
Sélectionnez GPE dans le menu principal pour vous rendre dans le menu GPE.
Utilisez la touche
pour sélectionner un évènement, utilisez la touche pour fureter et utilisez la touche pour
consigner un service. Enfoncez la touche OK pour afficher l’information détaillée. Enfoncez la touche SORTIE pour
quitter. Le service enregistré est affiché dans la liste d’enregistrements dans le menu de configuration.
DVBTR6_v2
- 26 -
VELLEMAN
7. Menu
Menu
principal
Service
Sous-menu
Service TV / Radio
Type scan
Scan
Canal
Mise à jour
TV / Radio
Verr
Déplacer
Infos (Rouge)
Films (Vert)
Sport (Jaune)
Musique (Bleu)
Scan manuel
Réglage AV
Scan NIT
Canal
Ajouter
Remplacer
Sortie
Piste audio
Réglage langue
Menu
Fuseau horaire
Réglage
Réglage heure
Heure veille
Heure d’été
4:3 LetterBox
4:3 Pan & Scan
4:3 Full Frame
16:9
RGB
CVBS
Stéréo
Gauche
Droite
Anglais
Français
Allemand
Espagnol
GMT-11~GMT+11
No Sleep
5 min.
10 min.
20 min.
30 min.
60 min.
On
Off
Réglage mdp
Réglages usine
Liste Prog.
Alimentation de l’antenne
GPE
DVBTR6_v2
Interrupteur 5V
Version
Even.
Parcour.
Program
Détails
Sortie
- 27 -
Description
TV / Radio
Verrouiller
Déplacer
Favori: Informations
Favori: Films
Favori: Sport
Favori: Musique
Balayage manuel
Balayage
automatique
Balayage NIT
Scan automatique
Format TV
M
E
N
U
P
R
I
N
C
I
P
A
L
Option
On
Off
Ajouter
Remplacer
4:3 Bandes noires
4:3 Pan & Scan
4:3 Plein écran
16:9 Plein écran
RGB
CVBS
Stéréo
Canal gauche
Canal droit
Anglais
Français
Allemand
Espagnol
Fuseau horaire
Pas de veille
5 min.
10 min.
20 min.
30 min.
60 min.
Heure d’été marche
Heure d’été arrêt
Mot de passe
Réglages d’usine
Liste des programmes
Alimentation marche
Alimentation arrêt
Version du logiciel
Evènements
Parcourir
Programmes
Info détails
Quitter
VELLEMAN
8. Problèmes et solutions
Un simple contrôle ou un petit ajustement peut parfois résoudre un problème et rétablir le bon fonctionnement de
l’appareil. Faites contrôler l’appareil par un technicien qualifié.
Tenez l’appareil à l’écart d’électricité statique pendant la manutention. Le vidéo-processeur peut s’endommager
facilement.
Problème
Cause possible
Pas d’alimentation
Le cordon d’alimentation est mal
branché
Pas de balayage
• L’antenne est mal réglée
• Configuration incorrecte des
paramètres
• Usage incorrect de l’antenne
Pas d’image
Image en noir et blanc
• Câble mal branché
• La vidéo n’est pas en concordance
avec le moniteur
• Câble mal branché
• La vidéo n’est pas en concordance
avec le moniteur
Distorsion de l’image en
Normal
passant d’un canal à l’autre
• Piles mal insérées
• Piles sont usées
Commande à distance ne
• Portée dépassée ou angle trop
fonctionne pas
important
• Capteur entravé par lumière forte
Audio et sous-titrage non
Mauvais choix du canal sonore
sélectionnable
• Bouton Mute enclenché
Pas de son
• Volume trop faible
• Câble mal branché
Baisse soudaine du son
• Court-circuit
• Bouton Mute enclenché
• Fonction veille activée
Réception lourdement
parasitée
Brouillage
Solution
Branchez le câble correctement et allumez
l’appareil. Si l’alimentation n’est toujours
pas revenue, éteignez l’appareil et
patientez une dizaine de minutes avant de
le rallumer.
• Réglez l’antenne ou utilisez une antenne
d’extérieur
• Utilisez une antenne ave une impédance
de 75Ω
• Instaurez la fréquence et la largeur de
bande appropriées
• Branchez le câble correctement
• Restaurez le système
• Branchez le câble correctement
• Restaurez le système
• Insérez les piles correctement
• Remplacez les piles
• Diminuez la distance entre la commande
et l’appareil
• Déplacez l’appareil
Enfoncez la touche AUDIO pour passer de
canal
• Enfoncez la touche Mute
• Augmentez le son
• Branchez le câble correctement
• Branchez le câble correctement et
rouvrez l’appareil
• Enfoncez la touche Mute
• Rouvrez l’appareil
Réglez l’antenne
9. Spécifications techniques
Syntoniseur
Fréquence
Largeur de bande IF
Niveau signal d’entrée
Connecteur d’entrée RF
Impédance d’entrée
DVBTR6_v2
174 ~ 230MHz; 470 ~ 862MHz
7 of 8MHz
-72 ~ -20dBm
type IEC169-2, femelle
75Ω
- 28 -
VELLEMAN
Démodulation
Transmission
Signal
Mode
Intervalle de garde
Taux de poinçonnage
Décompression audio et vidéo
Décodage vidéo
Résolution vidéo
Débit de décompression vidéo
Télétexte
Décodage audio
Piste audio
Taux d’échantillonnage audio
Spécifications de l’alimentation
Alimentation
Consommation
Exigences environnementales
Température de travail
Taux d’humidité
Autres
Poids
Dimension
COFDM (Code Orthogonal Frequency Division Multiplexing)
QPSK, QAM16, QAM64, QAM32
2K, 8K
1/4, 1/8, 1/16, 1/32
1/2, 2/3, 3/4, 5/6, 7/8
compatible ISO/IEC13818-2 MPEG2
720 x 576
max. 15Mbits/s
supporte DVB-TXTETSI/EN300472
ISO/IEC13818-3
stéréo, canal gauche, canal droit
32, 44.1, 48KHz
+12~+24VCC
≤ 15W
-15°C ~ 65°C
≤ 90%
< 1.5kg
330 x 83 x 215mm
Pour plus d’information concernant cet article, visitez notre site web www.velleman.eu.
Toutes les informations présentées dans cette notice peuvent être modifiées sans notification préalable.
DVBTR6 – RECEPTOR DVB-T PARA EL USO MÓVIL
1. Introducción & Características
A los ciudadanos de la Unión Europea
Importantes informaciones sobre el medio ambiente concerniente este producto
Este símbolo en este aparato o el embalaje indica que, si tira las muestras inservibles, podrían dañar el
medio ambiente.
No tire este aparato (ni las pilas eventuales) en la basura doméstica; debe ir a una empresa especializada
en reciclaje. Devuelva este aparato a su distribuidor o a la unidad de reciclaje local.
Respete las leyes locales en relación con el medio ambiente.
Si tiene dudas, contacte con las autoridades locales para residuos.
¡Gracias por haber comprado el DVBTR! Lea atentamente las instrucciones del manual antes de usarlo. Si el
aparato ha sufrido algún daño en el transporte no lo instale y póngase en contacto con su distribuidor. Incluye: 1 x
receptor TNT, 1 x mando a distancia, 1 x pila de botón, 1 x cable de alimentación, 1 x cable A/V, 1 x cable de conexión
para el mando a distancia, accesorios de montaje y este manual del usuario.
Características:
•
•
•
•
•
•
•
•
•
•
•
compatible MPEG-2/DVB-T
receptor « true diversity » asegura una recepción óptima mientras viaja
ancho de banda 7MHz opcional, exploración automática 8MHz
recuperación automática en caso de fallo de tensión
subtítulos multilingüe (si disponible)
modos de exploración manual/auto/NIT
salida OSD & VBI
salida A/V RCA
compatible SCPC/MCPC
EPG (si disponible)
interfaz fácil de utilizar
DVBTR6_v2
- 29 -
VELLEMAN
•
•
•
•
4 salidas de vídeo para una conexión simultánea de 4 monitores
entrada A/V para VCD y DVD
salida estéreo hi-fi, tratamiento numérico de 32 bits
acepta una antena alimentada (5VCC)
2. Instrucciones de seguridad
• Daños causados por descuido de las instrucciones de seguridad de este manual invalidarán su garantía y su
distribuidor no será responsable de ningún daño u otros problemas resultantes.
• No abra el receptor DVB-T para evitar electrochoques. El usuario no habrá de efectuar el mantenimiento de
ninguna pieza. El mantenimiento debe ser realizado por personal especializado.
• No exponga este equipo a lluvia, humedad, vapor, gas y polvo.
• Respete las tensiones mencionadas en este manual del usuario.
• Nunca utilice el aparato mientras está conduciendo.
• Desactive el aparato si no lo utiliza.
• No bloquee los orificios de ventilación para garantizar una ventilación adecuada.
• Utilice sólo accesorios recomendados por el fabricante.
• Desactive el aparato y desconéctelo de la red eléctrica antes de empezar con los servicios de mantenimiento.
Limpie el aparato regularmente con un paño húmedo sin pelusas. Evite el uso de alcohol y de disolventes.
• Los daños causados por modificaciones no autorizadas, no están cubiertos por la garantía.
• Mantenga el DVBTR6 lejos del alcance de personas no capacitadas y niños.
3. Instalación y conexión de la antena
• Antena aplicada en un cristal
Limpie las dos partes y asegúrese de
Aplique las dos bandas en la antena. Limpie el cristal trasero en el lugar
que estén completamente limpias.
donde quiere aplicar la antena.
También es posible aplicar la antena en un cristal
lateral.
Fije la antena de manera que deje libre el campo visual
(gris).
• Antena magnética
Aplique la antena magnética en un lugar adecuado (según el modelo del vehículo).
DVBTR6_v2
- 30 -
VELLEMAN
4. Conexión básica
• No conecte estas antenas a una alimentación.
• Amarillo = conexión fija 12 ~ 24V – se puede
conectar también al conductor rojo.
• Rojo = 12V después del contacto de arranque.
• Negro = masa.
5. Descripción
• Panel trasero
1. entrada de alimentación
2. entrada del mando a distancia
3. entrada IR
4. entrada audio derecho
5. salida audio derecho
6. salida de vídeo
7. salida de vídeo
8. entrada antena 1
9. entrada antena 2
10. salida de vídeo
11. salida de vídeo
12. salida audio izquierdo
13. entrada audio izquierdo
14. entrada de vídeo
• Mando a distancia
1. tecla MUTE
2. teclas digitales
3. Electronic Program Guide
4. tecla INFO
5. tecla VOL –
6. tecla A/V IN
7. tecla MENU
8. tecla MODE
9. tecla SUB (subtítulos)
10. tecla TTX (teletexto)
11. tecla F2
12. tecla F1
13. alimentación ON/OFF
DVBTR6_v2
14. tecla LAST
15. tecla AUDIO
16. PAGE arriba
17. tecla CH+
18. PAGE abajo
19. tecla ENTER
20. tecla VOL +
21. tecla CH –
22. tecla EXIT
23. tecla TV/R
24. tecla F5
25. tecla F3
26. tecla F4
- 31 -
VELLEMAN
6. Uso
Pulse la tecla MENU para hacer visualizar el menú principal. Hay 4 submenús:
• Service
(Programa)
• Scan
(Exploración)
• Setup (Configuración)
• EPG
Pulse
parar seleccionar un submenú, pulse la tecla OK para confirmar. Pulse la tecla EXIT para volver al menú
principal.
OBSERVACIÓN: Pulse la tecla EXIT para volver al nivel anterior. Pulse la tecla varias veces para salirse del menú
principal.
Teclas abreviadas:
EPG: Información EPG sobre el canal actual.
TTX: Si no se visualiza ningún menú, pulse esta tecla para visualizar la información teletexto.
SUB: Seleccione otro idioma OSD. Borre el subtítulo con esta tecla.
INFO: Pulse esta tecla para visualizar la información sobre el canal actual.
SETUP: Entre en el menú de configuración.
ROJO, VERDE, AMARILLO, AZUL: Función.
LAST: Vuelva al último canal.
MODE: Selección entre 4:3/Frame, 4:3/LetterBox, 4:3/Pan&Scan y 16:9.
AUDIO: Conmute del canal de audio izquierdo al canal audio derecho.
STANDBY: Active el modo stand-by, vuelva a pulsar para desactivarlo.
Programa
Esta pantalla visualiza la lista de programas. Pulse la tecla TV/R para conmutar entre TV y radio. Pulse la tecla PGo la telca PG+ para visualizar la página anterior o la página siguiente. Es posible guardar máx. 600 canales. Pulse la
tecla ▲▼para elegir el programa. Luego, pulse la tecla OK. La información se visualiza en una pantalla. Pulse la
tecla TV/R para conmutar de la radio a TV.
Añadir un programa a los favoritos
Hay cuatro botones coloreados al final de la pantalla.
Estos botones representan los favoritos: News
(Informaciones - ROJO), Movie (película - VERDE),
Sports (deportes - AMARILLO) y Music (música AZUL).
Pulse la tecla ▲▼para seleccionar el programa. Pulse
una tecla coloreada para añadir un programa a la lista.
Un icono aparece a la derecha de la pantalla. Pulse la
tecla para borrar el programa de la lista. El icono
desaparece.
Si no se visualiza ningún menú en la pantalla, pulse
una tecla coloreada para visualizar el programa. Pulse
la tecla BLANCA para desplazar el programa favorito.
Pulse la tecla ▲▼ para seleccionar el programa, pulse la tecla BLANCA para ajustar y utilice la tecla ▲▼para
desplazar el programa hacia arriba o hacia abajo. Pulse la tecla OK para confirmar.
DVBTR6_v2
- 32 -
VELLEMAN
Editar un programa
Si no se visualiza ningún menú en la pantalla, pulse la tecla OK para visualizar la lista de programas. Tres botones
coloreados aparecen en la parte inferior de la pantalla: Move (Desplazar - ROJO), Lock (Bloquear - VERDE) y
Delete (Borrar - AMARILLO).
Pulse la tecla ROJA para desplazar el programa. Pulse la tecla ▲▼para seleccionar el programa. Vuelva a pulsar
la tecla ROJA para ajustar y utilice la tecla ▲▼para desplazar el programa hacia arriba o hacia abajo. Pulse la tecla
OK para confirmar.
Pulse la tecla VERDE para bloquear el programa. Pulse la tecla ▲▼para seleccionar el programa. Pulse la tecla
VERDE y entre el código confidencial con la tecla digital. Pulse la tecla OK para confirmar. El icono aparece al lado
del canal en cuestión. Desbloquee al volver a pulsar la tecla VERDE y al introducir el código confidencial. El icono
desaparece. El código por defecto es “0000”.
Pulse la tecla AMARILLA para borrar el programa. Pulse la tecla ▲▼para seleccionar el programa. Vuelva a pulsar
la tecla AMARILLA. Aparece “Delete?” en la pantalla. Pulse la tecla OK para confirmar. Pulse la tecla EXIT para
borrar y salirse de la pantalla.
Exploración
Explore el canal desde el submenú:
• Tipo de exploración: Exploración Manual, Exploración Automática
y Exploración NIT.
• Canal: Introduzca el número del canal con las teclas digitales del
mando a distancia.
• Update Mode: Añadir (el nuevo canal se añade al último canal en
la lista), Reemplazar (todos los canales se reemplazan).
NOTA: Pulse la tecla ► del mando a distancia en cuanto aparezca el icono ►. Una pantalla con opciones aparece.
Pulse la tecla ▲▼para hacer resaltar la opción y pulse la tecla OK para confirmar. Pulse la tecla ◄ para
salirse de la pantalla sin modificaciones.
Exploración Manual
Seleccione la exploración manual, introduzca el número del canal y
seleccione el ancho de banda adecuado y “Update Mode”. Pulse la tecla
OK. Aparece “Please Wait…” en una pantalla. La exploración se activa.
Pulse la tecla EXIT para salirse. Después de la exploración, la pantalla
“N service found” (N = número de canales explorados). Pulse la tecla
EXIT para salirse.
Exploración Automática
Seleccione la exploración automática, seleccione un “Update
Mode” y pulse la tecla OK. “Scan Process” aparece en una
pantalla. La exploración se activa. Pulse la tecla EXIT para
salirse.
La pantalla visualiza el porcentaje de exploración. Los
canales de televisión o de radio están divididos en dos
columnas.
Después de la exploración, la pantalla visualiza “N service
found” (N = número de canales explorados). Pulse la tecla
EXIT para salirse.
DVBTR6_v2
- 33 -
VELLEMAN
Exploración NIT
Seleccione la exploración NIT, introduzca el número del canal y seleccione el ancho de banda y el “Update Mode”.
Luego, pulse la tecla OK. Aparece “Please Wait…” en una pantalla. La exploración se activa. Pulse la tecla EXIT
para salirse de la pantalla. Después de la exploración, la pantalla visualiza “N service found” (N = número de canales
explorados). Pulse la tecla EXIT para salirse.
NOTA: No desconecte el sistema inmediatamente después de la exploración.
Ajuste
Hay 7 submenús:
•
•
•
•
•
•
•
•
Configuración AV
Selección del idioma
Configuración de la hora
Configuración de la contraseña
Ajustes de fábrica
Lista de grabaciones
Alimentación de la antena
Versión
Configuración AV
Elección entre las siguientes configuraciones:
• Formato TV: 4:3 LetterBox (aparición de bandas negras) / 16:9 Pan & Scan / 4:3 Pantalla Completa / 16:9
• Salida: RGB / CVBS
• Pista Audio: Estéreo / Izquierda / Derecha
Seleccionar el idioma
Menú: inglés / francés / alemán / español
Configuración de la hora
• Time Zone (Huso horario): GMT -11 ~ GMT +11
• Sleep Time (hora stand-by): No hora / 5 Min / 10 Min / 20
Min / 30 Min / 60Min
Summertime (horario de verano): Seleccione ON / OFF para
activar o desactivar la función
Configuración de la contraseña
Introduzca la contraseña vieja con las teclas digitales. Luego,
introduzca la nueva contraseña y confírmela. Pulse la tecla OK.
La nueva contraseña está activada.
Ajustes de fábrica
Seleccione esta opción y pulse la tecla OK. “Factory Restore” aparece en la pantalla. Pulse la tecla OK para
confirmar. Pulse la tecla EXIT para salirse.
Vuelva a seleccionar los ajustes de fábrica si utiliza este aparato por primera vez o si el software ha sido
actualizado.
DVBTR6_v2
- 34 -
VELLEMAN
Lista de grabaciones
Seleccione esta opción y pulse la tecla OK. La siguiente información aparece en la pantalla:
•
•
•
•
Channel Number (Número de canal)
Channel List (Lista de canales)
Play Time (Duración de la reproducción)
Event Time (Duración del acontecimiento)
Pulse
para borrar el programa seleccionado.
Alimentación de la antena
Seleccione ON/OFF para controlar la alimentación 5V.
Electronic Program Guide (EPG)
Seleccione EPG en el menú principal para entrar en el menú EPG.
Utilice la tecla
para seleccionar un acontecimiento, utilice la tecla para hojear y utilice la tecla para
consignar un programa. Pulse la tecla OK para visualizar la información detallada. Pulse la tecla EXIT para salirse.
El programa grabado se visualiza en la lista de grabaciones en el menú de configuración.
7. Menú
Menú
principal
M
E
N
Ú
P
R
I
N
C
I
P
A
L
Submenú
Opción
TV / Radio
Bloqueo
Desplazar
Programa
Programa TV / Radio
Informaciones (Rojo)
Películas (Verde)
Deporte (Amarillo)
Música (Azul)
Exploración manual
Tipo de exploración
Exploración
Canal
Modo Update
DVBTR6_v2
Exploración automática
Exploración NIT
Canal
Añadir
Reemplazar
- 35 -
Descripción
TV / Radio
Bloquear
Desplazar
Favorito:
Informaciones
Favorito: Películas
Favorito: Deporte
Favorito: Música
Exploración manual
Exploración
automática
Exploración NIT
Añadir
Reemplazar
VELLEMAN
Formato TV
Configuración AV
Salida
Pista audio
M
E
N
Ú
Selección del idioma
Configuración
P
R
I
N
C
I
P
A
L
Menú
Huso horario
Configuración de la hora
Stand-by
Horario de
verano
4:3 LetterBox
4:3 Pan & Scan
4:3 Pantalla
Completa
16:9
RGB
CVBS
Estéreo
Izquierda
Derecha
Inglés
Francés
Alemán
Español
GMT-11~GMT+11
No Sleep
5 min.
10 min.
20 min.
30 min.
60 min.
On
Off
Configuración contraseña
Ajustes de fábrica
Lista de grabaciones
Alimentación de la antena
Contraseña
Ajustes de fábrica
Lista de grabaciones
Interruptor 5V
Acontecimientos
Events
Browse
Booking
EPG
Configuración
On
Off
Versión del software
Acontecimientos
Hojear
Grabaciones
Informaciones
detalladas
Salirse
Detail Info
Exit
8. Solución a problemas
Un control sencillo o un pequeño ajuste puede resolver un problema y restablecer el buen funcionamiento del
aparato. Haga controlar el aparato por un técnico cualificado.
Mantenga el aparato lejos de electricidad estática antes del mantenimiento. El cargador y el CI podrían ser dañado
fácilmente.
Problema
Causa posible
No hay alimentación
El cable de alimentación está conectado
de manera incorrecta
No hay exploración
• La antena está mal ajustada
• Configuración incorrecta de los
parámetros
• Uso incorrecto de la antena
DVBTR6_v2
- 36 -
Solución
Conecte el cable correctamente y active el
aparato. Si sigue sin alimentación,
desactive el aparato y espere unos 10
min. antes de volver a activarlo.
• Ajuste la antena o utilice una antena
para exteriores
• Utilice una antena con una impedancia
de 75Ω
• Seleccione la frecuencia y el ancho de
banda adecuados
VELLEMAN
No hay imagen
Imagen blanco y negro
• El cable ha sido conectado de manera
incorrecta
• El vídeo no está ajustado de acuerdo
con el monitor
• El cable ha sido conectado de manera
incorrecta
• El vídeo no está ajustado de acuerdo
con el monitor
• Conecte el cable correctamente
• Restablece el sistema
• Conecte el cable correctamente
• Restablece el sistema
Distorsión de la imagen al
conmutar de un canal a
otro
Normal
El mando a distancia no
funciona
• Las pilas han sido introducidas de
manera incorrecta
• Las pilas están agotadas
• El alcance ha sido sobrepasado o el
ángulo está demasiado grande
• Una luz demasiado fuerte molesta el
sensor
• Introduzca las pilas correctamente
• Reemplace las pilas
• Disminuya la distancia entre el mando a
distancia y el aparato
• Desplazca el aparato
No es posible seleccionar
audio ni subtítulo
Selección incorrecta del canal sonora
Pulse la tecla AUDIO para conmutar el
canal
No hay sonido
• El botón Mute está activado
• Volumen demasiado bajo
• El cable está conectado de manera
incorrecta
• Pulse la tecla Mute
• Aumenta el sonido
• Conecte el cable correctamente
Baja repentina del sonido
• Cortocircuito
• Botón Mute activado
• Función stand-by activada
Recepción con mucho
ruido
• Conecte el cable correctamente y vuelva
a abrir el aparato
• Pulse la tecla Mute
• Vuelva a abrir el aparato
Muchas interferencias
Ajuste la antena
9. Especificaciones
Sintonizador
Frecuencia
Ancho de banda IF
Nivel de la señal de entrada
Conector de entrada RF
Impedancia de entrada
Demodulación
Forma de onda
Demodulación
Modo
Intervalo de frecuencia
Velocidad de código
Código vídeo y audio
Descodificación vídeo
Resolución vídeo
Velocidad de transmisión vídeo
Teletexto
Descodificación audio
Pista audio
Velocidad de muestreo audio
DVBTR6_v2
174 ~ 230MHz; 470 ~ 862MHz
7 ó 8MHz
-72 ~ -20dBm
tipo IEC169-2, hembra
75Ω
COFDM (Code Orthogonal Frequency Division Multiplexing)
QPSK, QAM16, QAM64, QAM32
2K, 8K
1/4, 1/8, 1/16, 1/32
1/2, 2/3, 3/4, 5/6, 7/8
compatible ISO/IEC13818-2 MPEG2
720 x 576
máx. 15Mbits/s
soporta DVB-TXTETSI/EN300472
ISO/IEC13818-3
estéreo, canal izquierdo, canal derecho
32, 44.1, 48KHz
- 37 -
VELLEMAN
Especificaciones de alimentación
Alimentación
Consumo
Requisitos
Temperatura de funcionamiento
Humedad
Otras
Peso
Dimensiones
+12~+24VCC
≤ 15W
-15°C ~ 65°C
≤ 90%
< 1.5kg
330 x 83 x 215mm
Para más información sobre este producto, visite nuestra página web www.velleman.eu.
Se pueden modificar las especificaciones y el contenido de este manual sin previo aviso.
DVBTR6 – DVB-T-EMPFÄNGER FÜR MOBILE ANWENDUNG
1. Einführung & Eigenschaften
An alle Einwohner der Europäischen Union
Wichtige Umweltinformationen über dieses Produkt
Dieses Symbol auf dem Produkt oder der Verpackung zeigt an, dass die Entsorgung dieses Produktes nach
seinem Lebenszyklus der Umwelt Schaden zufügen kann.
Entsorgen Sie die Einheit (oder verwendeten Batterien) nicht als unsortiertes Hausmüll; die Einheit oder
verwendeten Batterien müssen von einer spezialisierten Firma zwecks Recycling entsorgt werden.
Diese Einheit muss an den Händler oder ein örtliches Recycling-Unternehmen retourniert werden.
Respektieren Sie die örtlichen Umweltvorschriften.
Falls Zweifel bestehen, wenden Sie sich für Entsorgungsrichtlinien an Ihre örtliche Behörde.
Wir bedanken uns für den Kauf des DVBTR6! Bitte lesen Sie vor der Inbetriebnahme diese Bedienungsanleitung
sorgfältig durch. Überprüfen Sie, ob Transportschäden vorliegen. Sollte dies der Fall sein, verwenden Sie das Gerät
nicht und wenden Sie sich an Ihren Händler. Lieferumfang: 1 x DVB-T-Empfänger, 1 x Fernbedienung, 1 x Knopfzelle,
1 x Stromversorgungskabel, 1 x A/V-Kabel, 1 x Kabel für Fernbedienung, Montagezubehör und diese
Bedienungsanleitung.
Eigenschaften:
•
•
•
•
•
•
•
•
•
•
•
•
•
•
•
MPEG-2/DVB-T kompatibel
“True Diversity“-Empfänger für einen optimalen Empfang unterwegs
optionele 7MHz Bandbreite, 8MHz Autoscan
automatische Wiederherstellung (Auto Recovery) bei Stromunterbrechung
mehrsprachige Untertitelung (wenn vorhanden)
manuelle/auto/NIT Scanmodi
OSD- & VBI-Ausgang
RCA A/V-Ausgang
SCPC/MCPC kompatibel
EPG (wenn vorhanden)
benutzerfreundliche Schnittstelle
4 Video-Ausgänge für einen simultanen Anschluss an 4 Monitoren
A/V-Eingang für VCD en DVD
HIFI Stereo-Ausgang, numerische 32-Bits Datenverarbeitung
unterstützt Antenne mit Stromversorgung (5VDC)
DVBTR6_v2
- 38 -
VELLEMAN
2. Sicherheitshinweise
• Bei Schäden, die durch Nichtbeachtung der Bedienungsanleitung verursacht werden, erlischt der
Garantieanspruch. Für daraus resultierende Folgeschäden übernimmt der Hersteller keine Haftung.
• Öffnen Sie den DVB-T-Empfänger nicht, um Elektroschocks zu vermeiden. Es gibt keine wartbaren Teile. Lassen
Sie das Gerät von einer Fachkraft warten.
• Schützen Sie den Empfänger vor Regen und Feuchte, Dampf, Gas und Staub.
• Überschreiten Sie nie die Spannungen beschrieben in dieser Bedienungsanleitung.
• Verwenden Sie das Gerät nicht während Sie das Fahrzeug lenken.
• Schalten Sie das Gerät aus wenn Sie es nicht verwenden.
• Bedecken Sie die Lüftungsschlitze nicht, um eine gute Ventilation zu gewährleisten.
• Verwenden Sie nur die vom Fabrikanten genehmigten Zubehörteile.
• Trennen Sie das Gerät vom Netz ehe Sie mit den Servicearbeiten anfangen. Verwenden Sie zur Reinigung ein
feuchtes, fusselfreies Tuch. Verwenden Sie auf keinen Fall Alkohol oder irgendwelche Lösungsmittel.
• Bei Schäden verursacht durch eigenmächtige Änderungen erlischt der Garantieanspruch.
• Halten Sie Kinder und Unbefugte vom Gerät fern.
3. Installation und Anschluss der Antenne
• Innenantenne
Reinigen Sie die zwei Teile und
beachten Sie, dass diese völlig
sauber sind.
Befestigen Sie die zwei Streifen an
der Antenne.
Kleben Sie die Antenne so dass, die graue Oberfläche der
Rückscheibe frei bleibt.
Reinigen Sie den Teil des
Rückfensters an dem Sie die
Antenne befestigen möchten.
Sie können die Antenne auch an einem Seitenfenster
befestigen.
• Magnetische Außenantenne
Die Außenantenne kann an verschiedenen Stellen befestigt werden, abhängig vom Autotyp.
DVBTR6_v2
- 39 -
VELLEMAN
4. Basisanschluss
• Diese Antennen braucht man nicht mit einer
Stromversorgung zu verbinden.
• Gelb = 12 ~ 24V fester Anschluss – kann auch
mit rot verbunden werden.
• Rot = 12V nach Startkontakt.
• Schwarz = Masse.
5. Umschreibung
• Achterpaneel
1. Stromversorgungseingang
2. Eingang Fernbedienung
3. IR-Eingang
4. Audio-Eingang rechts
5. Audio-Ausgang rechts
6. Video-Ausgang
7. Video-Ausgang
8. Eingang Antenne 1
9. Eingang Antenne 2
10. Video-Ausgang
11. Video-Ausgang
12. Audio-Ausgang links
13. Audio-Eingang links
14. Video-Eingang
• Fernbedienung
1. MUTE-Taste
2. Numerische Tasten
3. Electronic Program Guide
4. INFO-Taste
5. VOL –-Taste
6. A/V IN-Taste
7. MENU-Taste
8. MODE-Taste
9. SUB-Taste (Untertitelung)
10. TTX-Taste (Videotext)
11. F2-Taste
12. F1-Taste
13. Power ON/OFF
DVBTR6_v2
14. LAST-Taste
15. AUDIO-Taste
16. PAGE omhoog
17. CH+-Taste
18. PAGE omlaag
19. ENTER-Taste
20. VOL +-Taste
21. CH –
22. EXIT-Taste
23. TV/R-Taste
24. F5-Taste
25. F3-Taste
26. F4-Taste
- 40 -
VELLEMAN
6. Anwendung
Hauptmenü (Main Menu)
Drücken Sie die MENÜ-Taste um das Hauptmenü erscheinen zu lassen. Es gibt 4 verschiedene Submenüs:
Service
• Scan
• Setup
• EPG
Drücken Sie
um ein Submenü zu wählen. Drücken Sie OK zum Bestätigen. Drücken Sie ENDE um zum
Hauptmenü zurückzukehren.
BEMERKUNG: Drücken Sie die ENDE-Taste um zum vorigen Niveau zurückzukehren. Drücken Sie wiederholt diese
Taste um das Hauptmenü zu verlassen.
Schnelltasten:
EPG: EPG-Informationen über den aktuellen Kanal.
TTX: Wenn kein Menü auf dem Schirm erscheint, drücken Sie dann diese Taste um die Videotextinformationen zu
zeigen.
SUB: Wählen Sie eine andere OSD-Sprache. Entfernen Sie die Untertitel mithilfe dieser Taste.
INFO: Drücken Sie diese Taste um Informationen über den aktuellen Kanal zu zeigen.
SETUP: öffnet das Setup-Menü.
ROT, GRÜN, GELB, BLAU: Funktion.
LAST: Kehren Sie zum letzten Kanal zurück.
MODE: Wählen Sie zwischen 4:3/Frame, 4:3/LetterBox, 4:3/Pan&Scan und 16:9.
AUDIO: Schalten Sie zwischen dem linken und dem rechten Audiokanal.
STANDBY: Schalten Sie die Standby-Funktion ein, drücken Sie nochmals um sie auszuschalten.
Service
Dieses Fenster gibt eine Liste mit Programmen wieder. Drücken Sie die TV/R Taste um zwischen Fernseher und
Radio zu wählen. Drücken Sie die PG- oder die PG+ Taste um die nächste Seite zu betrachten. Sie können bis zu
600 Kanäle speichern. Drücken Sie ▲▼um das Programm zu wählen und drücken Sie nachher auf OK. Die
Information wird in einem Informationsfenster angezeigt. Drücken Sie die TV/R zum Umschalten von Fernseher auf
Radio.
Ein Programm den Favoriten hinzufügen.
Es gibt 4 farbige Tasten an der Unterseite des Schirms.
Diese sind die Favoriten: News (Tagesschau - ROT),
Filme (GRÜN), Sport (GELB) und Musik (BLAU).
Drücken Sie ▲▼um das Programm zu wählen.
Drücken Sie eine farbige Taste um ein Programm der
Liste hinzuzufügen. Ein Symbol erscheint rechts auf
dem Schirm. Drücken Sie die Taste um das Programm
aus der Liste zu entfernen. Das Symbol verschwindet.
Wenn kein Menü auf dem Schirm erscheint, drücken
Sie eine farbige Taste um das Programm
wiederzugeben. Drücken Sie die WEIßE Taste das
gewählte Lieblingsprogramm umzustellen. Drücken Sie ▲▼ um das Programm zu selektieren, drücken Sie die
WEIßE Taste zum Aktivieren und verwenden Sie die ▲▼Tasten um das Programm nach oben oder nach unten zu
bewegen. Drücken Sie OK zum Bestätigen.
DVBTR6_v2
- 41 -
VELLEMAN
Ein Programm bearbeiten
Wenn kein Menu auf dem Schirm erscheint, drücken Sie OK um die Programmliste wiederzugeben. Drei farbige
Tasten erscheinen unten auf dem Schirm. Beweg. (ROT), Sperre (GRÜN) und Löschen (GELB).
Drücken Sie die ROTE Taste um das Programm zu verstellen. Drücken Sie die ▲▼-Taste um Ihr Programm zu
selektieren. Drücken Sie erneut die ROTE Taste zum Aktivieren und verwenden Sie die ▲▼Taste um das
Programm nach oben oder nach unten zu bewegen. Drücken Sie OK zum Bestätigen.
Drücken Sie die GRÜNE Taste um das Programm zu sperren. Drücken Sie die ▲▼Taste um Ihr Programm zu
selektieren. Drücken Sie die GRÜNE Taste und geben Sie den korrekten Pincode mithilfe der numerischen Taste ein.
Symbol neben dem betreffenden Kanal. Deaktivieren Sie die
Drücken Sie OK zum Bestätigen. Es erscheint ein
Verriegelung, indem Sie erneut die GRÜNE Taste drücken und den korrekten Pincode eingeben. Das Symbol
verschwindet. Der Standardcode ist “0000”.
Drücken Sie die gelbe Taste um das Programm zu entfernen. Drücken Sie die ▲▼Taste um das Programm zu
wählen. Drücken Sie erneut die GELBE Taste. “Delete?” erscheint auf dem Schirm. Drücken Sie OK zum Bestätigen.
Drücken Sie ENDE zum Löschen und zum Verlassen des Menüs.
Scan
Scannen Sie den Kanal ab dem Submenü:
• Such-Art: Manual Scan (manuell), Auto Scan (automatisch), und
NIT Scan.
• Kanal: Geben Sie mit den numerischen Tasten der
Fernbedienung die richtige Kanalnummer ein.
• Update Modus: Anfügen (der neue Kanal wird zu dem letzten
Kanal in der Liste hinzugefügt) Ersetzen (alle Kanäle werden
ersetzt).
BEMERKUNG: Wenn das ►Symbol erscheint, drücken Sie die ► Taste auf der Fernbedienung. Es erscheint ein
Optionsfenster. Drücken Sie die ▲▼-Taste um die Option nach vorne zu bringen und drücken Sie
OK zum Bestätigen. Drücken Sie die ◄ Taste um das Fenster ohne Änderungen zu verlassen.
Man. Scan (Manuelles Scanverfahren)
Wählen Sie das manuelle Scanverfahren, geben Sie die korrekte
Kanalnummer ein und wählen Sie die geeignete Bandbreite und
“Update Mode”. Drücken Sie OK. “Please Wait…” erscheint in
einem Fenster. Der Scanvorgang fängt an. Drücken Sie die ENDETaste zum Verlassen. Nach dem Scanverfahren gibt der Schirm “ N Service gef.” (N = Anzahl gescannte Kanäle)
wieder. Drücken Sie die EXIT-Taste zum Verlassen.
Auto Scan (Automatisches Scanverfahren)
Wählen Sie das automatische Scanverfahren, wählen Sie
einen “Update Mode” und drücken Sie OK. "Such-Prozess”
erscheint in einem Fenster. Der Scanvorgang fängt an.
Drücken Sie die ENDE-Taste zum Verlassen des Menüs. Das
Fenster gibt den Prozentsatz des Scanvorganges wieder. Die
Fernseh- und Radiokanäle werden in 2 Spalten
wiedergegeben. Nach dem Scanverfahren gibt der Schirm “N
Service gef.” (N = Anzahl gescannte Kanäle) wieder. Drücken
Sie die ENDE-Taste zum Verlassen.
DVBTR6_v2
- 42 -
VELLEMAN
NIT Scan
Wählen Sie NIT Scan, geben Sie die korrekte Kanalnummer ein und wählen Sie entsprechende Bandbreite und
“Update Modus”. Drücken Sie nachher OK. “Please Wait…” erscheint in einem Fenster. Der Scanvorgang fängt an.
Drücken Sie die ENDE-Taste um das Fenster zu verlassen. Nach dem Scanverfahren erscheint “N Service gef.” (N =
Anzahl gescannte Kanäle) wieder. Drücken Sie die ENDE-Taste zum Verlassen.
BEMERKUNG: Schalten Sie das System nicht sofort nach dem Scanverfahren aus.
Set-up
Es gibt 7 Submenüs:
•
•
•
•
•
•
•
•
AV Setup (AV einstellen)
Spracheinstellung
Zeiteinstellung
Passwort Setup (Passwort einstellen)
Werkseinstellungen
Buchungsliste
Antenna Supply (Antenne)
Software Version
AV einstellen
Wählen Sie zwischen folgenden Konfigurationen:
• TV Format: 4:3 Letter Box / 16:9 Pan & Scan / 4:3 Full Frame / 16:9
• Ausgabe: RGB / CVBS
• Audiospur: Stereo / Left (links) / Right (rechts)
Die Sprache einstellen
Menu: English (Englisch) / French (Französisch) / German (Deutsch) / Spanish (Spanisch)
Zeiteinstellung
• Zeitzone: GMT -11 ~ GMT +11
• Sleep Time (Schlaffunktion): No Time (keine Zeit) / 5 Min /
10 Min / 20 Min / 30 Min / 60Min
• Summertime (Sommerzeit): Wählen Sie EIN / AUS um die
Sommerfunktion ein- oder auszuschalten.
Password Setup (Passwort einstellen)
Benutzen Sie die numerischen Tasten und geben Sie das alte
Passwort ein. Geben Sie danach das neue Passwort ein und
bestätigen Sie. Drücken Sie OK. Das neue Passwort ist jetzt
aktiviert.
Werkseinstellungen
Wählen Sie die Option Werkseinstellungen und drücken Sie die OK-Taste. “Factory Restore” erscheint in einem
Fenster. Drücken Sie OK zum Bestätigen. Drücken Sie ENDE zum Verlassen.
Wählen Sie die Werkseinstellungen wenn Sie dieses Gerät zum ersten Mal verwenden oder wenn die Software
aktualisiert worden ist.
DVBTR6_v2
- 43 -
VELLEMAN
Buchungsliste
Wählen Sie die Option Buchungsliste und drücken Sie OK. Der Schirm zeigt die folgende Programminformation:
•
•
•
•
Kanalnummer
Kanalliste
Play Time (Abspielzeit)
Event Time (Zeit Ereignis)
Drücken Sie
um das gewählte Buchungsprogramm zu löschen.
Antenna Supply (Stromversorgung Antenne)
Wählen Sie ON / OFF um die 5V Antennenstromversorgung zu steuern.
Electronic Program Guide (EPG)
Wählen Sie EPG im Hauptmenü um das EPG-Menü zu öffnen.
Verwenden Sie die
Taste um das Ereignis zu selektieren, verwenden Sie die -Taste zum Durchblättern und die
-Taste um ein Programm zu buchen. Drücken Sie OK um die Detailinformation zu zeigen. Drücken Sie EXIT zum
verlassen. Das registrierte Programm wird in der Buchungsliste im Set-Up-Menü wiedergegeben.
7. Menü
Hauptmenü
Service
Submenü
Option
TV / Radio
Sperre
Beweg.
News (rot)
Filme (grün)
Sport (gelb)
Musik (blau)
TV Service / Radio
Service
Hauptmenü
Man. Scan
Scantyp
Auto Scan
Scan
NIT Scan
Kanal
Anfügen
Ersetzen
Kanal
Update Modus
DVBTR6_v2
- 44 -
Umschreibung
TV / Radio
Verriegelung
Verstellen
Favorit: Tagesschau
Favorit: Film
Favorit: Sport
Favorit: Musik
Manuelles
Scanverfahren
Automatisches
Scanverfahren
NIT Scan
Hinzufügen
Ersetzen
VELLEMAN
AV Setup
Setup
Spracheinstellungen
Hauptmenü
Zeiteinstellungen
4:3 Letter Box
4:3 Pan & Scan
TV Format
4:3 Full Frame
16:9
Umrechnu RGB
ng
CVBS
Stereo
Audio
Links
Spur
Rechts
Englisch
Französisch
Menu
Deutsch
Spanisch
Zeit Zone GMT-11~GMT+11
No Sleep
5 min.
Sleep
10 min.
Time
20 min.
30 min.
60 min.
Sommer- On
zeit
Off
Passwort Setup
Werkeinstellungen
Buchungsliste
Antenna Supply
EPG
5V Switch
Software Version
Event
Blättern
Buchen
Detailinfo
ENDE
On
Off
4:3 Letter Box
4:3 Pan & Scan
4:3 Full Frame
16:9 Full Frame
RGB
CVBS
Stereo
der linke Kanal
der rechte Kanal
Englisch
Französisch
Deutsch
Spanisch
Zeitzone
Keine Schlaffunktion
5 Min.
10 Min.
20 Min.
30 Min.
60 Min.
Sommerzeit ein
Sommerzeit aus
Passwort einstellen
Werkseinstellungen
Buchungsliste
Stromversorgung ein
Stromversorgung aus
Softwareversion
Ereignisse
Durchblättern
Buchung
Detailinformation
Verlassen
8. Problemlösung
Manchmal kann eine einfache Kontrolle oder eine kleine Modifikation ein Problem lösen und erneut zum korrekten
Betrieb führen. Lassen Sie das Gerät von einem qualifizierten Techniker warten.
Halten Sie das Gerät aus der Nähe von statischer Elektrizität wenn Sie es warten. Das Ladegerät und die IC können
schnell beschädigt geraten.
Problem
Es gibt keinen Strom
Tastet das Programm nicht
ab
DVBTR6_v2
Mögliche Ursache
Lösung
Schließen Sie das Versorgungskabel
korrekt an und schalten Sie das Gerät ein.
Das Versorgungskabel ist nicht richtig
Wenn es noch immer keinen Strom gibt,
schalten Sie das Gerät aus und warten
angeschlossen.
Sie 10 Minuten bevor Sie es wieder
einschalten.
• Stimmen Sie die Antenne ab oder
verwenden Sie eine Antenne zur
• Antenne ist nicht gut abgestimmt
Anwendung im Außenbereich.
• Parameter sind nicht korrekt eingestellt
• Verwenden Sie eine Antenne mit einer
worden
Impedanz von 75Ω.
• Falsche Anwendung der Antenne
• Stellen Sie die Frequenz und die
Bandbreite korrekt ein.
- 45 -
VELLEMAN
Kein Bild
Keine Farbe
Bildverformung von einem
Kanal zum anderen
• Kabel ist nicht richtig angeschlossen
• Video entspricht den Einstellungen des
Monitors nicht
• Kabel ist nicht richtig angeschlossen
• Video entspricht den Einstellungen des
Monitors nicht
• Schließen Sie das Kabel korrekt ein
• Stellen Sie das System zurück
• Schließen Sie das Kabel korrekt ein
• Stellen Sie das System zurück
Normal
Fernbedienung funktioniert
nicht
• Batterien sind nicht korrekt eingelegt
worden
• Batterien sind leer
• Reichweite wurde überschritten oder
der Winkel ist zu groß
• Der Sensor wird durch helles Licht
gehindert.
• Legen Sie die Batterien korrekt ein
• Wechseln Sie die Batterien
• Verkleinern Sie den Abstand zwischen
Fernbedienung und Gerät
• Verstellen Sie das Gerät
Audio und Untertitel
können nicht selektiert
werden
Falsche Auswahl beim Tonkanal
Drücken Sie die AUDIO-Taste um den
Kanal zu wechseln.
• Mute-Taste ist gedrückt
• Lautstärke ist zu niedrig
• Kabel ist nicht richtig angeschlossen
• Kurzschluss
• Mute-Taste ist gedrückt
• Schlaffunktion wird aktiviert
Schwere Störung
• Drücken Sie die Mute-Taste
• Erhöhen Sie die Lautstärke
• Schließen Sie das Kabel richtig an
• Schließen Sie das Kabel korrekt an und
schalten Sie das Gerät erneut ein.
• Drücken Sie die Mute-Taste
• Stellen Sie das Gerät zurück
Stimmen Sie die Antenne ab.
Es gibt keinen Ton
Plötzliche Abnahme der
Lautstärke
Deformierter Empfang
9. Technische Daten
Empfänger
Frequenz
174 ~ 230MHz; 470 ~ 862MHz
IF-Bandbreite
7 of 8MHz
Pegel Eingangssignal
-72 ~ -20dBm
RF-Ausgangsanschluss
IEC169-2 Typ, Buchse
Impedanz Eingang
75Ω
Demodulationsmodus
Wellenform
COFDM (Code Orthogonal Frequency Division Multiplexing)
Modulation
QPSK, QAM16, QAM64, QAM32
Modus
2K, 8K
Frequenzintervall
1/4, 1/8, 1/16, 1/32
Coderate
1/2, 2/3, 3/4, 5/6, 7/8
Video, Audio Code
Video-Dekodierung
ISO/IEC13818-2 MPEG2 kompatibel
Video-Auflösung
720 x 576
Videocode-Rate
max. 15Mbits/s
Videotext
unterstützt DVB-TXTETSI/EN300472
Audio-Dekodierung
ISO/IEC13818-3
Audio Track
Stereo, Kanal links, Kanal rechts
Audio-Abtastrate
32, 44.1, 48KHz
Stromversorgung
Stromversorgung
+12~+24VDC
Stromverbrauch
≤ 15W
Umgebungsvoraussetzungen
Betriebstemperatur
-15°C ~ 65°C
Feuchte
≤ 90%
Andere
Gewicht
< 1.5kg
Abmessungen
330 x 83 x 215mm
Für mehr Informationen zu diesem Produkt, siehe www.velleman.eu.
Alle Änderungen ohne vorherige Ankündigung vorbehalten.
DVBTR6_v2
- 46 -
VELLEMAN