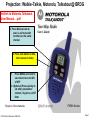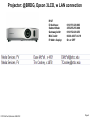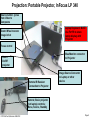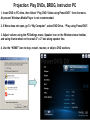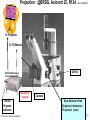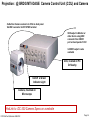
1
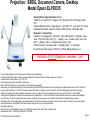
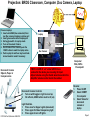
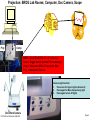
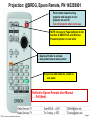
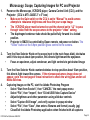
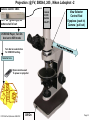
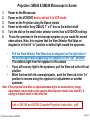
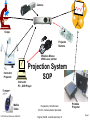
Camera Scope Projector Remote Wireless Mouse With Laser pointer Projection System SOP Instructor Projector Instructor PC , DVD Player Walkie Talkie FVCC:BioTech;Morrison 8/28/2012 Prepared by: Bob Morrison STLCC, Instrumentation Specialist Original Feb08, Last Revision Sep 10 Portable Projector Page 1 Projection: BRDG, Document Camera, Desktop Model Epson ELPDC05 General Device Type Document camera Width 27.4 in Depth 21.3 in Height 21.8 in Weight 21.6 lbs Still Image 1024 x 768 Features Remote control , Image Sensor , Type CCD 1/3" , Lens Iris F/2.8 , Focus Adjustment Automatic, manual Interfaces Video S-Video, composite video Expansion / Connectivity Interfaces 1 x management - RS-232C - 9 pin D-Sub (DB-9) ¦ 2 x display / video VGA - 15 pin HD D-Sub (HD-15) ¦ 1 x display / video - S-video output - 4 pin miniDIN ¦ 1 x display / video - composite video output - RCA Cables Included 1 x S-Video cable ¦ 1 x display cable ¦ 1 x VGA cable Power Device Power supply ( 50/60 Hz ) 43 Watt Battery AAA type x 2 HotLink to EPSON Brochure, overview…. pdf Provides high-performance 18X optical zoom for capturing minute features 2X digital magnification (with live camera) works together with the optical zoom to enlarge images up to 35 times Features built-in image rotation - 90º, 180º, 270º Clear Screen/Image mode eliminates random noise Built-in RS-232C interface for communication with a remote control system Designed to provide powerful support for your presentation, the ELPDC05 High Resolution Document Imager from Epson® gives you true XGA 1024x768 pixel resolution. Utilizing a 1/3" CCD, this imager captures fine details in images, text and 3-D objects. Its built-in base light provides optimum image quality for transparencies, slides, negatives, blueprints, and X-rays, while a live camera enables users to zoom in up to 35 times. The unit's RGB switching function allows for seamless transitions between two applications. The one-touch freeze function stabilizes motion on the screen and displays it as a still image. The built-in scrolling feature ensures an extensive image coverage while, the built-in white balance feature enhances contrast. Compatible with a full line of Epson® PowerLite® projectors, this Document Imager comes with a wireless remote control. Featuring a convenient handle and compact design, the ELPDC05 Document Imager is easy to carry at your next presentation. Included Accessories: Remote Control, 2 AAA Batteries, Power Cord, RGB Video Cable, RCA Video Cable, S-Video Cable Manufacturer Part# : V12H162020 Dell Part# : A0374595 FVCC:BioTech;Morrison 8/28/2012 Page 2 Projection: BRDG Classroom, Computer ,Doc Camera, Laptop Personal Laptop: 1. Insert extra RGB (blue connector) from rear Doc camera to laptop rear blue port 2. Insert green audio cable to laptop port 3. Set toggle switch to Laptop mode 4. Turn on Document Camera 5. On left side of Doc Camera, push the RGB1 button to switch to laptop video 6. Push Laptop fn and Func key to activate shared monitor mode if necessary Document Camera Objects, Paper or transparencies Laptop Computer Doc Camera FIRST LOCATE 2” x 2” white SWITCH box and set to the device you are using for input. Adjust volume using the thumb wheel box and/or the Amplifier volume control inside the cabinet. Document Camera Controls: 1. Turn on with toggle in right rear on top 2. On left side, MAIN button must be lit (on) Light Controls. 1. Press once for Upper Lights (document) 2. Press again for Base transparency light 3. Press again to turn off lights FVCC:BioTech;Morrison 8/28/2012 Computer: Web, DVDs Powerpoint Remote: 1. Press On/Off 2. Select COMP1 for computer 3. Select Video for document camera or laptop Page 3 Projection: BRDG Lab Rooms; Computer, Doc Camera, Scope Proj Comp FIRST LOCATE SWITCH 2” x 2” white box Source Toggle Switch (behind PC on desktop) Comp= Computer, DVDs, Powerpoint, Web Proj = Document Camera Camera Light Controls: 1. Press once for Upper Lights (document) 2. Press again for Base transparency light 3. Press again to turn off lights Document Camera FVCC:BioTech;Morrison 8/28/2012 Page 4 Projection: @BRDG, Epson Remote, PN 145258901 - - Point remote toward ceiling projector and depress to turn projector on and off. Turn off projector when not in use NOTE: At present, Page Up/Down do not function at BRDG Park, use Wireless Presenter/pointer on next slide - Depress Pointer to activate - Use pad/arrows to move pointer -Requires 2 AAA batteries, install on rear panel. Hotlink to Epson Remote User Manual …. Pdf (9mb) FVCC:BioTech;Morrison 8/28/2012 Page 5 Projection: Wireless Presenter/Mouse, Laser Pointer Kensington, K0941A with laser, required 2 AAA batteries Press for Laser Pointer, use Caution when pointing Laser will not operate unless the USB has been removed Move Back in Slides Blank/Black Screen Move Forward in Slides 1. Install in PC USB port -Requires 2 AAA batteries, install on rear panel. Note Laser will not light if batteries are low. FVCC:BioTech;Morrison 8/28/2012 Page 6 Projection: Walkie-Talkie, Motorola, Talkabout@ BRDG Hotlink to Motorola Talkabout User Manaul….pdf 3. Press Musical note to send a call tone alert to others on the same channel 4. Press side button to talk, then release to listen 1. Press MENU and hold >2 seconds to turn unit ON of OFF 2. (Optional) Press quickly to set other parameters: channel, ring tone, on/off timer Requires 3 AAA batteries FVCC:BioTech;Morrison 8/28/2012 Page 7 Projector: @BRDG, Epson 3LCD, w LAN connection R127 ID Address: Subnet Mask: Gateway Addr: MAC Addr: IP Addr display: FVCC:BioTech;Morrison 8/28/2012 010.151.020.003 255.255.255.000 010.152.020.253 00.00.48.37.04.19 On or OFF Page 8 Projection: Portable Projector, InFocus LP 340 Source button: cycles from Video to Computers Laptop Keyboard: MUST Use Fn+F8 to share laptop display with Projector Zoom: Wheel to zoom image in/out Focus control Blue/Monitor connector to Projector Green: On/Off projector Remote IR Receiver Connection to Projector Image Source Connector to Laptop or other device Remote; Basic projector (not laptop) controls; Menu, Source, Standby FVCC:BioTech;Morrison 8/28/2012 Page 9 Projection: Play DVDs, BRDG, Instructor PC 1. Insert DVD in PC drive, then Select “Play DVD Video using PowerDVD” from the menu. At present, Windows Media Player is not recommended. 2. If Menu does not open, go To “My Computer”, select DVD Drive, “Play using PowerDVD”. 3. Adjust volume using the PCSettings menu, Speaker icon on the Windows lower toolbar, and using thumb wheel on the small 2” x 2” box along speaker line. 4. Use the “HOME” icon to stop, restart, resume, or skip to DVD sections. Projection : @BRDG, Axiovert 25, R124 / SLCC # 0097770 To Projector To PC/Monitor Off/On MTI-DAGE Camera Control Unit (CCU) Set Gain to “manual” Off/On W green indicator FVCC:BioTech;Morrison 8/28/2012 Camera View Selector Knob Eyepiece (clockwise) Projection (ccw) Page 11 Microscopy: Scope, Capturing Images for PC and Projector 1. Power on the Microscope, VCR/DVD player, Camera Control Unit (CCU), and the Projector (CCU is MTI –DAGE 2” x 5” box) Make sure the Gain switch on the CCU is set to “Manual” to avoid camera attempts to rebalance brightness and thus dim your scope image. The VCR/DVD player must be turned on and the channel set to “L2” to pass through video from the scope camera to the projector “video” setting. The diaphragm/condenser tube should be pulled fully forward in a locked position. Projector in SM238 is controlled by Epson remote, red power-on button. The “Video” button at the 6-9pm position gives control to the camera. 2. Turn the View Selector Knob on the scope (next to the main focus dials) clockwise until it hits stop at about 4pm position, this directs light toward the eyepieces • Focus on specimen, adjust condenser, and light controls to get desired image 3. 4. • • • • • • Turn the View Selector Knob counterclockwise to stop position about 10am position, this directs light toward the camera. If the microscope/camera image does not appear, go to the next page of these instruction to check the wiring plan and/or call Media Services. Capturing Images on the PC, start the Adobe Photoshop Program Select “Start from Scratch”, then “CANCEL” the next popup menu Select “File”, then “Import”, then “D-link USB Video Capture Device” Adjust brightness and other parameters using slide bar controls Select “Capture Still Image”, and verify capture in popup window Select “File”, then “Save”, then enter a filename and format (usually .jpg) Close/Exit the Adobe Photoshop application when finished with all captures FVCC:BioTech;Morrison 8/28/2012 Page 12 Projection: @ FV, SM244, 245 , Nikon Labophot -2 Camera Control CMACamera 3CCD (details Slide #7) Turn “on” (green light) on bottom shelf of cart View Selector Control Rod Eyepiece (push in) Camera ( pull out) VCR/DVD Player, Turn On And set to VCR mode Turn dial on selector box To DVD/VCR setting. Selector box 1 2 3 4 Epson remote used To power on projector FVCC:BioTech;Morrison 8/28/2012 Off/On Page 13 Projection: SM244 & SM245 Microscope to Screen 1. 2. 3. 4. 5. 6. Power on the Microscope Power on the VCR/DVD device and set it to VCR mode. Power on the Projector using the Epson remote Power on the white Sony CMA-D2 1” x 6” box on the bottom shelf Turn the dial on the small video selector control box to DVD/VCR settings Focus the specimen in the microscope eyepiece as you would for normal observations. Note, this requires that the View Selector Rod (blue on diagram) is in the full “in” position to deflect light toward the eyepieces. • • • Pull the View Selector Rod (blue box on diagram) on the right side of the microscope frame supporting the eyepiece to the “out” position. This deflects light from the eyepiece to the camera If you still see any light in the eyepieces, pull the View rod to the full out position. When finished with the camera/projector, push the View rod to the “in” position to resume using the eyepiece for adjustments or another specimen Note: If the projected view dims or adjust automatically to an unsatisfactory image, adjustments can be made on the camera Auto Exposure modes (see slide #7). A setting to manual mode is often effective. Link to SM 244 and SM245 Computer/Projection Instructions (pdf) FVCC:BioTech;Morrison 8/28/2012 Page 14 Camera: Sony DXC-390P Automatic exposure modes AE Level - adjusts the standard brightness level up to +/- one F –stop in a lens iris> AE Speed - selectable AE ( Auto Exposure) reaction speed to suit applications under varying lighting conditions AE Area - AE Area is a light metering system that includes 6 different modes ( Multi, Slit, Mid, Manual, Large, Spot) Video outputs RGB, Y/C, and Composite Video outputs Rear View, ports Side View, Controls FVCC:BioTech;Morrison 8/28/2012 Page 15 Projection : @ BRDG MTI-DAGE Camera Control Unit (CCU) and Camera Cable from Camera connects to CCU on back panel Via BNC connector to EXT-SYNC terminal VBS output to Monitor or other device using BNC connector from VIDEO port on back panel of CCU S-VIDEO output is also available CCU, located on PC Or Nearby On/Off w Green Indicator Light Camera, mounted on Microscope HotLink to DC-330 Camera Specs on a website FVCC:BioTech;Morrison 8/28/2012 Page 16 Projection: BRDG Lab Room Improvement Options Option #1 Canted Screen - Better angle but, - Costly to move 10’ screen and projector mounted in ceiling near HVAC, Sprinklers, Elec - Could drop below ceiling to reduce some cost but may not be “attractive” Option #2 Centralize Location - Good angle but blocks whiteboard, some blockage by Instructor PC - Same costly ceiling move issues as #1 Option #3 Move to longitudinal end of classroom - Good view angle for most, some blockage by students in first bench - Same costly ceiling move issues as #1 Option #4 Add Flat Screen TV to supplement projection screen - No costly ceiling and projector moves required - Would require routing VGA/HDMI and adapters if needed - Additional uses of Flat screen for announcements, special notices. Add Flat TV Option #4 FVCC:BioTech;Morrison 8/28/2012 Moved Option #2 Moved Option #3 Problem: With larger class sizes, some students cannot see the screen clearly SCREEN (current) Page 17