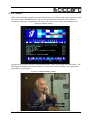
1
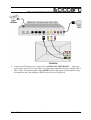
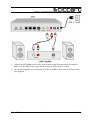
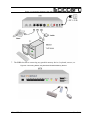
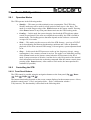
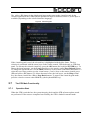
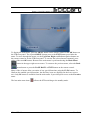
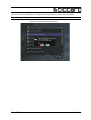
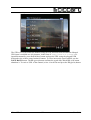
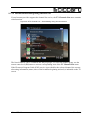
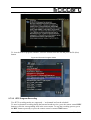
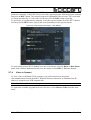
Set-Top Box
iTelec STB 82x
User Guide
Version 36
Notices
iTelec STB 82x User Guide
First edition: June 2009
Date modified: November 19, 2010.
For information, contact Elecard.
Phone: +7-3822-492-609; Fax: +7-3822-492-642
More information can be found at http://www.elecard.com.
For Technical Support, please contact the Elecard Technical Support Team:
[email protected] or [email protected].
Elecard provides this publication “as is” without warranty of any kind, either expressed or
implied.
This publication may contain technical inaccuracies or typographical errors. While every
precaution has been taken in the preparation of this document, the publisher and author assumes
no responsibility for errors or omissions. Nor is any liability assumed for damages resulting
from the use of the information contained herein. Changes are periodically made to the
information herein; these changes will be incorporated in new editions of the publication.
Elecard may make improvements and/ or change in the product(s) and/or the program(s)
described in this publication at any time.
Other company, product, trademarks, and service names are trademarks or service marks of
other companies or corporations.
Copyright © 2009-2010 Elecard. All rights reserved.
iTelec STB 82x
2
User Guide
CONTENTS
INTRODUCTION....................................................................................................................................................................5
1. STB DESCRIPTION......................................................................................................................................................6
1.1 STB DESTINATION.........................................................................................................................................................6
1.2 STB DESIGN................................................................................................................................................................ 6
1.2.1 Front Panel........................................................................................................................................................6
1.2.2 Back Panel.........................................................................................................................................................7
1.3 DELIVERY SET...............................................................................................................................................................8
1.4 MARKING......................................................................................................................................................................8
2. USING THE STB............................................................................................................................................................9
2.1 OPERATING LIMITATIONS.................................................................................................................................................9
2.2 THE STB PROVISIONING.................................................................................................................................................9
2.2.1 Safety Standards................................................................................................................................................ 9
2.2.2 External examination.........................................................................................................................................9
2.3 OPERABILITY TEST.......................................................................................................................................................10
2.4 TROUBLESHOOTING.......................................................................................................................................................10
2.5 CONNECTING UP THE STB.............................................................................................................................................11
2.6 BASIC STB OPERATIONS..............................................................................................................................................15
2.6.1 Operation Modes.............................................................................................................................................15
2.6.2 Controlling the STB.........................................................................................................................................15
2.6.2.1 Front Panel Buttons.................................................................................................................................................. 15
2.6.2.2 Remote Control......................................................................................................................................................... 16
2.6.2.3 Operations Available During Playback..................................................................................................................... 18
2.6.2.4 Text Input................................................................................................................................................................. 18
2.7 THE STB MAIN FUNCTIONALITY...................................................................................................................................19
2.7.1 Operation Start................................................................................................................................................19
2.7.2 On-air Broadcasting........................................................................................................................................21
2.7.2.1 Settings..................................................................................................................................................................... 21
2.7.2.2 Viewing of DVB Channels....................................................................................................................................... 24
2.7.2.3 Electronic Program Guide......................................................................................................................................... 29
2.7.2.4 Teletext..................................................................................................................................................................... 31
2.7.2.5 Recording of On-air Broadcasting............................................................................................................................ 32
2.7.3 Internet Broadcasting......................................................................................................................................36
2.7.3.1 Internet Broadcasting Using Announcements........................................................................................................... 36
2.7.3.2 Internet Broadcasting Using Channel List................................................................................................................. 38
2.7.3.3 IPTV Program Recording........................................................................................................................................ 40
2.7.4 Video on Demand............................................................................................................................................ 41
2.7.5 USB..................................................................................................................................................................43
2.7.5.1 Playback From External USB Storage...................................................................................................................... 43
2.7.5.2 Slide Show................................................................................................................................................................ 46
2.7.6 Favorites..........................................................................................................................................................47
2.7.7 Internet.............................................................................................................................................................50
2.7.7.1 Network Browsing.................................................................................................................................................... 51
2.7.7.2 Media Servers........................................................................................................................................................... 55
2.7.7.3 YouTube................................................................................................................................................................... 56
2.7.7.4 Web Navigation........................................................................................................................................................ 57
2.7.8 Voice over IP (VoIP)....................................................................................................................................... 61
2.7.8.1 VoIP Settings............................................................................................................................................................ 61
2.7.8.2 Outgoing Calls.......................................................................................................................................................... 63
2.7.8.3 Incoming Calls.......................................................................................................................................................... 64
2.7.8.4 Address Book........................................................................................................................................................... 65
2.7.8.5 Missed Calls, Answered Calls, Dialled Calls............................................................................................................ 66
2.7.9 Settings.............................................................................................................................................................68
iTelec STB 82x
3
User Guide
2.7.9.1 Information............................................................................................................................................................... 69
2.7.9.2 Language.................................................................................................................................................................. 69
2.7.9.3 Messages................................................................................................................................................................... 70
2.7.9.4 Time and Date.......................................................................................................................................................... 71
2.7.9.5 Video and Audio....................................................................................................................................................... 71
2.7.9.6 DVB......................................................................................................................................................................... 73
2.7.9.7 Network.................................................................................................................................................................... 74
2.7.9.8 Interface.................................................................................................................................................................... 79
2.7.9.9 Reset All Settings..................................................................................................................................................... 80
2.7.10 The STB Software Update..............................................................................................................................81
2.7.10.1 Update From USB Storage..................................................................................................................................... 81
2.7.10.2 Update via Network................................................................................................................................................ 81
APPENDIX A. THE STB SPECIFICATIONS – SUMMARY TABLE .................................................................................................82
iTelec STB 82x
4
User Guide
Introduction
This User Guide describes the iTeleс STB 82x Set-Top Box (hereinafter STB) that is intended
for receiving of digital TV (DVB-T) or Internet (IPTV) broadcasting in MPEG-2 and
MPEG-4.10 (AVC/H.264) formats.
The User Guide contains the following information:
•
The STB description and specifications
•
Common rules and safety standards
•
Instructions for the STB provisioning and usage
•
Maintenance and troubleshooting instructions
Please read all of the enclosed instructions before using the STB.
iTelec STB 82x
5
User Guide
1. STB Description
1.1
STB Destination
The STB is intended for receiving of digital data (video, audio, service information, user data,
etc.) that broadcast via digital TV systems (DVB-T) or Internet (IPTV). The STB decodes and
decrypts media data and renders it using the corresponding TV set, home theater or PC systems.
The STB is developed for use in households, hotels, health centers, rest homes, hospitals, and so
on.
The following digital data sources are supported:
•
Digital TV broadcasting (DVB-T) which signal is received using a DVB-T aerial
connected to the STB
•
Digital TV data broadcast via IP network (Ethernet, RJ-45)
•
Files from any type of USB storage (FlashDrive, portable USB disk, etc.)
User controls the STB via the following interfaces:
1.2
•
Issuing the command or selection of the STB internal menu command using the STB
remote control
•
Selection of the STB internal menu command using a keyboard or mouse connected
with the USB jacks
•
Selection of the STB internal menu command using the navigation buttons on the
STB front panel
STB Design
The STB is manufactured as the circuit board mounted in a plastic box with overall dimensions
238x145x35 mm.
1.2.1
Front Panel
The control elements, IR receiver window, LED indicators and USB connectors are placed on
the front panel.
iTelec STB 82x
6
User Guide
Figure 1. Front Panel
1. The receiving window for infrared signals from the remote control (RC)
2. Buttons for the STB menu navigation (Up
, Down
, Left
, Right
, OK
)
3. LED indicators:
4.
1.2.2
•
Power – indicates the supply presence (red), working mode (blue) or standby mode
(pink-pale)
•
Error – indicates an error or malfunction presence (red)
•
LAN – indicates the network data receiving/sending (green)
Two USB connectors for use with a portable memory device, keyboard, mouse, etc.
Back Panel
Figure 2. Back Panel
The following connectors are placed on the back panel:
1. DVB-T RF IN – input connection for a DVB-T aerial
2. DVB-T RF OUT – output connection for a DVB-T receiver
3. VoIP – RJ-11 socket for a telephone set connection
4. WAN, LAN – two Ethernet RJ-45 sockets for IP network connections (Internet and/or
LAN)
5. S-VIDEO – S-video output connection
6. VIDEO OUT – composite video output (RCA)
7. AUDIO OUT LEFT/RIGHT – left and right (white and red) analogue audio sockets for
connection to a standard audio system (RCA)
8. SPDIF – an output connection for digital audio
9. DC IN-12V – socket for the external power supply (delivered with the STB)
iTelec STB 82x
7
User Guide
1.3
Delivery Set
The STB delivery set is described in the following table.
Table 1. Delivery Set
Наименование
Set-Top Box iTeleс STB 82x
Transit packaging
Audio-video cable 3RCA-3RCA, 1.5 m in length
S-Video cable, 1.5 m in length
Ethernet cable 5 category (patch cord), 1 m in length
Power supply for iTeleс STB 82x, 12В, 2А
Remote control for iTeleс STB 82x
User Guide (this document)
1.4
Количество, шт.
1
1
1
1
1
1
1
1
Marking
The marking name plate located on the STB lower panel contains the following information:
•
Trade mark and the product full name
•
Country of design
•
Country of making
•
Date of making
•
Serial number
•
MAC address of the built-in Ethernet adapter
•
Power supply characteristics
iTelec STB 82x
8
User Guide
2. Using the STB
2.1
Operating Limitations
The STB is designed for operation in enclosed space with the following conditions:
•
Ambient temperature from +5°C to +40°C
•
Atmospheric moisture capacity from 40% to 80% (temperature 25°С)
•
Atmospheric pressure from 84 kPa to 107 kPa (from 630 to 800 millimeter of
mercury)
2.2
The STB Provisioning
2.2.1
Safety Standards
Attention! There is dangerous alternating voltage 220 V 50 Hz in the STB power supply unit.
Be careful during the STB operating time.
2.2.2
•
Unplug the mains cord from the wall outlet, if the STB is not going to be used for a
long period of time, or adverse weather conditions are expected (storm, lightning).
•
Unplug the mains cord from the wall outlet before the STB cleaning. Do not use
liquids or aerosol products to clean the STB. Wipe only the STB outer surface with a
dry cloth. Do not dismantle the case.
•
The STB is not user-serviceable. Servicing must only be attempted by suitably
qualified service personnel.
•
The STB must not be exploited in any location where it may become in contact with
any liquid or vapor.
•
Do not install the STB in any location where it may be exposed to direct sunlight or
heat from an open fire or radiator.
•
Place the STB on a hard flat surface where it may not be subject to physical shock,
vibration or dropping.
•
Do not cover the STB and do not place it on a soft surface. The airflow obstruction
may cause the STB to overheat.
External examination
After the transit packaging removing make the STB external examination and verify the
following:
iTelec STB 82x
9
User Guide
2.3
•
The delivery set checks with this User Guide
•
The STB is not mechanically damaged
•
Connectors are clean
•
Cables are serviceable
Operability Test
To test the STB operability, do the following:
Attention! Switch off all devices (STB, TV set, etc.) before connecting or disconnecting any
cables.
•
Plug a DVB-T antenna cable (for instance, any TV aerial for decimetric waves) into
the STB DVB-T RF IN connector
•
Connect one of the STB video outputs (S-VIDEO or VIDEO OUT) with the
corresponding television set input
•
Connect the STB analog stereo output jacks (white and red) with the television set
audio input
•
Connect the STB WAN socket to the local network outlet (Ethernet) using the
supplied patch cord
•
Connect the power lead from the power supply to the STB DC IN-12V input and
plug the power supply mains cord to the wall outlet (220 V, 50 Hz)
•
Switch on the STB with any button on the front panel or using the remote control
Attention! Before the remote control use, insert two batteries type AAA or LR03 (are not
supplied with the STB) into the battery compartment, taking care to observe the correct
polarity.
2.4
Troubleshooting
The following table describes possible malfunctions and troubleshooting methods.
Table 2. Troubleshooting
Malfunction and it Signs
Does not light Power indicator on the
front panel after the power supply is
switched on.
The remote control doer not operates.
iTelec STB 82x
Probable Cause
The power supply mains
cord is not plugged to the
wall outlet
The power supply unit
does not function properly.
The power supply is not
turned on.
10
Troubleshooting Method
Check the power supply
connection to the wall outlet.
Replace the power supply unit or
refer to the manufacturer.
Check the STB power supply.
User Guide
Malfunction and it Signs
Probable Cause
The remote control is used
improperly.
TV signal is present but video and/or
audio are absent.
Two batteries are absent in
the compartment.
Video and/or audio cables
are damaged or plugged
improperly.
The STB is in the standby
mode.
Troubleshooting Method
Check the remote control
direction. Be sure that the IR
receiver window on the STB front
panel is not overshadowed with
foreign objects.
Check the batteries presence in
the compartment.
Check the cable intactness and
connection accuracy.
Press any channel button on the
remote control or on the STB
front panel.
If described actions does not produce a result, refer to the supplier or contact the maintenance
service. Do not try to dismantle and repair the STB or the power supply unit.
2.5
Connecting up the STB
1. To connect the STB to the electricity supply network, connect the power lead from the
power supply to the STB DC IN-12V input and plug the power supply mains cord to the
wall outlet (220 V, 50 Hz).
2. Plug a DVB-T antenna cable (for instance, any TV aerial for decimetric waves) into the
STB DVB-T RF IN connector. The DVB-T RF OUT connector allows transmission of
received digital TV signal to other DVB-T receiving and processing devices.
3. Connect the composite video (CVBS) VIDEO OUT jack to the composite input of
television set or other analog video receiver (VTR, multimedia projector, etc.). The fourpins MiniDIN jack allows connection of the STB video output with any S-Video receiver. It
provides better picture quality and requires change of the Output Format parameter in the
Video and Audio configuration menu (see below).
iTelec STB 82x
11
User Guide
Figure 3. Connecting DVB-T Antenna and TV Set
4. Connect the STB analog stereo output jacks (AUDIO OUT LEFT/RIGHT — white and
red) with the television set audio input (or analog audio amplifier) using the supplied 3RCA3RCA cable. The digital optical output (SPDIF) allows high quality sound playback using
an external decoder and amplifier (SPDIF optical lead is not supplied).
iTelec STB 82x
12
User Guide
Figure 4. Connecting Audio
5. Connect the STB WAN socket to the local network outlet (Ethernet) using the supplied
patch cord. The LAN socket (if presented) allows the STB usage as a router.
6. An external telephone set is connected to the RJ-11 (VoIP) socket using a telephone cable
(not supplied).
iTelec STB 82x
13
User Guide
Figure 5. Connecting Telephone Set and Local Network
7. The USB slots allow connecting any portable memory device, keyboard, mouse, etc.
Figure 6. Connecting Mouse, Keyboard and Portable Memory Device
iTelec STB 82x
14
User Guide
2.6
Basic STB Operations
2.6.1
Operation Modes
The STB operates in the following modes:
2.6.2
•
Standby — This state provides minimal power consumption. The STB in the
Standby mode may not be used for a long period of time (up to a few days). The
mode is set with long pressing of the Power button on the remote control. Pressing
of the Power button or any front panel button activates the STB Loading mode.
•
Loading — In this mode the system integrity check and the STB software update
search are performed. If the tests are completed successfully, the STB is loaded in
normal mode. The loading process duration depends on the software version and
averages 20-30 seconds.
•
Work — This mode provides access to all of the STB features – preview of DVB-T
on-air broadcasting and Internet broadcasting (multicast and Video on Demand),
playback of files from external USB storage, web navigation, system adjustment and
so on.
•
Sleep — In this mode the STB processor works on low frequency (sleeps), energy
consumption is low, memory content is not lost. The mode is set with short pressing
of the Power button on the remote control when the STB operates in the Work
mode. It stops execution of all tasks. And the device only keeps track of the internal
clock information and waits the awakening command from the remote control (short
pressing of the Power button). After return to Work mode, the interrupted task is
continued (if possible).
Controlling the STB
2.6.2.1 Front Panel Buttons
The STB control is possible using the navigation buttons on the front panel (Up
, Left
, Right
, OK
).
, Down
The button functionality depends on the screen content displayed at the moment (menu – Menu,
playback control panel – Panel, navigation slider – Slider, confirmation window –
Confirmation). The functionality is described in the following table.
iTelec STB 82x
15
User Guide
Table 3. Front Panel Buttons
Pressed Button
Up
Down
Left
Right
OK
On-screen Content
–
Menu
Panel
Panel and Slider
–
Menu
Panel
Panel and Slider
–
Menu
Confirmation
Panel
Panel and Slider
–
Menu
Panel
Panel and Slider
–
Menu
Confirmation
Panel
Panel and Slider
Action
Volume level increase.
Jump to the previous menu command.
Volume level increase.
Activation/deactivation of the navigation slider.
Volume level decrease.
Jump to the next menu command.
Volume level decrease.
Activation/deactivation of the navigation slider.
Displaying the playback control panel.
Jump to the menu beginning or the menu hiding.
Cancel.
Consecutive activation of the panel elements.
Change of the slider position.
Hiding the playback control panel.
–
Consecutive activation of the panel elements.
Change of the slider position.
Displaying the menu.
Selection of the menu command.
Confirmation.
Selection of the panel element.
Setting of the current playback position in accordance with
the slider position.
Note: The navigation slider is hidden after a time (about 5 seconds), if it is deactivated (lost
focus).
2.6.2.2 Remote Control
The STB control is possible using the infra-red remote control.
iTelec STB 82x
16
User Guide
Figure 7. Remote Control
The remote control button functionality is described in the following table (numbers correspond
to the figure above).
iTelec STB 82x
17
User Guide
Table 4. Remote Control
Button
1
2
3
4
5
6
7
8
9
10
11
12
13
14
15
16
17
18
19
20
21
22
23
24,25
26
27
28
29
30, 31, 32, 33
Action
Standby mode On/Off.
Mute/unmute sound.
Teletext mode On/Off.
Selection of TV channels or input of digits.
Menu displaying.
Menu hiding.
Moving to the previous link on web page, menu navigation (multiple
items up), displaying the previous image (slide show mode).
Moving to the next link on web page, menu navigation (multiple items
down), displaying the next image (slide show mode).
Return to the previous menu.
Web page refresh.
Navigation button — Up.
Navigation button — Left.
Navigation button — Right.
Navigation button — Down.
Choosing button — OK.
Consecutive switching of TV channels forward (+) or backward (-).
Volume level increase (+) or decrease (-).
Playback.
Rewind.
Fast forward.
Record.
Pause.
Stop.
Reserved buttons (not used).
Settings menu.
TV broadcasting menu.
IP telephony menu (not implemented in this version).
Web browser activation.
Programmable buttons. The button functionality depends on the menu
that is active at the press moment.
2.6.2.3 Operations Available During Playback
To increase/decrease sound volume, use the VOLUME +/- buttons of the remote control. The
MUTE button enables the mute mode. To disable the mute mode, repress the MUTE button or
press one of the VOLUME +/- buttons. The sound controlling operations are displayed on the
screen.
To add the currently viewed channel to the Favorites menu (see The STB Main Functionality
section), press the remote control yellow (F3) button.
2.6.2.4 Text Input
If you need to type any text (a parameter value in the Settings menu, an item name in the
Favorites menu, etc.), use the remote control or any USB keyboard connected with one of the
USB jacks.
There are two text input modes – numerical and alphabetical. In the numerical input mode the
remote control or keyboard 0-9 buttons allow you to type ciphers directly. In the alphabetical
mode a keyboard allows you to type text with the Roman alphabet. The repeated press of the
remote control 0-9 buttons types Roman or Cyrillic letters (depending on the selected interface
language). The left/right (</>) arrow keys of the remote control select the text cursor position.
The up/down arrow keys allows you to change the highlighted letter.
iTelec STB 82x
18
User Guide
The yellow (F3) button in the alphabetical input mode turns on the virtual-keypad. In the
virtual-keypad mode the USB keyboard alphabetical input is disabled, but the Cyrillic input is
available (depending on the selected interface language).
Figure 8. Virtual-keypad
If the virtual-keypad is used, the selected key is highlighted with the blue frame. The key
selection is performed with the arrow keys on the remote control, USB keyboard, or STB front
panel. To activate the selected virtual key, press the OK button (the keyboard ENTER key). To
choose the input language, use the Lang virtual key or the remote control Page Refresh button.
To change the typed text case, use the Shift virtual key or the remote control red (F1) button. To
select the text cursor position, use the virtual arrow (< and >) keys or the remote control green
(F2) and yellow (F3) buttons. To delete character before the text cursor, use the Bksp virtual
key, the remote control blue (F4) or Page Back buttons. To turn off the virtual-keypad mode,
press the virtual or remote control Exit key (the keyboard ESC key).
2.7
The STB Main Functionality
2.7.1
Operation Start
When the STB is switched on, the system integrity check and the STB software update search
are performed. If the tests are completed successfully, the STB is loaded in normal mode.
iTelec STB 82x
19
User Guide
Figure 9. The STB Loading Screen
To display the main menu, press the MENU button on the remote control or the OK button on
the STB front panel. The repeated MENU button press or the EXIT button press hides the
menu. To move through the menu, use the Up, Down, Right, and Left navigation buttons on
the remote control or on the STB front panel. To execute the selected menu command, press
either of the two OK buttons. Return to the main menu is performed using the Main Menu
button in the upper-right screen corner. To return to the previous menu, select the Back
menu button or press the PAGE BACK or EXIT button on the remote control.
Many of the of menus allow execution of any special functions using the F1-F4 buttons. To
illustrate the enabled special functions, the auxiliary icons are displayed in the lower screen
area. Only F4 button is available from the main menu. It provides quick access to the Favorites
menu.
The last main menu item (
iTelec STB 82x
) allows the STB switching to the standby mode.
20
User Guide
Figure 10. Main Menu
2.7.2
On-air Broadcasting
2.7.2.1 Settings
To view on-air broadcast programs, press the TV button on the remote control or choose DVB
Channels from the main menu.
The STB provides receiving of DVB-T on-air broadcasting in the frequency range from 48 MHz
to 860 MHz. The frequency range scanning is necessary to form the broadcast channel list,
when the STB is started for the first time.
iTelec STB 82x
21
User Guide
Figure 11. Initial Configuration of DVB-T Broadcasting
Start the channel configuration using the F2 (green) button. The F1 (red) button is used to
abandon scanning.
During the scanning process the number of detected channels and the progress indicator are
displayed.
Figure 12. Automatic Channel Scanning
If number of the broadcast channels varies, the channel scanning must be repeated. Invoke the
Settings menu using the SERVICES button on the remote control and select the DVB
command. To scan the whole frequency range, use the Scan for Channels command. To scan
only one TV channel bandwidth (8 MHz), use the Scan Custom Frequency command. In the
iTelec STB 82x
22
User Guide
appeared window type the lower frequency limit using the numeric buttons and press the F2
(green) button for confirmation. To abandon the typed value, press the F1 (red) button.
Note! The current channel screening is suspended during the scanning process!
Figure 13. Scanning the Specified Frequency
iTelec STB 82x
23
User Guide
2.7.2.2 Viewing of DVB Channels
When the scanning is complete, you can view any detected channel using the Select Channel
command from the DVB Channels menu. To open the DVB Channels menu, press the TV
button on the remote control.
Figure 14. DVB Channels Menu
Figure 15. Channel Selection
Select the required channel using the 0-9 (selection by number) or CHANNEL +/- (consecutive
switching) buttons on the Remote control. To view the last selected channel, choose the
Selected Channel command and press the OK button.
iTelec STB 82x
24
User Guide
Figure 16. Multiscreen mode
If the TV button is pressed during the channel selection or view, four broadcast channels will be
displayed simultaneously (with the same frequency). The current channel is highlighted with the
light border. To switch channel in this multiscreen mode, use the arrow navigation buttons. To
display the next or previous channel quadruple, use the PREV/NEXT or PAGE UP/PAGE
DOWN buttons.
If a channel is broadcast in multilingual mode, the language selection menu can be invoked with
the F2 (green) button.
Figure 17. DVB-T Viewing
iTelec STB 82x
25
User Guide
Figure 18. Selecting Channel by Number Using the Numeric Buttons
To change the channel number (that is set during the automatic scanning), select the channel
from the Select Channel list and press the F4 (blue) button. Type new two-digit number in the
appeared window using the remote control numeric buttons. Confirm the typed value with the
F2 (green) button or abandon it with the F1 (red) button.
Figure 19. Channel Number Change
The Select Channel menu allows sorting of the channels using the F1 (red) button consecutive
press. The following sorting modes are available:
1. No sorting (the channels are ordered according to their numbers)
2. Sorting in alphabetical order
iTelec STB 82x
26
User Guide
3. Channel type sorting (TV channels at first, radio channels next), and then – alphabetically
4. Broadcasting frequency sorting, and then – alphabetically
Figure 20. Alphabetically Sorted Channel List
Figure 21. Type Sorted Channel List
To display the channel information, select the channel from the Select Channel list and press
the F2 (green) button. Any button pressing (remote control or front panel) hides the information
window.
iTelec STB 82x
27
User Guide
Figure 22. Channel Information
iTelec STB 82x
28
User Guide
2.7.2.3 Electronic Program Guide
The Electronic Program Guide (EPG) menu enables access to a program schedule that is
broadcast by the digital TV service provider. To see the program schedule, select the
Electronic Program Guide command and press the OK button.
Figure 23. Electronic Program Guide
Select the required channel from the appeared list and press OK. The program schedule for the
days immediately ahead will be displayed.
Figure 24. Program Schedule
iTelec STB 82x
29
User Guide
The F4 (blue) button is used for quick access to EPG. If the broadcast channel is not supplied
with EPG, the Electronic Program Guide menu is not available and the F4 button causes the
informational message.
Figure 25. Channel Non-supplied with EPG
iTelec STB 82x
30
User Guide
2.7.2.4 Teletext
If the selected channel contains the teletext information, the teletext mode can be turned on with
the remote control ON/OFF button. The teletext loading takes some time. The number of
currently loaded page is displayed in the upper-left screen corner during the loading process.
Figure 26. Teletext Viewing
Navigation in the teletext mode is performed with the remote control 0-9 or F1-F4 buttons. The
STB supports subtitles delivered as teletext. To access the teletext subtitles, enter appropriate
page number (usually 888).
Figure 27. Teletext Subtitles Viewing
iTelec STB 82x
31
User Guide
2.7.2.5 Recording of On-air Broadcasting
To record any on-air broadcast program, it is necessary to plug an external USB memory device
(for example Flash Drive or USB HDD). Only one channel recording is available at a time.
During the channel recording, view of another channel is impossible.
Figure 28. Recording of On-air Broadcasting
Attention! Only storages with the NTFS file system are supported!
The memory storage must be specified before the recording process start. To specify the
storage, open the Recording submenu from the DVB Channels menu, click Recorded Video
Location, and choose memory device from the appeared list.
iTelec STB 82x
32
User Guide
Figure 29. Recorded Video Location Menu
New records will be located in the pvr subfolder of the storage root directory. The Records
Path menu command provides quick access to this subfolder. The pvr directory has the
following tree-type structure:
/pvr
/record start date
/record start time
/part00.ts
/part01.ts
…
Attention! Proper allowance must be made for the memory device capacity since one hour of
recorded video content usually takes more than 1 GB. Furthermore some file systems do not
support file size exceeded 2 GB. Therefore the recorded media data is splitted into pieces
automatically.
The on demand record mode and record using schedule are supported.
To start on demand recording, press the REC button on the remote control or click the
button on the on-screen toolbar during view of an on-air broadcast program. To stop recording,
iTelec STB 82x
33
User Guide
press the REC (repeatedly) or STOP button or click the
button.
Figure 30. Recording on Demand
For the scheduled recording the EPG information can be used, or the record task parameters can
be set manually.
To use the EPG information, select the EPG Record command from the Recording menu.
Figure 31. EPG Record Menu
The hour marked time scale is displayed at the screen top. In the upper-left corner the scale start
date is indicated. The channel and program list is located under the scale. The list can be
scrolled with the PAGE UP and PAGE DOWN buttons. But the topmost channel is fixed and
iTelec STB 82x
34
User Guide
is always displayed in the list. It is useful for comparison of the channel schedule with another
channels. To fix any channel, select it in the Electronic Program Guide menu and press the F1
(red) button.
The arrow buttons are used for the program navigation. To select the program for recording,
press the F1 (red) button. The selected program is highlighted with the red band under the
program and under the time scale. The record tasks for the channels not presented in the EPG
are also indicated on the time scale.
The Manage Records menu is used for the manual management of the record tasks. The menu
allows creation, deleting, and editing of the record tasks.
Figure 32. Management of Record Tasks
The record task state is indicated in the list with the following icons:
— The record task is failed (USB storage is not connected)
— The record task is waiting for start (USB storage is connected)
— The record task is started
— The record task is completed
To add new record task, press the F2 (green) button.
iTelec STB 82x
35
User Guide
Figure 33. Record Task Editing
The appeared menu allows editing of the record task parameters. In this mode the cursor shape
is changed and the cursor points to the currently edited position. The record time and date are
specified in HH:MM and DD.MM.YYYY formats respectively. The records longer than 24
hours are not supported. To exit the editing mode, press the F1 (red) button. The cursor shape is
restored. The selected menu item is highlighted. To continue the task editing, select the required
parameter (menu item) and press the OK button. To confirm the parameter changes, press the
OK or the F2 (green) button. The F1 (red) button rejects the changes.
To edit the record task parameters, select the task in the list and press OK or F3 (yellow) button.
The edited values must be saved using the Save menu command. To exit from the editing mode
without saving, return to the previous menu using the PAGE BACK or the
button.
Press of the F1 (red) button deletes the selected record task. To clear the record task list entirely,
click the Clear List menu command.
2.7.3
Internet Broadcasting
2.7.3.1 Internet Broadcasting Using Announcements
To view TV programs delivered via IP network, you need connection to the global
telecommunication network (Internet). When the Internet connection is established, the IP
address is assigned to the STB automatically. Manual assignment of a static address is available
too.
To view IPTV broadcasting, select the IP Channels item from the main menu. The available
announced channel list (or message about any broadcasting absence) is displayed after few
seconds search. The list is refreshed every 2-3 seconds, therefore repetition of the channel
search is not needed. Select the required channel from the list and press the OK button. During
the playback the STOP and START functions are available. The Selected Channel menu
command provides quick access to the last selected channel.
iTelec STB 82x
36
User Guide
Figure 34. IPTV Channel List — Broadcasting Using Announcements
The STB receives the multicast channels using the SAP announcement mechanism. Manual
URL input is available too (for instance, in the form of 'rtsp://224.0.0.1:1234'). To
input data manually, press the F4 (blue) button and type the URL using the plugged USB
keyboard or the remote control numeric buttons. To erase incorrectly typed symbols, use the
PAGE BACK button. The F2 (green) button confirms the typed data, and the F1 (red) button
abandons it. To retrieve URL of the channel, select it in the list and press the F2 (green) button.
iTelec STB 82x
37
User Guide
2.7.3.2 Internet Broadcasting Using Channel List
If your Internet-provider supports the channel list service, the TV Channels List menu contains
extra functions.
Figure 35. IPTV Channel List — Broadcasting Using Announcements
The listed channels can be combined into subject groups. To select the channel group, use the
remote control red (F1) button or activate corresponding item of the TV Channel List menu.
If the Electronic Program Guide (EPG) service is provided for the selected channel, the current
telecasting information (name, times of the broadcast beginning and end) is indicated on the TV
screen.
iTelec STB 82x
38
User Guide
Figure 36. IPTV With the EPG Service
To switch the short/detailed mode of the information indication during the program view, use
the remote control blue (F4) button. The remote control Left and Right buttons are used for
program selection. The channel selection is performed with the Page Up and Page Down
buttons.
Figure 37. IPTV With the EPG Service – Short Information
iTelec STB 82x
39
User Guide
Figure 38. IPTV With the EPG Service – Detailed Information
To view the nearest program schedule, select the channel from the list and press the F4 (blue)
button.
Figure 39. Electronic Program Guide
2.7.3.3 IPTV Program Recording
Two IPTV recording modes are supported — 'on demand' and 'on the schedule'.
To start 'on demand' recording during the Internet broadcast view, press the remote control REC
button or click the corresponding item in the screen menu. To stop the recording process, press
the REC button repeatedly or press the remote control or menu STOP button.
iTelec STB 82x
40
User Guide
To start 'on the schedule' recording, use EPG information (if available) or specify the record
parameters manually. If the EPG is used, select the required program from the program schedule
and press the REC button. The selected program is highlighted with red color. The record task
is created automatically. To cancel the record task, press the REC button repeatedly.
To specify the record parameters manually, select the required channel from the IPTV channel
list and press the REC button. Specify the record parameters in the appeared menu.
Figure 40. IPTV Program Recording – Task Editing
To quick jump from the IPTV channel list to the record menu, select the Back or Main Menu
menu items (with the Left button) and press the remote control REC or F4 (blue) buttons.
2.7.4
Video on Demand
To view Video on Demand (VoD) programs, you need connection to the global
telecommunication network (Internet). When the Internet connection is established, the IP
address is assigned to the STB automatically.
Note! Usually the VoD service is chargeable (user charge or pay per view).
To request the available program list from VoD server, select Movies (VOD) from the main
menu.
iTelec STB 82x
41
User Guide
Figure 41. Video on Demand Menu
To select movie, highlight required program and press the PLAY button on the remote control.
During the playback the STOP, PAUSE, FFWD, and REW functions are available. The
FFWD or REW repeated press changes the fast forward or rewind speed.
Figure 42. Video on Demand – Fast Forward (6x Speed)
To change the current playback position, use the navigation slider (see the tables above
describing the STB front panel and remote control buttons).
iTelec STB 82x
42
User Guide
Figure 43. Video on Demand – Navigation
It is possible to input address for the VoD program receiving. To input address manually, press
the F4 (blue) button and type the URL using the plugged USB keyboard or the remote control
numeric buttons. To erase incorrectly typed symbols, use the PAGE BACK button. The F2
(green) button confirms the typed data, and the F1 (red) button abandons it.
The Selected Movie menu command provides quick access to the last viewed movie.
2.7.5
USB
2.7.5.1 Playback From External USB Storage
To view previously saved media files, plug an external USB storage (FlashDrive, portable USB
disk, etc.) and select USB from the main menu.
iTelec STB 82x
43
User Guide
Figure 44. USB Menu — All Files
The USB menu allows exploring files and directories located on any plugged USB storage. The
F4 (blue) button switches the file filtering mode. The following modes are available (types of
displayed files):
•
— only video files
•
— only audio files
•
— only image files
•
— all files
The icon of the current filtering mode is located in the upper-left screen corner.
iTelec STB 82x
44
User Guide
Figure 45. USB Menu — Video Files
The F2 (green) button invokes the USB settings menu that allows user to set the playback, slide
show, and file filtering modes.
Figure 46. USB Settings Menu
During playback of the USB media files the following auxiliary controls appear on the screen:
The Playback Mode button sets the playback mode for the selected media file. The repeated
button click changes the mode. The following modes are available:
•
iTelec STB 82x
— playback of one selected file
45
User Guide
•
— file by file consecutive playback
•
— looped file by file consecutive playback
•
— continuous playback in random file order
2.7.5.2 Slide Show
The Slide Show button turns on the image viewing. When any image is displayed, the viewing
control buttons appear on the right side of screen. The upper and lower buttons change the
currently displayed image. The PAGE UP and PAGE DOWN buttons on the remote control
perform the same actions. The second button switches the image viewing mode. The following
modes are available:
•
— image viewing is switched off
•
— selected image is displayed continuously
•
— displayed images are changed one after another with the specified time lag
•
— displayed images are changed in random order with the specified time lag
The third button allows user to set the slide show time lag (the displaying time for each image).
The image viewing process can be accompanied by music playback. If any images are located
in the music file directory (for instance, album covers), the image displaying is started
automatically in background mode. This option is disabled, if the image viewing is activated by
user.
iTelec STB 82x
46
User Guide
Figure 47. Displaying of Album Cover During the Music Playback
The image viewing process is also available, if any broadcast program is received and viewed.
2.7.6
Favorites
The Favorites menu allows quick access to the selected media data.
Figure 48. Favorites Menu
To add new item to the Favorites list from any menu, select required element and press the F3
(yellow) button on the remote control. You can add the current audio or video program to
Favorites using the same button.
iTelec STB 82x
47
User Guide
Figure 49. Addition to the Favorites From the Movie List
Figure 50. Addition to the Favorites During Playback From USB Storage
To add new link to the list of favorite media content, select the Add URL command, press the
OK button, and type the address in the appeared window using the remote control numeric
buttons or plugged USB keyboard. To erase incorrectly typed symbols, use the PAGE BACK
button.
iTelec STB 82x
48
User Guide
Figure 51. Manual Link Addition to the Favorites List
The F2 (green) button confirms the typed data, and the F1 (red) button abandons it.
To rename any element from the Favorites list, press the F4 (blue) button and type the new
name.
Figure 52. Favorites – Item Renaming
The F3 (yellow) button allows editing of the selected item link. To display the current link
information, press the F2 (green) button.
iTelec STB 82x
49
User Guide
Figure 53. Favorites – Link Information
Note! The information about the last viewed program (DVB-T or IPTV) or file (USB storage) is
kept in the STB memory. The program/file playback is continued automatically, when the STB is
turned on and the loading is completed. This option can be disabled in the Interface part of the
Settings menu.
2.7.7
Internet
The STB provides several types of internet services. To select a required service, use the Web
Services menu.
iTelec STB 82x
50
User Guide
Figure 54. Web Services Menu
2.7.7.1 Network Browsing
The STB allows you to browse your network common resources and to play available media
files. For instance, this function allows you to play video or view photos from shared folders of
your home PC connected to the STB LAN socket.
To start the network browsing, select the Network Browsing item from the Web Services
menu.
Figure 55. Network Browsing
iTelec STB 82x
51
User Guide
To work with the network resources, at first select required workgroup from the list.
Figure 56. Workgroup List Browsing
The next step is selection of computer and browsing of its shared folders list.
Figure 57. Browsing of Shared Folders List
The shared folder selected for the browsing is automatically added to the special Network
Places menu.
iTelec STB 82x
52
User Guide
Figure 58. Folder Addition to the Network Places Menu and File Browsing
Content browsing for the folders added to the Network Places menu is performed in exactly the
same way as a USB storage browsing.
Figure 59. Network Places Menu
If the selected folder is not added to the Network Places menu and the error message is
displayed, it means that access to the selected folder is restricted by the folder owner.
iTelec STB 82x
53
User Guide
Figure 60. Folder Addition to the Network Places Menu – Error Message
To enter required username and password, press the remote control blue (F4) button and type.
Figure 61. Username Entering
iTelec STB 82x
54
User Guide
Figure 62. Password Entering
If the username and password are specified correctly, the shared folder is added successfully
and the file browsing is continued. The next access to this folder does not require the username
and password entering. To reset the access information, recall the entering menu (F4 button)
and delete the entered data. The specified username and password are not available after the
STB restart.
To remove unnecessary or inaccessible folder from the Network Places menu, highlight the
folder and press the remote control red (F1) button.
2.7.7.2 Media Servers
The Media Servers item of the Web Services menu allows you to browse available media
servers.
iTelec STB 82x
55
User Guide
Figure 63. List of Media Servers
Content browsing for the selected server is performed in exactly the same way as shared folders
and USB storage browsing.
Figure 64. Media Server Browsing
2.7.7.3 YouTube
The YouTube menu allows view the list of the most popular video clips. To start playback,
select the clip in the list and press the OK button.
iTelec STB 82x
56
User Guide
Figure 65. YouTube Menu
To search a video clip, click the Video Search command and specify search keywords in the
appeared window. To search clips that descriptions and comments do not contain certain words,
type the '-' (minus) symbol before these words. The search process is started, if the typed
keyword are confirmed with the OK button press.
Figure 66. Search of YouTube Clips
2.7.7.4 Web Navigation
The STB allows web navigation. To start the web browser, from the Internet menu select the
iTelec STB 82x
57
User Guide
Internet Browsing service or press the WEB button on the remote control. To exit from the
web mode, press the EXIT button. Plug a USB keyboard and/or mouse for the web browsing
facilitation.
The browser operates in one of two modes – common and MiddleWare. The common mode is
default and provides web navigation. The browser starts work in this mode right after the WEB
button press.
Figure 67. Web Browser Loading
To type address of the required website, invoke the control panel using the WEB button.
Figure 68. Web Browser – Control Panel
The second WEB button press hides the control panel. For the address typing you can use the
virtual keyboard that is invoked with the SERVICES button. Select the required virtual key
using the navigation buttons (Up, Down, Right, and Left) and press the OK button.
Figure 69. Web Browser – Control Panel and Virtual Keyboard
The second SERVICES button press or the EXIT button press hides the virtual keyboard. To
iTelec STB 82x
58
User Guide
confirm the typed address, press the OK button on the remote control or click the
button
on the control panel. The functions of the keyboard color buttons are the same as the functions
of the corresponding color buttons on the remote control. The
buttons allow
navigation to the previous and next visited web pages. The
button displays the Favorites
list.
Figure 70. Web Browser – Favorites
To add the current web page to the Favorites, press the F3 (yellow) button.
Figure 71. Web Browser – Adding to Favorites
To invoke the web browser settings (scale, cleaning of Favorites list, etc.), press the TV button
on the remote control.
Table 5. Functionality of the Remote Control Buttons in the Web Navigation Mode
Button
SERVICES
SERVICES or EXIT
UP (navigation button)
DOWN (navigation button)
RIGHT (navigation button)
LEFT (navigation button)
PAGE BACK
REFRESH
VOLUME+
VOLUME-
iTelec STB 82x
Action
Displays the virtual keyboard.
Hides the virtual keyboard.
Moves the cursor upward.
Moves the cursor downward.
Moves the cursor rightward .
Moves the cursor leftward.
Moves to the previous page.
Refreshes the current page.
Scrolls upward.
Scrolls downward.
59
User Guide
Button
Action
CHANNEL+
CHANNELTV
WEB
F3 (yellow)
EXIT
Scrolls leftward.
Scrolls rightward .
Invokes the browser settings menu.
Displays/hides the control panel.
Adds the current page to the Favorites list.
Closes the web browser.
The STB allows operation with any MiddleWare supplied by your Internet Service Provider
(ISP). The MiddleWare installed on broadcasting servers provides the STB user interface,
manages the system, and controls all services. To switch on the MiddleWare mode, specify the
MiddleWare server address (provided by ISP) in the STB settings. If the server address is set
and the Auto Loading MiddleWare option is enabled (see the Settings section), the
MiddleWare mode is the STB default loading mode.
Figure 72. Web Browser – MiddleWare
In this mode the cursor is not displayed, and scrolling, virtual keyboard, and control panel are
not available.
During playback of any media content in the MiddleWare mode the remote control buttons
perform the following actions:
PLAY — playback start/stop
PAUSE — pause
FFWD — fast forward
REW — rewind
The WEB button press switches the MiddleWare mode to the common (web navigation) mode.
To close the web browser, use the EXIT button.
The proxy server settings (if it is necessary for the Internet access) are available via the HTTP
Proxy command from the Network → Settings → Internet Browsing menu.
iTelec STB 82x
60
User Guide
Figure 73. Proxy Settings
2.7.8
Voice over IP (VoIP)
2.7.8.1 VoIP Settings
Figure 74. VoIP Menu
If your ISP supports the VoIP service, the STB adjustment is necessary before the service use.
The VoIP settings are available in the Account submenu from the VoIP settings..
iTelec STB 82x
61
User Guide
Figure 75. Account Submenu
Type the VoIP server IP address in the Server field.
Figure 76. VoIP Server Address Setting
The server address confirmation enables the Login, Password, and Realm fields. The
Password string is displayed only during the password typing. If all fields are filled in correctly
and the server is available, the Login to Server menu command activates a try for the service
connection. If any errors are absent, the Login to Server field is replaced by the Disconnect
one and the Account icon becomes green.
iTelec STB 82x
62
User Guide
Figure 77. VoIP Menu After the Server Connection
When the server is connected, any home and cellular telephone calls are also available.
2.7.8.2 Outgoing Calls
To make an outgoing call, select the Dial command and type the abonent SIP address in the
appeared window. In the server connected mode you can type any home or cellular number or
character name. If server is not connected, only peer-to-peer call are available and only IP
address is acceptable.
Figure 78. SIP Address Typing
After the address confirmation the call is started. During the telephone conversation the Call
iTelec STB 82x
63
User Guide
icon blinks in the upper-right screen corner. To finish the conversation, hang up the
telephone receiver or select the Hang up menu command
Figure 79. VoIP Menu – Outgoing Call Mode
2.7.8.3 Incoming Calls
When an incoming call is received, the Call
icon blinks in the upper-right screen corner.
Figure 80. VoIP Menu – Incoming Call Mode
To answer an incoming call, use one of the following ways:
iTelec STB 82x
64
User Guide
•
Take up your handset
•
Press the PHONE button on the remote control
•
Select the Answer Call command from the VoIP menu
2.7.8.4 Address Book
Figure 81. Address Book Menu
The address book contains the phone directory. To add new contact, select the Add command
from the Address Book submenu or press the F3 (yellow) button from all of the VoIP
submenus. The SIP address is typed in the same way as described in the Outgoing Calls section.
iTelec STB 82x
65
User Guide
Figure 82. Addition to the Address Book
As in the case of Favorites list, any contact can be renamed using the F4 (blue) button. The F3
(yellow) button allows editing of the selected contact data. To display the current contact
information, press the F2 (green) button. The F1 (red) button removes the selected contact from
the address book.
2.7.8.5 Missed Calls, Answered Calls, Dialled Calls
These submenus list missed, received, and dialled calls. To add call from any list to address
book, press the F3 (yellow) button. To display the selected SIP address, use the F2 (green)
button. The F1 (red) button removes the selected call from the list. The Clear list command
clears the current call list entirely.
iTelec STB 82x
66
User Guide
Figure 83. Missed Calls List
Figure 84. Answered Calls List
iTelec STB 82x
67
User Guide
Figure 85. Dialled Calls List
2.7.9
Settings
To adjust the STB settings, select the Settings item from the main menu or press the
SERVICES button on the RC.
Figure 86. Settings Menu
iTelec STB 82x
68
User Guide
Figure 87. Settings Menu (2)
2.7.9.1 Information
To display the information about STB, software version, network parameters, etc., select the
Information command from the Settings menu.
Figure 88. Information
2.7.9.2 Language
The Language menu item allows you to specify the STB user interface language. Selection of
this command opens the list of available languages. The current interface language is
iTelec STB 82x
69
User Guide
highlighted.
Note! The language change is applied only after the STB system restart.
2.7.9.3 Messages
The Messages menu allows receiving and reading messages from your telecoms operator.
Figure 89. Messages Menu
If a new message is received, the unread message icon appears in the upper-right screen corner.
Figure 90. Main Menu With Unread Message Icon
iTelec STB 82x
70
User Guide
To read the received message, open the Messages menu and activate the required message.
If all of the received messages are read, the unread message icon disappears.
Figure 91. Message Reading
2.7.9.4 Time and Date
The Time and Date menu allows you to set the time values that are necessary for correct work
of some features (EPG, and so on):
To set the current time, select the Set Time command and specify the time value using the
remote control numeric buttons. The F2 (green) button confirms the typed data, and the F1 (red)
button abandons it.
To set the time zone, select the Set Time Zone command, choose the required time zone using
the navigation (Up, Down, Right, and Left) buttons, and press the OK button.
To set the current date, select the Set Date command and specify the date value using the
remote control numeric buttons. The F2 (green) button confirms the typed data, and the F1 (red)
button abandons it.
The NTP Server menu item allows you to specify the name or IP-address of the time
synchronization server.
2.7.9.5 Video and Audio
The Video and Audio menu allows you to set the common (for all sources) parameters that
determine the media data playback.
iTelec STB 82x
71
User Guide
Figure 92. Video and Audio Settings
The following settings are available:
TV Standard – sets standard of the received TV signal. Available values:
•
NTSC
•
SECAM
•
PAL_I
•
PAL_M
Output Format – activates one of the STB video outputs:
•
S-Video
•
CVBS
Screen Aspect Ratio – sets the picture aspect ratio for the best fit to the screen size of used
TV set. The following values are available:
•
4:3
•
16:9
Picture Size – changes the picture size mode using the repeated OK button pressing. The
following modes are available:
•
Auto Scale – The picture is scaled so that it occupies all available screen area
with the aspect ratio keeping
•
Auto Stretch – The picture is scaled to full screen size without the aspect
ratio keeping
•
Original Size – The picture size is not changed
Screen Filtration — enables/disables picture filtration during web browsing (can make
some difficulties for small font reading).
iTelec STB 82x
72
User Guide
Color Settings — adjusts the picture hue, saturation, contrast, and brightness using the Up,
Down, and OK buttons. The EXIT button closes the Color Settings menu. If any program
is not viewed during the color adjustment, the test image is displayed for the settings visual
control.
Figure 93. Color Settings
2.7.9.6 DVB
The DVB settings menu allows configuration of the broadcast channels and adjustment of the
DVB parameters.
Figure 94. DVB Settings Menu
iTelec STB 82x
73
User Guide
The Clear Current Channel List command removes all items from the configured channel list.
After the list clearing the channels must be configured again using the Scan for Channels or
Scan Custom Frequency commands.
The Reset Channel Numbers command allows reordering of the configured channel numbers.
This command does not clear the channel list.
The DVB Signal Inversion, DVB Scan Speed, and Extended Scan of DVB Channels
parameter values are set using the OK button repeated pressing.
To set the Lower DVB Frequency Limit, Upper DVB Frequency Limit, and DVB
Frequency Step parameter values, use the remote control numeric buttons. Confirm the typed
value with the F2 (green) button or abandon it with the F1 (red) button.
In the extended scanning mode the channel scanning is performed in extended frequency range
(not only for reference frequencies). This option increases the scanning time.
The DVB Frequency Step parameter has an influence on the scanning speed. The default
parameter value is 8 MHz. The large value can cause missing of some channels.
2.7.9.7 Network
The Network settings menu allows you to set the network parameters.
Figure 95. Network Settings
The Network menu is divided into the following submenus:
iTelec STB 82x
74
User Guide
Figure 96. WAN Menu — Internet Connection Settings
Address Mode – specifies the address receiving mode for the Internet network adapter:
•
DHCP – address is received automatically (if it is possible)
•
Static – address is specified by user
IP Address – specifies the STB IP address that is used, if the automatic address receiving is
disabled or unavailable
Netmask – specifies the mask of subnetwork to wich the STB is connected
Gateway – specifies the gateway address that is used, if the automatic address receiving is
disabled or unavailable
DNS Server Address – specifies the DNS server address that is used, if the automatic
address receiving is disabled or unavailable
Renew IP-address Settings – applies the Internet network adapter settings
iTelec STB 82x
75
User Guide
Figure 97. LAN Menu — LAN Adapter Settings
Enable Gateway – enables/disables the network gateway mode for the second network
adapter:
•
Off – the gateway mode is disabled
•
DHCP and NAT – the automatic address setting (for connected network
devices) and the network address translation are enabled
•
Bridge – the bridge mode is enabled (the STB operates as a two-port router)
•
NAT – only the network address translation is enabled (the network
parameters of connected devices must be set manually)
Batdwidth Limit – limits network traffic for the second adapter. This option is unavailable,
if the gateway mode is disabled. In the bridge mode the bandwidth limitation is available if
only the connected device address is specified explicitly. To disable the traffic limitation, the
zero value must be set.
Client MAC Address – specifies the MAC address of the device connected to the second
network adapter. This option is available, if the bridge mode and traffic limitation are
enabled. If the value is not specified or incorrect, the network traffic is blocked.
Address Mode 2 – specifies the address receiving mode for the second network adapter:
•
DHCP – address is received automatically (if it is possible)
•
Static – address is specified by user
IP Address – specifies the STB IP address (second network adapter)
Renew IP-address Settings – applies the second network adapter settings
The Wireless menu allows settings of a wireless network adapter (is not included into the
STB delivery set).
iTelec STB 82x
76
User Guide
Figure 98. Wireless Menu – Wireless Network Settings
If a wireless network adapter is connected to the USB socket, the STB creates an 'ad hoc'
home wireless network automatically. If the WAN network adapter is adjusted and
connected to the Internet, the Internet access is available in the STB home wireless network.
If the adapter is absent or disconnected, the wireless network settings are disabled.
IP Address – IP-address of the STB wireless network
Netmask – mask of the STB subnetwork
ESSID – network name
Channel Number – number of the wireless network channel
Mode – encryption mode. The following encryption modes are available for the wireless
network:
•
No – encryption is disabled
•
WEP – wireless traffic is encrypted with WEP
Password – wireless network password, if the encryption mode is enabled
Renew IP-address Settings – applying of the specified adapter settings
iTelec STB 82x
77
User Guide
Figure 99. IP Channels Menu
IPTV Channel List – if the SAP parameter value is set, the STB retrieves the IPTV channel
list using the SAP-announcements. If the SAP-announcements are not broadcast in the
network, the channel list provided with HTTP server can be used. In this case the URL
parameter value must be set. This value enables the following auxiliary parameters:
IPTV Channel List – this parameter specifies URL of the channel list. The plain text, M3U,
and XSPF list formats are supported.
IPTV EPG – specifies URL for the Electronic Program Guide (if the broadcast channel list
is supplied with this service)
Figure 100. Movies (VOD) Menu
iTelec STB 82x
78
User Guide
VOD Playlist – this parameter specifies interpretation of the next parameter. The following
values are available:
•
URL – the next parameter specifies URL of the XSPF VOD playlist
•
IP-address – the next parameter specifies the address of server that provides the list
of programs available for playback from the VoD server
IP Address of VOD Server – specifies the address of server that provides the VoD
services.
Figure 101. Internet Browsing Menu
HTTP Proxy – specifies the address of proxy server that is used for web navigation.
HTTP Proxy Login – specifies the proxy login name.
HTTP Proxy Password – specifies the proxy login password.
MiddleWare Address – specifies the IP address of MiddleWare server.
Auto Loading MiddleWare – enables the STB automatic loading in the MiddleWare mode.
Note! In the MiddleWare mode use of the proxy server is not recommended.
2.7.9.8 Interface
The Interface menu allows you to adjust the STB user interface parameters – menu transition
effects, highlight color. Также имеется возможность настроить следующие параметры:
Resume Playback After Start — if enabled, the restarted STB resumes playback of the last
selected DVB or IP channel.
Autoplay — if enabled, the DVB or IP Channels menu opening automatically starts playback
of the last viewed or the first in the list channel. This feature does not stop the channel playback
started previously.
iTelec STB 82x
79
User Guide
VoIP Indication — if enabled, the IP call information is displayed on the screen. If the option
is disabled, the VoIP operation is not indicated.
Buzzer — if enabled, the STB provides buzzer together with the telephone set.
Figure 102. Interface Settings Menu
2.7.9.9 Reset All Settings
The Reset All Settings command allows you to reset all parameters to the default values
(factory settings). To confirm the reset, press the F2 (green) button. The F1 (red) button
abandons it.
Figure 103. Parameter Reset Confirmation
iTelec STB 82x
80
User Guide
2.7.10
The STB Software Update
The software update is performed during the STB loading. The update is possible both from any
USB storage connected to the STB and via the IP network. The minimal update search time is
about 6 seconds and 1 second, respectively. If the previous STB loading was not completed
successfully, the system integrity check is performed during about 20 seconds. If the software
update is available, the loading time increases up to 1-2 minutes (depends on the data amount).
The STB is restarted, if any critical system components are changed during the update process.
2.7.10.1 Update From USB Storage
To perform the STB software update from any USB storage, copy the update file with the
filename extension .EFP to the storage root directory. The directory may contain any number of
update files. When the USB device is connected to the STB and the STB is restarted, the system
automatically determines the last version of suitable file and starts update process. The STB is
restarted, if any critical system components (for instance, core) are changed during the update
process. If the suitable .EFP file is not found on the USB storage, the system tries to find it via
the network. Updates from USB storage have higher priority than network updates.
2.7.10.2 Update via Network
To perform the STB software update via network, connect the PC with started Elecard STB
Firmware Update Server to the STB network segment. If the STB system detects the new
software version sent via the network, the update process is started. Updates from USB storage
have higher priority than network updates. The STB is restarted, if any critical system
components (for instance, core) are changed during the update process.
The update and loading progress information is displayed on the screen.
Attention! The STB incorrect operation may be caused by the update process abend. If the
network cable or the USB storage is disconnected during the update process for some reason,
wait till the STB loading is completed and try to repeat the software update.
iTelec STB 82x
81
User Guide
Appendix A. The STB Specifications – Summary Table
Supported Input Formats
Video
Audio
IP Telephony
Stream an file formats
Network protocols
Web browser
MPEG-1, (ISO/IEC 11172-1), MPEG-2 (ISO/IEC 1318-1) MP@ML, MPEG4.2 (ISO 14496-2) ASP, MPEG-4.10/H.264 (ISO 14496-10) [email protected]
MPEG-1 Layer I, II, III (MP3) ( ISO/IEC 11172-3, ISO/IEC 13818-3),
MPEG-4 AAC (ISO 14496-3)
SIP (G711)
MPEG-2 TS/PS, AVI, MP4
UDP (unicast/multicast), IPv4,ICMP, DHCP client,IGMP v.3 (RFC2236),
RTP (RFC1889), RTSP (RFC2326)
HTML 4.02, JavaScript 1.5, XHTML, CSS-2, SSL3.0, DOM-2, XML
Supported Output Formats
Video
Analog audio output
Digital audio output
Up to D1 (720x576 - PAL and 720x480 – NTSC)
Stereo 20 - 20000 Hz
Stereo PCM, AC3, DTS
TV Tuner
Standard
Frequency range
Bandwidth
Gain
DVB-T (ETSI 300 744)
Input
Output
IEC female 75 Ohm
IEC male 75 Ohm
174-230 MHz, 474 – 858 MHz
7/8 MHz
50 Db
Jacks, Plugs, and Interfaces
Video
Audio
IP Telephony
USB
Ethernet
TV Tuner
Composite (RCA), S-Video
Stereo RCA, SPDIF (Optical)
Phone jack RJ-11, FXS
USB 1.1 Full-speed up to 12 Mbit/s (х2)
RJ-45 10/100 Mbit/s (x2)
IEC
Power Supply
Type
Input voltage
Output voltage
Power consumption in Work
mode
Power consumption in Standby
mode
Power consumption in Sleep
mode
External unit
~100-240 V AC 50-60 Hz
12 V DC
10 W
5W
< 0,5 Вт
Weight and HWD
Weight
HWD
450 гр
238x145x35 mm
Working conditions
Temperature
Atmospheric moisture capacity
Atmospheric pressure
iTelec STB 82x
+5...+40 °C
40—80 %
84—107 kPa (630—800 mm of mercury)
82
User Guide