1
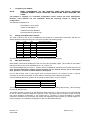
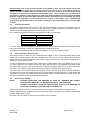
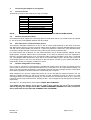
ICA93LV
I2C Communications Adapter User Manual
Contents
1.
Introduction
1.1. Packing List
2.
Configuring the Adapter
2.1. Setting the Adapter Base Address
2.2. Wait State Generator
2.3. Interrupt Generation
2.4. Bus Termination and Protection
2.5. Installing the Adapter
3.
Connecting the Adapter to your System
3.1. Connector Pinout
3.2. Normal/Long Distance Mode
3.3. Bus Capacitance Limitations/Cable Choice
3.4. Variable Voltage Bus Power Supply
4.
Getting Started
4.1. Resetting the Adapter
4.2. Introduction to the Utilities
5.
Using the Utilities
5.1. C Routines
5.2. TurboBASIC Routines
5.3. DLLs for Programming in Microsoft Windows 3.X Environments
6.
Further Information
7.
The Real-Time Bus Monitor
2
Appendix A I C Communications Adapter Status Codes
2
Appendix B – I C Communications Adapter Control Codes
2
Appendix C - The Most Commonly Asked I C Questions
Calibre UK Limited
Cornwall House, Cornwall Terrace
Bradford, West Yorkshire, BD8 7JS, England
Tel No: (01274) 394125
Fax No: (01274) 730960
Email [email protected]
web-site www.calibreuk.com
Revision 1.7
09/12/1999
1
1
2
2
2
3
3
3
4
4
4
4
4
5
5
5
6
6
10
15
21
22
23
24
25
1.
Introduction
2
The I C Communications Adapter is a half length PC interface card designed to fit any IBM PC
2
compatible expansion slot. Based on the Philips PCF8584 bus controller, it features full I C bi-directional
2
compatibility as either a master or slave. I C connections are made via a 9 way “D” socket. This product
complies with the requirements of EEC Directive 89/336 for EMC and is CE marked.
1.1.
Packing List
Your I2C Communications Adapter is supplied with the following items:A.
I2C CD ROM
B.
The ICA93 plug-in card (the actual adapter)
TO AVOID DAMAGE TO THIS PRODUCT PLEASE BE SURE TO READ PAGE 7, SECTION 5.4
BEFORE USE
Revision 1.7
09/12/1999
Page 1 of 27
2.
Configuring the Adapter
NOTE:
MANY COMPONENTS ON THE ADAPTER CARD ARE STATIC SENSITIVE.
OBSERVE NORMAL STATIC SENSITIVE PRECAUTIONS WHEN HANDLING THE
CARD!
The adapter is supplied in a standard configuration which should suit most applications.
However, some features are link selectable. Read the following section to change the
configuration.
The standard configuration is:
base address = 0310 (Hex)
number of wait States = 1
hardware interrupts disabled
bus termination & protection off
2.1.
Setting the Adapter Base Address
The card occupies a pair of PC I/O addresses and responds to input/output commands. Set the hex
starting address of this pair using LK1, LK2 and LK3 within the following range:
LK3
0
0
0
0
1
1
1
1
LK2
0
0
1
1
0
0
1
1
LK1
0
1
0
1
0
1
0
1
Start Address(Hex)
0310
0312
0314
0316
0318
031A
031C
031E
The standard configuration is LK1-3 at “0” giving a start address of 0310 (Hex).
2.2.
Wait State Generator
Data validity is assured by delaying the PC bus using the IOCHRDY signal. The number of wait states
imposed on the PC bus is link selectable from 1 to 4 using LK4.
The card is supplied with LK4 in the “1” position, which is suitable for machines up to 10 MHz clock rate. If
your machine implements dynamic speed switching on I/O channel access (as do most good
PCs), position 1 is correct no matter what its clock speed.
If a PC with a faster clock is used which does not switch speed on I/O channel access, it may be
necessary to increase the number of cycles delay to achieve the same absolute time delay.
Use the following table as a guideline for choosing the right position for your machine:
PC up to 10MHz
PC over 10MHz, up to 16MHz
PC over 16MHz, up to 20MHz
PC over 20 MHz
Position 1
Position 2
Position 3
Position 4
The best position is the minimum number of wait states while maintaining data security. This can easily
be found by trial and error.
The ICA93 operates correctly in all 'well behaved' faster machines. In most cases just one wait state will
be fine in even the fastest of machines. However, some rogue PCs that do not obey correct I/O timing
may cause problems occasionally. If you suspect this is a problem, try using the adapter in another
computer if possible to prove the fault. For further help regarding timings contact your ICA93 supplier for
technical support. The standard configuration is with one Wait State selected.
Revision 1.7
09/12/1999
Page 2 of 27
Important Note: Due to the internal operation of the ICA93, it must not be accessed over the PC
bus (read or written) more than once every nine of its own clock cycles. The ICA93 is clocked at
12MHz; therefore it MUST NOT be accessed more than once every 0.75 microseconds. If this
requirement is not observed operation may become erratic. This is usually only encountered in
very fast PCs, however it must be borne in mind when writing software if say the system hardware
might be updated in the future. When timing problems are encountered it is invariably this which
is causing the difficulties, not the selection of the number of wait states. This is automatically
controlled by the Windows DLLs, but must be checked by the programmer when using the DOS
routines.
2.3.
Interrupt Generation
The adapter is designed for either polled or interrupt driven operation. Interrupts are generated after the
sending or reception of any byte on the I2C Bus. The pulse is negative going with a duration of approx.
100nS, the interrupt being signalled by the rising edge of this pulse.
Link 5 allows the selection of which PC interrupt line the card is connected to:
LK5 position
NONE
2
3
4
7
PC Interrupt
DISABLED
IRQ2
IRQ3
IRQ4
IRQ7
As can be seen, the card is capable of connecting to four out of the eight available PC I/O interrupts. The
final choice will depend on what other peripherals are connected to the PC.
The standard configuration is with the interrupts disabled, i.e. LK5 in the “NONE” position.
2.4.
Bus Termination and Protection
Normally the system to which the I2C Communications Adapter is to be connected should already have
master pull up resistors fitted to the SCL and SDA lines. If this is not the case, LK10 and LK12 can be
used to connect 4K7 pull up resistors to the variable supply on these lines. The standard configuration is
with these resistors disconnected.
The SCL and SDA lines are protected by 100R series resistors before exiting the adapter via the 9 way
“D” socket. Upstream of the series resistors, the SCL and SDA pins on the PCF8584 are pulled up with
high value resistors (10K). These ensure that the I2C Bus is in a defined state even if no other devices are
connected. The standard configuration is with these resistors connected using LK9 and LK11
LK13 and LK14 connect optional protection diodes to the SCL and SDL lines. When selected, these lines
are clamped to the 0V and variable supply lines giving protection against transients. If these diodes are
connected, the external I2C system will not function if the adapter is connected but not powered up. The
standard configuration is with these diodes disconnected.
2.5.
Installing the Adapter
NOTE:
BEFORE INSTALLING THE ADAPTER IN YOUR PC, OBSERVE ANY SAFETY
PRECAUTIONS GIVEN BY THE MANUFACTURER OF THE COMPUTER.
NORMAL ANTI-STATIC HANDLING PRECAUTIONS SHOULD BE OBSEVED TO
AVOID ANY DAMAGE TO THE ICA93 OR THE COMPUTER.
Switch off the power to the PC and remove the mains plug from its socket before opening the case.
Plug the adapter into any available slot. Ensure the fixing screw is replaced in the computer rear panel to
hold the adapter firmly in place.
Close the case, reconnect the mains lead and switch on the computer.
Revision 1.7
09/12/1999
Page 3 of 27
3.
Connecting the Adapter to your System
3.1.
Connector Pinout
All external connections are made via a 9 way “D” socket:
Pin
1
2
3
4
5
6
7
8
9
NOTE:
3.2.
Normal Mode
0V
0V
0V
0V
NC
SDA (Bi-directional)
+V Variable bus voltage
SCL (Bi-directional)
NC
THE PINS MARKED NC MUST NOT BE CONNECTED IN NORMAL MODE.
Normal/Long Distance Mode
The ICA93 does NOT support the 4-wire long distance mode which the 5V only ICA90 model can operate
in. This is the only incompatibility between the two models.
3.3.
Bus Capacitance Limitations/Cable Choice
2
The maximum allowable capacitance on the I C bus in normal mode depends on the value of the SCL
and SDA master pull-ups, but never exceeds 400pF. Refer to Phillips Technical Handbook Book 4 Parts
12a and 12b for further details (see Section 8 - Further Information for references). Care should be taken
in choosing a length and type of interconnecting cable, which will not exceed this limit.
2
For most systems with a distance of a few metres between the I C Communications Adapter and the
target system, screened cable is NOT recommended, as it is likely to introduce too much capacitance.
However, the EMC performance of an unscreened cable is always potentially poorer than a screened
one. The Adapter's EMC performance even with an unscreened cable is good - but this may not be true
of the target system! If you are in any doubt at to the best way to connect up your system with EMC in
mind please contact your supplier or Calibre for advice.
3.4.
Variable Voltage Bus Power Supply
Pin 7 on the “D” connector is connected to the variable bus voltage power rail. Power for external circuitry
can be drawn from here, but care should be taken never to short it to 0V or to exceed 250mA loading. It is
short circuit and overload protected by a self-resetting thermal fuse but prolonged shorting could cause
the ICA93 to generate an excessive amount of heat inside your computer.
When shipped to you, the bus voltage was pre-set at 3.3V for use with low voltage memories. You can
adjust the voltage between 2V and 6V by inserting a small screwdriver through the hole in the card
mounting bracket. As you adjust the voltage (you can monitor it by connecting a meter to pin 7 of the bus
connector) the bus logic levels will track, keeping at 30% / 70% of supply for low and high level thresholds
respectively.
The Links 6, 7, and 8 are factory set to VAR and MUST NOT BE MOVED.
2
2
Your ICA93 has been factory set for use on 3.3V I C bus systems. Use on 5V I C bus systems
without adjusting the voltage control WILL CAUSE PERMANENT DAMAGE to the IC93. The fault is
factory detectable and you WILL BE CHARGED FOR THE REPAIR.
Revision 1.7
09/12/1999
Page 4 of 27
4.
Getting Started
4.1.
Resetting the Adapter
A reset forces the adapter into a well defined state, ready for initialisation. The card uses the same reset
line as the PC so either a power up or hard reset (press the <RESET> button on your PC) will suffice.
4.2.
Introduction to the Utilities
The utilities supplied with the adapter contain simple DOS routines in both C and TurboBASIC, which can
be used for setup and basic communications. This is a list of the DOS utilities supplied:
C Library/Programs
Procedure or
File Name
i2c.h
Subroutine Name
Brief Functional Description
setup
getstatus
sendaddress
sendstop
writebyte
readbyte
restart
Sets user defined initial conditions.
Reads status register.
Sends slave address, data transmission mode and start signal.
Sends stop signal.
Writes a byte of data to a previously specified address.
Reads a byte of data from a previously specified address.
Sends Restart and slave address of device, which is to be
communicated with, without sending a Stop.
Sends a counting sequence of 0 to 99 to a seven segment
display driver.
Executable version of above.
Writes then reads back data from a series of RAM locations.
Checks for correct readback.
Executable version of above.
Sets up typical initial conditions – Own Slave Address = AE
(Hex), SCL = 90KHz; assumes adapter’s base address = 0310
(Hex).
Executable version of above.
count.c
count.exe
ram.c
ram.exe
setup.c
setup.exe
TurboBASIC Library/Programs
Procedure or
File Name
Subroutine Name
i2c.inc
setup
FNgetstatus%
sendaddress
sendstop
writebyte
FNreadbyte%
restart
count.bas
tbcount.exe
ram.bas
tbram.exe
Brief Functional Description
Sets user defined initial conditions.
Reads status register.
Sends slave address, data transmission mode and start signal.
Sends stop signal.
Writes a byte of data to a previously specified address.
Reads a byte of data from a previously specified address.
Sends restart and slave address of device which is to be
communicated with, without sending a Stop.
Sends a counting sequence of 0 to 99 to a seven segment
display driver.
Executable version of above.
Writes then reads back data from a series of RAM locations.
Checks for correct readback.
Executable version of above.
16 bit Windows DLLs for use with Visual Basic 3.0 and Microsoft C++1.5 are included on the disc. See
Section 7.3 for a detailed description of the routines available. All library functions listed for the DOS
routines are covered. Additionally some extra multiple operation functions are supplied.
Revision 1.7
09/12/1999
Page 5 of 27
5.
Using the Utilities
Each utility is documented in a standard format, which lists its name, usage, function, and effect on the
adapter is given. Following a reset, the adapter should be setup prior to any data transfer.
5.1.
C Routines
5.1.1.
I2C Setup/Initialisation Routine
Name:
setup(base, own, sclk)
Usage:
setup(base, own, sclk);
Function:
procedure to set up I2C Communications Adapter.
Parameters are:
int base
base address of adapter set by links on circuit board.
int own
I2C address to which the adapter is to respond in slave mode. This forms the
upper 7 bits of the 8 bit address; the lowest bit being the Read (1) or Write (0) bit.
This means that if own = 0x57, the card will respond to a Write to address 0xAE
and a Read to address 0xAF. Be sure not to select an address that is already in
use by any other device in your I2C system. If own = 0x00 the adapter will monitor
all I2C bus information but will not affect any data transfers, thus acting as a bus
monitor.
int sclk
the SCL clock rate (bit rate for I2C serial bus).
Value of sclk
0
1
2
3
Approximate SCL (kHz)
90
45
11
1.5
Value Returned:none.
I2C status on exit from routine:
The I2C Communications Adapter will have the serial interface enabled; also data
reception acknowledge will be enabled. The status register will contain 0x81
(assuming that no other masters exist on the I2C system, if this is not the case
then the contents of the status register will also depend on externally generated
bus activity).
Example Usage: (see also sample programs)
#include <stdio.h>
#include <dos.h>
/*Optional, but recommended if your compiler */
/*supports DOS I/O functions */
#include <i2c.h>
/*This contains the I2C routines */
main
{
int base, own, sclk;
base = 0x310;
/* Adapter’s base address = 0x310 (hex) */
own = 0x57;
/* Own slave address set to 0x57 (hex) */
sclk = 1;
/* Serial clock rate set to 45KHz */
setup(base, own sclk);
printf(“I2C Communications Adapter initialised\n”);
}
/* This will set up the I2C Communications Adapter with a base */
/* address of 0x310, an I2C slave address of 0xAE and a SCL */
/* clock rate of approximately 45KHz */
5.1.2.
I2C Status Checking Routine
Name:
getstatus(controladdress)
Usage:
status = getstatus(controladdress);
Function:
function to read status register of I2C Communications Adapter.
Revision 1.7
09/12/1999
Page 6 of 27
Parameters are:
int controladdress
address of I2C control register. This is equal to 1+(base address of adapter set
by links on circuit board).
Value Returned:
int <status>
where status is an integer from 0x00 to 0xFF which indicates the current status
of I2C Communications Adapter. See Appendix A for details of the status values
returned.
I2C status on exit from routine:
The status of the I2C Communications Adapter will not be affected by using the
getstatus function.
Example Usage: (see also sample programs)
#include <stdio.h.>
#include <dos.h>
/*Optional, but recommended if your compiler */
/*supports DOS I/O functions */
#include <i2c.h>
/*This contains the I2C routines */
main
{
int status, base, controladdress;
base = 0x310;
/*Adapter’s base address = 0x310 (hex) */
controladdress = base + 1;
Status = getstatus (controladdress);
printf(“I2C Communications Adapter Status = %x\n”, status);
}
/*This will read the I2C Communications Adapter’s current status */
5.1.3.
I2C Address and Start Sending Routine
Name:
sendaddress (base, slv, setnack)
Usage:
sendaddress(base, slv, setnack)
Function:
procedure to send Start and slave address of device that is to be communicated
with.
Parameters are:
int base
the base address of the I2C Communications Adapter set by links on circuit
board.
int slv
the slave address of the device which is to be communicated with. This will be an
even number if the adapter is to write to the slave, add 1 to get an odd number if
the adapter is to read from the slave.
int setnack
this controls whether the I2C Communications Adapter transmits an
Acknowledge down the I2C Bus on reception of a byte. The last byte received
during a transfer must not be acknowledged, in all other cases acknowledge is
enabled, if setnack = 1 then acknowledge is disabled. Therefore, if a read (odd
numbered) address is being sent AND only 1 byte is to be read, setnack should
be set to = 1; in all other cases it must be set = 0.
Value Returned:none.
I2C status on exit from routine
The status of the I2C/ the Communications Adapter will be either 0x00 - bus busy
and unread data in the data register or 0x80 - bus busy and no unread data in the
data register when a Start and Slave Address have been successfully transmitted
(see Appendix A for details of Status Codes).
Example Usage:
#include <stdio.h>
#include <dos.h>
#include <i2c.h>
main
Revision 1.7
09/12/1999
(see also sample programs)
/* Adapter’s base address = 0x310 (hex) */
/* compiler supports DOS I/O functions */
/* This contains the I2C routines */
Page 7 of 27
{
int base, slv, setnack;
base = 0x310;
slv = 0xa0;
/* Adapter’s bas address = 0x310 (hex) */
/* I2C Address of slave, this is a typical */
/* write for an I2C static RAM or EEPROM */
setnack = 0;
/* Enable Acknowledge (see parameter */
/* descriptions) */
sendaddress(base, slv, setnack);
printf(“Start and I2C Slave Address sent\n”);
}
/* This will send a start and the I2C Slave Address of the device */
/* to be communicated with. */
5.1.4.
I2C Read Data Byte from Slave Routine
Name:
readbyte(base, setnack)
Usage:
data = readbyte(base, setnack);
Function:
To read a byte of data from a slave device whose slave address has already
been sent by sendaddress. Can be used to disable acknowledge after reading
data if it is the last but one byte to be read.
Note: First byte read after read-address is always that address and should be discarded. This byte
should be ignored when working out when to acknowledge/not acknowledge.
Parameters are:
int base
The base address of the I2C Communications Adapter set by links on circuit
board.
int setnack
This controls whether the I2C Communications Adapter transmits an
Acknowledge down the I2C Bus on reception of a byte. The last byte received
during a transfer must not be acknowledged, in all other cases must be enabled.
If setnack = 0 then acknowledge is enabled, if setnack = 1 then acknowledge is
disabled. Therefore, if the LAST BUT ONE byte is to be read, setnack should be
set to = 1; in all other cases it must be set = 0. (in case of reading 1 byte only,
acknowledge will have been disabled by sendaddress and so should now be
enabled again after reading the data, hence setnack = 0 for reading a single byte
of data.)
Value Returned:
int <data>
The function reads the byte of data and returns an integer equal to the value
read.
I2C status on exit from routine:
The status of the I2C Communications Adapter will be either 0x00 - bus busy and
unread data in the data register or 0x80 - bus busy and no unread data in the
data register depending on whether any more bytes of data have been
transmitted by the slave device which is being read. (See Appendix A for details
of the status Codes).
Example Usage:
#include <stdio.h>
#include <dos.h>
(see also sample programs)
/* Optional, but recommended if your compiler */
/* supports DOS I/O functions */
/* This contains the I2C functions */
#include <i2c.h>
main
{
int base, setnack, data;
base = 0x310;
/* Adapter’s base address = 0x310 (hex) */
setnack = 0;
/* Enable acknowledge - only one byte it to */
/* be read (see parameter descriptions) */
data = readbyte(base, setnack);
printf(“Data read was %x\n”, data);
}
Revision 1.7
09/12/1999
Page 8 of 27
/* This will read a byte of data from a slave previously addressed */
/* by and with acknowledge already disabled by sendaddress. */
/* After reading the data, acknowledge will be re-enabled. */
5.1.5.
Write Data Byte to Slave Routine
Name:
writebyte(base, data)
Usage:
writebyte(base, data)
Function:
procedure to write a byte of data to a slave device whose slave address has
already been sent by sendaddress.
Parameters are:
int base
The base address of the I2C Communications Adapter set by links on circuit
board.
int data
The byte of data which is to be written to the slave device.
Value Returned:none.
I2C status on exit from routine:
The status of the I2C Communications Adapter will be 0x00 - bus busy and data
in the data register transmitted successfully. (See Appendix A for details of
Status Codes).
Example Usage:
#include <stdio.h>
#include <dos.h>
(see also sample programs)
/* Optional, but recommended if your compiler */
/* supports DOS I/O functions */
/* This contains the I2C routines */
#include <i2c.h>
main
{
int base, data;
base = 0x310;
/* Adapter’s base address = 0 x 310- (hex) */
data = 0x69;
/* Data byte which is to be transmitted */
writebyte (base, data) ;
printf(“Data has been transmitted\n”);
}
/* This will write a byte of data to a slave previously addressed */
/* by sendaddress. */
5.1.6.
Send an I2C Stop Routine
Name:
sendstop(controladdress)
Usage:
sendstop(controladdress);
Function:
procedure to send a stop (end of communication signal) down the I2C Bus,
ending a transmission or reception with a slave which was addressed previously
by sendaddress.
Parameters are:
int controladdress
the address of the I2C Communications Adapter control register, equal to
1+(base address set by links on circuit board).
Value Returned:none.
I2C status on exit from routines:
The status of the I2C/ the Communications Adapter will be 0x81 - bus idle and no
unread/untransmitted data in the data register. Note - this may not be the case in
a system where there is another master as well as the I2C Communications
Adapter, since this other master may well have taken control of the bus by the
time a program next uses getstatus to read the status register. (See Appendix A
for details of Status Codes).
Example Usage:
#include <stdio.h>
Revision 1.7
09/12/1999
(see also sample programs)
Page 9 of 27
#include <dos.h>
/* Optional, but recommended if your compiler */
/* supports DOS I/0 functions */
/* This Contains the I2C routines */
#include <i2c.h>
main
{
int base, controladdress;
base = 0x310;
/* Adapter’s base address = 0x310 (hex) */
controladdress = base + 1;
/* Control Register address */
sendstop(controladdress);
printf(“Stop has been transmitted\n”);
}/* This will write a Stop to the I2C Bus */
5.1.7.
I2C Restart and Address Sending Routine
Name:
restart(base, slv, setnack)
Usage:
restart(base, slv, setnack)
Function:
Procedure to send a Restart and the slave address of device that is to be
communicated with, without a Stop having been sent at the end of last
transmission/reception. This routine is particularly useful for reading memories
which must first have a data pointer written to them to select where the read is to
occur from, and must have their address sent as a Restart to proceed with the
read operation.
Parameters are:
int base
the base address of the I2C Communications Adapter set by links on the circuit
board.
int slv
the slave address of the device which is to be communicated with. This will be an
even number if the adapter is to write to the slave, add 1 to get an odd number if
the adapter is to read from the slave.
int setnack
this controls whether the I2C communications Adapter transmits an Acknowledge
down the I2C Bus on reception of a byte. The last byte received during a transfer
must not be acknowledged, in all other cases acknowledge must be enabled, if
setnack = 1 then acknowledge is disabled. Therefore, if a read (odd numbered)
address is being sent AND only 1 byte is to be read, setnack should be set to =
1; in all other cases it must be set = 0.
Value Returned:none.
I2C status on exit from routine:
The status of the I2C/ the Communications Adapter will be either 0x00 - bus the
busy and
unread data in the data register or 0x80 - bus busy and no
unread data in the data register when a Restart and Slave Address have been
successfully transmitted (see Appendix A for details of status codes).
Example Usage:
#include <stdio.h>
#include <dos.h>
(see also sample programs)
/* Optional, but recommended if your compiler */
/* supports DOS I/O functions */
/* This contains the I2C functions */
#include <12c.h>
main
{
int base, slv, setnack;
base = 0x310;
slv = 0xa1;
/* Adapter’s base address = 0x310 (hex) */
/* I2C Address of slave, this is a typical read */
/* address for an I2C static RAM or EEPROM */
setnack = 0;
/* Enable Acknowledge (see parameter descriptions)*/
restart(base, slv, setnack);
}
5.2.
TurboBASIC Routines
5.2.1.
I2C Setup/Initialisation Routines
Revision 1.7
09/12/1999
Page 10 of 27
Name:
setup (baseaddr%, own%, sclk%)
Usage:
call setup(baseaddr%, own%, sclk%)
Function:
procedure to set up I2C Communications Adapter.
Parameters are:
baseaddr%
base address of adapter set by links on circuit board.
own%
I2C address to which the adapter is to respond in slave mode. This forms the
upper 7 bits of the 8 bit address, the lowest bit being the Read(1) or Write (0) bit.
This means that if own% = &h57, the card will respond to a Write to address
&hAF. Be sure not to select an address that is already in use by any other device
in your I2C system. If own% &h00 the adapter will monitor all I2C bus information
but will not affect any data transfers, thus acting as a bus monitor
sclk%
the SCL clock rate (bit rate for I2C serial bus).
Value of sclk%
0
1
2
3
Approximate SCL (kHz)
90
45
11
1.5
Value Returned:none.
I2C status on exit from routine:
The I2C Communications Adapter will have the serial interface enabled, also data
reception acknowledge will be enabled. The status register will contain &h81
(assuming that no other masters exist on the I2C system, if this is not the case
then the contents of the status register will also depend on externally generated
bus activity).
Example Usage:
(see also sample programs)
$include “i2c.inc”
‘* This contains the I2C routines*
baseaddr% = &h310
‘* Adapter’s base address = &h310 (hex) *
own% = &h57
‘* Own slave address set to &h57 (hex) *
sclk% = 1
‘* Serial clock rate set to 45KHz *
call setup(baseaddr%, own%, sclk%)
print”I2C Communications Adapter initialised”
‘* This will set up the I2C Communications Adapter with a base address *
‘* of &h310, an I2C slave address of &hAE and a SCL clock rate of *
‘* approximately 45KHz *
5.2.2.
I2C Status Checking Routine
Name:
FNgetstatus%(Controladdress%)
Usage:
status% = FNgetstatus%(controladdress%)
Function:
function to read status register of I2C Communications Adapter.
Parameters are:
controladdress%
address of I2C control register. This is equal to 1+(base address of adapter set
by links on circuit board).
Value Returned:
<status%>
where status is an integer from &h00 to &hFF which indicates the current status
of the I2C communications Adapter. Appendix A for details of the status values
returned.
I2C status on exit from routine:
The status of the I2C Communications Adapter will not be affected by using the
FNgetstatus% function.
Example Usage:
$include “i2c.inc”
Revision 1.7
09/12/1999
(see also sample programs)
‘* This contains the I2C routines *
Page 11 of 27
baseaddr% = &h310
‘* adapter’s base address = 0x310 (hex) *
controladdress% = baseaddr% + 1
status% = FNgetstatus%(controladdress%)
print”I2C Communications Adapter Status = “;status%
‘* This will read the I2C Communications Adapter’s current status *
5.2.3.
I2C Address and Start Sending Routine
Name:
sendaddress(baseaddr%, slv%, setnack%)
Usage:
call sendaddress(baseaddr%, slv%, setnack%)
Function:
procedure to send Start and slave address of device that is to be communicated
with.
Parameters are:
baseaddr%
the base address of the I2C Communications Adapter set by links on circuit
board.
slv%
the slave address of the device which is to be communicated with. This will be an
even number if the adapter is to write to the slave, add 1 to get an odd number if
the adapter is to read from the slave.
setnack%
this controls whether the I2C Communications Adapter transmits an
Acknowledge down the I2C Bus on reception of a byte. The last byte received
during a transfer must not be acknowledged, in all other cases acknowledge
must be enabled. If setnack% = 0 then acknowledge must be enabled, if
setnack% = 1 then acknowledge is disabled. Therefore, if a read (odd numbered)
address is being sent AND only 1 byte is to be read, setnack% should be set to =
1; in all other cases it must be set = 0.
Value Returned:none.
I2C Status on exit from routine:
The status of the I2C Communications Adapter will be either &h00 - bus busy and
unread data in data register or &h80 - bus busy and no unread data in data
register when a Start and Slave Address have been successfully transmitted (see
Appendix A for details of status codes).
Example Usage:
$include “i2c.inc”
baseaddr% = &h310
slv% = &ha0
(see also sample programs)
‘* This contains the I2C routines*
‘* Adapter’s base address = 0x310 (hex) *
‘* IC Address of slave, this is a typical write *
‘* address for an I2C static RAM or EEPROM *
setnack% = 0
‘* Enable Acknowledge (see parameter descriptions) *
call sendaddress (baseaddr%, slv%, setnack%)
print”Start and I2C Slave Address sent”
‘* This will send a Start and the I2C Slave Address of the device to be communicated with. *
5.2.4.
I2C Read Data Byte from Slave Routine
Name:
FNreadbyte%(baseaddr%, setnack%)
Usage:
databyte% = FNreadbyte%(baseaddr%, setnack%)
Function:
function to read a byte of data from a slave device whose slave address has
already been sent by sendaddress. Can be used to disable acknowledge after
reading data if it is the last but one byte to be read.
Parameters are:
baseaddr%
Revision 1.7
09/12/1999
the base address of the I2C Communications Adapter set by
board.
links on circuit
Page 12 of 27
setnack%
this controls whether the I2C Communications Adapter transmits and
Acknowledge down the I2C Bus on reception of a byte. The last byte received
during a transfer must not be acknowledged, in all other cases acknowledge
must be enabled. If setnack% = 0 then acknowledge is enabled, if setnack% = 1
then acknowledge is disabled. Therefore, if the LAST BUT ONE byte is to be
read, setnack% should be set to =1; in all other cases it must be set = 0. (In the
case of reading 1 byte only, acknowledge will have been disabled by
sendaddress and so should now be enabled again after reading the data, hence
setnack% = 0 for reading a single byte of data.)
Value Returned:
<databyte%>
the function reads the byte of data and returns an integer equal to the value read.
2
I C status on exit from routine:
The status of the I2C/ the Communications Adapter will be either &h00 - bus the
busy and unread data in the data register or &h80 - bus busy and no unread data
in the data register
depending on whether any more bytes of data have
been transmitted by the slave device which is being read. (See Appendix A for
details of Status Codes).
Example Usage:
$include”i2c.inc”
baseaddr% = &h310
setnack% = 0
(see also sample programs)
‘* This contains the I2C routines *
‘* Adapter’s base address = 310 (hex) *
‘* Enable Acknowledge - only one byte is to be read *
‘* (see parameter descriptions) *
databyte% = FNreadbyte%(baseaddr%, setnack%)
print “Data read was “;databyte%
‘* This will read a byte of data from a slave previously addressed by and with acknowledge already *
‘* disabled by sendaddress. After reading the data, acknowledge will be re-enabled.*
5.2.5.
Write Data Byte to Slave Routine
Name:
writebyte(baseaddr%, databyte%)
Usage:
call writebyte(baseaddr%, databyte%)
Function:
procedure to write a byte of data to a slave device whose slave address has
already been sent by sendaddress.
Parameters are:
baseaddress%
the base address of the I2C Communications Adapter set by links on circuit
board.
databyte%
the byte of data which is to be written to the slave device.
Value Returned:none.
I2C status on exit from routine:
The status of the I2C Communications Adapter will be &h00 - bus busy and data
in the data register transmitted successfully. (See Appendix A for details of
Status Codes).
Example Usage:
(see also sample programs)
$include “i2c.inc”
‘* This contains the I2C routines *
baseaddr% = &h310
‘* Adapter’s base address = 310 (hex) *
databyte% = &h69
‘* Data byte which is to be transmitted*
call writebyte(baseaddr%, data byte%)
print”Data has been transmitted”
‘* This will write a byte of data to a slave previously addressed by sendaddress. *
5.2.6.
Send an I2C Stop Routine
Name:
sendstop(controladdress%)
Usage:
call sendstop (controladdress%)
Revision 1.7
09/12/1999
Page 13 of 27
Function:
procedure to send a Stop (end of communication signal) down the I2C Bus,
ending a transmission or reception with a slave that was address previously by
sendaddress.
Parameters are:
controladdress%
The address of the I2C Communications Adapter control register, equal to
1+(base address set by links on circuit board).
Value Returned:none.
I2C status on exit from routine:
The status of the I2C/ the Communications Adapter will be &h81 - bus idle and no
unread/untransmitted data in the data register. Note - this may not be the case in
a system where there is another master as well as the I2C Communications
Adapter, since this other master may well have taken control of the bus by the
time a program next uses getstatus to read the status register. (See Appendix A
for details of Status Codes).
Example Usage:
$include “i2c.inc”
baseaddr% = &h310
controladdress% = baseaddr% + 1
call sendstop(controladdress%)
print”Stop has been transmitted”
‘* This will write a stop to the I2C Bus*
5.2.7.
(see also sample programs)
‘* This contains the I2C routines*
‘* Adapter’s base address = 310 (hex) *
‘* Control Register address *
I2C Restart and Address Sending Routine
Name:
restart(baseaddr%, slv% setnack%)
Usage:
call restart(baseaddr%, slv%, setnack%)
Function:
procedure to send a Restart and the slave address of device that is to be
communicated with, without a Stop having been sent at the end of the last
transmission/reception. This routine is particularly useful for reading memories
which must first have a data pointer written to them to select where the read is to
occur from, and must then have their read address sent with a Restart to
proceed with the read operation.
Parameters are:
baseaddr%
the base address of the I2C Communications Adapter set by links on circuit
board.
slv%
the slave address of the device which is to be communicated with. This will be an
even number if the communicated with. This will be an even number if the
adapter is to write to the slave, add 1 to get an odd number if the adapter is to
read from the slave.
setnack%
this controls whether the I2C Communications Adapter transmits an
Acknowledge down the I2C Bus on reception of a byte. The last byte received
during a transfer must not be acknowledged, in all other cases acknowledge
must be enabled. If setnack% = 0 then acknowledge is enabled, if setnack% = 1
then acknowledge is disabled. Therefore, if a read (odd numbered) address is
being sent AND only 1 Byte is to be read, setnack% should be set to = 1; in all
other cases it must be set = 0.
Value Returned:none.
I2C status on exit from routine:
The status of the I2C/ the Communications Adapter will be either &h00 - bus the
busy and unread data in the data register or &h80 - bus busy and no unread data
in the data register when a Restart and Salve Address have been successfully
transmitted (see Appendix
A for details of Status Codes).
Example Usage:
$include “i2c.inc”
baseaddr% = &h310
Revision 1.7
09/12/1999
‘* This contains the I2C routines*
‘* Adapter’s base address = 310 (hex) *
Page 14 of 27
‘* I2C Address of slave, this is a typical read address *
‘* for an I2C static RAM or EEPROM*
setnack% = 0
‘* Enable Acknowledge (see parameter descriptions) *
call restart(baseaddr%, slv%, setnack%)
print”Restart and I2C Slave Address sent”
‘* This will send a Restart and the I2C Slave Address of the device to *
slv% = &ha1
5.3.
DLLs for Programming in Microsoft Windows 3.X Environments
5.3.1.
Files
\readme.doc
User Information
\c\i2inc.h
“C” function prototypes
\c\cali2c.lib
I C “C” library
\vb30\cali2c.bas
Visual Basic 3.0 declarations
\vb30cali2c.dll
I C Visual Basic dynamic link library
2
2
C functions – Function Prototypes
The following function prototypes are required by the DLL, these are defined in the file I2CINC.H
Void far_pascal_export setup (int baseaddress, int ownaddress, int sclk, int statuswait);
int far_pascal_export sendaddress (int sendaddress, int setnack);
int far_pascal_export restart (int slaveaddress, int setnack);
int far_pascal_export getstatus (void);
int far_pascal_export writebyte (int wrData);
int far_pascal_export readbyte (int setnack);
int far_pascal_export sendstop (void);
int far_pascal_export recover (void);
int far_pascal_export sendbytes (int_far *transferarray);
int far_pascal_export getbytes (int_far *transferarray);
void far_pascal_export slavelastbyte (void);
To ensure the prototypes are added correctly copy the file I2CINC.H into the directory containing your
project and add the line: #include “I2CINC.H”
Remember to add the library CALI2C.LIB to your project make file.
Visual Basic 3.0 function
Add the file CALI2.BAS to your project, this contains the declarations for the procedures within the DLL.
If the DLL is not in the root directory change the path to the DLL to suit your system.
The sendbytes and getbytes functions pass the transfer array to the DLL by reference, the following
example indicates how to do this:
ReDim transferarray (0 to 258) ‘remember 3 locations are required for the slave write and word
addresses so array allows 256 bytes of data.
transferarray (0) = &HA0
‘slave write address.
transferarray (1) = &H00
‘slave word address.
Transferarray (2) = 256
‘the number of bytes.
Bytes_sent = sendbytes(transferarray(0))
DLL function descriptions – Applies to both C++ and Visual Basic
setup
Function specification
Revision 1.7
09/12/1999
Void setup(int baseaddress, int ownaddress, int sclk, int statuswait)
Page 15 of 27
baseaddress is the address at which the adapter has been installed, e.g.
310H
ownaddress I2C address to which the adapter is to respond in slave
mode. This forms the upper 7 bits of the 8 bit address, the lowest bit
being the read (1) or write (0) bit. This means that if ownaddress = 57H
the card will respond to a write address of AEH and a read address of
AFH.
Statuswait is a period of time (in microseconds) to wait for the required
2
bus status. If this time-out expires the I C functions will exit returning an
error code.
2
sclk is clock rate (bit rate for the I C serial bus) when operating as a
master.
Value of sclk
0
1
2
3
Approximate SCL-kHz
90
45
11
1.5
Parameters returned
none.
Prerequisites
none.
Functional description
This function characterises the PC and initialises adapter ready for I C
transfers.
2
sendaddress
Functional specification
Int sendaddress (int slaveaddress, int setnack)
slaveaddress is the address to be accessed via the I2C, e.g. A0H
setnack 1 for no acknowledge 0 for acknowledge – see Functional
Description
Parameters returned
ErrCode. If the transfer time out occurs error code 8001H is returned
otherwise the status is returned.
Prerequisites
adapter must be configures by running setup.
Functional description
The function waits for the bus to be free. Then sends the slave address
with the appropriate acknowledge.
The acknowledge is set ready for the data transfer after the address and
hence in read mode (odd address being sent) if only one byte is to be
read the setnack parameter must equal 1. If more than one byte is to be
read or if in write mode (even address being sent) then setnack must
equal 0.
writebyte
Function specification
Int writebyte (int wrData)
wrData is the byte of data to be written.
Paramteres returned
ErrCode. If the transfer time out occurs error code 8004H is returned
otherwise the status is returned.
Prerequisites
Adapter must be configured using setup, start and write address sent by
sendaddress.
Functional description
The function writes the data to the adapter and then waits for it to be
sent. Should a time-out occur during the sending of the data then error
code 8004H is returned, otherwise the status is returned. Writebyte is
compatible with both master write and slave write modes.
readbyte
Function specification
Revision 1.7
09/12/1999
Int readbyte (int setnack)
Page 16 of 27
Setnack 1 for no acknowledge 0 for acknowledge.
2
Parameters returned
I Cdata, the data read, if a time-out occurs the ErrCode 8005H is
returned.
Prerequisites
Adapter must be configured using setup, start and read address sent by
sendaddress.
Functional Description
If setnack is 1 the function writes 40H to the control register to establish
the correct acknowledge procedure. The data is read from the adapter.
IMPORTANT: SETNACK MUST = 1 WHEN READING THE LAST AND
THE LAST BUT ONE BYTES IN A SEQUENCE OF BYTES
SETNACK MUST = 0 FOR ALL OTHER READS. IF THIS FORMAT IS
NOT STRICTLY FOLLOWED THEN THE ADAPTER AND BUS WILL
NOT OPERATE CORRECTLY.
WHEN READING ANOTHER I2C DEVICE THE FIRST BYTE READ
USING THE READBYTE FUNCTION IS ALWAYS THE SLAVE
ADDRESS OF THAT DEVICE. THIS MUST BE READ AND
DISCARDED BEFORE THE REAL DATA CAN BE READ. DO NOT
COUNT THIS EXTRA READ WHEN CONSIDERING WHETHER OR
NOT TO ACKNOWLEDGE.
Should a time-out occur then an error code 8005H is returned, otherwise
the data is returned. Readbyte is compatible with both master read and
slave read modes.
sendstop
Function specification
Int sendstop ( )
Parameters returned
ErrCode. If the transfer time out occurs error code 8002H is returned
otherwise the status is returned.
Prerequisites
Adapter must be configured using setup. Should normally only be used
at the end of transmission. Correct acknowledge sequence must have
been applied if the transmission was a read.
Functional description
Instruct the adapter to send a stop code and wait for it to be sent. Should
a time-out occur during the sending of a stop then an error code 8002H
is returned, otherwise the status is returned.
restart
Function specification
Int restart (int slaveaddress, int setnack)
Slaveaddress is the address to be accessed via the I2C, e.g. A1H
Setnack 1 for no acknowledge 0 for acknowledge – see Functional
Description.
Parameters returned
ErrCode. If the transfer time out occurs error code 8003H is returned
otherwise the status is returned.
Prerequisites
Adapter must be configures using setup. A start and slave address must
have previously been sent using sendaddress. Usually a data pointer
would already have been written using writebyte.
Functional description
Sends a start code and the slave address specified and presets the
acknowledge status depending on the value of setnack. The
acknowledge is set ready for the data transfer after the address and
hence in read mode (odd address being sent) if only one byte is to be
read the setnack parameter must equal 1. If more than one byte is to be
read or if in write mode (even address being sent) then setnack must
equal 0.
The function waits for the address to be sent. Should a time-out occur
during the sending of an address then an error code 8003H is returned,
otherwise the status is returned.
Revision 1.7
09/12/1999
Page 17 of 27
getstatus
Function specification:
Int getstatus ( )
Parameters returned
I Cstatus, the current value of the bus status.
Prerequisites
Adapter must be configured using setup.
Functional description
The function reads status word from the adapter and returns it.
2
recover
Function specification:
Int recover
Parameters returned
ErrCode. If the bus recovery failed error code 8006H is returned
otherwise the status is returned.
Prerequisites
Adapter must be configured using setup.
Functional description
This function issues two consecutive stop commands on the bus, with a
delay in between. It then clears the adapter registers and reads the
status. This should normally set the adapter into a known idle state when
a bus error or other problem has occurred.
If the status does not indicate bus free or the Bus Error bit is still set then
8006H is returned otherwise the status is returned.
sendbytes
Function specification
Int sendbytes (int far *transferarray)
The far pointer must point to a single dimensional array the format of which is detailed below. The calling
function must have initialised elements 0, 1 and 2 prior to calling the function.
Element no
0
Element name
slaveaddress
1
wordaddress
2
3
nobytes
byte 0
“
“
byte n
Description
2
Slaveaddress is the address to be accessed via the I C
Bus, this is in hexadecimal e.g. A0H.
Wordaddress is the offset within the slave to which the
first byte of data is to be written, see transmission format
for more details.
The number of bytes (n) to be sent. Min value 1.
First byte to be sent.
Last byte to be sent.
Parameters returned
bsent, the number of bytes actually sent.
Prerequisites
Adapter must be configured using setup. Array elements 0, 1 and 2
must be initialised. Usually elements 3 to n would also be initialised.
Array must be pre-defined to a size at least large enough to hold all the
parameters and data concerned.
Transmission format
i.
There are two transmission formats, these are:
start-slaveaddress-byte(s)-stop
If transmission format i.) is required set the wordaddress to a number greater than FFH.
ii.
start-slaveaddress-wordaddress-byte(s)-stop
If transmission format ii.) is required set the wordaddress to a number less than or equal to FFH.
Functional description
The function determines the required transmission format and then
sends a start code and the slave address. If transmission format ii) has
been selected the wordaddress is sent.
The data bytes are then transmitted sequentially.
Should a time-out occur or he slave not acknowledge a transfer the
transmission is terminated by a stop and the number of bytes actually
transmitted is returned.
Revision 1.7
09/12/1999
Page 18 of 27
When all the bytes have been transmitted a stop is issued and the total
number of bytes is returned.
Sendbytes can only be used in master write mode.
getbytes
Function specification
Int getbytes (int far *transferarray)
The far pointer must point to a single dimensional array the format of which is detailed below.
The calling function must have initialised elements 0, 1 and 2 prior to calling the function.
Element no
0
Element name
Slaveaddress
1
Wordaddress
2
3
Nobytes
byte 0
“
“
byte n
Parameters returned
Description
2
Slaveaddress is the address to be accessed via the I C
Bus, this is in hexadecimal e.g. A0H.
Wordaddress is the offset within the slave to which the
first byte of data is to be written, see transmission
format for more detail.
The number of bytes (n) to be sent. Min value 1.
First byte read.
Last byte read.
nobytesread, the number of bytes actually read.
Prerequisites
Adapter must be configured using setup. Array elements 0, 1 and 2
must be initialised. Elements 3 to n do not need to be initialised since
they are where the read data is returned. Array must be pre-defined to a
size at least large enough to hold all the parameters and data concerned.
Transmission format
If the slaveaddress has the least significant but set (1) then this forms a
read address, if the least significant bit is clear (0) then this forms the
write address e.g. A0H is the write address and A1H is the associated
read address.
Getbytes supports two transfer formats these being:
i.
start-slavereadaddress-byte(s)-stop
To select transfer format i.) pass the read address as slave address.
The wordaddress is not used in this format and is ignored by getbytes.
ii.
start-slavewriteaddress-wordaddress-restart-slavereadaddress-byte(s)-stop
To select transfer format ii.) pass the write address as slaveaddress.
In this format the wordaddress must be valid.
Wordaddress is a pointer to the first byte of data to be read.
Nobytestoread is the number of bytes to be read. The minimum value allowable is 1.
Functional description
The function determines the required transmission transfer format,
sends the appropriate sequence of start(s) and slave address(es) and
checks for acknowledges where necessary.
If the slave fails to acknowledge then a stop is sent and nobytesread is
returned equal to 0.
The first data byte read is the slave read address sent(see readbyte
description). This is discarded, it is not returned in the transfer array. The
data bytes are then read and stored in the transfer array. At the
appropriate point acknowledges are ceased – for the last and the last but
one byte to be transferred.
A stop is sent after the last byte has been read. On completion the
number of bytes read is returned.
Should a time-out occur the transfer is terminated by a stop and the
number of bytes successfully read is returned.
Revision 1.7
09/12/1999
Page 19 of 27
Getbytes can only be used in master read mode.
slavelastbyte
Function specification
void slavelastbyte( )
Parameters returned
none.
Prerequisites
Adapter must be configured using setup. This function would normally
only be called following the end of a transmission in slave write mode –
when the adapter is being read as a slave, by another master, not when
writing to a slave using the adapter.
Functional description
This function is used when the adapter is a slave being read by a master
elsewhere on the bus – the adapter is in slave write mode. The function
must be called immediately after the master indicates the last byte has
been read (by not acknowledging that byte) this function is required to
2
clear the I C data lines so that the master can send a stop signal.
Revision 1.7
09/12/1999
Page 20 of 27
6.
Further Information
The following references may be found useful when using the adapter:
Philips Semiconductors Technical Handbook Book 4 Parts 12a and 12b. These give details of the
I2C compatible ICs, and the I2C Bus specification. The PCF8584P used on the adapter is
included in later editions. Where the data sheet and this manual disagree, this manual should
always be followed when using the adapter.
Philips Components Data Sheet for PCF8584
Philips Application Note No EIE/AN90001 - Interfacing PCF8584 I2C bus controller to 80(C) 51
family micro controllers. This gives some useful code but is not written directly for the PC. Please
note - the hardware information on the PCF8584 given in this application note sometimes
contradicts the data sheet referenced in 8.2, in general the data sheet is correct; the only
exception is that a Stop should be sent as c3 (Hex) - as shown in the application, not 43 (hex) implied in the data sheet ) see Appendix B of this manual for details of control codes). Where in
doubt, follow this manual.
Revision 1.7
09/12/1999
Page 21 of 27
7.
The Real-Time Bus Monitor
The program REALTIM1.EXE in the MONTOR directory is a completely non-invasive real-time bus
2
monitor which records activity on an I C-bus, post-processes the data and stores the results in an ASCII
file. This file can be printed out or examined with a word-processor as required. The monitor can record
2
up to 30,000 operations on the I C-bus.
For the real-time monitor to work correctly it must be run using an 8MHz 286 AT type computer or any
faster machine (386/486 are ideal). Also, no TSR programs or background applications must be active
while running the monitor.
The monitor program can write quite large data files to disc; it must be copied from the floppy disc
supplied onto your hard disc before being executed.
The monitor program has to run very fast and without interruptions in order to accurately record data from
2
the I C-bus. To achieve this it re-vectors the normal BIOS keyboard and clock-tick interrupt routines and
uses these for its own purposes. It is essential that the monitor program is exited cleanly – this is
achieved by pressing any alphanumeric key on the keyboard while it is monitoring; the monitor program
will restore the normal interrupts when it finishes.
Do not attempt to run the real-time monitor from any version of Windows
The following mnemonics are used by the monitor program in the ASCII file which it produces.
SaXX
Start code followed by address, acknowledged.
SnXX
Start code followed by address, not acknowledged.
DaXX
Data byte, acknowledged.
DnXX
Data byte, not acknowledged.
STOP
Stop code.
BUS ERROR
A bus error has occurred. This is non-fatal to the monitor but a small amount of
data may have been lost whilst recovery was taking place.
Note: The program REALTIM1 expects the ICA93 adapter to be configured as supplied (i.e. default
base address, no interrupts). If this is not the case please refer to Section 3 of the User Manual for details
of the correct link positions. The one exception is the bus pull-ups. These may be on or off on the ICA93;
bus terminations must be present somewhere on the bus for it to operate. The alternative program,
REALTIM2 is identical except it is for an ICA93 configured with an alternative base address of 0x312.
Revision 1.7
09/12/1999
Page 22 of 27
2
Appendix A I C Communications Adapter Status Codes
This is an eight bit register, read using the getstatus routine. Each individual bit has its own meaning as
follows:
Bit 7 (MSB) - The PIN Bit
The PIN bit “Pending Interrupt Not” is a read-only flag which is used to synchronize serial communication.
Each time a serial data transmission is initiated (by sendaddress routine or setting STA bit) the PIN will be
set (= 1) automatically. After successful transmission of one byte (9 clock pulses, including acknowledge),
this bit will be automatically reset (= 0) indicating a complete transmission. When the ENI bit (enable
interrupt) is also set, the PIN triggers an external interrupt via the selected IRQ line when PIN is reset.
When in receiver mode, the PIN is also reset on completion of each received byte. In polled applications,
the PIN bit is tested (using the getstatus routine) to determine when a serial transmission has been
completed. In receiver mode, the PIN bit is tested (using the readbyte function). When the PIN becomes
set all other status bits will be reset, with the exception of the BB (not Bus Busy) bit.
In short, when transmitting data, if PIN = 0 then the data has been sent, if PIN = 1 then it has not. When
receiving data, if PIN = 0 then there is unread received data ready to read, if PIN = 1 then either the data
received has already been read, or no data has yet been received.
Bit 6 - Not Used
This bit is not currently used and will always = 0.
Bit 5 - The STS Bit
When in slave-receiver mode (i.e. transmission initiated by a master elsewhere on the I2C bus), the flag
STS = 1 when an externally generated Stop condition is detected, otherwise STS = 0. This flag is used
only in slave-receiver mode.
Bit 4 - The BER Bit
The BER (Bus Error) bit. BER = 1 when a misplaced Start or Stop has been detected, otherwise BER = 0.
This can be quite serious since the I2C devices on the bus may be left in an undefined state after a bus
error has occurred - in some circumstances the only way to get the bus going again may be to reset all
the I2C devices on it.
Bit 3 - The LRB/ADO Bit
The LRB (Last received Bit) / ADO (Address 0 “General Call” Address Received) bit. This dual function
status bit holds the value of the last received bit over the I2C bus when AAS (Bit 2) = 0. Normally this will
be the value of the slave acknowledge; thus checking for slave acknowledgement is done via testing of
the LRB bit. When AAS (Bit 2) = 1 (“Addressed As Slave”), the I2C Communications Adapter has been
addressed as a slave and the ADO bit will = 1 if the slave address received was the “General Call”
address. For further information on the “General Call” Address, see the Philips data books referenced in
Section 8 of this User Manual.
Bit 2 - The AAS Bit
The AAS (“Addressed As Slave”) bit. When acting as a slave-receiver, this flag is set = 1 when an
incoming address over the I2C bus matches the value defined by the setup routine, or if the slave address
received was the I2C bus “General Call” address (00 Hex). In all other circumstances, AAS = 0.
Bit 1 - The LAB Bit
The LAB (Lost Arbitration) bit. This bit is set = 1 when, in multimaster operation (more than one master
present on the I2C bus) arbitration is lost to another master on the I2C bus. In all other circumstances,
LAB = 0.
Bit 0 - The BB Bit
The BB (not Bus Busy) bit. This is a read-only flag indicating when the I2C bus is in use. BB = 0 indicates
that the bus is busy, and access is not possible (unless of course it is busy because the I2C
Communications Adapter itself has control of the bus). This bit is set = 1 by Stop conditions and reset = 0
by Start conditions. In short, BB = 1 means that the bus is free and a new transmission can be started.
Revision 1.7
09/12/1999
Page 23 of 27
2
Appendix B – I C Communications Adapter Control Codes
The Control Register should normally be written using the setup, sendaddress and sendstop routines. To
implement more advanced functions such as enabling hardware interrupt generation or implementing
long distance mode, these routines may need to be modified or the users own routines used in their
place.
The Control Register is accessed by writing to I/O address:
1+Base address of card (set by links on board).
The Data Register is accessed by writing to I/O address:
Base address of card (set by links on board).
E.g. in C, outp(0x311, 0xc3); would cause an I2C Communications Adapter with base address = 0x310 to
generate a Stop condition on the I2C bus. For detailed information on these codes, the Philips data sheet
on the PCF8584 device (see Section 8, Further Information)
0x00
read/write own address register (followed by a data byte to the data register).
0x20
read/write clock register (followed by a data byte to the data register).
After either of the above operations, 0x41 must be written to the control register to re-enable the I2C
interface.
0xc3
send a Stop signal over the I2C bus.
0x41
I2C NOP (no operation) instruction, acknowledge enabled.
(Use 0x41 and 0x40 to turn on and off acknowledge)
0x45
(While bus is free) - Send Start & slave address, acknowledge enabled. The address to
be sent must have first been written to the data register before sending the startcode.
0x45
(While already master on the bus) - Send Repeated Start & slave address (Restart). The
address to be sent is placed in the data register after sending the start code.
0x47
send Stop, Start, slave address (i.e. restart transmission without releasing control of the
I2C bus). The address to be sent is placed in the data register
after sending the start
code.
To execute the last four instructions with acknowledge disabled, i.e. negative acknowledge - nack, set;
send the control code-1, e.g. 0x40, 0x44, 0x46.
Revision 1.7
09/12/1999
Page 24 of 27
2
Appendix C - The Most Commonly Asked I C Questions
General Questions
Question
Will my adapter work in a Pentium PC?
Answer Yes and there is no need to alter LK 4 from the position in which your adapter was shipped.
Question
Will my adapter run I2C clock speeds greater than 90KHz?
Answer At the moment your adapter is limited by the Bus Controller chip fitted, to a maximum of 90KHz
as a master and 100KHz as a slave.
Question
Answer
Will my adapter work under Windows NT4* or Windows 95*?
The adapter will work under both these systems without problems, but the software
supplied with the adapter is 16 bit only. Windows NT and Windows 95 DLLs are available
please contact our sales team for further information.
The bus monitors are best run from DOS (not Windows DOS Shell) as this minimises the risk of
missing part of a transfer.
* All trade marks acknowledged
Question
Answer
How can I find out if the adapter is clashing with another card in my PC?
If your adapter is located at a base address of 310H (as shipped) then run the bus
monitor (REALTIM1) application supplied following the instructions in the adapter
manual. With no activity on the bus the monitor should display a fix 'A', stop the monitor
and edit the file produced if the file states that the bus was free and the status was 81H
then your adapter is indeed located at 310H and there are no clashes within the PC.
If your adapter is at 312H then repeat the above using the REALTIM2 bus monitor.
Question
Answer
I get corrupted transfers why is this?
The most likely reason for corrupted transfers is either incorrect bus termination or
excessive capacitance - see the manual for details.
Question
Answer
Do you have software to talk to my........?
Unfortunately there are too many I2C devices for us to be able to offer complete solutions
- although we can supply a windows based application called WINI2C which is designed
for those just starting I2C or wishing to perform simple I2C tasks, please contact our
sales team or look on our web site, www.calibreuk.com for further information.
Question
I am trying to read from a device, the first time my software works fine but when I
try again I can't get anything what's wrong?
Please check that you are changing the value of Setnack in accordance with the manual,
it is likely that you have not made Setnack 1 for the last AND last but one bytes being
read.
Answer
DOS Software Questions
Question
Answer
My I2C adapter locks up with a constant status - why?
If you are using either the 'C' or Basic library functions supplied with the adapter on a fast
PC it is possible that the PC is polling the status register too quickly, the simplest way to
prevent this is to add a small delay prior to reading the status in the getstatus routine.
Alternatively use the windows DLL supplied as these automatically allow for speed of the
PC at run-time.
Windows 95 and NT Questions
Question
My software cannot find the adapter. Your Windows software reports that it cannot
configure the adapter. Why is this?
Answer
Have you registered the device driver as detailed in the software manual? If so check that
the address links (see adapter manual for details) are correct for the location at which
you registered the driver.
Question
Answer
Revision 1.7
09/12/1999
I think I have registered the driver how can I find out if I have?
You need to inspect the registry as follows
Page 25 of 27
Windows 95 START - Run regedit
HKEY_LOCAL_MACHINE
|
|--SYSTEM
|
|--CurrentControlSet
|
|--Services
|
|--Class
|
|--WinRT
|
|--WinRTdev0
|
|--Parameters
|--Section0
|--Section1
Windows NT START - Run regedit
HKEY_LOCAL_MACHINE
|
|--SYSTEM
|
|--CurrentControlSet
|
|--Services
|
|--WinRT
|
|--WinRTdev0
|
|--Parameters
|--Section0
|--Section1
Question
Answer
Question
Answer
I am using your Windows 95 / NT DLL and I am always getting a time out error
code. Why?
Check the Syntax of the setup function, swapping the Status Wait and Sclk parameters
most usually causes this problem.
The correct syntax is i2cstatus = setup (baseaddress, ownaddress, sclk, statuswait)
I have read the manual and still cannot get the communications to run. What do I
do next?
Check that you have fully implemented the protocol between the adapter and the other
I2C devices see the device manufacturers data sheet for details.
Check that the software you have written is logically and syntactically correct - this is
probably the most common cause of software faults we have to deal with.
Send us the following details:1)
The link settings of the adapter.
2)
A sketch of the relevant I2C hardware including the location of bus termination.
3)
The type and speed of processor within your PC and which operating system,
you are running.
4)
Brief software listings, or which Calibre software you are running.
5)
The serial number of your I2C adapter, or when you purchased it.
PLEASE EMAIL YOUR QUERY TO:
[email protected]
OR FAX YOUR QUERY TO:
44-1274-730960
We will endeavour to help you.
Revision 1.7
09/12/1999
Page 26 of 27