1
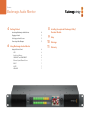
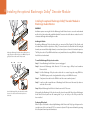
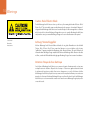
Installation and Operation Manual
Blackmagic Audio Monitor
Mac OS X™
Windows™
July 2013
Welcome
Welcome to Blackmagic Audio Monitor!
Thank you for purchasing a Blackmagic Audio Monitor for
your production needs! We hope you share our dream for
the television industry to become a truly creative industry by
allowing anyone to have access to the highest quality video
equipment.
Audio monitoring is crucial for any video production
workflow, whether it's broadcast, post production or live
production. Blackmagic Audio Monitor gives you all the
features of professional audio monitors in a compact rack
mount design. You can connect to virtually all types of audio
equipment for high quality monitoring.
This instruction manual contains all the information you need
to start using your Blackmagic Audio Monitor.
Please check the support page on our web site at
www.blackmagicdesign.com for the latest version of this
manual and updates to your Blackmagic Audio Monitor’s
internal software. Keeping your internal software up to
date will always ensure you get all the latest features.
When downloading software, please register with your
information so we can keep you updated when new software
is released. We are constantly working on new features and
improvements, so we would love to hear from you!
Grant Petty
CEO Blackmagic Design
Contents
Blackmagic Audio Monitor
4
6
8
Getting Started
Introducing Blackmagic Audio Monitor
4
Plugging in Audio
5
Selecting your Audio Source
5
Connecting Video Outputs
5
Using Blackmagic Audio Monitor
Using the Control Panel
6
LCD6
Audio Level Meters
6
SOLO LEFT and SOLO RIGHT
6
Channel Up and Channel Down
7
INPUT7
MUTE7
VOLUME7
9
10
11
Installing the optional Blackmagic Dolby®
Decoder Module
Help
Warnings
Warranty
Getting Started
4 Getting Started
Introducing Blackmagic Audio Monitor
Blackmagic Audio Monitor is a single rack real time audio monitoring solution that can be used with a
variety of video and audio sources in live, post production and broadcast environments.
The audio monitor connects to SD/HD/3G/6G-SDI, digital AES/EBU and analog audio equipment to
ensure outputs have the correct audio levels. Left and right channel LED VU meters let you see where your
audio is peaking and the built in LCD shows your SDI video input plus important information such as input
connection type, video format, frame rate, audio channels and volume level.
You can monitor up to 16 channels of embedded SDI audio, or use XLR connectors for balanced analog
and AES/EBU digital audio. There are also RCA connectors so you can plug in consumer equipment such
as HiFi systems and iPods.
The Blackmagic Audio Monitor includes two high quality internal full range speakers and two sub woofers
that give you a wide range of frequencies for clear and deep sound reproduction, or you can connect a
headset for confident sound monitoring that is great if you are in a noisy environment!
5 Getting Started
PUSH
USB 2.0
HDMI OUT
1
SDI IN
SDI LOOP OUT
2
PUSH
Blackmagic Audio Monitor supports virtually all types of audio equipment! If you want to connect SDI
signals in SD, HD, 2K or even Ultra HD 4K, you can plug in via the SDI input using a standard BNC connector.
Plug in using XLR connectors if you want to monitor digital AES/EBU audio from equipment including disk
recorders and digital audio consoles, or from analog equipment such as audio mixers or Betacam SP decks.
Analog audio from consumer equipment such as VCRs and DVD players can be connected using standard
RCA phono connectors, and monitoring 4K video is as simple as plugging in an Ultra HD TV via HDMI.
You can also connect headphones via the 1/4” TRS headphone jack when you need to listen to your audio
privately without disturbing others.
AES/EBU IN
3
1. HDMI
2. SDI embedded audio
3. XLR for AES/EBU
Plugging in Audio
PUSH
4
5
4. XLR for Analog audio
5. RCA for consumer audio connections
Selecting your Audio Source
SOLO
LEFT
SOLO
RIGHT
CH
CH
After plugging in your audio equipment to Blackmagic Audio Monitor, all you need to do is select your
connection by pressing the INPUT button on the control panel. When your input is selected and audio is
present, you’ll notice the VU meter at work. The VU meter consists of 2 rows of colored LEDs and are brightly
lit so you can easily confirm your audio input is working.
SDI
SOLO
LEFT
SOLO
RIGHT
CH
CH
INPUT
-45
-30
INPUT
-20
1080PsF/30
Ch 1&2
The INPUT button lets you cycle through your audio connections and you can see them on the color LCD
L
with information including input type, audio channels and volume level. That's all you need to do to monitor
audio -10
with Blackmagic
Audio
Monitor!
-3
0
+3
R
Connecting Video Outputs
If you need video as well as audio monitoring, Blackmagic Audio Monitor's video outputs let you monitor
video with audio on a large screen, or connect to more video equipment.
The selection buttons allow you to choose which input you wish
to monitor, isolate left and right stereo channels, move up or
down through available audio channels, and mute the speakers
or headphones.
The SDI loop output can be used to monitor video with embedded audio. 6G-SDI lets you connect to SD,
HD, 2K and even Ultra HD 4K capture devices such as DeckLink 4K Extreme with a single SDI cable. Connect
video with embedded audio to recording decks such as HyperDeck Studio via SD/HD-SDI, or the latest
Ultra HD 4K display and projectors via HDMI.
Using Blackmagic Audio Monitor
6 Using Blackmagic Audio Monitor
SDI
1080PsF/30
Using the Control Panel
Ch 1& 2
Blackmagic Audio Monitor's control panel provides fast access to critical functions and status.
L
-3
0
+3
LCD
The built in color LCD features a text overlay that displays your selected input, the video format if SDI is
connected, selected audio channels, and the volume level for your speakers or headphones. The LCD will
also display the incoming video signal if SDI video is connected and selected. Otherwise a music icon will
be displayed.
R
The color LCD displays audio and video information including
connection type, video format, selected audio channels and
volume level.
The following information is displayed for the selected input:
SDI input - SDI, video format, selected audio channels.
Analog
Balanced AES/EBU XLR input - AES/EBU, selected audio channels.
Ch 1& 2
Balanced XLR analog inputs - ANALOG, selected audio channels.
L
-3
0
+3
Unbalanced RCA analog inputs - HiFi, selected audio channels.
R
Audio Level Meters
Blackmagic Audio Monitor’s VU meter features two banks of green, orange and red LEDs that show the
strength of your audio levels. If all LEDs are lit, your audio levels are too high and are clipping. To ensure
your audio is at the highest quality, adjust the output levels on your audio equipment so Blackmagic Audio
Monitor’s VU meter peaks at the 0dB indicator on the control panel. If your audio peaks beyond the 0dB
indicator there is a high risk of sound distortion.
A music icon is displayed on the LCD unless an SDI signal is
connected and selected.
SOLO
LEFT
SOLO
LEFT
CH
INPUT
SOLO
RIGHT
SOLO LEFT and SOLO RIGHT
SDI
1080PsF/30
Ch 1&2
These buttons let you isolate left and right channel
audio
so you can
listen for any potential audio problems
in each channel independently.
SOLO
RIGHT
CH
L
To monitor left channel audio:
-45
-30
CH
CH
-20
-10
-3
0
+3
Step 1. Press the Solo Left button. The button will become backlit green and your audio will play through
R
the left speaker only.
Step 2. Press Solo Left again to return to stereo audio monitoring.
Selecting Solo Left deactivates the right audio channel. The VU
meter will continue to display both levels.
INPUT
SOLO
LEFT
SOLO
RIGHT
7 Using Blackmagic Audio Monitor
To monitor right channel audio:
CH
CH
Step 1. Press the Solo Right button. The button will become backlit green and your audio will play through
the right speaker only.
SDI
SOLO
LEFT
SOLO
RIGHT
CH
CH
1080PsF/30
Ch 1&2
Step 2. Press Solo Right again to return to stereo audio monitoring.
L
-45
-30
INPUT
INPUT
-20
-10
Channel
Up and -3Channel0 Down+3
These buttons let you cycle throughR 16 channels of audio embedded in your SDI connection. Press the
channel up button to move up through 8 pairs of audio channels. Press the channel down button to move
down through the pairs of channels.
INPUT
Repeatedly pressing the INPUT button cycles through the SDI, AES/EBU, Analog and HiFi inputs so you can
select which video and audio equipment you wish to monitor.
INPUT
The selected audio input can also be heard via HDMI. The SDI Loop output always uses the SDI video and
audio input signal and is unaffected by the INPUT button.
MUTE
This button mutes Blackmagic Audio Monitor’s control panel speakers and headphones. Muting the audio
will not affect your audio input and will only affect the speakers and headphones output. Pressing the MUTE
button again will restore audio to the control panel speakers or headphones. Alternatively, increasing the
volume will also restore audio.
SDI
1080PsF/30
Ch 1&2
L
-3
0
+3
R
The volume level is displayed on the control panel LCD.
VOLUME
This knob adjusts the volume for the speakers or headphones independently. Volume level is displayed on
the built in LCD. When headphones are connected, Blackmagic Audio Monitor’s speakers will mute and
audio is outputted via headphones. Volume can easily be adjusted up or down by turning the volume knob
clockwise or counterclockwise.
Installing the optional Blackmagic Dolby® Decoder Module
8 Installing the optional Blackmagic Dolby® Decoder Module
Installing the optional Blackmagic Dolby® Decoder Module in
Blackmagic Audio Monitor
WARNING
Installation requires removing the lid of the Blackmagic Audio Monitor chassis to access the motherboard
and should only be performed by qualified individuals. Precautions should be taken to reduce the risk of
electrostatic discharge while installing the module.
Installing the Module
By installing a Blackmagic Dolby decoder module you can monitor Dolby Digital or Dolby E audio used
in modern film and television productions. Dolby 5.1 surround sound is encoded with front left and right
channels, rear surround left and right channels, a center channel, plus one channel for low bass frequencies.
Holding the Blackmagic Dolby decoder module by the top
edges, align the module’s keyway to the SIMM slot key and
gently insert the module until it is firmly seated.
The Dolby decoder is a 72 pin SIMM module that is easily installed into the empty SIMM slot on Blackmagic
Audio Monitor’s motherboard.
To install the Blackmagic Dolby decoder module:
Step 1. Ensure Blackmagic Audio Monitor’s power is unplugged.
Step 2. Unscrew all Blackmagic Audio Monitor’s 21 lid screws using a Phillips head screwdriver.
Remove the lid.
Step 3. Hold the Blackmagic Dolby decoder module with its contacts facing the empty SIMM slot.
The SIMM’s keyway needs to be aligned with the slot key or the SIMM will not seat.
Step 4. Gently insert the module into the SIMM slot until the contacts are firmly seated.
Step 5. Lean the module towards the rear of Blackmagic Audio Monitor until the metal clips fasten to
each side of the module.
Step 6. Replace Blackmagic Audio Monitor’s lid and screw in the 21 lid screws.
Lean the Blackmagic Dolby decoder module towards
the rear of the chassis until the metal clips fasten to
both sides.
After installing the Blackmagic Dolby decoder module, place the supplied Dolby sticker on Blackmagic
Audio Monitor’s back panel near the warning label so you can easily see the Dolby module has
been installed.
Confirming Dolby Audio
When Dolby encoded audio is detected by Blackmagic Audio Monitor the Dolby logo will appear on the
top right corner of the control panel LCD. You can monitor 4 pairs of Dolby surround channels by pressing
the control panel channel up and down buttons.
Help
9 Help
Getting Help
The fastest way to obtain help is to go to the Blackmagic Design online support pages and check the latest
support material available for your Blackmagic Audio Monitor.
Blackmagic Design Online Support Pages
The latest manual, internal software and support notes can be found at the Blackmagic Support Center at
www.blackmagicdesign.com/support.
Contacting Blackmagic Design Support
If you can't find the help you need in our support material, please use the "Send request" button, on the
support page for your Blackmagic Audio Monitor, to email a support request. Alternatively call your nearest
Blackmagic Design support office at www.blackmagicdesign.com/company.
How to Get the Latest Internal Software Updates
Please visit the Blackmagic Support Center at www.blackmagicdesign.com/support to check for the latest
updates. While it is usually a good idea to run the latest updates, it is a wise practice to avoid updating any
software if you are in the middle of an important project.
Warnings
10 Warnings
Caution: Risk of Electric Shock
On the Blackmagic Audio Monitor enclosure you will see a yellow warning label marked ‘Caution: Risk of
Electric Shock’. This is intended to warn users that there may be the presence of uninsulated “dangerous”
voltage within the Blackmagic Audio Monitor enclosure which may be of sufficient magnitude to constitute a
risk of electric shock to the user. Blackmagic Design advises you not to open the Blackmagic Audio Monitor
unit, but rather contact your nearest Blackmagic Design service center should assistance be required.
Caution label
Warnetikett
Avertissement
Achtung: Stromschlaggefahr
Auf dem Blackmagic Audio Monitor-Gehäuse befindet sich ein gelbes Warnetikett mit der Aufschrift
'Caution: Risk of Electric Shock’. Dieses warnt den Benutzer vor einer möglichen, nicht isolierten,
"gefährlichen" Spannung innerhalb des Blackmagic Audio Monitor-Gehäuses, die einen Elektroschock
verursachen kann. Blackmagic Design empfiehlt das Gehäuse des Blackmagic Audio Monitor nicht selbst
zu öffnen, sondern bei Hilfebedarf das nächstgelegene Blackmagic Design Servicecenter zu kontaktieren.
Attention: Risque de choc électrique
Sur le boîtier du Blackmagic Audio Monitor, vous verrez une étiquette d’avertissement de couleur jaune
sur laquelle est inscrit « Attention : Risque de choc électrique ». Cette mise en garde est destinée à avertir
les utilisateurs de la présence possible d’une tension « dangereuse » non isolée à l’intérieur du boîtier
du Blackmagic Audio Monitor, laquelle tension pouvant avoir une amplitude suffisante pour constituer un
risque de choc électrique à l’utilisateur. Blackmagic Design vous déconseille donc d’ouvrir l’unité Blackmagic
Audio Monitor, et vous recommande de contacter votre centre de service Blackmagic Design le plus proche
en cas de nécessité.
Warranty
11 Warranty
12 Month Limited Warranty
Blackmagic Design warrants that this product will be free from defects in materials and workmanship for
a period of 12 months from the date of purchase. If a product proves to be defective during this warranty
period, Blackmagic Design, at its option, either will repair the defective product without charge for parts and
labor, or will provide a replacement in exchange for the defective product.
In order to obtain service under this warranty, you the Customer, must notify Blackmagic Design of the
defect before the expiration of the warranty period and make suitable arrangements for the performance
of service. The Customer shall be responsible for packaging and shipping the defective product to a
designated service center nominated by Blackmagic Design, with shipping charges pre paid. Customer
shall be responsible for paying all shipping charges, insurance, duties, taxes, and any other charges for
products returned to us for any reason.
This warranty shall not apply to any defect, failure or damage caused by improper use or improper or
inadequate maintenance and care. Blackmagic Design shall not be obligated to furnish service under
this warranty: a) to repair damage resulting from attempts by personnel other than Blackmagic Design
representatives to install, repair or service the product, b) to repair damage resulting from improper use
or connection to incompatible equipment, c) to repair any damage or malfunction caused by the use of
non Blackmagic Design parts or supplies, or d) to service a product that has been modified or integrated
with other products when the effect of such a modification or integration increases the time or difficulty
of servicing the product. THIS WARRANTY IS GIVEN BY BLACKMAGIC DESIGN IN LIEU OF ANY
OTHER WARRANTIES, EXPRESS OR IMPLIED. BLACKMAGIC DESIGN AND ITS VENDORS DISCLAIM
ANY IMPLIED WARRANTIES OF MERCHANTABILITY OR FITNESS FOR A PARTICULAR PURPOSE.
BLACKMAGIC DESIGN’S RESPONSIBILITY TO REPAIR OR REPLACE DEFECTIVE PRODUCTS IS THE
WHOLE AND EXCLUSIVE REMEDY PROVIDED TO THE CUSTOMER FOR ANY INDIRECT, SPECIAL,
INCIDENTAL OR CONSEQUENTIAL DAMAGES IRRESPECTIVE OF WHETHER BLACKMAGIC DESIGN
OR THE VENDOR HAS ADVANCE NOTICE OF THE POSSIBILITY OF SUCH DAMAGES. BLACKMAGIC
DESIGN IS NOT LIABLE FOR ANY ILLEGAL USE OF EQUIPMENT BY CUSTOMER. BLACKMAGIC IS
NOT LIABLE FOR ANY DAMAGES RESULTING FROM USE OF THIS PRODUCT. USER OPERATES THIS
PRODUCT AT OWN RISK.
© Copyright 2013 Blackmagic Design. All rights reserved. ‘Blackmagic Design’, ‘DeckLink’, ‘HDLink’, ‘Workgroup Videohub’, ‘Multibridge Pro’,
‘Multibridge Extreme’, ‘Intensity’ and ‘Leading the creative video revolution’ are registered trademarks in the US and other countries. All other
company and product names may be trade marks of their respective companies with which they are associated.