1
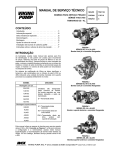
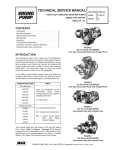
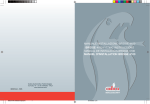
BRIDGE 4100 MANUALE UTENTE USER INSTRUCTIONS MANUEL POUR L’UTILISATEUR MANUAL DE USO 1 06DE2142E.pmd 1 11/02/2008, 11.15 Dear customer, Thank you for having purchased this product. It is a technologically advanced anti - theft device that complies with the performance standards established by car manufacturers and with the relative European Union standards. The manual is divided into 8 parts: Page 15 16 17 19 22 23 24 25 INTRODUCTION ADDITIONAL PROTECTIONS BRIEF INSTRUCTIONS BASIC FUNCTIONS ALARM MEMORY EMERGENCY PERSONAL PIN CODE MAINTENANCE AND TROUBLE SHOOTING After the system was installed, you will have been given the radio controls and user manual, containing the declaration of conformity for the product and the relative installation certificate. We kindly ask you to read this manual to get full benefit the system. We suggest you keep this manual with the registration documents of the vehicle. It will be easier for you to find the information you require in the event of emergency.Your dealer will be pleased to clarify and queries you may have with the system or its operation in the case you did not any suggestion in chapter 8 (page 25) GB BRIDGE 4100 14 06DE2142E.pmd 14 11/02/2008, 11.15 1 - INTRODUCTION The anti - intrusion alarm system is operated by a with a security code. This technology offers an extremely high level of protection against any attempt to reproduce the code. The radio control allows the system to be activated at a distance of 5 - 10 meters from the vehicle. Other radio sources may cause interference which can reduce the effective range of the radio controls (e.g. amateur radio operators using the same band). If the system can not be set / unset using the radio control try again close to the vehicle. If automatic window closing is connected we raccomended you to stay close to the vehicle while the windows are moving to ensure safety and security. Total protection of your vehicle is ensured by: MOD. AK4198 AC4196 AK4193 HOTWIRE PROTECTION VOLUMETRIC PROTECTION PERIMETRIC PROTECTION CABLE CUTTING PROTECTION The system have a protected self - learning feature which allows you to add or replace radio controls. The procedure is described in the fitting instructions. BRIDGE 4100 - Introduction 06DE2142E.pmd 15 15 11/02/2008, 11.15 2 - ADDITIONAL PROTECTIONS You can increase the protection level of the system with the following additional sensors: OPTIONAL: • EMERGENCY PANEL PLUS JACK KEY: CODE AM0939EUSAA 5452: Level monitor module When the system is armed, this sensor will detect the vehicle being jacked up to tow it away or steal the wheels. 5462: Hyperfrequency module In case of emergency, connect the key in the emergency panel for 1 s. • 2771 DRIVER CARDS: Used for recognition purposes in anti-robbery mode. When the system is armed, hyperfrequency emissions from the module hidden in the car will ensure volumetric protection of the vehicle. 2980: Windows lift module The electric windows of your car will raise automatically when the system is armed. It can be fitted to any car with electrical windows. 16 06DE2142E.pmd Additional protections - BRIDGE 4100 16 11/02/2008, 11.15 3 - BRIEF INSTRUCTIONS 3.3 - Protection 3.1 - Arming When armed, the system will generate acoustic and visual alarm lsting about 30 s when the bonnet, boot or one of the doors is opened or there is an attempt to start the vehicle. System with the volumetric sensor will generate the alarm in case of intrusion. The system remains armed at the end of the cycle. The turn indicators will also stop blinking but the alarm system remains armed. Press button “B” on the radio control a second time to completely disarm the system. • Press button “A” of the radio control to lock the doors (if the vehicle has central locking). • The turn indicators will flash twice. • The buzzer will issue two beeps (if activated). • The protections activate after 23 s. • The LED will come on with a fixed light for 23 s then it will flash. RADIO CONTROL FUNCTION Arm Button A B A 3.4 - Interrupting an alarm in progress Button B Disarm Siren interrupt Panic alarm Ultrasonic volumetric sensor and additional sensor exclusion (if installed) Car Finder 3.2 - Silent Arming If the system generates an alarm, the siren can be deactivated by pressing button “B” on the radio control once. The turn indicators will also stop blinking but the alarm system remains armed. Press button “B” on the radio control a second time to completely disarm the system. 3.5 - Disarming • Press button “B” on the radio control to disarm the system and unlock the doors. • The turn indicators will flash once. • The buzzer will beep once (if activated). • The protection deactivates immediately. • The LED will turn off. 3.6 - Alarm memory If an alarm has occurred in your absence the buzzer and the turn indicators will give four signals instead of one (See chapter 5). To silence the buzzer’s acoustic signal (when enabled) for a short time, press key ‘A’ of the remote before turning the instrument panel off. When the instrument panel is turned on again (+15 ON), silencing is disabled and the buzzer will sound again upon product triggering. 17 BRIDGE 4100 - Brief instructions 06DE2142E.pmd 17 11/02/2008, 11.15 3.7 - Deactivating the volumetric ultrasonic sensor 3.10 - Garage function The volumetric sensor can be deactivated if you want to leave the windows open or if someone remains in the passenger compartment. The “Garage” function allows the alarm system to be temporarily cut out. It is especially useful when leaving a vehicle in a parking facility where it is necessary to hand over the vehicle’s keys. When this function is used it is possible to hand over the keys without having to give the attendant the radiocontrol device or PIN code as well. Its use is recommended to prevent unauthorised use of the vehicle. Before handing over the vehicle, proceed as follows: 1) Arm the system pressing button “A” of the radio control. 2) Press button “A” on the radio control again within 23 s. B A If hyperfrequency or level monitor sensors are fitted, it is possible to deactivate them by pressing button “A” twice within 23 s. To confirm that the signal has been received, the turn indicators will flash twice and the buzzer will give an acoustic signal (if activated). The sensor will now have been inhibited but all the other protections will remain activated. The sensors will automatically activate again the next time the system is armed. 3.8 - Car Finder This function allows you to find your car in a car park, for example. When the alarm is armed and the inhibition time has elapsed, press key “A” on the radio control once and the system will generate a visual alarm, activating the blinkers (and the buzzer, if activated) for up to 3 s. The Car Finder function can only be used when the alarm is armed. 3.9 - Panic alarm • turn on the ignition and open the door on the driver’s side, keeping the “A” key on the radiocontrol device pressed down for at least 4 s. During this time the LED will stay on with a steady light. Confirmation that the function has been activated is given by a flash of the direction arrows and a buzzer signal, both lasting 3 s. Each time the ignition is turned on the active status of the garage function is confirmed by an acoustic signal from the buzzer and a visual signal from the LED. The radiocontrol device is operative for locking and unlocking the centralized locks and activating and disactivating the engine lock but does not arm the system. The function is disactivated in 3 different ways: • by pressing key “B” on the radiocontrol device for 4 s with the ignition on; • by pressing the button on the LED panel for 2 s; • after the vehicle’s ignition has been switched on 10 times. If the Car Finder function is not activated, an alarm cycle will be generated (the siren will operate and the turn indicators will flash) whenever you press button “A” on the radio control, after 23 s have elapsed since arming. If the Car Finder function is activated, press key “A” on the radio control twice. Press button “B” on the radio control to interrupt the panic alarm. 18 06DE2142E.pmd Brief instructions - BRIDGE 4100 18 11/02/2008, 11.15 4 - BASIC FUCTIONS Foreword As the functional characteristics of this system can be customized, the installer must mark the ones he has activated in this manual. The standard factory set - up is shown by the dark squares. 4.1 - Controlled windows lift (confort) Enabled Disabled 4.5 - Automatic alarm arming Enabled Disabled Keep button “A” pressed, when arming the allarm. The windows close in a “controlled mode”. The windows will stop closing if the button is release. The system will arm without locking the doors 2 min. after the ignition is switched off and the last door closed. The system will not arm if the ignition is switched on within the 2 min. period. 4.2 - Window radio control activation 4.6 - Automatic immobilizer arming Enabled Disabled Enabled If the window radio control output function is activated (page 5 line 8). When this function is activated, the windows will rise with a 1 s delay in relation to door locking. 4.3 - Autolock - Automatic door locking mode Enabled Disabled Automatically locks the doors at a preset speed or 20 s after turned on the ignition. In both cases, the doors are automatically unlocked when the ignition is turned off. 4.4 - Automatic door locking mode selection Time Speed Automatically locks the doors, depending on the speed or time. Disabled The engine immobiliser will automatically activate 2 min. after the ignition is switched off. The LED will flash. The engine will be immobilised. To restore motor block of the system, press key ‘B’ of the remote. 4.7 - Immobilizer alarm Enabled Disabled An alarm function can be added to the immobiliser automatic arming. If enabled, an alarm is triggered 25 sec after the instrument panel has been turned ON. 4.8 - Anti-distraction motor - block Enabled Disabled After disarming with the radio control, there is a 40 s delay within which the immobiliser rearms unless the ignition is switched on. 19 BRIDGE 4100 - Basic function 06DE2142E.pmd 19 11/02/2008, 11.15 4.14 - Buzzer during Car Finder procedure 4.9 - Alarm rearm Enabled Disabled After disarming with the radio control, there is a delay of 40 s within which the system rearms unless the ignition is switched on. The count is halted if a door or the boot are opened. 4.10 - Alarm auto re - arm with door locking Enabled 4.11 - Doors / bonnet / boot open signal Disabled Disabled 4.16 - Voluntary anti - robbery protection Two flashes from the turn indicators indicate that the system is armed, one flash that it is disarmed. If the system is deactivated, the turn indicators will only flash when an alarm cycle is triggered. 4.13 - Buzzer Provides an acoustic signal in synchronism with the turn indicators when the system is armed or disarmed. 20 06DE2142E.pmd • correct entry of the first two digits of the PIN code; • contact of the Jack key for 1 s with the emergency panel (if self - learned); • reception of the Driver Card signal (if self - learned). Recognition is confirmed by a long flash of the LED and enables normal use of the vehicle. Recognition must occur within 60 s after anti - robbery protection has been activated. If recognition does not occur within the next 30 s, the radio controls are disabled. If recognition does not occur within 60 s, 9 alarms cycles lasting 30 s are generated, at the end of which the system is armed without the engine lock (if the ignition is switched off the alarm stops sounding the system remains armed and the engine is immediately immobilised). To disarm the system when in anti - robbery alarm state it is necessary to key in the entire PIN Code. 4.12 - Blinker arming / disarming Enabled Disabled This mode requires a user recognition procedure whenever the ignition is turned on and every time the door is opened while the ignition is on. Activation of the anti - robbery mode is signalled by a long flash of the LED. User recognition can be performed by the following means: Disabled When the system is armed, it will signal by buzzing and direction indicator flashes (3 buzzer signals and 5 flashes) if a a door or the bonnet or boot is open. If they are closed within 23 s, any subsequently door / bonnet / boot opening will trigger these signals. If the 23 s elapse without closing the door / bonnet / boot, the system will not check their status again until another closing / opening operation occurs that triggers an alarm. Enabled Disabled 4.15 - Automatic anti - robbery protection Enabled Disabled This function adds automatic door locking to the alarm auto rearm procedure. Enabled Enabled Signals the car finder function in synchronism with the turn indicators. Enabled Disabled This mode allows the user to activate the function voluntarily by pressing radio control key “B” with the ignition turned on. Basic Function - BRIDGE 4100 20 11/02/2008, 11.15 Activation of the anti - robbery function is signalled by quick flashing of the LED. Whenever a door is opened while the ignition is on, this activates the anti - robbery mode and the LED is turned off. User recognition can be performed by the following means: • correct entry of the first two digits of the PIN code; • contact of the Jack key for 1 s with the emergency panel (if self - learned); • reception of the Driver Card signal (if self - learned). Recognition is confirmed by a long flash of the LED and enables normal use of the vehicle. Recognition must occur within 60 s after anti - robbery protection has been activated. If recognition does not occur within the next 30 s, the radio controls are disabled. If recognition does not occur within 60 s, 9 alarms cycles lasting 30 s are generated, at the end of which the system is armed without the engine lock (if the ignition is switched off the alarm stops sounding the system remains armed and the engine is immediately immobilised). To disarm the system when in anti - robbery alarm state it is necessary to key in the entire PIN Code. 4.17 - Autohazard Enabled Disabled If activated, the system turns on the four hazard lights if the vehicle’s speed drops by 50% in one s. 4.18 - Speed Alert Enabled Disabled If the function is activated, the buzzer will warn in the vehicle exceeds the speed limit. To memorize the speed limit, press button “A” on the radio control when the vehicle is being driven at the limit speed. To deactivate the function, press button “B” on the radio control when the vehicle is on the move. It’s possible to active / deactive the function by extended pressure of the control panel push button. BRIDGE 4100 - Basic Function 06DE2142E.pmd 21 21 11/02/2008, 11.15 5 - ALARM MEMORY If an alarm has occurred the buzzer and the turn indicators will give four signals. The alarm status history is displayed the LED when the system is disarmed, and will remain available until the system rearmed or the ignition will be switched ON. The flashes from the LED show what caused the alarm. LED SIGNAL ALARM DESCRIPTION 1 blink doors, boot have been opened 2 blinks ultrasonic volumetric sensor triggered 3 blinks bonnet has been opened 4 blinks attemp to start (ignition key/hotwire) 5 blinks speedometer boot input/alarm 6 blinks not used / Cobra Bus 7 blinks activation of speed alert sensor input / additional sensors 22 06DE2142E.pmd Alarm memory - BRIDGE 4100 22 11/02/2008, 11.15 6 - EMERGENCY OVERRIDE To disarm the system without using the remote, proceed as follows: press the push - button located on the emergency panel the number of times corresponding to the first digit of your PIN code. At each button pressure corresponds an acoustic signal of the buzzer. A longer pressure is interpreted by the system as being the end of the digit entry, signalled by a long flashing of the LED. Do the same for all of the other digits. Once all of the digits have been entered, if the code is correct, the system is disarmed. PIN CODE SIREN ON OK quick flashing pause EMERGENCY Push for a number of times correspondent to the digit of your PIN code ALARM DISARMED long flashing Enter following digit of your PIN CODE 23 BRIDGE 4100 - Emergency override 06DE2142E.pmd 23 11/02/2008, 11.15 7 - PERSONAL PIN CODE 6. Enter the new PIN code: As the PIN code enables access to the system, it should not be left in the unattended vehicle as it can be used to deactivate the system or to add new radio controls without authorization. To change your PIN code, follow this simple procedure: • Turn off the ignition once the fourth digit has been entered. • Enter the PIN code again. If the system ascertains that the entered code matches the programmed one, the code will be memorized. This is signalled by a 3 s flash from the turn indicators and the LED. Close the door to quit the procedure at any time. The old PIN code will not be modified in this case. 1. Disarm the system using the radio control. 2. Turn the ignition key “on”. 3. Open a door and the bonnet and keep them open during the programming phase. 4. Press key “A” on the radio control until the turn indicators flash to indicate that you have accessed the programming function. 5. Enter the old PIN code: • Press the button on the emergency panel for the number of times corresponding to the first digit of the new PIN code. The LED will flash fast each time you press the button. • A longer pause will be interpreted by the system as the number having been fully entered and will be signalled by a long flash from the LED and a beep from the buzzer. Proceed in the same way for the other digits. • Enter the old PIN code again. 24 06DE2142E.pmd Personal pin code - BRIDGE 4100 24 11/02/2008, 11.15 8 - MAINTENANCE AND TROUBLE SHOOTING 8.2 - Trouble shoting 8.1 - Radio control battery low If the LED flashes for a brief time or in an irregular way when one of the buttons is pressed, this means that the battery is low and must be replaced. 1. To change the battery, open the shell of the radio control by levering in the zone shown in the figure. 2. Remove the battery as indicated. 3. Wait about 10 s. 4. Fit the new battery, taking care to only touch its sides with the fingers. Comply with the polarity as shown in the figure. 5. Close the battery shell and press key “A” on the radio control, make sure that the system responds. Conduct tests near to the vehicle. 6. Dispose of the old battery in the relative containers provided for this purpose. 7. If both the radio controls are lost, you will still be able to disarm the system in an emergency. The radio control fails to arm/disarm the system A Solution: The radio control battery may be flat (chapitre 8 page 25). B Solution: Follow the emergency procedure to disarm the system (chapter 6 page 23) and then contact your dealer. An alarm has triggered for no apparent reason A Solution: If ultrasonic volumetric trigger is shown, check that windows, sunroof and air vents are closed and that no moving objects are in the vehicle.If the problem persist contact your dealer. B Solution: If direct contact trigger (doors, boot and bonnet opening) is shown, one of the switches requires adjustement.Contact your dealer. Refer to the emergency override procedure (chapter 6). 25 BRIDGE 4100 - Maintenance and trouble shooting 06DE2142E.pmd 25 11/02/2008, 11.15