1
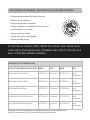
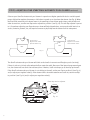
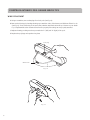
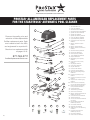
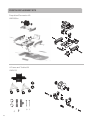
Installation manual
automatic suction pool cleaner
877.768.2717 fax: 877.276.POOL (7665)
Outside the U.S.: +1.805.620.5060 fax: +1.949.336.1940
www.aquastarpoolproducts.com [email protected]
The StarzTruck automatic suction side pool cleaner features:
•Programmed movement for better cleaning
•Efficient, quiet operation
•Highly engineered for durability
•Simple installation, no additional tools required
•Vinyl/fiberglass or concrete
•Easy grip roll bar handle
•Private label grill insert available
•Patent-pending design
Kit includes cleaner, nine connector hoses, one leader hose,
flow gauge, regulator valve, skimmer cone, safety vacuum lock
wall fitting and owner’s manual.
Available Color Combinations
Top/Bottom/Handle&Grill/Hose PART#
TYPE
PART#
TYPE
White/White/White/White
SZT0101-H
Concrete
SZTV0101-H
Vinyl/
Fiberglass
Black/Black/Black/Black
SZT0202-H
Concrete
SZTV0202-H
Vinyl/
Fiberglass
Grey/Black/Black/Grey
SZT0302-H
Concrete
SZTV0302-H
Vinyl/
Fiberglass
Deep Blue/White/White/White
SZT1001-H Concrete
SZTV1001-H
Vinyl/
Fiberglass
Aqua Blue/White/White/White
SZT1601-H
SZTV1601-H
Vinyl/
Fiberglass
Concrete
See pages 14-16 for a complete list of replacement parts and kits available from ProStar™ Replacement Parts, a division of AquaStar Pool Products.
The StarzTruck automatic pool cleaner
Thank you for purchasing the StarzTruck automatic pool cleaner. AquaStar proudly manufactures and
assembles all of their products in the U.S.
The StarzTruck automatic pool cleaner works from the suction side of your pool filter system – subject to the GPM (gallons per minute) of the suction line. Designed to operate and install simply with most swimming pools, occasionally additional hoses and/or parts are needed to complete
your special situation. For technical assistance and parts availability, call AquaStar Pool Products at 877.768.2717.
Keep this installation manual on file – with your receipt, purchase date and serial number. The installation
instructions are also available online at www.aquastarpoolproducts.com.
Always remove the StarzTruck automatic pool cleaner and hoses before swimmers enter the pool. It is not a toy and is not intended for children to play with.
When removed from the pool, keep the StarzTruck automatic pool cleaner disconnected and stored in a shaded safe place – away from all chewing animals! The hoses must be stored straight. Do not coil!
Carry the StarzTruck automatic pool cleaner by the handle only.
With sidewall suction connections, always install a USPC-approved safety vacuum lock (AquaStar p/n VLK15Txx). When the StarzTruck automatic pool cleaner is removed,
make sure the safety vacuum lock wall fitting cap is securely covering the sidewall suction port and
snapped shut.
Safety first!
Remember These Important Facts!
Before installing the StarzTruck automatic pool cleaner:
•Manually clean/vacuum the pool and clean all skimmer, pump and debris baskets.
•Clean or backwash the filter.
•Check that the water is at its proper level.
•Check water chemistry – make sure the pool is free from excess algae to ensure proper operation of
StarzTruck automatic pool cleaner.
Never use the StarzTruck automatic pool cleaner to remove plaster/pebble debris in new or remodeled pools.
Always remove the StarzTruck automatic pool cleaner before backwashing or chemically shocking the pool.
1
Step 1: Connecting and submerging the hoses and cleaner
There are nine connector hoses and one leader hose with a grey hose cuff. The hose cuff connects to the top
of the StarzTruck automatic pool cleaner (see Fig. 1).
Connect the StarzTruck automatic pool cleaner hose sections together by pushing and twisting the tapered
male connector end of each hose firmly into the open female end of the adjacent hose section (see Fig. 2).
Depending on the size and shape of your pool, all hose sections might not be used. The hose should reach
from the skimmer or safety vacuum lock wall fitting (AquaStar p/n VLK15Txx) to the furthest point in the
pool plus one extra hose section. If the hose is not long enough, it will be necessary to purchase additional hose
sections from your pool dealer. After the correct hose length has been assembled, fill the hose completely with
water by lowering the attached StarzTruck automatic pool cleaner and then vertically pushing the hose down,
allowing all the air to escape. When the hose is full, remove the StarzTruck automatic pool cleaner from the
hose and insert the flow gauge into the leader hose. Make sure the flow gauge is under water (see Fig. 3).
If optional leaf canister (AquaStar p/n HWN152) is purchased, install between first and second hose sections
(see Fig. 4).
Flow indicator
(desired position)
Flow Gauge
HWN163
Leader hose
First hose section
To skimmer or vac-lock
Pool deck / coping
Fig. 3
Fig. 1
First hose section
To StarzTruck
Fig. 2
Skimmer
Second hose section
(showing leaf canister)
Fig. 4
2
Step 2: Connecting to Suction
Connect the skimmer cone adapter (p/n HWN152) to the regulator valve (p/n HWN161) and then insert the
skimmer cone into:
A. The suction port of the skimmer (see Fig. 5) or
B. The wall port safety vacuum lock without a three-way or ball valve (see Fig. 6) or
C. Without the skimmer cone and regulator valve – insert the male end of the hose directly into the safety vacuum
lock wall fitting port – with a three-way or ball valve (see Fig. 7)
Hose
To StarzTruck
Skimmer
VLK15Txxx safety
vacuum lock wall fitting
HWN161 regulator valve
HWN152 cone adapter
To pump
Fig. 6
To main drain (if applicable)
Fig. 5
VLK15Txxx safety
vacuum lock wall fitting
Fig. 7
3
Step 3: Adjusting your StarzTruck automatic pool cleaner
Check the water flow reading on the Flow Gauge (refer to step 1, Fig. 3). The black disk should be in the box
between the “MIN” and “MAX” markings. If the setting is higher than required with the black disk outside
of the box on the “MAX” side and you have connected your hose to the skimmer, it will be necessary to
reduce the vacuum/water flow by using a valve or valves in the filter system, or the AquaStar HWN161
Regulator Valve or an optional AquaStar Automatic Skimmer Vacuum Plate designed to adjust vacuum/
water flow. To install the HWN161 Regulator Valve, turn the filter system off. Remove the hose from the
HWN152 Skimmer Cone, and after closing the Regulator Valve (rotate the blue collar clockwise/toward + until closed/tight), insert the Regulator Valve into the Skimmer Cone, and insert the hose end into the
Regulator Valve (see Fig. 5 on previous page).
Turn the filter system on and allow it to run long enough to eliminate any air in the system. Turn the blue
collar counter clockwise until the proper reading appears on the gauge.
If you have connected your hose to the AquaStar Vacuum Lock, it will be necessary to adjust the vacuum/
water flow using the three-way valve at the filter system. The handle on the valve should be turned so that
the Flow Gauge which is installed in the StarzTruck hose reads properly (refer to Fig. 3 on page 2). After the
three-way valve has been properly adjusted, the vacuum gauge at the three-way valve should be marked
so that the water flow can be adjusted by referring to the gauge at the valve rather than reinstalling the
Flow Gauge in the hose each time an adjustment is necessary. Once the Flow Gauge has a proper reading,
remove it from the leader hose and reattach the StarzTruck automatic pool cleaner. Submerge the StarzTruck
back into the pool until it reaches the bottom for operation.
4
Step 3: Adjusting your StarzTruck automatic pool cleaner continued
Some skimmers have a vari-flow or diverter valve in the bottom of the skimmer. This valve can be turned
to regulate skimming and main drain suction. Turn the valve to full skim and then adjust the Flow Gauge
vacuum gauge by turning the valve toward main drain suction. Usually this valve is the same size as the
hose end, and it will therefore be necessary to purchase an HWN158 Hose Connector (see Fig. 8). After the
proper gauge reading has been established, the diverter valve will have to be locked in place with a wedge of some kind so that it won’t change position with operation of the StarzTruck.
Periodically check the water flow/vacuum to be sure that the StarzTruck is operating as efficiently as
possible. Remember, too much vacuum is just as bad as too little.
Periodically check to make sure that the StarzTruck hose is securely attached to its suction source (i.e. Skimmer, Skimmer Vacuum Plate, Safety Vacuum Lock, etc.).
Disconnect the StarzTruck hose from the skimmer/regulator valve, or, if using a dedicated line, turn cleaner
valve off before backwashing, so that you’re not restricting water flow.
Never coil the StarzTruck hose. Damage caused by coiling the hose is not covered under the warranty.
When the StarzTruck is out of the pool, always disconnect the leader hose from the StarzTruck head.
Always carry the StarzTruck by the molded-in handle. Do not carry it by the hose.
When swimming in the pool, remove the StarzTruck from the water.
If you are going to super-chlorinate, shock or add gas chlorine to your pool, make sure the cleaner and hose
are removed before doing so.
To StarzTruck
Hose
Optional hose adapter
Skimmer diverter valve
To pump
To main drain
Fig. 8
5
Step 3: Adjusting your StarzTruck automatic pool cleaner continued
Observe your StarzTruck automatic pool cleaner in operation at higher speed with dual or variable speed
pumps. Adjust the regulator, three-way or ball valves to speed up or slow down the cleaner (see Fig. 9). When
the StarzTruck automatic pool cleaner seems to be spending too much time against steps, vertical walls and
other obstructions, turn the rear flap tension adjuster to position I (see Fig. 10). The rear flap adjuster is preset
to II. Sometimes adjusting your flow valve up or down will help. Nevertheless, custom pools with interior bar
stools, fountains, planters, etc., will require someone to physically free the cleaner from its entrapment.
Screw top in.
Bypass less water.
Speed cleaner up.
Min
Max
Max
Unscrew top.
Bypass more water.
Slow cleaner down.
Fig. 9
The StarzTruck automatic pool cleaner will climb vertical walls in concrete and fiberglass pools (not vinyl) if there is at least a 12-inch radius where the floor meets the walls. Because of the internal programmed gear
box, the cleaner will not climb the wall every time. Likewise, it will not always go all the way up the wall. If the StarzTruck automatic pool cleaner is not sticking to the wall, set the rear flap to position III (see Fig. 9)
and/or adjust your regulator valve(s). If the cleaner climbs above the waterline and sucks air, set the rear flap to position I (see Fig. 10) and/or adjust your regulator valve(s).
Rear flap tension adjuster
Fig. 10
6
StarzTruck automatic pool cleaner Service tips
Check the condition of the shoes, wings and flaps periodically
The shoes and wings have wear indicators on their sides and should be checked occasionally to determine if
they need replacing. The shoe wear indicator is a line on the side of the shoe that appears as a difference in
texture. When this texture difference is no longer visible at the bottom of the shoe when viewed from either
side, the shoes must be changed (see Fig. 11). Also on the side, the wing wear indicator is a horizontal line
which has three vertical lines above it. When you can no longer see the horizontal line, the wings must be
changed (see Fig. 12 on page 8 ).
Shoe replacement
A. Turn unit upside down.
B. Insert screwdriver between foot and shoe on one of the pods (see Fig. 11).
C. Using a lifting motion, remove the shoe from the foot.
D. Dip a new shoe in water and attach the shoe to the foot, making sure to put the small post into the small hole
and the large post into the large hole. These posts and holes are different sizes to prevent the shoes from being
improperly installed.
E. Repeat steps b, c and d for each shoe.
Good shoe
Wear
Mark
Worn
Shoe
Fig. 11
7
StarzTruck automatic pool cleaner Service tips
Wing replacement
A. Using a screwdriver, remove the plugs from both pods (see Fig. 12).
B. Remove the old wings by bending the wings up toward the sides of the cleaner, and lift them off their hooks (see Fig. 13). If any of the wing hooks are broken, take the StarzTruck automatic pool cleaner to your dealer for pod replacement as the cleaner will not function properly if the wings are not properly attached.
C. Replace the wings, making sure that you match the “L” (left) and “R” (right) of the pods.
D. Replace the pod plugs and tap them into place
Pod plug
Wear mark
Fig. 12
Fig. 13
8
StarzTruck automatic pool cleaner Service tips
Flap replacement
A. Remove the front and rear flaps from your StarzTruck automatic pool cleaner by inserting a small screwdriver
between the flap and the lower body near the pivot point of the flaps (see Fig. 14).
Bottom of cleaner
Fig. 14
B. You will notice that your replacement flaps look similar but are marked “Front” and “Rear” on the flap. Because
the springs in the flaps are different, it is absolutely necessary to install the proper flap in the front and rear of
the unit. Failure to do so will result in unsatisfactory performance of the StarzTruck automatic pool cleaner. When
installing the front flap, be sure that the extended leg of the spring is inserted into the notch on the front of the
lower body (see Fig. 16). Push the flap in place. You will feel and hear a snap when the flap is in place. Fold the flap in toward the bottom of the StarzTruck automatic pool cleaner. You will feel some resistance at this point (that is normal). As the flap snaps into its normal position, you will feel the spring action and notice that the front
flap is now in its normal operating position. When installing the rear flap, the extended leg of the spring must fit
against one of the flat surfaces of the cam (see Fig. 15).
FRONT
REAR
Bottom of cleaner
Fig. 15
9
StarzTruck automatic pool cleaner Service tips
StarzTruck automatic pool cleaner bumper replacement
Replacement of the StarzTruck automatic pool cleaner bumper is not recommended as a “do it yourself ”
repair, because there is a slight possibility that the replacement might cause a problem in the propulsion
system. We strongly suggest that you consult your dealer for this repair.
A #2 phillips screwdriver is necessary for this repair.
1. Turn off pump.
2. Remove StarzTruck automatic pool cleaner from pool.
3. Disconnect StarzTruck automatic pool cleaner from leader hose.
4. Turn StarzTruck automatic pool cleaner upside down and place it in a position that is steady/firm.
5. Locate and loosen the captive screw behind the throat in the center of the bottom (see Figs. 16, 17 & 18).
6. Lift the bottom opening (see Figs. 17 & 18)
7. Remove four “A” screws (see Fig. 16).
8. Lift the lower body assembly off the StarzTruck automatic pool cleaner (see Fig. 16).
9. Remove four “B” screws (see Fig. 16).
10. Remove bumper carefully, making sure that other cleaner parts are not moved or disturbed.
11. Remove two “C” screws (see Fig. 16).
12. Replace bumper, again making sure that other cleaner parts are not moved or disturbed.
13. Reinstall screws and parts, following steps in reverse – 11, 9, 8, 7, 6, 5, 4, 3.
14. Reinstall StarzTruck automatic pool cleaner in pool per installation instructions.
Captive screw
“A” screws
Lower body assembly
Front flap
“B” screws
Bumper
“C” screws
Fig. 16
10
StarzTruck automatic pool cleaner Service tips
Bottom opening removal and cleaning instructions
Removing the bottom opening
Should the StarzTruck automatic pool cleaner stop moving or become sluggish due to debris trapped in the
throat or inside the unit, the turbine/vacuum chamber is accessible following these instructions.
1. Turn off pump.
2. Remove StarzTruck automatic pool cleaner from pool.
3. Disconnect StarzTruck automatic pool cleaner from leader hose.
4. Turn StarzTruck automatic pool cleaner upside down.
5. L ocate and loosen the captive screw behind the throat in the center of the bottom (see Figs. 17 & 18).
Captive
screw
Fixed access
cover
6. Lift bottom opening (see Figs. 17 & 18).
7. Clean turbine/vacuum chamber (see Fig. 19).
8. Check turbine for free movement.
Slots
9. R
einstall bottom opening by lining up the fixed access cover with the two slots shown in Figs. 17 & 18. Slide the cover in place and tighten the captive screw.
10. Reinstall StarzTruck automatic pool cleaner in pool per installation instructions.
Bottom of cleaner (concrete)
Fig. 17
Turbine/vacuum chamber
Captive
screw
Fixed access
cover
Slots
Bottom of cleaner (vinyl)
Fig. 18
Fig. 19
11
StarzTruck automatic pool cleaner troubleshooting guide
Problem: Slow/no forward movement
Causes
Solutions
Lack of/improper water flow through cleaner
Check and adjust water flow per step 3, Figs. 7, 8, 9, 10
Partial blockage of StarzTruck throat
Clear blockage
Worn shoes
Replace shoes
Worn wings
Replace wings
Problem: Cleaner fails to climb vertical walls gunite/concrete pool
12
Causes
Solutions
Improper shoes for application
Call AquaStar
Lack of/improper water flow through cleaner
Adjust water flow per step 3, Fig. 10
Partial blockage of StarzTruck throat
Clear blockage
Worn shoes
Replace shoes
Worn wings
Replace wings
Hose too short
Install additional hose sections per installation
Instructions
Improper tension on rear flap
Turn rear flap adjuster to III
StarzTruck automatic pool cleaner troubleshooting guide
Problem: Cleaner climbs to surface and sucks air
Causes
Solutions
Too much/improper water flow through cleaner
Check and adjust water flow per step 3, Figs. 7, 8, 9, 10
Improper tension on rear flap
Turn rear flap adjuster to I
If still climbing too much, reduce water flow until proper operation is achieved
Steering failure
1.Check and clean rear screen
2.Check to see that cone gear is free and rotates smoothly in both directions
3.Check medium turbine and spindle gear assemblies for malfunction
Problem: Cleaner head floats
Causes
Solutions
Cleaner head or return line has air in it
Remove all air from cleaner head
Stop all air from entering the pool through the return lines
If cleaner head and hose are covered with fine bubbles, give the hose a good tug. This will release the air bubbles and allow the cleaner head to settle to the bottom of the pool until the hose is covered with bubbles again
The cleaner head is being pulled or lifted off the bottom of the pool by the cleaner hose or return line flow – either at the surface or at the bottom of the pool – or both
Readjust return lines to prevent water flow from
interfering with cleaner head and/or hose
13
StarzTruck automatic pool cleaner Troubleshooting guide
Problem: Cleaner sticks at steps, corners, etc.
Causes
Solutions
Improper water flow
Check and adjust water flow per step 3, Figs. 7, 8, 9, 10
Worn shoes
Replace shoes
Worn wings
Replace wings
Hose too short
Install additional hose per installation instructions
Steering failure
1.Check and clean rear screen
2.Check to see that cone gear is free and rotates
smoothly in both directions
3.Check steering program and troubleshoot – then:
A.clean, repair or replace gearbox
B.check pod/A-frame connection and replace if necessary – do not attempt to retighten loose pods
C. check medium turbine and spindle gear
assemblies
StarzTruck automatic pool cleaner Disclaimer
A. Pool plaster is affected by age, water chemistry, etc.
B. Pool plaster can deteriorate over a period of time.
C. T he integrity of “good” pool plaster is such that a pool
vacuum cleaner – automatic or manual – cannot remove
that plaster.
D. T he integrity of “good” pool plaster is such that the
plaster will cause wear on the StarzTruck automatic pool
cleaner – not vice versa.
E. Vinyl and fiberglass are affected by age, sunlight and
water chemistry.
F. Vinyl can become brittle and weak.
G. Vinyl can also be affected by the installation and the
pool’s surroundings.
H. W
hen installing the StarzTruck automatic pool cleaner,
you assume all responsibility for the condition of the pool
and the pool’s surroundings.
To better serve you, please have the following information
available if you call AquaStar’s Technical Support Department:
1. The purchase date and purchase location of your
StarzTruck automatic pool cleaner.
2. The serial number of your StarzTruck automatic pool
cleaner.
3. The number of hose sections used.
14
StarzTruck automatic pool cleaner Limited Warranty
This limited warranty is only valid if the warranty card has been
filled out and returned with proof of purchase within allotted
time period. This limited warranty is extended to the original
purchaser (consumer) from the manufacturer of the StarzTruck
Automatic Pool Cleaner, AquaStar Pool Products, Inc., 2340 Palma Drive, Warranty Dept. 104, Ventura, CA 93003, USA.
Phone 877.768.2717, outside the USA +1.805.620.5060.
AquaStar warrants this cleaner to be free from defects in
materials and workmanship for a period of one year from the
original date of purchase subject to all the following conditions
and exclusions.
1. Should the cleaner fail to be in good working order in
accordance with the above schedule, AquaStar will at its
option repair or replace the cleaner or any defective parts
at no additional charge except as set forth below. Repair
parts and replacement products will be furnished on an
exchange basis and will be new or functionally equivalent.
All parts removed as a result of replacement shall become
the property of AquaStar. Liability of AquaStar and the
sole remedy of the purchaser whether in contract under
any warranty, in tort (including negligence), in strict
liability or otherwise, shall be limited to the repair or
replacement of defective parts only and shall in no event
exceed return of the amount of the purchase price paid by
the purchaser.
2. This limited warranty is for the replacement of alleged
defective parts during the term of the warranty; owner
may ship the product by prepaid freight to AquaStar
Pool Products, Inc., 2340 Palma Drive, Warranty Dept.
104, Ventura, CA 93003, USA. Enclose a letter including
the serial number, date and place of purchase, name,
telephone number and address of owner, copy of purchase
receipt and a description of the problem. AquaStar, upon
determination and at our option, will repair and return
to the owner all defective parts that are covered by this
warranty. Any parts not covered by this limited warranty
will be returned to owner freight collect.
3. This limited warranty is only extended to the original
purchaser (consumer) and only during the time in which
the original purchaser occupies the premises where the
cleaner was originally installed. It does not apply to any
subsequent purchasers or recipients of the cleaner.
4. This limited liability warranty includes the replacement of parts due to normal wear but does not include cosmetic
situations including but not limited to: discoloration or fading due to sunlight or chemicals, scratches, scuffs, etc.
5. This limited warranty does not cover any loss, damage,
injury, or malfunction of the equipment due to the failure
to properly maintain and or operate the cleaner, or
alteration of the equipment, tampering, and act of God,
abuse, misuse, negligence, omissions.
6. This cleaner is intended for a properly designed and
maintained swimming pool. This limited warranty
does not cover pools that have a defective design, are
improperly maintained, and are inappropriate for the
StarzTruck automatic pool cleaner’s operation.
7. This limited warranty does not cover damage or injury
from improper installation, pump running dry, damage
due to loss of prime or plugged pipes.
8. This limited warranty does not cover any change in
appearance, damage, malfunction due to chemical
reactions, etc.
9. AquaStar is not responsible for any loss of time,
inconvenience or any consequential expenses such as
telephone calls, labor, etc., unless required by law.
10. Deterioration, discoloration or brittleness of pool plaster
and vinyl liners can be caused over time separately by
or in combination with, age and an imbalance in pool
water chemistry, improper installation and other factors.
AquaStar hereby disclaims any and all claims, and
purchaser releases AquaStar from any and all claims for
damages to any pool plaster or vinyl liner in purchaser’s
pool by reason of the use and/or operation of the cleaner.
11. This limited warranty is only valid in the USA and Canada.
12. This limited warranty is in lieu of any other warranties
express or implied, including the warranties of
merchantability or fitness. Any such implied warranty
imposed by state consumer law is limited in duration to one year from date of purchase.
No distributor, dealer or representative has any authority to
make any warranties express or implied concerning StarzTruck
automatic pool cleaner except as contained herein. Unless
warranty card has been received by AquaStar, AquaStar reserves
the right to refuse repair service or to honor warranty.
877.768.2717 fax: 877.276.POOL (7665)
Outside the USA: +1.805.620.5060 fax: +1.949.336.1940
www.aquastarpoolproducts.com info @ aquastarpoolproducts.com
15
A DIVISION OF AQUASTAR POOL PRODUCTS
PROSTAR All-American REPLACEMENT PARTS
FOR the STARZTRUCK automatic pool Cleaner
™
™
1
Discover the quality, price and
selection of these dependable
18
ProStar replacement parts. Each
2
5
one is made to last in the USA,
and engineered for a perfect fit.
6
3
Check out our replacement kits
8
on pages 15-16.
4
7
9
877-768-2717
11
12
ProStarReplacementParts.com
13
15
16
14
17
19
35
31
21
20
34
30
25
26
24
23
22
27
37
10
29
28
32
16
33
38
37 39 38
40
41
42
1.
Top Shell HWN121xx
2.
Cone Gear HWN122
3. Intermediate Gear HWN123
4. Intermediate Gear Shaft HWN124
5. Spindle Gear Screw HWN125
6. Spindle Gear HWN126
7. Spindle Gear Bushing HWN127
8. Cone Gear Bushing HWN128
9. Upper Middle Body HWN129
10. Upper Body Screw Kit (6 Pack)
HWN130
11. Medium Turbine Drive Gear
HWN131
12. Medium Turbine HWN132
13. Medium Turbine Case with Axle
HWN133
14. Gear Box Assembly HWN134
15. Rear Screen HWN135xx
16. Float Kit (2 Pack) HWN136
17. Lower Middle Body HWN137
18. Bumper HWN138xx
19. Middle Body Screw (6 Pack)
HWN139
20. Lower Body Screw (4 Pack)
HWN140
21. Flap Adjuster HWN141
22. Lower Body HWN142xx
23. Flap Kit HWN143xx
24. Pod Screw Kit HWN110
25. Pod Plugs (6 Pack) HWN111
26. Wing Kit: Left and Right Wings
HWN117xx
27a. Pod Shoes (4 Pack) for Vinyl
HWN114
27b. Pod Shoes (4 Pack) for Concrete
HWN115
28. Captive Screw / Retaining Clip
HWN148
29a.Fixed Access Cover Assembly
for Concrete Models HWN149xx
29b. Fixed Access Cover Assembly
for Vinyl Models HWN157xx
30. Pod Kit HWN116xx
31. Turbine Bearings HWN112
32. Skimmer Cone HWN152
33. Medium Turbine/Spindle Gear Kit
HWN154 (not shown)
34. Universal A-Frame Kit HWN118
35. Turbine Kit HWN113
36. A-Frame and Turbine Kit HWN119
(not shown)
37. A-Frame/Bushing/Saddle Kit
HWN120 (not shown)
38. Leaf Canister HWN162
43 Regulator Valve HWN161
39.
40. Safety Vacuum Lock Wall Fitting
VLK15Txx
41. Propulsion/Conversion Kit
HWN160 (not shown)
42. Flow Gauge HWN153
43. Hose Connector HWN158
: (2 PACK)
PROSTAR
REPLACEMENT KITS
30a
31
HWN11601 POD
KIT (WHITE)
(REPLACES AXV417WHP)
HWN112 -TURBINE BEARINGS: (2 PACK)
(REPLACES AXV055P)
36
We’ve made your pool equipment service and repair a lot easier with these convenient replacement kits. Each one
H
(R
is a complete
contains
everything you need for that particular repair. For more information or to stock
HWN11602that
-POD
KIT (BLACK)
30b grouping
(REPLACES AXV417BKP)
up on individual replacement parts, visit ProStarReplacementParts.com or call 877-768-2717.
Medium Turbine/Spindle Gear Kit
HWN154
34
41
HWN154 - MED. TURBINE/SPINDLE GEAR KIT
(REPLACES AXV079VP)
HWN120 - A-FRAME/BUSHING/SADDLE KIT
(REPLACES AXV621D)
Turbine Kit: Turbine and
Two Turbine Bearings
HWN113
36
Universal A-Frame Kit
HWN118
40
35
HWN118 -UNIVERSAL A-FRAME KIT
(REPLACES AXV621D)
HWN160 - PROPULSION
(REPLACES AXV622DP
37
A-Frame/Bushing/Saddle Kit
HWN120
HWN113 -TURBINE KIT
(REPLACES AXV602P / AXV112P)
17
H
(R
PROSTAR REPLACEMENT KITS
HWN154 - MED. TURBINE/SPINDLE
GEAR KIT
34
Propulsion/Conversion
Kit
(REPLACES AXV079VP)
HWN160xx
HWN112 -TURBINE BEARINGS: (2 PACK)
(REPLACES AXV055P)
35
18
A-Frame and Turbine Kit
HWN118
-UNIVERSAL A-FRAME KIT
HWN119
(REPLACES AXV621D)
40
HWN160 - PROPULSION/CONVERSION KIT
(REPLACES AXV622DPK)
36
HWN113 -TURBINE KIT
(REPLACES AXV602P / AXV112P)
37
HWN119 -A-FRAME & TURBINE KIT
(REPLACES AXV621DAT)
Warranty Registration Card
Include a copy of your receipt and return this form within 15 days of purchase. The additional information requested is to help us
understand our customers. The information is NOT sold or shared with any other party. Thank you for your purchase.
First Name
Last Name
Company Name (if pool service or builder)
Address
City
State
phone
Fax
Zip Code
Email
Comments
1. Serial number (found on bottom of cleaner)
____________________________________________________________________
2. Type of pool:
5. Name of dealer/builder/service professional where
purchased: _ _________________________________________
6. Pool is ________________ years old.
o Vinyl
o Fiberglass
o Gunite
o Other
3. Cleaner model:
o Concrete
o Vinyl/fiberglass
7. What cleaner is this replacing?
______________________________________________________
8. Are you a:
o Consumer
o Pool Service Technician
o Pool Builder
4. Date of purchase: ___________________________________
o Other
Please complete and mail with receipt to:
AquaStar Pool Products, Inc. Warranty Registration Dept. 104
2340 Palma Drive
Ventura, CA 93003
Or fax to:
877.276.POOL (7665)
Outside the U.S.: +1.949.336.1940
automatic suction pool cleaner
Please fill out warranty information on reverse
side and mail to:
AquaStar Pool Products, Inc. Warranty Registration Dept. 104
2340 Palma Drive
Ventura, CA 93003
Don’t forget to include a copy of your receipt
as proof of purchase.
Rev 06/12
P/N SZTM