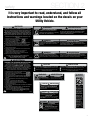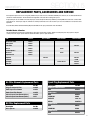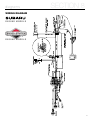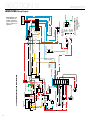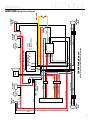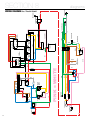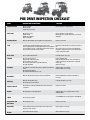
1
UTILITY VEHICLE O P E R ATO R ’ S SAFETY MANUAL Gasoline, Gas/Electric Hybrid & Electric Utility Vehicles This manual applies the following brands: LANDmaster UTVs BULLDOG UTVs Trail Wagon UTVs Chuck Wagon UTVs All of our Illustrated Parts Lists are now online at: amsportworks.com/manuals_UTV.php Copyright August 23, 2013 15571R1 INDEX Table of Contents Section 1 Introduction . . . . . . . . . . . . . . . . . . . . . . . . . . . . . . . . . . . . . . . . . . . . . . . . . . pages 4-5 Section 2 Safety . . . . . . . . . . . . . . . . . . . . . . . . . . . . . . . . . . . . . . . . . . . . . . . . . . . . . . . pages 6-12 Section 3 Assembly Instructions . . . . . . . . . . . . . . . . . . . . . . . . . . . . . . . . . . . . . . . . . . pages 13-16 Section 4 Inspection . . . . . . . . . . . . . . . . . . . . . . . . . . . . . . . . . . . . . . . . . . . . . . . . . . . . page 17 Your Vehicle’s Model, VIN and Serial Number . . . . . . . . . . . . . . . . . . . . . . . . . . . . . . . . . . . . . . . . . . . 5 Warning Labels / Safe Operating Procedures . . . . . . . . . . . . . . . . . . . . . . . . . . . . . . . . . . . . . . . . . . . 7-9 Electric / Hybrid Vehicle Specific Warnings & Cautions . . . . . . . . . . . . . . . . . . . . . . . . . . . . . . . . . . . . 10 Before You Drive . . . . . . . . . . . . . . . . . . . . . . . . . . . . . . . . . . . . . . . . . . . . . . . . . . . . . . . . . . . . . . . . . 11-12 Section 5 Operation . . . . . . . . . . . . . . . . . . . . . . . . . . . . . . . . . . . . . . . . . . . . . . . . . . . . pages 18-24 Responsible Operation and Rider Safety . . . . . . . . . . . . . . . . . . . . . . . . . . . . . . . . . . . . . . . . . . . . . . . 18-20 Replacement Parts, Accessories and Service . . . . . . . . . . . . . . . . . . . . . . . . . . . . . . . . . . . . . . . . . . . 21 2WD and 4WD Gas UTV Operating Instructions . . . . . . . . . . . . . . . . . . . . . . . . . . . . . . . . . . . . . . . . . . 22 Electric UTV Operating Instructions . . . . . . . . . . . . . . . . . . . . . . . . . . . . . . . . . . . . . . . . . . . . . . . . . . . 23 Gas / Electric Hybrid UTV Operating Instructions . . . . . . . . . . . . . . . . . . . . . . . . . . . . . . . . . . . . . . . . 24 Section 6 Maintenance . . . . . . . . . . . . . . . . . . . . . . . . . . . . . . . . . . . . . . . . . . . . . . . . . . pages 25-32 Section 7 Troubleshooting . . . . . . . . . . . . . . . . . . . . . . . . . . . . . . . . . . . . . . . . . . . . . . . pages 33-35 Section 8 Wiring Diagrams . . . . . . . . . . . . . . . . . . . . . . . . . . . . . . . . . . . . . . . . . . . . . . . pages 36-41 Section 9 Warranty . . . . . . . . . . . . . . . . . . . . . . . . . . . . . . . . . . . . . . . . . . . . . . . . . . . . . pages 42-44 General UTV Maintenance . . . . . . . . . . . . . . . . . . . . . . . . . . . . . . . . . . . . . . . . . . . . . . . . . . . . . . . . . . 25-29 Electric / Hybrid UTV Specific Maintenance . . . . . . . . . . . . . . . . . . . . . . . . . . . . . . . . . . . . . . . . . . . . 30-32 Honda / Subaru / Briggs & Stratton Wiring Diagrams . . . . . . . . . . . . . . . . . . . . . . . . . . . . . . . . . . . . . 36-37 48V Wiring Diagrams / Hybrid Wiring Diagrams / Terminal Block Wiring . . . . . . . . . . . . . . . . . . . . . . 38-41 Full Size UTV Warranty Statement . . . . . . . . . . . . . . . . . . . . . . . . . . . . . . . . . . . . . . . . . . . . . . . . . . . . 42 Service and Warranty Contact Information . . . . . . . . . . . . . . . . . . . . . . . . . . . . . . . . . . . . . . . . . . . . . 43 UTV Setup and Pre-Delivery Checklist . . . . . . . . . . . . . . . . . . . . . . . . . . . . . . . . . . . . . . . . . . . . . . . . . 44 Pre Drive Inspection Checklist . . . . . . . . . . . . . . . . . . . . . . . . . . . . . . . . . . . . . . . . . . . . . . . . Back Cover 4404 Engle Ridge Drive Fort Wayne IN 46804 62194 Commercial Street Roseland, LA 70456 Toll Free 800-643-7332 Fax 800-399-1399 www.amsportworks.com SECTION 1 American SportWorks welcomes you to its growing family of new product owners. This Utility Vehicle “UTV” is a light utility vehicle that has been designed with care and built by skilled workers using quality materials. Proper set-up, maintenance and safe operating practices will help you get years of satisfactory use from this vehicle. Safety First American SportWorks is fully aware of the need for safe operating procedures around all of our equipment. We hope you will make a sincere effort to put safety above all other priorities. The Utility Vehicle was designed and built for work, recreation, and enjoyment; however, improper and irresponsible operation could result in serious injury or death. Since this is an off-road vehicle, operators will seldom see the road safety and warning signs they are accustomed to seeing on highways and public streets. This places additional responsibility on the driver to operate this vehicle well within the safe operational limits and capabilities of the unit. This manual has been prepared to instruct you in the safe and responsible operation of your Utility Vehicle. Read and abide by all safety alert information about this vehicle. If you do not understand any part of this manual, contact your local dealer for additional information and clarification. As the operator of this piece of equipment, you are in complete control. Only you can prevent an accident from happening. Using This Manual • Prior to any vehicle operation it is absolutely essential that you read and comprehend each section in this manual to develop an understanding of your vehicle and for your safety. After reviewing this manual, store it in a dry and easily accessible place for future reference. • The Operator’s Section is designed to help familiarize you with safety, assembly, operation, adjustments, troubleshooting, and maintenance. Read this manual and follow the recommendations to help ensure safe and efficient operation. • The information contained within this manual was current at the time of printing. Some parts may change slightly to assure you of the best performance. • To order a new Operator’s or Parts Manual contact your authorized dealer or contact American SportWorks Customer Service at 800-6437332 or visit us on the web at www.amsportworks.com. 4 introduction Terminology Right-hand and left-hand as used in this manual are determined by facing the direction the vehicle will travel while in use unless otherwise stated. Getting Acquainted with your Utility Vehicle This utility vehicle is designed exclusively for off-road use. It is not designed, properly equipped, or licensed to be safely operated on public streets and highways unless equipped with an LSV package. An ASW Low Speed Vehicle (LSV) is street legal where allowed when properly licensed and plated. Although street legal, the LSV is not designed for, nor allowed on highways. Refer to your local ordinances regarding the use of Low Speed Vehicles in your area. Unlike an ATV’s one person “straddle saddle” seat, the Utility Vehicle sports dual headrests, cushioned seats with seat belts and a protective full length body. Two passengers can ride comfortably in this vehicle protected from splashing water and mud. The Brush Guard mounted to the vehicle’s frame provides protection against low hanging limbs and briars. The Brush Guard also provides a mounting system for American SportWorks optional windshields, canopy tops and weather enclosures. It also serves as a mounting base for many other optional accessories. The cargo bed is for transporting accessories such as camping equipment, tree stands, hunting gear, and fishing gear. A standard hitch mounting plate enables quick installation of a rear hitch for pulling small trailers full of supplies, tools, gear, and game. Please visit our website at www.amsportworks.com for a full list of available accessories. introduction The Utility Vehicle has some similarities to an ATV. Your Utility Vehicle has a short wheelbase, narrow stance, and high center clearance all which provide for narrow and difficult trail access. This combination also enables this vehicle to be loaded in the back of most full to midsized pickups for transport. SECTION 1 Always use the serial and model number when ordering parts for your Utility Vehicle. The serial-number plate is located under the cargo bed on the driver’s side just above the engine, on the frame as shown in figure 1 below. The Utility Vehicle’s ground compaction and is very gentle on the ground and surrounding vegetation. The engine is EPA certified and will meet California Air Resources Board (CARB) certification standards, when so equipped. Owner Assistance The parts on your Utility Vehicle have been specially designed and should only be replaced with genuine American SportWorks parts. If customer service or repair parts are required contact an American SportWorks dealer or our customer service department toll free at 800643-7332 or by email at [email protected]. Our dealers have trained personnel, genuine repair parts and equipment specially designed to repair American SportWorks products. Fig. 1 Serial Number Plate Location Record your Utility Vehicle Model, VIN and Serial Number here for quick reference: The model and vehicle identification number (VIN) are located in the cab under the steering column / the serial number is located under the dump bed (see figure 1) MODEL: VIN: SERIAL NUMBER: American SportWorks wants you to be satisfied with your new vehicle. If you do not understand any part of this manual or you’re not satisfied with the service received, please take the following actions: 4404 Engle Ridge Drive Fort Wayne IN 46804 • Discuss the matter with your dealership service manager. Make sure they are aware of any problems so they can assist you. 62194 Commercial Street Roseland, LA 70456 • If you are still unsatisfied, please call American SportWorks customer service at 800-643-7332 or email us at [email protected]. Toll Free 800-643-7332 • Fax 800-399-1399 www.amsportworks.com 5 SECTION 2 safety Read These Important Rules for Safe Operation NOTE The Operator, Passenger, Parent or Guardian must read, study and understand all the items contained within this operator’s manual before operating the Utility Vehicle. Failure to follow these instructions could endanger the personal safety of the Operator, Passenger and any Bystanders. Recommended minimum age of operator is 16 years of age. Close adult supervision is required at all times! Pay close attention to all Caution and Warning labels located on the Utility Vehicle CAUTION Transporting vehicle at a high rate of speed may cause damage to component parts. When transporting any utility vehicle with an installed windshield or roof DO NOT travel at high speeds! Assumption Of Risk: The owner or operator assumes all the risks incident to or arising out of the operation of this Utility Vehicle FAILURE TO FOLLOW AND COMPLY WITH ALL WARNINGS MAY CAUSE SERIOUS INJURY OR DEATH SOME WORDS ABOUT SAFETY The following pages present important information and recommendations to help you drive your vehicle safely. Please read through these pages thoroughly. WARNINGS AND CAUTIONS ! This is the safety alert symbol. When you see this symbol on your machine or in this manual, be alert to the potential for personal injury. Read and follow all instructions in this Operator’s Safety Manual, Owners Manual / Parts Guide and any accompanying manuals before attempting to operate this vehicle. ! WARNING Indicates a potential hazard that could result in severe personal injury or death ! CAUTION Indicates a potential hazard which may result in personal injury or damage to the machine. NOTE 6 will alert you to key information or instructions. Before operating this vehicle The owner, and each operator, must understand that this vehicle was not designed or manufactured to meet specifications for use on public roads, streets, highways and thoroughfares. The owner, operator(s) and passenger(s) must read and understand all the instructions for proper assembly and safe operation, as well as the instructions concerning the engine and all other portions of the vehicle as described and illustrated in this manual. Children must be of the specified age or older and supervised by an adult at all times when using the vehicle. This vehicle is not a toy. Cell Phone Use The use of Mobile Communications Equipment has become increasingly important and prevalent in both personal and business affairs. Drivers must not compromise their own, or others safety when using such equipment. ASW recommends against the use of any handheld device while driving this vehicle. We hope you will have a fun, safe experience with our products and thank you again for choosing an American SportWorks utility vehicle. SECTION 2 safety It is very important to read, understand, and follow all instructions and warnings located on the decals on your Utility Vehicle. WARNING WARNING OBSERVE THE FOLLOWING INSTRUCTIONS ALWAYS WEAR SEATBELT Failure to understand and follow Warnings and Instructions for the safe use and maintenance of this product may result in Death or Injury! This information is contained in the Warning Labels, Owner’s Manual & Supplements, Safety Video, and Engine Manual supplied with this product. Make sure that you understand and follow all Warnings and Instructions in this material. Seatbelt must be properly fastened and adjusted for each occupant prior to operating the vehicle; See Owner’s Manual. Always wear a D.O.T.-approved motorcycle helmet, eye protection, and protective clothing. under This vehicle is not to be operated by Age anyone under 16 years of age. Do NOT operate the vehicle without the brush bars securely in place. Keep all covers and shields properly installed. Never ride after consuming alcohol, drugs, or other intoxicants. Throttle and Brake Controls must work properly and freely before starting the engine. Operator must be seated, safety belt must be fastened before operating the vehicle. Never operate at speeds too fast for your skills or the conditions. Never attempt jumps or other stunts. Check tire pressures before operating. Refer to Owner’s Manual for proper operating pressure. If you did not receive any of the material listed above, please call 1-800-643-7332 and request to have them sent to you at no charge. WARNING HOT SURFACES Surfaces around the engine and exhaust can be extremely hot. Allow surfaces to cool before servicing. WARNING EXHAUST GAS HARMFUL Engine exhaust from this product contains chemicals, known in certain quantities to cause cancer, birth defects, or other reproductive harm. ADVERTENCIA SIEMPRE USE CINTURON DE SEGURIDAD El cinturón de seguridad debe ser apropiadamente atado y ajustado para cada ocupante antes de la operación del vehículo; Ver Manual de Dueño. 2-60057 ES ADVERTENCIA SUPERFICIES CALIENTES Las superficies alrededor del motor y el escape pueden estar extremadamente calientes. Permita que las superficies se enfríen antes de realizar el mantenimiento. 2-60057 FS ADVERTENCIA GASES DE ESCAPE NOCIVOS Gases de motor de este producto contienen productos químicos, conocidos que en determinadas cantidades pueden causar cáncer, defectos de nacimiento u otros daños reproductivos. 2-60057 GS 2-60057 A ADVERTENCIA OBSERVE LAS SIGUIENTES INSTRUCCIONES El hecho de no comprender y seguir las Advertencias y Instrucciones para el uso seguro y el mantenimiento de este producto puede causar ¡MUERTE O LESION!. Esta información esta contenida en las Etiquetas de Advertencia, Manual de Dueño y Suplementos, Video de Seguridad, y el Manual del Motor proveídos con este producto. Asegúrese de comprender y seguir todas las advertencias e instrucciones suministradas. Siempre lleve puesto un casco de motocicleta aprobado por D.O.T., protección en los ojos, y ropa de protección. under Este vehículo no debe ser operado por ninguna persona Age menor de 16 años de edad. NO opere este vehículo sin las barras protectoras aseguradas en su lugar. Mantenga todos las cubiertas y protectores apropiadamente instalados. Nunca maneje después de consumir alcohol, drogas, u otros intoxicantes. Acelerador, y controles de frenos deben trabajar apropiada y libremente antes de encender el motor. El operador debe estar sentado, el cinturón de seguridad antes de operar el vehículo. Nunca opera a una. Nunca intente saltos o acrobacias. Sus habilidades o las condiciones. Checar inflación de IIantas antes de operar. Consulte el Manual de Dueño para la presión adecuada de operación. Si Usted no recibió alguno de los materiales mencionados anteriormente, por favor llame al 1-800-643-7332 y solicite que se le envíen sin cargo. 2-60057 AS CAUTION USE ONLY MID-GRADE UNLEADED GASOLINE (89 – 93 OCTANE) PRECAUCION USE SOLO GASOLINA DE MEDIO-GRADO SIN PLOMO (OCTANO 89-93) E15 This engine is designed to run on automotive gasoline with allowable ethanol blends from 0% - 10%. E15 Este motor fue diseñado para funcionar con gasolina de automobil con mezclas de etanol permitidos de 0% a 10%. E85 Attempting to use anything other than this will cause damage to the engine and void the manufacturer warranty. E85 El intentar utilizar otro tipo del que se requiere, causara daños al motor y no sera valida la garantia del fabricante. ADVERTENCIA WARNING NO SUBIR NO RIDERS 2-60057 HS WARNING ADVERTENCIA Todos los ocupantes deben estar All occupants must be inside adentro del vehículo usando equipo de the vehicle and wearing the proper restraints and safety gear. seguridad y restricciones adecuadas. 2-60057 JS CAUTION PRECAUCION SHUT OFF FUEL VALVE Always shut off fuel valve before transporting this vehicle. APAGE LA VÀLVULA DE COMBUSTIBLE Todo el tiempo apague la válvula de combustible antes de que transporte este vehículo. 2-60057 CS WARNING ADVERTENCIA TURN OFF ENGINE Always turn off engine before refueling. Refuel in a well ventilated area. Keep away from flame or sparks. APAGE EL MOTOR Todo el tiempo APAGE el motor antes de poner combustibles. Ponga combustible en un área bien ventilada. Aleje de las llamas o chispas. WARNING 2-60057 DS ADVERTENCIA LATCH DUMP BED Driving with the cargo bed raised is hazardous. Always lower and latch bed before driving. SEGURO DE LA CAJA DE VOLCAR VEHICLE MAY ROLL This vehicle will handle differently from any ordinary passenger car or truck. Sharp turns or abrupt maneuvers at high speeds may cause this vehicle to roll over or go out of control. Read and understand Owner’s Manual before operating this vehicle. EL VEHÍCULO SE PUEDE VOLCAR Este vehiculo se maneja y se maniobra diferente de cualquier otro carro o camión común de pasajeros. Curvas cerradas o maniobras bruscas en alta velocidad puede causar una volcadura o pérdida del control. Lea y comprenda el Manual de Dueño antes de operar este vehículo. 2-60057 BS Manejar con la caja de carga levantada es peligroso. Todo el tiempo manténgala abajo y use el seguro de la caja cuando maneje. 2-60057 IS 7 SECTION 2 Safe Operating Procedures Your Utility Vehicle has been designed with many built-in safety features. However, no one should operate this vehicle before carefully reading this Operator’s Manual. Also read all instructions noted on the safety decals. WARNING • Be familiar with all functions of this vehicle. • Keep all bystanders away from this vehicle during operation. • Do not allow anyone to operate this vehicle who has not fully read and comprehended this manual and who has not been properly trained in the safe operation of this vehicle. • Do not operate a vehicle with damaged or defective parts. Repair all damages and defective parts before putting vehicle back in to service. • Do not allow anyone under 16 years of age to operate this vehicle. • Operator must always use both hands on the steering wheel. • No riders allowed except in factory designed and supplied seating. • Operate this vehicle from the driver’s seat only. • Do not leave this vehicle unattended with engine running. • Do not dismount a moving vehicle as serious injury or death could occur. • Always operate vehicle with belt guard installed. Do not leave pulleys and belts exposed. • Do not touch engine, engine exhaust pipe and/or muffler while they are hot. • Always wear seatbelt - seatbelt must be properly fastened and adjusted for each occupant prior to operating this vehicle. • Do not exceed total payload capacity of this vehicle. • Do not pull a trailer or implement exceeding 1100 pound towing capacity or loss of control may result. • Do not attach an implement, trailer or other device to the hitch that will produce negative tongue weight. • Follow all towing instructions in this manual when towing the UTV behind another vehicle. Do not tow vehicle faster than 25 MPH. • Do not use the vehicle as an anchor device. • Beware, tow ropes, cables and chains can break when pulling another vehicle or object causing serious injury or death to anyone in line with the whipping action created when they break. Never jerk when pulling, always ease into a pull gently. Always stay clear of the tow line. Never be in line with the tow line. • Reduce speed when loaded with cargo. Heavy cargo load takes longer to stop. • Reduce speed and payload on hilly, rough, wet, slick or unstable ground. • Always make turns at a speed that will maintain control of vehicle. Never make turns at full speed. Reduce speed when turning empty and reduce speed even more when turning loaded with cargo or when pulling a cargo load. The heavier the cargo load, the slower the turn should be. • Make sure all gear or cargo is properly secured and tied down. • Do not exceed 400 lbs. in cargo bed area (NOTE: 300lbs with rear seat kit installed), or 900 lbs. total on this vehicle. • Do not mount a receiver hitch type carrier platform to the vehicle. • Keep hands, feet, long hair, clothing, and jewelry away from moving parts and obvious pinch points to avoid getting caught. • Do not load the Brush Guard Bar with heavy equipment. Rollover could result from such loading. • Wear snug-fitting clothing to avoid entanglement with moving parts. • The Brush Guard is not certified ROPS (Roll Over Protection System). Always avoid rollovers. • Use of a D.O.T. approved helmet is recommended when operating this vehicle on uneven surfaces or rough terrain. Most fatalities are due to head injuries. • Do not operate this vehicle on highways, public roads, or where it may be a hazard to faster moving traffic. • Keep hands, arms, feet and all bodily appendages safely inside the confines of the vehicle. • Always be aware of and avoid tree limbs and brush that have a potential of hitting and/or poking individuals riding the vehicle. Serious body harm could result. • Avoid sudden stops, starts, and turns. • Always operate your vehicle at a safe speed that will allow you to maintain control. 8 safety • Do not operate this vehicle while drinking or under the influence of alcohol and drugs. • Never attempt wheelies, jumps, or other stunts. Never drive recklessly. Always operate your vehicle at a safe speed that will allow you to maintain control. • Never use vehicle for racing and never modify the engine to exceed 25 MPH vehicle speed. • Never modify any parts on the vehicle without authorization. Unauthorized modifications will void warranty to all parts directly and indirectly affected by the modification. safety SECTION 2 • Always make sure the vehicle pathway is clear of all objects when backing up. Know location of personnel around vehicle and especially location of small children. Take extra precautions when rear view is hindered by cargo. • Do not smoke or use electrical devices including cell phones while refueling. • Always park on level ground, stop engine, set parking brake and remove ignition key before leaving the vehicle. Chock tires if condition warrants. • Always disconnect the negative battery terminal before making adjustments to the vehicle electrical system or welding on this vehicle. • Use extreme caution when cresting hills or when visibility is limited. Proceed slowly until you are sure trail conditions immediately ahead are safe. • Battery fumes are explosive. A spark will ignite battery fumes. Wear a face shield when charging or jumping a battery. Follow all battery safety rules outlined in this manual. • Keep front wheels straight when cresting hills or going over bumps. • Avoid battery acid spills. Do not get battery acid on eyes, face, or other body parts. Flush eyes and other body parts immediately with water for at least 15 minutes if battery acid has gotten on them. • Do not stop, start suddenly or over accelerate on hills. Loss of control and rollover could result. • Always maintain proper tire inflation. • Do not operate vehicle on 15 degree slopes or steeper. • Always check wheel lug nut torque values two hours after initial operation and two hours after each tire repair and/or replacement. Routinely check lug nut torque valves every 100 hours of operation. • Support this vehicle securely before working beneath. Chock the wheels to prevent the vehicle from rolling. • Avoid changing direction or making sharp steering corrections on slopes or rollover may occur. • Do not shift transaxle unless this vehicle is fully stopped and the engine is at idle or damage may occur. • Use extreme caution when descending hills or running on loose slippery surfaces. Towing, braking, and traction are greatly diminished. • If this vehicle begins to tip when crossing a slope, turn the front wheels downhill to regain stability and control. • When crossing a slope on soft terrain, turn the front wheels slightly uphill and maintain a constant speed to maintain a straight line of travel. • When descending hills or slopes apply steady pressure to the foot brake to avoid potential of freewheeling or runaway. • Never allow vehicle to coast or free wheel in neutral or loss of control may result. • If your vehicle loses power and stops on a hill, immediately engage the foot brake and back slowly down the hill maintaining a straight downhill line of travel. Do not attempt to turn the vehicle sideways on the hill or a rollover could result. • When traveling at night always use your headlights and reduce speed according to visibility, trail, and terrain conditions. • Avoid water crossings when possible and never cross a body of water where depth is unknown. Loss of power will occur if the drive belt becomes submerged or wet. Unnecessary crossing of streams and waterways erodes shore line and damages water-born habitat. If you must cross, do it at a point where banks are not steep and proceed at a slow and steady speed. • Front bumper and brush guards are not designed as pusher bars. Do not attempt to push other vehicles or implements or damage may result. • When refueling use an (UL) approved non-metallic container that has no screen or filter. Set the container on the ground before fueling to eliminate static discharge and do not use Methanol fuel. CAUTION When transporting any utility vehicle with a windshield or roof installed do NOT exceed 55 mph. CAUTION This utility vehicle may be equipped with a Low Oil Indicator Light located on the left hand side of the dash panel. This light will come on when the key is turned to the “on” position, and then go off after the engine is started. While operating the vehicle if the oil light becomes illuminated immediately turn the key to the “off” position to kill the engine. NOTICE For all models with the Subaru 653cc motors, the EH65 High Altitude Jet Kit (Part# 2-20160 for single barrel and Part# 2-20164 for dual barrel) is required in order to be operated at an altitude of 5000 feet or higher. 9 SECTION 2 safety 48 Volt / Gas-Electric Hybrid Utility Vehicle Specific Warnings & Cautions BEFORE INITIAL USE NOTE LIMITED ELECTRIC RUNTIME: Plan carefully before using this vehicle to go significant distances over questionable terrain. Remember that a one hour drive may take many hours to walk out should you run out of battery power or be stranded by becoming stuck on unsuitable terrain. WARNING • Do NOT let metal objects fall from the seat onto the top of your batteries. This may cause a serious power short and possibly a fire. • Hydrogen gas is generated as a natural part of the lead acid battery charging process. A 4% concentration of hydrogen gas is explosive and could cause severe injury or death. Because hydrogen gas is lighter that air, it will collect in the ceiling of buildings necessitating proper ventilation. Charging must take place in an area that is adequately ventilated (minimum of 5 air exchanges per hour). To reduce the chance of battery explosion that could result in severe injury or death, never smoke around or charge batteries in an area that has an open flame or electrical equipment that could cause an electrical arc. Pay particular attention to natural gas or propane gas water heaters and furnaces. Battery Prolonged Storage All batteries will self discharge over time. The rate of self discharge varies depending on the ambient temperature and the age and condition of the batteries. A fully charged battery will not freeze in winter temperatures unless the temperature falls below -75° F (-60° C). For winter storage, the batteries must be clean, fully charged and disconnected from any source of electrical drain. Please assure that the key switch is in the off position for storage. As with all electric vehicles, the batteries must be checked and recharged as required or at a minimum of 30 day intervals. Charge Gauge Before operating the 48V, make sure the batteries have a full charge! Located on the dash, the charge gauge indicates approximately the state of charge of the batteries. Far right (as shown) indicates batteries are fully charged, far left indicates a low charge. 0 1 BATTERY GAUGE: Showing a full charge. Washing Your Vehicle • Always wear a safety shield or approved safety goggles when adding water or charging batteries. Any electrolyte spills should be neutralized with a solution of 1/4 cup (60ml) sodium bicarbonate (baking soda) dissolved in 1 1/2 gallons (6 liters) of water and flushed with water. Overfilling batteries may result in electrolyte being expelled from the battery during the charge cycle. Expelled electrolyte may cause damage to the vehicle and storage facility. Aerosol containers of battery terminal protectant must be used with extreme care. Insulate metal container to prevent can from contacting battery terminals which could result in an explosion. • Deep water crossings MUST be avaoided. 10 It is acceptable to wash your electric utility vehicle, though a pressure washer should not be used, and common sense should be exercised. Remember that some of the electronics in the controller and charging system are sensitive to water and corrosion. The charger should be protected during washing by placing a plastic bag or other protection over the top of the charger before washing. Allow for any water that does get on/in the charger to dry out before using. SECTION 2 safety ! WARNING BEFORE YOU DRIVE 1. Check tire pressure before each use. a. Prior to operating the vehicle check and adjust tire pressure to the proper operating pressure as indicated on the sidewall of each tire or in the Specifications section of the Operator’s Safety Manual. A tire pressure gauge is required to obtain accurate readings. 2. Check fuel supply before each use. a. NEVER fill fuel tank while the engine is running or hot. b. DO NOT overfill tank. c. ALWAYS allow at least ½” of expansion space at the top of tank. d. There should not be any fuel in the filler neck. e. Replace cap tightly to prevent a fuel spillage fire hazard. NOTE: Always use an original gas cap or OEM (Original Equipment Manufacturer) replacement. f. NEVER fill fuel tank while the vehicle is inside a building. g. After filling the tank, move the vehicle at least ten feet before attempting to start the engine. 3. NEVER start the engine without the operator properly seated and the restraint system properly adjusted and secured with the brake applied and the vehicle in neutral. 4. Be sure the passenger restraint system (i.e. Seat Belt) is properly adjusted and fastened at all times during operation. a. If the passenger restraint system is not properly used by the operator and/or passenger, loss of control and possible personal injury and/or vehicle damage may occur. 5. When there is no passenger in the vehicle, the passenger seatbelt must be securely fastened within the vehicle. a. If the passenger restraint system is not properly used by the operator and/or passenger, loss of control and possible personal injury and/or vehicle damage may occur. 6. Keep the engine free of dirt and debris, especially in the throttle linkage area. 7. NEVER start the engine without checking to see that the throttle control is in idle position. 8. ALWAYS use extreme caution when starting the engine. a. Hot engine, muffler, or drive components can burn on contact. 9. NEVER operate the machine while under the influence of alcohol, drugs, or medication of any kind. a. Such operation is dangerous to yourself and/or others. 10. NEVER use hand held electronic devices while driving this vehicle. a. Driving while distracted can result in loss of vehicle control, accident and injury. 11. Long hair, loose clothes, or jewelry can get caught in moving parts below and behind the seat or surrounding environment. a. Remove or tie back anything loose that can reach below and behind the seat before riding. 11 SECTION 2 ! safety WARNING WHILE OPERATING THIS VEHICLE 1. NEVER place hands, feet, or any body parts or clothing near the engine, wheels, and other rotating parts of the vehicle while riding or running the engine. a. Use caution in performing required maintenance on or near operating engine. b. Use caution after the engine has been running, since the engine and other drive components may be extremely hot. 2. Wet, slippery, rough, or sloped terrain is potentially dangerous and may result in injury if proper caution is not observed. a. ALWAYS SLOW DOWN b. Operator must use mature judgment, skill, and experience to choose a speed suitable for terrain and riding conditions in protecting operator, passenger, and/or any bystanders. c. Operator must use mature judgment, skill and experience in choosing suitable terrain for individual operational capabilities. 3. ALWAYS SLOW DOWN when turning. a. This vehicle is not a passenger car. High-speed turning and failure to operate this vehicle correctly may cause loss of control, vehicle rollover and/or possible death or injury to the vehicle occupant(s). b. Turning on a slope increases the risk of rollover. c. Practice driving in a safe open area to develop a feel for the vehicles performance and handling characteristics, size and weight. 4. When turning on pavement, loose gravel, or similar surfaces, there is an increased risk in loss of control. ** ALWAYS SLOW DOWN! ** 5. Operating the vehicle in conditions where water, mud, snow, dirt, sand, or other debris can get into the throttle cable conduit and/or on the throttle mechanism may cause binding of the cable and/or the throttle mechanism. a. This may result in the throttle sticking which can cause the engine to continue to run and result in loss of control. 6. Keep hands, feet, and all body parts in the vehicle at all times. 7. STOP the vehicle and back slowly down any hill that the vehicle lacks the power or traction to climb. Do NOT turn across the slope or try to turn around. a. Turning on a slope increases the risk of rollover. b. Control the descent speed with the brake (left foot pedal). c. Re-applying the throttle when facing up a steep hill increases the risk of the front tires leaving the ground and the vehicle over-turning. 8. ! 12 STOP the engine if the machine makes unusual noises or vibrations. a. Check the vehicle for damage. b. Excessive noise or vibration is a sign of loose or worn parts. c. Do not attempt to use the vehicle until it has been serviced to correct the issue. CAUTION 1. Vehicle must be stored where gasoline fumes will not reach an open flame, spark, or other source of ignition. a. For long-term storage, fuel tank should be drained in an open, cool area. b. Engine must be allowed to cool before storage in any enclosure. c. NEVER store the vehicle in close proximity to appliances such as hot water heaters or furnaces. 2. NEVER use E-15 or E-85 fuel or blends with Ethanol content in excess of 10%. Ethanol blends in excess of 10% will cause damage to the engine and void manufacturer warranty a. Use regular unleaded 87 octane gasoline with up to a 10% ethanol blend. b. This engine supplied with this vehicle is NOT designed for Flex Fuel operation. assembly SECTION 3 A S S E M B LY I N S T R U C T I O N S Cargo bed ! WARNING Brush guard Other items are located under the unit Wear proper eye protection during the uncrating and assembly process to avoid potential eye injuries. ! WARNING RISK OF SERIOUS INJURY OR DEATH The Brush Bars and the Seat and Shoulder Belt are critical parts of the Operator / Passenger safety system on this unit. Do not attempt to operate the unit until all components have been properly installed. Your new Utility Vehicle should include the following items to be assembled: Qty Item 6 6 4 10 4 4 6 12 12 4 2 2 2 2 1 1 1 2 2 1 1 1 1 1 ¼” x ¾” Socket head bolts (steering cap) ¼” – 20 Nylock nuts (steering cap) ¼” x 1” hex head bolts (poly bed) ¼” Nylock nuts ¼” x ¾” Carriage bolts (steel bed) ¼” Flat washers 5/16” x 2” socket head bolts 5/16” curved washers 5/16” nylock nuts 5/16” x 2” hex head bolts 5/16” x 2 ¼” Socket head bolts (LM) 5/16” Nylock nuts (LM) 5/8” x 4” Hex bolt 5/8” nylock nuts Set of keys Steering wheel (with cap) Bumper Rear fenders Rear frame stubs Seat back Cage Cargo Bed with tailgate Seat Back Frame Seat Bottom 1 Uncrating the vehicle • Wear your Safety Glasses to prevent eye injury. • Using the Hammer and Pry Bar, remove cross supports at each end of the crate and discard. • Carefully pry and remove crate top and sides then discard. 2 Remove crate sides and discard • Using Box Cutters, cut and remove the hold down ties. • Remove seat back and other loose items from underneath unit and set aside • Remove the unit from the crate base and discard base. NOTE: Some models may require installing front tires prior to removing from crate. 3 Unpacking the components • Unpack all of the loose components from the unit and set aside. • Remove protective plastic from each component and discard. Step 2 Crate Top Step 1 End Cross Supports Step 3 Sides Step 3 Sides Step 1 End Cross Supports 13 SECTION 3 Pre-Assembly Instructions 1) Read Owner’s Manual. 2) Unpack all vehicle and assembly parts. Make sure you have everything listed on the previous page. assembly 4) Then secure the plastic hood onto the same bolt with the second nylock nut located beneath the hood, until the bolt head is flush with the end of the nut. 5) Tighten all brush guard fasteners. 3) If you have any questions or problems with your American SportWorks product please call us, toll free at 1-800-643-7332. Seat / Brushguard Assembly Your new American SportWorks UTV uses two socket head 5/16” x 2 ¼” bolts to hold the hood as well as the Brushguard in place, with an additional nylock behind the plastic as shown 1) Place seat back bar on vehicle frame tubes. Insert a 5/16” x 2” socket head bolt through both bottom joints. The head of the bolt should be on the outside of the vehicle. Put a curved washer on the threaded end of the bolt. Place a 5/16” nylock nut on the bolts but do not tighten. Bumper Installation 1) 2) Place the cage on front vehicle frame tubes and seat back. Insert a 5/16” x 2” socket head bolt through all four joints. The head of the bolt should be on the outside of the vehicle. Put a curved washer on the threaded end of the bolt. Place a 5/16” nylock nut on the bolts. 3) Tighten the nylock against the bent washer VERY tightly to secure the Brushguard. 14 Align the holes in the front bumper with the mounting holes in the front frame tubes. Insert the four 5/16” x 2” bolts through the bumper bracket and then into the frame tubes. Put a curved washer on the threaded end of the bolt. Place a 5/16” nylock nut on the bolts and verify bumper is level before tightening. SECTION 3 assembly Steering Wheel Installation 1) Turn vehicle steering so that the tires are pointed straight forward. There should be a mark showing the top of the steering hub. Line up holes in steering wheel with mounting holes so that the center spoke is pointing down. 2) Place the cargo bed on the vehicle and insert a 5/8” x 4” hex head bolt through each pivot bracket and frame stub tube. The bolt heads should be facing the center of the vehicle with the nuts facing the ouside. 2) Install ¼” x ¾” socket head bolts through the center cap, then into the steering wheel and steering hub. Tighten with ¼” nylock nuts. 3) Tighten both 5/16” frame stub bolts and nuts. 4) Install the 5/8” nylock nuts on the pivot bolts. Tighten the pivots and then loosen ¼ turn. Cargo Bed Installation 1) Locate and install rear frame stubs at the rear of frame. The bed pivot tube on the stub should be at the top. Insert 5/16” x 2” socket head bolt. Loosely install 5/16” center lock nut (do not tighten until after cargo bed is installed) 5) Loosen the bed latch pin bolt on the frame just enough for it to slide in the adjustment slot. 6) Close the bed and position the latch pin bolt so that it is at the bottom of the latch slot to prevent rattles. Tighten the latch pin. Note: Rear frame stubs not applicable on the LM700 with Independent Rear Suspension (IRS). 15 SECTION 3 assembly Rear Fender Installation 1) Fenders installation Tilt the cargo bed up. Line up the holes in the rear fenders with the square holes in the bed. The raised rectangular surface on the fender should be completely hidden under the bed. If not, turn the fender around. Insert a ¼” x ¾” carriage bolt through the bed and into the fender. Fasten with a ¼” flat washer and a ¼” nylock. (If installing fenders on a poly bed, you will use ¼” x 1” hex head bolts instead of the carriage bolts.) 2) Secure underseat storage tray by pushing down firmly around the plastic seat bottom wrap. Seat Installation 1) Place back of seat base / underseat storage tray over seat frame bar and lower seat base into position. 16 3) Place front tabs of seat bottom into the slots on the underseat storage tray and lower seat into position. Rear tabs of seat should fit into slots at the rear of seat base / underseat storage tray. SECTION 4 inspection IS YOUR VEHICLE READY TO DRIVE? PRE-RIDE INSPECTION Before each drive, it is important to inspect your vehicle and make sure any problems you find are corrected. A PRE-RIDE INSPECTION is a must, not only for safety, but because having a breakdown, or even a flat tire, can be a major inconvenience. Perform a PRE-RIDE INSPECTION using the list on the back cover of this book before each use to ensure that your vehicle is in proper working order. Correct any discrepancies according to this Operator’s Safety Manual before riding. If the problem cannot be corrected, contact an authorized dealer for assistance or call 1-800-643-7332 for Customer Service. If your vehicle has overturned or has been involved in a collision, do not drive it until your vehicle has been inspected by your dealer or an authorized service center. There may be damage or other problems that you cannot see. ! WARNING Improperly maintaining this vehicle or failing to correct a problem before driving can cause an accident resulting in serious injury or death. Always perform a pre-drive inspection before every drive and correct any problems. ARE YOU READY TO DRIVE? Driver Readiness Before each drive, you also need to make sure that you, along with your vehicle are ready to drive. To help get you prepared, this section discusses how to evaluate your driving readiness. Before you drive your vehicle for the first time, we urge you to: - Read this Operator’s Safety Manual and the labels on your vehicle carefully. - Make sure you understand all the safety messages. - Know how to operate all the controls. Protective Apparel Although complete protection is not possible, wearing proper gear can reduce the chance of injury should you have an accident. The following suggestions will help you choose the proper protective gear. • Helmet and Eye Protection • Additional Riding Gear - Your helmet is your most important piece of protective gear because it offers the best protection against head injuries. A helmet should fit your head comfortably and securely. - Open-face helmets offer some protection, but a full-face helmet offers more. Regardless of the style, look for a D.O.T. (Department of Transportation) or Snell Memorial Foundation (SNELL) sticker on any helmet you buy. Always wear a face shield or goggles to protect your eyes and help your vision. - Sturdy boots, such as an off-road motorcycle boot, to help protect feet, ankles, and lower legs. - Gloves, such as off-road motorcycle gloves, to help protect your hands. - Long pants, preferably with knee and hip pads, and a long-sleeved shirt or jacket. Training and Driver Development Developing good driving skills and habits is an ongoing process. Even if you are an experienced driver, take time to become familiar with the vehicle controls and how the vehicle handles. Practice driving in a safe, open area to develop your skills. Do not drive on rough terrain until you get accustomed to the controls and feel comfortable with its size and weight. Inexperienced drivers of specified age must be supervised by an adult and should practice in an open, uncongested area. ! WARNING • Operating this vehicle without wearing an approved motorcycle helmet, eye protection, and protective clothing could increase your chances of head and/or eye injury, and the possibility of death in the event of a severe accident. • Always wear an approved motorcycle helmet that fits properly, eye protection (goggles or face shield), gloves, boots, long-sleeved shirt or jacket and long pants. 17 SECTION 5 operation SOME WORDS ABOUT RESPONSIBLE OPERATION AND RIDER SAFETY The following pages present important information and recommendations to help you operate your vehicle responsibly and safely. Forming good habits and developing driving skills is an ongoing process. Even if you are an experienced driver, take time to become familiar with the controls, handling characteristics, capabilities, size and weight of your vehicle. Please read through these pages thoroughly. Qualifications for Utility Vehicle (UTV) Users This vehicle is restricted to use by operator and passenger with a minimum age of thirteen (16) years as indicated on the vehicle and vehicle specific literature. UTV’s are intended for use by operators who meet the physical and cognitive capabilities set out by the manufacturer in this manual and in the material provided with the vehicle. Consumer Responsibility for Safe Use and Maintenance of a UTV 1. UTV’s shall not be modified from the manufacturer’s original design and configuration. 2. UTV’s shall not be used to perform racing, stunt riding, jumps, spinouts, donuts, or other maneuvers as they may cause loss of control. As such, these activities are likely to result in possible injury to the operator, passenger, bystanders, or all. 3. Prior to each use, the operator shall perform the pre-operational checks specified by the manufacturer, and further verify: a. Smooth throttle operation and positive return of the throttle linkage to a closed throttle position when released; b. That the throttle cable and linkages operate properly and the throttle cable or other linkages are adjusted properly; c. That the steering mechanism(s) is adjusted and operates smoothly; d. That the engine stop switch is properly functioning; e. That all guards originally supplied by the manufacturer are in proper place in serviceable condition; f. That engine idle speed is below the point of clutch or torque converter engagement; g. That the gas tank is in good condition and the proper gas cap is fastened securely; h. That the braking system is functioning properly; i. That all safety labels are in place, legible and understood; j. That any and all guards, torque converter covers, or other covers or guards supplied by the manufacturer are in place and in serviceable condition; k. That tires are in good condition, inflated properly, and have sufficient tread remaining; and l. That all fasteners are in place and tightened securely. 4. UTV engines shall not be started unless the operator is seated and restrained in proper position for vehicle operation and the brake is fully engaged and locked with the park brake mechanism. 5. Long hair, loose clothes, or jewelry can get caught in moving parts below the seat or surrounding environment. Remove or tie back anything loose that can reach below or behind the seat before riding. 6. UTV’s shall only be fueled by personnel knowledgeable with regard to proper fuel selection and fueling techniques. 7. UTV operators and passengers shall adhere to all manufacturer’s recommendations and instructions, as well as comply with all laws and ordinances, and the following: a. Operators shall stay seated with both hands on the steering wheel and both feet in the vehicle at all times, whether moving or stationary, unless the vehicle is stopped completely and the engine has been shut off. b. Passengers shall remain seated with arms and legs inside the vehicle at all times during operation. c. Shall observe minimum age restrictions. d. Shall not allow smoking in the vehicle. e. Persons under the influence of drugs, alcohol, or intoxicants shall not supervise, operate, or ride in a UTV. g. UTV’s shall operate only on a surface or terrain recommended by the UTV’s manufacturer. h. UTV’s shall not be operated on roads, streets, highways, or any other location where road vehicles are intended to travel. 8. Persons with the following conditions shall not ride in or operate a UTV: a. Those with heart conditions b. Pregnant women c. Persons with head, back, or neck ailments, or prior surgeries to those areas of the body. d. Persons with any mental or physical conditions, which may make them susceptible to injury or impair their physical dexterity or mental capabilities to recognize, understand, and perform all of the safety instructions, and be able to assume the hazards inherent in motor vehicle use. 9. No operator or other person shall contact any portion of the engine, wheels, or drive train for any purpose including maintenance until the engine has been turned off and allowed to cool, and the UTV is in a stable and stationary position. 10. Passenger restraints must be used in accordance with, and limited to, the manufacturer’s guidelines. 11. UTV components shall be maintained and repaired in accordance with the manufacturer’s specifications and utilizing only the manufacturer’s authorized replacement parts with installation performed by designated dealers or other skilled persons. ! WARNING Long hair, loose clothes, or unsecured cargo can get caught in moving parts below and behind the seat or surrounding environment. Remove or tie back anything loose that can reach below or behind the seat before riding. 18 operation SECTION 5 Off-Road Use Only: Your UTV and its tires are designed and manufactured for off-road use only and not for use on paved surfaces. Driving on paved surfaces can affect the handling, control, and cause excessive wear to your tires. When driving off-road, also remember to always obey local off-road driving laws and regulations. Obtain permission to drive on private property. Avoid posted areas and obey “NO TRESPASSING” signs. Unless equipped for such, you should never drive your vehicle on public streets, roads or highways, even if they are not paved. Drivers of street vehicles may have difficulty seeing and avoiding you, which could lead to a collision. ! WARNING • Operating this UTV on paved surfaces may seriously affect handling and control of the vehicle, and may cause the vehicle to go out of control. • Operating this UTV on public streets, roads or highways could result in a collision with another vehicle. Never operate this UTV on any public streets, roads or highways, whether they are dirt, gravel or paved surfaces unless properly equipped. Keep Hands and Feet on Controls When driving your vehicle, always keep both hands on the steering wheel. It is important to remain alert and remain focused when driving the vehicle. Removing hands or feet from the controls can reduce your ability to react and maintain control of the vehicle. ! WARNING • Removing your hands from the steering wheel or feet from the foot controls during operation can reduce your ability to control the vehicle and could result in a collision. Always keep both hands on the steering wheel during operation. • Keep hands, feet, and all body parts in the vehicle at all times. - In the event of a vehicle roll-over, do NOT extend arms, legs or any other extremity outside the vehicle as possible personal injury can occur. Control Speed Driving at excessive speeds increases the likelihood of an accident. In choosing an appropriate speed, you must consider the capability of your vehicle, the terrain, visibility, and other operating conditions, in addition to the skill and experience of the driver. ! WARNING Operating this vehicle at excessive speeds increases your chances of losing control, resulting in an accident. Always drive at a speed that is appropriate for your skill, your vehicle, the terrain, visibility and other operating conditions. 19 SECTION 5 operation Use of this Vehicle on Unfamiliar or Rough Terrain Before driving in an unfamiliar area, always check the terrain thoroughly. Don’t drive fast on unfamiliar terrain or when visibility is limited (it is often difficult to react to hidden obstructions like rocks, bumps, or holes). Never drive past the limit of visibility. Maintain a safe distance between your vehicle and other off-road vehicles. Always exercise caution and use extreme care on rough, slippery and loose terrain. ! WARNING • Failure to use extra care when operating this vehicle on unfamiliar terrain could result in the unit overturning or going out of control. Go slowly and use extreme caution when operating on unfamiliar terrain. Always be alert to changing terrain conditions when operating the vehicle. • Failure to use extra care when operating on excessively rough, slippery or loose terrain could cause loss of traction or vehicle control, resulting in an accident or overturn. Do not operate on excessively rough, slippery or loose terrain until you have learned and practiced the skills necessary to control the vehicle on such terrain. Always be especially cautious on these types of terrain. • STOP the vehicle and back slowly down any hill that the vehicle lacks the power or traction to climb. Do NOT turn across the slope or try to turn around. a) Turning on a slope increases the risk of rollover. b) Control the descent speed with the brake (left foot pedal). c) Re-applying the throttle when facing a steep up-hill increases the risk of the front tires leaving the ground and the vehicle over-turning. Do Not Perform Stunts You should always operate your vehicle in a safe and reasonable manner. When driving, always keep all four wheels on the ground. ! WARNING Attempting wheelies, jumps, and other stunts increase the chances of an accident, including an overturn. Never attempt stunt riding of any type and ride responsibly. Don’t try to show off. ! WARNING Operating this vehicle without your seat belt could cause you to be thrown from the vehicle, causing serious injury or death. NO ALCOHOL OR DRUGS Alcohol, drugs, and UTV’s DO NOT mix. Even a small amount of alcohol can impair your ability to operate this vehicle safely. Likewise, drugs, even if prescribed by a physician, can be dangerous while operating a UTV. Consult your doctor to be sure it is safe to operate a vehicle after taking medication. ! WARNING Operating this vehicle after consuming alcohol or drugs can seriously affect your judgment, cause you to react more slowly, affect your balance and perception, and could result in serious injury or death. Never consume alcohol or drugs before or while operating this vehicle. 20 SECTION 5 operation REPLACEMENT PARTS, ACCESSORIES AND SERVICE Most replacement parts and accessories are typically available from your dealer. Because of immediate availability and convenience, it is recommended that items be ordered from an authorized dealer. Take this manual and all supplements to the dealer when ordering parts in person. If replacement parts are not available from a dealer, they may be ordered directly from American SportWorks by contacting ASW at 1-800-643-7332 or online at www. amsportworks.com. Orders may be subject to a minimum fee. A listing of authorized service center locations in your area is also available from our Customer Service department. Record the Model, Vehicle Identification Number (VIN) and Serial Number in the spaces provided at the front of this Manual. Periodic Checks & Services The general maintenance intervals in the following table are based upon average driving conditions. Driving in unusually dusty areas may require more frequent servicing. Refer to the engine operation manual for detailed information specific to engine maintenance. ITEM EACH USE Tire Pressure / Wear INSPECT Brake System INSPECT Brake Fluid INSPECT Chassis INSPECT Fastener Tightness INSPECT Air Cleaner INSPECT Engine Oil Level INSPECT FIRST 10 HOURS EVERY 20 HOURS EVERY 40 HOURS REPLACE CLEAN CLEAN Engine Oil REPLACE REPLACE Carburetor CLEAN Spark plug CLEAN / ADJUST Drive Belt REPLACE INSPECT Air Filter Elements Replacement Parts Spark Plug Replacement Parts Description Briggs & Stratton Air Filter Honda Paper Filter Element Honda Foam Filter Element Subaru Paper & Foam Element (653cc) Subaru Paper & Foam Element (265cc) Description BRIGGS & STRATTON 479cc NGK HONDA 390cc NGK CHAMPION AUTOLITE DENSO SUBARU 265cc NGK CHAMPION SUBARU 653cc NGK Part No. 2-20165 2-20153 2-20154 2-20158 12374 Oil Filter Replacement Parts Description 653cc Spin-on REPLACE Part No. 2-20159 Part No. BPR6ES BPR6ES RN9YC 4263 / 63 W20EPR-U BR6HS RLH6C BPR2ES 21 SECTION 5 operation Gasoline Utility Vehicles This section covers the operation of the gasoline powered 2WD and 4WD Utility Vehicles. NOTE Perform a Pre-Ride Inspection using the list on the back cover of this book before each use to ensure that your vehicle is in proper working order 4WD Models This section covers the additional features, operation and maintenance of the 4x4 Utility Vehicles. Operation of Four Wheel Drive Features General Operation The rear axle is equipped with a manually operated differential lock on all models except for the LM700 with Independent Rear Suspension which features an auto locking differential. It is engaged (locked) by moving the differential lever to the left and down. Locking the differential sends equal power to both rear wheels for better traction. It may be used in both 2WD and 4WD modes. Start your Utility Vehicle by following the starting procedures as noted below. 1.Depress brake pedal with your foot and hold. Pull firmly up on the park brake lever with your hand until the lever is tight. 2.Place gearshift in neutral 3.Apply choke fully when engine is cold. 4.Turn ignition key fully clockwise and hold to start engine. 5.Release ignition key to run position and choke to normal operating position immediately after engine starts. 6.Turn ignition key counterclockwise to stop engine. NOTE Locking the differential on paved or hard surfaces may increase steering effort and tire wear. To switch to four wheel drive, the front wheels are engaged simply by flipping the dashboard switch to 4WD. In 4WD mode power is automatically sent to the front wheels when the rear wheels lose traction. Driving is as easy as driving a car with an automatic transmission. A simple forward and reverse shifter provides direction control. Never shift while the vehicle is moving. For convenience, on some models a back-up pull-rope starter mechanism is provided on the engine. Braking is accomplished by simply releasing the throttle pedal and depressing the brake pedal that is located on the floorboard left of the accelerator. A lever action parking brake control is mounted on the center console located between the operator and passenger seats. Depress the button on the park brake control lever to release the park brake. HEADLIGHT SWITCH: This switch turns the Running lights / Headlights on or off. HEADLIGHT ON/OFF SWITCH WARNING Engine should be idle before selecting 4WD mode. Sudden engagement of 4X4 switch under power may damage the drive train. Failure to do so may void warranty. Because the power transfer is automatic, you may operate the vehicle in 4WD mode continuously without affecting steering effort or tire wear. OIL PRESSURE LIGHT: When illuminated while engine is running indicates low oil pressure (not on all models). OIL PRESSURE WARNING LIGHT (Not on all models) F-N-R LEVER: This lever controls the direction of the vehicle. Moving the lever upward puts the transmission into FORWARD, the center is NEUTRAL and the bottom position is REVERSE. F N R TRANSMISSION LEVER GAS ENGINE IGNITION Diff DIFFERENTIAL: This lever controls the rear locking differential if it is applicable to your vehicle. MANUAL LOCKING DIFFERENTIAL (Not on all models*) F N R Diff * The LM700 with Independent Rear Suspension features an auto locking differential 22 SECTION 5 operation Electric Utility Vehicles 0 This section covers the operation of the Electric 2WD Utility Vehicles. Some ASW models are configured as street legal Low Speed Vehicles (LSV). Low Speed Vehicles may be used on public roads (check local ordinances). Low Speed Vehicles do NOT have comparable crash protection to a car or truck. Follow all safety procedures. Avoid roads with considerable traffic. Avoid driving on public roads at night or in low visibility. Never drink and drive. Check local laws and ordinances about the use of LSV’s in your area. 1 BATTERY GAUGE: Showing a full charge. NOTE STALK CONTROL Keyswitch must be in the “RUN” position for vehicle to operate. HEADLIGHT SWITCH: This switch turns the Running lights / Headlights on or off. FWD REV FWD / REV SWITCH: selects the direction of the vehicle. when the keyswitch is turned to the “RUN” position. The operator must select the proper switch position before applying the throttle. NOTE: When the switch is set to the center position, the vehicle is in NEUTRAL. HEADLIGHTS MODE SWITCH: This switch is used for “FAST” mode (M1) with speeds up to 18 mph, or “SLOW” mode (M2) with speeds up to 10 mph. “SLOW” mode has a more gentle acceleration and a greater vehicle range. Note: on some models this switch may be labeled as M1 and M2. TURN HORN TURN Multi Function Stalk Turn Signal / Horn / Headlights The Multi-Function Stalk is a multiple feature control. It is located on the left side of the steering wheel and functions similar to an automobile for turn signaling but also includes the headlamp and horn control. Turn Signal Pushing down on the stalk indicates a left turn, pushing up indicates a right turn. Note: the turn signal stalk will not automatically return to the off position after a turn. The operator should move the stalk to the center position after completing each turn. HEADLIGHT ON/OFF SWITCH BATTERY GAUGE ELECTRIC MOTOR FWD / REV SWITCH MULTI-FUNCTION STALK Not on all models ELECTRIC MOTOR KEY SWITCH Turns the electric motor functionality on or off MODE SWITCH Selects the speed mode of the electric motor FWD 0 1 REV 23 SECTION 5 operation Hybrid Utility Vehicles GAS ONLY MODE This section covers the operation of the Gas/Electric 4WD Hybrid Utility Vehicles. DRIVE FWD REGEN REV There are 4 different modes to use when operating an ASW Hybrid Utility Vehicle: OFF ON • GAS ONLY MODE: utilizes the gasoline engine only with the rear wheels. • ELECTRIC ONLY MODE: utilizes the 48v motor only with the front wheels. • GAS / REGEN MODE: utilizes the gasoline engine only with the rear wheels while recharging the 48v motors batteries. • 4WD MODE: utilizes both the gasoline engine and the 48v motor in tandem for superior power with all 4 wheels. HEADLIGHT SWITCH: This switch turns the Running lights / Headlights on or off. DRIVE DRIVE / REGEN SWITCH: When switched to “DRIVE” and the electirc motor keyswitch to “ON”, vehicle is ready to run on electric power. When switched to REGEN with the electric motor in Neutral the batteries are recharged as the vehicle moves REGEN F N R Diff F-N-R LEVER: This lever controls the direction of the vehicle. Moving the lever upward puts the transmission into FORWARD, the center is NEUTRAL and the bottom position is REVERSE. REV DIFFERENTIAL: This lever controls the rear locking differential if it is applicable to your vehicle. 0 BATTERY GAUGE OIL PRESSURE WARNING LIGHT 0 FWD REV NEUTRAL ONLY F N R ON GAS / REGEN MODE DRIVE FWD REGEN REV FOR RECHARGING BATTERIES F N R OFF ON 4WD (GAS + ELECTRIC) DRIVE FWD REGEN REV SAME DIRECTION F N R 1 ON BATTERY GAUGE: Showing a full charge. APPLICABLE CONTROLS / ACTIONS SHOWN IN DARK GREY DRIVE / REGEN SWITCH ELECTRIC MOTOR Switches the transmission FWD / REV SWITCH direction when in electric mode DRIVE mode: batteries are not being charged REGEN mode: batteries are being recharged ELECTRIC MOTOR KEY SWITCH Turns the electric motor functionality on or off TRANSMISSION LEVER GAS ENGINE IGNITION Starts the gasoline engine DRIVE FWD REGEN REV 1 F N R 24 DRIVE REGEN OFF OIL PRESSURE LIGHT: When illuminated while engine is running indicates low oil pressure. HEADLIGHT ON/OFF SWITCH ELECTRIC ONLY MODE OFF FWD / REV SWITCH: selects the direction of the vehicle. when the keyswitch is turned to the “RUN” position. The operator must select the proper switch position before applying the throttle. NOTE: When the switch is set to the center position, the vehicle is in NEUTRAL. FWD F N R Diff MANUAL LOCKING DIFFERENTIAL maintenance Vehicle Maintenance The following section covers routine maintenance procedures for your utility vehicle. SECTION 6 Rear Transaxle Gear Box – It is recommended that the oil be changed once a year or after 600 hours. See page 18 of owner’s manual. 90˚ Transfer Gear Box – It is recommended that the oil be changed once a year or after 600 hours. Front Differential Gear Box – It is recommended that the oil be changed once every 2000 miles (about 150 to 200 hours). To change the oil, follow each step on the procedure listed below. 1. Remove the oil drain plug located on the bottom of the gear case using a ¼” hex key wrench. 2. Let all the oil drain out of the unit. Catch and discard the oil properly. 3. Be sure to clean off any debris on the drain plug and reinstall. Torque oil drain plug to 10 ft*lbs. 4. Remove the oil fill plug using a ¼” hex key wrench. 5. Add 200 ml. (7 oz.) of 80W90 gear oil. 6. Reassemble the oil fill plug into the gearcase and torque to 10 ft*lbs. 1. Remove the oil drain plug located on the bottom of the gear case using a 7/16” socket. 2. Let all the oil drain out of the unit. Catch and discard the oil properly. 3. Be sure to clean off any debris on the drain plug and reinstall using a new nylon washer (part #20843). Torque the oil drain plug to 9 ft*lbs. 4. Remove the oil fill plug using a 5/16” hex key wrench. 5. Add 150 ml. (5 oz.) of Mobil fluid 424 American SportWorks part # 20848 (note: do not use any other type of oil in this system or the 4WD will not operate properly!) 6. Reassemble the oil fill plug into the gear case and torque to 10 ft*lbs. Gear Spacing adjustment 1. Locate set screw on front gear box. 2. Turn clockwise until you feel resistance. 3. Turn back counter clockwise ¼ turn. Hydraulic Brakes – Hydraulic Brakes use fluid pressure to transfer the braking force to the wheels. Before driving the vehicle each day, check the fluid level in the reservoir. The reservoir is located under the hood behind the front differential gear box. Fill to the MAX line with DOT 3 brake fluid. If you notice that the brake pedal feels spongy or the vehicle is not stopping well, take the vehicle to a qualified service center. Authorized ASW service centers in your area can be found by visiting www.amsportworks.com or by calling customer service toll free at 800-643-7332 25 SECTION 6 maintenance Fuel Type Engine Fuel Valve Lever 390cc, 479cc & 653cc Fuel Capacity is 5 Gallons. On single cylinder models the engine has a fuel valve that opens and closes the passage between the fuel tank and carburetor. Leave fuel valve lever in the OFF position when the engine is not in use to prevent carburetor flooding and reduce possibility of fuel leakage into the cylinder cavity and engine oil reservoir. Turn fuel valve lever to the ON position when running the engine. The fuel tank is located under seat. 265cc Fuel capacity is 1.6 Gallons. When filling the fuel tank, place the gear shift in forward or reverse, set the park brake, turn off the engine, and remove ignition key. Clean dirt from around the fuel tank cap, remove cap, and begin filling. When finished, screw the cap back on securely and wipe up any spilled gasoline. Use regular unleaded gasoline with an octane rating of 87 or higher. Refer to Figure 5-1 and images below CAUTION Never use methanol, gasoline containing methanol, or gasohol containing more than 10% ethanol because the fuel system could be damaged. Do NOT mix oil with gasoline. Using a fuel stabilizer/conditioner in the vehicle can provide benefits such as: •Keeps gasoline fresh during storage of 90 days or less. For longer storage, drain the fuel tank. • Cleans the engine during operation. • Eliminates gum-like varnish build-up in the fuel system. Add the correct amount of gas stabilizer/conditioner to the gas. Follow the gas stabilizer/conditioner manufacturer’s directions for best results. See engine operator’s manual for the following: • Draining the fuel tank. • Checking fuel line for cracks and leaks. • Engine fuel valve lever (if applicable). Engine Maintenance General Information Detailed instructions and recommendations for break-in and regular maintenance are specified in the engine operator’s manual. Engine warranty is backed by the engine manufacturer. Please refer to engine manufacturer’s manual for engine servicing, lubricating oil levels, oil quality and viscosity recommendations, bolt torques, etc. Special attention should be paid to applicable data that is not duplicated here. NOTICE For all models with the Subaru 653cc motors, the EH65 High Altitude Jet Kit (Part# 2-20160 for single barrel and Part# 2-20164 for dual barrel) is required in order to be operated at an altitude of 5000 feet or higher. 26 figure 5.1 SECTION 6 maintenance Foam element Clean foam element with detergent in warm water or in a nonflammable solvent. Do not wring element. Squeeze excess cleaning fluids out. Allow time for the element to dry and then soak it with clean engine oil. Squeeze excess oil out. Excess oil left in the filter will cause engine to smoke briefly when first started. Before installing the filter elements to make sure they have not been damaged during cleaning. Never run an engine without the filters installed. Fuel Hose Inspect fuel hose monthly for cracks, leaks or other damage. Replace immediately if any damage is suspected. Engine Oil A general description for engine oil maintenance, recommendations, and capacities is provided below. See Engine Operator’s Manual for a detailed description. NOTE • Running engine low on oil can cause engine damage and void engine warranty. • Overfilling of oil level can cause loss of power, engine damage and void engine warranty. Oil Filter Replacement Parts Description 653cc Spin-on Part No. 2-20159 Engine Oil Fill and Drain Locations Refer to Figure 5.4 and images on opposite page figure 5.2 Air Filter Elements Replacement Parts Description Briggs & Stratton Air Filter Honda Paper Filter Element Honda Foam Filter Element Subaru Paper & Foam Element (653cc) Subaru Paper & Foam Element (265cc) Part No. 2-20165 2-20153 2-20154 2-20158 12374 figure 5.4 REMOVE SEAT AND PLASTIC TRAY (if equipped) TO ACCESS Spark Plug Replacement Parts Description BRIGGS & STRATTON 479cc NGK HONDA 390cc NGK CHAMPION AUTOLITE DENSO SUBARU 265cc NGK CHAMPION SUBARU 653cc NGK Part No. BPR6ES BPR6ES RN9YC 4263 / 63 W20EPR-U • • • • • • • • Filler cap/dipstick location: At front of engine Drain plug location: At rear end of engine Type of Lubrication: SAE 30 API classification of SJ, SL or Equivalent Honda Oil Capacity: 1.16 US qts. /1.1 liters Subaru 265cc Oil Capacity: 1.1 US qts. / 1.0 liters Subaru 653cc Oil Capacity: 1.64 US qts. / 1.55 liters Briggs 479cc Oil Capacity: 1.5 US qts. / 1.42 liters Engine Oil Maintenance Schedule * Check oil level after each use. BR6HS RLH6C BPR2ES * Make first oil change after the first month of operation or at 20 hours of operation (whichever comes first). * Make all subsequent oil changes every 6 months or every 50 hours of operation (whichever comes first). 27 SECTION 6 maintenance Engine Oil Level Check Refer to Figure 5.4 and images below Check engine oil daily with filler cap/dipstick located at the engine rear end as follows: 1. Park Vehicle on a level surface, set park brake, turn off ignition switch, and remove key. 2. Remove filler cap/dipstick and wipe it clean. 3. Insert and remove dipstick without screwing it into the fill neck. Check oil level shown on dipstick. 4. Fill to edge of oil fill hole with recommended oil when oil levels are low. 5. Replace filler cap/dipstick and tighten securely. Engine Oil Change Warm oil drains quickly and completely. Therefore, drain used engine oil while engine is still warm as follows: 1. Park vehicle on a level surface, set park brake, turn off ignition switch, and remove key. 2. Place a suitable container below engine to catch used oil. Remove filler cap/ dipstick and drain plug. 3. Allow used oil to drain completely and then reinstall and tighten drain plug securely. 4. Dispose of used motor oil in a manner that is compatible with the environment. Do not throw used oil in the trash. Do not pour it on the ground, or down a drain. 5. Fill oil to the outer edge of the oil fill hole, using a funnel, with recommended oil. Engine must be level when filling. 6. Replace filler cap/dipstick and tighten securely. Transaxle Oil A general description for transaxle oil maintenance, recommendations, and capacities is provided below. NOTE Running vehicle low on transaxle oil can damage transaxle and void warranty. Transaxle Oil Type, Fill, and Drain Refer to Figure 5.5b * Fill cap location: At rear left hand side (see arrow on figure 5.5b) * Drain plug location: At bottom center of transaxle. * Type of Lubrication: SAE 30W oil. * Transaxle Lubrication Capacity: 20 oz. Transaxle Oil Maintenance Schedule * Check transaxle housing for damage and possible oil leakage after each use. * Check transaxle oil level every 6 months or every 200 hours (whichever comes first). Park vehicle on a level surface, set park brake, turn off ignition switch, and remove key. Use a clean long bladed screw driver (or similar object) insert into filler hole until it touches the bottom of gear case. Remove the screw driver. There should be approximately 2.1/4” to 2.1/2” of oil visible on screw driver. Refer to Figure 5.5a * Change transaxle oil once a year or every 600 hours (whichever comes first). figure 5.5a 28 maintenance Transaxle Oil Change Warm oil drains quickly and completely. Therefore, drain used transaxle oil while transaxle housing is still warm as follows: 1. Park vehicle on a level surface, set park brake, turn off ignition switch, and remove key. 2. Place a suitable container below the transfer case to catch used oil. Remove fill cap and drain plug. 3. Allow used oil to drain completely and then reinstall drain plug and tighten it securely. 4. Dispose of used transaxle case oil in a manner that is compatible with the environment. Do not throw used oil in the trash, pour it on the ground, or down a drain. 5. Fill transaxle housing with 20 oz. SAE 30W oil. 6. Replace fill cap and tighten securely. SECTION 6 Drive Belt The dive belt is considered a wearable item. Replacement intervals depend on vehicle use and environment. If your belt is slipping you may need to replace it. 1. Park vehicle on a level surface, set park brake, place shifter in Neutral, turn off ignition switch, and remove key. 2. Remove the upper belt covers. (It is not necessary to remove the bottom cover. 3. “Walk” the belt off of the rear pulley as shown in Figure 5.6. 4. Install the new belt on the front pulley first and “walk” it onto the rear pulley. 5. Reinstall the belt guards. Figure 5.7. Attention: Failure to reinstall the belt guards may void your warranty. figure 5.6 figure 5.5b figure 5.7 Cleaning the Windshield (if applicable) • • • Rinse windshield with lukewarm water; wash gently with mild soap or detergent and lukewarm water, using a soft cloth or sponge. DO NOT SCRUB or use brushes or squeegees. Rinse again. Dry with soft cloth or moist cellulose sponge to prevent water spotting. Abusive cleaning procedures by hand washing or automated washing equipment will eventually result in visual hazing, loss of light transmission and coating contamination. Compatible Cleaning Agents Aqueous Solutions (Mix With Water) of Soaps and Detergents Fantastik, Formula 409, Hexcel, F.O. 554, Joy, Lysol, Mr. Clean, Neleco-Placer, PineSol, Top Job, Windex. 29 SECTION 6 ELECTRIC OR HYBRID VEHICLES ONLY maintenance Battery Charging Refer to Figure 5.8 • On-Board battery charger is located under the dump bed or under the seat on select models. • Put the adapter into the AC cord then plug the AC cord into a grounded outlet. If an extension cord is used, a heavy duty cord of no more than 25 feet must be used. The extension cord must be AWG 12 or heavier. •The charger will come on and begin to charge on its own. •A fully discharged battery set will take 9-12 hours to fully recharge. Battery Watering Flooded batteries need water. More importantly, watering must be done at the right time and in the right amount or else the battery’s performance and longevity suffers. Water should always be added after fully charging the battery. Prior to charging, there should be enough water to cover the plates. If the battery has been discharged (partially or fully), the water level should also be above the plates. Keeping the water at the correct level after a full charge will prevent having to worry about the water level at a different state of charge. Depending on the local climate, charging methods, application, etc. Trojan recommends that batteries be checked once a month until you get a feel for how thirsty your batteries are. Important things to remember: 1.Do not let the plates get exposed to air. This will damage (corrode) the plates. 2.Do not fill the water level in the filling well to the cap. This most likely will cause the battery to overflow acid, consequently losing capacity and causing a corrosive mess. 3.Do not use water with a high mineral content. Use distilled or deionized water only. figure 5.8 Battery Disposal Lead-acid batteries are completely recyclable. Return whole scrap battery to distributor, manufacturer or lead smelter for recycling. For information on returning batteries to Trojan Battery Company for recycling call 800-423-6569. For neutralized spills, place residue in acid-resistant containers with sorbent material, sand or earth and dispose of in accordance with local, state and federal regulations for acid and lead compounds. Contact local and/or state environmental officials regarding disposal information. Transaxle Oil Refer to Figure 5.9 WARNING The electrolyte is a solution of acid and water so skin contact should be avoided. Step by step watering procedure: REMEMBER: Always wear a safety shield or approved safety goggles when adding water or charging batteries. 1.Open the vent caps and look inside the fill wells. 2.Check electrolyte level; the minimum level is at the top of the plates. 3.If necessary add just enough water to cover the plates at this time. 4.Put batteries on a complete charge before adding any additional water (refer to the Charging section). 5.Once charging is completed, open the vent caps and look inside the fill wells. 6.Add water until the electrolyte level is 1/8” below the bottom of the fill well. 7.A piece of rubber can be used safely as a dipstick to help determine this level. 8.Clean, replace, and tighten all vent caps. 30 SAE 30W oil is used in the transaxle. Oil should be changed after one year of normal use, and every other year after. To change the oil, a vacuum device may be used to remove the old fluid or remove the differential cover from the bottom in order to get all of the old oil out of the housing. To fill, some fresh oil should be put in the differential cover then installed back to the housing, then fill up to the level of the plug. (figure 5.9) figure 5.9 SECTION 6 ELECTRIC OR HYBRID VEHICLES ONLY maintenance Mode Switch figure 5.11 Refer to Figures 5.10a & 5.10b Your 48V UTV is equipped with a mode switch. These two modes allow for parental control of the speed of the vehicle. The switch is located either on the dash or on the left side of the vehicle, under the bed. The fast mode (M1) will allow speeds up to 18 mph. The slower mode (M2) will allow speeds up to 10 mph. “Slow Mode” also has a more gentle acceleration curve. The vehicle range is considerably greater in slow mode as well. figure 5.10a NOTE In addition to the main fuse, there are three smaller fuses to protect the 12volt and 48 volt circuits. These fuses are illustrated below. Should these fuses blow and need replacement, a replacement fuse of the same rating must be used. figure 5.12 figure 5.10b figure 5.13 Fuses Refer to Figures 5.11, 5.12 & 5.13 Your 48V Vehicle has fused protection for the main motor circuit, along with the low amperage 48 volt circuit, and the 12 volt circuit. Pictured to the right sbove is the 500 amp main fuse. This fuse will blow in the event of a short across the battery posts, or a catasatrophic failure in the motor or controller. Should this fuse blow, it must be replaced with a like 500 amp fuse. These fuses are available through your dealer. 31 SECTION 6 ELECTRIC OR HYBRID VEHICLES ONLY maintenance American SportWork’s LSV/UTV models are equipped with certain parts unique to these models only. Special care and attention may be required during maintenance of these vehicles. • Turn Signal Control Switch - part # 2-70140 • Front Amber Turn Signal Lamp - part # 2-70143 • Rear Red Turn Signal Lamp - part # 2-70142 • Turn Signal Control Module(Grote) - part # 2-70141 • Blue Pigtail Plugs for front and rear Lamps - part # 2-70144 • Turn Signal Wiring Harness - part # 2-70051 • Plastic Turn Signal Switch Cover - part # 2-18318 • Lexan Polycarbonate Windshield - part# 2-18410 • Dana Transaxle H12 High Speed - part # 2-20840 • SeatBelts Retractable (LSV) - part # 2-10706 • RearView Mirror - part # 2-55081 • Horn - part # 2-55033 Wiring of Tail Lights Refer to Figures 5.14 After installation of the fenders, the tail lights must be wired. The wire harness is routed through the holes in the fender. Please note that these fender holes face inward after mounting. As in the diagram below, the FLAG COLOR on the harness wire is plugged into the corresponding WIRE COLOR on the taillight end. Note that these colors are not the same on the left as the right. TAIL LIGHT WIRING figure 5.14 32 BLACK FLAG WHITE FLAG Harness RED FLAG Flags on harnesses must match wire color on tail light If no flags are present, match the wire colors Tail Light RED WIRE BLACK WIRE CAUTION Accessories Must NOT be Grounded to Chassis. Damage to Converter Will Occur Ground to Distribution Block Ground (Neg) Terminal Only (see fig. 5.15 below) WHITE WIRE figure 5.15 SECTION 7 troubleshoooting SYMPTOMS PROBABLE CAUSES SUGGESTED REMEDIES DEAD BATTERY Key switch left on Turn key off, recharge battery Bad battery Replace battery Shorted starter solenoid Replace starter solenoid Loose or corroded battery connection Clean and tighten connections Defective voltage regulator Contact local service center BATTERY WONT CHARGE Turn key on and pull rope to start engine. Replace battery as soon as possible Turn key on and pull rope to start engine. Replace battery as soon as possible Dead battery cell Worn out or defective battery ELECTRICAL SYSTEM NOT WORKING Bad magnet on engine Contact local Honda service center Blown or missing fuse Replace fuse Loose or corroded battery connection Clean and tighten connections Worn out or defective battery Replace battery Defective ignition switch Replace ignition switch Bad connection in wire harness Replace or replace wire harness Fouled sparkplug Replace or clean sparkplug Missing or incorrectly installed air intake restrictor Replace or correctly install air intake restrictor Throttle cable is defective or out of adjustment Clean and oil or replace cable Engine idle speed too low Adjust engine idle Overloaded engine Avoid overloading engine Stale or dirty fuel Replace fuel with new fuel ENGINE SHUTS DOWN WHILE TURNING, ON INCLINES, OR ON UNEVEN TERRAIN Low engine oil Check oil level with unit on level ground Honda oil sensor is bad Get Honda low oil sensor changed by authorized Honda service center STEERING FEELS FUNNY / PULLING TO ONE SIDE / HARD TO STEER One side may still be engaged in 4WD with the switch off Put unit in reverse and back up straight a few feet to get the axle to release One side may still be engaged in 4WD with the switch off Take unit to a service center Low tire pressure Inflate tires to proper inflation levels ENGINE BACKFIRES ENGINE KNOCKS (CALL NORMALLY FOR 4WD) BRAKES DONT WORK WELL / HARD TO PUSH / NO TRAVEL IN PEDAL BELT SLIPPING / WILL NOT PULL UPHILL Brake rotors are dirty 4WD Clean rotors with brake cleaner and test. A stiff pedal is normal for a 4WD unit Brake rotors are dirty 2WD Put unit in reverse, back up at low speed and step hard on the brake (2WD units have an auto brake adjuster) Too much weight Lighten load The belt is wet Dry the belt Torque converter pulleys are dirty Clean the torque converter Belt may have stretched or have a low spot causing slipping Replace the belt 33 SECTION 7 Fuel in the Cylinder Cavity (applies only to single cylinder engines) In the event that the fuel valve is left open while transporting or towing this Utility Vehicle it is possible that fuel has leaked down into the cylinder cavity. If this has occurred the engine will not start. With the cylinder cavity full of fuel the engine will feel like it has “locked up”. Below are the proper steps to follow if your Utility Vehicle engine seems to have fuel in the cylinder cavity. WARNING Use EXTREME CAUTION when performing the activity below. Gasoline is EXTREMELY FLAMABLE! 1. Move the vehicle to a well ventilated area, away from sparks or flame. 2. Park Vehicle on a level surface, set park brake, turn off ignition switch, and remove key. 3. Remove the wire connected to the spark plug. And remove the spark plug from the engine. (See Figure 6.1) (Spark Plug Wrench supplied with Operator’s Manual) 4. WARNING: Stand away from the spark plug hole when performing step 5. Fuel can spray several feet. 5. Wearing eye protection, slowly pull the recoil start grip handle (See Figure 6.2) in an upward motion. This should force the fuel out of the cylinder cavity through the spark plug hole. Caution: This gasoline spraying out of the cylinder cavity is very flammable, use extreme caution and make sure there are no sparks or flames nearby. 6. Repeat step 3 until only air escapes out of the spark plug hole. 7. Properly replace the spark plug back into the cylinder head, move the vehicle away from any spilled fuel. If there is fuel on the vehicle itself, allow for it to evaporate before continuing. 8. Connect the plug wire. Your Utility Vehicle is now ready to start. figure 6.1 figure 6.2 34 troubleshooting ASW Utility Vehicle Shifter Trouble Shooting Notice: Always check transmission oil level. Dip a clean screwdriver straight down in the fill hole to the bottom of the gear case. There should be about 2 ½ inches of oil on the screw diver. If oil needs to be added, use SAE 30 motor oil. See Page 19 for Instructions • Engine will not turn over when key is turned to start. – This vehicle is equipped with a safety switch that only allows starting in neutral. Go to Neutral switch diagnostic procedure below. • Gears grind when going into a gear or vehicle stays in gear when shifted to neutral. – Cables need to be lubricated or adjusted. Go to Cable adjustment procedure below. Neutral Switch Diagnostic Procedure If starter does not engage when shift lever is in neutral: 1. Apply the parking brake. 2. Turn and hold the key to start. – “Jiggle” the shift lever in the neutral slot. If the starter engages, release the key and call American SportWorks Customer service to order a neutral switch shim kit. 3. If the starter did not engage in step 2, turn and hold the key to start – slowly move the shift lever from neutral to reverse – if the starter engages, release the key. Repeat, moving the shift lever from neutral to forward. • If the starter did engage, go to Cable adjustment procedure section. • If the starter did not engage call Customer Service at 1-800-643-7332. troubleshooting SECTION 7 Cable Adjustment Procedure Stiff or sticking cables can cause the vehicle to not shift properly and it may affect starting since the vehicle must go to neutral to start. Before attempting to adjust the cables there are several steps that can be taken to insure the cables are operating properly. • • Lubricate the cables. Behind the dash board there are two cables attached to the gear selector lever. Slide the rubber dust caps up the cable. Drip or spray penetrating oil into the cable housing while working the lever. Do this several times as the oil soaks into the housing. Test the vehicle. If this did not help move to the next step. Remove the center console (with cup holders). Find the shifter cables and cut the plastic ties that fasten them to the frame tube. Over tight cable ties can cause the cable to bind. Replace cable ties but leave them loose so that the cable can move in them. Test the vehicle. If it is still not performing correctly, move to the adjustment procedures that follow. 1. Put the vehicle in neutral. 2. Loosen the cable adjusters behind the dash board. (figure 6.3) 3. Make sure the selector lever on the dashboard is in neutral. 4. Make sure the transmission is in neutral. You can check by turning the key to Start. The engine will only turn over if the transmission is in neutral. 5. Pull the slack out of both cables (but do not stretch the springs) and tighten the adjuster nuts or you can also use the adjuster nuts on the cable bracket located on the transmission. (figure 6.4) If you have tried all of this and it is still not operating correctly, you may need new cables. Please call American SportWorks Customer Service at 1-800-643-7332. Have your serial number when you call. figure 6.3 figure 6.4 35 SECTION 8 WIRING DIAGRAM ENGINE MODELS 36 diagrams diagrams SECTION 8 WIRING DIAGRAM ENGINE MODELS ENGINE MODELS 37 12V B+ black red + bank battery 48V 48V Neg 48V A-2 F-2 48V A-1 red to contactor motor F-1 A-2 Battery discharge indicator 48V black red green orange plug to motor Headlight switch 1/4” loom x 34” L 3/8” loom x 16” L red 1/4” loom x 34” L black 12V+ 12V- Not Used A/H S/H grey green grey power to controller F/R switch 48V 48V keyswitch red brown 48V 8” pigtail to F/R switch brown white yellow grey J-1 black 1/4” loom x 17” L black Reverse horn 1/4” loom x 44” L red red 48V green 20A fuse B+ horn button To B+ on Motor Control Forward black from A/H post terminal block 12V red 12V accessory plug black red to optional horn button black 1/4” loom x 48” L grey red black black fuse 10A Pos 48V 48v to 12v converter blue F-2 to main cont. on to A-2 black to A-1 headlights 48V 48V 12V 48V 48V M- 4 pin 6 pin 24 pin yellow B- white red b F-1 red black 4 5 6 green to neg. blue to pos. red red J-2 contactor plug brown J-2 J-3 grey J-1 green black green red grey A-2 Neg Pos 3/8” pigtail 4 #6 battery 8 volts Bk up switch Back up alarm 2 1 17 15 4 13 T-19 @ J-1 plug Rev 7-19-13 bottom of firewall top of firewall white blue brown red yellow grey black green S/H = switched hot A/H = always hot 1/4” To Throttle Position Potentiometer Throttle Position Potientiometer 1/4” loom x 12” L blue blue blue 20.375” L blue 1/4” loom x 11.5” blue white T 24-13 24 2019 J-1 plug 1110 8 T 12-1 1/4” loom x 11.5” brown green for optional backup alarm black Hi/Low switch to + battery Main contactor coil blue black white red DC motor control red yellow green 38 brown Please note that not all circuits illustrated are included on all models. Please disregard circuits that do not apply to your application. blue 48 VOLT DC MOTOR CONTROL & TERMINAL BLOCK WIRING SECTION 8 diagrams 48VOLT 2WD Wiring Diagram Rear Left Signal Black Red White Red Red Brown Red Gray Brown Red / Blue Stripe Red / Black Stripe White Black Blue Red / Black Stripe Black White 1 3 5 Red Green White Black White Green Red White 4 6 LSV 48V Wiring Harness 10A 2 Distribution Block Yellow Black White 1 = 12V Pos 2 = 12V Neg 3 = Switched 12V Pos Red Red / Black Stripe Green Black A F Module B G C H D J E K Left as viewed from front of vehicle Red / Black Stripe ground into existing harness Note wire color change @ rear lights on early models Red / Black Green White Red White Red / Brown Stripe Green Signal / Horn / Headlight Switch Red / Black Stripe A B C D A B C Black Red / Black Stripe Red Red / Black Stripe Horn Black Black ground into existing harness Yellow Black Green Red White Hazard Switch Yellow Headlight Rear Right Signal Brake Switch Front Right Signal Black Black Headlight Black Front Left Signal Black diagrams SECTION 8 48VOLT 2WD Wiring Harness Diagram 39 N F Reverse Safety Switch GREEN BLACK Starter Solenoid 20A Fuse 20A Fuse Motor Ground GREY WHITE STOP WIRE To Carburetor Wire GREEN BROWN GREY WHITE Headlight Switch RED Large 12v Battery 87 86 85 87a BLACK Converter YELLOW A2 F2 BROWN Speed Sensor RED GREY GREEN 2wd/4wd Switch Differential Plug GREEN YELLOW BLACK/WHITE RED BLACK Large 12v Battery BLACK GREEN YELLOW Large 12v Battery BLACK Charger BROWN GREEN 4wd Relay 30 BLUE BLACK Large 12v Battery GREEN WHITE BLUE BROWN RED YELLOW GREEN RED Curtis Controller A1 GREEN RED RED R RED GREEN BLACK F/N/R Switch Forward Safety Switch BLACK BLACK 10A Fuse YELLOW WHITE PINK = WHITE BLUE Battery Discharge Indicator BLUE Drive/Regen Contactor BLACK RED F1 B- M1 B+ F2 F1 GREY Motor Ground Headlight Plug Headlight Plug RED Small 12v Battery 12v Outlet Negative 12v Outlet Positive 500A Fuse Neutral Safety Switch RED Key Switch BROWN BLUE Potentiometer BLUE Curtis Controller Plug GREEN BLUE WIRING DIAGRAM Gas / Electric Hybrid WHITE BLUE WHITE BLACK BLUE YELLOW BLACK BLACK 40 BLACK Electric Motor SECTION 8 diagrams RED BROWN diagrams WIRING DIAGRAM Terminal Blocks SECTION 8 650cc / 479cc Honda GASOLINE MODELS GASOLINE MODELS GRN GRN GRY GRY YEL RED BRN RED RED BLK RED BRN RED YEL GRN GRN GRY GRY YEL RED BRN RED RED RED GRN BLK BLK GRN BLK BLK GRN YEL -GROUND -GROUND +12V CONSTANT ACC* SWITCHED +12V (LIGHTS) SWITCHED +12V +12V CONSTANT -GROUND -GROUND +12V CONSTANT ACC* SWITCHED +12V (LIGHTS) SWITCHED +12V +12V CONSTANT 265cc 48 Volt GASOLINE MODELS ELECTRIC MODELS RED GRY GRY YEL RED BRN RED RED RED GRN GRN BLK BLK RED BLK ORNG BLK GREY RED GRN BLUE BLUE BLK BLK GRN YEL RED RED GRN BRN GREY SWITCHED + 48V – 48V GROUND SWITCHED + 12V – 12V GROUND + 12V CONSTANT -GROUND -GROUND +12V CONSTANT ACC* SWITCHED +12V (LIGHTS) SWITCHED +12V +12V CONSTANT RED GREY 41 SECTION 9 warranty limited warranty Full Size Utility Vehicle American SportWorks (hereinafter referred to as “ASW”), hereby warrants to the original purchaser, that a new ASW UTV will be free from defects in material and workmanship. The period of warranty is one (1) year from date of purchase for the component parts (except as noted below) and three (3) years from the date of purchase for a Honda engine or Briggs & Stratton Vanguard Engine and five (5) years from the date of purchase on a Subaru engine (engine warranties are covered by the engine manufacturer). Please refer to the engine manufactures warranty policy included with your ASW product. ASW, if notified of a defect in material or workmanship during the period of warranty, will repair or replace, at its option, defective parts at no charge, other than the reasonable cost for the transportation of the component(s). ASW will also agree to pay reasonable charges for labor, if necessary, to perform a warranty repair. The original purchaser must operate the vehicle and maintain the vehicle in accordance with the instructions provided in the Operator’s Manual, the supplements hereto, and labels affixed to the vehicle. General Exclusions: This limited warranty does not cover component failure or damage caused by any of the following: abnormal strain or stress, neglect; abuse; improper assembly of components which were supplied in the factory sealed carton after the vehicle left ASW; improper maintenance, improper use of the vehicle, including, but not limited to racing, jumping, stunt driving, or any other uses prohibited by the Operator’s Manual. Additionally, this warranty does not cover component failure or damage to vehicles which are leased or rented, or vehicles which are used at a concession track. Specific Exclusions: This limited warranty does not apply to components, which are subject to normal wear and tear. These items include, but are not limited to, the tires, brakes, throttle, shift, and brake cables, drive belt, the torque converter system, chain, seat, lights, fasteners, decals, or cosmetic body panels and natural discoloration of material due to ultraviolet light. Downtime, pick-up and delivery charges are not covered by this warranty. This warranty does not apply to the engine, which is covered by its manufacturers warranty, unless otherwise noted above. Warranty Service: To obtain warranty service you must return your ASW product to the local authorized dealer or service center, you must inform them of your warranty problem and provide proof of purchase before any warranty service is provided. The authorized dealer or service center will inspect the product to determine what warranty repairs or parts are needed and if the problem meets the requirements of ASW’s Limited Warranty Policy. To locate the authorized dealer or service center nearest you please call ASW customer service at 800-643-7332, or visit our website at www.amsportworks.com for more information. ASW MAKES NO OTHER WARRANTY OF ANY KIND, EXPRESSED OR IMPLIED. ALL WARRANTIES OF MERCHANTABILITY AND FITNESS FOR A PARTICULAR PURPOSE WHICH EXCEED THE OBLIGATIONS AND TIME LIMITATIONS SPECIFIED IN THE WARRANTY ABOVE ARE HEREBY DISCLAIMED BY ASW AND EXCLUDED FROM THIS WARRANTY. ADDITIONALLY, THIS WARRANTY EXCLUDES ANY INCIDENTAL OR CONSEQUENTIAL DAMAGES, INCLUDING BUT NOT LIMITED TO LOSS OF USE. SOME STATES, PROVINCES OR COUNTRIES DO NOT ALLOW A MANUFACTURER TO EXCLUDE OR LIMIT INCIDENTAL OR CONSEQUENTIAL DAMAGES AND, THEREFORE, THE ABOVE EXCLUSION MAY NOT APPLY TO YOU. SOME STATES, PROVINCES OR COUNTRIES DO NOT ALLOW LIMITATIONS ON HOW LONG AN IMPLIED WARRANTY WILL LAST; IT IS POSSIBLE THAT THE ABOVE LIMITATION MAY NOT APPLY TO YOU. THIS WARRANTY GIVES YOU SPECIFIC LEGAL RIGHTS, AND YOU MAY ALSO HAVE OTHER LEGAL RIGHTS, WHICH VARY, FROM STATE TO STATE PROVINCE TO PROVINCE OR COUNTRY TO COUNTRY. 42 ASW, LLC, 4404 Engle Ridge Dr., Fort Wayne, IN 46804 • 62194 Commercial St., Roseland, LA 70456 • Phone 800-643-7332 warranty SECTION 9 Service and Warranty Special Note Should your American SportWorks product require warranty repair, service or if you have any questions concerning assembly, replacement parts or how to care for your product please contact your local American SportWorks dealer or American SportWorks directly. American SportWorks Dealers: To locate the authorized dealer nearest you please call American SportWorks customer service at 1-800-643-7332, visit our website at www.amsportworks.com or contact your place of purchase. Mail: Customer Support c/o American SportWorks 4404 Engle Ridge Drive Ft. Wayne, IN 46804 Telephone: Customer Support American SportWorks 1-800-643-7332 Fax: Customer Support American SportWorks 1-800-399-1399 e-mail: Customer Support American SportWorks [email protected] 43 SECTION 9 warranty UTILITY VEHICLE SET-UP / PRE DELIVERY CHECKLIST MODEL # SERIAL # DATE OF PURCHASE DEALER SET-UP SET UP BY: VISUALLY - inspect for damage FASTENERS - inspect for missing bolts, nuts CHECK ORDER - verify all items are as ordered LOOSE COMPONENTS - verify all are there MANUALS - operators safety manual / engine manual WELDS - inspect for missing CLEAN UP - check clean up of unit DECALS - inspect for missing decals PRE DELIVERY DATE: CHECKED BY: TIRES - adjust pressure to proper specification WHEELS - check lug and axle nut for proper torque BATTERY - insure that it is fully charged CAGE - check to insure cage is assembled properly FASTENERS - check all fasteners for proper torque LIGHTS - verify proper operation of all lights TRANSAXLE - insure oil level is correct ENGINE - check engine RPM’s for settings PARKING BRAKE - insure that working correctly SEAT RESTRAINTS - insure installed properly DUMP BED - insure latch is adjusted properly SHIFT LEVER - insure working properly BRAKE - insure brake is adjusted and working OIL - insure that engine oil level is correct SEATS - insure seat is installed properly KEYS - verify operations of key switch AXLE - inspect attachment and wheel bearings GUARDS - inspect for missing bolts, nuts, guards THROTTLE - insure throttle is working properly DATE: DEALER INFORMATION NAME PHONE ADDRESS FAX CITY, STATE, ZIP EMAIL CUSTOMER CHECKLIST 44 VISUAL INSPECTION RECEIVED SERVICE INSTRUCTIONS MY DEALER DEMONSTRATED ALL CONTROLS RECEIVED KEYS & ENGINE MANUAL SHOWN ALL ENGINE CONTROLS WARRANTY EXPLAINED FULLY I have visually inspected unit and found no defects RECEIVED OWNERS MANUAL I understand this vehicle product is not designed for racing I have reviewed and understand the warranty policy I understand that this product is designed for off road use only and is NOT intended for use on public roads or highways unless equipped with an LSV package.* I understand that before operating this vehicle all operators and passengers must read, follow and understand all safe operating instructions * American SportWorks Low Speed Vehicle (LSV) models are street legal where allowed when properly licensed and plated. No ASW vehicles are designed for, nor allowed on highways. Check local ordinances regarding the use of Low Speed Vehicles in your area. 07/23/2013 notes 45 notes 46 PRE DRIVE INSPECTION CHECKLIST ITEM INSPECTION PROCEDURE ACTION Engine Oil Level Add oil if required. Check for leaks. Tighten filler cap securely. Refer to operator's or engine manual. Fuel Level Add fuel if necessary. DO NOT overfill. DO NOT mix oil with gas. Replace cap tightly. Refer to operator's or engine manual. DO NOT refuel a hot engine. Allow engine to cool before adding fuel. Warning Decals Make sure all warning decals are legible and securely attached. Replace as necessary. Tires Tread must have a minimum height of 1/8" at center of tire. Prior to operating vehicle, check and adjust tire pressure as indicated on the sidewall of each tire, or in the vehicle manual. A tire pressure gauge is required to obtain accurate readings. Replace tires if tread height is less than 1/8" at center of tire. Add or remove air as necessary to meet requirements indicated on sidewall of each tire or in the specifications section of the vehicle manual. Drive Train Check condition and fluid levels Lubricate, adjust as necessary. Throttle Check for smooth operation. Ensure throttle 'snaps' back to idle. Check for frayed or loose cable. Check for mud, debris, and ice in throttle mechanism Check idle adjustment Replace damaged cable. Clean out any mud and debris. If ice is present, move vehicle to a warm place and allow the ice to melt and water to dry. Adjust as necessary Fasteners Check wheels to see that all wheel nuts are tightened securely at 65 ft. Lbs. Check for missing fasteners. Check that all other fasteners are secure. Tighten fasteners as necessary. Replace fasteners as necessary. Brush Bars Make sure all brush bars are in place and securely attached. Replace damaged bars or fasteners and tighten as necessary. Steering Make sure steering turns freely. Check for proper 'toe-in' of wheels. Lubricate and adjust as necessary. Frame / Chassis Check for bent or otherwise damaged frame and/or other chassis components. Replace as necessary. Guards Check all guards covering moving parts. Tighten fasteners on loose guards. Replace worn or damaged guards. Lights Check for proper operation Suspension and Ball Joints Check for ball looseness Replace as necessary Keyswitch Perform switch test and ensure that engine shuts off when key is turned to the “OFF” position. Repair / replace as necessary Brakes Ensure brakes function properly. Adjust / replace as necessary See OPERATION section of the Operator’s Safety Manual