1
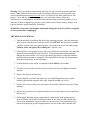
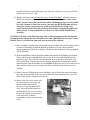
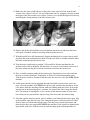
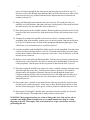
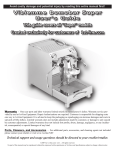
1
DESCALING a Vibiemme Domobar Super
This operation should be performed by an authorized espresso machine technician.
However, should you feel technically competent to descale your espresso machine; these
instructions can be used in conjunction with your user’s manual and the descaler
manufacturer’s instructions to help you complete the process correctly. Please read them
thoroughly before attempting to complete the cleaning process. If you do not feel
comfortable with any step of the process, please hire a professional to complete this
process. Stefano’s Espresso Care is not responsible for any damage to your equipment,
your property, or your person during this cleaning process
Descaling is preventative maintenance that will prolong the life of your espresso machine As
boiling water turns to steam, mineral content leaves behind hard water deposits which can cause
multiple problems in your espresso machine, such as:
¾
¾
¾
¾
¾
¾
¾
¾
Water sensor malfunction and failure
Heating element failure
Clogging of the thermosyphon pipes
Low brewing volume
Poor pressurestat response
Low-temperature grouphead
Drips and leaks from the grouphead
Inability to form pressure in the boiler due to vacuum breaker failure
Depending on the mineral content of your water and frequency of use, your machine should be
descaled approximately four times a year.
Warning: Descaling involves pumping a chemical solution through the machine. These special
chemicals usually contain a food-grade acid that can be hazardous. Carefully follow the
manufacturer’s recommendations and use safety precautions. Even when working carefully,
some solution may splash in your work area. Eye protection and gloves are required when
handling and using these chemicals. Do not allow bystanders in the area unless they are properly
protected. You must also protect the work area both under and around your espresso machine.
Immediately wash off any splashes, particularly on painted surfaces. Do not touch your skin or
eyes during this process as descaler can cause serious irritation and burns to sensitive tissues.
Warning: Descaling involves opening the case of the machine and exposing internal
components. Electrical components and their wiring can present a shock hazard and many parts
inside the machine can get very hot.
2
Warning: Only use products manufactured explicitly for scale removal in espresso machine
boilers. Other products, such as those made for cleaning coffee pots or removing hard water
scale from bathrooms must never be used. Never use vinegar or any other chemicals for this
purpose. Never add any other cleaning agent to your water tank. Always follow the
manufacturer’s recommendation and instructions when descaling an espresso machine. Use of
improper cleaners or improperly using the correct cleaner can void the warranty, damage your
espresso machine, and be harmful to your health.
WARNING: Do not leave the machine unattended during this all process with an exception
of when the machine is unplugged.
THE DESCALING PROCESS
1. Turn the machine on and bring the boiler up to operating pressure. Once the machine is
up to pressure, turn the power switch to 0 (off) and UNPLUG the unit. Place a suitable
container under the hot water spout, open the valve and let the water flow until it stops.
Caution: water and spout will be boiling hot. Close the valve
2. If the machine is so equipped, remove the water softener device from the water tank and
install the screen that fits the end of the hose. The descaling agent will permanently
damage the water softener if it is left in place during this process, so do not reinstall it
until this entire procedure is completed. The original filter will stop any foreign matter
from entering the boiler or heat exchanger.
3. Confirm that the power switch is in position 0 and UNPLUG the machine
4. Pull the hoses out of the reservoir and remove the reservoir and its platform from the
machine.
5. Remove the drip tray and its cover
6. Tip the machine on its back and remove the two small Phillips head screws on the
bottom of the machine along the back edge. Stand the machine on its feet.
7. Remove the 6 screws on the outer case (three on each side). Slide the outer case off the
machine.
8. Replace the water reservoir’s platform and the reservoir and replace the hoses back into
the reservoir.
9. Following the descaling agent’s manufacturer’s instructions, make approximately 3
liters of solution. The powder will dissolve better in hot water, but the solution must
cool to room temperature when you add it to your reservoir. To expedite this process,
start by dissolving the powder in approximately one liter of hot water, and then add
3
enough cold water to reach the proper ratio. Once the solution is cool, use it to fill the
water reservoir at least ½ full.
10. Plug the machine in and only turn the power switch to Position I. Allow the boiler to
fill. Do not continue to the next step until the pump stops. Please note: Some of the
earlier versions had a time-out function which will disengage power to the autofill
box after 1 minute. If that is the case in your unit, and the autofill shuts off on its
own after 1 minute, turn the power switch to 0 and the back to I and it will
reactivate the autofill. This safety function will continue engaging throughout the
whole process, so keep in mind that you’ll have to reactivate the autofill when
necessary.
WARNING: In many of the following steps, such as when pumping descaler through the
grouphead and removing the hoses from the water tank, splashing acid can create a safety
hazard. Gloves, eye protection, and work-area protection are required.
11. Place a suitable container under the grouphead, turn on the brew function, and run about
8 ounces of descaling solution through the grouphead. This also ensures that the
thermosyphon pipes, the heat exchanger, and the internal components of the grouphead
will be descaled.
12. Snap the blind filter into the portafilter handle and simulate backflushing the machine.
Turn on the brew function and allow it to run for about 10 seconds after the pressure
reaches its peak. This will force descaler through the over-pressure relief valve. You
will see the liquid flowing back into the reservoir through the secondary hose. When
that takes place, turn the machine to 0 and UNPLUG the power cord. Leave the hoses in
place and move the reservoir off to the side of the machine and lift off the reservoir
platform.
13. Remove the two Phillips head screws holding the top of the divider panel and swing it
back and off the machine. Take care not to stress the wires attached to the water-level
microswitch which is attached to the panel.
14. Remove the water level sensor wire
by loosening the screw inside the
plastic housing shown in the
picture. Leave it disconnected for
now. This will fool the boiler into
thinking that it is low on water and
needs to be refilled. Set the wire off
to the side where it cannot
accidentally connect with any metal
parts.
4
15. Note: once the water reaches the top of the boiler, some water will leak from the antivacuum valve (figure 1 below). You can address this issue by wrapping a twist tie around
the nipple of the anti-vacuum valve (figure 2 below) in a way that the nipple will stick up
mimicking the closed position of the anti-vacuum valve.
16. Replace the divider. Reinstall the reservoir platform and reservoir and insert the hoses
once again. If needed, add more descaling solution to the reservoir.
17. With the autofill wire still disconnected, plug the machine back in, remove the tip and 0ring from the steam wand and place them off to the side. Place a suitable container under
the steam wand and open the steam valve.
18. Turn the power switch only to position I. The autofill is defeated and therefore the
machine will overfill (completely fill) the boiler. As soon as a solid stream comes out of
the steam wand, turn the power switch to Position 0 and close the steam valve.
19. Place a suitable container under the hot water spout. Open the hot water valve and turn
the power switch to Position I. Pump about 16 ounces of solution through the spout..
Turn the power switch to Position 0 and then close the hot water valve and UNPLUG the
machine.
20. At this point, descaler has been pushed through all possible avenues where water can
pass. Leave the machine off, UNPLUG the power cord, and allow the machine to sit for
a few hours while the descaling solution works on buildup inside the boiler. Refer to the
instructions on the descaling agent’s container for a better idea of how long this should
take. The amount of soaking time is also a matter of the mineral content of your water,
how often you use your machine, and how long it has been since the last descaling.
21. After the requisite time has passed, place a suitable vessel under the hot water spout, plug
in the machine, open the hot water valve, and turn the power switch to position I. Pump
about 8 ounces of solution through the spout. Turn the power switch to position 0 and
then close the hot water spout and UNPLUG the machine. If the liquid you drained looks
quite fouled with scale, refill the reservoir with descaling agent and pump another 16
5
ounces of cleaner through the hot water spout (repeating the process back at step 17).
Excessive scale in the drained water indicates that you need to descale more often. If the
water does not look very polluted with hard water deposits that have been dissolved,
continue with step 22.
22. Empty and thoroughly wash and rinse the water reservoir, fill it with the water you
normally use in the machine, and replace the hose with the particle filter on the end back
into the reservoir. (Do not replace the water softener yet.)
23. Place the bypass hose in a suitable container. Removing this hose from the reservoir will
keep the water in the reservoir free from the descaler which is still in the pressure-relief
system.
24. Temporarily reconnect the autofill level sensor wire. Place a container under the
grouphead, plug in the machine, turn the power switch to position I and turn on the brew
cycle for 15 seconds or more to flush out the grouphead and thermosyphon pipes. Turn
off the brew cycle and turn the power switch to position 0.
25. Lock the portafilter with the blind filter basket in place on the grouphead. Turn the power
switch to position I and run the brew cycle for 10 seconds after the brew pressure gauge
reaches about 9 BAR to flush the over-pressure relief valve. Turn off the brew cycle and
turn the power switch to 0.
26. Remove, rinse, and replace the blind portafilter. Turn the power switch to position I and
turn the brew cycle on and off a few times as when you are backflushing to clear the rest
of the grouphead. Turn the power switch to position 0, then turn the brew cycle off.
27. Disconnect again the autofill level sensor wire, place a suitable container under the steam
wand and open the steam valve. Turn the power switch to position I. The autofill is
defeated and so the machine will pump a stream of water through the steam wand.
Continue pumping until the water is clean and is free of descaling agent. Set the power
switch to position 0, and then close the valve. Remember to check the reservoir level
during this process.
28. Once again, place a suitable vessel under the hot water tap, open the hot water tap and
turn the power switch to position I. Allow water to flow from the spout until it is clean
and free of descaling agent. Set the power switch to position 0, and then close the valve.
29. Repeat steps 21 through 27 until the water you drain is tasteless (totally free from the
taste of the cleaner). This might take as many as three or more rinses.
WARNING: Most proper descalers are a form of food-grade citric acid and are safe to
consume when highly diluted. Sample only a very small amount (one drop on a clean
fingertip) to be safe. Thoroughly wash your hands in hot, soapy water before and after
performing this test.
6
29. When the drain water is clean and free from the acidic taste of the cleaner, turn the
power switch to 0 and UNPLUG the machine.
30. Remove the reservoir, the reservoir platform, and the two screws holding the divider
panel. Tip the panel back so you can reach the water sensor probe. After mentally noting
the length of probe that extends up and out of the boiler, loosen the small nut that holds
the probe, and pull the probe straight up and out of the boiler. Wipe it clean with a cloth.
If necessary, light use of a scrubbing pad is okay. Replace the probe in the boiler
making sure it sits at its original depth. Reconnect the autofill sensor wire on the boiler
and remove the twist tie from the anti-vacuum valve.
CAUTION: Failure to reconnect the autofill wire will cause your machine to behave
erratically and can cause damage not covered by the warranty.
31. Move the partition panel back into place and fasten with the two upper Phillips screws.
32. Tip the machine onto its back and install the two small Phillips screws in the bottom that
hold the internal partition.
33. Place the machine upright and replace the outer cover and fasten the 6 Phillips screws
that hold it in place. Take care not to pinch the reservoir hoses.
34. Replace the water reservoir platform, the water reservoir, reinstall the water softener if
so equipped, wipe the two hoses clean, and replace them in their proper location in the
reservoir. Refill the reservoir with the water normally used in the machine. If you
removed heavy mineral deposits during the descaling process, think seriously about
improving your water source or water treatment system. Also check the hardness of
your water at more frequent intervals.
CAUTION: Exercise extreme caution during the following step. You will be dealing with
boiling water gushing out of the hot water spout. Use necessary protection.
35. Plug the machine back in and turn the power switch to position I. The pump should not
start. Place a suitable container under the hot water spout and open the hot water valve.
Turn the switch to position II. As the machine heats up and pressure builds, some of the
excess water in the boiler will be displaced by steam. When the pump begins to operate,
signifying that the water has been lowered to about the correct level, close the hot water
tap. The pump should stop shortly after closing the tap.
WARNING: Do not leave the machine unattended until the proper water level in the boiler
has been verified!
36. When the machine reaches operating temperature, bleed steam off the boiler to assure
that the water level is correct. If a lot of water comes out, then the water level is too
high. Repeat step 35. If this problem continues, consult your retailer.
7
37. Now that the machine is up to temperature, make sure the components are clear of
descaling agent by flushing a good amount of clean water through the hot water spout,
bleeding some steam out of the steam wand, and using the brew cycle to run 4 to 6
ounces of water through the grouphead. Save a few ounces of water, and when it cools,
taste it. If the water tastes like the acid used in the cleaning agent, repeat the flush
process until the water is free from the acidic taste of the descaler.
38. Your machine is now descaled.
Any questions? Contact us at [email protected]