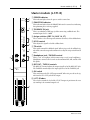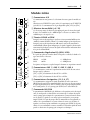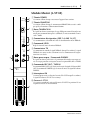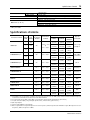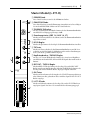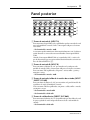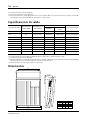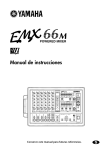
1
MIXING CONSOLE
CONSOLES DE MIXAGE
MISCHPULTE
CONSOLA DE MEZCLA
User’s Guide
Manuel d’utilisation
Bedienungsanleitung
Manual de uso
1
2
3
4
5
6
7
8
9
10
11
12
13
14
15
16
17
18
19
20
21
22
23
24
A
B
A
B
A
B
A
B
A
B
A
B
A
B
A
B
A
B
A
B
A
B
A
B
A
B
A
B
A
B
A
B
A
B
A
B
A
B
A
B
A
B
A
B
A
B
A
B
20dB
20dB
20dB
20dB
20dB
20dB
20dB
20dB
20dB
20dB
20dB
20dB
20dB
20dB
20dB
20dB
20dB
20dB
20dB
20dB
20dB
20dB
20dB
20dB
ST IN 1/3
A
B
S
T
1
+4
-10
PEAK
ST IN 2/4
A
B
S
T
2
–16
GAIN
–60
–16
GAIN
–60
–16
GAIN
–60
–16
GAIN
–60
–16
GAIN
–60
–16
GAIN
–60
–16
GAIN
–60
–16
GAIN
–60
–16
GAIN
–60
–16
GAIN
–60
–16
GAIN
–60
–16
GAIN
–60
–16
GAIN
–60
–16
GAIN
–60
–16
GAIN
–60
–16
GAIN
–60
–16
GAIN
–60
–16
GAIN
–60
–16
GAIN
–60
–16
GAIN
–60
–16
GAIN
–60
–16
GAIN
–60
–16
GAIN
–60
–16
GAIN
PEAK
PEAK
PEAK
PEAK
PEAK
PEAK
PEAK
PEAK
PEAK
PEAK
PEAK
PEAK
PEAK
PEAK
PEAK
PEAK
PEAK
PEAK
PEAK
PEAK
PEAK
PEAK
PEAK
SIGNAL
SIGNAL
SIGNAL
SIGNAL
SIGNAL
SIGNAL
SIGNAL
SIGNAL
SIGNAL
SIGNAL
SIGNAL
SIGNAL
SIGNAL
SIGNAL
SIGNAL
SIGNAL
SIGNAL
SIGNAL
SIGNAL
SIGNAL
SIGNAL
SIGNAL
SIGNAL
80
80
80
80
80
80
80
80
80
80
80
80
80
80
80
80
80
80
80
80
80
80
–15
HIGH
+15
–15
HIGH
+15
–15
HIGH
+15
–15
HIGH
+15
–15
HIGH
+15
–15
HIGH
+15
–15
HIGH
+15
–15
HIGH
+15
–15
HIGH
+15
–15
HIGH
+15
–15
HIGH
+15
–15
HIGH
+15
–15
HIGH
+15
–15
HIGH
+15
–15
HIGH
+15
–15
HIGH
+15
–15
HIGH
+15
–15
HIGH
+15
–15
HIGH
+15
–15
HIGH
+15
–15
HIGH
+15
–15
HIGH
+15
–15
HIGH
HIGH
+15
–15
HIGH
PEAK
PEAK
PEAK
+6
+6
+6
+4
+4
+2
+2
0
0
–2
–2
–4
–4
+15
80
–15
–15
SIGNAL
–60
PEAK
SIGNAL
80
MIXING CONSOLE
+4
-10
PEAK
SIGNAL
+15
–15
HIGH
LOW
+15
–15
LOW
AUX 1
AUX 1
AUX 2
AUX 2
1–2
1–2
3–4
3–4
ST
ST
+15
+15
250
5K
MID FREQ
250
5K
MID FREQ
250
5K
MID FREQ
250
5K
MID FREQ
250
5K
MID FREQ
250
5K
MID FREQ
250
5K
MID FREQ
250
5K
MID FREQ
250
5K
MID FREQ
250
5K
MID FREQ
250
5K
MID FREQ
250
5K
MID FREQ
250
5K
MID FREQ
250
5K
MID FREQ
250
5K
MID FREQ
250
5K
MID FREQ
250
5K
MID FREQ
250
5K
MID FREQ
250
5K
MID FREQ
250
5K
MID FREQ
250
5K
MID FREQ
250
5K
MID FREQ
5K
MID FREQ
0
–2
–4
–7
–10
–15
–15
–15
–20
–20
GROUP 1
GROUP 2
GROUP 3
250
5K
MID FREQ
+2
–7
–10
–20
250
+4
–7
–10
GROUP 4
L STEREO 1 R
L ST2/MONITOR R
METER SELECT
–15
MID
+15
–15
+15
–15
MID
+15
–15
+15
–15
MID
+15
–15
+15
–15
MID
+15
–15
+15
–15
MID
+15
–15
+15
–15
MID
+15
–15
+15
–15
MID
+15
–15
+15
–15
MID
+15
–15
+15
–15
MID
+15
–15
+15
–15
MID
+15
–15
+15
–15
MID
+15
–15
+15
–15
MID
+15
–15
+15
–15
MID
+15
–15
+15
–15
MID
+15
–15
+15
–15
MID
+15
–15
+15
–15
MID
+15
–15
+15
–15
MID
+15
–15
+15
–15
MID
+15
–15
+15
–15
MID
+15
–15
+15
–15
MID
+15
–15
+15
–15
MID
+15
–15
+15
–15
MID
+15
–15
+15
–15
MID
+15
–15
+15
–15
MID
+15
POWER
L
ODD
–15
LOW
EQ
LOW
EQ
LOW
EQ
LOW
EQ
LOW
EQ
LOW
EQ
LOW
EQ
LOW
EQ
LOW
EQ
LOW
EQ
LOW
EQ
LOW
EQ
LOW
EQ
LOW
EQ
LOW
EQ
LOW
EQ
LOW
EQ
LOW
EQ
LOW
EQ
LOW
EQ
LOW
EQ
LOW
EQ
LOW
EQ
LOW
+15
R
EVEN
L
ODD
BAL/PAN
0
LEVEL
10
ON
0
0
0
AUX 1
AUX 2
AUX 3
10 P
R
E
0
10
0
10
0
10
0
AUX 1
AUX 2
AUX 3
10 P
R
E
0
10
0
10
0
10
0
AUX 1
AUX 2
AUX 3
10 P
R
E
0
10
0
10
0
10
0
AUX 1
AUX 2
AUX 3
10 P
R
E
0
10
0
10
0
10
0
AUX 1
AUX 2
AUX 3
10 P
R
E
0
10
0
10
0
10
0
AUX 1
AUX 2
AUX 3
10 P
R
E
0
10
0
10
0
10
0
AUX 1
AUX 2
AUX 3
10 P
R
E
0
10
0
10
0
10
0
AUX 1
AUX 2
AUX 3
10 P
R
E
0
10
0
10
0
10
0
AUX 1
AUX 2
AUX 3
10 P
R
E
0
10
0
10
0
10
0
AUX 1
AUX 2
AUX 3
10 P
R
E
0
10
0
10
0
10
0
AUX 1
AUX 2
AUX 3
10 P
R
E
0
10
0
10
0
10
0
AUX 1
AUX 2
AUX 3
10 P
R
E
0
10
0
10
0
10
0
AUX 1
AUX 2
AUX 3
10 P
R
E
0
10
0
10
0
10
0
AUX 1
AUX 2
AUX 3
10 P
R
E
0
10
0
10
0
10
0
AUX 1
AUX 2
AUX 3
10 P
R
E
0
10
0
10
0
10
0
AUX 1
AUX 2
AUX 3
10 P
R
E
0
10
0
10
0
10
0
AUX 1
AUX 2
AUX 3
10 P
R
E
0
10
0
10
0
10
0
AUX 1
AUX 2
AUX 3
10 P
R
E
0
10
0
10
0
10
0
AUX 1
AUX 2
AUX 3
10 P
R
E
0
10
0
10
0
10
0
AUX 1
AUX 2
AUX 3
10 P
R
E
0
10
0
10
0
10
0
AUX 1
AUX 2
AUX 3
10 P
R
E
0
10
0
10
0
10
0
AUX 1
AUX 2
AUX 3
10 P
R
E
0
10
0
10
0
10
0
AUX 1
AUX 2
AUX 3
R
EVEN
BAL/PAN
0
PHANTOM
EQ
10 P
R
E
0
10
0
10
0
10
0
AUX 1
AUX 2
AUX 3
10 P
R
E
PFL
+4
-10
PEAK
+4
-10
PEAK
S
T
4
SIGNAL
10
–15
10
–15
HIGH
10
10
10
10
10
10
5
5
5
5
5
0
0
0
0
0
5
5
5
5
5
ON
PFL
S
T
3
10
LEVEL
TALKBACK IN
SIGNAL
+15
–15
+15
–15
HIGH
10
10
10
10
10
15
15
15
15
15
20
20
20
20
20
30
30
30
30
30
40
∞
40
∞
+15
40
40
∞
GRP 1–4
40
∞
∞
AUX 1–4
ST
0
AUX 4
PRE
AUX 4
PRE
P
O
S
T
0
AUX 5
10
AUX 4
PRE
P
O
S
T
0
AUX 5
10
AUX 4
PRE
P
O
S
T
0
AUX 5
10
AUX 4
PRE
P
O
S
T
0
AUX 5
10
AUX 4
PRE
P
O
S
T
0
AUX 5
10
AUX 4
PRE
P
O
S
T
0
AUX 5
10
AUX 4
PRE
P
O
S
T
0
AUX 5
10
AUX 4
PRE
P
O
S
T
0
AUX 5
10
AUX 4
PRE
P
O
S
T
0
AUX 5
10
AUX 4
PRE
P
O
S
T
0
AUX 5
10
AUX 4
PRE
P
O
S
T
0
AUX 5
10
AUX 4
PRE
P
O
S
T
0
AUX 5
10
AUX 4
PRE
P
O
S
T
0
AUX 5
10
AUX 4
PRE
P
O
S
T
0
AUX 5
10
AUX 4
PRE
P
O
S
T
0
AUX 5
10
AUX 4
PRE
P
O
S
T
0
AUX 5
10
AUX 4
PRE
P
O
S
T
0
AUX 5
10
AUX 4
PRE
P
O
S
T
0
AUX 5
10
AUX 4
PRE
P
O
S
T
0
AUX 5
10
AUX 4
PRE
P
O
S
T
0
AUX 5
10
AUX 4
PRE
P
O
S
T
0
AUX 5
10
AUX 4
PRE
P
O
S
T
0
AUX 5
10
AUX 4
PRE
P
O
S
T
0
AUX 5
10
AUX 5
1–2
1–2
1–2
1–2
1–2
1–2
1–2
1–2
1–2
1–2
1–2
1–2
1–2
1–2
1–2
1–2
1–2
1–2
1–2
1–2
1–2
1–2
1–2
1–2
3–4
3–4
3–4
3–4
3–4
3–4
3–4
3–4
3–4
3–4
3–4
3–4
3–4
3–4
3–4
3–4
3–4
3–4
3–4
3–4
3–4
3–4
3–4
3–4
ST
ST
ST
ST
ST
ST
ST
ST
ST
ST
ST
ST
ST
ST
ST
ST
ST
ST
ST
ST
ST
ST
ST
ST
LOW
+15
PEAK
PEAK
PEAK
PEAK
PEAK
0
0
0
0
0
–20
–20
–20
–20
–20
AUX 3
AUX 4
AUX 4
1–2
1–2
ON
ON
ON
ON
ON
3–4
AFL
AFL
AFL
AFL
AFL
P
O
S
T
0
LOW
AUX 3
0
LEVEL
10
TB
10
3–4
ST
AUX SEND 1 AUX SEND 2 AUX SEND 3 AUX SEND 4 AUX SEND 5
ST
0
10
REC OUT
PFL
L
ODD
R
EVEN
BAL/PAN
L
ODD
R
EVEN
TO ST
TO ST
TO ST
TO ST
2TR IN
0
10
TAPE IN
BAL/PAN
0
10
PHONES
MONI
L
ODD
PAN
R
EVEN
L
ODD
PAN
R
EVEN
L
ODD
PAN
R
EVEN
L
ODD
PAN
R
EVEN
L
ODD
PAN
R
EVEN
L
ODD
PAN
R
EVEN
L
ODD
PAN
R
EVEN
L
ODD
PAN
R
EVEN
L
ODD
PAN
R
EVEN
L
ODD
PAN
R
EVEN
L
ODD
PAN
R
EVEN
L
ODD
PAN
R
EVEN
L
ODD
PAN
R
EVEN
L
ODD
PAN
R
EVEN
L
ODD
PAN
R
EVEN
L
ODD
PAN
R
EVEN
L
ODD
PAN
R
EVEN
L
ODD
PAN
R
EVEN
L
ODD
PAN
R
EVEN
L
ODD
PAN
R
EVEN
L
ODD
PAN
R
EVEN
L
ODD
PAN
R
EVEN
L
ODD
PAN
R
EVEN
L
ODD
PAN
R
EVEN
ST2
0
LEVEL
10
0
LEVEL
10
L
PAN
R
L
PAN
R
L
PAN
R
L
PAN
R
ON
ON
ON
ON
ON
ON
ON
ON
ON
ON
ON
ON
ON
ON
ON
ON
ON
ON
ON
ON
ON
ON
ON
ON
ON
ON
ON
ON
ON
ON
ON
PFL
PFL
PFL
PFL
PFL
PFL
PFL
PFL
PFL
PFL
PFL
PFL
PFL
PFL
PFL
PFL
PFL
PFL
PFL
PFL
PFL
PFL
PFL
PFL
PFL
PFL
AFL
AFL
AFL
AFL
L+R
1
ON
10
10
10
10
10
10
10
10
10
10
10
10
10
10
10
10
10
10
10
10
10
10
10
10
10
10
10
10
10
10
10
5
5
5
5
5
5
5
5
5
5
5
5
5
5
5
5
5
5
5
5
5
5
5
5
5
5
5
5
5
5
5
0
0
0
0
0
0
0
0
0
0
0
0
0
0
0
0
0
0
0
0
0
0
0
0
0
0
0
0
0
0
0
5
5
5
5
5
5
5
5
5
5
5
5
5
5
5
5
5
5
5
5
5
5
5
5
5
5
5
5
5
5
5
10
10
10
10
10
10
10
10
10
10
10
10
10
10
10
10
10
10
10
10
10
10
10
10
10
10
10
10
10
10
10
15
15
15
15
15
15
15
15
15
15
15
15
15
15
15
15
15
15
15
15
15
15
15
15
15
15
15
15
15
15
15
20
20
20
20
20
20
20
20
20
20
20
20
20
20
20
20
20
20
20
20
20
20
20
20
20
20
20
20
20
20
20
25
25
25
25
25
25
25
25
25
25
25
25
25
25
25
25
25
25
25
25
25
25
25
25
25
25
25
25
25
25
25
30
40
30
40
30
40
30
40
30
40
30
40
30
40
30
40
30
40
30
40
30
40
30
40
30
40
30
40
30
40
30
40
30
40
30
40
30
40
30
40
30
40
30
40
30
40
30
40
30
40
30
40
30
40
30
40
30
40
30
40
∞
∞
∞
∞
∞
∞
∞
∞
∞
∞
∞
∞
∞
∞
∞
∞
∞
∞
∞
∞
∞
∞
∞
∞
∞
∞
∞
∞
∞
∞
2
3
4
5
6
7
8
9
10
11
12
13
14
15
16
17
18
19
20
21
22
23
24
ST IN 1/3
ST IN 2/4
GROUP 1
GROUP 2
GROUP 3
GROUP 4
ST2/MONITOR
30
40
∞
L — ST 1 — R
IMPORTANT NOTICE FOR
THE UNITED KINGDOM
Connecting the Plug and Cord
IMPORTANT: The wires in this mains lead are coloured in accordance
with the following code:
BLUE
: NEUTRAL
BROWN : LIVE
As the colours of the wires in the mains lead of this apparatus may not
correspond with the coloured markings identifying the terminals in your
plug proceed as follows:
The wire which is coloured BLUE must be connected to the terminal
which is marked with the letter N or coloured BLACK.
The wire which is coloured BROWN must be connected to the terminal
which is marked with the letter L or coloured RED.
Making sure that neither core is connected to the earth terminal of the
three pin plug.
* This applies only to products distributed by YAMAHA - KEMBLE
MUSIC (U.K.) LTD.
5-2 BS2 01 2/5
Contents
i
Contents
1
Introduction . . . . . . . . . . . . . . . . . . . 1
Features of the MX400 . . . . . . . . . . . . . . . . . . . . . . . . . . . . 1
2
Front and rear panels . . . . . . . . . . . . 2
Input modules . . . . . . . . . . . . . . . . . . . . . . . . . . . . . . . . . . . 2
Stereo module . . . . . . . . . . . . . . . . . . . . . . . . . . . . . . . . . . . 5
AUX SEND module . . . . . . . . . . . . . . . . . . . . . . . . . . . . . . 7
GROUP module . . . . . . . . . . . . . . . . . . . . . . . . . . . . . . . . . 7
ST2/MONITOR module . . . . . . . . . . . . . . . . . . . . . . . . . . . 8
Master module (L-ST1-R) . . . . . . . . . . . . . . . . . . . . . . . . . 9
Meters . . . . . . . . . . . . . . . . . . . . . . . . . . . . . . . . . . . . . . . . . 10
3
Rear panel . . . . . . . . . . . . . . . . . . . . 11
4
Appendix . . . . . . . . . . . . . . . . . . . . . 14
General specifications . . . . . . . . . . . . . . . . . . . . . . . . . . . .
Input Specifications . . . . . . . . . . . . . . . . . . . . . . . . . . . . . .
Output Specifications . . . . . . . . . . . . . . . . . . . . . . . . . . . .
Dimensions . . . . . . . . . . . . . . . . . . . . . . . . . . . . . . . . . . . .
14
15
16
16
IMPORTANT NOTICE FOR
THE UNITED KINGDOM
Connecting the Plug and Cord
IMPORTANT: The wires in this mains lead are coloured in accordance
with the following code:
BLUE
: NEUTRAL
BROWN : LIVE
As the colours of the wires in the mains lead of this apparatus may not
correspond with the coloured markings identifying the terminals in your
plug proceed as follows:
The wire which is coloured BLUE must be connected to the terminal
which is marked with the letter N or coloured BLACK.
The wire which is coloured BROWN must be connected to the terminal
which is marked with the letter L or coloured RED.
Making sure that neither core is connected to the earth terminal of the
three pin plug.
* This applies only to products distributed by YAMAHA - KEMBLE
MUSIC (U.K.) LTD.
5-2 BS2 01 2/5
MX400 User’s Guide
ii
Precautions
Precautions
1. Location
Keep the unit away from locations where it is likely to be exposed to high temperatures or humidity — such as near radiators, stoves, etc. Also avoid locations
which are subject to excessive dust accumulation or vibration which could
cause mechanical damage and locations subject to strong electromagnetic
fields, such as close to broadcast equipment.
2. Ventilation
The unit has ventilation slots on the bottom panel. Do not block these vents.
3. Avoid Physical Shocks
Strong physical shocks to the unit can cause damage. Handle it with care.
4. Do Not Open the Case or Attempt Repairs or Modifications Yourself
This product contains no user-serviceable parts. Refer all maintenance to qualified Yamaha service personnel. Opening the case and/or tampering with the
internal circuitry voids the warranty.
5. Always power off before making connections
Always turn the power OFF before connecting or disconnecting cables. This is
important to prevent damage to the unit itself as well as other connected equipment.
6. Handle Cables Carefully
Always plug and unplug cables — including the AC power cord — by gripping
the connector, not the cord.
7. Clean With a Soft Dry Cloth
Never use solvents such as benzine or thinner to clean the unit. Wipe clean with
a soft, dry cloth.
8. Always Use the Correct Power Supply
Make sure that the power supply voltage specified on the rear panel matches
your local AC mains supply. Also make sure that the AC mains supply can
deliver more than enough current to handle all equipment used in your system.
MX400 User’s Guide
Introduction
1
Introduction
Thank you for purchasing the Yamaha MX400. The MX400 series is designed
for easy operation and versatility in a wide range of applications, including PA
and installed systems. The MX400 series includes three models; 8 channel, 12
channel, 16 channel, and 24 channel mixers.
In order to take full advantage of the MX400’s functionality, please read this
manual carefully.
Features of the MX400
Each of the mono input channels provides the following functions.
• XLR/phone input jacks
• 20dB pad switch / continuously variable gain control
• 3 band EQ (with variable mid-range frequency) / EQ on/off switch / high
pass filter switch
• TRS insert jack / direct output
• A total of 5 AUX SEND systems (pre × 2, post/pre × 2 (switchable), post
× 1)
• ODD/EVEN group and stereo assign switch / pan control
• Channel ON switch
• PFL switch
• Level meter for accurate level control
In addition to the mono input channels, 4 sets of stereo input channels are provided, with the following functions.
• Four stereo inputs with 2 band EQ
• GROUP/AUX/STEREO assign switches
• Balance/pan control
• TRS 1/4” phone jack and RCA input jack select switch (only for stereo
input 1/2)
The master section provides the following features.
• Five fader-style AUX SEND controls
• Independent 3 point level meter for each AUX SEND control
• TO ST switch and pan control for each GROUP
• GROUP ON switch, AFL switch, and 100 mm fader for each GROUP
• The MONI/ST2 switch allows the ST2/MONI OUT output signal to be
switched in the following two ways;
1) One of the signals from an external source input to the stereo bus, the
PFL bus, or the 2TR IN.
2) The same signal as the ST1 OUT output signal.
• ON switch, L+R switch, and fader are provided for the ST2/MONI OUT
output signal.
In addition, the following functions are provided.
• XLR mic inputs
• Talkback level control
• Assign switch
The TAPE IN jacks and REC OUT jacks have level controls, for convenience
when you need additional margin for monitoring or recording. The level
meters with peak indicators allow accurate monitoring.
MX400 User’s Guide
2
Front and rear panels
Front and rear panels
A
B
1
Input modules
20dB
2
1 A/B switch
3
–16
GAIN
–60
PEAK
4
SIGNAL
5
80
–15
HIGH
5K
MID FREQ
6
MID
–15
LOW
2 20dB pad switch
This is a 20dB input pad (attenuator) that affects INPUT A and INPUT B.
If the level of the input signal is too high for adjustments to be made using
the GAIN control alone, use the pad to attenuate the signal to an appropriate
level. The pad is on when this switch is pressed in.
3 GAIN control
+15
250
–15
This switch selects the signal source of the input module.
Select INPUT A (XLR type) or INPUT B (1/4” phone type).
+15
+15
This controls the gain of the preamp for INPUT A and INPUT B. Gain is
variable to a maximum of 44dB.
The GAIN control is always used in conjunction with the SIGNAL indicator
and the PEAK indicator. Adjust the GAIN control so that the SIGNAL indicator is always lit when an input signal is present, and the PEAK indicator
lights occasionally. If the PEAK indicator lights frequently, lower the GAIN
control to prevent the signal from distorting.The following table shows
usual settings for the GAIN control.
Signal source
GAIN control position
20dB pad switch
EQ
Dynamic mic (low level)
–60 ~ –50
off
–16 GAIN –60
Condenser mic (high level)
0
0
0
0
10 P
AUX 1
R
E
AUX 2
AUX 3
AUX 4
Audio device, electronic musical instrument (low level)
–20
Audio device, electronic musical instrument (high level)
+4
off
–16 GAIN –60
on
–16 GAIN –60
4 SIGNAL indicator and PEAK indicator
10
8
10
P
O
S
T
AUX 5
off
–16 GAIN –60
10
PRE
0
7
–35
10
MX400 User’s Guide
When the post EQ signal level (nominal level 0dB) reaches –10dB, the SIGNAL indicator will light. This indicator indicates that a signal is being input.
When the post EQ signal level reaches 3dB before clipping level, the PEAK
indicator will light. This indicator indicates that the signal has approached
clipping level. Set the signal level based on the status of the PEAK indicator.
For the procedure, see the explanation for 3 GAIN control.
Input modules
3
5 80 high pass filter switch
This switch cuts the input signal below 80 Hz at 12dB/octave. The filter is
turned on when the switch is pressed in.
By using the high pass filter, you can reduce or eliminate wind noise, mic
pop noise, and power supply hum etc.
6 EQ controls (HIGH, MID FREQ, MID, LOW)
This is a 3-band equalizer with center frequencies, range, and type as shown
below.
HIGH:
12 kHz
+/–15dB shelving type
MID:
250 Hz ~ 5 kHz (variable) +/–15dB peaking type
LOW:
80 Hz
+/–15dB shelving type
The frequency response is flat when the knob is in the center position.
20
5k
MID FREQ
250
Signal Level (dB)
10
0
–10
–20
20
50
100
200
500
1k
2k
5k
10k
20k
50k
Frequency (Hz)
EQ switch
This switch turns the EQ on/off. When the switch is pressed in the EQ is on.
In addition to bypassing the EQ when it is not being used, this switch provides a convenient way to compare the equalized and unequalized signals.
7 AUX 1 / AUX 2 controls
These adjust the signal level that is sent to each output AUX SEND 1 and
AUX SEND 2. These signals are pre-fader (i.e., they are taken from before
the fader adjustment). Nominal level is at 3 o’clock position.
8 AUX 3 / AUX 4 / AUX 5 controls
These adjust the signal level that is sent to each output AUX SEND 3, AUX
SEND 4 and AUX SEND 5.
The signals controlled by AUX 3 and AUX 4 will depend on the setting of
the PRE switch.
• When the PRE switch is not pressed
They control the post-fader signal.
• When the PRE switch is pressed
They control the pre-fader signal.
AUX 5 controls the post-fader signal.
Nominal level is at 3 o’clock position.
MX400 User’s Guide
4
Front and rear panels
9 Assign switches (1-2, 3-4, ST)
1–2
9
3–4
ST
These switches assign the signal of the input module to the group outputs
and the ST output. The PAN control located below adjusts the stereo position of the signal between the odd (ODD) group and left (L) outputs and
the even (EVEN) group and right (R) outputs.
0 PAN control
0
L
ODD
PAN
R
EVEN
ON
A
PFL
B
This knob adjusts the stereo position of the signal between the stereo L and
R, and between the odd/even groups. For example if this knob is turned all
the way to the left, the signal will be sent only to the L and odd (ODD) groups
whose assign switches are pressed. If it is turned all the way to the right, the
signal will be sent only to the R and even (EVEN) groups. If the knob is set
to the center position, the same amount of signal will be sent to the stereo
L and R, and the odd/even groups.
A ON switch
This switch turns the input module on/off. When the switch is pressed in
the input module is on. Be sure to turn off input modules that are not in
use. Even when a module is off, the SIGNAL and PEAK indicators will light
if a signal is being input. You can also use the PFL switch to monitor the signal even if a module is off.
10
5
0
5
10
15
20
25
30
40
∞
MX400 User’s Guide
C
B PFL switch
PFL is an acronym for Pre-Fader Listen. This switch allows you to monitor
the signal of the input module regardless of the fader position, the settings
of the ON switch, the group assign switches, or the AUX settings. As the
name suggests, the signal is taken pre-fader (post EQ). You may listen to an
individual module, or to two or more modules simultaneously. The PFL
indicator located at the top of the STEREO module will light when a PFL
switch is on.
C Fader
This adjusts the signal level that is sent to the various outputs. Faders are
used individually or in conjunction with the faders of the other input modules to create the desired mix balance. A position at the zero (0) marking is
the nominal level. Raising the fader above 0 provides up to 10dB of gain.
Stereo module
5
Stereo module
1 A/B switch
1
A
B
S
T
1
+4
-10
PEAK
2
3
SIGNAL
–15
HIGH
+15
4
This switch selects the signal source for the stereo module.
Select either ST INPUT A (unbalanced 1/4” phone type) or ST INPUT B
(RCA pin) input. This switch is not provided for [ST3] or [ST4].
2 Sensitivity select (+4/–10) switch
This switch selects the gain appropriate for the input signal level. The sensitivity is –10dB when the switch is pressed in, and +4dB when the switch
is not pressed in.
3 SIGNAL and PEAK indicators
–15
LOW
+15
AUX 1
5
AUX 2
When the post EQ signal level (nominal level 0dB) reaches –20dB, the SIGNAL indicator will light. This indicator indicates that a signal is being input.
When the post EQ signal level reaches 3dB before clipping level, the PEAK
indicator will light. This indicator indicates that the signal has approached
clipping level. Set the signal level based on the status of the PEAK indicator.
1–2
6
3–4
ST
7
L
ODD
R
EVEN
BAL/PAN
8
0
S
T
3
LEVEL
10
ON
9
PFL
0
+4
-10
PEAK
SIGNAL
AUX 3
AUX 4
2
3
5
4 EQ controls (HIGH, LOW)
This is a 2-band equalizer with center frequencies, range, and type as shown
below.
HIGH:
12 kHz
+/–15dB shelving type
LOW:
80 Hz
+/–15dB shelving type
The frequency response is flat when the knob is in the center position.
5 AUX 1 / AUX 2 / AUX 3 / AUX 4 switches
These switches send the mono signal to the AUX buses. They are on when
pressed in.
[ST1] and [ST2] select the AUX 1 and AUX 2 buses.
[ST3] and [ST4] select the AUX 3 and AUX 4 buses.
6 Assign switches (1-2, 3-4, ST)
These switches assign the signal of the stereo module to the group outputs
and the ST output. The PAN control located below adjusts the stereo position of the signal between the odd (ODD) group and left (L) outputs and
the even (EVEN) group and right (R) outputs.
7 BAL/PAN control
The BAL/PAN knob adjusts the balance or the L/R position of the stereo
module signal. For example if this knob is turned all the way to the left, the
signal will be sent only to the L and odd (ODD) groups whose assign
switches are pressed. If it is turned all the way to the right, the signal will be
sent only to the R and even (EVEN) groups. If the knob is set to the center
position, the same amount of signal will be sent to the stereo L and R, and
the odd/even groups.
8 LEVEL control
This adjusts the output level of the stereo module.
MX400 User’s Guide
6
Front and rear panels
9 ON switch
This switch turns the stereo module on/off. When the switch is pressed the
stereo module is on. Be sure to turn off input modules that are not in use.
Even when a module is off, the SIGNAL and PEAK indicators will light if a
signal is being input. You can also use the PFL switch to monitor the signal
even if a module is off.
0 PFL switch
PFL is an acronym for Pre-Fader Listen. This switch allows you to monitor
the signal of the stereo module regardless of the fader position, the settings
of the ON switch, the group assign switches, or the AUX settings. As the
name suggests, the signal is taken pre-fader (post EQ). You may listen to an
individual module, or to two or more modules simultaneously.
MX400 User’s Guide
AUX SEND module
7
AUX SEND module
1 AUX SEND fader
10
5
0
5
1
This adjusts the signal level of the AUX SEND output. A position at the zero
(0) marking is the nominal level. Raising the fader above 0 provides up to
10dB of gain.
2 PEAK indicator
10
This indicator lights when the level of the input signal reaches 3dB before
clipping.
15
20
30
40
∞
3 Signal (0/–20) indicator
The 0dB indicator (yellow) lights when the output signal level reaches +4dB.
The –20dB indicator (green) lights when the output signal reaches –16dB.
2
PEAK
0
3
–20
ON
4
AFL
5
4 ON switch
This switch turns the AUX SEND on/off. When the switch is pressed in it is
turned on. When off, no signal will be output from the corresponding AUX
SEND jack.
5 AFL (After Fader Listen) switch
This monitors the AUX SEND signal. This is on when the switch is pressed
in.
1
TO ST
2
L
PAN
GROUP module
1 TO ST switch
This sends the GROUP signal to the stereo bus.
R
ON
3
AFL
4
2 PAN control
This adjusts the panning of the signal sent to the stereo bus.
3 ON switch
This switch turns the GROUP on/off. The group is on when the switch is
pressed in. When off, no signal will be output from the corresponding
GROUP OUT jack.
10
4 AFL (After Fader Listen) switch
This monitors the GROUP signal. This is on when the switch is pressed in.
5
0
5 Group fader
5
This fader adjusts the signal level of the GROUP output.
5
10
15
20
25
30
40
∞
MX400 User’s Guide
8
Front and rear panels
ST2/MONITOR module
1 PFL indicator
1
PFL
2
2TR IN
MONI
3
ST2
ON
4
L+R
5
This indicator (yellow) will light when the PFL switch of one or more modules is turned on.
2 2TR IN switch
This switch selects the 2TR IN input signal. This signal will be sent to the
headphone jack and to the ST2/MONI OUT jack. When this switch is on,
the 2TR IN input signal will be sent regardless of each module’s PFL and
AFL switch settings.
3 MONI/ST2 switch
This switch selects the signal that is output to the ST2/MONI OUT jack.
When the switch is in the “ST2” position, the signal will be the same as the
signal that is sent to the ST1 OUT jack. When the switch is in the “MONI”
position, the signal will be taken from the PFL bus, AFL bus, or the 2TR IN
jack.
10
4 ON switch
5
0
5
10
15
20
25
30
40
∞
MX400 User’s Guide
6
This switch turns the ST2/MONITOR module on/off. When the switch is
pressed in the module is on. When the module is off, no signal will be output
from the ST2/MONI OUT jack.
5 L+R switch
This switch causes a mono mixed signal to be output from the ST2/MONI
OUT jack.
6 ST2/MONITOR fader
This fader controls the signal level of the ST2/MONITOR output.
Master module (L-ST1-R)
9
Master module (L-ST1-R)
1
2
POWER
PHANTOM
1 POWER indicator
This indicator lights when the power switch is turned on.
2 PHANTOM indicator
This indicator lights when the PHANTOM switch is turned on, indicating
that phantom power is being supplied.
3
This is an unbalanced XLR type jack for connecting a talkback mic. The
nominal input level is –50dB.
TALKBACK IN
4 Assign switches (GRP 1-4, AUX 1-4, ST)
GRP 1–4
4
AUX 1–4
5
LEVEL
These switches select the output destination (mix bus) of the talkback mic.
5 LEVEL control
ST
0
3 TALKBACK IN jack
10
6
TB
This adjusts the signal level of the talkback mic.
6 TB switch
This switch controls the talkback signal. When it is pressed, the talkback signal will be sent to the output destination selected by the assign switch located
above.
7 Headphone jack / PHONES control
0
10
REC OUT
8
0
10
TAPE IN
7
0
10
PHONES
This is a 1/4” stereo phone jack for connecting a set of stereo headphones.
Headphones connected here can be used to monitor PFL, AFL, and the 2TR
IN signals.
8 REC OUT / TAPE IN controls
9
The REC OUT control adjusts the output signal level of the REC OUT jack.
The TAPE IN control adjusts the input signal level of the TAPE IN jack.
ON
9 ON switch
This switch turns the ST1 OUT output on/off. When it is pressed in, the signal from the ST1 OUT jack will be output.
10
0 L-ST1-R faders
10
These faders control the level of the ST OUT output. A position at the zero
(0) marking is the nominal output level.
5
5
0
0
5
5
10
10
15
15
20
20
25
25
30
40
30
40
∞
∞
0
L — ST 1 — R
MX400 User’s Guide
10
Front and rear panels
Meters
GROUP 1
PEAK
PEAK
PEAK
+6
+6
+6
+4
+4
+4
+2
+2
+2
0
0
0
–2
–2
–2
–4
–4
–4
–7
–7
–7
–10
–10
–10
–15
–15
–15
–20
–20
GROUP 2
GROUP 3
–20
GROUP 4
L STEREO 1 R
L ST2/MONITOR R
1
METER SELECT
The MX400 provides six LED meters, and three types of output level can be
viewed on the meters. 1) GROUP 1/2, 2) GROUP 3/4 or ST2/MONITOR L/R,
3) STEREO L/R.
The “0” position indicates the nominal output level.
The “PEAK” position indicates that the output level is 3dB before clipping.
1 METER SELECT switch
This switch selects whether GROUP 3/4 or ST2/MONITOR L/R will be
monitored.
When the switch is not pressed in ( ), the central meter group will indicate
the GROUP 3/4 signal level.
When the switch is pressed in ( ), the central meter group will indicate
the ST2/MONITOR L/R signal level.
MX400 User’s Guide
Rear panel
11
Rear panel
INPUT A
8
7
6
5
4
3
2
1
1
INPUT B
8
7
6
5
INPUT
8
7
6
4
INSERT I/O
5
4
DIRECT OUT
8
7
6
5
3
2
1
2
3
2
1
3
3
2
1
4
0dB
0dB
4
INSERT
OUT IN
1 INPUT A jacks
These are unbalanced XLR3-31 type jacks which input the signal for each
input module. Use the A/B switch to select these jacks.
• Nominal input level: –60dB
Phantom power (+48 V) can be supplied to these jacks. Phantom power is
turned on/off using the PHANTOM switch.
When the PHANTOM switch is on, make sure that those devices which do
not require phantom power are connected to the INPUT B jacks (2).
2 INPUT B jacks
These are 1/4” phone jacks which input the signal for each input module.
Use the A/B switch to select these jacks. These are balanced TRS jacks, with
tip=hot, ring=cold, and sleeve=ground.
• Nominal input level: –60dB
3 INPUT INSERT I/O jacks (0dB)
These are 1/4” phone jacks patched in front of the input module faders.
These are unbalanced TRS jacks, with tip=out, ring=in, and sleeve=ground.
• Nominal input level: 0dB
• Nominal output level: 0dB
4 DIRECT OUT jacks (0dB)
These are unbalanced 1/4” phone jacks which output the post-fader signal
independently from each input module.
• Nominal output level: 0dB
MX400 User’s Guide
12
Rear panel
E
AUX SEND +4dB
4
3
5
5
2
GROUP SUB IN +4dB
2
1
1
ST INPUT 2
C
D
4
GROUP INSERT I/O 0dB
3
2
4
GROUP OUT +4dB
3
2
1
4
ST INSERT
I/O
R
2TR IN
1
R
G
–10dBV
ON
OFF
POWER
+4dB
ST INPUT 4
REC OUT
TAPE IN
L
L
B
A
R
ST INPUT 3
L/
MONO
L/
MONO
R
R
B
–10dBV
R
R
ON OFF
R
R
L
L
–10dBV
9-E FNTM 01 3/5
0
L
B
R
ST1 OUT +4dB
L
L
L
R
Phantom Power Warning
To prevent hazard or damage, connect
only microphones and cables that
conform to the IEC268-15A standard.
A
R
ST SUB IN
0dB
R
ST2/MONI OUT +4dB
I
L/
MONO
A
3
L
F
H
ST INPUT 1
L/
MONO
PHANTOM+48V
J
6
8
9
7
5 GROUP SUB IN jacks (+4dB)
These are unbalanced 1/4” phone jacks which input signals from sub-mixers
or other devices.
• Nominal input level: +4dB
6 2TR IN jacks (–10dBV)
These are RCA pin jacks used to input a stereo sound source.
• Nominal input level: –10dBV
7 ST SUB IN jacks (+4dB)
These are 1/4” unbalanced phone jacks which input a stereo signal from a
sub-mixer or other source.
• Nominal input level: +4dB
8 REC OUT jacks (–10dBV)
These are RCA pin jacks which output a stereo signal to a DAT or cassette
recorder. These jacks are positioned before the stereo master fader.
• Nominal output level: –10dBV
9 TAPE IN jacks (–10dBV)
These are RCA pin jacks which input a stereo source such as a DAT, stereo
cassette deck, or CD player.
• Nominal input level: –10dBV
0 ST INPUT 1/2 A jacks
These are unbalanced 1/4” phone jacks which input a stereo source. These
jacks are selected by the A/B switch.
• Nominal input level: +4dB or –10dB
A ST INPUT 1/2 B jacks
These are RCA pin jacks which input a stereo source. These jacks are selected
by the A/B switch.
• Nominal input level: +4dB or –10dB
MX400 User’s Guide
Rear panel
13
B ST INPUT 3/4 jacks
These are unbalanced 1/4” phone jacks which input a stereo source.
• Nominal input level: +4dB or –10dB
C AUX SEND jacks (+4dB)
These are unbalanced 1/4” phone jacks which output the signals of the AUX
SEND buses.
• Nominal output level: +4dB
D GROUP INSERT I/O jacks (0dB)
Ground
Out
In
These are 1/4” phone jacks patched in front of the GROUP faders. These
TRS jacks are unbalanced.
• Nominal output level: 0dB
• Nominal input level: 0dB
Tip=out, Ring=in, Sleeve=ground
E ST INSERT I/O jacks (0dB)
These are 1/4” phone jacks patched in front of the L-ST1-R fader of the master module. These TRS jacks are unbalanced, with Tip=out, Ring=in, and
Sleeve=ground.
• Nominal output level: 0dB
• Nominal input level: 0dB
F GROUP OUT jacks (+4dB)
These are unbalanced 1/4” jacks which output the signals of the GROUP
buses.
• Nominal output level: +4dB
G ST2/MONI OUT jacks (+4dB)
These are unbalanced 1/4” jacks which output the signal of the STEREO L,R
bus or the signal of the MONITOR bus.
• Nominal output level: +4dB
H ST1 OUT jacks (+4dB)
These are balanced XLR3-32 type jacks which output the signal of the stereo
L,R bus.
• Nominal output level: +4dB
I POWER switch
This switch turns the power on/off. When in the “ON” position, the POWER
indicator will light.
J PHANTOM power switch
This switch turns the internal phantom power supply on/off. When in the
“ON” position, the PHANTOM indicator will light, and 48 DC power will
be provided between pin 2 and pin 3 of the INPUT A jacks.
If you do not need phantom power, be sure to turn this to the “OFF” position.
MX400 User’s Guide
14
Appendix
Appendix
General specifications.
Frequency response
Total harmonic distortion
Crosstalk (@1 kHz)
Hum & Noise (Average, Rs=150 Ω)
(Measured with BPF 20 Hz~20 kHz)
Maximum voltage gain
Input module EQ
ST input module EQ
Input module HPF
Input module GAIN control
Meters (0 LED = +4dB* output level)
Input module, stereo input module indicators
AUX SEND indicators
MX400 User’s Guide
20 Hz~20 kHz +1, –2dB (ST L/R, GROUP @ 600 Ω AUX SEND @ 600 Ω)
Less than 0.1% (20 Hz~20 kHz @ 14dB*) (ST L/R, GROUP @ 600 Ω AUX SEND
@ 600 Ω)
–70dB (between adjacent channels)
–70dB (between outputs)
–128dB* equivalent input noise (CH 1~24)
–96dB* residual noise (STEREO 1,2, GROUP 1~4, AUX SEND 1~5)
–87dB* (STEREO 1,2, GROUP 1~4) Measured with master faders at nominal
level and all assign switches off
–64dB* (SN ratio = 68dB) (STEREO 1,2, GROUP 1~4) Measured with master
fader and input module 1 at nominal level position
–78dB* (AUX SEND 1~5) Measured with AUX SEND master faders at nominal
level and AUX controls of all modules at minimum position
–64dB* (SN ratio = 68dB) (AUX SEND 1~5) Measured with AUX SEND faders
and the AUX control of one module at nominal level position
–82dB* (STEREO 2/MONITOR) Measured with the ST2/MONITOR master fader and PFL and AFL switched off for all modules. Measured with MONI/ST2
switch in the MONI position.
–64dB* (SN ratio = 68dB) (STEREO 2/MONITOR) Measured with the
ST2/MONITOR master fader and the PFL switch on for one module, and the
MONI/ST2 switch in the MONI position
84dB INPUT A/B → STEREO OUT 1,2
84dB INPUT A/B → GROUP OUT 1~4
80dB INPUT A/B → AUX SEND 1,2
90dB INPUT A/B → AUX SEND 3~5
28dB TAPE IN → STEREO OUT 1,2
30dB ST INPUT 1~4 → STEREO OUT 1,2, GROUP OUT 1~4
30dB ST INPUT 1~4 → AUX SEND 1~4
10dB GROUP SUB IN → GROUP OUT
10dB ST SUB IN → STEREO OUT
22dB 2TR IN → STEREO 2/MONITOR
70dB TALKBACK → STEREO OUT
Maximum variation +/–15dB
HIGH 12 kHz shelving type
MID
250 Hz~5 kHz peaking
LOW 80 Hz shelving type
* Turnover/roll-off frequency for shelving: 3dB before maximum variation
Maximum variation +/–15dB
HIGH 12 kHz shelving
LOW 80 Hz shelving
* Turnover/roll-off frequency: 3dB before maximum variation
80 Hz 12dB/oct
44dB variable –60dB~ –16dB
6 × 11 segment LED (–20, –15, –10, –7, –4, –2, 0, +2, +4, +6, PEAK), GROUP
1,2, GROUP 3,4 or ST2/MONITOR L,R, ST1 L,R
PEAK
Lights red when post EQ signal reaches 3dB before clipping
SIGNAL Lights green when post EQ signal reaches 10dB before nominal level
PEAK
Lights red when output signal reaches 3dB before clipping
0
Lights yellow when output signal reaches +4dB
–20
Lights green when output signal reaches –16dB
Input Specifications
US&Canada model
General model
Power requirements
Weight
Power Consumption
Dimensions (W × H × D)
15
120V AC, 60Hz
230V AC, 50Hz
MX400-8 17kg, MX400-12 19kg, MX400-16 22kg, MX400-24 28kg
80W
MX400-8 562×180.2×596mm
MX400-12 682×180.2×596mm
MX400-16 802×180.2×596mm
MX400-24 1042×180.2×596mm
* 0dB=0.775V R.M.S
Input Specifications
Input Connection
PAD
GAIN Actual Load
Switch Control Impedance
—
INPUT A/B
For Use with
Nominal
–60
4k Ω
50–600 Ω mics
&
600 Ω lines
Input level
Sensitivity *1
Nominal
Max. Before
Clip
–80dB
(77.5µV)
–60dB
(775µV)
–40dB
(7.75mV)
–36dB
(12.3mV)
–16dB
(123mV)
+4dB
(1.23V)
—
–16
–20
–16
–16dB
(123mV)
+4dB
(1.23V)
+24dB
(12.3V)
+4
—
–12dB
(195mV)
+4dB
(1.23V)
+24dB
(12.3V)
5k Ω
STEREO INPUT 1, 2
600 Ω lines
–10
—
–26dB
(38.8mV)
–10dB
(245mV)
+10dB
(2.45V)
+4
—
–12dB
(195mV)
+4dB
(1.23V)
+24dB
(12.3V)
–10
—
–26dB
(38.8mV)
–10dB
(245mV)
+10dB
(2.45V)
Mixer
Connector
XLR-3-31 type
(A),
Phone jack (B)
*2
Phone jack *4
RCA
(switchable)
5k Ω
600 Ω lines
INPUT INSERT IN
10k Ω
600 Ω lines
–20dB
(77.5mV)
0dB
(775mV)
+20dB
(7.75V)
Phone jack
(TRS) *3
STEREO INSERT IN
10k Ω
600 Ω lines
–20dB
(77.5mV)
0dB
(775mV)
+20dB
(7.75V)
Phone jack
(TRS) *3
GROUP INSERT IN
10k Ω
600 Ω lines
–20dB
(77.5mV)
0dB
(775mV)
+20dB
(7.75V)
Phone jack
(TRS) *3
TAPE IN
10k Ω
600 Ω lines
–26dBV
(50mV)
–10dBV
(316mV)
—
RCA
STEREO SUB IN
10k Ω
600 Ω lines
–6dB
(388mV)
+4dB
(1.23V)
+24dB
(12.3V)
Phone jack *4
GROUP SUB IN
10k Ω
600 Ω lines
–6dB
(388mV)
+4dB
(1.23V)
+24dB
(12.3V)
Phone jack *4
2TR IN
10k Ω
600 Ω lines
–20dBV
(100mV)
–10dBV
(316mV)
+10dBV
(3.16V)
RCA
TALKBACK
10k Ω
50~600 Ω mics
–66dB
(388µV)
–50dB
(2.45mV)
–30dB
(24.5mV)
XLR-3-31 type
*5
STEREO INPUT 3, 4
Phone jack *4
*1. Sensitivity is the lowest input level that will produce an output of +4dB (1.23V) or the nominal output level when MX400 is set to
maximum gain (i.e. all level controls and faders set to maximum).
*2. XLR-type connectors and phone jacks (TRS) are balanced (Tip=HOT, Ring=COLD, Sleeve=shield).
*3. Insert phone jacks (TRS) are unbalanced (Tip=out, Ring=in, Sleeve=GND).
*4. Phone jacks are unbalanced.
*5. The talkback jack is unbalanced.
*6. In these specifications, when dB represents a specific voltage, 0dB is referenced to 775mV RMS,and when dBV represents a specific
voltage, 0dBV is referenced to 1V RMS.
MX400 User’s Guide
16
Appendix
Output Specifications
Output Level
Actual Source
Impedance
For Use with
Nominal
ST1 OUT L/R
150 Ω
600 Ω lines
+4dB (1.23V)
+24dB (12.3V)
XLR-3-32 type *1
STEREO INSERT OUT L/R
600 Ω
10k Ω lines
0dB (775mV)
+20dB (7.75V)
Phone jack (TRS)*2
ST2/MONI OUT L/R
75 Ω
600 Ω lines
+4dB (1.23V)
+20dB (7.75V)
Phone jack *3
REC OUT L/R
600 Ω
10k Ω lines
–10dBV (316mV)
+16dBV (6.31V)
RCA
GROUP 1~4
75 Ω
600 Ω lines
+4dB (1.23V)
+20dB (7.75V)
Phone jack *3
AUX SEND 1~5
75 Ω
600 Ω lines
+4dB (1.23V)
+20dB (7.75V)
Phone jack *3
Output Connection
Nominal
Max. Before Clip
Mixer Connector
INPUT INSERT OUT
600 Ω
10k Ω lines
0dB (775mV)
+20dB (7.75V)
Phone jack (TRS) *2
GROUP INSERT OUT
600 Ω
10k Ω lines
0dB (775mV)
+20dBV (7.75V)
Phone jack (TRS) *2
DIRECT OUT
600 Ω
10k Ω lines
0dB (775mV)
+20dB (7.75V)
Phone jack *3
PHONES OUT
100 Ω
40 Ω phones
3mW (346mV)
100mW (2.0V)
Stereo phone jack
*1. XLR-type connectors and Phone jacks are balanced (Tip=HOT, Ring=COLD, Sleeve=GND).
*2. Insert phone jacks (TRS) are unbalanced (Tip=out, Ring=in, Sleeve=GND).
*3. Phone jacks are unbalanced.
*4. In these specifications, when dB represents a specific voltage, 0dB is referenced to 775mV RMS, for TAPE SEND dBV represents a specific
voltage, 0dBV is referenced to 1V RMS.
• All specifications subject to change without notice.
Dimensions
Wl
H: 180.2
155.5
434.5
129.5
Wi
W
MX400 User’s Guide
108.9
D: 596
31.9
13.3
Model
WI
Wi
W
MX400-8
465
527
562
MX400-12
585
647
682
MX400-16
705
767
802
MX400-24
945
1007
1042
Français
CONSOLES DE MIXAGE
MANUEL D’UTILISATION
i
Table des matières
1 Introduction . . . . . . . . . . . . . . . 1
3 Panneau arrière . . . . . . . . . . 11
Caractéristiques du MX400 . . . . . . . . . . . . . . . . 1
2 Panneaux avant et arrière . . . . 2
Modules d’entrée . . . . . . . . . . . . . . . . . . . . . . . . . 2
Module stéréo . . . . . . . . . . . . . . . . . . . . . . . . . . . 5
Module AUX SEND . . . . . . . . . . . . . . . . . . . . . . 7
Module GROUP . . . . . . . . . . . . . . . . . . . . . . . . . 7
Module ST2/MONITOR . . . . . . . . . . . . . . . . . . 8
Module Master (L-ST1-R) . . . . . . . . . . . . . . . . . 9
Indicateurs . . . . . . . . . . . . . . . . . . . . . . . . . . . . . 10
4 Appendice . . . . . . . . . . . . . . . 14
Spécifications générales.. . . . . . . . . . . . . . . . . . .
Spécifications d’entrée . . . . . . . . . . . . . . . . . . .
Spécifications de sortie . . . . . . . . . . . . . . . . . . .
Dimensions . . . . . . . . . . . . . . . . . . . . . . . . . . . .
14
15
16
16
Précautions
1. Emplacement
Evitez les emplacements soumis à de fortes températures (proximité de radiateur, poêles, etc.) ou une importante
humidité. Evitez également les endroits soumis à des vibrations qui pourraient entraîner un endommagement
mécanique ou les lieux particulièrement poussiéreux ainsi que les endroits sujets à d’importants champs magnétiques tels que la proximité du matériel de réception/transmission.
2. Aération
L’appareil est pourvu de fentes d’aération sur le panneau inférieur. Ne bouchez jamais ces orifices.
3. Evitez les chocs violents.
Des chocs violents peuvent endommager l’appareil. Maniez-le avec prudence.
4. N’ouvrez pas le boîtier et n’essayez pas de réparer ou modifier l’appareil vous-même.
Ce produit ne contient aucune pièce que vous pourriez réparer/remplacer. Veuillez consulter un service
après-vente Yamaha qualifié. L’ouverture du boîtier et/ou toute tentative de toucher aux circuits internes annule
la garantie.
5. Coupez toujours l’alimentation avant de procéder à des connexions.
Coupez toujours l’alimentation avant de brancher ou de débrancher des câbles. C’est particulièrement important pour éviter d’endommager l’appareil et le matériel qui y est branché.
6. Manipulez les câbles avec soin
Branchez et débranchez toujours les câbles (y compris le cordon d’alimentation) en prenant la fiche en main,
pas le câble.
7. Nettoyez avec un chiffon doux et sec
N’utilisez jamais de diluants tels que du benzène ou de la térébenthine pour nettoyer l’appareil. Nettoyez-le avec
un chiffon doux et sec.
8. Utilisez toujours une alimentation adéquate
Assurez-vous que la tension spécifiée sur le panneau arrière correspond à celle de votre secteur. Veillez également
à ce que les prises secteur puissent alimenter tout votre matériel.
MX400 Manuel d’utilisation
Introduction
1
Introduction
Nous vous remercions d’avoir porté votre choix sur le MX400 de Yamaha. Le
MX400 est conçu pour vous faciliter la vie et surtout pour pouvoir s’insérer dans
une vaste gamme de systèmes, y compris des systèmes d’amplification de salle
mobiles et fixes. La série MX400 comprend trois modèles: un mélangeur à 8
canaux, à 12 canaux, à 16 canaux et à 24 canaux.
Afin de pouvoir profiter pleinement des possibilités du MX400, veuillez lire attentivement ce manuel.
Caractéristiques du MX400
Chaque canal à entrée mono vous offre les fonctions suivantes:
• Prises XLR/jack
• Commutateur d’atténuation 20dB / commande de gain variable en continu
• Egalisation 3 bandes (avec bande moyenne variable) / commutateur EQ
On/Off /commutateur de filtre passe-haut
• Borne d’insertion TRS/ sortie directe
• Un total de 5 systèmes AUX SEND (pre × 2, post/pre × 2 (commutatble), post
× 1)
• Groupes ODD/EVEN et commutateur d’assignation stéréo/ commande Pan.
• Commutateur Channel ON
• Commutateur PFL
• Indicateur de niveau de grande précision
Outre les canaux d’entrée mono, vous disposez de 4 jeux de canaux d’entrée stéréo
dotés des fonction suivantes:
• Quatre entrées stéréo avec égalisation à deux bandes
• Commutateur d’assignation GROUP/AUX/ST
• Commande de balance/pan
• Commutateur de sélection, prise d’entrée TRS 1/4” et prise RCA (uniquement pour entrée stéréo 1/2)
La section master offre les caractéristiques suivantes:
• Cinq commandes AUX SEND de type curseur
• Indicateur indépendant à trois points pour chaque commande AUX SEND
• Commutateur TO ST et commande Pan pour chaque GROUP.
• Commutateur GROUP ON, commutateur AFL et curseur 100mm pour
chaque GROUP
• L e commutateur MONI/ST2 permet de commuter le signal de sortie
ST2/MONI OUT de deux façons:
1) Un des signaux d’une source externe entre par le bus stéréo, le bus PFL ou
le bus 2TR IN.
2) Le même signal comme signal de sortie STI1 OUT.
• Un commutateur ON, L+R , et un curseur contrôlent le signal de sortie
ST2/MONI OUT.
Vous trouverez en outre les fonctions suivantes:
• Entrées XLR pour micro
• Commande de niveau Talkback
• Commutateur d’assignation
Les prises TAPE IN et REC OUT ont respectivement des commandes de niveau,
pratique lorsque vous avez besoin d’une marge supplémentaire pour l’écoute ou
l’enregistrement. Les indicateurs de niveau vous offrent un contrôle précis.
MX400 Manuel d’utilisation
2
Panneaux avant et arrière
Panneaux avant et arrière
A
B
1
Modules d’entrée
20dB
2
1 Commutateur A/B
3
–16
GAIN
–60
PEAK
4
SIGNAL
5
80
–15
HIGH
+15
5K
MID FREQ
6
MID
–15
LOW
2 Commutateur d’atténuation 20dB
Il s’agit d’un atténuateur d’entrée de 20dB qui affecte INPUT A et INPUT B.
Si le niveau du signal d’entrée est trop haut pour effectuer des réglages au
moyen de la commande GAIN uniquement, utilisez le commutateur d’atténuation pour ramener le signal à un niveau adéquat. L’atténuation est activée lorsque le commutateur est enfoncé.
3 Commande GAIN
250
–15
Ce commutateur sélectionne la source de signal du module d’entrée.
Sélectionne INPUT A (type XLR) ou INPUT B (type jack 1/4).
+15
+15
Cette commande contrôle le gain du préampli pour INPUT A et INPUT B.
Le gain est variable jusqu’à un maximum de 44dB.
La commande GAIN s’utilise toujours en conjonction avec le témoin
SIGNAL et le témoin PEAK. Réglez la commande GAIN de sorte à ce que
le témoin SIGNAL soit toujours allumé lorsqu’un signal est présent à
l’entrée et que le témoin PEAK s’allume sporadiquement. Si ce dernier
témoin s’allume souvent, diminuez le GAIN pour éviter toute distorsion du
signal. Le tableau suivant vous données les réglages habituels pour la commande GAIN.
EQ
Source de signal
0
0
0
0
AUX 1
AUX 2
AUX 3
AUX 4
10 P
R
E
10
8
10
P
O
S
T
AUX 5
Micro dynamique (bas niveau)
–60 ~ –50
Commutateur
d’atténuation 20dB
désactivé
–16 GAIN –60
Micro à condensateur (haut niveau)
–35
Appareil audio, instrument de musique électronique (bas niveau)
–20
Appareil audio, instrument de musique électronique (haut niveau)
+4
désactivé
–16 GAIN –60
désactivé
–16 GAIN –60
10
PRE
0
7
Position de la
commande GAIN
10
MX400 Manuel d’utilisation
activé
–16 GAIN –60
4 Témoin SIGNAL et témoin PEAK
Lorsque le niveau du signal après égalisation (niveau nominal 0dB) atteint
–10dB, le témoin SIGNAL s’allume. Ce témoin indique qu’un signal entre.
Lorsque le niveau du signal après égalisation atteint 3dB avant le niveau de
saturation, le témoin PEAK s’allume pour indiquer que le signal s’approche
du niveau de saturation. Réglez donc le niveau du signal en fonction du statut du témoin PEAK. Pour la procédure, voyez l’explication donnée pour la
commande GAIN en 3.
Modules d’entrée
3
5 Commutateur de filtre passe-haut 80
Ce commutateur coupe le signal d’entrée inférieur à 80 Hz à 12dB/octave.
Le filtre est activé lorsque le commutateur est enfoncé.
Le filtre passe-haut vous permet de réduire ou d’éliminer les bruits de souffle, de micro, de secteur, etc.
6 Commandes d’égalisation (HIGH, MID FREQ, MID, LOW)
Il s’agit d’un égaliseur 3 bandes dont les fréquences centrales, la bande et le
type sont décrits ci-dessous.
HIGH:
12 kHz
+/–15dB plateau
MID:
250 Hz ~ 5 kHz (variable) +/–15dB cloche
LOW:
80 Hz
+/–15dB plateau
La réponse en fréquence est plate lorsque le bouton est en position centrale.
20
Volume du signal (dB)
5k
MID FREQ
250
10
0
–10
–20
20
50
100
200
500
1k
2k
5k
10k
20k
50k
Fréquency (Hz)
Commutateur EQ
Ce commutateur active et désactive l’égalisation. Lorsque ce commutateur
est enfoncé, l’égalisation est activée. Ce commutateur vous permet non seulement de contourner l’égaliseur lorsqu’il n’est pas utilisé mais en plus, il
vous permet de comparer facilement les signaux égalisés et non égalisés.
7 Commandes AUX 1 / AUX 2
Ces commandes règlent le niveau du signal envoyé à chaque sortie AUX
SEND 1 et AUX SEND 2. Ces signaux sont pris avant-curseur (ce qui signifie
qu’ils sont pris avant de subir les réglages du curseur). Le niveau nominal
est obtenu avec une position “3 heures”.
8 Commandes AUX 3 / AUX 4 / AUX 5
Règlent le niveau du signal envoyé aux sorties AUX SEND 3, AUX SEND 4
et AUX SEND 5.
Les signaux contrôlés par AUX 3 et AUX 4 dépendent du réglage du commutateur PRE.
• Lorsque le commutateur PRE n’est pas enfoncé
Elles contrôlent le signal après (post) curseur.
• Lorsque le commutateur PRE est enfoncé
Elles contrôlent le signal avant (pre) curseur
AUX 5contrôle le signal après-curseur.
Le niveau nominal est obtenu avec une position “3 heures”
MX400 Manuel d’utilisation
4
Panneaux avant et arrière
9 Commutateurs d’assignation (1-2, 3-4, ST)
1–2
9
3–4
ST
Ces commutateurs assignent le signal du module d’entrée aux sorties
GROUP et à la sortie ST. La commande PAN, située juste en-dessous, permet
de régler la position stéréo (voire le volume) entre le groupe impair (ODD)
ou le canal gauche (L) et le groupe pair (EVEN) ou le canal droit (R).
0 Commande PAN
0
L
ODD
PAN
R
EVEN
ON
A
PFL
B
A Interrupteur ON
10
5
0
5
10
15
20
25
30
40
∞
Ce potentiomètre règle la position stéréo du signal entre le canal gauche et
droit du bus stéréo ainsi que le volume du signal entre le groupe pair et
impair. Si ce potentiomètre se trouve à bout de course vers la gauche, le
signal ne sera envoyé qu’au canal gauche et au groupe impair (ODD). Il s’agit
du groupe dont le commutateur d’assignation est enfoncé. Si ce potentiomètre se trouve à bout de course vers la droite, le signal ne sera envoyé qu’au
canal droit et au groupe pair (EVEN) de l a paire choisie. Si cette commande
se trouve au milieu, le niveau du signal du canal gauche et droit voire du
groupe pair et impair est identique.
C
Cet interrupteur active et désactive un module d’entrée. Lorsque l’interrupteur est enfoncé, le module est activé (On). Veillez à couper les modules dont
vous n’avez pas besoin. Même lorsque le module est coupé, les témoins
SIGNAL et PEAK s’allumeront si un signal entre. Vous pouvez également
vous servir du commutateur PFL pour écouter le signal (fonction solo).
B Commutateur PFL
PFL représente Pre-Fader Listen ou écoute avant curseur. Ce commutateur
vous permet d’écouter le signal entré dans le module indépendamment de
la position du curseur ou des réglages AUX. Comme le nom l’indique, le
signal est pris avant le curseur (mais après l’égalisation). Vous pouvez écouter un module individuel ou deux modules, ou davantage, simultanément.
Le témoin PFL est situé au-dessus du module STEREO et s’allume lorsqu’un
commutateur PFL est enfoncé.
C Curseur
Il permet de régler le niveau du signal envoyé aux diverses sorties. Les curseurs peuvent être utilisés individuellement ou en conjonction avec les curseurs des autres modules d’entrée pour créer une balance pour le mélange.
La marque “0” représente le niveau nominal. Si vous relevez le curseur
au-delà de cette marque, vous augmentez le niveau jusqu’à concurrence de
10dB.
MX400 Manuel d’utilisation
Module stéréo
5
Module stéréo
1 Commutateur A/B
1
A
B
S
T
1
+4
-10
PEAK
2
3
SIGNAL
Ce commutateur vous permet d e sélectionner la source pour le module stéréo.
Choisissez soit ST INPUT A (prise jack 1/4” asymétrique) ou ST INPUT B
(prise RCA). Ce commutateur n’est pas disponible pour [ST3] ou [ST4].
2 Sélecteur de sensibilité (+4/–10)
–15
–15
HIGH
LOW
+15
4
3 Témoins SIGNAL et PEAK
+15
AUX 1
5
AUX 2
1–2
6
3–4
7
R
EVEN
BAL/PAN
8
0
S
T
3
LEVEL
10
ON
9
PFL
0
+4
-10
PEAK
SIGNAL
AUX 3
AUX 4
Lorsque le niveau du signal après égaliseur (niveau nominal 0dB) atteint
–20dB, le témoin SIGNAL s’allume. Ce témoin indique qu’un signal entre.
Lorsque le niveau du signal atteint 3dB avant le niveau de saturation, le
témoin PEAK s’allume pour indiquer que le signal s’approche du niveau de
saturation. Réglez donc le niveau du signal en fonction des indications données par le témoin PEAK.
4 Commandes d’égalisation EQ (HIGH, LOW)
ST
L
ODD
Ce sélecteur permet de choisir le gain approprié pour le niveau du signal
d’entrée. La sensibilité est de –10dB lorsque le sélecteur est enfoncé et de
+4dB lorsque ce n’est pas le cas.
2
3
Il s’agit d’un égaliseur 2 bandes dont les fréquences centrales, la bande et le
type sont décrits ci-dessous.
HIGH:
12 kHz
+/–15dB plateau
LOW:
80 Hz
+/–15dB plateau
La réponse en fréquence est plate lorsque le bouton est en position centrale
5 Commutateurs AUX 1 / AUX 2 / AUX 3 / AUX 4
Ces commutateurs envoient le signal mono aux bus AUX. Ils sont activés
lorsque vous les enfoncez.
[ST1] et [ST2] sélectionnent les bus AUX 1 et AUX 2.
[ST3] et [ST4] sélectionnent les bus AUX 3 et AUX 4.
6 Commutateurs d’assignation (1-2, 3-4, ST)
5
Ces commutateurs assignent le signal du module d’entrée aux sorties
GROUP et à la sortie ST. La commande PAN, située juste en-dessous, permet
de régler la position stéréo (voire le volume) entre le groupe impair (ODD)
ou le canal gauche (L) et le groupe pair (EVEN) ou le canal droit (R).
7 Commandes BAL/PAN
Le potentiomètre BAL/PAN règle la balance ou la position stéréo du signal
entre le canal gauche et droit du bus stéréo ainsi que le volume du signal
entre le groupe pair et impair. Si ce potentiomètre se trouve à bout de course
vers la gauche, le signal ne sera envoyé qu’au canal gauche et au groupe
impair (ODD). Il s’agit du groupe dont le commutateur d’assignation est
enfoncé. Si ce potentiomètre se trouve à bout de course vers la droite, le
signal ne sera envoyé qu’au canal droit et au groupe pair (EVEN) de l a paire
choisie. Si cette commande se trouve au milieu, le niveau du signal du canal
gauche et droit voire du groupe pair et impair est identique.
MX400 Manuel d’utilisation
6
Panneaux avant et arrière
8 Commande LEVEL
Cette commande règle le niveau de sortie d’un module stéréo.
9 Interrupteur ON
Cet interrupteur active et désactive un module d’entrée. Lorsque l'interrupteur est enfoncé, le module est activé (On). Veillez à couper les modules dont
vous n’avez pas besoin. Même lorsque le module est coupé, les témoins
SIGNAL et PEAK s’allumeront si un signal entre. Vous pouvez également
vous servir du commutateur PFL pour écouter le signal (fonction solo).
0 Commutateur PFL
PFL représente Pre-Fader Listen ou écoute avant curseur. Ce commutateur
vous permet d’écouter le signal entré dans le module indépendamment de
la position du curseur ou des réglages AUX. Comme le nom l’indique, le
signal est pris avant le curseur (mais après l’égalisation). Cette fonction solo
vous permet d’écouter un ou plusieurs canaux simultanément.
MX400 Manuel d’utilisation
Module AUX SEND
7
Module AUX SEND
1 Curseur AUX SEND
10
5
0
5
1
2 Témoin PEAK
10
Ce témoin s’allume lorsque le niveau du signal d’entrée atteint 3dB sous le
niveau de saturation.
15
20
30
40
∞
3 Témoin Signal (0/–20)
2
PEAK
0
Il permet de régler le niveau du signal envoyé aux sorties AUX SEND. La
marque “0” représente le niveau nominal. Si vous relevez le curseur au-delà
de cette marque, vous augmentez le niveau jusqu’à concurrence de 10dB.
3
–20
ON
4
AFL
5
Le témoin 0dB (jaune) s’allume lorsque le niveau du signal de sortie atteint
+4dB. Le témoin –20dB (vert) lorsque le niveau du signal de sortie
atteint–16dB.
4 Interrupteur ON
Cet interrupteur active et désactive le bus AUX SEND. Lorsque l’interrupteur est enfoncé, le bus est activé (On). Lorsque le bus est désactivé, aucun
signal ne sera envoyé via le jack AUX SEND correspondant.
5 Commutateur AFL (After Fader Listen)
Active la fonction solo du signal AUX SEND signal. La fonction est activée
lorsque le commutateur est enfoncé.
TO ST
L
PAN
1
Module GROUP
2
1 Commutateur TO ST
R
Envoie le signal GROUP au bus stéréo.
ON
3
AFL
4
2 Commande PAN
Elle vous permet de déterminer la position stéréo du signal du bus stéréo.
3 Interrupteur ON
Cet interrupteur active et désactive le GROUP. Le groupe est activé lorsque
l’interrupteur est enfoncé. S’il ne l’est pas, aucun signal ne sortira du jack
GROUP OUT correspondant.
10
4 Commutateur AFL (After Fader Listen)
5
0
5
Ce commutateur active la fonction solo de ce signal GROUP. Elle est activée
lorsque le commutateur est enfoncé.
5 Curseur Group
5
Ce curseur règle le niveau du signal de la sortie GROUP.
10
15
20
25
30
40
∞
MX400 Manuel d’utilisation
8
Panneaux avant et arrière
Module ST2/MONITOR
1 Témoin PFL
1
PFL
2
2TR IN
MONI
3
ST2
ON
4
L+R
5
Ce témoin (jaune)s’allumera lorsque le commutateur PFL d'un ou de plusieurs modules est allumé.
2 Commutateur 2TR IN
Avec ce commutateur vous pouvez choisir le signal de l’entrée 2TR IN. Ce
signal sera envoyé à la borne casque et à la borne ST2/MONI OUT. Lorsque
ce commutateur est activé, le signal d’entrée 2TR IN sera envoyé, quels que
soient les réglages des commutateurs PFL et AFL.
3 Commutateur MONI/ST2
Ce commutateur sélectionne le signal qui est envoyé à la borne ST2/MONI
OUT. Lorsque le commutateur est en position “ST2”, le signal sera le même
que le signal envoyé à la borne ST1 OUT. Lorsque le commutateur est en
position “MONI”, le signal du bus PFL, du bus AFL ou du bus 2TR IN sera
choisi.
10
4 Interrupteur ON
5
0
5
10
15
20
25
30
40
∞
MX400 Manuel d’utilisation
6
Cet interrupteur active et désactive le module ST2/MONITOR. Lorsque
l’interrupteur est enfoncé, le module est activé (On). Lorsque le module est
désactivé, aucun signal ne sera envoyé via la borne ST2/MONI OUT.
5 Commutateur L+R
Avec ce commutateur, vous envoyez un signal mono mixé via la borne
ST2/MONI OUT.
6 Curseur ST2/MONITOR
Ce curseur contrôle le niveau du signal de la sortie ST2/MONITOR.
Module Master (L-ST1-R)
9
Module Master (L-ST1-R)
1
2
POWER
PHANTOM
1 Témoin POWER
Ce témoin s’allume lorsque vous mettez l’appareil sous tension.
2 Témoin PHANTOM
Ce témoin s’allume lorsque le commutateur PHANTOM est activé et indique qu’il y a fourniture d’alimentation fantôme.
3
3 Borne TALKBACK IN
Il s’agit d’une borne asymétrique de type XLR permettant de brancher un
micro pour communication privée (talkback). Le niveau nominal d’entrée
est de –50dB.
TALKBACK IN
GRP 1–4
4
AUX 1–4
4 Commutateur d’assignation (GRP 1-4, AUX 1-4, ST)
Ces commutateurs sélectionnent le bus de destination du micro Talkback.
ST
5
0
LEVEL
6
0
10
REC OUT
0
10
TAPE IN
Règle le niveau d’entrée du micro Talkback.
10
TB
8
5 Commande LEVEL
7
6 Commutateur TB
Ce commutateur contrôle le signal Talkback. Lorsqu’il est enfoncé, le signal
Talkback sera envoyé au bus sélectionné avec les commutateurs d’assignation situés au-dessus.
7 Borne pour casque / Commande PHONES
Il s’agit d’une borne jack stéréo 1/4” permettant de brancher un casque stéréo. Ce casque peut alors servir pour écouter les signaux PFL, AFL et 2TR IN.
0
10
PHONES
8 Commandes REC OUT / TAPE IN
9
La commande REC OUT règle le niveau de sortie du signal de la borne REC
OUT. La commande TAPE IN règle le niveau d’entrée du signal de la borne
TAPE IN.
ON
9 Interrupteur ON
Cet interrupteur active et désactive la sortie ST1 OUT. Lorsqu’il est enfoncé,
le signal de la borne ST1 OUT sera envoyé.
10
10
5
5
0
0
5
5
10
10
15
15
20
20
25
25
30
40
30
40
∞
∞
0 Curseurs L-ST1-R
Ces curseurs contrôlent le niveau de la sortie ST OUT. Une position “0” correspond au niveau de sortie nominal.
0
L — ST 1 — R
MX400 Manuel d’utilisation
10
Panneaux avant et arrière
Indicateurs
GROUP 1
PEAK
PEAK
PEAK
+6
+6
+6
+4
+4
+4
+2
+2
+2
0
0
0
–2
–2
–2
–4
–4
–4
–7
–7
–7
–10
–10
–10
–15
–15
–15
–20
–20
GROUP 2
–20
GROUP 3
GROUP 4
L STEREO 1 R
L ST2/MONITOR R
1
METER SELECT
Le MX400 vous offre six indicateurs à diodes et trois types de niveaux de sortie
peuvent y être visualisés: 1) GROUP 1/2, 2) GROUP 3/4 ou ST2/MONITOR
L/R, 3) STEREO L/R.
La position “0” indique le niveau de sortie nominal.
La position “PEAK” indique que le niveau du signal de sortie n’est plus qu’à 3 dB
du niveau de saturation.
1 Commutateur METER SELECT
Ce commutateur vous permet de choisir le signal contrôlé par les indicateurs: GROUP 3/4 ou ST2/MONITOR L/R.
Lorsque le commutateur n’est pas enfoncé ( ), les deux indicateurs centraux affichent le niveau du signal GROUP 3/4.
Lorsque le commutateur est enfoncé ( ), les indicateurs centraux affichent
le niveau du signal ST2/MONITOR L/R.
MX400 Manuel d’utilisation
Panneau arrière
11
Panneau arrière
INPUT A
8
7
6
5
4
3
2
1
1
INPUT B
8
7
6
5
INPUT
8
7
6
4
INSERT I/O
5
4
DIRECT OUT
8
7
6
5
3
2
1
2
3
2
1
3
3
2
1
4
0dB
0dB
4
INSERT
OUT IN
1 Bornes INPUT A
Il s’agit de prises asymétriques de type XLR3-31 par où entre le signal
d’entrée de chaque module. Utilisez le commutateur A/B pour sélectionner
ces bornes.
• Niveau d'entrée nominal: –60dB
Vous pouvez disposer d’une alimentation fantôme (+48 V) à ces bornes.
Pour activer/désactiver celle-ci, utilisez le commutateur PHANTOM.
Lorsque vous activez le commutateur PHANTOM, assurez-vous que les
appareils qui n’ont pas besoin d’alimentation fantôme sont branchés aux
bornes INPUT B (2).
2 Bornes INPUT B
Il s’agit de prises jacks 1/4” par où entre le signal d’entrée de chaque module.
Utilisez le commutateur A/B pour sélectionner ces bornes. Ce sont des jacks
symétriques TRS (pointe=chaud, anneau=froid, gaine=masse).
• Niveau d'entrée nominal: –60dB
3 Bornes INPUT INSERT I/O (0dB)
Il s’agit de bornes jacks 1/4” qui se trouvent devant les curseurs des modules
d’entrée. Ce sont des jacks asymétriques TRS (pointe=chaud,
anneau=froid, gaine=masse).
• Niveau d'entrée nominal: 0dB
• Niveau de sortie nominal: 0dB
4 Bornes DIRECT OUT (0dB)
Il s’agit de bornes jacks 1/4” asymétriques qui émettent le signal après curseur de chaque module d’entrée indépendamment.
• Niveau de sortie nominal: 0dB
MX400 Manuel d’utilisation
12
Panneau arrière
E
AUX SEND +4dB
4
3
5
5
2
GROUP SUB IN +4dB
2
1
1
ST INPUT 2
C
L/
MONO
D
4
GROUP INSERT I/O 0dB
3
2
4
GROUP OUT +4dB
3
2
1
4
ST INSERT
I/O
1
R
–10dBV
0
B
A
ST1 OUT +4dB
OFF
POWER
ST INPUT 4
REC OUT
TAPE IN
L
L
R
ST INPUT 3
L/
MONO
L/
MONO
R
R
B
–10dBV
R
R
ON OFF
R
R
L
–10dBV
ON
L
B
+4dB
R
L
L
L
L
R
G
9-F FNTM 01 4/5
A
R
ST SUB IN
0dB
R
Sattention: alimentation fantôme
Pour prevénir tout danger ou dommage,
ne branchez que des microphones et
des câbles répondant à la norme
IEC268-15A.
3
R
2TR IN
ST2/MONI OUT +4dB
I
L/
MONO
A
L
F
H
ST INPUT 1
PHANTOM+48V
J
6
8
9
7
5 Bornes GROUP SUB IN (+4dB)
Il s’agit de bornes jacks asymétriques 1/4”par où entre un signal d’un autre
mélangeur ou d’une autre source.
• Niveau d'entrée nominal: +4dB
6 Bornes 2TR IN (–10dBV)
Il s’agit de prises RCA par où entre un signal d’une source sonore stéréo.
• Niveau d'entrée nominal: –10dBV
7 Bornes ST SUB IN (+4dB)
Il s’agit de bornes jacks asymétriques 1/4”par où entre un signal stéréo
venant d’un autre mélangeur ou d’une autre source.
• Niveau d'entrée nominal: +4dB
8 Bornes REC OUT (–10dBV)
Il s’agit de prises RCA par où sort un signal stéréo envoyé à un DAT ou un
enregistreur à cassette. Ces prises sont placées avant le curseur master stéréo.
• Niveau de sortie nominal: –10dBV
9 Bornes TAPE IN (–10dBV)
Il s’agit de prises RCA par où entre un signal d’une source sonore stéréo telle
qu’un DAT, un enregistreur à cassette ou un lecteur de CD.
• Niveau d'entrée nominal: –10dBV
0 Bornes ST INPUT 1/2 A
Il s’agit de bornes jacks asymétriques 1/4”par où entre un signal stéréo. Utilisez le commutateur A/B pour sélectionner ces bornes
• Niveau d'entrée nominal: +4dB ou –10dB
A Bornes ST INPUT 1/2 B
Il s’agit de prises RCA par où entre un signal d’une source sonore stéréo. Utilisez le commutateur A/B pour sélectionner ces bornes.
• Niveau d'entrée nominal: +4dB ou –10dB
MX400 Manuel d’utilisation
Panneau arrière
13
B Bornes ST INPUT 3/4 jacks
Il s’agit de bornes jacks asymétriques 1/4”par où entre un signal stéréo.
• Niveau d'entrée nominal: +4dB ou –10dB
C Bornes AUX SEND (+4dB)
Il s’agit de bornes jacks asymétriques 1/4” qui envoient les signaux des bus
AUX SEND.
• Niveau de sortie nominal: +4dB
D Bornes GROUP INSERT I/O (0dB)
Chaud
Froid
Masse
Il s’agit de bornes jacks 1/4” disposées devant les curseurs GROUP. Ces bornes jack TRS sont asymétriques.
• Niveau de sortie nominal: 0dB
• Niveau d'entrée nominal: 0dB
Pointe=chaud, anneau=froid, gaine=masse.
E Bornes ST INSERT I/O (0dB)
Il s’agit de bornes jacks 1/4” disposées devant les curseurs L-ST1-R du
module master. Ces bornes jack TRS sont asymétriques. Pointe=chaud,
anneau=froid, gaine=masse.
• Niveau de sortie nominal: 0dB
• Niveau d'entrée nominal: 0dB
F Bornes GROUP OUT (+4dB)
Il s’agit de bornes jacks asymétriques 1/4” qui envoient les signaux des bus
GROUP.
• Niveau de sortie nominal: +4dB
G Bornes ST2/MONI OUT (+4dB)
Il s’agit de bornes jacks asymétriques 1/4” qui envoient les signaux du bus
STEREO L,R ou le signal du bus MONITOR.
• Niveau de sortie nominal: +4dB
H Borne ST1 OUT (+4dB)
Il s’agit de bornes symétriques de type XLR3-32 qui envoient les signaux du
bus STEREO L,R .
• Niveau de sortie nominal: +4dB
I Interrupteur POWER
Cet interrupteur met l’appareil sous et hors tension. Lorsqu'il est en position
ON, le témoin POWER s’allume.
J Commutateur PHANTOM
Ce commutateur allume et coupe l’alimentation fantôme interne. Lorsqu’il
est en position ON, le témoin PHANTOM s’allume et une alimentation fantôme de 48V sera fournie aux broches 2 et 3 des bornes INPUT A.
Si vous n’avez pas besoin d’alimentation fantôme, n’oubliez surtout pas de
mettre ce commutateur sur OFF.
MX400 Manuel d’utilisation
14
Appendice
Appendice
Spécifications générales.
Réponse en fréquence
Distorsion harmonique totale
Séparation des canaux (@1 kHz)
Bourdonnement & bruit (Moyenne, Rs=150 Ω)
(Mesuré avec BPF 20 Hz~20 kHz)
Gain de tension maximum
Egalisation du module d’entrée
Egalisation du module d’entrée ST
HPF du module d’entrée
Commande GAIN du module d’entrée
Indicateurs (Témoin 0 = +4dB* niveau de sortie)
Témoins des modules d’entrée et stéréo
Témoins AUX SEND
MX400 Manuel d’utilisation
20 Hz~20 kHz +1, –2dB (ST L/R, GROUP @ 600 Ω AUX SEND @ 600 Ω)
Moins de 0,1% (20 Hz~20 kHz @ 14dB*) (ST L/R, GROUP @ 600 Ω AUX SEND @
600 Ω)
–70dB (entre de s canaux adjacents)
–70dB (entre sorties)
–128dB* bruit d’entrée équivalent (Can. 1~24)
–96dB* bruit résiduel (STEREO 1,2, GROUP 1~4, AUX SEND 1~5)
–87dB* (STEREO 1,2, GROUP 1~4)Mesuré avec les curseurs master au niveau nominal et tous les commutateurs d’assignation sur Off.
–64dB* (Rapport S/B= 68dB) (STEREO 1,2, GROUP 1~4) Mesuré avec les curseurs
master et module d’entrée 1 au niveau nominal
–78dB* (AUX SEND 1~5)Mesuré avec les curseurs AUX SEND master en position
nominal et les commandes AUX de tous les modules en position minimum
–64dB* (Rapport S/B = 68dB) (AUX SEND 1~5) Mesuré avec les curseurs AUX
SEND master et les commandes AUX d’un module en position de niveau nominal
–82dB* (STEREO 2/MONITOR) mesuré avec le curseur maître ST2/MONITOR et
PFL et AFL désactivés pour tous les modules. Mesuré avec le commutateur MONI/ST2 en position MONI.
–64dB* (Rapport S/B = 68dB) (STEREO 2/MONITOR) Mesuré avec le curseur master ST2/MONITOR e le commutateur PFL activé pour un module, et le commutateur MONI/ST2 en position MONI.
84dB INPUT A/B → STEREO OUT 1,2
84dB INPUT A/B → GROUP OUT 1~4
80dB INPUT A/B → AUX SEND 1,2
90dB INPUT A/B → AUX SEND 3~5
28dB TAPE IN → STEREO OUT 1,2
30dB ST INPUT 1~4 → STEREO OUT 1,2, GROUP OUT 1~4
30dB ST INPUT 1~4 → AUX SEND 1~4
10dB GROUP SUB IN → GROUP OUT
10dB ST SUB IN → STEREO OUT
22dB 2TR IN → STEREO 2/MONITOR
70dB TALKBACK → STEREO OUT
Variation maximum +/–15dB
HIGH 12 kHz plateau
MID
250 Hz~5 kHz cloche
LOW 80 Hz plateau
*Fréquence de transition pour plateau: 3dB avant la variation maximum
Variation maximum +/–15dB
HIGH 12 kHz plateau
LOW 80 Hz plateau
* Fréquence de transition: 3dB avant la variation maximum
80 Hz 12dB/oct
44dB variable –60dB~ –16dB
6 × 11 segments (–20, –15, –10, –7, –4, –2, 0, +2, +4, +6, PEAK), GROUP 1,2,
GROUP 3,4 ou ST2/MONITOR L,R, ST1 L,R
PEAK
S’allume en rouge lorsque le signal après EQ atteint 3dB avant saturation
SIGNAL S’allume en vert lorsque le signal après EQ atteint 10dB avant le niveau
nominal
PEAK
S’allume en rouge lorsque le signal de sortie atteint 3dB avant saturation
0
S’allume en jaune lorsque le signal de sortie atteint +4dB
–20
S’allume en vert lorsque le signal de sortie atteint –16dB
Spécifications d’entrée
Alimentation
Modèle US&Canada
Modèle général
Consommation
Poids
Dimensions (L × H × P)
15
120V AC, 60Hz
230 AC, 50Hz
MX400-8 17kg, MX400-12 19kg, MX400-16 22kg, MX400-24 28kg
80W
MX400-8 562×180,2×596 mm
MX400-12 682×180,2×596 mm
MX400-16 802×180,2×596 mm
MX400-24 1042×180,2×596 mm
* 0dB=0,775V R.M.S
Spécifications d’entrée
Connexion d’entrée
INPUT A/B
Comm Comma Impedance
utateur
nde
de charge
PAD
GAIN
effective
Pour niveau
nominal
Niveau d’entrée
Sensibilité *1
Nominal
Max. avant
saturation
–80dB
(77,5µV)
–60dB
(775µV)
–40dB
(7,75mV)
–36dB
(12,3mV)
–16dB
(123mV)
+4dB
(1,23V)
—
–60
—
–16
–20
–16
–16dB
(123mV)
+4dB
(1,23V)
+24dB
(12,3V)
+4
—
–12dB
(195mV)
+4dB
(1,23V)
+24dB
(12,3V)
–10dB
(245mV)
+10dB
(2,45V)
4k Ω
5k Ω
STEREO INPUT 1, 2
50–600 Ω micro
&
600 Ω Ligne
600 Ω Ligne
–10
—
–26dB
(38,8mV)
+4
—
–12dB
(195mV)
+4dB
(1,23V)
+24dB
(12,3V)
–10
—
–26dB
(38,8mV)
–10dB
(245mV)
+10dB
(2,45V)
Type de
connecteur
XLR-3-31 (A),
Jack (B) *2
jack *4 RCA
(commutable)
5k Ω
600 Ω Ligne
INPUT INSERT IN
10k Ω
600 Ω Ligne
–20dB
(77,5mV)
0dB
(775mV)
+20dB
(7,75V)
Jack (TRS) *3
STEREO INSERT IN
10k Ω
600 Ω Ligne
–20dB
(77,5mV)
0dB
(775mV)
+20dB
(7,75V)
Jack (TRS) *3
GROUP INSERT IN
10k Ω
600 Ω Ligne
–20dB
(77,5mV)
0dB
(775mV)
+20dB
(7,75V)
Jack (TRS) *3
TAPE IN
10k Ω
600 Ω Ligne
–26dBV
(50mV)
–10dBV
(316mV)
—
RCA
STEREO SUB IN
10k Ω
600 Ω Ligne
–6dB
(388mV)
+4dB
(1,23V)
+24dB
(12,3V)
Jack *4
GROUP SUB IN
10k Ω
600 Ω Ligne
–6dB
(388mV)
+4dB
(1,23V)
+24dB
(12,3V)
Jack *4
2TR IN
10k Ω
600 Ω Ligne
–20dBV
(100mV)
–10dBV
(316mV)
+10dBV
(3,16V)
RCA
TALKBACK
10k Ω
50~600 Ω micro
–66dB
(388µV)
–50dB
(2,45mV)
–30dB
(24,5mV)
XLR-3-31
type *5
STEREO INPUT 3, 4
Jack *4
*1. La sensibilité est le niveau d’entrée le plus bas avec lequel un niveau de sortie de +4dB (1,23V) est atteint. Niveau nominal lorsque tous
les curseur et commandes de niveau sont sur leur valeur maximale.
*2. Les connecteurs de type XLR et jacks (TRS) sont symétriques (Pointe=chaud, anneau=froid, gaine=masse).
*3. Les jacks d’insertion (TRS) sont symétriques (Pointe=sortie, anneau=entrée, gaine=masse).
*4. Jacks asymétriques.
*5. La borne jack Talkback est asymétrique.
*6. Dans ces spécifications lorsque dB représente une tension précise, 0dB correspond à 775 mV RMS et lorsque dBV représente une tension précise, 0dBV correspond à 1 V RMS.
MX400 Manuel d’utilisation
16
Appendice
Spécifications de sortie
Niveau de sortie
Impédance de
source
Pour un niveau
nominal
Nominal
Max. avant saturation
Type de connecteur
ST1 OUT L/R
150 Ω
600 Ω Ligne
+4dB (1,23V)
+24dB (12,3V)
XLR-3-32 *1
Connexion
STEREO INSERT OUT L/R
600 Ω
10k Ω Ligne
0dB (775mV)
+20dB (7,75V)
Jack (TRS) *2
ST2/MONI OUT L/R
75 Ω
600 Ω Ligne
+4dB (1,23V)
+20dB (7,75V)
Jack *3
REC OUT L/R
600 Ω
10k Ω Ligne
–10dBV (316mV)
+16dBV (6,31V)
RCA
GROUP 1~4
75 Ω
600 Ω Ligne
+4dB (1,23V)
+20dB (7,75V)
Jack *3
AUX SEND 1~5
75 Ω
600 Ω Ligne
+4dB (1,23V)
+20dB (7,75V)
Jack *3
INPUT INSERT OUT
600 Ω
10k Ω Ligne
0dB (775mV)
+20dB (7,75V)
Jack (TRS) *2
GROUP INSERT OUT
600 Ω
10k Ω Ligne
0dB (775mV)
+20dBV (7,75V)
Jack (TRS) *2
DIRECT OUT
600 Ω
10k Ω Ligne
0dB (775mV)
+20dB (7,75V)
Jack *3
PHONES OUT
100 Ω
40 Ω casque
3mW (346mV)
100mW (2,0V)
Jack stéréo
*1. Les connecteurs de type XLR et les bornes jacks sont symétriques (Pointe=chaud, anneau=froid, gaine=masse).
*2. Jacks d’insertion(TRS) asymétriques (Pointe=sortie, anneau=entrée, gaine=masse).
*3. Jacks asymétriques.
*4. Dans ces spécifications lorsque dB représente une tension précise, 0dB correspond à 775 volts RMS et lorsque TAPE SEND dBV représente
une tension précise, 0dBV correspond à 1 volt RMS.
• Toutes ces caractéristiques peuvent être modifiées sans préavis.
Dimensions
Ll
H: 180.2
155.5
434.5
129.5
Li
L
MX400 Manuel d’utilisation
108.9
P: 596
31.9
13.3
Modelo
LI
Li
L
MX400-8
465
527
562
MX400-12
585
647
682
MX400-16
705
767
802
MX400-24
945
1007
1042
BEDIENUNGSANLEITUNG
Deutsch
MISCHPULTE
i
Inhaltsverzeichni
1 Vorweg . . . . . . . . . . . . . . . . . . . 1
3 Rückseite . . . . . . . . . . . . . . . . 11
Das Besondere am MX400 . . . . . . . . . . . . . . . . . 1
2 Front- und Rückseite . . . . . . . . 2
Eingangsmodule . . . . . . . . . . . . . . . . . . . . . . . . . 2
Stereo-Modul . . . . . . . . . . . . . . . . . . . . . . . . . . . . 5
AUX SEND Modul . . . . . . . . . . . . . . . . . . . . . . . 7
GROUP Modul . . . . . . . . . . . . . . . . . . . . . . . . . . 7
ST2/MONITOR Modul . . . . . . . . . . . . . . . . . . . 8
Master Modul (L-ST1-R) . . . . . . . . . . . . . . . . . . 9
Meter . . . . . . . . . . . . . . . . . . . . . . . . . . . . . . . . . 10
4 Anhang . . . . . . . . . . . . . . . . . 14
Allgemeine Spezifikationen . . . . . . . . . . . . . . . .
Eingangsspezifikationen . . . . . . . . . . . . . . . . . .
Ausgangsspezifikationen . . . . . . . . . . . . . . . . . .
Abmessungen . . . . . . . . . . . . . . . . . . . . . . . . . . .
14
15
16
16
Vorsichtsmaßnahmen
1. Aufstellung
Stellen Sie das MX400 niemals in die Sonne – also niemals in die Nähe von Heizkörpern, Öfen usw. Meiden Sie
außerdem extreme Temperaturen, Feuchtigkeit, Staub, Vibrationen und schwere Stöße, die zu mechanischen
Schäden führen könnten. Weiterhin ist die Nähe zu starken elektromagnetischen Feldern zu meiden (Radios,
Fernseher).
2. Lüftung
Der Lüftungsgrill befindet sich an der Unterseite des MX400. Achten Sie darauf, daß die Luft immer gut zirkulieren kann.
3. Umsichtig behandeln
Behandeln Sie das MX400 mit der gebührenden Vorsicht. Schwere Stöße usw. sollten Sie auf jedenfall vermeiden.
4. Niemals das Gehäuse öffnen. Reparaturen und Modifikationen nicht selbst ausführen.
Das MX400 enthält keinerlei Teile, die vom Anwender selbst gewartet werden dürfen. Überlassen Sie alle Wartungsarbeiten dem anerkannten Yamaha-Kundendienst. Beim Öffnen des Gehäuses erlischt der Garantieanspruch.
5. Vor dem Anschließen ausschalten
Schalten Sie dieses Gerät aus, bevor Sie Kabel anschließen oder Anschlüsse lösen. Das ist wichtig, um Schäden
am MX400 sowie bei den anderen Geräten zu vermeiden.
6. Kabel umsichtig behandeln
Ziehen Sie beim Lösen der Kabelverbindungen sowie des Netzanschlusses immer nur am Stecker und niemals
an der Schnur, damit die Adern nicht reißen.
7. Mit einem trockenen Tuch abwischen
Wischen Sie das MX400 ausschließlich mit einem trockenen Tuch ab. Verwenden Sie niemals ätzende Reinigungsmittel, wie z.B. Waschbenzin oder Alkohol.
8. Immer die geeignete Spannung verwenden
Schließen Sie das Netzkabel ausschließlich an eine Steckdose an, die die auf dem Typenschild aufgeführte Spannung führt. Außerdem sollten Sie es nur an eine Steckdose anschließen, die genug Strom führt, um alle Geräte
Ihrer Anlage speisen zu können.
MX400 Bedienungsanleitung
Vorweg
1
Vorweg
Vielen Dank, daß Sie sich für ein MX400 von Yamaha entschieden haben. Die
MX400 Serie wurde im Hinblick auf eine schnelle und problemlose Bedienung
in einer Vielzahl von Einsatzbereichen konzipiert, darunter Beschallungs- und
fest eingebaute Anlagen. Die MX400 Serie besteht aus drei Modellen: einer 8-,
einer 12-, einer 16- und einer 24-Kanalversion.
Bitte lesen Sie sich diese Bedienungsanleitung vor dem Einsatz durch, damit Sie
auch wirklich alle Funktionen kennenlernen.
Das Besondere am MX400
Jeder Mono-Eingangskanal ist folgendermaßen bestückt:
• XLR/Klinkeneingänge
• 20dB Pad-Abschwächung/stufenlos regelbare Eingangsempfindlichkeit
• 3-Bandentzerrung (mit durchstimmbaren Mitten)/EQ An/AusTaster/Hochpaßfilterschalter
• TRS-Einschleifweg/Direktausgang
• Insgesamt fünf AUX SEND-Systeme (Pre × 2, Post/Pre × 2 (umschaltbar),
Post × 1)
• ODD/EVEN-Gruppenzuordnung und Taster für die Zuordnung zur stereosumme/Pan-Regler
• Kanal An/Aus-Taster
• PFL -Taster
• Meter für eine präzise Pegeleinstellung
Neben den Mono-Kanälen bietet das MX400 4 Stereo-Eingangspaare, die folgendermaßen bestückt sind:
• Vier Stereo-Eingänge mit 2-Bandentzerrung
• GROUP/AUX/ST-Zuordnungstaster
• Balance/Pan-Regler
• TRS 1/4” Klinken- und RCA-Eingangsbuchse mit Anwahlschalter (ausschließlich für Stereo-Eingang 1/2)
Die Master-Sektion bietet folgende Funktionen:
• Fünf als Fader ausgeführte AUX SEND-Regler
• Separater 3-Punkt Meter für jeden AUX SEND-Regler
• TO ST Taster und Pan-Regler für jede Gruppe
• GROUP ON Taster, AFL Taster und 100 mm Fader für jede Gruppe
(GROUP)
• Mit dem MONI/ST2 Taster können Sie das ST2/MONI OUT Ausgangssignal folgendermaßen zuordnen:
1) Ein Signal einer externe Signalquelle zu der Stereosumme, der PFLSumme oder der 2TR IN Buchsen.
2) Dasselbe Signal wie das der ST1 OUT Buchsen.
• ON Taster, L+R Taster und Fader für das ST2/MONI OUT Ausgangssignal.
Außerdem noch:
• XLR Mikrofoneingänge
• Einstellbarer Pegel der Kommandofunktion
• Zuordnungstaster
Die TAPE IN und REC OUT Buchsen sind mit Pegelreglern ausgestattet, was
sich besonders beim Abhören und Aufnehmen als besonders hilfreich erweist.
MX400 Bedienungsanleitung
2
Front- und Rückseite
Front- und Rückseite
A
B
1
Eingangsmodule
20dB
2
1 A/B Taster
3
–16
GAIN
–60
PEAK
4
SIGNAL
5
80
–15
HIGH
+15
5K
MID FREQ
6
MID
–15
LOW
2 20dB Abschwächungstaster
Dieser 20dB Abschwächungstaster ist sowohl INPUT A als auch INPUT B
zugeordnet.
Wenn der Pegel des Eingangssignals so hoch, daß Sie ihn mit dem GAINRegler allein nicht bändigen können, sollten Sie diesen Taster verwenden,
um den Eingangspegel zu reduzieren. Die Abschwächung ist aktiv, wenn
dieser Taster gedrückt ist.
3 GAIN Regler
250
–15
Mit diesem Taster wählen Sie die Signalquelle des Eingangsmoduls an.
Wählen Sie INPUT A (XLR Buchse) oder INPUT B (1/4” Klinkenbuchse).
+15
+15
Hiermit stellen Sie den Pegel des Vorverstärkers von INPUT A und INPUT
B ein. Die Anhebung ist in einem Bereich von 44dB einstellbar.
Der GAIN Regler sollte immer mit einem auf die SIGNAL und PEAK
Dioden gerichteten Auge eingestellt werden: Stellen Sie den GAIN Regler so
ein, daß die SIGNAL Diode leuchtet, sobald ein Signal angeboten wird. Die
PEAK Diode darf nur bei Signalspitzen leuchten. Wenn die PEAK Diode
häufiger leuchtet, müssen Sie den Eingangspegel reduzieren, um Signalverzerrung zu vermeiden. Bitte entnehmen Sie die empfohlenen GAIN Werte
der folgenden Tabelle.
EQ
Signalquelle
Dynamikmikrofon (niedriger Pegel)
0
10 P
AUX 1
R
E
GAIN Einstellung
–60 ~ –50
20dB Pad Taster
aus
–16 GAIN –60
7
Kondensatormikrofon (hoher Pegel))
–35
aus
–16 GAIN –60
0
0
0
AUX 2
AUX 3
AUX 4
10
10
8
10
P
O
S
T
AUX 5
–20
Audiogerät, elektronisches Musikinstrument (niedriger Pegel)
+4
aus
–16 GAIN –60
an
–16 GAIN –60
4 SIGNAL Diode und PEAK Diode
PRE
0
Audiogerät, elektronisches Musikinstrument (niedriger Pegel)
10
MX400 Bedienungsanleitung
Sobald der hinter dem EQ (Entzerrung) abgegriffene Signalpegel (Nennpegel 0dB) die -10dB Marke erreicht, leuchtet die SIGNAL Diode. Diese Diode
besagt, daß an dem Eingang ein Signal anliegt.
Wenn der hinter dem EQ abgegriffenen Signalpegel nur noch 3dB unter der
Verzerrungsgrenze liegt, leuchtet die PEAK Diode. Diese Diode soll Sie warnen, wann immer der Signalpegel kurz davor ist zu verzerren. Wie man den
Eingangspegel richtig einstellt, entnehmen Sie bitte Punkt 3.
Eingangsmodule
3
5 80 Hochpaßfiltertaster
Mit diesem Taster können den unter 80Hz liegenden Frequenzanteil eines
Eingangssignals mit 12dB/Oktave reduzieren. Bei gedrücktem Taster ist die
Filterfunktion aktiv.
Mit dem Hochpaßfilter können Sie Windgeräusche, Mikrofon-Plops sowie
Brummschleifen aus dem Signal entfernen.
6 EQ Regler (HIGH, MID FREQ, MID, LOW)
Diese Dreibandentzerrung ist mit durchstimmbaren Mitten versehen. Die
Filterfrequenzen sind:
HIGH:
12kHz
+/–15dB Kuhschwanz
MID:
250Hz ~ 5kHz (einstellbar) +/–15dB Glocke
LOW:
80Hz
+/–15dB Kuhschwanz
Wenn sich einer dieser Regler in der Mitte befindet, wird die betreffende Frequenz weder angehoben noch abgesenkt.
20
5k
MID FREQ
250
Signalpegel (dB)
10
0
–10
–20
20
50
100
200
500
1k
2k
5k
10k
20k
50k
Frequenz (Hz)
EQ Taster
Mit diesem Taster können Sie die Entzerrung (EQ) ein- und ausschalten. Ist
er gedrückt, so ist die Entzerrung aktiv. Neben dem Vorteil, daß Sie die Entzerrung aus der Signalkette nehmen wenn Sie sie nicht brauchen, erlaubt
Ihnen dieser Taster A/B-Vergleiche zwischen dem bearbeiteten und dem
Originalsignal vorzunehmen.
7 AUX 1 / AUX 2 Regler
Mit diesen Reglern können Sie den Pegel des an die AUX SEND 1 und AUX
SEND 2 Summe angelegten Signals einstellen. Beide Summen liegen vor
dem Kanalfader (der Kanalpegel übt also keinerlei Einfluß aus). Die 3-Uhr
Einstellung vertritt den Nennwert.
8 AUX 3 / AUX 4 / AUX 5 Regler
Mit diesen Reglern stellen Sie den Pegel des Signals ein, das an die AUX
SEND 3, AUX SEND 4 und AUX SEND 5 Summe angelegt wird. Die an AUX
3 und AUX 4 angelegten Signale richten sich nach der Einstellung des PRE
Tasters:
• PRE Taster ist nicht gedrückt:
Das Signal wird hinter dem Fader abgegriffen.
• PRE Taster ist gedrückt
Der Signalpegel wird vor dem Fader abgegriffen.
Das AUX 5 Signal wird immer hinter dem Fader abgegriffen.
Die 3-Uhr Einstellung vertritt den Nennwert.
MX400 Bedienungsanleitung
4
Front- und Rückseite
9 Zuordnungstaster (1-2, 3-4, ST)
1–2
9
3–4
ST
0
L
ODD
PAN
R
EVEN
ON
A
PFL
B
10
Mit diesen Tastern ordnen Sie das an das Eingangsmodul angelegte Signal
den GROUP- sowie dem ST-Ausgang zu. Mit dem darunter befindlichen
PAN-Regler können Sie die Stereoposition bzw. die Balance zwischen der
ungeradzahligen (ODD) Gruppe oder dem linken Kanal (L) sowie der
geradzahligen (EVEN) Gruppe oder dem rechten Kanal (R) einstellen.
0 PAN Regler
Mit diesem Regler können Sie die Stereoposition zwischen dem linken und
rechten Kanal der Stereosumme bzw. die Balance des Signals zwischen der
geradzahligen und ungeradzahligen Gruppe einstellen. Befindet sich dieser
Regler ganz links, wird das Signal dem linken Kanal und der ungeradzahligen (ODD) Gruppe zugeordnet. Um welche Gruppe es sich dabei handelt,
richtet sich danach, welcher Zuordnungstaster gedrückt ist. Drehen Sie PAN
Regler ganz nach rechts, wird das Signal dem rechten Kanal oder der geradzahligen Gruppe des angewählten Paares zugeordnet. Befindet sich der Regler in der Mitte, so ist der Signalpegel des linken und rechten bzw. der
geradzahligen und ungeradzahligen Gruppe derselbe.
A ON Taster
5
0
C
5
10
15
20
25
30
40
∞
Mit diesem Taster können Sie das Modul zu- und abschalten. Wenn der
Taster gedrückt ist, ist das betreffende Modul eingeschaltet. Module, die Sie
in einer bestimmten Situation nicht brauchen, sollten Sie auf jeden Fall ausschalten. Selbst wenn ein Modul ausgeschaltet ist, leuchten die SIGNAL und
PEAK Diode, sobald ein Signal an das Modul angelegt wird. Außerdem können Sie das Signal abhören, indem Sie den PFL Taster drücken (Solofunktion).
B PFL Taster
PFL ist die Abkürzung für Pre-Fader Listen (vor dem Fader abhören). Mit
diesem Taster können Sie das an einem Eingangsmodul anliegende Signal
jederzeit abhören, ganz gleich, wie der Fader, der ON Taster, die Gruppenund AUX-Zuordnung eingestellt sind. Wie der Name besagt, wird das Signal
vor dem Fader (aber hinter der Entzerrung) abgegriffen. Diese Solofunktion
kann für mehrere Kanäle gleichzeitig aktiviert werden. Die PFL Diode oben
auf dem STEREO Modul leuchtet, sobald ein PFL Taster gedrückt ist.
C Fader
Mit dem Fader können Sie den Pegel des an die Gruppen und/oder den Stereo-Ausgang angelegten Signals einstellen. Mit den Fadern können Sie das
Lautstärkeverhältnis der angebotenen Signale einstellen. Die “0” Marke vertritt den Nennpegel. Oberhalb dieser Marke kann der Pegel noch um 10dB
angehoben werden.
MX400 Bedienungsanleitung
Stereo-Modul
5
Stereo-Modul
1 A/B Taster
1
A
B
S
T
1
+4
-10
PEAK
2
3
SIGNAL
Mit diesem Taster wählen Sie die Signalquelle des Stereo-Moduls an.
Wählen Sie entweder den ST INPUT A (asymmetrische 1/4” Klinkenbuchse) oder ST INPUT B (RCA-Buchse) Eingang. Dieser Taster ist auf den
Modulen [ST3] und [ST4] nicht belegt.
2 Empfindlichkeitswahltaster (+4/–10)
–15
HIGH
+15
4
Mit diesem Taster wählen Sie die Signalanhebung für das angebotene Eingangssignal. Wenn der Taster gedrückt ist, beträgt der Signaleingangspegel
–10dB. Ist der Taster frei, beträgt der Signaleingangspegel +4dB.
3 SIGNAL und PEAK Diode
–15
LOW
+15
AUX 1
5
AUX 2
1–2
6
3–4
ST
7
L
ODD
R
EVEN
BAL/PAN
8
0
S
T
3
LEVEL
10
ON
9
PFL
0
+4
-10
PEAK
SIGNAL
AUX 3
AUX 4
2
3
5
Sobald der hinter dem EQ (Entzerrung) abgegriffene Signalpegel (Nennpegel 0dB) die -20dB Marke erreicht, leuchtet die SIGNAL Diode. Diese Diode
besagt, daß an dem Eingang ein Signal anliegt.
Wenn der hinter dem EQ abgegriffenen Signalpegel nur noch 3dB unter der
Verzerrunsgrenze liegt, leuchtet die PEAK Diode. Diese Diode soll Sie warnen, wann immer der Signalpegel kurz davor ist zu verzerren.
4 EQ Regler (HIGH, LOW)
Diese Zweibandentzerrung erlaubt die Anhebung und Absenkung folgender
Frequenzen:
HIGH:
12 kHz
+/–15dB Kuhschwanz
LOW:
80 Hz
+/–15dB Kuhschwanz
Wenn sich einer dieser Regler in der Mitte befindet, wird die betreffende Frequenz weder angehoben noch abgesenkt.
5 AUX 1 / AUX 2 / AUX 3 / AUX 4 Taster
Mit diesem Taster ordnen Sie das Mono-Signal der entsprechenden AUX
Summe zu. Die Zuordnung erfolgt bei gedrücktem Taster.
[ST1] und [ST2]: Anwahl der AUX 1 und AUX 2 Summe.
[ST3] und [ST4]: Anwahl der AUX 3 und AUX 4 Summe.
6 Zuordnungstaster (1-2, 3-4, ST)
Mit diesen Tastern ordnen Sie das an das Eingangsmodul angelegte Signal
den GROUP- sowie dem ST-Ausgang zu. Mit dem darunter befindlichen
PAN-Regler können Sie die Stereoposition bzw. die Balance zwischen der
ungeradzahligen (ODD) Gruppe oder dem linken Kanal (L) sowie der
geradzahligen (EVEN) Gruppe oder dem rechten Kanal (R) einstellen.
7 BAL/PAN Regler
Mit diesem Regler können Sie die Stereoposition zwischen dem linken und
rechten Kanal des Stereokanals einstellen. Befindet sich dieser Regler ganz
links, wird das Signal dem linken Kanal und der ungeradzahligen (ODD)
Gruppe zugeordnet. Um welche Gruppe es sich dabei handelt, richtet sich
danach, welcher Zuordnungstaster gedrückt ist. Drehen Sie den PAN Regler
ganz nach rechts, wird das Signal dem rechten Kanal oder der geradzahligen
Gruppe des angewählten Paares zugeordnet. Befindet sich der Regler in der
Mitte, so ist der Signalpegel des linken und rechten bzw. der geradzahligen
und ungeradzahligen Gruppe derselbe.
MX400 Bedienungsanleitung
6
Front- und Rückseite
8 LEVEL Regler
Hiermit stellen Sie den Pegel eines Stereo-Moduls ein.
9 ON Taster
Mit diesem Taster können Sie das Modul zu- und abschalten. Wenn der
Taster gedrückt ist, ist das betreffende Modul eingeschaltet. Module, die Sie
in einer bestimmten Situation nicht brauchen, sollten Sie auf jeden Fall ausschalten. Selbst wenn ein Modul ausgeschaltet ist, leuchten die SIGNAL und
PEAK Diode, sobald ein Signal an das Modul angelegt wird. Außerdem können Sie das Signal abhören, indem Sie den PFL Taster drücken (Solofunktion).
0 PFL Taster
PFL ist die Abkürzung für Pre-Fader Listen (vor dem Fader abhören). Mit
diesem Taster können Sie das an einem Eingangsmodul anliegende Signal
jederzeit abhören, ganz gleich, wie der Fader, der ON Taster, die Gruppenund AUX-Zuordnung eingestellt sind. Wie der Name besagt, wird das Signal
vor dem Fader (aber hinter der Entzerrung) abgegriffen. Diese Solofunktion
kann für mehrere Kanäle gleichzeitig aktiviert werden.
MX400 Bedienungsanleitung
AUX SEND Modul
7
AUX SEND Modul
1 AUX SEND Fader
10
5
0
5
1
Mit diesem Fader können Sie den Signalpegel des an die AUX SEND Ausgangsbuchsen angelegten Signals einstellen. Der Wert “0” vertritt den Nennwert. Oberhalb dieser Marke verfügen Sie noch über 10dB.
2 PEAK Diode
10
Diese Diode leuchtet, sobald der Signalpegel 3dB unter der Verzerrungsgrenze liegt.
15
20
30
3 Signal (0/–20) Diode
40
∞
Die 0dB Diode (gelb) leuchtet, sobald der Signalpegel +4dB beträgt. Die 20dB Diode (grün) leuchtet, wenn der Signalpegel -16dB beträgt.
2
PEAK
0
3
–20
ON
4
AFL
5
4 ON Taster
Mit diesem Taster können Sie die AUX SEND Summe zu- und abschalten.
Bei gedrücktem Taster ist die AUX SEND Summe eingeschaltet. Ist sie ausgeschaltet, so liegt an der betreffenden AUX SEND Buchse kein Signal an.
5 AFL (After Fader Listen) Taster
Dient zum Aktivieren der Solofunktion dieses AUX SEND Signals. Die Solofunktion ist aktiv, wenn dieser Taster gedrückt ist.
GROUP Modul
1
TO ST
2
L
PAN
1 TO ST Taster
Hiermit ordnen Sie das Gruppensignal der Stereosumme zu.
2 PAN Regler
R
ON
3
AFL
4
Hiermit bestimmen Sie die Stereoposition des an die Stereosumme angelegten Signals.
3 ON Taster
Mit diesem Taster können Sie die Gruppe ein- und ausschalten. Bei gedrücktem Taster ist die betreffende Gruppe aktiv. Ist dieser Taster frei, wird das
Signal nicht an den entsprechenden Gruppenausgang angelegt.
10
4 AFL (After Fader Listen) Taster
Dient zum Aktivieren der Solofunktion dieses GROUP Signals. Die Solofunktion ist aktiv, wenn dieser Taster gedrückt ist.
5
0
5
5
5 Gruppen-Fader
Mit diesem Fader stellen Sie den Pegel des an den betreffenden Gruppenausgang angelegten Signals ein.
10
15
20
25
30
40
∞
MX400 Bedienungsanleitung
8
Front- und Rückseite
ST2/MONITOR Modul
1 PFL Diode
1
PFL
2
2TR IN
MONI
3
ST2
ON
4
L+R
5
10
2 2TR IN Taster
Mit diesem Taster wählen Sie die Signalquelle des 2TR IN Eingangs an. Dieses Signal wird an die Kopfhörer- und ST2/MONI OUT Buchse angelegt.
Ist dieser Taster gedrückt, wird das 2TR IN Signal immer gesendet, also
auch, wenn ein PFL oder AFL Taster gedrückt ist.
3 MONI/ST2 Schalter
Mit diesem Schalter wählen Sie die Signalquelle, die an die ST2/MONI OUT
Buchse angelegt wird, an. Befindet sich der Schalter in der “ST2” Position,
ist das Signal mit dem an die ST1 OUT Buchse angelegten Signal identisch.
Befindet er sich in der “MONI” Position, wird das Signal der PFL Summe,
der AFL Summe oder der 2TR IN Summe gewählt.
4 ON Taster
Mit diesem Taster schalten Sie das ST2/MONITOR Modul ein und aus. Bei
gedrücktem Taster ist dieses Modul aktiv. Ist der Taster frei, wird kein Signal
an die ST2/MONI OUT Buchse angelegt.
5
0
Diese (gelbe) Diode leuchtet, wenn der PFL Taster eines oder mehrerer
Module gedrückt ist.
6
5
10
15
20
25
30
40
∞
MX400 Bedienungsanleitung
5 L+R Taster
Mit diesem Taster legen Sie ein Mono-Signal an die ST2/MONI OUT
Buchse an.
6 ST2/MONITOR Fader
Mit diesem Fader können Sie den Pegel des ST2/MONITOR Ausgangs einstellen.
Master Modul (L-ST1-R)
9
Master Modul (L-ST1-R)
1 POWER Diode
Diese Diode leuchtet, wenn Sie das MX400 einschalten.
1
22
POWER
PHANTOM
PHANTOM Diode
Diese Diode leuchtet, wenn die Phantomspeisung aktiviert ist. Das erledigen
Sie mit dem PHANTOM Schalter auf der Geräterückseite.
3 TALKBACK IN Buchse
An diese asymmetrisch XLR Buchse können Sie das Kommandomikrofon
anschließen. Der Eingagspegel beträgt –50dB.
3
4 Zuordnungstaster (GRP 1-4, AUX 1-4, ST)
TALKBACK IN
Mit diesen Tastern wählen Sie die Summe, an die das Kommandomikrofon
angeschlossen wird.
GRP 1–4
4
AUX 1–4
5 LEVEL Regler
ST
Mit diese Regler können Sie den Pegel des Kommandomikrofons einstellen.
56
0
LEVEL
10
6
TB
TB Taster
Mit diesem Taster schalten Sie das Kommandomikrofon zu und ab. Ist er
gedrückt, so wird das Signal des Mikrofons an die mit den Zuordnungstastern (siehe oben) gewählte Summe angelegt.
7 Kopfhörerbuchse / PHONES Regler
0
10
REC OUT
8
0
10
TAPE IN
9
7
0
10
PHONES
An diese 1/4” Stereo-Klinkenbuchse können Sie einen Stereo-Kopfhörer
anschließen, mit dem die PFL, AFL und 2TR IN Signale überwacht werden
können.
8 REC OUT / TAPE IN Regler
Mit dem REC OUT Regler können Sie den Pegel des an die REC OUT
Buchse angelegten Signals einstellen. Mit dem TAPE IN Regler können Sie
den Pegel des an die TAPE IN Buchse angelegten Signals einstellen.
ON
9 ON Taster
Mit diesem Taster können Sie die Ausgabe des ST1 OUT Ausgangs aktivieren
oder deaktivieren. Bei gedrücktem Taster wird das Signal an die ST1 OUT
Buchse angelegt.
10
10
5
5
0
0
5
5
10
10
15
15
20
20
25
25
30
40
30
40
∞
∞
0 L-ST1-R Fader
Mit diesen Fadern bestimmen Sie den Pegel des an die ST OUT Buchsen
angelegten Signals. Der Wert “0” vertritt dabei den Nennausgangspegel.
0
L — ST 1 — R
MX400 Bedienungsanleitung
10
Front- und Rückseite
Meter
GROUP 1
PEAK
PEAK
PEAK
+6
+6
+6
+4
+4
+4
+2
+2
+2
0
0
0
–2
–2
–2
–4
–4
–4
–7
–7
–7
–10
–10
–10
–15
–15
–15
–20
–20
GROUP 2
GROUP 3
–20
GROUP 4
L STEREO 1 R
L ST2/MONITOR R
1
METER SELECT
Das MX400 bietet sechs Meter. Drei Ausgangssignaltypen können mit den 1)
GROUP 1/2, 2) GROUP 3/4 oder ST2/MONITOR L/R, 3) STEREO L/R
Metern optisch überwacht werden.
“0” bezieht sich auf den Nennausgangspegel.
Die “PEAK” Position besagt, daß sich das Signal 3dB unter der Verzerrungsgrenze befindet.
1 METER SELECT Taster
Mit diesem Taster ordnen Sie entweder das GROUP 3/4 oder ST2/MONITOR L/R Signal den Metern zu.
Ist dieser Taster nicht gedrückt ( ), zeigen die beiden mittleren Meter den
Signalpegel von Gruppe 3/4 an.
Ist der Taster gedrückt ( ), zeigen die beiden mittleren Meter den Signalpegel der ST2/MONITOR L/R Summe an.
MX400 Bedienungsanleitung
Rückseite
11
Rückseite
INPUT A
8
7
6
5
4
3
2
1
1
INPUT B
8
7
6
5
INPUT
8
7
6
4
INSERT I/O
5
4
DIRECT OUT
8
7
6
5
3
2
1
2
3
2
1
3
3
2
1
4
0dB
0dB
4
INSERT
OUT IN
1 INPUT A Buchsen
Hierbei handelt es sich um asymmetrische XLR3-31 Buchsen, an die Signalquelle der Eingangsmodule angelegt werden muß. Diese Buchsen müssen
mit dem A/B Taster angewählt werden.
• Nenneingangspegel: –60dB
An diese Buchsen können Sie Phantomspeisung anlegen (+48 V). Die Phantomspeisung muß mit dem PHANTOM Schalter ein- und ausgeschaltet
werden.
Ist der PHANTOM Schalter eingeschaltet, dürfen Sie Signalquellen, die keiner Phantomspeisung bedürfen, ausschließlich an die INPUT B Buchsen
(2) anschließen.
2 INPUT B Buchsen
Hierbei handelt es sich um 1/4” Klinkenbuchsen, an die die Signalquelle der
Eingangsmodule angelegt werden muß. Diese Buchsen müssen mit dem
A/B Taster angewählt werden. Es sind symmetrische TRS Buchsen mit folgender Belegung: Spitze= heiß, Ring= kalt, Mantel= Masse.
• Nenneingangspegel: –60dB
3 INPUT INSERT I/O Buchsen (0dB)
Hierbei handelt es sich um 1/4” Klinkenbuchsen, die sich vor den Fadern
der Eingangsmodule befinden. Es sind asymmetrische TRS Buchsen mit folgender Belegung: Spitze= heiß, Ring= kalt, Mantel= Masse.
• Nenneingangspegel: 0dB
• Nennausgangspegel: 0dB
4 DIRECT OUT Buchsen (0dB)
Hierbei handelt es sich um asymmetrische 1/4” Klinkenbuchsen, an denen
nur jeweils das Post-Fader Signal des betreffenden Eingangsmoduls anliegt.
• Nennausgangspegel: 0dB
MX400 Bedienungsanleitung
12
Rückseite
E
AUX SEND +4dB
4
3
5
5
2
GROUP SUB IN +4dB
2
1
1
ST INPUT 2
C
L/
MONO
D
4
GROUP INSERT I/O 0dB
3
2
4
GROUP OUT +4dB
3
2
1
4
ST INSERT
I/O
L/
MONO
A
3
R
A
0
B
A
R
L
2TR IN
F
1
G
OFF
POWER
ST INPUT 4
REC OUT
TAPE IN
L
L
R
ST INPUT 3
L/
MONO
L/
MONO
R
R
B
–10dBV
R
R
ON OFF
R
R
L
–10dBV
ON
L
B
+4dB
R
L
L
L
L
–10dBV
ST1 OUT +4dB
R
R
ST SUB IN
0dB
R
ST2/MONI OUT +4dB
H
ST INPUT 1
PHANTOM+48V
I
J
6 8
5 GROUP SUB IN Buchsen (+4dB)
9
7
Hierbei handelt es sich um asymmetrische 1/4” Klinkenbuchsen, an die Sie
das Signal eines anderen Mischpults oder einer anderen Signalquelle anlegen können.
• Nenneingangspegel: +4dB
6 2TR IN Buchsen (–10dBV)
Hierbei handelt es sich um RCA Buchsen, die Sie mit den Ausgängen der
Stereo-Signalquelle verbinden müssen.
• Nenneingangspegel: –10dBV
7 ST SUB IN Buchsen (+4dB)
Hierbei handelt es sich um asymmetrische 1/4” Klinkenbuchsen, an die Sie
das Stereo-Signal eines anderen Mischpults oder einer anderen Signalquelle
anlegen können.
• Nenneingangspegel: +4dB
8 REC OUT Buchsen (–10dBV)
Hierbei handelt es sich um RCA Buchsen, die Sie mit den Stereo-Eingängen
eines DAT- oder Cassettenrecorder verbinden können. Das Signal dieser
Buchsen wird vor dem Stereo-Masterfader abgegriffen.
• Nennausgangspegel: –10dBV
9 TAPE IN Buchsen (–10dBV)
Hierbei handelt es sich um RCA Buchsen, mit denen Sie die Ausgängen eines
DAT- oder Cassettenrecorders bzw. eines CD-Spielers verbinden können.
• Nenneingangspegel: –10dBV
0 ST INPUT 1/2 A Buchsen
Hierbei handelt es sich um asymmetrische 1/4” Klinkenbuchsen, an die Sie
eine Stereo-Signalquelle anlegen können. Diese Buchsen müssen mit dem
A/B Taster angewählt werden.
• Nenneingangspegel: +4dB oder –10dB
A ST INPUT 1/2 B Buchsen
Hierbei handelt es sich um asymmetrische RCA Buchsen, an die Sie eine Stereo-Signalquelle anlegen können. Diese Buchsen müssen mit dem A/B
Taster angewählt werden.
MX400 Bedienungsanleitung
Rückseite
13
• Nenneingangspegel: +4dB oder –10dB
B ST INPUT 3/4 Buchsen
Hierbei handelt es sich um asymmetrische 1/4” Klinkenbuchsen, an die Sie
eine Stereo-Signalquelle anlegen können.
• Nenneingangspegel: +4dB oder –10dB
C AUX SEND Buchsen (+4dB)
Hierbei handelt es sich um asymmetrische 1/4” Klinkenbuchsen, an denen
das Ausgangssignal der betreffenden AUX SEND Summe anliegt.
• Nennausgangspegel: +4dB
D GROUP INSERT I/O Buchsen (0dB)
Ausgang
Eingang
Masse
Hierbei handelt es sich um 1/4” Klinkenbuchsen, die sich vor den GROUP
Fadern befinden. Es sind asymmetrische TRS Buchsen.
• Nennausgangspegel: 0dB
• Nenneingangspegel: 0dB
Tip=Ausgang, Ring=Eingang, Mantel=Masse
E ST INSERT I/O Buchsen (0dB)
Hierbei handelt es sich um 1/4” Klinkenbuchsen, die sich vor dem L-ST1R Fader des Master-Moduls befinden. Es sind asymmetrische TRS Buchsen
mit folgender Stiftbelegung: Spitze= heiß, Ring= kalt, Mantel= Masse.
• Nennausgangspegel: 0dB
• Nenneingangspegel: 0dB
F GROUP OUT Buchsen (+4dB)
Hierbei handelt es sich um asymmetrische 1/4” Buchsen, an denen das
Signal der entsprechenden Gruppe anliegt.
• Nennausgangspegel: +4dB
G ST2/MONI OUT Buchsen (+4dB)
Hierbei handelt es sich um asymmetrische 1/4” Buchsen, an denen das
Signal der STEREO L,R Summe bzw. der MONITOR Summe anliegt.
• Nennausgangspegel: +4dB
H ST1 OUT Buchsen (+4dB)
Hierbei handelt es sich um symmetrische XLR3-32 Buchsen, an denen das
Signal der Stereo L, R Summe anliegt.
• Nennausgangspegel: +4dB
I POWER Taster
Mit diesem Taster schalten Sie das MX400 ein und aus. Wenn es eingeschaltet ist, leuchtet die POWER Diode.
J PHANTOM Schalter
Mit diesem Schalter können Sie die Phantomspeisung ein- und ausschalten.
Ist die Phantomspeisung eingeschaltet, so leuchtet die PHANTOM Diode,
um anzuzeigen, daß nun 48V Gleichstrom an Stift 2 und 3 der INPUT A
Buchsen angelegt wird.
Wenn Sie keine Phantomspeisung brauchen, sollten Sie diesen Schalter auf
jeden Fall in die OFF Position schieben.
MX400 Bedienungsanleitung
14
Anhang
Anhang
Allgemeine Spezifikationen.
Frequenzgang
Klirrfaktor
Kanaltrennung (@1 kHz)
Brummen und Rauschen (Mittel, Rs=150 Ω)
(Gemessen mit BPF 20 Hz~20 kHz)
Maximale Spannungsanhebung
Entzerrung der Eingangsmodule
Entzerrung der ST Eingangsmodule
Eingangsmodul HPF
GAIN Regler
Meter (0 LED = +4dB* Ausgangspegel)
Dioden der Eingangs- und Stereo-Eingangsmodule
AUX SEND Dioden
MX400 Bedienungsanleitung
20 Hz~20 kHz +1, –2dB (ST L/R, GROUP @ 600 Ω AUX SEND @ 600 Ω)
Weniger als 0,1% (20 Hz~20 kHz @ 14dB*) (ST L/R, GROUP @ 600 Ω AUX SEND @
600 Ω)
–70dB (zwischen nebeneinander liegenden Kanälen)
–70dB (zwischen den Ausgängen)
–128dB* äquivalentes Eingangsrauschen (Kan. 1~24)
–96dB* Restrauschen (STEREO 1,2, GROUP 1~4, AUX SEND 1~5)
–87dB* (STEREO 1,2, GROUP 1~4) Gemessen auf Nennwert gestelltem Master-Fader und ausgeschalteten Zuordnungstastern
–64dB* (Fremdspannungsabstand = 68dB) (STEREO 1,2, GROUP 1~4) Gemessen bei
auf Nennwert gestelltem Master- und Eingangsmodul 1-Fader
–78dB* (AUX SEND 1~5) Gemessen bei auf Nennwert gestellten AUX SEND Master-Fadern und auf Mindestwert gestellten AUX-Reglern aller Module.
–64dB* (Fremdspannungsabstand = 68dB) (AUX SEND 1~5) Gemessen bei auf
Nennwert gestellten AUX SEND Fadern sowie eines Eingangsmodulreglers
–82dB* (STEREO 2/MONITOR) Gemessen bei ausgeschaltetem ST2/MONITOR Master-Fader, wobei alle PFL und AFL Taster ausgeschaltet waren. Gemessen bei auf
MONI gestelltem MONI/ST2 Schalter.
–64dB* (Fremdspannungsabstand = 68dB) (STEREO 2/MONITOR) Gemessen bei
eingeschaltetem ST2/MONITOR Master-Fader, wobei der PFL Taster eines Eingangsmoduls eingeschaltet war und der MONI/ST2 Schalter sich in der MONI Position befand.
84dB INPUT A/B → STEREO OUT 1,2
84dB INPUT A/B → GROUP OUT 1~4
80dB INPUT A/B → AUX SEND 1,2
90dB INPUT A/B → AUX SEND 3~5
28dB TAPE IN → STEREO OUT 1,2
30dB ST INPUT 1~4 → STEREO OUT 1,2, GROUP OUT 1~4
30dB ST INPUT 1~4 → AUX SEND 1~4
10dB GROUP SUB IN → GROUP OUT
10dB ST SUB IN → STEREO OUT
22dB 2TR IN → STEREO 2/MONITOR
70dB TALKBACK → STEREO OUT
Anhebung/Absenkung +/–15dB
HIGH 12 kHz Kuhschwanz
MID
250 Hz~5 kHz Glocke
LOW 80 Hz Kuhschwanz
* Übergangsfrequenz für Kuhschwanz: 3dB bevor Höchstwert
Anhebung/Absenkung +/–15dB
HIGH 12 kHz Kuhschwanz
LOW 80 Hz Kuhschwanz
* Übergangsfrequenz für Kuhschwanz: 3dB bevor Höchstwert
80 Hz 12dB/Okt
44dB einstellbar –60dB~ –16dB
6 × 11gliedrige LED-Kette (–20, –15, –10, –7, –4, –2, 0, +2, +4, +6, PEAK), GROUP
1,2, GROUP 3,4 oder ST2/MONITOR L,R, ST1 L,R
PEAK
Leuchtet rot, wenn das Post-EQ Signal sich 3dB unter der Verzerrungsgrenze befindet.
SIGNAL Leuchtet grün, wenn das Post-EQ Signal 10dB unter dem Nennpegel
liegt.
PEAK
Leuchtet rot, wenn der Signalpegel 3dB unter der Verzerrungsgrenze liegt
0
Leuchtet gelb, wenn der Ausgangssignalpegel +4dB beträgt
–20
Leuchtet grün, wenn der Ausgangssignalpegel –16dB beträgt
Eingangsspezifikationen
Stromanforderungen
Gewicht
Leistungsaufnahme
USA&Kanada Modell
Allg. Modell
Abmessungen (W × H × D)
15
120V AC, 60Hz
230V AC, 50Hz
MX400-8 17kg, MX400-12 19kg, MX400-16 22kg, MX400-24 28kg
80W
MX400-8 562×180,2×596 mm
MX400-12 682×180,2×596 mm
MX400-16 802×180,2×596 mm
MX400-24 1042×180,2×596 mm
* 0dB=0.775V R.M.S
Eingangsspezifikationen
Eingänge
INPUT A/B
PAD
Taster
GAIN
Regler
—
–60
—
–16
–20
+4
Lastimpedanz
Eingangspegel
Bei Nennwert
Empf. *1
Nennwert
Max. vor
Verzerrung
–80dB
(77,5µV)
–60dB
(775µV)
–40dB
(7,75mV)
–36dB
(12,3mV)
–16dB
(123mV)
+4dB (1,23V)
–16
–16dB
(123mV)
+4dB
(1,23V)
+24dB
(12,3V)
—
–12dB
(195mV)
+4dB
(1,23V)
+24dB
(12,3V)
–10dB
(245mV)
+10dB
(2,45V)
4k Ω
5k Ω
STEREO INPUT 1, 2
50–600 Ω
Mikrof. &
600 Ω Line
600 Ω Line
–10
—
–26dB
(38,8mV)
+4
—
–12dB
(195mV)
+4dB
(1,23V)
+24dB
(12,3V)
–10
—
–26dB
(38,8mV)
–10dB
(245mV)
+10dB
(2,45V)
Anschluß
XLR-3-31 (A),
Klinke (B) *2
Klinke *4 RCA
(schaltbar)
5k Ω
600 Ω Line
INPUT INSERT IN
10k Ω
600 Ω Line
–20dB
(77,5mV)
0dB
(775mV)
+20dB
(7,75V)
Klinke (TRS) *3
STEREO INSERT IN
10k Ω
600 Ω Line
–20dB
(77,5mV)
0dB
(775mV)
+20dB
(7,75V)
Klinke (TRS) *3
GROUP INSERT IN
10k Ω
600 Ω Line
–20dB
(77,5mV)
0dB
(775mV)
+20dB
(7,75V)
Klinke (TRS) *3
TAPE IN
10k Ω
600 Ω Line
–26dBV
(50mV)
–10dBV
(316mV)
—
RCA
STEREO SUB IN
10k Ω
600 Ω Line
–6dB
(388mV)
+4dB
(1,23V)
+24dB
(12,3V)
Klinke *4
GROUP SUB IN
10k Ω
600 Ω Line
–6dB
(388mV)
+4dB
(1,23V)
+24dB
(12,3V)
Klinke *4
2TR IN
10k Ω
600 Ω Line
–20dBV
(100mV)
–10dBV
(316mV)
+10dBV
(3,16V)
RCA
TALKBACK
10k Ω
50~600 Ω
Mikrof.
–66dB
(388µV)
–50dB
(2,45mV)
–30dB
(24,5mV)
XLR-3-31 *5
STEREO INPUT 3, 4
Klinke *4
*1. Empfindlichkeit vertritt den kleinsten Eingangspegel, mit dem ein +4dB (1.23V) erzielt werden kann oder den Nennausgangspegel,
wenn das MX400 auf maximale Anhebung eingestellt ist (d.h. alle Pegelregler und Fader auf Höchstwert).
*2. Buchsen und Klinken (TRS) sind symmetriert (Spitze=HEISS, Ring=KALT, Mantel=Abschirmung).
*3. Insert-Klinkenbuchsen (TRS) sind asymmetrisch (Spitze=Ausgang, Ring=Eingang, Mantel=Masse).
*4. Asymmetrische Klinkenbuchsen.
*5. Die Kommandomikrophonbuchse ist asymmetrisch.
*6. In diesen Spezifikationen, und sofern dB einen Spannungswert vertritt, entspricht 0dB 775 mV RMS, für TAPE SEND vertritt dBV einen
spezifischen Spannungswert, wobei 0dBV 1 V RMS entspricht.
MX400 Bedienungsanleitung
16
Anhang
Ausgangsspezifikationen
Ausgangspegel
Ausgang
Quellenimpedanz
Bei Nennwert
Nennwert
Max. vor
Verzerrung
Mischpultanschluß
ST1 OUT L/R
150 Ω
600 Ω Line
+4dB (1,23V)
+24dB (12,3V)
XLR-3-32 *1
STEREO INSERT OUT L/R
ST2/MONI OUT L/R
600 Ω
10k Ω Line
0dB (775mV)
+20dB (7,75V)
Klinke (TRS) *2
75 Ω
600 Ω Line
+4dB (1,23V)
+20dB (7,75V)
Klinke *3
REC OUT L/R
GROUP 1~4
600 Ω
10k Ω Line
–10dBV (316mV)
+16dBV (6,31V)
RCA
75 Ω
600 Ω Line
+4dB (1,23V)
+20dB (7,75V)
Klinke *3
AUX SEND 1~5
75 Ω
600 Ω Line
+4dB (1,23V)
+20dB (7,75V)
Klinke *3
INPUT INSERT OUT
600 Ω
10k Ω Line
0dB (775mV)
+20dB (7,75V)
Klinke (TRS) *2
GROUP INSERT OUT
600 Ω
10k Ω Line
0dB (775mV)
+20dBV (7,75V)
Klinke (TRS) *2
DIRECT OUT
600 Ω
10k Ω Line
0dB (775mV)
+20dB (7,75V)
Klinke *3
PHONES OUT
100 Ω
40 Ω phones
3mW (346mV)
100mW (2,0V)
Stereo-Klinke
*1. Die XLR-und Klinken sind symmetriert (Spitze= HEISS, Ring= KALT, Mantel= MASSE (GND)).
*2. Insert-Klinkenbuchsen (TRS) sind asymmetrisch (Spitze =Ausgang, Ring=Eingang, Mantel= GND).
*3. Asymmetrische Klinkenbuchsen.
*4. In diesen Spezifikationen, und sofern dB einen Spannungswert vertritt, entspricht 0dB 775 mV RMS, für TAPE SEND vertritt dBV einen
spezifischen Spannungswert, wobei 0dBV 1 V RMS entspricht.
• Änderungen der Spezifikationen ohne Vorankündigung vorbehalten.
Abmessungen
Wl
H: 180.2
155.5
434.5
129.5
Wi
W
MX400 Bedienungsanleitung
108.9
D: 596
31.9
13.3
Model
WI
Wi
W
MX400-8
465
527
562
MX400-12
585
647
682
MX400-16
705
767
802
MX400-24
945
1007
1042
CONSOLA DE MEZCLA
Español
MANUAL DE USO
i
Índice
1 Introducción . . . . . . . . . . . . . . . 1
3 Panel posterior . . . . . . . . . . . 11
Características del MX400 . . . . . . . . . . . . . . . . . 1
2 Paneles frontal y posterior . . . . 2
4 Apéndice . . . . . . . . . . . . . . . . 14
Módulos de entrada . . . . . . . . . . . . . . . . . . . . . . 2
Módulo estéreo . . . . . . . . . . . . . . . . . . . . . . . . . . 5
Módulo AUX SEND . . . . . . . . . . . . . . . . . . . . . . 7
Grupo MODULE . . . . . . . . . . . . . . . . . . . . . . . . . 7
Módulo ST2/MONITOR . . . . . . . . . . . . . . . . . . 8
Módulo principal (L-ST1-R) . . . . . . . . . . . . . . . 9
Medidores . . . . . . . . . . . . . . . . . . . . . . . . . . . . . 10
Especificaciones generales . . . . . . . . . . . . . . . . .
Especificaciones de entrada . . . . . . . . . . . . . . .
Especificaciones de salida . . . . . . . . . . . . . . . . .
Dimensiones . . . . . . . . . . . . . . . . . . . . . . . . . . .
14
15
16
16
Precauciones
1. Ubicación
Mantenga la unidad alejada de lugares en los que pueda quedar expuesta a altas temperaturas o a la humedad
- como cerca de radiadores, estufas, etc. Evite también lugares sometidos a la acumulación excesiva de polvo o
a vibraciones que podrían causar daños mecánicos, y lugares sometidos a campos electromagnéticos intensos,
como cerca de un equipo de radiodifusión.
2. Ventilación
La unidad posee ranuras de ventilación en el panel frontal. No las bloquee.
3. Evite golpes físicos.
Los golpes físicos fuertes podrían dañara la unidad. Manéjela con cuidado.
4. No abra la caja ni intente reparar ni modificar usted mismo la unidad.
Este producto no contiene componentes que pueda reparar el usuario. Solicite todo el mantenimiento al personal de servicio cualificado de Yamaha. Si abre la caja y/o modifica los circuitos internos, se anulará la garantía.
5. Antes de realizar las conexiones, desconecte siempre la alimentación.
Antes de conectar o desconectar los cables, desconecte siempre la alimentación. Esto será muy importante para
evitar que de dañe tanto la propia unidad como los demás equipos conectados.
6. Maneje cuidadosamente los cables.
Enchufe y desenchufe siempre los cables - incluyendo el cable de alimentación de CA - sujetando el conecto, no
el propio cable.
7. Limpie con un paño suave y seco.
No utilice nunca disolventes tales como bencina o diluidor de pintura para limpiar la unidad. Límpiela con un
paño suave y seco.
8. Utilice siempre la fuente de alimentación correcta.
Cerciórese de la tensión de alimentación especificada en el panel posterior coincida con la de la red de CA local.
Además, cerciórese de que la fuente de alimentación de CA pueda suministrar más de la corriente suficiente
para manejar todos los equipos utilizados en su sistema.
MX400 Manual de uso
Introducción
1
Introducción
Muchas gracias por la adquisición del MX400 Yamaha. La serie MX400 ha sido diseña
para facilitar la operación y para ofrecer versatilidad en una amplia gama de aplicaciones,
incluyendo audiodifusión (PA) y sistemas instalados. La serie MX400 incluye tres modelos; mezcladores de 8 canales, 12 canales, 16 canales, y 24 canales.
Características del MX400
Cada uno de los canales de entrada monoaurales proporciona las funciones siguientes.
• Tomas de entrada XLR/telefónicas
• Interruptor amortiguador de 20dB/control de ganancia continuamente variable
• Ecualizador (EQ) de 3 bandas (con frecuencia de gama media variable)/interruptor
de activación/desactivación de ecualizador/interruptor de filtro de paso alto
• Toma de inserción/salida directa TRS
• 5 sistemas de transmisión auxiliar (AUX SEND) en total (pre × 2, post/pre × 2 (conmutable), post × 1)
• Interruptor de asignación de grupo par/impar (ODD/EVEN) y estéreo/control de
panoramización
• Interruptor de conexión de canal
• Interruptor de escucha de pre-regulador de nivel (PFL)
• Medidor de nivel para control preciso del nivel
Además de los canales de entrada monoaurales , existen 4 juegos de canales de entrada
estéreo, con las funciones siguientes.
• Cuatro entradas estéreo con ecualizador (EQ) de 2 bandas
• Interruptor de asignación de grupo/auxiliar/estéreo (GROUP/AUX/ST)
• Control de equilibrio/panoramización
• Selector de toma telefónica TRS de 1/4” y toma de entrada RCA (solamente para
entrada estéreo 1/2)
La sección principal proporciona las funciones siguientes.
• Cinco controles de transmisión auxiliar (AUX SEND) tipo regulador de nivel
• Medidor de nivel de 3 puntos independiente para dada control de transmisión auxiliar (AUX SEND)
• Interruptor a estéreo (TO ST) y control de panoramización para cada grupo
(GROUP)
• Interruptor de activación de grupo (GROUP ON), interruptor de escucha de
post-regulador de nivel (AFL), y regulador de nivel de 10 mm para cada grupo
(GROUP)
• Interruptor de monitorización/estéreo 2 (MONI/ST2) que permite cambiar la señal
de salida de ST2/MONI OUT de las dos formas siguientes:
1) Una de las señales de una fuente de entrada externa entra en bus estéreo, el bus
PFL, o 2 TR IN.
2) La misma señal que la señal de salida de ST1 OUT.
• Interruptor ON, interruptor L+R, y regulador de nivel para la señal de salida de
ST2/MONI OUT.
Además, existen las funciones siguientes.
• Entradas XLR para micrófono
• Control de nivel de intercomunicación
• Interruptor de asignación
Las tomas TAPE IN y las tomas REC OUT poseen controles de nivel para mayor conveniencia cuando necesite margen adicional para escucha o grabación. Los medidores de
nivel con indicadores de pico permiten una comprobación precisa.
MX400 Manual de uso
2
Paneles frontal y posterior
Paneles frontal y posterior
A
B
1
Módulos de entrada
20dB
2
1 Interruptor A/B
3
–16
GAIN
–60
PEAK
4
SIGNAL
5
80
–15
HIGH
+15
5K
MID FREQ
6
MID
–15
LOW
2 Interruptor de atenuador de 20dB
Éste es un atenuador de entrada de 20dB que afecta a INPUT A e INPUT B.
Si el nivel de la señal de entrada es demasiado alto para realizar ajustes utilizando solamente el control GAIN, utilice este atenuador para reducir la
señal hasta el nivel apropiado. El atenuador estará activado cuando este interruptor se encuentre enganchado.
3 Control de ganancia (GAIN)
250
–15
Este interruptor selecciona la fuente de señal del módulo de entrada.
Seleccione INPUT A (tipo XLR) o INPUT B (tipo telefónico de 1/4”).
+15
+15
Controla la ganancia del preamplificador para INPUT A e INPUT B. La
ganancia es variable hasta un máximo de 44dB.
El control GAIN se utiliza siempre en conjunción con el indicador SIGNAL
y el indicador PEAK. Ajuste el control GAIN de forma que el indicador SIGNAL esté siempre encendido cuando esté presente una señal de entrada, y
el indicador PEAK se encienda ocasionalmente. Si el indicador PEAK se
enciende con frecuencia, reduzca el nivel con el control GAIN para evitar
que la señal se distorsione. En la tabla siguiente se muestran los ajustes usuales para el control GAIN.
EQ
Fuente de señal
Micrófono dinámico (nivel bajo)
0
0
0
0
AUX 1
AUX 2
AUX 3
AUX 4
10 P
R
E
abierto (OFF)
–16 GAIN –60
7
10
8
10
P
O
S
T
AUX 5
–60 ~ –50
Interruptor del
atenuador de 20dB
Micrófono electrostático (nivel alto)
–35
Dispositivo de audio, instrumento
musical electrónico (nivel bajo)
–20
Dispositivo de audio, instrumento
musical electrónico (nivel alto)
+4
abierto (OFF)
–16 GAIN –60
10
PRE
0
Posición del control
GAIN
10
MX400 Manual de uso
abierto (OFF)
–16 GAIN –60
cerrado (ON)
–16 GAIN –60
4 Indicador de señal (SIGNAL) e indicador de pico (PEAK)
Cuando el nivel de la señal de post-ecualización (nivel nominal de 0dB)
alcance –10dB, el indicador SIGNAL se encenderá. Este indicador muestra
que se está introduciendo una señal.
Cuando la señal de post-ecualización alcance 3dB antes del nivel de recorte,
se encenderá el indicador PEAK. Este indicador muestra que la señal se ha
aproximado al nivel de recorte. Ajuste el nivel de la señal basándose en el
estado del indicador PEAK. Con respecto al procedimiento, consulte la
explicación para el control GAIN 3.
Módulos de entrada
3
5 Interruptor del filtro de paso alto 80
Este interruptor corta la señal de entrada por debajo de 80 Hz a 12dB/octava.
El filtro estará activado cuando este interruptor se encuentre enganchado.
Utilizando el filtro de paso alto, usted podrá reducir o eliminar el ruido del
viento, el ruido del micrófono, el zumbido de la fuente de alimentación, etc.
6 Controles del ecualizador (EQ) (frecuencias altas, medias,
y bajas) (HIGH, MID FREQ, MID, LOW)
Éste es un ecualizador de 3 bandas las con frecuencias centrales, las gamas,
y los tipos indicados a continuación.
HIGH:
12 kHz tipo aplanamiento de +/–15dB
MID:
250 Hz - 5 kHz (variable) tipo agudizamiento de +/–15dB
LOW:
80 Hz tipo aplanamiento de +/–15dB
La respuesta en frecuencia será plana cuando el mando esté en la posición
central.
20
Nivel de la señal (dB)
5k
MID FREQ
250
10
0
–10
–20
20
50
100
200
500
1k
2k
5k
10k
20k
50k
Frecuencia (Hz)
Interruptor del ecualizador (EQ)
Este interruptor activa/desactiva el ecualizador. El ecualizador estará activado cuando el interruptor esté enganchado. Además, para poner en derivación el ecualizador cuando no esté utilizándose, este interruptor
proporciona una forma muy útil de comparar señales ecualizadas y sin ecualizar.
7 Controles de transmisión auxiliar (AUX 1/AUX 2)
Estos controles ajustan el nivel de la señal que se envía a cada salida AUX
SEND 1 y AUX SEND 2. Estas señales son de pre-regulación de nivel (es
decir, se toman antes del ajuste del regulador de nivel). El nivel nominal es
la posición de las 3 en punto.
8 Controles de transmisión auxiliar (AUX 3/AUX 4/AUX 5)
Ajustan el nivel de la señal enviada a cada salida AUX SEND 3, AUX SEND
4, u AUX SEND 5.
Las señales controladas mediante AUX 3 y AUX 4 dependerán del ajuste del
interruptor PRE.
• Cuando el interruptor PRE no esté enganchado
Controlan la señal de post-regulación de nivel.
• Cuando el interruptor PRE esté enganchado
Controlan la señal de pre-regulación de nivel
AUX 5 controla la señal de post-regulación.
El nivel nominal es la posición de las 3 en punto.
MX400 Manual de uso
4
Paneles frontal y posterior
9 Interruptores de asignación (1-2, 3-4, ST)
1–2
9
3–4
ST
Estos interruptores asignan la señal del módulo de entrada a las salidas de
grupo y la salida ST. El control PAN situado debajo ajusta la posición estéreo
de la señal entre las salidas del grupo impar (ODD) e izquierdo (L) y las salidas del grupo par (EVEN) y derecho (R).
0 Control de panoramización (PAN)
0
L
ODD
PAN
R
EVEN
ON
A
PFL
B
Este mando ajusta la posición estéreo de la señal entre los canales izquierdo
(L) y derecho (R), y entre los grupos impar/par. Por ejemplo, si gira este
mando completamente hacia la izquierda, la señal se enviará solamente a los
grupos izquierdo (L) e impar (ODD) cuyos interruptores de asignación
estén enganchados. Si lo gira completamente hacia la derecha, la señal se
enviará solamente a los grupos derecho (R) y par (EVEN). Si el mando se
coloca en la posición central, la misma cantidad de señal se enviará a los
canales izquierdo (L) y derecho (R) estéreo y a los grupos impar/par.
A Interruptor ON
10
5
0
5
10
15
20
25
30
40
∞
C
Este interruptor activa/desactiva el módulo de entrada. Cuando este interruptor esté enganchado, el módulo de entrada estará activado. Cerciórese
de desactivar los módulos de entrada que no esté utilizando. Aunque un
módulo esté desactivado, los indicadores SIGNAL y PEAK se encenderán si
se está introduciendo una señal. Usted también podrá utilizar el interruptor
PFL para monitorizar la señal aunque un módulo esté desactivado.
B Interruptor de escucha de pre-regulación de nivel (PFL)
PFL son las siglas de Pre-Fader Listen. Este interruptor le permitirá monitorizar la señal del módulo de entrada independientemente de la posición
del regulador de nivel, los ajustes del interruptor ON, los interruptores de
asignación de grupo, o los ajustes de AUX. Como el nombre sugiere, la señal
se toma antes de la regulación de nivel (después de la ecualización). Usted
podrá escuchar un módulo individual, o dos o más módulos simultáneamente. El indicador PFL situado en la parte superior del módulo STEREO
se encenderá cuando un interruptor PFL esté enganchado.
C Regulador de nivel
Este regulador ajusta el nivel de la señal que se envía a varias salidas. Los
reguladores de nivel se utilizan individualmente o en conjunción con los
reguladores de nivel de otros módulos de entrada para crear el equilibrio de
mezcla deseado. La posición de la marca cero (0) es el nivel nominal.
Subiendo el regulador de nivel sobre 0 se consigue hasta 10dB de ganancia.
MX400 Manual de uso
Módulo estéreo
5
Módulo estéreo
1 Interruptor A/B
1
A
B
S
T
1
+4
-10
PEAK
2
3
SIGNAL
–15
HIGH
+15
4
Este interruptor selecciona la fuente de señal para el módulo estéreo.
Seleccione entrada ST INPUT A (tipo telefónico de 1/4” desequilibrado) o
ST INPUT B (tipo RC). Este interruptorno existe en [ST3] ni [ST4].
2 Selector de sensibilidad (+4/–10)
Este selector selecciona la ganancia apropiada para el nivel de la señal de
entrada. La sensibilidad es –10dB cuando el selector está enganchado, y
+4dB cuando el selector está desenganchado.
3 Indicador de señal (SIGNAL) e indicador de pico (PEAK)
–15
LOW
+15
AUX 1
5
AUX 2
1–2
6
3–4
Cuando el nivel de la señal de post-ecualización (nivel nominal de 0dB) alcance –20dB, el indicador SIGNAL se encenderá. Este indicador muestra que
se está introduciendo una señal.
Cuando la señal de post-ecualización alcance 3dB antes del nivel de recorte,
se encenderá el indicador PEAK. Este indicador muestra que la señal se ha
aproximado al nivel de recorte. Ajuste el nivel de la señal basándose en el
estado del indicador PEAK.
4 Controles del ecualizador (EQ) (frecuencias altas, y bajas)
ST
(HIGH, LOW)
7
ON
9
Éste es un ecualizador de 2 bandas las con frecuencias centrales, las gamas,
y los tipos indicados a continuación.
HIGH:
12 kHz
tipo aplanamiento de +/–15dB
LOW:
80 Hz
tipo aplanamiento de +/–15dB
La respuesta en frecuencia será plana cuando el mando esté en la posición
central.
PFL
0
5 Interruptores de transmisión auxiliar (AUX 1/AUX 2/AUX
L
ODD
R
EVEN
BAL/PAN
8
0
S
T
3
LEVEL
10
+4
-10
PEAK
SIGNAL
AUX 3
AUX 4
2
3
5
3/AUX 4)
Estos interruptores envían la señal monoaural a los buses AUX. Estarán activados (ON) cuando se encuentren enganchados.
[ST1] y [ST2] seleccionan los buses AUX 1 y AUX 2.
[ST3] y [ST4] seleccionan los buses AUX 3 y AUX 4.
6 Interruptores de asignación (1-2, 3-4, ST)
Estos interruptores asignan la señal del módulo estéreo a las salidas de grupo
y la salida ST. El control PAN situado debajo ajusta la posición estéreo de la
señal entre las salidas del grupo impar (ODD) e izquierdo (L) y las salidas
del grupo par (EVEN) y derecho (R).
7 Control de equilibrio/panoramización (BAL/PAN)
El mando BAL/PAN ajusta el equilibrio o la posición L/R de la señal del
módulo estéreo. Por ejemplo, si gira este mando completamente hacia la
izquierda, la señal se enviará solamente a los grupos izquierdo (L) e impar
(ODD) cuyos interruptores de asignación estén enganchados. Si lo gira
completamente hacia la derecha, la señal se enviará solamente a los grupos
derecho (R) y par (EVEN). Si el mando se coloca en la posición central, la
MX400 Manual de uso
6
Paneles frontal y posterior
misma cantidad de señal se enviará a los canales izquierdo (L) y derecho (R)
estéreo y a los grupos impar/par.
8 Control de nivel (LEVEL)
Este control ajusta el nivel de salida del módulo estéreo.
9 Interruptor ON
Este interruptor activa/desactiva el módulo de entrada. Cuando este interruptor esté enganchado, el módulo de entrada estará activado. Cerciórese
de desactivar los módulos de entrada que no esté utilizando. Aunque un
módulo esté desactivado, los indicadores SIGNAL y PEAK se encenderán si
se está introduciendo una señal. Usted también podrá utilizar el interruptor
PFL para monitorizar la señal aunque un módulo esté desactivado.
0 Interruptor de escucha de pre-regulación de nivel (PFL)
PFL son las siglas de Pre-Fader Listen. Este interruptor le permitirá monitorizar la señal del módulo de entrada independientemente de la posición
del regulador de nivel, los ajustes del interruptor ON, los interruptores de
asignación de grupo, o los ajustes de AUX. Como el nombre sugiere, la señal
se toma antes de la regulación de nivel (después de la ecualización). Usted
podrá escuchar un módulo individual, o dos o más módulos simultáneament
MX400 Manual de uso
Módulo AUX SEND
7
Módulo AUX SEND
1 Regulador de nivel de transmisión auxiliar (AUX SEND)
10
5
0
5
1
2 Indicador de pico (PEAK)
10
El indicador se encenderá cuando el nivel de la señal de entrada alcance 3dB
antes del recorte.
15
20
30
40
∞
3 Indicador de señal (0/–20)
2
PEAK
0
Este control ajusta el nivel de salida de AUX SEND. La posición de la marca
cero (0) es el nivel nominal. Subiendo el regulador de nivel sobre 0 se consigue hasta 10dB de ganancia.
3
–20
ON
4
AFL
5
El indicador 0dB (amarillo) se encenderá cuando el nivel de la señal de salida
llegue a +4dB. El indicador –20dB (verde) se encenderá cuando la señal de
salida alcance –16dB.
4 Interruptor ON
Este interruptor activa/desactiva el módulo AUX SEND. Estará activado
(ON) cuando se encuentre enganchado. Cuando esté desactivado (OFF), no
saldrá señal a través de la toma AUX SEND correspondiente.
5 Interruptor de escucha post-regulador de nivel (AFL)
Monitoriza la señal de AUX SEND. Estará activado (ON) cuando se encuentre enganchado.
TO ST
L
PAN
1
Grupo MODULE
2
1 Interruptor a estéreo (TO ST)
R
Este interruptor envía la señal de GROUP al bus estéreo.
ON
3
AFL
4
2 Control de panoramización (PAN)
Este control ajusta la panoramización de la señal enviada al bus estéreo.
3 Interruptor ON
Este interruptor activa/desactiva el módulo GROUP. Estará activado (ON)
cuando se encuentre enganchado. Cuando esté desactivado (OFF), no saldrá
señal a través de la toma AUX SEND correspondiente.
10
4 Interruptor de escucha post-regulador de nivel (AFL)
5
0
5
5
Monitoriza la señal de GROUP. Estará activado (ON) cuando se encuentre
enganchado.
5 Regulador de nivel de grupo
Este regulador ajusta el nivel de la señal de salida de GROUP.
10
15
20
25
30
40
∞
MX400 Manual de uso
8
Paneles frontal y posterior
Módulo ST2/MONITOR
1 Indicador de escucha pre-regulador de nivel (PFL)
1
PFL
2
2TR IN
Este indicador (amarillo) se encenderá cuando enganche (ON) el interruptor de uno o más módulos.
2 Interruptor de transmisión 2/monitorización (2TR/MONI-
3
TOR)
ON
4
L+R
5
Este interruptor selecciona la señal de entrada de 2TR IN. Esta señal se enviará a la toma de auriculares y a la toma ST2/MONI OUT. Cuando este interruptor esté enganchado (ON), la señal de entrada de 2TR IN se transmitirá
independientemente de los ajustes de los interruptores PFL y AFL del
módulo.
MONI
ST2
3 Interruptor de monitorización/estéreo 2 (MONI/ST2)
Este interruptor selecciona la señal que sale a la toma ST2/MONI OUT.
Cuando el interruptor esté en la posición “ST2”, la señal será la misma que
la señal que se transmite a la toma ST1 OUT. Cuando el interruptor esté en
la posición “MONI”, la señal se tomará del bus PFL, el bus AFL, o la toma
2TR IN.
10
4 Interruptor ON
5
0
6
Este interruptor activa/desactiva el módulo ST2/MONITOR. El módulo
estará activado (ON) cuando se encuentre enganchado. Cuando el módulo
esté desactivado (OFF), no saldrá señal a través de la toma ST2/MONI.
5
5 Interruptor de canal izquierdo + derecho (L+R)
10
15
20
25
30
40
∞
MX400 Manual de uso
Este interruptor causa la salida de una señal mezclada monoaural a través
de la toma ST2/MONI OUT.
6 Regulador de nivel de estéreo 2/monitorización
(ST2/MONITOR)
Este regulador controla el nivel de la señal de salida de ST2/MONITOR.
Módulo principal (L-ST1-R)
9
Módulo principal (L-ST1-R)
1
2
POWER
PHANTOM
1 Indicador de alimentación (POWER)
Este indicador se encenderá cuando se enganche (ON) el interruptor de alimentación.
2 Indicador de alimentación fantasma (PHANTOM)
3
Este indicador cuando se enganche (ON) el interruptor PHANTOM, señalando que se está suministrando la alimentación fantasma.
3 Toma de entrada de intercomunicación (TALKBACK IN)
Ésta es una toma tipo XLR desequilibrada para conectar un micrófono de
intercomunicación. El nivel nominal de entrada es –50dB.
TALKBACK IN
GRP 1–4
4
AUX 1–4
ST
5
0
LEVEL
10
0
10
REC OUT
8
0
10
TAPE IN
9
Estos interruptores seleccionan el destino de salida (bus de mezcla) del
micrófono de intercomunicación.
5 Control de nivel (LEVEL)
Este control ajusta el nivel de la señal del micrófono de intercomunicación.
6
TB
4 Interruptores de asignación (GRP 1-4, AUX 1-4, ST)
7
6 Interruptor de intercomunicación (TB)
Este interruptor controla la señal de intercomunicación. Cuando lo enganche, la señal de intercomunicación se enviará al destino de salida seleccionado con el interruptor de asignación situado arriba.
7 Toma para auriculares/control de auriculares (PHONES)
Ésta es una toma telefónica estéreo de 1/4” para conectar un juego de auriculares estéreo. Los auriculares conectados aquí podrán utilizarse para monitorizar las señales PFL, AFL, y 2TR IN.
0
10
PHONES
8 Controles de salida de grabación/entrada de cinta (REC
ON
OUT/TAPE IN)
El control REC OUT ajusta el nivel de la señal de salida de la toma REC OUT.
El control TAPE IN ajusta el nivel de la señal de entrada de la toma TAPE IN.
9 Interruptor ON
10
10
5
5
0
0
5
5
10
10
15
15
20
20
25
25
30
40
30
40
∞
∞
Este interruptor activa/desactiva la salida ST1 OUT. Cuando esté enganchado (ON), saldrá la señal de la toma ST1 OUT.
0 Reguladores de nivel L-ST1-R
0
Estos reguladores controlan el nivel de la salida ST OUT. La posición marcada con cero (0) es el nivel nominal de salida.
L — ST 1 — R
MX400 Manual de uso
10
Paneles frontal y posterior
Medidores
GROUP 1
PEAK
PEAK
PEAK
+6
+6
+6
+4
+4
+4
+2
+2
+2
0
0
0
–2
–2
–2
–4
–4
–4
–7
–7
–7
–10
–10
–10
–15
–15
–15
–20
–20
GROUP 2
GROUP 3
–20
GROUP 4
L STEREO 1 R
L ST2/MONITOR R
1
METER SELECT
El MX400 dispone de seis medidores de LED, y en ellos podrán verse tres tipos
de niveles de salida: 1) GROUP 1/2, 2) GROUP 3/4 o ST2/MONITOR L/R, y
3) STEREO L/R.
La posición “0” indica el nivel nominal de salida.
La posición “PEAK” indica que el nivel de salida es 3dB antes del recorte.
1 Selector METER SELECT
Este selector la monitorización de GROUP 3/4 o ST2/MONITOR L/R.
Cuando no haya presionado en ( ), el grupo de medidores centrales indicará el nivel de la señal de GROUP 3/4.
Cuando haya presionado el interruptor en ( ), el grupo de medidores centrales indicará el nivel de la señal de ST2/MONITOR L/R.
MX400 Manual de uso
Panel posterior
11
Panel posterior
INPUT A
8
7
6
5
4
3
2
1
1
INPUT B
8
7
6
5
INPUT
8
7
6
4
INSERT I/O
5
4
DIRECT OUT
8
7
6
5
3
2
1
2
3
2
1
3
3
2
1
4
0dB
0dB
4
INSERT
OUT IN
1 Tomas de entrada A (INPUT A)
Éstas son tomas de tipo XLR3-31 desequilibradas que dan entrada a la señal
para cada módulo de entrada. Utilice el interruptor A/B para seleccionar
estas tomas.
• Nivel nominal de entrada: –60dB
A estas tomas podrá suministrarse alimentación fantasma (+48). La alimentación fantasma se conecta/desconecta utilizando el interruptor PHANTOM.
Cuando el interruptor PHANTOM esté enganchado (ON), cerciórese de
que los dispositivos que no requieran alimentación fantasma estén conectados a las tomas INPUT B (2).
2 Tomas de entrada B (INPUT B)
Éstas son tomas telefónicas de 1/4” que introducen la señal para cada
módulo de entrada. Utilice el interruptor A/B para seleccionar estas tomas.
Éstas son tomas TRS equilibradas, con punta = activo, anillo = pasivo, y
manguito = masa.
• Nivel nominal de entrada: –60dB
3 Tomas de entrada/salida de inserción de entrada (INPUT
INSERT I/O 0dB)
Éstas son tomas telefónicas de 1/4” para conexión en el panel frontal de los
reguladores de nivel del módulo de entrada.
Éstas son tomas TRS desequilibradas, con punta = salida, anillo = entrada,
y manguito = masa.
• Nivel nominal de entrada: 0dB
• Nivel nominal de salida: 0dB
4 Tomas de salida directa (DIRECT OUT 0dB)
Éstas son tomas telefónicas de 1/4” desequilibradas que dan salida a la señal
de post-regulador de nivel independientemente desde cada módulo de
entrada.
• Nivel nominal de salida: 0dB
MX400 Manual de uso
12
Panel posterior
E
AUX SEND +4dB
4
3
5
5
2
GROUP SUB IN +4dB
2
1
1
ST INPUT 2
C
D
4
GROUP INSERT I/O 0dB
3
2
4
GROUP OUT +4dB
3
2
1
4
ST INSERT
I/O
L/
MONO
A
3
R
A
0
B
A
R
L
2TR IN
F
1
G
–10dBV
OFF
POWER
R
ST INPUT 4
REC OUT
TAPE IN
L
L
R
ON OFF
L
R
R
L
L
L
B
+4dB
R
–10dBV
ON
L
L
ST1 OUT +4dB
R
R
ST SUB IN
0dB
R
ST2/MONI OUT +4dB
H
ST INPUT 1
L/
MONO
ST INPUT 3
L/
MONO
L/
MONO
R
R
B
–10dBV
R
PHANTOM+48V
I
J
6 8
9 7
5 Tomas de entrada secundarias de grupo (GROUP SUB IN
+4dB)
Éstas son tomas telefónicas de 1/4” que dan entrada a señales de los mezcladores secundarios u otros dispositivos.
• Nivel nominal de entrada: +4dB
6 Tomas de entrada de transmisión (2TR IN –10dBV)
Éstas son tomas RCA utilizadas para dar entrada a una fuente de sonido
estéreo.
• Nivel nominal de entrada: –10dBV
7 Tomas de entrada secundaria estéreo (ST SUB IN +4dB)
Éstas son tomas telefónicas desequilibradas de 1/4” que dan entrada a una
señal estéreo desde un mezclador secundario u otra fuente.
• Nivel nominal de entrada: +4dB
8 Tomas de salida de grabación (REC OUT –10dBV)
Éstas son tomas RCA que dan salida a una señal estéreo a un grabador de
cinta audiodigital (DAT) o un grabador de cassettes. Estas tomas están
colocadas antes del regulador de nivel principal estéreo.
• Nivel nominal de salida: –10dBV
9 Tomas de entrada de cinta (TAPE IN –10dBV)
Éstas son tomas RCA que dan entrada a una fuente estéreo como un grabador de cinta audiodigital (DAT), un grabador de cassettes, o un reproductor
de discos compactos (CD).
• Nivel nominal de entrada: –10dBV
0 Tomas A de entrada estéreo 1/2 (ST INPUT 1/2 A)
Éstas son tomas telefónicas de 1/4” desequilibradas que dan entrada a una
fuente estéreo. Estas tomas se seleccionan con el interruptor A/B.
• Nivel nominal de entrada: +4dB o –10dB
A Tomas A de entrada estéreo 1/2 (ST INPUT 1/2 B)
Éstas son tomas RCA que dan entrada a una fuente estéreo. Estas tomas se
seleccionan con el interruptor A/B.
• Nivel nominal de entrada: +4dB o –10dB
MX400 Manual de uso
Panel posterior
13
B Toma de entrada estéreo 3/4 (ST INPUT 3/4)
Éstas son tomas telefónicas de 1/4” desequilibradas que dan entrada a una
fuente estéreo.
• Nivel nominal de entrada: +4dB o –10dB
C Tomas de transmisión auxiliar (AUX SEND +4dB)
Éstas son tomas telefónicas de 1/4” desequilibradas que can salida a señales
de los buses AUX SEND.
• Nivel nominal de salida: +4dB
D Tomas de entrada/salida de inserción de grupo (GROUP
Salida
Entrada
Masa
INSERT I/O 0dB)
Éstas son tomas telefónicas de 1/4” para conexión en el panel frontal de los
reguladores de nivel de GROUP.
Éstas son tomas TRS desequilibradas.
• Nivel nominal de salida: 0dB
• Nivel nominal de entrada: 0dB
Punta = salida, anillo = entrada, manguito = masa
E Tomas de entrada/salida de inserción de estéreo (ST
INSERT I/O 0dB)
Éstas son tomas telefónicas de 1/4” para conexión en el panel frontal del regulador de nivel de L-ST1-R del módulo principal. Éstas son tomas TRS desequilibradas, con punta = salida, anillo = entrada, y manguito = masa.
• Nivel nominal de entrada: 0dB
• Nivel nominal de salida: 0dB
F Tomas de salida de grupo (GROUP OUT +4dB)
Éstas son tomas de 1/4” desequilibradas que dan salida a las señales de los
buses GROUP.
• Nivel nominal de salida: +4dB
G Tomas de salida estéreo 2/monitorización (ST2/MONI OUT
+4dB)
Éstas son tomas de 1/4” desequilibradas que dan salida a la señal del bus
STEREO L, R o a la señal del bus MONITOR.
• Nivel nominal de salida: +4dB
H Tomas de salida estéreo 1 (ST1 OUT +4dB)
Éstas son tomas de tipo XLR3-32 equilibradas que dan salida a la señal del
bus L,R estéreo.
• Nivel nominal de salida: +4dB
I Interruptor de alimentación (POWER)
Este interruptor conecta/desconecta la alimentación. En la posición “ON”,
el indicador POWER estará encendido.
J Interruptor de alimentación fantasma (PHANTOM)
Este interruptor conecta/desconecta la alimentación fantasma interna. En
la posición “ON”, el indicador PHANTOM estará encendido, y la alimentación de 48 V CC se suministrará entre las patillas 2 y 3 de las tomas INPUT
A.
Si no necesita alimentación fantasma, cerciórese de poner este interruptor
este interruptor en la posición “OFF”.
MX400 Manual de uso
14
Apéndice
Apéndice
Especificaciones generales.
Respuesta en frecuencia
Distorsión armónica total
Diafonía (a 1 kHz)
Zumbido y ruido (media, Rs = 1500 Ω)
(Medición con filtro de paso bajo
20 Hz~20 kHz)
Ganancia máxima de tensión
Ecualizador del módulo de entrada
Ecualización del módulo de entrada estéreo
Filtro de paso alto del módulo de entrada
Control de ganancia del módulo de entrada
Medidores (LED 0 = nivel de salida de
+4dB)
Indicadores del módulo de entrada, módulo de entrada estéreo
MX400 Manual de uso
20 Hz - 20 kHz +1, –2dB (ST L/R, GROUP a 600 Ω AUX SEND a 600 Ω)
Menos del 0,1% (20 Hz - 20 kHz a 14dB*) (ST L/R, GROUP a 600 Ω AUX SEND a 600 Ω)
–70dB (entre canales adyacentes)
–70dB (entre salidas)
Ruido de entrada equivalente a –128dB* (CH 1-24)
Ruido residual de –96dB* (STEREO 1,2, GROUP 1-4, AUX SEND 1-5)
–87dB* (STEREO, 1,2, GROUP 1-4) Medición realizada con el reguladores de nivel principales al nivel nominal y todos los interruptores de asignación desenganchados (OFF)
posición de nivel nominal
–64dB* (relación señal-ruido = 68dB) (STEREO, 1,2, GROUP 1-4) Medición realizada con
el regulador de nivel principal y el módulo de entrada 1 en la posición de nivel nominal
–78dB* (AUX SEND 1-5) Medición realizada con los reguladores de nivel principales AUX
SEND al nivel nominal y los controles AUX de todos los módulos en la posición mínima.
–64dB* (relación señal-ruido) (AUX SEND 1-5) Medición realizada con los reguladores
de nivel AUX SEND y el control AUX de un módulo en la posición de nivel nominal
–82dB* (STEREO 2/MONITOR) Medición realizada con el regulador de nivel principal de
ST2/MONITOR y PFL y AFL desenganchados (OFF) en todos los módulos. Medición realizada con el interruptor MONI/ST2 en la posición MONI
–64dB* (relación señal-ruido = 68dB) (STEREO 2/MONITOR) Medición realizada con el
regulador de nivel principal ST2/MONITOR y el interruptor PFL enganchado (ON) para
un módulo, y el interruptor MONI/ST2 en la posición MONI
84dB INPUT A/B → STEREO OUT 1,2
84dB INPUT A/B → GROUP OUT 1-4
80dB INPUT A/B → AUX SEND 1,2
90dB INPUT A/B → AUX SEND 3-5
28dB TAPE IN → STEREO OUT 1,2
30dB ST INPUT 1-4 → STEREO OUT 1,2, GROUP OUT 1-4
30dB ST INPUT 1-4 → AUX SEND 1-4
10dB GROUP SUB IN → GROUP OUT
10dB ST SUB IN → STEREO OUT
22dB 2TR IN → STEREO 2/MONITOR
70dB TALKBACK → STEREO OUT
Variación máxima +/–15dB
HIGH 12 kHz tipo aplanamiento
MID
250 Hz-5 kHz tipo agudizamiento
LOW 80 Hz tipo aplanamiento
* Frecuencia de cruce/desplazamiento para aplanamiento: 3dB antes de la variación
máxima
Variación máxima: +/–15dB
HIGH 12 kHz aplanamient
LOW 80 Hz aplanamiento
* Frecuencia de cruce/desplazamiento para aplanamiento: 3dB antes de la variación
máxima
80 Hz 12dB/octava
44dB variable –60dB - –16dB
LED de 6 x 11 segmentos (–20, –15, –10, –7, –4, –2, 0, +2, +4, +6 PEAK), GROUP 1,2
GROUP 3, 4 o ST2/MONITOR L,R, ST1 L,R
PEAK
Se enciende en rojo cuando la señal de post- ecualización alcanza 3dB antes
del recorte
SIGNAL Se enciende en verde cuando la señal de post- ecualización alcanza 10dB antes del nivel nominal
Especificaciones de entrada
Indicadores AUX SEND
Alimentación
Modelo para
EE.UU. y Canadá
Modelo general
Peso
Consumo
Dimensiones (An × Al × Prf)
15
PEAK
Se enciende en rojo cuando la señal de salida alcanza 3dB antes del recorte
0
Se enciende el amarillo cuando la señal de salida alcanza +4dB
–20
Se enciende cuando la señal de salida alcanza –16dB
120 V CA, 60 Hz
230V CA, 50Hz
MX400-8 17kg, MX400-12 19kg, MX400-16 22kg, MX400-24 28kg
80W
MX400-8 562×180.2×596 mm
MX400-12 682×180.2×596 mm
MX400-16 802×180.2×596 mm
MX400-24 1042×180.2×596 mm
* 0dB = 0,775 V eficaz
Especificaciones de entrada
Conexión de entrada
Interru Contr Impedancia
ptor
ol
de carga
PAD
GAIN
actual
—
INPUT A/B
Para utilizar
con el valor
nominal
–60
4k Ω
Micrófonos de
50 - 600 Ω
y
líneas de 600 Ω
Nivel de entrada
Sensibilidad
*1
Nominal
Máx. antes
del recorte
–80dB
(77.5µV)
–60dB
(775µV)
–40dB
(7.75mV)
–36dB
(12.3mV)
–16dB
(123mV)
+4dB
(1.23V)
—
–16
–20
–16
–16dB
(123mV)
+4dB
(1.23V)
+24dB
(12.3V)
+4
—
–12dB
(195mV)
+4dB
(1.23V)
+24dB
(12.3V)
5k Ω
STEREO INPUT 1, 2
Líneas de 600 Ω
–10
—
–26dB
(38.8mV)
–10dB
(245mV)
+10dB
(2.45V)
+4
—
–12dB
(195mV)
+4dB
(1.23V)
+24dB
(12.3V)
–26dB
(38.8mV)
–10dB
(245mV)
+10dB
(2.45V)
Conector de
mezclador
Tipo XLR-3-31
(A),
toma telefónica
(B) *2
Toma telefónica
*4 RCA (conmutable)
Toma telefónica
*4
5k Ω
Líneas de 600 Ω
INPUT INSERT IN
10k Ω
Líneas de 600 Ω
–20dB
(77.5mV)
0dB
(775mV)
+20dB
(7.75V)
Toma telefónica
(TRS) *3
STEREO INSERT IN
10k Ω
Líneas de 600 Ω
–20dB
(77.5mV)
0dB
(775mV)
+20dB
(7.75V)
Toma telefónica
(TRS) *3
GROUP INSERT IN
10k Ω
Líneas de 600 Ω
–20dB
(77.5mV)
0dB
(775mV)
+20dB
(7.75V)
Toma telefónica
(TRS) *3
TAPE IN
10k Ω
Líneas de 600 Ω
–26dBV
(50mV)
–10dBV
(316mV)
—
RCA
STEREO SUB IN
10k Ω
Líneas de 600 Ω
–6dB
(388mV)
+4dB
(1.23V)
+24dB
(12.3V)
Toma telefónica
*4
GROUP SUB IN
10k Ω
Líneas de 600 Ω
–6dB
(388mV)
+4dB
(1.23V)
+24dB
(12.3V)
Toma telefónica
*4
2TR IN
10k Ω
Líneas de 600 Ω
–20dBV
(100mV)
–10dBV
(316mV)
+10dBV
(3.16V)
RCA
TALKBACK
10k Ω
Micrófonos de
50 - 600 Ω
–66dB
(388µV)
–50dB
(2.45mV)
–30dB
(24.5mV)
Tipo XLR-3-31 *5
STEREO INPUT 3, 4
–10
—
*1. La sensibilidad es el nivel de entrada más bajo que producirá una salida de +4dB (1,23 V) o el nivel de salida nominal cuando el MX400
se ajusta a la ganancia máxima (es decir, todos los controles de nivel y los reguladores de nivel ajustados al máximo)
*2. Conectores de tipo XLR y tomas telefónicas (TRS) están equilibrados (punta = ACTIVO, Anillo = ACTIVO, Manguito = Apantallado).
*3. Las tomas telefónicas de inserción (TRS) están desequilibradas (punta = salida, anillo = entrada, manguito = masa)
MX400 Manual de uso
16
Apéndice
*4. Las tomas telefónicas están desequilibradas
*5. La toma de comunicación es desequilibrada.
*6. En estas especificaciones, cuando dB representa una tensión específica, 0dB hace referencia a 775 mV de valor eficaz, y cuando dBV
representa una tensión específica, 0dBV hace referencia a 1 V de valor eficaz.
Especificaciones de salida
Nivel de salida
Impedancia de la
fuente actual
Para utilizar con el
valor nominal
Nominal
Máx. antes del
recorte
Conector de mezclador
ST1 OUT L/R
150 Ω
Líneas de 600 Ω
+4dB (1.23V)
+24dB (12.3V)
Tipo XLR-3-32 *1
STEREO INSERT OUT
L/R
600 Ω
Líneas de 10 kΩ
0dB (775mV)
+20dB (7.75V)
Toma telefónica (TRS) *2
ST2/MONI OUT L/R
75 Ω
Líneas de 600 Ω
+4dB (1.23V)
+20dB (7.75V)
Toma telefónica *3
REC OUT L/R
600 Ω
Líneas de 10 kΩ
–10dBV (316mV)
+16dBV (6.31V)
RCA
GROUP 1-4
75 Ω
Líneas de 600 Ω
+4dB (1.23V)
+20dB (7.75V)
Toma telefónica *3
AUX SEND 1-5
75 Ω
Líneas de 600 Ω
+4dB (1.23V)
+20dB (7.75V)
Toma telefónica *3
INPUT INSERT OUT
600 Ω
Líneas de 10 kΩ
0dB (775mV)
+20dB (7.75V)
Toma telefónica (TRS) *2
GROUP INSERT OUT
600 Ω
Líneas de 10 kΩ
0dB (775mV)
+20dBV (7.75V)
Toma telefónica (TRS) *2
DIRECT OUT
600 Ω
Líneas de 10 kΩ
0dB (775mV)
+20dB (7.75V)
Toma telefónica *3
PHONES OUT
100 Ω
Auriculares de 40 Ω
3mW (346mV)
100mW (2.0V)
Toma telefónica estéreo
Conexión de salida
*1:
*2:
*3:
*4:
Los conectoers de tipo XLR y las tomas telefónicas están equilibradas (punta = ACTIVO, anillo = PASIVO, manguito - MASA)
Tomas telefónicas de inserción (TRS) desequilibradas (punta = salida, anillo = entrada, manguito = masa)
Las tomas telefónicas están desequilibradas
En estas especificaciones, cuando dB representa una tensión específica, 0dB hace referencia a 775 mV de valor eficaz, para TAPE SEND,
dBV representa una tensión específica, 0dBV hace referencia a 1 V de valor eficaz.
• Todas las especificaciones están sujetas a cambios sin previo aviso.
Dimensiones
An1
Al: 180.2
155.5
434.5
129.5
An2
An
MX400 Manual de uso
108.9
Prf:596
31.9
13.3
Model
An1
An2
An
MX400-8
465
527
562
MX400-12
585
647
682
MX400-16
705
767
802
MX400-24
945
1007
1042
*
R
L
R
ST INPUT
3-4
R
L/
MONO
B
ST INPUT
1-2
L/
MONO
A
24
*:12168
*
HA
PAD
PAD
EQ
EQ
EQ
HIGH
SIGNAL
LEVEL
LEVEL
(+V)
(+V)
(+V)
PRE
PFL
AUX [–6]
[–3]
BAL/PAN
PFL
BAL/PAN
PFL
AUX 5
AUX 4
AUX 3
AUX 2
SUM
SUM
SUM
SUM
2TR IN
–10dBV
SUM
SUM
SUM
INV
INV
L
AFL
(+V)
PFL
INV
INV
ST INSERT
I/O R 0dB
R
PAN
(+V)
ST INSERT
I/O L 0dB
AFL
TO ST
INV
2TR IN
MONI
ST2
R
L
SUM
REC OUT
INV
REC OUT
–10dBV
PHONES
L+R
LA
HPA
HPA
LA
LA
LA
AUX SEND
GROUP OUT
ST 1 OUT
ON
(METER)
ON
(METER)
ON
(METER)
ON
–20
0
PEAK
AUX SEND
+4dB
1-5
ST2/MONI
OUT +4dB
ST1 OUT
+4dB
–10
0
(dB)
+10
R
L
R
L
GROUP OUT
+4dB
1-4
–60
CH IN [–16]
–60
–50
TB
ON
ON
ON
AUX 1
PAN
–40
BA
GROUP
INSERT I/O
0dB 1-4
–50
LEVEL
TAPE IN
TAPE IN [–10dBV]
GROUP SUB IN
ST SUB IN [+4]
EQ
PEAK
SIGNAL
PEAK
EQ
*
DIRECT OUT
0dB 1-
1
2
3 GROUP
4
–30
R
L
EQ
SIGNAL
PEAK
L STEREO
R
–40
TALKBACK IN
ST SUB IN
+4dB L,R
GROUP SUB IN
+4dB 1-4
TAPE IN
–10dBV
80
*
INPUT
INSERT I/O
0dB 1-
1
2
3 AUX
4
5
–20
HA
HA
PAD
+4
–10
HA
PAD
HPF
(+48V)
L PFL
R
PFL CTRL
–30
CH IN [–16]
CH IN Pad On [+4]
GAIN
20dB
+4
–10
HA
PAD
PHANTOM
AFL
AFL CTRL
–20
–10
0
(dB)
+10
GROUP 3
ST2/MONITOR L
GROUP 4
ST2/MONITOR R
ON
LOW
OFF
A
B
A
B
STEREO 1 L
INPUT B
1-
GROUP 1
MID
LOW
LOW
INPUT A
1-
GROUP 2
(INPUT A)
(PHANTOM)
STEREO 2 R
MID FREQ
HIGH
HIGH
PHANTOM
Block/Level diagram Schéma de connexions/de niveau
Block- und Pegelschaltbild Diagrama en bloques/de nivel
R0 1 IP Printed in Korea
YAMAHA CORPORATION
P.O.Box 1, Hamamatsu, Japan