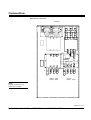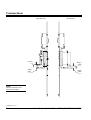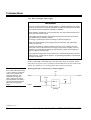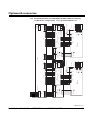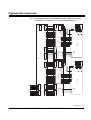
1
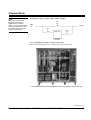
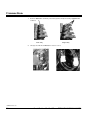
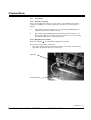
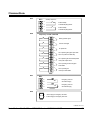
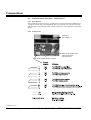
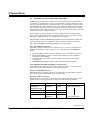
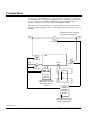
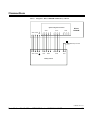
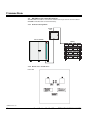
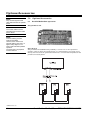
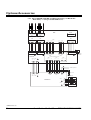
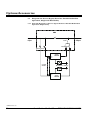
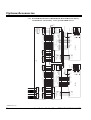
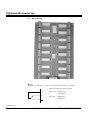
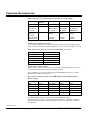
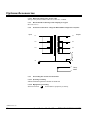
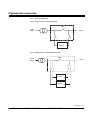
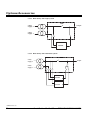
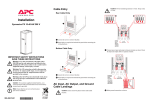
Silcon DP300E Series
480V 120–160kVA
Installation Guide
Copyright © 1999 APC Denmark A/S
Due to continuous product development information
given in this guide is subject to change without notice.
7OH0006 US rev. 03
Installation Guide Silcon DP300E Series 480V 120-160kVA
7OH0006 US rev. 03
1
IMPORTANT SAFETY INSTRUCTIONS
SAVE THESE INSTRUCTIONS
This guide contains important instructions for your Silcon DP300E
UPS that should be followed during installation and maintenance of
the UPS and batteries.
The installation and use of this product must comply with all national, federal, state,
municipal or local codes that apply. If you need help, please call APC’s toll free
technical support at: 1-877-287-7835 (1-877-2UPS-TEK).
WARNING!
UPS units contain hazardous AC and DC voltages. A qualified electrician must install
the UPS, AC line service, and external batteries according to national and local codes
and must be familiar with batteries and battery installation.
Before installing, maintaining, or servicing the UPS, shut off the UPS and disconnect
all sources of AC and DC power.
This UPS system has no built-in disconnecting devices for the external AC and DC
input power sources. Disconnecting devices must be provided as external parts in
connection with the installation!
The installer must provide each external disconnecting device for this UPS system
with labels having the following wording:
“Isolate the Uninterruptible Power Supply (UPS) as instructed in this guide before
working on the circuit”.
Whenever AC and/or DC voltage is applied, there may be AC voltage at the UPS
output; this is true because the UPS can supply output power from utility or from its
batteries. To avoid equipment damage or personal injury, always assume that there
may be voltage at the UPS output.
This system is equipped with an auto-start function. If activated the system may start
without warning. Please refer to chapter 4: “Programming parameters” in User Guide
to ensure de-activation.
TEST BEFORE TOUCHING!
To reduce the risk of fire or electric shock, install the UPS and external batteries in a
temperature and humidity controlled indoor area, free of conductive contaminants.
UPS batteries are high current sources. Shorting battery terminals or DC terminal
strips can cause severe arcing, equipment damage and injury. A short circuit can
cause a battery to explode. Always wear protective clothing and eye protection and
use insulated tools when working near batteries.
This unit contains components that are sensitive to electrostatic discharge (ESD). If you do not follow proper ESD procedures, you may
cause severe damage to electronic components.
7OH0006 US rev. 03
2
Installation Guide Silcon DP300E 480V 120-160kVA
Contents
1.0
Introduction
1.1
2.0
Unpacking
2.1
3.0
5.3
5.4
5.5
5.6
5.7
5.8
Parallel/redundant operation
Diagrams for service bypass panel for single operation,
single and dual utility
Diagrams for service bypass panel for parallel redundant operation,
single and dual utility
Relay board
Seismic anchoring
NEMA 12 cover
Remote display
Isolation transformer module
System Specifications
6.1
7.0
Connecting the Silcon DP300E
System integration interface
Communication interface - ComInterface
SmartSlots for Silcon DP3120E-DP3160E
Installing the UPS in a computer room
Cubicles for batteries
MCCB-box for batteries
Options/Accessories
5.1
5.2
6.0
Requirements on the installation site
Dimensions and weights
Foot prints
Connection
4.1
4.2
4.3
4.4
4.5
4.6
4.7
5.0
Identifying equipment
Placing
3.1
3.2
3.3
4.0
Required tools and equipment
Technical data
How to contact APC
7OH0006 US rev. 03
Installation Guide Silcon DP300E Series 480V 120-160kVA
3
Introduction
1.0 Introduction
The information provided in this installation guide is of a general nature for a local
authorized electrical installer. Please refer to local/national electrical codes for more
information.
WARNING!
The UPS and related equipment are very heavy. To prevent
personal injury or equipment
damage, please use extreme
care when handling and
transporting the UPS cabinet
and related equipment.
WARNING!
Never lift or transport the
system without front doors and
without the internal front cover
plate mounted and fastened
with screws.
SPE Factory Warranty:
1 year on parts and on-site labor. Labor response time is best endeavour. Travel
expenses are not included. An APC Start-Up Service must be performed/completed
by an APC or APC authorized service personnel or this on-site factory warranty (onsite labor) will be void. Parts will only be covered upon right commissioning and
installation.
1.1
Required tools and equipment
This section lists all tools that could be required to install the UPS and related
equipment. Whether all tools are used, depends on what UPS configuration you are
using.
Tools needed for installation of Silcon DP3120E and Silcon DP3160E:
10 mm socket
13 mm socket–deep
17 mm socket
3/4” or 19 mm socket–deep
3/4” or 19 mm combo wrench
Small flat/regular screwdriver
#3 philips screwdriver
Compression lug crimp tool
Knock–out set (for conduit)
Supplies needed:
Compression lugs for power terminations
Cable to service bypass panel from system feeder (see wire sizing)
Cable to UPS input from service bypass panel (see wire sizing)
Cable to service bypass panel from UPS output (see wire sizing)
Cable from service bypass panel to customer distribution (see wire sizing)
Cable to UPS from external batteries/external MCCB (see wire sizing)
Control wire, solid core, to UPS from service bypass panel (see control wiring)
Control wire, solid core, to UPS from external batteries/external MCCB (see
control wire)
Conduit necessary for above listed cabling (see wire size for requirements)
7OH0006 US rev. 03
4
Installation Guide Silcon DP300E 480V 120-160kVA
Unpacking
2.0 Unpacking
1.
2.
3.
4.
Unpack the system.
Check that the type sign placed inside on the front door corresponds to the
ordered system, especially with respect to input / output voltages.
To simplify later identification of the installed system – please transfer the data
from the type sign to the below blank copy.
Transport the system to the installation site by lifting underneath by means of a
fork lift.
Copy of type sign (without battery):
NOTE!
A lift truck will be required to lift
some of the equipment off the
pallet, unless special inside
delivery was requested of the
shipping company. Once off the
pallet, all equipment can be
moved, lifting from underneath
using a fork lift, pallet jack, or
special moving equipment.
NOTE!
If you have any questions
regarding the equipment you
receive please contact your
local APC representative or call
APC support (Listed in chapter
7).
2.1
Identifying equipment
This section is to help identifying and unpacking all received equipment and where
to use it. Verify name plate on equipment to ensure that correct voltage/power
ratings have been received.
Main UPS system.
This is the battery back-up system. Unconditioned
power is fed to the UPS input and condition power
is received from the UPS output.
Service bypass panel.
The service bypass panel is used for supplying the
critical load from utility power while the UPS is shutdown for maintenance. All AC power connections
should run through this panel.
External MCCB/Fuse box.
This is used, if the external battery cabinet does not
have an internal disconnection and an overcurrent
protection, or if battery racks are used. If the batteries
are located out of the UPS site, then external MCCB
should be used near the UPS for proper disconnection
of power.
7OH0006 US rev. 03
Installation Guide Silcon DP300E Series 480V 120-160kVA
5
Unpacking
Battery rack or cubicle.
The rack or cubicle is used for external
batteries, for storing the battery bank.
Battery cubicle
Battery rack
Isolation transformer.
The isolation transformer is used, when galvanic
isolation is required from the source to the
conditioned power. This transformer should also
be used if the source is something other than a
grounded Wye supply.
Seismic Anchoring.
Seismic anchoring is used for stabilization of the
UPS, when needed for seismic areas.
NEMA 12 cover.
This is used for locations where there is a potential
of liquid discharge or leakage above the UPS
system.
Remote display.
The remote display is used for remote monitoring
of the UPS.
7OH0006 US rev. 03
6
Installation Guide Silcon DP300E 480V 120-160kVA
Placing
3.0 Placing
WARNING!
Do not stand on or place any
object on any UPS cabinet or
UPS cubicle due to personal
and product safety.
3.1
Requirements on the Installation Site
The system is designed with parts accessible from front or top and cable entries from
top or bottom.
The system can be placed close to walls, only free space for front door opening has to
be ensured.
Sufficient cooling and service clearance must be ensured by a free space of min. 3
feet above and in front of the system.
Avoid placing the system in direct sunlight.
3.2
Dimensions and Weights
3.2.1 Dimensions and Weights Silcon DP3120E–DP3160E
Type
Height
inch/mm
Width
inch/mm
Depth
inch/mm
Weight
lbs/kg
DP3120E/480V
70.86/1800
67.00/1600
31.50/800
2643/1200
DP3160E/480V
70.86/1800
67.00/1600
31.50/800
2643/1200
Cubicle
70.86 / 1800 in./mm
67.00 / 1600 in./mm wide
7OH0006 US rev. 03
Installation Guide Silcon DP300E Series 480V 120-160kVA
7
Placing
3.3
Foot Prints
3.3.1 Foot prints Silcon DP3120E–DP3160E – 67.00 / 1600 in./mm cubicle
62.99/1600
62.05/1576
NOTE:
Dimensions in drawings are
stated in inches / millimeters
respectively.
COM
DC
UTILITY 1
59.25/1505
59.06/1500
50.93/1280
OUTPUT
47.64/1210
42.40/1077
30.59/777
FRONT
REAR
UTILITY 2
39.65/1007
26.65/677
23.90/607
3.74/95
1.81/46
1.02/26
0
6.14/156
7.87/200
14.37/365
15.94/405
25.98/660
31.50/800
30.47/774
0.94/24
0
7OH0006 US rev. 03
8
Installation Guide Silcon DP300E 480V 120-160kVA
Placing
3.3.2 Conduit entrance plate in bottom of the system
REAR
LEFT
RIGHT
Utility 1
30.39/771.9
DC
19.78/502.5
Output
10.14/257.5
0
Utility 2
COM
COM
FRONT
For cable entry, holes will need to be punched into the UPS. Follow the diagram for
proper orientation of the power and control wires to be brought into the UPS.
7OH0006 US rev. 03
Installation Guide Silcon DP300E Series 480V 120-160kVA
9
Placing
3.3.3 Top cable entry
REAR
17.72/450
Utility 1–2 / Output / DC
11.61/295
COM
LEFT
RIGHT
7.68/195
26.12/663.5
16.28/413.5
3.31/84
0
0
FRONT
For cable entry, holes will need to be punched into the UPS. Follow the diagram for
proper orientation of the power and control wires to be brought into the UPS.
7OH0006 US rev. 03
10
Installation Guide Silcon DP300E 480V 120-160kVA
Connection
4.0 Connection
WARNING!
Before continuing, read the
warnings on page 2 of this
manual.
NOTE!
Always separate AC, DC, and
communication cables. See
chapter 4.1.3.
4.1
Connecting the Silcon DP300E
This section is for connecting the UPS unit itself. Before connection, refer to section
5.0 Options/Accessories to ensure that the UPS and options are properly interfaced
together during the installation process.
4.1.1 Connecting Silcon DP3120E–DP3160E [480V]
To get access to the cable terminals open the front door.
There are 4 front covers. Remove the screws and lift off the front covers.
Power cable entry from the bottom remove front cover no. 2 and 3, power cable entry
from the top, remove front cover no. 1 and 2. Communication cable for system
integration interface, parallel, relay boards remove cover no. 4. SmartSlots can be
connected without removing covers.
1
2
4
3
UPS system without cover and doors
Connecting AC and DC power cables
Connecting
Connecting communication cables
Ground
7OH0006 US rev. 03
Installation Guide Silcon DP300E Series 480V 120-160kVA
11
Connection
NOTE:
This UPS must be fed from a
grounded WYE service, 3 or 4
wire to UPS.
4.1.2 Connecting AC and DC power cables
NOTE:
UPS system must be fed with
an A-B-C clockwise rotation.
NOTE:
UPS input and UPS output
conductors must be in separate
conduits.
NOTE:
UPS AC and DC conductors
must be in separate conduits.
NOTE:
Battery 1 and battery 2 DC
conductors must be in separate
conduits.
NOTE:
UPS power conductors and
UPS control wiring must be in
separate conduits.
Top bar – Utility 2 (L1, L2, L3)
Bottom bar – Output (N/E, L1, L2, L3)
Top bar – Ext. DC (X003 ±, X004 ±)
Bottom bar – Utility 1 (N, L1, L2, L3)
connection in the
bottom of the cabinet
7OH0006 US rev. 03
12
Installation Guide Silcon DP300E 480V 120-160kVA
Connection
Dual utility connection
FRONT
E
L1
L2
L3
N
L1
L2
L3
N
Utility 2 - X002
Output - X005
Ext. DC
Utility 1 - X001
NOTE:
Ground connection in the
bottom of the cabinet.
7OH0006 US rev. 03
Installation Guide Silcon DP300E Series 480V 120-160kVA
13
Connection
Right side view
Ext. DC
Utility 1
X001
Left side view
Utility 2
X002
Output
X005
NOTE:
Ground connection in the
bottom of the cabinet.
7OH0006 US rev. 03
14
Installation Guide Silcon DP300E 480V 120-160kVA
Connection
4.1.3 Separation of AC from DC1 and DC2
Two pieces of polycarbonate are supplied along with
the UPS and are used for separating the AC from
DC1 and DC2. The length of the polycarbonate is
delivered as standard top entry.
If bottom entry is used, the polycarbonate has to be
cut for proper installation.
4.1.4 Top or bottom entry
If top cable entry is used, the copper angle bar has to be moved to bottom.
Unscrew bolt, take out the split, move the
angle bar down, insert split, and tighten the
bolt.
Angle bar
7OH0006 US rev. 03
Installation Guide Silcon DP300E Series 480V 120-160kVA
15
Connection
4.1.5 Dual and single utility supply
WARNING!
UPS units contain hazardous AC and DC voltages. A qualified electrician must install
the UPS, AC line service, and external batteries according to national and local codes
and must be familiar with batteries and battery installation.
Before installing, maintaining, or servicing the UPS, shut off the UPS and disconnect
all sources of AC and DC power.
The installer must provide each external disconnecting device for this UPS system
with labels having the following wording:
“According to local/national codes for working on electrical equipment”.
Isolate the Uninterruptible Power Supply (UPS) as instructed in this guide before
working on the circuit.
Whenever AC and/or DC voltage is applied, there may be AC voltage at the UPS
output; this is true because the UPS can supply output power from utility or from its
batteries. To avoid equipment damage or personal injury, always assume that there
may be voltage at the UPS output.
This system is equipped with an auto-start function. If activated the system may start
without warning. Please refer to chapter 4: “Programming parameters” in User Guide
to ensure de-activation.
All Silcon DP3120E – DP3160E comes with dual utility input as standard. If dual
utility does not appear or if it not needed, a small modification has to be made in the
system, see chapter 4.1.6 for changing from dual to single utility input.
NOTE:
Max. phase shift between utility
1 and 2, less than ±3 degrees.
Utility 1 and 2 voltage and
frequency tolerance, see
specification in chapter 6.
Utility 1 supports the load in
normal operation, and utility 2
supports the load through the
static and service bypass
switch.
Working principle of dual utility (2 utility supplies):
Q3
Utility 2
Output
Q10a
Q2a
Q1a
Utility 1
Utility 2
Utility 1
DP300E
7OH0006 US rev. 03
16
Installation Guide Silcon DP300E 480V 120-160kVA
Connection
NOTE:
Utility 1 and 2 voltage and
frequency tolerance, see
specification in chapter 6.
Utility 1 or 2 support the load in
normal operation and the load
through the static and service
bypass switch as well.
Working principle of single utility (1utility supply):
Q3
Utility
1/2
Output
Q1
Q2
Utility 1/2
DP300E
4.1.6 Changing from dual to single utility input
Follow below the description for changing from dual to single input.
In the static switch the following modifications have to be made for single utility input.
7OH0006 US rev. 03
Installation Guide Silcon DP300E Series 480V 120-160kVA
17
Connection
1.
Remove fiber bar (55322) by unscrewing bolts and by mounting copper bars
as below.
Dual utility
2.
Single utility
Change around the connector in Con3 to Con1.
7OH0006 US rev. 03
18
Installation Guide Silcon DP300E 480V 120-160kVA
Connection
NOTE:
This UPS is intended to be
supplied from a grounded WYE
–service, either 3 or 4 wire.
External power conductors and overcurrent protection
AC
Utility 1
MCCB
[A]
AC
Utility 1
conductors
per phase
a)
DP3120E
– 480V
NOTE:
Ensure clockwise rotation of
utility input voltage!! Max.
power cable size: 500 kcmil.
DP3160E
– 480V
NOTE:
All external cable dimensions
are recommended.
Please refer to local legal
provisions.
System
NOTE:
With 3 wire input, the UPS can
only be loaded 3 wire (phase to
phase.
NOTE:
Conduit entrance plate in bottom
of system must be mounted.
WARNING:
At 100% non linear load the
neutral shall be rated for 173%
output phase current.
NOTE:
f is symbol for “phase”.
is symbol for “risk of
electric shock”.
Terminal for Equipment
Grounding Conductor is
marked:
Terminal for Grounding
Electrode Conductor is
marked “E”.
System
AC
Utility 2
& Output
conductors
per phase
b)
Conductors
for
equipment
grounding
b)
AC
Utility 2
& Output
MCCB
[A]
a)
250
250 kcmil
200
4/0 AWG
c)
300
400 kcmil
250
300 kcmil
c)
External power conductors and overcurrent protection
AC Output
grounding
electrode
conductor
Battery
MCCB
[A]
DC
Conductors
per battery pole
d)
b)
DP3120E
– 480V
e)
200
2 x 1/0 AWG
DP3160E
– 480V
e)
250
2 x 3/0 AWG
a) Input must be limited to less than 50KAIC.
b) Cable sizes refer to US National Electric Code.
All cables rated for 125% * nominal currents.
For linear load neutral cables must be rated like the phase cables.
For non-linear load neutral cables must be rated for INEUTRAL = √3 * ILOAD PHASE
and phase cables must be redimensioned.
All cables rated for 600V.
The tabled configurations are routed in conduits as follows:
AC Utility 1:
1 conduit with 3 phases, neutral, and equipment ground
AC Utility 2:
1 conduit with 3 phases, neutral, and equipment ground
AC Output:
1 conduit with 3 phases, neutral, and equipment ground
1 conduit with grounding electrode conductor (not for 4-wire system)
DC:
Battery 1:1 conduit with +, +, –, –, and equipment ground each
Battery 2:1 conduit with +, +, –, –, and equipment ground each
UPS power conductors and UPS control wiring must be in separate conduits.
As regards recommended cable lugs and crimping tool, see section 4.1.6.
NOTE:
The terminals marked
and
are electrically connected to the
terminal marked “E”.
c) Routed in each of the power cable conduits for the connected equipment.
Cable sizes refer to NEC.
As regards recommended cable lugs and crimping tool, see section 4.1.6.
d) Alternate suppliers of battery cubicle must be Listed by Unterwriters Laboratory.
When APC battery cubicle is not used, the proper DC disconnects/overcurrent must be used
in accordance with the APC Design Guide.
e) Routed in one separate conduit.
NOTE:
Grounding, please refer to local
legal provisions.
Cable sizes refer to NEC.
As regards recommended cable lugs and crimping tool, see section 4.1.6.
7OH0006 US rev. 03
Installation Guide Silcon DP300E Series 480V 120-160kVA
19
Connection
4.1.6 Recommended cable lugs and crimping tools, manufacturer
FRAMATOME CONNECTORS INTERNATIONAL (FCI)
Cable Size
[AWG]
Terminal bolt
diameter 6mm
Cable lug
Type
Crimping tool
Tool
Die
14
YAV10-2TC14
Y8MRB-1
Groove 2
12
YAV10-2TC14
Y8MRB-1
Groove 2
10
YAV102TC14
Y8MRB-1
Groove 2
8
YA8CL2TC14
Y8MRB-1
Groove 2
6
YA6CL2TC14
Y2MR
Blue Die
Cable Size
[AWG]
Terminal bolt
diameter 8mm
Cable lug
Type
Crimping tool
Tool
Die
8
YA8CL2TC38
MD7-34R
W8CVT
6
YA6CL2TC38
MD7-34R
W5CVT
4
YA4CL2TC38
MD7-34R
W4CVT
3
YA3CL2TC38
Y35
U3CRT
2
YA2CL2TC38
MD7-34R
W2CVT
1
YA1CL2TC38
MD7-34R
W1CVT
1/0
YA25L2TC38
MD7-34R
W25VT
2/0
YA26L2TC38
MD7-34R
W26VT
3/0
YA27L2TC38
MD7-34R
W27VT
4/0
YA28L2TC38
MD7-34R
W28VT
250kcmil
YA29L2TC38
MD7-34R
W29VT
Cable Size
[AWG]
Terminal bolt
diameter 12mm
Cable lug
Type
3/0
Crimping tool
Tool
Die
YA272LN
MD7-34R
W26VT
4/0
YA282LN
MD7-34R
W28VT
250kcmil
YA292LN
MD7-34R
W29VT
300kcmil
YA302LN
MD7-34R
W30VT
350kcmil
YA312LN
MD7-34R
W31VT
400kcmil
YA322LN
MD7-34R
W32VT
500kcmil
YA342LN
MD7-34R
W34WT
7OH0006 US rev. 03
20
Installation Guide Silcon DP300E 480V 120-160kVA
Connection
4.1.7
Grounding
4.1.7.1 System grounding
If none of the UPS neutral inputs are connected to a grounded service neutral
conductor per NEC per local code requirement, provisions have to be made as
follows:
a.
The bonding wire is mounted between output terminals X005:N/E and
equipment ground bar in bottom of unit.
b.
The output terminal X005:E/N and “Grounding electrode terminal”, are
both connected by the grounding electrode conductor to a local grounding
electrode per NEC per local code requirement.
4.1.7.2 Equipment grounding
Terminals marked
are intended for equipment grounding.
Provisions have to be made as followed:
• The input equipment ground terminal(s) shall be connected to the grounding
electrode(s) provided for the service entrance(s).
E terminal
Ground terminals
7OH0006 US rev. 03
Installation Guide Silcon DP300E Series 480V 120-160kVA
21
Connection
4.2
System Integration Interface
4.2.1 Introduction
Single Utility
NOTE:
Use of the same designations
in your diagrams make information exchange much easier.
NOTE:
Refer to chapter 4.1.6
Changing from dual to single
utility input.
Dual Utility
WARNING!
System Integration Interface
can receive high voltage from
external alarm and signal circuit
field wiring even if all AC and
DC sources are off.
The system Integration Interface (SII) is the control link between the UPS and the
system main switches as shown in the above diagram. The purpose is to ensure
correct operation of the switches without loosing the system output power.
Position information from auxiliary contacts on the main switches are the inputs for
the SII-board and the outputs are the lamp signals giving “the green light” for
operating the specific switches.
7OH0006 US rev. 03
22
Installation Guide Silcon DP300E 480V 120-160kVA
Connection
Besides previous mentioned the SII-board also have input facilities for emergency
shut down and temperature compensation of the charge voltage for external battery
(used together with the battery monitor, see also User Guide). “Battery operation”
and “Common fault” are the two main status relay signals also coming from the SIIboard.
NOTE:
When installing UPS systems
with Emergency Power Off
(EPO) all input sources must be
provided with disconnecting
device when activating EPO
4.2.2 Connections
System Integration Interface
X004
X003
X012
X005
S001
X001
S002
Remarks:
X003 and X004, auxiliary contacts:
When switching Q001, Q002, Q010, MCCB1, and MCCB2 from “ON or 1” to “OFF or
0” the auxiliary contacts have to give a signal before the corresponding utility switch
is opened. When switching from “OFF or 0” to “ON or 1” the auxiliary contact has to
be activated with max. 0.5 sec. delay from the corresponding main switch.
When switching Q003 from “OFF or 0” to “ON or 1” the auxilliary contact has to give
a signal before Q003 is closed. When switching from “ON or 1” to “OFF or 0” the
auxilliary contact has to be activated with max. 0.5 sec. delay
NOTE:
All alarm and signal circuit field
wiring shall be rated 300V
minimum.
X005, output relays:
The battery operation signal is 30 secs. delayed, but inhibited during battery tests.
The common fault relay is delayed. Standard factory setting is 0 sec., however other
periods can be programmed as described in User Guide chapter 4.
Same phase as power source for the output relays is mandatory for voltages above
170V.
Terminals X001, X003, X005, X004, X012:
Cable size AWG18 to AWG14, use solid copper conductors only.
7OH0006 US rev. 03
Installation Guide Silcon DP300E Series 480V 120-160kVA
23
Connection
X004
X004
LED's
OK for operating:
8
Battery MCCB2
7
Battery MCCB1
6
+12V
5
Auxiliary contacts on:
4
Internal battery fuse F021 (NO) position
3
Internal battery fuse F020 (NO) position
2
1
White
Black
Temperature sensor, external battery
S001
1
Internal battery temperature sensor
2
External battery temperature sensor
S001
X003
(Charge voltage compensation: -0.576V/°C)
X003
Input signals:
Contact load: TTL
12
Iso. trafo temp.
11
switch (NC pos.)
10
9
Not used
Auxiliary contacts on:
8
Q004 Parallel UPS system
7
output switch (NO pos.)
6
Q003 Service Bypass
5
switch (NC pos.)
4
Q002 UPS output
3
switch (NO pos.)
2
Q001 and Q010 input
1
switch (NO pos.)
7OH0006 US rev. 03
24
Installation Guide Silcon DP300E 480V 120-160kVA
Connection
X012
X005
X012
Auxiliary contacts on:
4
External battery
3
Fuse/MCCB2 (NO) position
2
External battery
1
Fuse/MCCB1 (NO) position
Output relays: 277V/8A, 0,3VA-2kVA
14
Battery operation signal.
13
12
Common fault signal
11
10
For special use
9
8
Ok for operating the bypass input switch
7
Q010 on systems with dual utility
6
Ok for operating the switch Q004 parallel
5
UPS system output switch
4
OK for operating the service bypass
3
switch Q003
2
OK for operating the
1
UPS output switch Q002
X005
X001
X001
4–
Emergency power off
3+
with internal supply
2–
Emergency power off
with external supply
1+
12V/20mA
S002
1
Internal supply for emergency shut down
2
External supply for emergency shut down
S002
7OH0006 US rev. 03
Installation Guide Silcon DP300E Series 480V 120-160kVA
25
Connection
4.3
Communication interface – ComInterface
4.3.1 Introduction
The ComInterface having 2 ports - is used when an interaction between UPS and e.g.
a computer system has to be established. The main purpose is to ensure monitoring
and if needed, a controlled shut down of the computer in case of failures in the utility
supply.
4.3.2 Connections
Smart slot,
see chapter 4.4
X008, 25 pin SUB D male.
Serial port RS232.
For service use.
X005, 25 pin SUB D female. ComPort.
7OH0006 US rev. 03
26
Installation Guide Silcon DP300E 480V 120-160kVA
Connection
4.4
SmartSlot for Silcon DP3120E – DP3160E
A UPS system alone provides excellent protection from brief power problems. However, during an extended power outage an unattended computer system will eventually shut down due to battery capacity exhaustion. To prevent data corruption when
the UPS shuts down, the computer must be informed by the UPS of impending shut
down and take appropriate file-saving measures. This important function is called
UPS monitoring. The UPS’s computer interface port is the means by which your UPS
communicates with a computer system.
Some computer operating systems have built-in UPS monitoring. These systems
require various hardware interfaces. Interface kits for all major operating systems
that support UPS monitoring are available from your dealer.
APC SmartSlot for Silcon DP300E Series UPS’s has been designed for reliable and
maintenance-free service in combination with your American Power Conversion
(APC) Silcon DP300E Series uninterruptible power supply (UPS).
4.4.1 SmartSlot Accessories
SmartSlot at the front of the frame accomodate up to 3 accessory cards. Before installing any SmartSlot accessory, ensure it is a compatible “Silcon DP300E OK”
model.
1.
2.
3.
4.
Share-UPS TM, provides automatic shutdown of up to two additional servers.
Measure-UPS TM II, provides environmental information such as ambient
temperature and humidity.
Call-UPS TM, works with an external modem to provide out-of-band UPS
manegement
WEB/SNMP Management card, provides web based UPS management.
4.4.2 Multiple SmartSlot Installation - introduction
If your UPS configuration uses more than one SmartSlot device, you must install
them in the correct order for them to work together properly.
Priority of SmartSlot devices:
A SmartSlot device with higher priority is to be placed in the SmartSlort accessory
slot with the higher number. Refer to the following table.
Priority of APC accessories:
Install SmartSlot accessories as dictated by the following table. An accessory with
higher priority is to be placed in the accessory slot with the higher number.
Accessory
P/N
Priority
Position
Web/SNMP
AP9606S
Highest
High–numbered slot
Management Card
Call-UPS ® //
AP9608
Second-highest
Interface expander
AP9607
Second–lowest
Measure-UPS ® //
AP9612T
AP9612TH
Lowest
Low–numbered slot
7OH0006 US rev. 03
Installation Guide Silcon DP300E Series 480V 120-160kVA
27
Connection
Installing accessories – procedure:
To install accessories, perform the following steps.
1.
2.
Make sure that the Silcon DP300E is powered off.
Install the SmartSlot accessories into the housings on the front of the chassis.
See the instructions supplied with the accessories and “Priority of APC accessories.”
If your UPS has one SmartSlot accessory slot
If your UPS has exactly one SmartSlot accessory slot, use this accessory slot for the
SmartSlot device with the lowest priority.
Installation in the Silcon DP3120E and DP3160E
For installation of multiple SmartSlot devices in the Silcon DP3120E and DP3160E,
refer to the numbering shown in the figure that follows:
SmartSlot
1
2
3
7OH0006 US rev. 03
28
Installation Guide Silcon DP300E 480V 120-160kVA
Connection
4.5
Installing the UPS in a computer room
If installing the UPS system in a computer room the following MUST be provided at
installation site:
1. – The system can only be installed with external batteries.
– Alternate supplier’s battery cubicle must be UL Listed. If used in computer
room it must be approved for use in computer room.
– When APC battery cubicle is not used, the proper DC disconnects/overcurrent
must be used in accordance with the APC Design Guide.
– If alternate supplier’s batteries are installed in the computer room, please
note that the batteries must be R/C (BAZR2) and have a flame rating of
UL94V2 or UL94V1 or UL94V0.
2. The system must be provided with switch gear.
The switch gear must contain trip function for all switches for Emergency Power
Off function. See principal diagram.
3. The system must be provided with Emergency Power Off function.
The EPO must disconnect all AC and DC sources. See principal diagram.
When pushing the EPO switch, the UPS switches to system off. All switches in the
switch gear are tripped. UPS will discharge capacitors within 5 minutes.
In connection with yearly service it is recommended to test the EPO-function.
APC recommend that noise level is measured in computer room after installation,
with all equipment in operation (UPS, computers, servers, printers, air conditioning,
etc.) and if needed, necessary precaution is taken according to Occupational Noice
Exposure recommendation”.
4.5.1 Principal for EPO
Diagram shows the Emergency Power Off (EPO) principal, and has to be established
in connection with the EPO- and UPS-installation. MCCB’s and switchgear must be
installed with “shunt trip”.
When tripping MCCB’s and switches energy must be available. This energy comes
from an external power supply, power is supplied from “UTILITY 2”, if available,
otherwise from “UTILITY 1” and from the output of the UPS before (Q002).
The EPO circuit and the DP300E have interconnection to the pushbuttons, turn
system “OFF” and “ON”, through the system integration interface card terminals
X001, and on the system integration interface card a selection switch S002 for
internal or external power supply can be set.
S002
Choose between:
– Pos. 1, internal supply
– Pos. 2, external supply
Emergency shutdown connection between:
X001:3 and X001:4
X001:1, +12V / X001:2, GND
The connected EPO switch must have break function. It may be chosen to supply the
current loop of 20mA internally or externally by selector switch S002 on the system
integration interface. In case of external supply, a 12Vdc supply or a 20mA current
generator has to be used.
7OH0006 US rev. 03
Installation Guide Silcon DP300E Series 480V 120-160kVA
29
Connection
The other part of the EPO switch has interconnection to an electronic control system
(not supplied by APC), supplying the tripping function in the MCCB and switchgear
with an external 277Vac or 480Vac 50/60Hz supply, supported from Utility 2, if
available, or Utility 1 and from the output of the UPS before Q002.
This combination of 2 break function, one for the UPS system and one for external
switchgear makes it possible to make a quick shutdown of the total system in case of
emergency.
All switches in switch gear must
be provided with trip function
Output
Utility 2
Q3
Trip function
UPS
Q10
Trip function
Q2
Trip function
EPO
X001
Utility 1
Q1
Trip function
Trip function
EPO SW
Ext. batt.
cubicle or
batt. room
All MCCB’s in ext. batt.
cubicle or batt. room must
be provided with trip
function
Used for
tripping all
switches in
switch gear
and batt.
MCCB’s
User supplied electronics
and supply for tripping of
MCCB’s and switches
7OH0006 US rev. 03
30
Installation Guide Silcon DP300E 480V 120-160kVA
Connection
4.5.2 Emergency Power Off (EPO) for Silcon DP300E
If installing the UPS system in a computer room, the installation MUST contain
external batteries with MCCB’s and switchgear provided with trip function – approved for use in computer room – for EPO tripping of MCCB’s and switches. See
chapter 4.5.1 for details.
By the following, the system is installed with dual utility.
Q3
Output
Utility 2
User supplied external PSU. Used
for tripping of MCCB’s in external
battery cubicle or battery room
and switches in switch gear.
Q10
Q2
UPS
Utility 1
Q1
Ext. DC
Matrix dual utility
DC
Utility 2
Utility 1
Operation mode
0
0
0
Off
Nothing to trip
0
0
1
X
Under installation only
0
1
0
Bypass op.
0
1
1
Bypass op.
1
0
0
Batt. op.
1
0
1
Normal op.
1
1
0
Bypass op.
1
1
1
Normal op.
Batt. op.
7OH0006 US rev. 03
Installation Guide Silcon DP300E Series 480V 120-160kVA
31
Connection
By the following, the system is installed with single utility.
Q3
Output
User supplied external PSU. Used
for tripping of MCCB’s in external
battery cubicle or battery room
and switches in switch gear.
Utility 1/2
Q1
Q2
UPS
Ext. DC
Matrix single utility
DC
Utility 1
Operation mode
0
0
Off
Bypass op.
0
1
1
0
Batt. op.
1
1
Normal op.
Nothing to trip
Batt.
Bypass
7OH0006 US rev. 03
32
Installation Guide Silcon DP300E 480V 120-160kVA
Connection
4.6
Cubicles for batteries
IMPORTANT SAFETY INSTRUCTIONS
a) Servicing of batteries should be performed or supervised by personel knowledgeable of batteries and the required precautions. Keep unauthorized personnel
away from batteries.
b) When replacing batteries, replace with the same number and type as installed.
See also the installation guide from battery supplier, on how to install.
c)
CAUTION - Do not dispose of battery or batteries in a fire. The battery may
explode.
d) CAUTION - Do not open or mutilate the battery or batteries. Released electrolyte
is harmful to the skin and eyes. It may be toxic.
e) CAUTION - A battery can present a risk of electrical shock and high short circuit
current. The following precautions should be observed when working on batteries:
1) Remove watches, rings, or other metal objects.
2) Use tools with insulated handles.
3) Wear rubber gloves and boots.
4) Do not lay tools or metal parts on top of batteries.
5) Disconnect charging source prior to connecting or disconnecting battery
terminals.
6) Determine if the battery is inadvertently grounded. If inadvertently grounded,
remove source of ground. Contact with any part of a grounded battery can
result in electrical shock. The likelihood of such shock will be reduced if such
grounds are removed during installation and maintenance.
The installation and use of this product must comply with all national, federal, state,
municipal or local codes that apply. If you need assistance, please have your UPS
model and serial number available and call APC’s toll free technical support at:
1-877-287-7835 (1-877-2UPS-TEK).
You can find additional product information on the APC World Wide Web site at
http://www.apcc.com. See Section: How to contact APC.
7OH0006 US rev. 03
Installation Guide Silcon DP300E Series 480V 120-160kVA
33
Connection
4.6.1
Cubicle for batteries
4.6.1.1 Safety - Warnings
WARNINGS
The total system contains HAZARDOUS AC/DC VOLTAGES and is supplied
from more power sources. Some terminals and components are live even when the
system is switched off!
ONLY qualified electricians are allowed to perform the installation according to
national and local codes!
NO Silcon DP300E types are allowed to have built-in batteries when connected to
external batteries!
Do NOT install batteries that do not follow the specification indicated by APC,
otherwise the installer takes over the full responsibility!
Do NEVER lift or transport the battery cubicle with batteries installed.
4.6.1.2 Placing
See Installation Guide from battery supplier.
4.6.1.3 Preparing the batteries and the Silcon DP300E
Unpack the batteries, check that the type, no., and size is corresponding to the
ordered.
4.6.1.4 Dimensions and weights
See Installation Guide from battery supplier.
4.6.1.5 Mounting the batteries
See Installation Guide from battery supplier.
7OH0006 US rev. 03
34
Installation Guide Silcon DP300E 480V 120-160kVA
Connection
4.6.1.6 Introduction
Warning
With reference to Local/National Code use:
1.
2.
Additional insulating material
Insulating tools
WARNING
The battery bank is sub-divided into two separated DC busses “batteries”:
1.
Battery 1 is a series connection of a number of batteries, drawing on next page
shows the principle. No. 1 and no. 2 containing 32 batteries (can also be 64, 96,
or 128 batteries depending on the total battery solution), return in no. 3, the
battery block contains 192 cells and has a nominal voltage of Un = 384Vdc.
2.
Battery 2 is a series connection of a number of batteries, no. 4 and no. 5 containing 32 (can also be 64, 96, or 128 batteries), return in no. 6, the battery block
contains 192 cells and has a nominal voltage of Un = 384Vdc.
3.
Ensure that DC breakers are in position “OFF” or “0”.
7OH0006 US rev. 03
Installation Guide Silcon DP300E Series 480V 120-160kVA
35
Connection
Principal diagram
Bat. 1+
Bat. 1–
NOTE:
See Installation Guide from
battery cubicle supplier for
installation.
F002
Bat. 2–
Bat. 2+
F001
No. 3
No. 1
No. 4
Battery 1
No. 2
Battery 2
No. 5
No. 6
Connecting the batteries to the Silcon DP300E, see chapter 4 for DC connections.
7OH0006 US rev. 03
36
Installation Guide Silcon DP300E 480V 120-160kVA
Connection
4.6.1.7 Before Starting-up
WARNING
1.
Ensure that no electric power supply source has been connected to the Silcon
DP300E for at least 5 min.
2.
Ensure that DC breakers in cubicle are in position “OFF”.
3.
Place the switch S001 on the Silcon DP300E System Integration Interface in the
position “External battery temperature sensor”.
7OH0006 US rev. 03
Installation Guide Silcon DP300E Series 480V 120-160kVA
37
Connection
4.6.1.8 Connecting the units
Regarding cables – please refer to point 4.0: Connection and to below diagram
4.6.1.9. The following procedure is recommended:
1. Connect the Silcon DP300E terminals X004 and X012 on the System Integration
Interface to the terminals X009, X010, and X012 in the battery box. These wires
must be separated from the power cables.
2. Connect a possible external trip circuit to the X011 terminal in the battery box.
3. Connect the Silcon DP300E terminals PE, X003, and X004 to the corresponding in
the battery box.
NOTE:
Screw
Spring
Flat
Cable shoe
Sprocket
4. Mount top and front covers. Mount earth conductor.
CU-rail
Use copper conductor only !
WARNING
5. Follow the described „Starting-up procedure“
in User Guide, when all cables for the total
system are in place.
Do not close MCCB until the display shows:
otherwise the system may be damaged.
Close MCB
7OH0006 US rev. 03
38
Installation Guide Silcon DP300E 480V 120-160kVA
Connection
4.6.1.9
Diagram – Silcon DP300E with battery cubicle
System Integration Interface
X003 X004
+ – + – G
X004
1 2 6 7
8
X012
1 2 3 4
X001
1 2 3 4
Silcon
DP300E
MCCB trip for EPO
+ – + – G
X003 X004
1 2 1 2 3
X012 X009
1 2 3 4
X010
1 2
X011
Battery Cubicle
7OH0006 US rev. 03
Installation Guide Silcon DP300E Series 480V 120-160kVA
39
Connection
4.7
MCCB-box for external batteries
The MCCB-box is used for overcurrent and shortcircuit protection when the Silcon
DP300E is installed with an external battery.
4.7.1 General arrangement
MCCBbox
Silcon DP300E
Battery
4.7.2 Front view (closed door)
Front view
7OH0006 US rev. 03
40
Installation Guide Silcon DP300E 480V 120-160kVA
Connection
Front view (Open door)
7OH0006 US rev. 03
Installation Guide Silcon DP300E Series 480V 120-160kVA
41
Connection
4.7.3 Mounting and Connection
B
NOTE:
All external cable dimensions
are recommended.
Please refer to local national
legal codes.
4 x Ø 10mm on 648 x 448
A
Centres for fixing holes
in rear of enclosure
NOTE:
Ensure correct polarity at
connection of DC cables.
NOTE:
Terminal for Equipment
Grounding Conductor is
marked
External power conductors, overcurrent protection & mechanical sizes
Type
NOTE:
Grounding, please refer to local
legal provisions.
For
System
Conduc–
tors for
equipment
grounding
Battery
MCCB
[A]
c)
DC
Dimensions
conductors HxWxD
per battery
[mm3]
pole
a)
Fixing
centres
AxB
[mm2]
MCCB–
3120E–480
DP3120E
- 480V
b)
200
2 x 1/0
AWG
750 x 550
x 175
648 x
448
MCCB–
3160E–480
DP3160E
- 480V
b)
250
2 x 3/0
AWG
750 x 550
x 175
648 x
448
For
System
Weight
[kg/lbs]
MCCB–
3120E–480
DP3120E
- 480V
24/52.8
MCCB–
3160E–480
DP3160E
- 480V
24/52.8
Type
a) Cable sizes refer to US National Electric Code.
All cables rated for 125% * nominal currents.
All DC cables rated 600V.
The tabled configurations are routed in conduits as follows:
DC:
Battery 1:1 conduit with +, +, –, –, and equipment ground each.
Battery 2:1 conduit with +, +, –, –, and equipment ground each.
MCCB Power conductors and MCCB control wiring must be in separate conduits.
As regards recommended cable lugs and crimping tool, see section 4.1.6.
b) Routed in each of the power cable conduits for the connected equipment.
Cable sizes refer to NEC.
As regards recommended cable lugs and crimping tool, see section 4.1.6.
c) Alternate suppliers of battery cubicle must be Listed by Unterwriters Laboratory.
When APC battery cubicle is not used, the proper DC disconnects/overcurrent must be used
in accordance with the APC Design Guide.
4.7.3.1 Mounting and Connection
DC-cables rated 600V on 480V systems from MCCB-box to UPS.
7OH0006 US rev. 03
42
Installation Guide Silcon DP300E 480V 120-160kVA
Connection
4.7.4
Silcon DP300E with external battery via MCCB-box
Silcon
DP300E
X003 X004
+ – + – G
System Integration Interface
X004
X012
X001
1 2 6 7 8
1 2 3 4
1 2 3 4
MCCB trip for EPO
Temp. sensor
+ – + – G
X001 X002
1 2 3
1 2 3
X009
X010
4
1 2
X011
MCCB-Box
G
X004 +
Battery 2
G
X003 +
Battery 1
7OH0006 US rev. 03
Installation Guide Silcon DP300E Series 480V 120-160kVA
43
Options/Accessories
NOTE:
Only use the original control
cable delivered with the parallel
board.
5.0
Options/Accessories
5.1
Parallel/Redundant operation
The parallel board.
NOTE:
The control cables must be
separated from the AC and DC
power cables.
NOTE:
Common battery pack is a
technical possibility.
However, APC recommend
separate battery pack due to a
higher safety degree in connection with redundant/parallel
operation.
The UPS system is prepared
for both solutions.
Introduction.
The parallel board establishes the possibility to connect two or more systems in
parallel - either to obtain increased security or to obtain higher total output power.
Among other functions the parallel board ensures a correct load sharing between the
parallel connected systems
7OH0006 US rev. 03
44
Installation Guide Silcon DP300E 480V 120-160kVA
Options/Accessories
Control cables.
The external multicable is terminated with a 15 pin SUB-D plug in both ends. Pin 1
to pin 1, pin 2 to pin 2, and so on up to pin 15 - except pin 8, which is not connected.
Shield is connected to plug cover in both ends.
The terminals X020 and X021 for the control cables are situated on the parallel
board. X020 in UPS1 is connected to X021 in UPS2, X020 in UPS2 is connected to
X021 in UPS3 and so on. X020 in last UPS is connected to X021 in UPS1.
Power cables.
To optimize load sharing in parallel operation the external power circuits must be
“symmetrical”, i.e. power input cables must have same lengths and cross-sections
and the same for output cables.
7OH0006 US rev. 03
Installation Guide Silcon DP300E Series 480V 120-160kVA
45
Options/Accessories
5.2
Diagrams for Service Bypass Panel for Single Operation,
Single and Dual Utility
5.2.1 Diagram for Service Bypass Panel for Single Operation,
Single Utility
SBP
Q003
System
Input
System
Output
Q002
Internal
output
fuse
Q001
Silcon
DP300E
MCCB-box Battery
7OH0006 US rev. 03
46
Installation Guide Silcon DP300E 480V 120-160kVA
Options/Accessories
5.2.2 Silcon DP300E with SBP and External Battery via MCCB Box
- Single Utility - 4 wire grounded WYE-service
Utility input 1
L1 L2 L3 N
System
Output
SBP
G
L1 L2 L3 N
X002
X003
X010
L1 L2 L3 N
G
L1 L2 L3 N
G
L1 L2 L3 N
X002
X001
1
2
3
4
5
6
7
8
1
2
3
4
5
6
1
2
9
10
3
4
G
L1 L2 L3 N
G
L1 L2 L3 N
G
E
X005
X003
X005
System Integration Interface
DP300E
X003
G
X004
X001
X004
+ - + -
1
2
X004
6 7
8
1
X012
2 3
4
1
X001
2 3
4
G
MCCB trip for EPO
Temp. sensor
+ - + X001
G
1
2 3
X009
1
2 3
X010
4
1 2
X011
Battery 2
X002
MCCB-box
X004
+
G
X003
+
G
Battery 1
7OH0006 US rev. 03
Installation Guide Silcon DP300E Series 480V 120-160kVA
47
Options/Accessories
5.2.3 Silcon DP300E with SBP and External Battery via MCCB Box
- Single Utility - 3 wire grounded WYE-service
Utility input 1
L1 L2 L3 N
System
Output
SBP
L1 L2 L3 N
G
X002
X003
X010
L1 L2 L3 N
G
L1 L2 L3 N
G
L1 L2 L3 N
X001
X002
1
2
3
4
5
6
7
8
9
10
1
2
3
4
5
6
1
2
3
4
G
L1 L2 L3 N
G
L1 L2 L3 N
G
E
X005
Grounding
Electrode
X003
X005
System Integration Interface
DP300E
X003
G
X004
X001
X004
+ - + -
1
2
X004
6 7
8
1
X012
2 3
4
1
X001
2 3
4
G
MCCB trip for EPO
Temp. sensor
+ - + X001
G
1
2 3
X009
1
2 3
X010
4
1 2
X011
Battery 2
X002
MCCB-box
X004
+
G
X003
+
G
Battery 1
7OH0006 US rev. 03
48
Installation Guide Silcon DP300E 480V 120-160kVA
Options/Accessories
5.2.4 Silcon DP300E with SBP and External Battery via MCCB Box
- Dual Utility - 4 wire grounded WYE-service
System
Output
SBP
L1 L2 L3 N
G
L1 L2 L3 N
G
L1 L2 L3 N
X001
Utility input 1
X004
Utility input 2
X006
X002
G
L1 L2 L3 N
G
L1 L2 L3 N
G
L1 L2 L3 N
G
X002
X001
X003
X010
L1 L2 L3 N
1
2
3
4
5
6
7
8
9
10
1
2
3
4
5
6
1
2
3
4
L1 L2 L3 N
G
L1 L2 L3 N
G
E
X005
X003
X005
System Integration Interface
DP300E
X003
G
X005
X004
+ - + -
1
2
X004
6 7
8
1
X012
2 3
4
1
X001
2 3
4
G
MCCB trip for EPO
Temp. sensor
+ - + X001
G
1
2 3
X009
1
2 3
X010
4
1 2
X011
Battery 2
X002
MCCB-box
X004
+
G
X003
+
G
Battery 1
7OH0006 US rev. 03
Installation Guide Silcon DP300E Series 480V 120-160kVA
49
Options/Accessories
5.2.5 Silcon DP300E with SBP and External Battery via MCCB Box
- Dual Utility - 3 wire grounded WYE-service
System
Output
SBP
L1 L2 L3 N
G
L1 L2 L3 N
G
L1 L2 L3 N
Utility input 1
X004
Utility input 2
X006
X002
G
L1 L2 L3 N
G
L1 L2 L3 N
G
L1 L2 L3 N
G
X002
X001
X003
X010
L1 L2 L3 N
1
2
3
4
5
6
7
8
9
10
1
2
3
4
5
6
1
2
3
4
L1 L2 L3 N
G
L1 L2 L3 N
G
E
X005
Grounding
Electrode
X003
X005
System Integration Interface
DP300E
X003
G
X005
X001
X004
+ - + -
1
2
X004
6 7
8
1
X012
2 3
4
1
X001
2 3
4
G
MCCB trip for EPO
Temp. sensor
+ - + X001
G
1
2 3
X009
1
2 3
X010
4
1 2
X011
Battery 2
X002
MCCB-box
X004
+
G
X003
+
G
Battery 1
7OH0006 US rev. 03
50
Installation Guide Silcon DP300E 480V 120-160kVA
Options/Accessories
5.2.6 Mounting & Connection
NOTE:
All external cable dimensions are recommended. Refer to local/national legal codes.
WARNING:
At 100% switch mode load the neutral conductor shall be rated for 173% output phase
current.
NOTE:
φ is symbol for “phase”.
is symbol for “Risk of electric shock”.
Terminal for Equipment Grounding Conductor is marked
NOTE:
Grounding, refer to local/national legal codes.
NOTE:
Ensure correct phase connection of inputs and outputs.
7OH0006 US rev. 03
Installation Guide Silcon DP300E Series 480V 120-160kVA
51
Options/Accessories
5.3
Diagrams for Service Bypass Panel for Parallel Redundant
Operation, Single and Dual Utility
5.3.1 Principle Diagram for Service Bypass Panel for Parallel Redundant
Operation Single Utility
SBP
Q003
System
Input
Q004
System
Output
Q002b Q002a
Q001a Q001b
X020
X021
Control
cables
Silcon
DP300E
MCCB-box Battery
X020
X021
Silcon
DP300E
7OH0006 US rev. 03
52
Installation Guide Silcon DP300E 480V 120-160kVA
G
L1 L2 L3 N
Installation Guide Silcon DP300E Series 480V 120-160kVA
X002
G
+ - + -
X001
G
X004
+ - + -
X003
X002
L1 L2 L3 N
Silcon DP300E
X001
G
G
L1 L2 L3 N
X002a
X001
L1 L2 L3 N
Utility input 1
G
3
3
1
5
6
6
7
7
8
8
X010a
1
2 3
X009
8
1
1
2 3
X010
X012
2 3
4
4
1 2
X011
1
X003
5
X021
G
E
X002b
G
G
X004
X002
G
G
G
3
3
1
5
6
6
7
7
8
8
X010a
1
9
2 3
X009
8
1
1
2 3
X010
X012
2 3
4
4
System Integration Interface
4 5
X003
4
X004
2 6 7
2
2
MCCB-box
1
1
1
G
X003
5
+
X001
2 3
1 2
X011
1
3 4
X005
X004
2
G
4
6
10 11 12 13 14
+
X001
+ - + -
+ - + -
X003
X002
L1 L2 L3 N
Silcon DP300E
X001
L1 L2 L3 N
L1 L2 L3 N
G
Battery 1
Battery 2
Temp. sensor
MCCB trip for EPO
X020
Parallel Board
X005
L1 L2 L3 N
G
+
4
6
X003a
L1 L2 L3 N
G
+
X001
2 3
3 4
X005
X004
2
9 10 11 12 13 14
System Integration Interface
4 5
X003
4
X004
2 6 7
2
2
MCCB-box
1
1
1
SBP
X021
G
G
G
E
Battery 1
Battery 2
Temp. sensor
MCCB trip for EPO
X020
Parallel Board
X005
L1 L2 L3 N
L1 L2 L3 N
X003b
X003
L1 L2 L3 N
System
Output
Options/Accessories
5.3.2 Parallel/Redundant Silcon DP300E with SBP and External Battery
via MCCB Box - Single Utility - 4 wire grounded WYE service
7OH0006 US rev. 03
53
54
G
L1 L2 L3 N
X002
G
+ - + -
X001
G
X004
+ - + -
X003
X002
L1 L2 L3 N
Silcon DP300E
X001
G
G
L1 L2 L3 N
X002a
X001
L1 L2 L3 N
Utility input 1
G
2
2
2
1
5
6
6
7
7
8
8
X010a
1
2 3
X009
8
1
1
2 3
X010
X012
2 3
4
4
X003
5
X021
G
E
X002b
G
G
X004
X002
G
G
G
2
2
2
1
5
6
6
7
7
8
8
X010a
1
9
2 3
X009
8
1
1
2 3
X010
X012
2 3
4
4
System Integration Interface
4 5
X003
4
X004
6 7
3
3
MCCB-box
1
1
1
G
X003
5
+
X001
2 3
1 2
X011
1
3 4
X005
X004
2
G
4
6
10 11 12 13 14
+
X001
+ - + -
+ - + -
X003
X002
L1 L2 L3 N
Silcon DP300E
X001
L1 L2 L3 N
L1 L2 L3 N
G
Battery 1
Battery 2
Temp. sensor
MCCB trip for EPO
X020
Parallel Board
X005
L1 L2 L3 N
G
+
4
6
X003a
L1 L2 L3 N
G
+
X001
2 3
1 2
X011
1
3 4
X005
X004
2
9 10 11 12 13 14
System Integration Interface
4 5
X003
4
X004
6 7
3
3
MCCB-box
1
1
1
SBP
X021
G
G
G
E
Battery 1
Battery 2
Temp. sensor
MCCB trip for EPO
X020
Parallel Board
X005
L1 L2 L3 N
L1 L2 L3 N
X003b
X003
L1 L2 L3 N
System
Output
Grounding
Electrode
Options/Accessories
5.3.3 Parallel/Redundant Silcon DP300E with SBP and External Battery
via MCCB Box - Single Utility - 3 wire grounded WYE service
7OH0006 US rev. 03
Installation Guide Silcon DP300E 480V 120-160kVA
G
L1 L2 L3 N
Installation Guide Silcon DP300E Series 480V 120-160kVA
G
X002
+ - + -
X001
G
X004
+ - + -
X003
X002
L1 L2 L3 N
L1 L2 L3 N
X006a
Utility input 2
X005
L1 L2 L3 N
Silcon DP300E
X001
G
G
L1 L2 L3 N
X002a
Utility input 1
X001
L1 L2 L3 N
G
G
G
2
2
2
1
5
6
6
7
7
8
8
X010a
1
2 3
X009
8
1
1
2 3
X010
X012
2 3
4
4
X003
5
X021
G
E
X002b
G
G
X004
X002
G
G
X002
L1 L2 L3 N
G
G
2
2
2
1
5
6
6
7
7
8
8
X010a
1
9
2 3
X009
8
1
1
2 3
X010
X012
2 3
4
4
System Integration Interface
4 5
X003
4
X004
6 7
3
3
MCCB-box
1
1
1
G
X003
5
+
X001
2 3
1 2
X011
1
3 4
X005
X004
2
G
4
6
10 11 12 13 14
+
X001
+ - + -
+ - + -
X003
X006b
L1 L2 L3 N
Silcon DP300E
X001
L1 L2 L3 N
L1 L2 L3 N
G
Battery 1
Battery 2
Temp. sensor
MCCB trip for EPO
X020
Parallel Board
X005
L1 L2 L3 N
G
+
4
6
X003a
L1 L2 L3 N
G
+
X001
2 3
1 2
X011
1
3 4
X005
X004
2
9 10 11 12 13 14
System Integration Interface
4 5
X003
4
X004
6 7
3
3
MCCB-box
1
1
1
SBP
X021
G
G
G
E
Battery 1
Battery 2
Temp. sensor
MCCB trip for EPO
X020
Parallel Board
X005
L1 L2 L3 N
L1 L2 L3 N
X003b
X003
L1 L2 L3 N
System
Output
Options/Accessories
5.3.4 Parallel/Redundant Silcon DP300E with SBP and External Battery
via MCCB Box - Dual Utility - 4 wire grounded WYE service
7OH0006 US rev. 03
55
56
G
L1 L2 L3 N
X002
G
+ - + -
X001
G
X004
+ - + -
X003
X002
L1 L2 L3 N
L1 L2 L3 N
X006a
Utility input 2
X005
L1 L2 L3 N
Silcon DP300E
X001
G
G
L1 L2 L3 N
X002a
Utility input 1
X001
L1 L2 L3 N
G
G
G
2
2
2
1
5
6
6
7
7
8
8
X010a
1
2 3
X009
8
1
1
2 3
X010
X012
2 3
4
4
X003
5
X021
G
E
X002b
G
G
X004
X002
G
G
X002
L1 L2 L3 N
G
G
2
2
2
1
5
6
6
7
7
8
8
X010a
1
9
2 3
X009
8
1
1
2 3
X010
X012
2 3
4
4
System Integration Interface
4 5
X003
4
X004
6 7
3
3
MCCB-box
1
1
1
G
X003
5
+
X001
2 3
1 2
X011
1
3 4
X005
X004
2
G
4
6
10 11 12 13 14
+
X001
+ - + -
+ - + -
X003
X006b
L1 L2 L3 N
Silcon DP300E
X001
L1 L2 L3 N
L1 L2 L3 N
G
Battery 1
Battery 2
Temp. sensor
MCCB trip for EPO
X020
Parallel Board
X005
L1 L2 L3 N
G
+
4
6
X003a
L1 L2 L3 N
G
+
X001
2 3
1 2
X011
1
3 4
X005
X004
2
9 10 11 12 13 14
System Integration Interface
4 5
X003
4
X004
6 7
3
3
MCCB-box
1
1
1
SBP
X021
G
G
G
E
Battery 1
Battery 2
Temp. sensor
MCCB trip for EPO
X020
Parallel Board
X005
L1 L2 L3 N
L1 L2 L3 N
X003b
X003
L1 L2 L3 N
System
Output
Grounding
Electrode
Options/Accessories
5.3.5 Parallel/Redundant Silcon DP300E with SBP and External Battery
via MCCB Box - Dual Utility - 3 wire grounded WYE service
7OH0006 US rev. 03
Installation Guide Silcon DP300E 480V 120-160kVA
Options/Accessories
5.3.6 Mounting and Connection
NOTE:
All external cable dimensions are recommended. Refer to local/national legal codes.
WARNING:
At 100% switch mode load the neutral conductor shall be rated for 173% output phase
current.
NOTE:
φ is symbol for “phase”.
is symbol for “Risk of electric shock”.
Terminal for Equipment Grounding Conductor is marked
NOTE:
Grounding, refer to local/national legal codes.
NOTE:
Ensure correct phase connection of inputs and outputs.
7OH0006 US rev. 03
Installation Guide Silcon DP300E Series 480V 120-160kVA
57
Options/Accessories
5.4
Relay Board
Relays.
All relays are “fail safe”, i.e. relay coil is energized when there is no alarm.
The relay is shown in alarm position.
1
Max. load:
8.0A - 277VAC
0.3A - 60VDC
Min. load:
0.05A - 6VAC
0.05A - 6VDC
2
3
7OH0006 US rev. 03
58
Installation Guide Silcon DP300E 480V 120-160kVA
Options/Accessories
5.4.1 Relay Board, relay functions
NOTE:
If “Communication to controller
lost” alarm is active, ALL relays
will indicate failure.
## Delay is programmable from
the display under “Common
fault delay”, see User Guide.
Settings: 0, 10, 20, 30 seconds
Relay No.
Name
Events that will trigger the alarm
1 ##
(X002)
Utility Outside Limits
Utility voltage RMS value is outside limits
Utility wave form (fast detector) is outside limits
Utility frequency is outside limits
2 ##
(X003)
Bypass Outside Limits
Bypass voltage RMS value is outside limits
Bypass wave form (fast detector) is outside limits
Bypass frequency is outside limits
3 ##
(X004)
Output Outside Limits
Output voltage RMS value is outside limits
Output wave form (fast detector) is outside limits
Output frequency is outside limits
4
(X005)
System overload
Output load is over 100%
Delta inverter current limiter is active
Main inverter current limiter is active
5 (X006)
Fan fault
Blocked or faulty fan
6
(X007)
Equipment high
temperature
Too high temperature on static switch
Too high temperature on main inverter
Too high temperature on delta inverter
Too high temperature on magnetics
Too high temp. on isolation transformer (option)
Too high battery temperature
7 (X008)
Battery MCB OFF
Battery MCB is off
8 (X009)
Normal operation
UPS is running in normal operation (Status)
9 ##
(X010)
Battery operation
UPS is running in battery operation (Status)
10 ##
(X011)
Bypass operation
UPS is running in bypass operation (Status)
11 ##
(X012)
Stand-by operation
UPS is in stand-by (Hot stand-by, parallel
systems only)
12
(X013)
Service bypass
operation
The service bypass switch is active
13 ##
(X014)
Boost charge operation UPS is boost charging on the battery
14
(X015)
Battery voltage
outside limits
Too high DC voltage (shut down)
DC voltage under warning level
Too low DC voltage (shut down)
15
(X016)
Battery condition fault
The ABM has detected that the battery is week
The ABM has detected that the battery is
defective (ABM = Advanced Battery Monitor)
16 ##
(X017)
Common fault
All alarms as mentioned above
(Not relay 8+9+10+11)
Internal power supply fault
System locked in operation mode
Fault in internal memory
Fault in internal communication
5.4.2 Relay Board, cable sizes
Cable sizes 24 AWG to 12 AWG are suitable. Use copper conductors only.
Cable size depends on current demand and ambient temperature.
7OH0006 US rev. 03
Installation Guide Silcon DP300E Series 480V 120-160kVA
59
Options/Accessories
5.5
Seismic anchoring
57.56/1462
55.98/1422
37.95/964
FRONT
36.38/924
22.20/564
20.63/524
7.01/178
5.43/138
0
3.21/815
28.28/7185
0
7OH0006 US rev. 03
60
Installation Guide Silcon DP300E 480V 120-160kVA
Options/Accessories
8 seismic anchoring angles
IMPORTANT:
Remember to tighten all bolts in
the 8 angles to the floor. Bolts
for the floor are not enclosed.
5.5.1 Mounting seismic anchoring
16 holes for Ø10mm bolts have to be drilled according to dimensioned sketch, where
the UPS system is to be placed.
The system is placed after drilling the holes, then 8 angles for seismic anchoring are
to be fitted into the bars, see above. The angles are then tightened in the holes.
The angles for seismic anchoring are placed as shown above and bolted with bolts
and plain washer.
7OH0006 US rev. 03
Installation Guide Silcon DP300E Series 480V 120-160kVA
61
Options/Accessories
5.6
NOTE:
NEMA 12 is impossibel with top
cabel entry.
NEMA 12 cover (IP31)
5.6.1 Mounting NEMA 12 cover
• Replace all screws on the top cover (4) with distance stays (5) and plastic locking
washer (6).
• Mount the NEMA 12 cover with plain washer (10), spring washer (11) and screw
(12) on the 4 distance stays.
Front view
with NEMA
12 cover
5
6
4
5.6.1.1 Front view with NEMA 12 cover
7OH0006 US rev. 03
62
Installation Guide Silcon DP300E 480V 120-160kVA
Options/Accessories
5.7
Remote display
5.7.1 Introduction
The remote display unit provides the Silcon DP300E series with the possibility to
display condition data at remote sites of up to 25 meters away from the Silcon
DP300E unit. For extension of communication distance, see section 5.7.1.1 below.
The remote display can easily be connected to the Silcon DP300E series via the serial
communication ports on the communication interface.
To obtain a transmission distance of 3.2 km the normal RS232C signal levels of the
serial in/out port must be converted to a 20mA current loop. The RS232C/20mA
converter must be placed outside the Silcon DP300E cubicle.
5.7.1.1 Extension of communication distance for remote display
The remote display communicates with the UPS through a 3 wire RS232 interface.
The remote display is a DTE (Data Terminal Equipment) employing a SUB-D 9 pole
female connector. The communication speed is 9,600 bps.
The communication distance is rather limited, see Table I. If a longer distance is
necessary or if the communication cable goes through magnetic noisy areas, it is
necessary to insert converters. Table 1 gives examples of three ways of increasing the
communication distance. All converters must be locally purchased.
7OH0006 US rev. 03
Installation Guide Silcon DP300E Series 480V 120-160kVA
63
Options/Accessories
Table 1: Examples of communication extension to remote display.
Standard
(RS232)
RS485
Current Loop
Optic fibre
Max. distance
25 meters
1,200 meters
3,200 meters
2,000 meters
Converter
Manufacture
Art. code
No converter
BLACK BOX
IC 109A-E
BLACK BOX
ME 800A-E
BLACK BOX
ME540AE-ST
Sub-D 25 pole
female
Sub-D 25 pole
female
Sub-D 9 pole
female
4-screw
terminal
4-screw
terminal
ST fibre
terminal
RS232 connector on
black box
Interconnector
of black boxes
Connections - without converter:
A 3 wire shield cable with a 25 pole female Sub-D and a 9 pole male Sub-D must be
made. Connect the cables as shown in Table 2. Do only connect the shield in one end.
Table 2: Pin connection for interconnection without converter.
25 pole female
9 pole male
Pin no.
Pin no.
2 (TXD)
2 (RXD)
3 (RXD)
3 (TXD)
7 (GND)
5 (GND)
House
No connection
Connections - with converter:
When buying a converter solution, the enclosed manual will explain how the connections must be made. Please follow this manual carefully.
As an example, the connection of the Black box: ME 800A-E (current loop) will be
described in the following by Table 3.
Table 3: Pin connections from host to ME 800A-E and from ME 800A-E to
Remote display
Host
(DTE)
ME 800A-E
(DCT)
Pin no.
Pin no.
Interconnection
ME 800A-E
(DCT)
Remote display
(DTE)
Pin. no.
Pin no.
2 (TXD)
2
3
2 (RXD)
3 (RXD)
3
2
3 (TXD)
7 (GND)
7
House (Shield) No connection
7
5 (GND)
No connection
House (Shield)
The ME 800A-E must be set up as a DCT with no RTS/DTR control.
The interconnection cable is a 4 wire twisted pair telephone cable with or without
shield. The shield improves noise immunity but reduces the maximum communication distance.
7OH0006 US rev. 03
64
Installation Guide Silcon DP300E 480V 120-160kVA
Options/Accessories
5.7.2
Installation of remote display
5.7.2.1 Connecting RS232C and utility adapter
Back view
1. Loosen the 4 screws
by turning 180°
2. Remove front cover
Cabel entry from bottom and back
NOTE:
All alarm and signal circuit field
wiring shall be rated 300V
minimum.
Back view
Front view
3. Mount the backplate
DP9P
Utility adapter
4. Connect cables
7OH0006 US rev. 03
Installation Guide Silcon DP300E Series 480V 120-160kVA
65
Options/Accessories
5.7.2.2 Remote display power supply
The remote display power supply is a normal AC power supply with no battery backup. This means that if data transmission with the Silcon DP300E has to continue
during break down of the commercial utility, the remote display has to be supplied
from the Silcon DP300E or another uninterruptible power source.
5.7.2.3 Cables for remote display
RS232C to RS232C cable:
DP300E, DB25S
Remote Display, DB9P
2 TxD
3 RxD
3 TxD
2 RxD
7 GND
5 GND
Connect shield at one end only!
Rating: Please refer to Local/National electrical codes for more
information,communication voltage ±15VDC
7OH0006 US rev. 03
66
Installation Guide Silcon DP300E 480V 120-160kVA
Options/Accessories
5.8
WARNING:
For dual utility the same type of
isolation transformers always
has to be used for the 2 utility
input.
NOTE:
Ensure correct phase connection of inputs and outputs.
WARNING:
At 100% switch mode load, the
neutral shall be rated for 173%
output phase current.
NOTE:
All external cable dimensions
are recommended.
Refer to local/national legal
codes.
NOTE:
Grounding, refer to local/
national legal codes.
NOTE:
is symbol for “risk of
electric shock”.
Terminal for Equipment
Grounding Conductor is
marked
Isolation Transformer Module
Introduction.
The isolation transformer module is used in following mentioned configurations:
1.
Between utility supply and UPS input, when a 3-phase Delta-service, phase
or midpoint of 2 phases grounded, is available.
2.
Between utility supply and UPS input, when galvanic isolation is required.
3.
Between UPS output and load, when galvanic isolation is required.
4.
Between UPS output and load, when step down from 480V to 208V/Y120V is
required.
The isolation transformer may not be bypassed by any kind of switchgear. Even if
the turn ratio is unity, heavy and damaging circulation currents can occur, when the
transformer is bypassed.
Coupling methods:
The isolation transformer is configured as Delta-WYE with accessibel neutral
(Dyn11).
Recommended use:
• For 3 wires in/out.
• For 3 wires in / 4 wires out.
• For 4 wires in/out.
5.8.1 Requirement on the installation site
The isolation transformer is designed with all parts accessible from front or top, and
cable entries from bottom. The isolation transformer can be placed close to walls,
only free space for front door opening has to be ensured. Sufficient cooling has to be
ensured by a free space for ventilation slots. Avoid placing the isolation transformer
in direct sunlight. See also Installation Guide from transformer supplier.
5.8.2 Cubicles and dimensions
See the installation guide for Isolation Transformer.
5.8.3 Foot prints
See the installation guide for Isolation Transformer.
5.8.4 Connecting the isolation transformer
See the installation guide for Isolation Transformer.
Terminal for Grounding
Electrode Conductor is
marked “E”.
NOTE:
The terminals marked
and
are electrically connected to the
terminal marked “E”.
7OH0006 US rev. 03
Installation Guide Silcon DP300E Series 480V 120-160kVA
67
Options/Accessories
5.8.4.1 External temperature alarm cable
Voltage rating must be 600V. Cable size can be 18 to 14 AWG.
5.8.5 Recommended cable lugs and crimping tool types
See section 4.1.6.
5.8.6
Input
Isolation transformer - Diagram Delta-WYE configuration (Dyn11)
L1
L1
L2
L2
L3
L3
Output
N
E
G
G
1
2
5.8.7
Temp.
Alarm
Grounding the isolation transformer
5.8.7.1 System grounding
See the installation guide for Isolation Transformer.
5.8.7.2 Equipment grounding
Terminal marked
is intended for equipment grounding.
7OH0006 US rev. 03
68
Installation Guide Silcon DP300E 480V 120-160kVA
Options/Accessories
5.8.8
Principal diagram
5.8.8.1 Single utility and single system
SBP
Utility
Supply
Output
DP300E
5.8.8.2 Single utility and redundant system
SBP
Utility
Supply
Output
DP300E
DP300E
7OH0006 US rev. 03
Installation Guide Silcon DP300E Series 480V 120-160kVA
69
Options/Accessories
5.8.8.3 Dual utility and single system
SBP
Utility
Supply 2
Output
Utility
Supply 1
DP300E
5.8.8.4 Dual utility and redundant system
SBP
Utility
Supply 2
Output
Utility
Supply 1
DP300E
DP300E
7OH0006 US rev. 03
70
Installation Guide Silcon DP300E 480V 120-160kVA
System specifications
6.0 System specifications
6.1
Technical data
Input
Voltage
Voltage tolerance
Normal operation
Bypass operation
Frequency
Input PF
Output
Current distortion
Voltage
Voltage tolerance
Voltage distortion
Load power factor
Frequency
General
Overload capacity
Normal operation
Normal operation
Battery operation
Bypass operation
Ambient temperature
Humidity
Protection class
Safety
Emission and Immunity
Static bypass switch
Auto restart
Economy mode
3 x 480V
±15%
±10% (standard)
±4, 6, 8% (programmable)
60Hz
±6% standard
±0,5-8% (programmable)
Load 25% min. 0,97
Load 100% min. 0,99
Max. 5%
3 x 480V
±1% static, sym. load
±3% static, asym. load
±5% 0-100% load step
Max. 3%, linear load
Max. 5%, non-linear load
(Silcon DP3120E-DP3160E)
0,9 lead to 0,8 lag
60Hz (utility synchronized)
±0,1% free running
200% - 60 secs.
125% - 10 min.
150% - 30 secs.
125% - cont.
0-40°C/32-104°F
(Above 25°C/77°F the battery life
time is reduced)
Max. 95%, non condensing
NEMA 1
EN50091-1
UL 1778
EN50091-2
Built-in
Programmable
Programmable
7OH0006 US rev. 03
Installation Guide Silcon DP300E Series 480V 120-160kVA
71
How to Contact APC
7.0 How to contact APC
For more information call:
Tel: (800) 800-4APC - US & Canada
Tel: (401) 789-0204 - Worldwide
APC Corporate
132 Fairgrounds Road
West Kingston, RI 02892
USA
Tel:
(401)789-0204
Fax:
(401)789-3710
Internet:
[email protected]
PowerFax™:
(800) 347 - FAXX
APC Web site: www.apcc.com
APC Denmark A/S
Silcon Allé
DK-6000 Kolding
Tel:
(+45) 75 54 22 55
Fax:
(+45) 75 54 27 89
Product Support
E-mail:
[email protected]
Pre-sales Technical Support
1-877-474-5266 (1-877-4Silcon)
Post-sales Technical Support
1-877-287-7835 (1-877-2UPS-TEK)
Fax:
Web:
1-401-438-7761
www.apcc.com/support/contact/contact_support.cfm
7OH0006 US rev. 03
72
Installation Guide Silcon DP300E 480V 120-160kVA