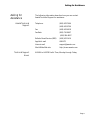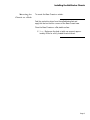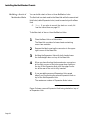
1
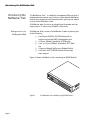
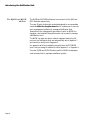
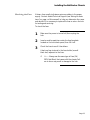
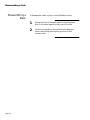
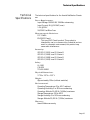
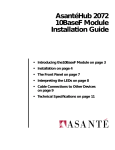
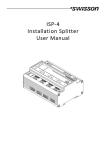
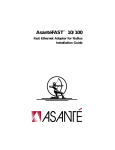
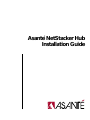
Asanté NetStacker Hub
Installation Guide
Copyright Notice
Copyright 1996 by Asanté Technologies, Inc.
All rights reserved. No part of this manual, or any associated artwork, software, product design or design concept, may be copied,
reproduced or stored, in whole or in part, in any form or by any means mechanical, electronic, optical, photocopying, recording or
otherwise, including translation to another language or format, without the express written consent of Asanté Technologies, Inc.
Manual part number 06-00147-00 Rev. B
Trademarks
Asanté Technologies and NetStacker are trademarks of Asanté Technologies, Inc.
Macintosh is a registered trademark of Apple Computer, Inc.
Ethernet is a registered trademark of the Xerox Corporation, Inc.
All brand names and products are trademarks or registered trademarks of their respective holders.
FCC Information
This equipment is classified as a Class A computing device. Class A devices may be used only in commercial, business, or industrial
environments.
This equipment generates, uses and can radiate radio frequency energy. If this equipment is not insulated properly in strict accordance with the instructions in this manual, then it may cause interference in this electronic environment. This equipment has been
tested and found to comply with the limits for a Class A computing device pursuant to Subpart J of Part 15 of FCC Rules, which are
designed to provide reasonable protection against radio frequency interference when operated in a commercial environment.
Operation of this equipment in a residential area is likely to cause interference, in which case, the user at his own risk and expense
will be required to correct the interference in a commercial environment.
Asanté Lifetime Warranty
The Asanté NetStacker Hub has a limited lifetime warranty which applies to the original purchaser of the product. Asanté Technologies, Inc. warrants that this product will be free from defects in title, materials and manufacturing workmanship. If the NetStacker Hub
is found to be defective, then, as your sole remedy and as the manufacturer’s only obligation, Asanté Technologies, Inc. will repair or
replace the product provided that (1) you call Asanté Technologies, Inc. for a Returned Merchandise Authorization (RMA) number, that (2)
you clearly write this RMA number on the outside of the package, and that (3) you return it, postage prepaid. This warranty is exclusive and is limited to the Asanté NetStacker Hub.
This limited lifetime warranty shall not apply to an Asanté NetStacker Hub that has been subjected to abuse, misuse, abnormal electrical
or environmental conditions, or any condition other than what can be considered normal use.
Note: The warranty card must be filed with Asanté Technologies, Inc. within 30 days after date of purchase.
Warranty Disclaimers
Asanté Technologies, Inc. makes no other warranties, express, implied, or otherwise, regarding the Asanté NetStacker Hub, and specifically
disclaims any warranty for merchantability or fitness for a particular purpose.
The exclusion of implied warranties is not permitted in some states and the exclusions specified herein may not apply to you. This warranty provides you with specific legal rights. There may be other rights that you have which vary from state to state.
Limitation of Liability
The liability of Asanté Technologies, Inc. arising from this warranty and sale shall be limited to a refund of the purchase price. In no event
shall Asanté Technologies, Inc. be liable for costs of procurement of substitute products or services, or for any lost profits, or for any consequential, incidental, direct or indirect damages, however caused and on any theory of liability, arising from this warranty and sale. These limitations shall apply notwithstanding any failure of essential purpose of any limited remedy.
Table of Contents
Asking for Assistance . . . . . . . . . . . . . . . . . . . . . . . . . . . . . . . . . . . . . . . . . . . . . . . . . . . . . . . . . v
Asanté Technical Support . . . . . . . . . . . . . . . . . . . . . . . . . . . . . . . . . . . . . . . . . . . . . . . . . . . v
Technical Support Hours . . . . . . . . . . . . . . . . . . . . . . . . . . . . . . . . . . . . . . . . . . . . . . . . . . . v
Preface
About this Manual . . . . . . . . . . . . . . . . . . . . . . . . . . . . . . . . . . . . . . . . . . . . . . . . . . . . . . . . . . viii
Related Documentation. . . . . . . . . . . . . . . . . . . . . . . . . . . . . . . . . . . . . . . . . . . . . . . . . . . viii
What Typographic Changes and Symbols Mean. . . . . . . . . . . . . . . . . . . . . . . . . . . . . . . . . . . . ix
Procedures and Instructions . . . . . . . . . . . . . . . . . . . . . . . . . . . . . . . . . . . . . . . . . . . . . . . . . x
Asanté NetStacker Hub Installation Guide
Introducing the NetStacker Hub. . . . . . . . . . . . . . . . . . . . . . . . . . . . . . . . . . . . . . . . . . . . . . . . . 2
Components of a NetStacker Hub. . . . . . . . . . . . . . . . . . . . . . . . . . . . . . . . . . . . . . . . . . . . . 2
About Building a Stack . . . . . . . . . . . . . . . . . . . . . . . . . . . . . . . . . . . . . . . . . . . . . . . . . . . . . 3
Installing the NetStacker Hub . . . . . . . . . . . . . . . . . . . . . . . . . . . . . . . . . . . . . . . . . . . . . . . . . . . 5
Introducing the NetStacker Chassis . . . . . . . . . . . . . . . . . . . . . . . . . . . . . . . . . . . . . . . . . . . . . . 6
Installing the NetStacker Chassis . . . . . . . . . . . . . . . . . . . . . . . . . . . . . . . . . . . . . . . . . . . . . . . . 7
Preparing for the Installation . . . . . . . . . . . . . . . . . . . . . . . . . . . . . . . . . . . . . . . . . . . . . . . . 8
Positioning the NetStacker Chassis . . . . . . . . . . . . . . . . . . . . . . . . . . . . . . . . . . . . . . . . . . . 8
Mounting the Chassis on a Desk . . . . . . . . . . . . . . . . . . . . . . . . . . . . . . . . . . . . . . . . . . . . . . 9
Building a Stack of NetStacker Hubs . . . . . . . . . . . . . . . . . . . . . . . . . . . . . . . . . . . . . . . . . . 10
Mounting a Single Hub or a Hub Stack on a Rack. . . . . . . . . . . . . . . . . . . . . . . . . . . . . . . . 12
Checking the Fuse. . . . . . . . . . . . . . . . . . . . . . . . . . . . . . . . . . . . . . . . . . . . . . . . . . . . . . . . 13
Disassembling a Stack . . . . . . . . . . . . . . . . . . . . . . . . . . . . . . . . . . . . . . . . . . . . . . . . . . . . . . . . 14
Technical Specifications . . . . . . . . . . . . . . . . . . . . . . . . . . . . . . . . . . . . . . . . . . . . . . . . . . . . . . 15
Page iii
Page iv
Asking for Assistance
Asking for
Assistance
Asanté Technical
Support
The following information describes how you can contact
Asanté Technical Support for assistance.
Telephone
(800) 622-7464
(408) 435-0706
Fax
(408) 432-6018
Fax-Back
(800) 741-8607
(408) 954-8607
Technical Support
Hours
Bulletin Board Service (BBS)
(408) 432-1416
Applelink mail
ASANTE
Internet mail
[email protected]
World Wide Web site
http://www.asante.com
6:00AM to 6:00PM Pacific Time, Monday through Friday
Page v
Page vi
Preface
•
About this Manual on page viii
•
What Typographic Changes and
Symbols Mean on page ix
About this Manual
About this Manual
This Installation Guide for the Asanté NetStacker Hub is part of a set
of four installation guides which you will use when you install the
NetStacker Hub.
The three additional guides you will find useful when installing
the hub are:
❏
❏
❏
Asanté RJ21B Module Installation Guide
Asanté RJ45B Module Installation Guide
Asanté NetStacker NMM Lite Installation Guide
The NMM Lite daughter board is designed specifically for the NetStacker Hub.
Related Documentation
You can install other Asanté modules in the NetStacker Hub.
For information about these products, refer to the appropriate
installation guide.
Page viii
Related Documentation
What Typographic
Changes and
Symbols Mean
Sometimes it is necessary to give a special meaning or significance
to the information in the manual.This is done by displaying a different typeface and by presenting the text in a different format.
The following are examples of the special typefaces and formats
used in this manual. Asanté suggests you become familiar with
them here before continuing with the manual.
This kind of bold text is used when special emphasis is necessary.
When certain information is noteworthy or unusual, it is set off in
a special format:
∆
Note: This information is noteworthy or unusual.
When information is especially important, it is set off with this
format:
▲
Important: This information is very important.
The following table describes the type changes and symbols used
in this guide.
Typeface or Symbol
Meaning
Example
AaBbCc123
The names of commands,
parameters, and directories;
on-screen computer output
Use dir to list all parameters.
AaBbCc123
What you type, contrasted with
on-screen computer output
Login: su
Password:
AaBbCc123
Command-line placeholder:
replace with a real name or
value
set baudrate=38400
[AaBbCc123]
Commands in brackets denote
a key to press
To set baud rate, type:
Login: su [Return]
Page ix
What Typographic Changes and Symbols Mean
Procedures and
Instructions
The manual provides specific instructions about how to perform a
task or configure an application.Where you must perform certain
steps in a certain order, the manual provides a formal procedure.
All procedures in the manual are made to look different from the
regular text to make them easily recognizable and simple to follow.
Page x
1
Read this first step in this procedure. Be sure to follow
all following steps as well.
If any step in the procedure requires an explanation,
the information will follow the instruction, as shown
here.
2
3
4
Now read this step in the procedure.
And finally, read this step in the procedure.
The last step in any procedure has a line drawn underneath it, showing the end of the procedure.
Asanté NetStacker Hub
Installation Guide
•
Introducing the NetStacker Hub
on page 2
•
Installing the NetStacker Hub
on page 5
•
Introducing the NetStacker Chassis
on page 6
•
Installing the NetStacker Chassis
on page 7
•
Technical Specifications on page 15
Introducing the NetStacker Hub
Introducing the
NetStacker Hub
The NetStacker Hub™ is a dual-slot, two-segment Ethernet hub. It
is designed to be used as a unit of two or three stacked NetStacker
Hubs, or as a single hub with the potential for growing into a stack
of up to three NetStacker Hubs.
A NetStacker stack functions as a single logical repeater and can
support up to 72 users using 10BaseT connections.
Components of a
NetStacker Hub
A NetStacker Hub consists of a NetStacker chassis containing one
of the following:
❏
❏
❏
❏
❏
One 24-port RJ45B or RJ21B Module with or
without a mounted NMM Lite daughter card
A 10-port 10Base2 AsantéHub 2072 Module
A six- or 12-port 10BaseF AsantéHub 2072 Module
A two-port Asanté NetConnect Bridge Module
A full-size AH2072 NMM Module for dual segment support
Figure 1 shows a NetStacker Hub containing an RJ45B Module.
Ne
t
BasSt
e Hac
ub k
er
Figure 1
Page 2
A NetStacker Hub containing an RJ45B Module
Introducing the NetStacker Hub
About Building a Stack
A stack of two or three NetStacker Hubs must consist of the
following:
❏
A Base Hub on the bottom of the stack
and
❏
One or two Expansion Hubs on top of the Base
Hub
The Base Hub, always located on the bottom of the stack, consists
of a Base Chassis containing one or two modules. The Base Chassis provides built-in backplane timing for the stack.
The Expansion Hub consists of an Expansion Chassis containing
one or two modules.
Figure 2 shows a stack of three NetStacker Hubs, each containing
a 24-port, double-height RJ45B Module.
Ne
ExptSt
an ac
sion k
e
Hub r
Ne
ExptSt
an ac
sion k
e
Hub r
Ne
t
BasSt
e Hac
ub k
er
Figure 2
A stack of three NetStacker Hubs
Page 3
Introducing the NetStacker Hub
The RJ45B and RJ21B
Modules
The RJ45B and RJ21B Modules are new versions of the RJ45 and
RJ21 Modules, respectively.
They are 24-port, dual-height modules designed to accommodate
a special NMM Lite daughter board which enables you to use network management software to manage a NetStacker Hub.
AsantéView Lite is designed to be used only with an NMM Lite
daughter card installed. (AsantéView also can be used to manage
a NetStacker Hub.)
The NMM Lite does not allow network segment switching. All
ports on the NetStacker Hub are automatically set to Segment 1
and cannot be switched to Segment 2.
For segment switching capability, use a full-size AH2072 NMM
which lets you assign a module to either Segment 1 or Segment 2.
The new RJ45B and RJ21B Modules, and the NMM Lite daughter
card are described in separate installation guides.
Page 4
Installing the NetStacker Hub
Installing the
NetStacker Hub
To install a single NetStacker Hub, you will perform the following
procedures (if you have purchased unassembled components):
❏
❏
Install the NetStacker Chassis
Install a module in the chassis
With the RJ45B or RJ21B Modules, if using an
NMM Lite, mount the NMM Lite daughter card on
the module before you install it.
Instructions for installing the NetStacker Chassis are on page 7 of
this manual. Instructions for installing a module in the chassis are
in the individual installation guide for the module.
A preassembled NetStacker Hub requires only that you place it on
a desk or rack and plug it into a power outlet.
To build a stack of two or three NetStacker Hubs, you need to
perform the following operations:
❏
❏
❏
❏
❏
If you are using individual modules, build a Base
Hub
Place the Base Hub on a desk or mount it on a
rack
If you are using individual modules, build an
Expansion Hub
Place the first Expansion Hub on top of the Base
Hub
If you have a second Expansion Hub, build the
hub (if using individual modules) and place it on
top of the first Expansion Hub
Instructions for building a stack of NetStacker Hubs are on page 10
of this manual.
To build a stack of two or three NetStacker Hubs, using separate
NetStacker components, you first need to install the individual
modules to create a Base Hub and one or two Expansion Hubs.
You can then build a stack by following the above procedure.
Page 5
Introducing the NetStacker Chassis
Introducing the
NetStacker
Chassis
The NetStacker Chassis has two slots for single- or double-slotted
multiport repeater modules.
The chassis has the following features:
❏
❏
❏
❏
❏
❏
❏
❏
Two slots that accept a variety of multiport
repeater modules, allowing you to add nodes
when needed
Smart Snap TM stacking mechanism for stacking a
maximum of two hubs on top of a base hub
A dual-segment backplane that lets you assign a
repeater module to either Segment 1 or Segment
2 and create two separate networks
A universal AC-input switching power supply
Complete compliance with IEEE 802.3 specifications for Ethernet
Network management capability using AsantéView Lite In-Band and Out-of-Band (or AsantéView In-Band or Out-of-Band)
Local terminal management capability using a
VT100 terminal
Hot-swappable modules
The NetStacker chassis has a dual backplane which can be utilized
only in conjunction with an AH2072 NMM full-size module
installed in the chassis. AH2072 NMM lets you use segment control to create separate network segments. You can assign a
repeater module to either Segment 1 or Segment 2 using the
NMM’s Segment Control buttons or AsantéView software. You
may choose to do this to help balance traffic or to separate a module from the rest of the network when testing network equipment.
The modules in a NetStacker stack are hot swappable—you can
make changes or repairs, without powering down or interrupting
the entire network.
Page 6
Installing the NetStacker Chassis
Installing the
NetStacker Chassis
This section describes how to install a NetStacker Chassis (with or
without preassembled components) and build a stack of NetStacker Hubs.
Figure 3 shows a front view of a single empty NetStacker Chassis.
ASANTÉ
Figure 3
Front view of NetStacker Chassis
Figure 4 shows a back view of the Base NetStacker chassis.
On/Off switch
Overlay for
Base Chassis
Figure 4
Fan
Power outlet
Back view of NetStacker Base Chassis
Page 7
Installing the NetStacker Chassis
Preparing for the
Installation
Before you install the NetStacker Chassis, you need to ground
yourself, check the package contents and prepare the work area.
Grounding Yourself
Before you unpack or handle the chassis, you must discharge
static electricity from your body or clothes by attaching the provided grounding strap to your wrist and then by touching the
mount rack for the chassis or a piece of metal.
Checking the Package Contents
The Asanté NetStacker Chassis package includes the following:
❏
❏
❏
❏
❏
❏
Base Chassis or Expansion Chassis in protective
plastic packaging
AC power cable
Two mounting brackets and eight screws for rack
mounting
Four self-adhesive feet for desktop mounting
This installation guide
Warranty card
Preparing the Work Area
Before unpacking the chassis, make sure that you have a large,
dust-free, clean, and electrostatically safe work area.
Positioning the
NetStacker Chassis
To correctly position the chassis, make sure you:
❏
❏
❏
∆
Place the single Base Chassis or the stack near an
AC outlet.
Place the chassis or stack within 100 meters of
another device if you are using twisted pair cable
(10BaseT); 185 meters for thin Ethernet cable
(10Base2), two kilometers for fiber optic cable
(10BaseF).
Leave a two-inch clearance around the ventilation
grills on each side.
Note: Do not place the chassis near sources of
electrical interferences, such as motors or heavy
current switches.
Normal office temperature and humidity generally suit this type of
equipment (operating temperature: 0° to 40° C ambient).
Page 8
Installing the NetStacker Chassis
Mounting the
Chassis on a Desk
To mount the Base Chassis on a desk:
Peel the protective strips from the self-adhesive feet and
apply the feet on the four corners of the Base Chassis base.
Place the Base Chassis on a flat, stable surface.
∆ Note: Make sure the desk or table can support approximately 40 lbs for a fully loaded three-hub stack.
Page 9
Installing the NetStacker Chassis
Building a Stack of
NetStacker Hubs
You can build a stack of two or three NetStacker hubs.
The first hub in a stack must be the Base Hub while the second and
third hubs (called Expansion hubs ) must be used only with a Base
Hub.
∆
Note: If you plan to mount the stack on a rack, follow the instructions on page 12.
To build a stack of two or three NetStacker Hubs:
1
Place the Base Hub on a flat surface.
The Base Hub consists of a base chassis containing
one or two modules.
2
Remove the label covering the connector in the upper
right corner of the Base Hub.
3
Holding the Expansion Hub with both hands, lower
the hub straight down on top of the Base Hub.
4
When you have lined up the bus extension connectors
at the right corners of the hubs, press down lightly on
the top of the Expansion Hub until the edge connector at the rear of the unit is fully inserted.
5
If you are adding a second Expansion Hub, repeat
steps 2 and 3, mounting the second Expansion Hub on
top of the first Expansion Hub.
The maximum number of Expansion Hubs is two.
Figure 5 shows a second Expansion Hub being stacked on top of
an Expansion Hub.
Page 10
Installing the NetStacker Chassis
Net
Sta
Ex
pa
ck
ns
ion
er
Hu
b
Expansion Hub
Net
Sta
Ex
pa
ck
ns
ion
er
Hu
b
Expansion Hub
Net
Ex
Sta
pa
ns
ck
ion
er
Hu
b
Base Hub
Figure 5
Building a stack of NetStacker Hubs
Page 11
Installing the NetStacker Chassis
Mounting a Single Hub
or a Hub Stack on a
Rack
To mount a NetStacker Hub or a stack of NetStacker hubs on a rack:
1
Mark the desired location on the rack for the single
hub or the stack.
2
Fasten the brackets to the hub(s), using two of the
four screws provided in the package.
3
With a single hub, fasten the hub to the rack.
With a stack of hubs, first fasten the Base Hub to the
rack (ask an assistant to hold it in place if necessary)
using the other two screws provided in the package.
4
Mount the first Expansion Hub on top of the Base
Hub (see page 10) and fasten the hub to the rack.
5
If you have a second Expansion Hub, mount it on top
of the first Expansion Hub and fasten it to the rack.
Figure 6 shows a three-hub stack mounted on a rack.
NetStacker
Base Hub
NetStacker
Base Hub
UPLINK 0
AUI
PARTITION
1
2
3
4
5
6
7
8
9
10
11
12
1
2
3
4
5
6
7
8
9
10
11
12
SEG1
1
2
3
4
5
6
7
8
9
10
11
12
SEG 0
UPLINK 0
AUI
PARTITION
NetStacker
Base Hub
Page 12
2
3
4
5
6
7
8
9
10
11
12
SEG 0
NetStacker-RJ21
Figure 6
SEG1
1
LINK/RECEIVE
Rack-Mounting the Chassis
Installing the NetStacker Chassis
Checking the Fuse
A blown fuse usually indicates a serious problem in the power
supply. Contact Asanté Technical Support (see “Asking for Assistance” on page v of this manual) to help you determine the cause
and decide if it is necessary to replace the fuse or return the hub
for testing and servicing.
To check the fuse:
1
Make sure the power is turned off, then unplug the
hub.
2
Insert a small screwdriver under the fuse faceplate
located on the hub’s back panel, then lift it off.
3
Check the fuse to see if it has blown.
A back-up fuse is stored in the fuse holder (a small
black box) adjacent to the fuse.
∆
Note: Always use the same type of fuse (2A/
250V Fast Blow) that came with the chassis. Failure to do so may result in damage to the hub.
Page 13
Disassembling a Stack
Disassembling a
Stack
Page 14
To disassemble a stack of two or three NetStacker Hubs:
1
Facing the front of the stack, grasp the top Expansion
Hub on the sides, toward the very rear of the hub.
2
Lift the hub straight up, disconnecting the edge connector and pulling the mounting pins out of their
receiver holes.
Technical Specifications
Technical
Specifications
The technical specifications for the Asanté NetStacker Chassis
are:
Power Requirements:
Input Voltage: 100-240 VAC 50-60Hz autosensing
Input Current: 2A @ 110 VAC (max.)
1.1A @ 220 V
2A/250V Fast Blow Fuse
Electromagnetic Emissions:
FCC Class A
EN 55022 Class A
This is an EMC Class A product.This product is
intended for use in a commercial or industrial environment. In a domestic environment, this product may
cause radio interference.
Immunity:
IEC 801-2 (1991) Level 2 Criteria B
IEC 801-3 (1984) Level 2 Criteria A
IEC 801-4 (1988) Level 2 Criteria B
IEC 801-5 (1993) Level 3 Criteria B
Safety:
UL 1950
CSA 950
TUV EN 00950
Physical Dimensions:
17”W x 2.5”H x 13.5”L
Weight:
Approximately 15lbs. (without modules)
Environmental:
Operating Temperature: 0° to 40° C ambient
Operating Humidity: 5 to 85% noncondensing
Operating Altitude: 10,000 ft. (3,048m) maximum
Storage Temperature: -30° to 80° C
Storage Humidity: 5 to 90% noncondensing
Storage Altitude: 25,000 ft. (7,620m) maximum
Warranty:
Asanté lifetime warranty
Page 15
NetStacker Book Page 17 Wednesday, October 15, 1997 4:29 PM
NetStacker Book Page 18 Wednesday, October 15, 1997 4:29 PM
ASANTÉ TECHNOLOGIES,
INC.,
HEADQUARTERS, 821 FOX LANE, SAN JOSE, CA 95131
Phone: 408.435.8388, 800.662.9686 * Fax: 408.432.7511, APPLELINK: ASANTE,
e-mail address: [email protected], World Wide Web Site: http://www.asante.com
Asanté Technologies Asia T: 886 25162636, F: 886 25171999
Asanté Technologies Europe T: 441 81 332 1326, F: 441 81 332 1334.
©1996 Asanté Technologies, Inc. Asanté is a trademark of Asanté Technologies, Inc. All brand names and products are trademarks
or registered trademarks of their respective holders. Part Number: 06-00147-00 Rev. B