1
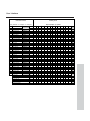
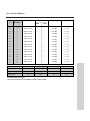
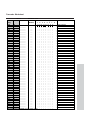
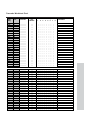
Security
System
Owner’s Manual
What You Need to Know
Before using this manual, you should become familiar with the Security System User’s Guide. The
User’s Guide provides step by step instructions for using command center functions. It also gives
definitions of the command center displays and the security system’s memory logger event
descriptions.
Individual users learn the basic steps needed to operate the security system from the Security
System User’s Guide.
How to Use This Manual
Use this manual to perform advanced system functions like add and delete user passcodes, reassign
authority levels to user passcodes and operate or change programmed scheduled events (Skeds)
from the command centers. As you make changes to the system, update the information contained
in the tables in this guide to provide an accurate account of the programmed information.
Your Custom Display
“At an idle state” means that the system is not currently performing a function entered by a user.
There are three idle states the system may be in:
•
Turned on (Armed)
•
Turned off (Disarmed) with no points faulted (doors or windows open) in the area
•
Turned off with faulted points (doors or windows open) in the area.
This guide uses the default idle state displays for examples of these idle states. Your security
company may have programmed custom text for the idle displays. The User’s Guide describes the
idle displays in your panel.
Introduction
This document supplements the Security System User’s Guide. It presents a number of advanced
commands for system administrators and others who perform security system management
functions. Refer to the Security System User’s Guide for the basics of system operation, including
basic system commands and definitions of terms.
Basic Commands (User’s Guide)
CMD 1 (MASTER ARM)
CMD 11 (MASTER ARM INSTANT)
CMD 2 (PERIMETER INSTANT)
CMD 3 (PERIMETER DELAY)
CMD 4 (SILENCE TROUBLE SOUNDER)
CMD 4 0 (VIEW MEMORY)
CMD 4 4 (WALK TEST)
CMD 4 7 (RESET SENSORS)
CMD 6 (WATCH MODE)
CMD 7 (SPECIAL ALERT)
CMD 8 (PERIMETER PARTIAL)
CMD 9 (SPECIAL ALERT)
Advanced Commands
CMD 0 (BYPASS A POINT)
CMD 00 (UNBYPASS A POINT)
CMD 41 (TEST REPORT)
CMD 42 (STATUS REPORT)
CMD 43 (REMOTE PROGRAM)
CMD 45 (CHANGE TIME/DATE)
CMD 49 (CHANGE DISPLAY)
CMD 50 (MOVE TO AREA)
CMD 51 (EXTEND CLOSING)
CMD 52 (CHANGE SKED)
CMD 53 (DELETE PASSCODE)
CMD 54 (CHANGE RELAY)
CMD 55 (CHANGE PASSCODE)
CMD 56 (ADD PASSCODE)
CMD 58 (FIRE TEST)
PRINT LOG
VIEW LOG
VIEW POINT STATUS
Terms Used in This Manual
Listed below are some of the terms you’ll see throughout this manual. Each term is covered in
greater detail later in this manual and in the Security System User’s Guide.
Account
One or more areas reporting under a particular account number.
Area
A group of detection devices connected to your security system.
Arm and Disarm
To switch your burglar detection devices “on” and “off.” When the burglar detection device is
armed and is tripped, an alarm may be set off. When the burglar detection devices are disarmed,
the security system will not detect intruders. Your security system is always “on” to provide
24-hour fire detection and police alert (optional).
Authority Levels
Levels of access authority assigned to passcodes.
Command Center
Arming station used to operate your security system.
Command Center Scope
Determines which areas a particular command center can access.
Panel
The main control unit which is locked in a steel enclosure. It sends data to and receives inputs
from the command centers.
Relays
Optional dry contact outputs that respond to system events.
Skeds
Programmed functions your security system automatically performs.
User Passcodes
A three to six digit number entered at a command center to access the system.
Advanced Commands
BYPASS A POINT?
Description
Bypass points that you do not want included in the system. Points that are not included in the
system do not detect intruders and cannot send any reports. You can bypass points when an area is
disarmed. Bypassing a point reduces the level of security and should be used with discretion.
Points remain bypassed until you unbypass them or some points may return when the area is
disarmed. See Unbypassing a Point (COMMAND 00).
You could use COMMAND 0 to leave a window open over night without initiating an alarm. Also
see Turning the System On With Doors or Windows Open in the Security System User’s Guide.
Using Bypass a Point
1.
Ensure your command center is at disarmed idle text.
2.
Press the [COMMAND] bar. The display shows SYSTEM COMMAND.
3.
Press the [0] key.
Note:
4.
5.
If you prefer, you may use the Command Menu in place of steps 2 and 3 to initiate this function.
Press the [MENU] key to enter the Command Menu, then press [NEXT] repeatedly until you
reach the BYPASS A POINT ? prompt. Press [ENT].
The display shows ENTER PT NUM.
•
If you know the point number you wish to bypass, enter the number and press [ENT]. A
description of the point type is displayed, such as POINT ## @@@@@@ (where ## = the
point number and @@@@@@ = point type). Press [ENT] again.
•
If you don’t know the number of the point you wish to bypass, you can view the list of
devices that can be bypassed by pressing the [NEXT] key without entering any digits
when ENTER PT NUM is displayed.
•
Continuously pressing [NEXT] scrolls through these devices. When the point text of the
point you wish to bypass appears, press [ENT].
One of the following messages displays:
•
PT ## BYPASSED indicates the point was successfully bypassed.
•
ALREADY BYPASSED indicates that the point has already been bypassed.
•
NOT BYPASSABLE indicates the system is programmed not to allow that point to be
bypassed.
•
INVALID POINT indicates that the device is not assigned to the area that you are in.
•
NO POINTS indicates that there are no points remaining to be bypassed.
6.
You can return to idle text by pressing [ESC].
7.
If the bypassed point is a 24-hour point, the message 24 HOUR BYPASS begins scrolling in the
display. If the bypassed point is a fire point, the message FIRE BYPASS scrolls in the display.
0
UNBYPASS A POINT?
Description
Unbypassing a point is a way to return a bypassed point to the security system so that it can once
again respond to trouble and alarm conditions.
Using Unbypass a Point:
1.
Ensure your command center is at disarmed idle text.
2.
Press the [COMMAND] bar. The display shows SYSTEM COMMAND.
3.
Press the [0] key, then press the [0] key again.
Note:
4.
5.
If you prefer, you may use the Command Menu in place of steps 2 and 3 to initiate this function.
Press the [MENU ]key to enter the Command Menu, then press [NEXT] repeatedly until you
reach the UNBYPASS A POINT ? prompt. Press [ENT].
The display shows ENTER PT NUM.
•
If you know the point number you wish to unbypass, enter the number and press
[ENT]. A description of the point type is displayed, such as POINT ## @@@@@@ (where
## = the point number and @@@@@@ = point type). Press [ENT] again.
•
If you don’t know the number of the point you wish to unbypass, you can view the list
of devices that can be unbypassed by pressing the [NEXT] key without entering any
digits when ENTER PT NUM is displayed. Continuously pressing [NEXT] scrolls
through these devices. When the point text of the point you wish to unbypass appears,
press [ENT].
One of the following messages displays:
•
PT ## UNBYPASSED indicates the point is unbypassed.
•
PT NOT BYPASSED indicates that the point had not been bypassed.
•
INVALID POINT indicates that the device is not assigned to the area that you are in.
•
24-HOUR-FAULTED indicates that the device is a “24-HOUR-DEVICE” and is
currently faulted, and must be returned to normal prior to unbypassing.
•
FIRST DISARM indicates the area is currently armed and needs to be disarmed prior
to unbypassing the point.
•
NO POINTS indicates that there are no points remaining to be unbypassed.
7.
To confirm that the point is back in the system, press a number key at idle disarmed text and
view the scrolling list of currently faulted and bypassed points.
8.
If the point now displays as faulted it will not completely return to the system until the door or
window is shut.
9.
If the unbypassed point was the last bypassed 24-hour or fire point, the messages 24 HOUR
BYPASS or FIRE BYPASS will automatically clear.
00
SEND REPORT?
Description
This function tests the communication link between your security system and your security
company. It is an important part of maintaining a high level of security for your property.
Two types of test reports may be sent. The first type of report is a simple test report COMMAND
41. The second type of report is a status report COMMAND 42. This status report indicates the
current condition of your system.
Using Send Report:
1.
Always call your security company before sending a test report.
2.
Ensure your command center is at idle text.
3.
Press the [COMMAND] bar. The display shows SYSTEM COMMAND.
4.
Press the [4] key, then press the [1] key.
Note:
5.
6.
7.
If you prefer, you may use the Command Menu in place of steps 3 and 4 to initiate this function.
Press the [MENU] key to enter the Command Menu, then press [NEXT] repeatedly until you
reach the SENT REPORT ? prompt. Press [ENT].
TEST REPORT? displays.
•
If you wish to send a test report, press [ENT].
•
If you wish to send a status report, press [NEXT] to display STATUS REPORT ?. Press
[ENT].
The command center displays SENDING REPORT until the report is transmitted to the security
company. When the transmission is complete the command center displays REPORT SENT for
5 seconds and then returns to idle text.
If [ESC] is entered the display will return to idle text. If the test (or status) report doesn’t
successfully transmit to the central station, the command center will display COMM FAIL after
numerous unsuccessful attempts.
41
&
42
REMOTE PROGRAM?
Description
Your security company can remotely program your security system using the telephone line your
panel is connected to. Typical remote programming functions include: changing personal 7,
passcodes, changing entry/exit delays, resetting the system clock/calendar, and adding/deleting
system arming commands.
Your security company may ask you to follow the steps below to begin a remote programming
session. The time it takes to program the panel is dependent on the number of changes made to
the program.
You’ll notice that two sets of procedures are presented. Which one you use will depend upon
whether your system has a pre-programmed telephone number in its memory.
My system has a phone number.
My system does not have a phone number.
For systems without a phone number:
1.
Ensure your security system is at idle text.
2.
. This number is designated for the
Call this phone number:
Remote Account Manager. You must make the call using the telephone located at
__________________________.
3.
Identify yourself and your premises (account number, name, address, etc.) and advise the operator
of the services you wish to have performed.
4.
When the operator directs you, enter COMMAND 43 at your command center. Press the
[COMMAND] bar. The display shows SYSTEM COMMAND. Now press the [4 ]key, then press
the [3] key. Do not hang up the telephone.
Note:
If you prefer, you may use the Command Menu in place of steps 3 and 4 to initiate this function.
Press the [MENU] key to enter the Command Menu, then press [NEXT] repeatedly until you
reach the REMOTE PROGRAM ? prompt. Press [ENT].
5.
The display shows RAM CONNECTING.
6.
The security system will now disconnect telephones sharing its telephone line during the remote
programming session. Hang up the telephone now.
7.
The display changes to SYSTEM PROGRAM.
8.
At the conclusion of the programming session your system sends a report to the security company
and then returns your telephone to normal service and your display to idle text.
For systems with a phone number:
1.
Ensure your security system is at idle text.
2.
Call this phone number:________________________________. This number is designated
for the Remote Account Manager.
3.
Identify yourself and your premises (account number, name, address, etc.) and advise the operator
of the services you wish to have performed.
43
4.
Note:
5.
When the operator directs you, enter COMMAND 43 at your command center. Press the
[COMMAND] bar. The display shows SYSTEM COMMAND. Now press the [4 ] key, then press
the [3] key. Do not hang up the telephone.
If you prefer, you may use the Command Menu in place of steps 3 and 4 to initiate this function.
Press the [MENU] key to enter the Command Menu, then press [NEXT] repeatedly until you
reach the REMOTE PROGRAM ? prompt. Press [ENT].
The display shows CALL RAM ? Note: The central station may direct you to press [NEXT].
When you do this, ANSWER NOW displays. Press [ENT] and the system will behave as described
in steps 5 - 8 above.
•
6.
If you want your system to call the RAM, press [ENT] when the display shows CALL
RAM ? The display shows CALLING RAM momentarily as the panel dials the RAM
phone number in its memory. The display changes to SYSTEM PROGRAM when it has
connected to RAM.
At the conclusion of the programming session your system sends a report to the security company
and then returns your telephone to normal service and your display to idle text.
Change Time/Date
The time and date in your system must be correct for scheduled events to occur at the correct
times. Check the time at least once a month to ensure accuracy. Use this function to set both the
time and date. The system uses a 12-hour AM/PM format.
1.
Note:
Ensure that your command center is at idle text.
2.
Press the [COMMAND] bar. The display shows SYSTEM COMMAND.
3.
Press the [4] key, followed by the [5] key.
If you prefer, you may use the Command Menu in place of steps 2 and 3 to initiate this function.
Press the [MENU] key to enter the Command Menu, then press [NEXT] repeatedly until you
reach the CHG TIME/DATE ? prompt. Press [ENT].
4.
The display shows ENT TIME. Enter the correct time and press [ENT].
5.
AM ? displays.
6.
•
If you wish to choose AM, press [ENT].
•
If you wish to choose PM, press [NEXT ]to display PM ?. Press [ENT].
The display shows ENT DATE. Enter the correct date and press [ENT].
7.
The new time and date appear in the display.
8.
To return to idle text, press [ESC].
45
Change Display
This function presents three options. One is to dim the display, one to brighten the display, and
one to continuously show the time and date in the display.
Bright/Dim
You can change your command center’s display to make it bright or dim. When the display is dim,
the tones are softer than those when the display is bright. Use this option for command centers in
bedrooms where a brighter display and louder tones could interfere with sleep.
If you dim the command center display and an alarm or trouble condition arises, the display
automatically brightens and the volume increases. The display returns to dim lighting when you
clear the alarm or trouble condition.
Continuous Time/Date
Use this function to replace the disarmed idle text with a continuous time and date display.
Use this function to prevent passersby from knowing the status of your system.
Any time your command center has an event to display, the time and date display are
automatically removed. To return the time and date display, you must perform this function again.
1.
Note:
Ensure that your command center is at idle text.
2.
Press the [COMMAND] bar. The display shows SYSTEM COMMAND.
3.
Press the [4] key, followed by the [9] key.
If you prefer, you may use the Command Menu in place of steps 2 and 3 to initiate this function.
Press the [MENU] key to enter the Command Menu, then press [NEXT] repeatedly until you
reach the CHG DISPLAY ? prompt. Press [ENT].
4.
The display shows BRIGHT DISPLAY ?. Press [ENT] to brighten the display.
5.
If you wish to dim the display or continuously show the date and time, press [NEXT].
6.
The display shows DIM DISPLAY ?. Press [ENT] to dim the display.
7.
If you wish to continuously show the time and date, press [NEXT]. Note: If your system
is turned on (armed), you cannot display the time.
8.
TIME DISPLAY ? displays. Press [ENT] to continuously show the date and time.
9.
Pressing [ESC] with the time and date showing returns the display to idle text.
49
Extend Closing
Your system may be programmed to expect you to arm within a scheduled closing window, which
is a duration of time that is programmed by your alarm company. Your system may also be
programmed to automatically arm at the end of the window.
COMMAND 51 lets you extend the scheduled closing window time either prior to the closing
window time or during the closing window time. Use this function when you expect to stay past
the scheduled end of the closing window. The length of time prior to the start of the closing
window in which you are allowed to extend the closing window is set by your alarm company.
AREA X INACTIVE displays during the time when the command center won’t allow the
window to be extended.
At the beginning of the closing window, the command center beeps and displays PLEASE CLOSE
NOW to remind you to arm your system. It remains in the display until you arm, the close window
ends, or you extend closing. Alarm or trouble messages replace this message in the event of an
alarm or trouble condition. If the alarm or trouble condition clears before the end of the close
window PLEASE CLOSE NOW returns to the command center display.
Pressing the [ESC] key will silence the beep and clear the message for 10 minutes. If you have not
armed or extended closing, the PLEASE CLOSE NOW and beep will reappear after 10 minutes.
The length of time for the closing window is set by your alarm company. To extend the window,
enter the new time at which you would like the reminder tone to begin. This time will be the new
beginning of the closing window. The time length of the closing window is programmed by your
security company and remains fixed.
When you hear the warning you can:
Note:
1.
•
Leave before the end of the closing window by pressing [ESC] to silence the signal,
arming the system, and leaving.
•
Stay past the scheduled end of the closing window, by using COMMAND 51 to extend
the closing window.
The amount of time available to close is not effected by extending the closing window. For
example, if your closing window starts at 4:00 p.m. and stops at 4:30 p.m. and you extend closing
to 5:00 p.m., the closing window will now be between 5:00 and 5:30 p.m.
Ensure that your command center is at disarmed idle text.
2.
Press the [COMMAND] bar. The display shows SYSTEM COMMAND.
3.
Press the [5] key, followed by the [1] key.
Note:
4.
Note:
If you prefer, you may use the Command Menu in place of steps 2 and 3 to initiate this function.
Press the [MENU] key to enter the Command Menu, then press [NEXT] repeatedly until you
reach the EXTEND CLOSING ? prompt. Press [ENT].
The display shows CLOSE BY ##:## (##:## = scheduled start of the closing window). Enter
the time you want the window to start and press [ENT].
The window time cannot be extended across the midnight boundary.
51
5.
6.
AM ? displays.
•
If you wish to choose AM, press [ENT].
•
If you wish to choose PM, press [NEXT] to display PM ? Press [ENT].
The new “close by” time displays. Press [ENT] to confirm and set the new time. The time is
shown momentarily before the display returns to idle text.
CHG SKEDS ?
Description
A Sked is a function programmed to be performed automatically at a scheduled time by your
security system. You can change the scheduled time for some functions, disable the Sked and thus
prevent it from automatically happening or restart a previously disabled Sked. Contact your
security representative to determine what Skeds may be programmed for your system.
Using Chg Skeds:
To change a Sked’s time, enable a Sked, or disable a Sked, follow the procedure below to first select
the Sked from a list of Skeds programmed for your system.
Note:
1.
Ensure your command center is at idle text.
2.
Press the [COMMAND] bar. The display shows SYSTEM COMMAND.
3.
Press the [5] key, then press the [2] key.
If you prefer, you may use the Command Menu in place of steps 2 and 3 to initiate this function.
Press the [MENU] key to enter the Command Menu, then press [NEXT] repeatedly until you
reach the CHG SKEDS ? prompt. Press [ENT].
4.
The number of the first Sked programmed into your system is displayed, plus either its
time or an indication that it is disabled. Press [NEXT] to scroll through the list of Sked
numbers to find the one you wish to change.
•
When an X appears in the Sked display, it is an indication that “Except on Holidays”
is enabled, S ## X ##:##AM.
•
When an * appears in the Sked display, it is an indication that the Sked has or will
happen today, S ## * X ##:##AM.
•
To change the state of the displayed Sked from enabled or disabled:
1.
With the selected Sked displayed, press [ENT].
2.
If the Sked is currently enabled, DISABLE ? is displayed. Press [ENT]. The Sked
displays showing it is disabled.
3.
If the Sked is currently disabled, ENABLE ? is displayed. Press [ENT]. The display
shows XOH ON ? You can toggle between this display and XOH OFF ? by pressing
[NEXT]. To enable the Sked on holidays, press [ENT] with XOH OFF ? displayed. To
disable the Sked on holidays, press [ENT] with XOH ON ? displayed.
4.
•
Enter the desired time and press [ENT].
•
AM ? displays. To choose AM, press [ENT]. To choose PM, press [NEXT] to
display PM ?, then press [ENT].
•
The display shows the Sked with its new time.
Press [ESC] to return to idle text.
52
DEL PASSCODES ?
Description
Use this function to delete a personal passcode from your system without assistance from your
security company. You need to know the user number for the passcode you want to delete.
The two digit user numbers identify users in reports transmitted from your system.
Using Del Passcodes:
1.
Ensure your command center is at idle text.
2.
Press the [COMMAND] bar. The display shows SYSTEM COMMAND.
3.
Press the [5] key, then press the [3] key.
Note:
4.
If you prefer, you may use the Command Menu in place of steps 2 and 3 to initiate this function.
Press the [MENU] key to enter the Command Menu, then press [NEXT] repeatedly until you
reach the DEL PASSCODES ? prompt. Press [ENT].
The command center displays ENTER USER NUM. Enter the two-digit user number, not the
passcode. Press [ENT].
•
If you enter a user number not programmed into the system, NOT IN USE displays.
Check the user number and enter again.
5.
DELETE USER ## ? displays. Press [ENT] to delete the passcode for this user.
6.
The command center briefly displays PASSCODE DELETED and then returns to idle disarmed
text.
53
CHG RELAYS?
Description
Your security company programs relays for automatic control and/or control from your
command center of devices such as premises lighting or entry gates. Contact them for further
information regarding the use of relays in your security system.
Using COMMAND 54:
1.
Ensure your command center is at idle text.
2.
Press the [COMMAND] bar. The display shows SYSTEM COMMAND.
3.
Press the [5] key, then press the [4] key.
Note:
If you prefer, you may use the Command Menu in place of steps 2 and 3 to initiate this function.
Press the [MENU] key to enter the Command Menu, then press [NEXT] repeatedly until you
reach the CHG RELAYS ? prompt. Press [ENT].
4.
When ENTER RELAY displays enter the relay number of the relay you wish to operate, and
press [ENT].
5.
If the relay is currently off, the display shows RELAY X ON ?. If you want to turn this relay
turned on, press [ENT]. If you want it to remain off, press [NEXT]. The display shows RELAY X
IS OFF. Press [ENT].
•
If the relay is currently on, the display shows RELAY X OFF ?. If you want to turn this
relay turned off, press [ENT]. If you want it to remain on, press [NEXT]. The display
shows RELAY X IS ON. Press [ENT].
6.
The display shows ENTER RELAY. If you wish to change another relay, enter its number and
press [ENT].
7.
You can return to idle text by pressing [ESC].
54
CHG PASSCODES ?
Description
Use this function to change your personal passcode without assistance from the security company.
Using Chg Passcodes
Before you begin:
Note:
•
Choose a new passcode three to six digits long. If you choose a passcode with the same
digit in consecutive order (for example “33” in 334697), take care when entering it.
•
To avoid conflicting with other passcodes and duress codes, your system does not let you
change to passcodes that are within plus or minus 2 of an existing passcode. For
example, if 1234 were an existing code, your system would not let you change your code
to 1232, 1233, 1235, or 1236.
1.
Ensure your command center is at idle text.
2.
Press the [COMMAND] bar. The display shows SYSTEM COMMAND.
3.
Press the [5] key, then press the [5] key.
If you prefer, you may use the Command Menu in place of steps 2 and 3 to initiate this function.
Press the [MENU] key to enter the Command Menu, then press [NEXT] repeatedly until you
reach the CHG PASSCODES ? prompt. Press [ENT].
4.
The command center displays ENTER PASSCODE. Enter your current passcode.
Press [ENT].
5.
ENTER NEW CODE displays. Enter your new passcode and press [ENT].
•
If the passcode is already in use, your command center emits a buzz indicating that
the passcode is invalid. Choose another passcode.
6.
ENTER NEW AGAIN is displayed. Enter your new passcode again.
7.
Press [ENT] again. If you do not reenter the same new passcode, the display shows
NOT CHANGED and returns to idle text.
8.
The command center briefly displays PASSCODE CHANGED and then returns to
idle disarmed text.
55
ADD PASSCODES?
Description
Use this function to add a passcode to your system without assistance from your security
company. You need to know which user numbers are available, the authority level you want to
assign to the new passcode and the areas in which it will be valid before you add it.
The two digit user numbers identify users in reports transmitted from your system. The authority
level determines what system functions the passcode can access. The area number identifies which
parts of your security system the passcode will have access to. Contact your security company if
you don’t know what user numbers, authority levels, or areas are available. See the Appendix for
further information on adding passcodes.
Using COMMAND 56:
Before you begin:
Note:
•
Do not try to add passcodes without knowing the available user numbers. These are two
digit numbers, not to be confused with passcodes, that identify users at your security
company.
•
Choose a new passcode three to six digits long. If you choose a passcode with the same
digit in consecutive order (for example “33” in 334697), take care when entering it.
•
To avoid conflicting with other passcodes and duress codes, your system does not let you
change to passcodes that are within plus or minus 2 of an existing passcode. For
example, if 1234 were an existing code, your system would not let you change your code
to 1232, 1233, 1235, or 1236.
•
Choose an authority level for each area. Leaving the authority level for an area blank by
pressing [ENT] without making an entry, denies the passcode access to that area.
1.
Ensure your command center is at idle text.
2.
Press the [COMMAND] bar. The display shows SYSTEM COMMAND.
3.
Press the [5] key, then press the [6] key.
If you prefer, you may use the Command Menu in place of steps 2 and 3 to initiate this function.
Press the [MENU] key to enter the Command Menu, then press [NEXT] repeatedly until you
reach the ADD PASSCODES ? prompt. Press [ENT].
4.
The command center displays ENTER USER NUM. Enter the two-digit user number
(not the passcode). Press [ENT].
•
If you enter a user number already in use, USER IN USE displays. Choose another
user number and try again.
5.
ENTER NEW CODE displays. Enter the new passcode and press [ENT].
•
If the passcode is already in use, the command center displays PASSCODE IN USE.
Choose another passcode.
•
If the passcode is not in use, the command center displays USER ## @@@@@@ (## =
user number, @@@@@@ = new passcode).
6.
If the information is correct, press [ENT]. If the information is incorrect, press [ESC].
56
7.
VALID AREA1? displays. Press [YES] if you want the passcode to be valid in area 1.
Press [NEXT] if not.
•
Enter the authority level for this passcode in area 1. You may assign an authority
level of 1 to 15. Press [ENT]. Press [NEXT] if you don’t want this passcode to have
authority in area 1.
•
VALID AREA 2 ? displays. Press [YES] if you want the passcode to be valid in
area 2. Enter an authority level for this area and press [ENT]. Press [NEXT] if you
don’t want the passcode to have any authority in this area. Repeat this procedure
for
areas 3 to 8.
8.
The command center briefly displays PASSCODE ADDED and then returns to idle text.
FIRE TEST?
Description
Use this function to test fire points and other 24-hour points to be certain they function properly.
You can review both the tested and untested points at your command center to help pinpoint any
problems.
Upon initiation, the fire test will test the fire bell pattern on the bell output and ring the
command center fire bell for 2 seconds. The AC will be disabled for 4 minutes in order to test the
system’s battery power. If the battery cannot maintain the system for the 4 minute period, the
command center will appear to go dead. If this happens, contact your security company. At the
end of the 4 minute period, AC is returned to the system and the panel restores. A message will be
sent to your security company upon initiation and completion of the Fire Test. During the Fire
Test, no 24-hour alarms will be sent to your security company.
If there is no activity on the system for 20 minutes, the system will automatically exit from the Fire
Test.
Using COMMAND 58:
1.
Ensure your command center is at disarmed idle text.
2.
Press the [COMMAND] bar. The display shows SYSTEM COMMAND.
3.
Press the [5] key, then press the [8] key.
Note:
If you prefer, you may use the Command Menu in place of steps 2 and 3 to initiate this function.
Press the [MENU] key to enter the Command Menu, then press [NEXT] repeatedly until you
reach the FIRE TEST ? prompt. Press [ENT].
4.
The display shows ## PTS TO TEST.
5.
One-at-a-time, activate the detection devices to fault each point.
6.
As you fault each point, your command center will display the point text for 60 seconds and
ring the fire sounders for 2 seconds. This verifies that the detection device is working properly.
Your system automatically resets smoke detectors.
•
When a resettable point (such as a smoke detector) is faulted, the display shows SENSOR
RESETTING for 5 seconds. During this time power is removed from smoke power
relays.
•
Faulting a point more than once does not increment the test count. However, the
command center emits a brief tone and displays the point text each time you fault the
point allowing you to test multiple devices assigned to one point.
7.
When all 24-hour points have been tested, 0 PTS TO TEST is displayed. Press [ESC]. The
display momentarily shows ALL PTS TESTED before returning to idle text.
8.
During the Fire Test you may want to see the points that remain untested. When point text is
displayed, press [ESC]. The display shows ## PTS TO TEST. Press the [ESC] key. VIEW
UNTESTED ? is displayed. Press [ENT]. ## PTS UNTESTED is displayed. Press [NEXT] to
see a list of the points that have not yet been tested. Move through this list by pressing the NEXT
key. To resume the Fire Test, press [ESC]. ## PTS UNTESTED is displayed. Press [ESC]. ##
PTS TO TEST is displayed. Resume testing points. To end the Fire Test, press [ESC] twice.
58
VIEW LOG ?
Description
Use this function to review events in your system at your command center. Reviewing past events
may help you identify problems. Viewing events does not require any additional equipment since
the information is displayed at your command center. Events are stored in the panel’s memory in
order of occurrence and tagged with the date and time.
Using View Log:
1.
Ensure your command center is at idle text.
2.
Press [9] and then [9] again and then [ENT].
3.
VIEW LOG ? displays. Press [ENT].
Note:
4.
Note:
If you prefer, you may use the Command Menu in place of steps 2 and 3 to initiate this
function. Press the [MENU] key to enter the Command Menu, then press [NEXT] repeatedly
until you reach the VIEW LOG ? prompt. Press [ENT].
ENTER START DATE displays.
•
To view part of the log, enter the date (month and day, MMDD) at which you wish to
start the review. Press [ENT].
•
To view the entire log from the newest event, press [ENT] without entering a start date.
The date and time of the event will display. Press [NEXT] to view the description of the
prior event, or press [PREV] to view the description of the prior event. Press [PREV]
again to view the date and time of the previous event.
•
Continue to press [PREV] to view event descriptions and the date and time of each
event.
When using the [NEXT] key to view the log, the date and time of the event are displayed first,
followed by the description of the event. An event description may take up 2 displays.
5.
Continue pressing [NEXT] to view the rest of the log. When you reach the end of the log, END
OF LOG displays.
6.
Press [ESC] to return to idle text.
PRINT LOG ?
Description
The Print Log function lets you print the events stored in your security system’s log. You can
choose to print the entire log or set a start date and print the events recorded from that date up to
today.
Your system must include a printer interface and a printer to perform this function.
Using Print Log
1.
Ensure your command center is at idle text.
2.
Press [9] and then [9] again and then [ENT].
Note:
3.
If you prefer, you may use the Command Menu in place of steps 2 and 3 to initiate this function.
Press the [MENU] key to enter the Command Menu, then press [NEXT] repeatedly until you
reach the PRINT LOG ? prompt. Press [ENT].
VIEW LOG ? displays.
•
Press [NEXT] until PRINT LOG ? scrolls into the display.
4.
Press [ENT].
5.
ENTER START DATE displays.
6.
•
To print part of the log, enter the date (month and day, MMDD) at which you wish to
start the review. Press [ENT].
•
To print the entire log, press [ENT] without entering a start date.
PRINTING EVENTS displays during printing. Each event appears in a line that includes the
date and time, area and type of event. See your printer interface user’s guide for more information.
Log Event Definitions
AC FAIL: AC power to the panel interrupted.
AC RSTOR: AC power to the panel restored.
ALARM: Alarm at point in area specified.
AUTO: Event Modifier for BYPASS event. Indicates 4 alarms or troubles in one clock hour caused
automatic (swinger) bypass.
BAD CALL: System tried to call Remote Account Manager and failed.
BATT LOW: Panel battery is below 11.7 VDC.
BATT MISS: Panel battery disconnected or discharged.
BATT RSTOR: Panel battery recharged.
BUS RSTOR: Data Expansion Loop for off-board points restored.
BUS TRBLE: Data Expansion Loop for off-board points faulted.
BYPASS: Point bypassed. An event modifier showing how the point was bypassed follows this event
in the log.
CANCEL: User canceled an alarm from the area specified.
CKSUM FAIL: Panel programming corrupted. Call for service.
CLOSE: User armed area. An event modifier showing the previous armed state follows this event in
the log. If a close window is in effect, a second event modifier shows if the arming (close) was
outside of the close window.
CODE CHG: Passcode changed for user number shown.
CODE DEL: Passcode deleted for user number shown.
CODE TMPR: User made six failed attempts to enter a passcode at a command center.
COMMAND: Event modifier for BYPASS, RELAY SET, and RELY RESET events. Indicates function
initiated from a command center.
COMM FAIL: Panel could not communicate using phone line reported.
COMM RSTOR: The communication problem with the phone line indicated resolved.
DATE CHG: User changed panel’s date and/or time.
DURESS: User initiated from command center special alarm in the area specified.
EARLY: Event modifier for arming (close) and disarming (open) events. Indicates the open or close
event occurred before the beginning of an open or close window.
EXTRA PT: Incorrectly programmed point connected to system.
F PERM DLY: User force armed area specified with delay. An event modifier showing the previous
armed state follows this event in the log. If a close window is in effect, a second event modifier
shows if the arming (close) was outside of the close window.
F PERM INS: User force armed area perimeter with no delay time. An event modifier showing the
previous armed state follows this event in the log. If a close window is in effect, a second event
modifier shows if the arming (close) was outside of the close window.
FAIL CLOSE: Area not armed before end of close window.
FAIL OPEN: Area not disarmed before end of open window.
FIRE ALARM: Fire alarm at point in area specified.
FIRE END: Fire Walk Test ended.
FIRE RSTOR: Fire alarm at point specified restored.
FIRE TRBLE: Trouble condition at point specified.
FIRE START: Fire Walk Test started.
FORCE ARMD: Beginning of force arm report. Indicates area was force armed, bypass armed, or
force/bypass armed. This event followed by events showing the points force armed and/or
bypassed, and by a FORCE CLSE event showing the end of the forced armed report.
FORCE CLSE: Indicates end of forced armed report. Followed by an event modifier showing the
previous armed state.
FORCE PT: Event modifier showing user force armed with point specified faulted.
LATE: Event modifier for arming (close) and disarming (open) events. Indicates the open or close
event occurred after the end of an open or close window.
LOG FULL: Panel log is full. New event overwrite oldest event.
LOG THRES: Panel log reached programmed threshold (Log % Full).
MISS ALARM: Point in area specified missing. Area armed.
MISS FIRE: Fire point specified missing.
MISS TRBLE: Point in area specified missing. Area disarmed.
NEW TIME: Event modifier for XTN event. Shows the new time for end of close window.
OPEN: User disarmed area. An event modifier showing the previous armed state follows this event in
the log. If an open window is in effect, a second event modifier shows if the disarming (open)
was outside of the open window.
PARAM CHG: Panel programming changed.
PERM DLY: User armed the perimeter of the specified area with entry delay time. An event modifier
showing the previous armed state follows this event in the log. If a close window is in effect, a
second event modifier shows if the arming (close) was outside of the close window.
PERM INS: User armed the perimeter of the specified area with no delay time. An event modifier
showing the previous armed state follows this event in the log. If a close window is in effect, a
second event modifier shows if the arming (close) was outside of the close window.
PHONE FAIL: Panel detected phone line specified as faulted.
PHONERSTOR: Phone line specified detected as restored from faulted condition.
PROG: Event modifier for BYPASS, RELAY SET, and RELY RESET events. Indicates function initiated
from local programmer.
PROG BAD: Attempt to access panel with a local programmer failed.
PROG OK: Panel successfully programmed by a local programmer.
PT CLOSE: User armed point specified.
PT OPEN: User disarmed point specified.
PT STATUS: Status report for point specified.
PT TESTED: This point walk tested.
PREV STATE: Event modifier for arming and disarming events. Shows the previous arming state of
the area. The number before PREV STATE in the command center display defines the previous
state as follows:
1 = Area previously master armed.
2 = Area previously perimeter instant armed.
3 = Area previously perimeter delay armed.
4 = Area previously disarmed.
PWR RESET: Power was reset at specified time.
RAM FAIL: RAM programming session terminated abnormally or RAM using incorrect passcode
and/or lock code.
RAM OK RAM: programming session terminated normally.
REBOOT: Panel reset.
RELAY SET: Relay set (activated). An event modifier showing how the relay was set follows this event
in the log.
RELY RESET: Relay reset (deactivated). An event modifier showing how the relay was reset follows
this event in the log.
REMO: Event modifier for BYPASS, RELAY SET, and RELY RESET events. Indicates function initiated
from RAM (Remote Account Manager).
REMO RESET: Panel reset from RAM (Remote Account Manager).
RESTORAL: Restoral at device in area specified.
SDI FAIL: SDI device specified is not working. 1 - 8 supervised command centers, 017, 018, 019 =
printers.
SDI RSTOR: The problem with SDI device specified resolved.
SENSOR: Event modifier for SENS RESET event. Shows the relay number activated for reset.
SENS RESET: User reset area sensor in area specified. An event modifier showing the relay number
activated for reset follows this event.
SKD CHG: User changed time for Sked specified to be executed.
SKD XEQ: Sked executed.
SKED: Event modifier for BYPASS, RELAY SET, and RELY RESET events. Indicates function initiated
by a SKED (scheduled event).
STAT RPT: Status report sent.
TEST RPT: Test report sent.
TIME CHG: User changed panel’s time.
TROUBLE: Trouble condition at point specified.
USER CMD 7: User initiated special alarm in the area specified.
USER CMD 9: User initiated special alarm in the area specified.
WALK END: Walk test in area specified completed.
WALK STRT: Walk test initiated in specified area.
WATCH: Area placed in watch mode.
WATCHDOG: Panel’s normal CPU operation interrupted and restarted. Call for service if event
occurs regularly or frequently.
XTN CLOSE: User extended area’s close window. An event modifier showing the new time the close
window ends follows this event in the log.
Working With Multiple Areas From
a Single Command Center
Working with Multiple Areas
from a Single Command Center
Each of the functions described in the preceding section on Advanced Commands is presented as
though your system includes only one area. If your system includes more than one area, it can be
set up one of two ways by the installing company: (1) Each command center will only have access
to the local area to which it is assigned, or (2) Each command center may access either some or all
areas beyond the one to which it is assigned. This factor is referred to hereafter as command center
scope.
If your command center allows access to areas other than the local area (that is to say, has scope in
other areas), then the command center will limit your access to those areas within the command
center scope and for which your personal passcode has authority.
Given that you have access to areas beyond the local area, the means of accessing the various
system functions depends upon the specific function.
For some functions, the command center allows you to select the area (or point) in which to
perform the function. These “selectable” functions are: DISARM ?, BYPASS A POINT?
,UNBYPASS A POINT? and MASTER ARM AREA ?.
Another group of functions may automatically work in all areas in which you have passcode
authority and which are within the scope of the command center. These are: Turning On Multiple
Areas with a Passcode, Turning Off Multiple Areas with a Passcode, DISARM ALL ?, MASTER
ARM ALL?, VIEW MEMORY?, WALK TEST?, RESET SENSORS ?, ADD PASSCODES ?, FIRE
TEST?, VIEW POINT STATUS? and VIEW AREA STATUS?.
Some functions may be area-specific. To perform these functions, you may first use the MOVE TO
AREA ? function (COMMAND 50) to gain access to the desired area. Once in the desired area you
can perform the functions you wish. Area-specific functions include: PERIMETR INST?,
PERIMETR DELAY ?, PERIMETR PART ?, EXTEND CLOSING ?, WATCH MODE ?, COMMAND
7 ?, COMMAND 9 ? and CHG DISPLAY ?.
A last group of functions don’t relate to specific areas and are thus system-wide. These are: SEND
REPORT?, REMOTE PROG ?, CHG TIME/DATE ?, CHG SKEDS ?, DEL PASSCODES ?, CHG
RELAYS ?, CHG PASSCODES ?, PRINT LOG ? and VIEW LOG?.
View Area Status
Use this function when you need to know the status (whether armed or disarmed) of areas other
than the one you’re in.
1.
Ensure that your command center is at idle text.
2.
Press the [ESC]/[MENU] keys to enter the command menu. Press [NEXT] until the
VIEW AREA STATUS function is displayed.
3.
Press [ENT]. The first display shows the status of the first area within your command
center’s scope.
4.
Press [NEXT] to see the status of each of the areas within your command center’s scope.
5.
Press [ESC] to return to your current area’s idle text.
View Point Status
•
Note:
Use this function to identify the number or location of each point in an area, and to show the
current condition of any point you select. This function is useful as an aid in servicing the
system.
1.
Ensure that your command center is at idle text.
2.
Press the [ESC]/[MENU] keys to enter the command menu. Press [NEXT] until the
VIEW PT STATUS function is displayed.
3.
Press [ENT]. The display shows AREA X ## (where X ## = the area number and the
number of points to view).
4.
Press [ENT]. The display shows PT ## XXXXX (where XXXXX = the type of point).
Press [ENT] again to see the current condition of the point. The display will show one
of the following:
•
PT###-SHORT-HW which indicates that a hard wire (HW) point is shorted.
•
PT###-OPEN-HW which indicates that a HW point is open.
•
PT###-NORML-HW which indicates that a HW point is normal.
•
PT###-MISNG-HW which indicates that a HW point is missing.
5.
Continue to press [ENT] to see the type and condition of each point in the area.
You will notice that the text for COMMAND 7 and COMMAND 9 is followed by a “MISNG”
condition on Points 72 and 136. Points 72 and 136 serve dual purposes. They are used for
COMMAND 7 and COMMAND 9, and they are also used to supervise the data expansion bus.
When you see that Points 72 and 136 are missing, do not be alarmed. When these points are
missing, the point bus is normal.
6.
Press [ESC] to return to your current area’s idle text.
Move to Area
With this function you can perform tasks in an area other than the one you’re in without having
to physically go to that area. Your access to other areas is limited by the scope of the command
center and your authority level. For example, if your passcode gives you authority to all 8 areas,
but the command center you’re working with is limited in scope to areas 1 and 2, then you will
only be able to move to either area 1 or area 2.
Upon moving to another area, the range of tasks you may perform depends upon the command
center you’re working with. Once you’ve performed a task (such as Turning the Area On), the
command center reverts back to its programmed area after 10 seconds. Thus only one task can be
performed in another area at a time.
1.
Ensure that your command center is at idle text.
2.
Press the [COMMAND] bar. The display shows SYSTEM COMMAND.
3.
Press the [5] key, followed by the [0] key. The display shows ENTER AREA. Enter the
area number you wish to move to. Press [ENT].
4.
AREA X MOVE displays briefly, and then the text of the area you’ve moved to is
displayed. You are now able to perform tasks in this area. The number of areas to which
you can move will be limited by the scope of the command center. If you try to move to
an area for which the command center does not have scope, NO AUTHORITY is
displayed.
5.
When you have completed all tasks in the area you’ve moved to, simply allow the
command center to time-out and revert to the area from which you started or enter the
Move to Area function again.
Turning the System On
Turning On Multiple Areas with a Passcode
You can use your personal passcode to turn on both perimeter and interior points in all areas
where your passcode has authority. If there are areas already turned on, this function turns on all
areas that are off without changing the status of the areas that are already on.
1.
Enter your passcode and press [ENT].
2.
The command center displays ARMING 12345678, indicating that all areas are being
turned on. The actual number of areas you may turn on is limited by command center
scope and/or your authority level. For example, if you have authority to arm all 8 areas
but the scope of the command center you’re using is limited to areas 1, 2, and 5, then
you will only be able to turn on areas 1, 2, and 5.
3.
If a point is faulted (door or window open for example), CHK AREA # displays. Try
one of the following:
•
Close doors and/or windows and repeat step 1.
•
Bypass the faulted points (if your system and authority level allow) and repeat step
1.
•
Force arm the areas with faulted points, if your system and authority level allow.
Remember that points that are force armed are not protected.
After arming your system, leave the building through a door programmed with exit
delay time. Your command center emits an intermittent beep tone and counts down the
exit delay in the display.
4.
•
If you open a door after exit delay time expires, entry delay time begins. Turn the
system off to avoid an alarm event.
Turning On Multiple Areas with Master Arm All
You can use this Command Menu function to turn on both perimeter and interior points in all
areas where your passcode has authority. If there are areas already turned on, this function turns
on all areas that are off without changing the status of the areas that are already on. This function
works the same as entering your passcode to arm, but allows the Master Arm All feature to be
included in the Command Menu.
1.
Press the [ESC]/[MENU] keys to enter the Command Menu.
2.
Press the [NEXT] key until the MASTER ARM ? function is displayed.
3.
Press [ENT]. The display shows MASTER ARM ALL ?
4.
Press [ENT]. The command center displays ARMING 12345678, indicating that all
areas are being turned on. The actual number of areas you may turn on is limited by
command center scope and/or your authority level. For example, if you have authority
to arm all 8 areas but the scope of the command center you’re using is limited to areas 1,
2, and 5, then you will only be able to turn on areas 1, 2, and 5.
5.
If a point is faulted (door or window open for example), CHK AREA # displays. Try
one of the following:
•
Close doors and/or windows and repeat step 1.
•
Bypass the faulted points (if your system and authority level allow) and repeat step
1.
•
Force arm the areas with faulted points, if your system and authority level allow.
Remember that points that are force armed are not protected.
6.
After arming your system, leave the building through a door programmed with exit
delay time. Your command center emits an intermittent beep tone and counts down the
exit delay in the display.
•
If you open a door after exit delay time expires, entry delay time begins. Turn the
system off to avoid an alarm event.
Turning On Selected Areas
You can use this Command Menu function to turn on both perimeter and interior points in some
or all of the areas where your passcode has authority. If there are areas already turned on, this
function turns on all areas that are off without changing the status of the areas that are already on.
1.
Press the [ESC]/[MENU] keys to enter the Command Menu.
2.
Press the [NEXT] key until the MASTER ARM ? function is displayed. Press [ENT].
3.
The display shows MASTER ARM ALL ? Press [NEXT]. The display shows ARM
AREA X ?, which is the first area you have authority to arm.
4.
Pressing the [NEXT] key allows you to scroll any other areas you have the authority to
arm into the display.
5.
When the display shows the area you wish to arm, press [ENT].
6.
Your system may require a passcode before allowing you to access this function. ENTER
PASSCODE appears in the display. Enter your passcode and press [ENT].
7.
After turning on other areas, the command center’s display returns to the disarmed idle
text for the area you are in. If you wish to turn on that area enter your personal passcode
and press [ENT].
Faulted Points in Other Areas
If there is a faulted point in an area you select (other than the one you are in), CHK AREA
appears for 3 seconds and then the display returns to the area disarmed idle text. Try one of the
following:
•
Clear faulted points (close doors and/or windows) and return to step 1.
•
Bypass faulted points (if your system and/or authority allows) and return to step 1.
•
Force arm (if your system and/or authority allows). See Turning the System On With
Doors or Windows Open in the Security System User’s Guide.
Turn the Entire System On Without Delays
You can use this Command Menu function to turn on the entire system, both perimeter and
interior, without delays. You may use this function in all of the areas or some of the areas where
your passcode has authority. If there are areas already turned on, this function turns on all areas
that are off without changing the status of the areas that are already on.
1.
Press the [ESC]/[MENU] keys to enter the Command Menu.
2.
Press the [NEXT] key until the MASTER ARM INST ? function is displayed. Press
[ENT]. Your system may require a passcode before allowing you to access this function.
ENTER PASSCODE appears in the display. Enter your passcode and press [ENT].
3.
The display shows ARM INSTANT ALL? Press [ENT]. The command center displays
the armed idle text for the area you are in. The actual number of areas you may turn on
is limited by command center scope and/or your authority level. For example, if you
have authority to arm all 8 areas but the scope of the command center you’re using is
limited to areas 1, 2, and 5, then you will only be able to turn on areas 1, 2, and 5.
4.
To arm selected areas instantly, press [NEXT] at the MASTER ARM INST ? prompt.
Continue to press [NEXT] until you find the area you wish to arm. Press [ENT].
Turning the System Off
Turning Off Multiple Areas with a Passcode
This function is useful for turning off multiple areas with a few keystrokes. It is quicker than
disarming several areas independently. Your passcode must have the proper authority level for each
area.
When an area is turned on (armed), you must enter a door programmed for entry delay time.
Opening the door, starts the entry delay time. Failing to turn the system off before the entry delay
time expires or entering through a door not programmed for entry delay time, causes an alarm.
If this happens, silence the alarm by entering your personal passcode and pressing [ENT]. Call
your security company to let them know that it is not an emergency situation.
Turning Off Multiple Areas with Disarm All
This function turns off multiple areas with a few keystrokes. It is quicker than disarming several
areas independently. Your passcode must have the proper authority level for each area. This
function works the same as entering your passcode to disarm, but allows the Disarm All feature to
be included in the Command Menu.
When an area is turned on (armed), you must enter a door programmed for entry delay time.
Opening the door, starts the entry delay time. Failing to turn the system off before the entry delay
time expires or entering through a door not programmed for entry delay time, causes an alarm.
If this happens, silence the alarm by entering your personal passcode and pressing [ENT]. Call
your security company to let them know that it is not an emergency situation.
1.
Press the [ESC]/[MENU] keys to enter the Command Menu.
2.
Press the [NEXT] key until the DISARM ? function is displayed. Press [ENT]. Your
system may require a passcode before allowing you to execute the Disarm All function.
ENTER PASSCODE appears in the display. Enter your passcode and press [ENT].
3.
DISARM ALL ? is displayed. Press [ENT] to disarm all areas. The command center
displays DISARM 12345678, indicating that all areas are being turned off. The actual
number of areas you may turn off is limited by command center scope and/or your
authority level. For example, if you have authority to disarm all 8 areas but the scope of
the command center you’re using is limited to areas 1, 2, and 5, then you will only be
able to turn off areas 1, 2, and 5.
Turning Off Selected Areas
•
If your passcode has the proper authority level this function allows you to turn off areas other
than the one you are in.
1.
With idle text displayed, press the [ESC]/[MENU] keys. Press [NEXT] until the DISARM
? function is displayed.
2.
Press [ENT]. Your system may require a passcode before allowing you to access this
function. ENTER PASSCODE appears in the display. Enter your passcode and press
[ENT].
3.
The display shows DISARM ALL? Press [NEXT].
4.
The display shows DISARM AREA X ? If you want to disarm this area, press [ENT].
5.
Pressing the [NEXT] key scrolls the remaining areas you have the authority to turn off
into the display. When the display shows an area you wish to turn off, press [ENT].
6.
After turning off other areas, the command center’s display returns to the idle text for
the area you are in.
Appendix
Supplementary Information for Adding Passcodes
Use the information contained in this Supplement to help you add user passcodes.
User Authority Levels
Your security company uses the information contained on this page to establish authority levels
for system users. For each of the 1- 15 authority levels, each command center function is either
enabled (E), disabled (blank), or Passcode enabled (P). A function that is enabled (E) is available
to all users. A function that is passcode enabled (P) is only available to users assigned an authority
level that includes that function. If you do not want a particular command included in a given
authority level, leave it blank.
If you are having trouble understanding the concept of authority levels, try this simple exercise.
Refer to the column titled E/P on the next page. Notice that your security technician has marked
some of the cells in this column with the letter “E”, others the letter “P”, while others are left blank.
An “E” indicates that this function is enabled for all authority levels. A “P” indicates that the
function is passcode protected. Look across the same row, and notice that some of the cells in the
authority level area have the letter “E”. For each authority level in which an “E” appears, this
function is enabled (with a passcode required). A blank cell in the E/P column means that this
function is unavailable for any authority level.
Under the heading Authority Level, you’ll see columns 1-15, representing the 15 authority levels.
Now look at the column labeled 1. Following down this column, you’ll see that some cells are
blank while some contain the letter “E”, which stands for enabled. Wherever there is an “E”, it
means that that function is available to users with an authority level of 1.
User Access Windows
Use the information on this page to describe access windows for users. An access window is a
period of time that is defined in which a user has access to the security system. If the user attempts
to use the system during a time period that falls outside the assigned access window, access will be
denied.
Passcode Worksheet
The passcode worksheet presents the information discussed above onto one page, and also
includes the user’s ID number, assigned passcode, and his or her name. Think of the passcode
worksheet as the page that “puts it all together.”
An important piece of information included in the passcode worksheet is the listing of areas to
which the user has access, along with the authority level assignment for each of those areas.
User Interface
Cmd Center Function
Authority Levels
Blank = Disabled / E = Enabled / P = Passcode
#
1
2
3
4
5
6
7
8
9
10
11
12
13
14
15
16
17
18
19
20
21
22
23
24
25
26
27
28
29
30
31
32
33*
34
35
Functions
Disarm
Master Arm
Mstr Arm Inst
Perim Inst
Perim Delay
Watch Mode
Perim Partial
View Area Stat
View Event Mem
View Pt Status
Walk Test
Fire Test
Send Report
Not Used
Chg Display
Chg Time/Date
Chg Passcode
Add Passcode
Del Passcode
Extend Close
View Log
Print Log
User Cmd 7
User Cmd 9
Bypass a Pt
Unbypass a Pt
Reset Sensors
Relay Control
Remote Program
Move to Area
Not Used
Display Rev
Service Walk
Default Text
Change Skeds
Force Arm
Area O/C
Restricted O/C
Perimeter O/C
Send Duress
Passcode Arm
Passcode Disarm
Command
E/P
CMD 1
CMD 11
CMD 2
CMD 3
CMD 6
CMD 8
Blank = Disabled / E = Enable
1
2
3
4
5
6
7
8
9
10
11
12
13
14
15
E
E
E
E
E
E
E
CMD 40
CMD 44
CMD 58
CMD 41/42
E
E
E
CMD 49
CMD 45
CMD 55
CMD 56
CMD 53
CMD 51
E
E
E
E
E
E
CMD 7
CMD9
CMD 0
CMD 00
CMD 47
CMD 54
CMD 43
CMD50
E
E
E
E
E
E
E
E
E
CMD 59
CMD 57
CMD 52
P
P
P
P
P
P
P
User Access Windows
Sked
#
User
Window #
Day of Week
Access Window
Xept Holidy
Holiday
50
1
SMTWTFS
_:_
_:_
Yes / No
1 2 3 4
51
2
SMTWTFS
52
3
SMTWTFS
_:_
_:_
Yes / No
1 2 3 4
_:_
_:_
Yes / No
1 2 3 4
53
4
54
5
SMTWTFS
_:_
_:_
Yes / No
1 2 3 4
SMTWTFS
_:_
_:_
Yes / No
55
1 2 3 4
6
SMTWTFS
_:_
_:_
Yes / No
1 2 3 4
56
7
SMTWTFS
_:_
_:_
Yes / No
1 2 3 4
57
8
SMTWTFS
_:_
_:_
Yes / No
1 2 3 4
58
9
SMTWTFS
_:_
_:_
Yes / No
1 2 3 4
59
10
SMTWTFS
_:_
_:_
Yes / No
1 2 3 4
60
11
SMTWTFS
_:_
_:_
Yes / No
1 2 3 4
61
12
SMTWTFS
_:_
_:_
Yes / No
1 2 3 4
62
13
SMTWTFS
_:_
_:_
Yes / No
1 2 3 4
63
14
SMTWTFS
_:_
_:_
Yes / No
1 2 3 4
64
15
SMTWTFS
_:_
_:_
Yes / No
1 2 3 4
Start
Stop
DOW Only
Yes
Yes
No
No
DOW Except Holiday
Yes
Yes
Yes
Yes
DOW Plus Holiday
Yes
Yes
No
Yes
Holiday Only
No
Yes
No
Yes
All windows start at midnight.
User access windows are not available on some control models.
Passcode Worksheet
Duress
User
Flag
User
Passcode
Selections: 1 or 2
User
Window
1
000
00
______
__
15
001
01
______
__
_
002
02
______
__
_
003
03
______
__
_
004
04
______
__
_
005
05
______
__
_
601
06
______
__
_
602
07
______
__
_
603
08
______
__
_
604
09
______
__
_
605
10
______
__
_
606
11
______
__
_
607
12
______
__
_
608
13
______
__
_
701
14
______
__
_
702
15
______
__
_
703
16
______
__
_
704
17
______
__
_
705
18
______
__
_
706
19
______
__
_
707
20
______
__
_
708
21
______
__
_
801
22
______
__
_
802
23
______
__
_
803
24
______
__
_
804
25
______
__
_
805
26
______
__
_
806
27
______
__
_
807
28
______
__
_
808
29
______
__
_
B01
30
______
__
_
B02
31
______
__
_
B03
32
______
__
_
B04
33
______
__
_
B05
34
______
__
_
B06
35
______
__
_
B07
36
______
__
_
B08
37
______
__
_
C01
38
______
__
_
C02
39
______
__
_
C03
40
______
__
_
C04
41
______
__
_
C05
42
______
__
_
C06
43
______
__
_
C07
44
______
__
_
C08
45
______
__
_
D01
46
______
__
_
D02
47
______
__
_
D03
48
______
__
_
D04
49
______
__
_
User windows are not available on some control models.
2
15
_
_
_
_
_
_
_
_
_
_
_
_
_
_
_
_
_
_
_
_
_
_
_
_
_
_
_
_
_
_
_
_
_
_
_
_
_
_
_
_
_
_
_
_
_
_
_
_
_
Area Authority
3 4 5 6
15
_
_
_
_
_
_
_
_
_
_
_
_
_
_
_
_
_
_
_
_
_
_
_
_
_
_
_
_
_
_
_
_
_
_
_
_
_
_
_
_
_
_
_
_
_
_
_
_
_
15
_
_
_
_
_
_
_
_
_
_
_
_
_
_
_
_
_
_
_
_
_
_
_
_
_
_
_
_
_
_
_
_
_
_
_
_
_
_
_
_
_
_
_
_
_
_
_
_
_
User Name
7
15 15 15 15
_ _ _ _
_ _ _ _
_ _ _ _
_ _ _ _
_ _ _ _
_ _ _ _
_ _ _ _
_ _ _ _
_ _ _ _
_ _ _ _
_ _ _ _
_ _ _ _
_ _ _ _
_ _ _ _
_ _ _ _
_ _ _ _
_ _ _ _
_ _ _ _
_ _ _ _
_ _ _ _
_ _ _ _
_ _ _ _
_ _ _ _
_ _ _ _
_ _ _ _
_ _ _ _
_ _ _ _
_ _ _ _
_ _ _ _
_ _ _ _
_ _ _ _
_ _ _ _
_ _ _ _
_ _ _ _
_ _ _ _
_ _ _ _
_ _ _ _
_ _ _ _
_ _ _ _
_ _ _ _
_ _ _ _
_ _ _ _
_ _ _ _
_ _ _ _
_ _ _ _
_ _ _ _
_ _ _ _
_ _ _ _
_ _ _ _
8
Service Passcode
Passcode Worksheet Cont.
User
Flag
User
D05
D06
D07
D08
E01
E02
E03
E04
E05
E06
E07
E08
F01
F02
F03
F04
F05
F06
F07
F08
000
000
000
000
000
000
50
51
52
53
54
55
56
57
58
59
60
61
62
63
64
65
66
67
68
69
70
71
72
73
74
75
Passcode
______
______
______
______
______
______
______
______
______
______
______
______
______
______
______
______
______
______
______
______
______
______
______
______
______
______
User
Window
1
2
__
__
__
__
__
__
__
__
__
__
__
__
__
__
__
__
__
__
__
__
__
__
__
__
__
__
_
_
_
_
_
_
_
_
_
_
_
_
_
_
_
_
_
_
_
_
_
_
_
_
_
_
_
_
_
_
_
_
_
_
_
_
_
_
_
_
_
_
_
_
_
_
_
_
_
_
_
_
Area Authority
3 4 5 6
User Name
7
8
_
_
_
_
_
_
_
_
_
_
_
_
_
_
_
_
_
_
_
_
_
_
_
_
_
_
_
_
_
_
_
_
_
_
_
_
_
_
_
_
_
_
_
_
_
_
_
_
_
_
_
_
_
_
_
_
_
_
_
_
_
_
_
_
_
_
_
_
_
_
_
_
_
_
_
_
_
_
_
_
_
_
_
_
_
_
_
_
_
_
_
_
_
_
_
_
_
_
_
_
_
_
_
_
_
_
_
_
_
_
_
_
_
_
_
_
_
_
_
_
_
_
_
_
_
_
_
_
_
_
_
_
_
_
_
_
_
_
_
_
_
_
_
_
_
_
_
_
_
_
_
_
_
_
_
_
000
76
______
__
_ _ _
000
77
______
__
_ _ _
000
78
______
__
_ _ _
000
79
______
__
_ _ _
000
80
______
__
_ _ _
000
81
______
__
_ _ _
000
82
______
__
_ _ _
000
83
______
__
_ _ _
000
84
______
__
_ _ _
000
85
______
__
_ _ _
000
86
______
__
_ _ _
000
87
______
__
_ _ _
000
88
______
__
_ _ _
000
89
______
__
_ _ _
000
90
______
__
_ _ _
000
91
______
__
_ _ _
000
92
______
__
_ _ _
000
93
______
__
_ _ _
000
94
______
__
_ _ _
000
95
______
__
_ _ _
000
96
______
__
_ _ _
000
97
______
__
_ _ _
000
98
______
__
_ _ _
000
99
______
__
_ _ _
User numbers 76-99 are not available on some control models.
_
_
_
_
_
_
_
_
_
_
_
_
_
_
_
_
_
_
_
_
_
_
_
_
_
_
_
_
_
_
_
_
_
_
_
_
_
_
_
_
_
_
_
_
_
_
_
_
_
_
_
_
_
_
_
_
_
_
_
_
_
_
_
_
_
_
_
_
_
_
_
_
_
_
_
_
_
_
_
_
_
_
_
_
_
_
_
_
_
_
_
_
_
_
_
_
_
_
_
_
_
_
_
_
_
_
_
_
_
_
_
_
_
_
_
_
_
_
_
_
71-06633-000-C 11/02
D9112B