1
Introduction
Display Management Utility Software
Basics
Display Manager
Version 1.0
For
Windows®
Adjustments and Controls
Operation Manual
Troubleshooting
• Please read this operation manual carefully to
ensure correct use of the software.
Appendix
Disp_Manager_E_Hyo1.p65
1
08.4.18, 16:38
Display Manager
Sharp Display Management Utility Software, Display Manager (hereafter referred to as "the Software"), allows
remote control and diagnostics of Sharp display devices* connected to a local area network (LAN) as well as the
modification of settings. Basic operations for selected devices can also be carried out using the Software, such
as powering on, switching into standby mode and switching input modes.
* In this operation manual, a display device is referred to as "a device". For more information about devices that
can be managed by the Software, see page 26.
Hardware and Software Requirements
The following hardware and software are required to use the Software.
PC running on Microsoft Windows ® XP Home Edition, XP Professional or Windows Vista ® (Japanese or English versions)
Free HDD space
5 MB or more
Interface
Ethernet LAN port
■ This operation manual is intended for users who know how to use the Windows ® operating systems and
a mouse. For questions concerning Windows ® operating systems, please see the operation manual for
each operating system of Microsoft Corp. Please also note that specifications for the Software are
subject to change without notice.
■ The screenshots used in this operation manual are taken from Windows Vista ®. Steps and screen
displays may differ slightly depending on the Windows ® version used.
■ Microsoft ®, Windows ® and Windows Vista ® are registered trademarks or trademarks of Microsoft
Corporation in the U.S.A. and other countries.
■ Adobe ®, Adobe ® Reader ®, Acrobat ® and Acrobat ® Reader are registered trademarks or trademarks of
Adobe Systems Incorporated.
■ All other company and product names mentioned in this operation manual are the registered trademarks
or trademarks of their respective companies or organizations.
■ Please also note that depending on the operating environment and processing power of your PC, some
operations may run slowly.
Info
• Please note that operations are not guaranteed for hand-made PCs with a modified motherboard.
• Before using the software, configure your PC so that it does not automatically switch to sleep mode, system
standby mode or hibernation mode.
2
Disp_Manager_E_p02-05.p65
2
08.4.28, 5:36 PM
Contents
Display Manager .................................................................................................................................................. 2
Hardware and Software Requirements .................................................................................................... 2
Contents ............................................................................................................................................................... 3
Installing Display Manager ................................................................................................................................... 4
To Install the Software .............................................................................................................................. 4
To Uninstall the Software .......................................................................................................................... 5
Basics
Starting up and Exiting from Display Manager .................................................................................................... 6
To Start up and Exit from Display Manager .............................................................................................. 6
Main Screen .............................................................................................................................................. 6
Registering Devices ............................................................................................................................................. 7
To Manually Register Devices .................................................................................................................. 7
To Delete Devices ..................................................................................................................................... 7
Checking the Device Status ................................................................................................................................. 8
Controlling Devices .............................................................................................................................................. 9
To Open the Controller Window ................................................................................................................ 9
To Turn the Power ON ............................................................................................................................. 11
To Switch the Device into Standby Mode ............................................................................................... 11
To Switch between Input Modes ............................................................................................................. 11
To Turn the AV Mute ON/OFF ................................................................................................................. 11
To Turn the Black Screen ON/OFF ......................................................................................................... 11
To Close/Open the shutter ...................................................................................................................... 11
To Turn the Mute ON/OFF ...................................................................................................................... 11
To Operate Devices via a Browser ......................................................................................................... 12
Adjustments and Controls
Specifying Mail Settings ..................................................................................................................................... 12
To Specify Mail Settings ......................................................................................................................... 12
To Set Contents ...................................................................................................................................... 12
Specifying Alert Settings .................................................................................................................................... 14
Creating Groups ................................................................................................................................................. 15
To Create a New Group .......................................................................................................................... 15
To Edit a Group ....................................................................................................................................... 16
To Delete a Group ................................................................................................................................... 16
Customizing the Device Information List ........................................................................................................... 16
To Select Items for Display ..................................................................................................................... 16
To Change the Order of Items Displayed ............................................................................................... 17
To Sort Device Information ..................................................................................................................... 18
To Register a User Name and Password ............................................................................................... 18
To Refresh the Device Information List .................................................................................................. 19
To Search Devices on the LAN ............................................................................................................... 19
Advanced ............................................................................................................................................................ 19
To Specify Auto Search Settings ............................................................................................................ 19
To Specify Auto Refresh Settings for the Device Information List ......................................................... 20
To Specify Settings for the Browser to Operate Devices ....................................................................... 21
To Specify Power On Settings ................................................................................................................ 21
List of Functions ................................................................................................................................................. 22
List of Right Click Menu .......................................................................................................................... 22
List of Menus ........................................................................................................................................... 23
Troubleshooting
Troubleshooting .................................................................................................................................................. 24
Error Messages .................................................................................................................................................. 26
Appendix
Compatible Devices ........................................................................................................................................... 26
Index ................................................................................................................................................................... 27
Device input list .................................................................................................................................................. 28
Since simplified screen displays and illustrations are used for explanatory purposes, they may appear slightly
different on the screen.
3
Disp_Manager_E_p02-05.p65
3
08.4.18, 15:57
Introduction
Introduction
Installing Display Manager
Check the instructions and cautions posted on the Web site before downloading and installing the Software.
To Install the Software
1
Check that the PC on which the Software is to be installed is compatible with the Software.
For more information, see "Hardware and Software Requirements" (page 2).
2
Turn the PC power "ON".
• Log into the system using an administrator login name.
3
4
Exit from all active applications.
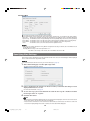
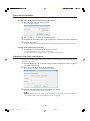
Double-click the downloaded installer.
After a while, the "Choose Setup Language" dialog box appears.
5
Select "English" and click the "OK" button.
The "InstallShield Wizard" dialog box appears.
6
Click the "Next >" button.
The "Choose Destination Location" dialog box appears.
• Change the installation folder only if necessary.
(Changing the folder is not normally required).
7
Click the "Next >" button.
The "Select Program Folder" dialog box appears.
• Change the program folder only if necessary.
(Changing the folder is not normally required.)
8
Click the "Next >" button.
The installation starts.
Once the installation is complete, the "InstallShield Wizard Complete" dialog box appears.
9
Click the "Finish" button.
The installation of the Software has been completed.
4
Disp_Manager_E_p02-05.p65
4
08.4.18, 15:57
To Uninstall the Software
1
2
3
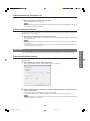
Click the "start" button and select "Control Panel".
Double-click "Programs and Features" or "Add or Remove Programs".
Select "Sharp Display Manager" and click the "Uninstall" or "Change/Remove" button.
The "Choose Setup Language" dialog box appears.
4
Click the "OK" button.
The "Confirm File Deletion" dialog box appears.
5
Click the "OK" button.
The uninstallation starts.
Once uninstallation is complete, the "Maintenance Complete" dialog box appears.
6
Click the "Finish" button.
The Software has now been uninstalled.
5
Disp_Manager_E_p02-05.p65
5
08.4.18, 15:58
Introduction
IMPORTANT
• If the Software is running, be sure to exit from the Software before uninstalling it.
Starting up and Exiting from Display Manager
Be sure to check that the PC and devices are connected before starting the Software. For more information
about connections, see the operation manual for each device or the network converter.
To Start up and Exit from Display Manager
To Start up
1
2
Start the PC.
Click the "start" button and select "All Programs", "Sharp Display Manager", and "Sharp
Display Manager".
Once the Software has loaded, the main screen appears.
• If a user name and password have been set up for the devices or the network converter, the user name and
password must be entered when connecting to the network. Enter the user name and password in the
dialog box and click the "OK" button.
• A security warning may be displayed when a search for a device is performed. Please refer in this case to
page 25.
To Exit
1
Select "Exit (X)" from the "Device (D)" menu.
The Software is exited.
• The Software can also be exited by clicking the "×" button on the top right of the screen.
Main Screen
Once the Software has loaded, the main screen appears. Management operations are generally performed from
this screen.
Menu
Tab
Device Information List
Row Title
Menu (page 23)
The menu is used to perform basic Software operations and edit the main screen.
Device (D), View (V), Option (O), Window (W) and Help (H)
Tab
The tab is used to switch between display modes for the device information list: "All Devices" or by group (any
created groups).
All Devices (page 7) and Any Created Groups (page 15)
Row Title (page 17)
A "row title" is the title for items displayed in the device information list.
6
Disp_Manager_E_p06-08.p65
6
08.4.28, 5:37 PM
Device Information List (page 8)
The information on Sharp devices is automatically or manually obtained for display.
Device Name, IP Address, MAC Address, Status, Model, Lamp Status, Lamp Life, Remaining Lamp Life,
INPUT, INPUT Signal and Serial Number*
* Items included in the device information list (row title) can be changed at "Customizing the Device Information
List" (page 16).
Registering Devices
IP addresses can be manually entered to obtain device information and add it to the device information list. The
new device information is displayed in "All Devices".
• By pre-specifying Auto Search (page 19) and Auto Refresh (page 20), Sharp devices on the LAN are
automatically searched at the specified timing and their information is displayed.
Basics
To Manually Register Devices
1
Select "Add (A)" from the "Device (D)" menu.
The "Add" dialog box appears.
2
Enter the IP address of a device and click the "OK" button.
• Information on the added device is displayed in "All Devices".
• After a short period of time, the latest device information is automatically displayed in the device information
list.
• By right-clicking on the device information list and selecting "Add (A)" from the popup menu, the "Add"
dialog box can also be displayed.
To Delete Devices
Registered device information can be deleted from the device information list, when "All Devices" is displayed.
• Only the information on devices whose "Status" is "Communication Error" or "Connection Error" can be deleted.
• Device information can not be deleted when a tab other than "All Devices" is displayed. To delete device
information from a group, use "Group Setting" (To Edit a Group → page 16).
• Any device information deleted from "All Devices" is deleted from all the groups.
1
2
Select the device information you wish to delete from "All Devices".
Select "Delete (D)" from the "Device (D)" menu.
The "Confirmation" dialog box appears.
3
Click the "Yes" button.
Information on the selected device is deleted.
• By clicking on device information on the main screen and pressing the "Delete" key, the device can also be
deleted.
• By right-clicking on device information and selecting "Delete (D)" from the popup menu, the device can also
be deleted.
7
Disp_Manager_E_p06-08.p65
7
08.4.18, 15:58
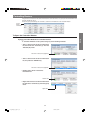
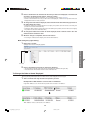
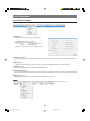
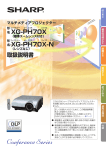
Checking the Device Status
The device status can be checked from the device information list.
(2)
(3)
(4)
(5)
(6)
(7)
(8)
(9)
(10)
(11)
(12)
(1)
(1) Status Icon
The status icon indicates the device status.
(Green) : The device was powered on normally.
(Red) : The device is in standby mode.
(Gray) : The device is in communication mode.
å
: An error has occurred.
×
: A connection error has occurred.
(2)Device Name, (3) IP Address, (4) MAC Address, and (6) Model
The device name, IP address, MAC address and model name are obtained for display.
• When the device is a projector, the projector name is displayed in "Device Name".
• When the device is a monitor, the monitor name is displayed in "Device Name".
• The MAC Address cannot be displayed unless the device is found.
(5) Status
Displays detailed device status.
Normal
: The device is operating normally.
Temperature Error
: The temperature inside the device is high.
Cooling Fan Error
: The cooling fan is broken.
Filter Cover Error
: The filter cover, air filter or lens cover are not installed correctly.
Lamp Error
: The lamp/backlight is burned out or malfunctioning.
Communication Error : No response is received from the device.
Connection Error
: The device cannot be connected.
• When the errors specified in "Alert Setting" occur, an error alert will be displayed (Alert Setting → page 14).
• When the errors specified in "Error Mail" occur, a mail message will be sent to a specified address (Error
Mail → page 13).
• When an error occurs, refer to "Troubleshooting" on page 24.
(7) Lamp Status
The projector lamp status is displayed as follows.
ON : The lamp is ON.
OFF : The lamp is OFF.
Retry : Inspection of the lamp is requested.
Wait : The projector is warming up or cooling.
(8) Lamp Life and (9) Remaining Lamp Life
Information on the lamp life and remaining lamp life of the projector is obtained for display.
• If no information can be obtained, "----" appears.
(10) INPUT
The input terminal currently in use is displayed.
(11) INPUT Signal
• "NTSC", "PAL" or "SECAM" is displayed when a video signal is input.
• The resolution is displayed when a non-video signal is input.
(12) Serial Number
The device serial number is obtained for display.
• If no information can be obtained, "----" appears.
• Serial number data is not available for all devices.
8
Disp_Manager_E_p06-08.p65
8
08.4.18, 15:58
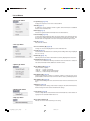
Controlling Devices
A single device selected from the device information list or all the devices in a group can be controlled from the
controller window on the PC.
The device/group controlled by the controller is shown in the window bar of the controller window.
Device/
Group
Controlled
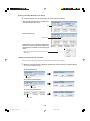
To Open the Controller Window
1
Controller windows can be opened using any of the following methods.
• Select a device from the device information
list, then select the "Controller (C)" from the
"Window (W)" menu.
The device selected is highlighted.
• Select a device from the device information
list, and press the "ENTER" key.
The device selected is highlighted.
• Double-click a device in the device
information list.
Double-click
• Right-click a device in the device information
list, and select "Controller (C)" from the popup
menu.
Right-click
9
Disp_Manager_E_p09-11.p65
9
08.4.28, 5:38 PM
Basics
Opening Controller Windows for individual devices
Opening Controller Window for the Group
1
Controller window can be opened using any of the following methods.
• Select the tab, then select the "Controller (C)"
from the "Window (W)" menu.
Tab
• Double-click the tab.
Double-click
• Right-click the part of the device information
list where no devices are shown (blank part),
and select the "Controller (C)" from the popup
menu.
Right-click the part where no devices are shown
(blank part)
Changing the Device/Group controlled
While the controller window is displayed, the device/group controlled can be changed.
1
While the controller window is displayed, double-click the tab or device you wish to display.
The controller window changes.
To Control All Devices
Double-click
To Control a Specified Group
Double-click
To Control a Specified Device
Double-click
10
Disp_Manager_E_p09-11.p65
10
08.4.28, 5:38 PM
To Turn the Power ON
1
Click the "ON" button next to "Power" on the controller window.
This turns power ON to the device.
To Switch the Device into Standby Mode
1
Click the "STANDBY" button next to "Power" on the controller window.
This switches the device into standby mode.
To Switch between Input Modes
The input mode can be switched among "RGB1"–"RGB6", "Video1"–"Video6".
The available input modes differ depending on the device used. See page 28 for details.
Click the button for the mode you wish to select from "INPUT" on the controller window.
This switches the input to the selected mode.
To Turn the AV Mute ON/OFF
The AV Mute function can be switched ON and OFF.
1
Click the "ON" or "OFF" button next to "AV Mute" on the controller window.
To Turn the Black Screen ON/OFF
The Black Screen function can be switched ON and OFF.
1
Click the "ON" or "OFF" button next to "Black Screen" on the controller window.
To Close/Open the Shutter
The shutter can be closed and opened.
1
Click the "CLOSE" or "OPEN" button next to "Shutter" on the controller window.
To Turn the Mute ON/OFF
The Mute function can be switched ON and OFF.
1
Click the "ON" or "OFF" button next to "Mute" on the controller window.
"AV Mute", "Black Screen" and "Mute"
AV Mute
: Displaying the black screen and turning off the sound temporarily
Mute
: Turning off the sound temporarily
Black Screen : Displaying the black screen temporarily
- If you operate AV Mute with the device which does not support AV Mute function, the device’s Black Screen and Mute will
be operated simultaneously.
- If you operate Black Screen with the device which supports AV Mute, the device’s AV Mute will be operated.
- If you operate Mute with the device which supports AV Mute, the device will do nothing.
* To determine if your device supports AV Mute or Mute, please refer to your device’s operation manual.
11
Disp_Manager_E_p09-11.p65
11
08.5.12, 2:35 PM
Basics
1
To Operate Devices via a Browser
Devices can be controlled via the network using a Web browser.
• This function can be used only when devices that can be operated through a Web browser are selected.
• Devices cannot be controlled through Web browser on "All Devices" or a group basis.
• The browser specified in "Browser used for accessing to device" will be started (Browser used for accessing to
device → page 21).
• The URL to be accessed by the browser is the device IP address.
1
Click the "Browser" button on the controller window.
The browser is started, and it accesses the IP address of the specified device.
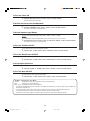
Specifying Mail Settings
If the e-mail transmission settings are enabled on the PC, a mail message can be automatically sent to a specified
address whenever an error occurs. A mail message that reports the device status can also be sent periodically
even in the absence of an error.
• Be sure to enable the e-mail transmission settings (e.g. LAN connection) on the PC before using this function.
To Specify Mail Settings
1
Select "Mail Setting (M)" from the "Option (O)" menu.
The "Mail Setting" dialog box appears.
2
Click a tab to switch the screen and make the various settings.
For details, see "To Set Contents".
3
Once the settings are complete, click the "Apply" button.
The mail settings will be applied to the Software currently running.
4
Click the "OK" button to finish the mail settings.
To Set Contents
Originator
Set up information about the mail originator.
• SMTP Server
: Enter the server name or the IP address of the SMTP server.
• Originator Mail Address : Enter the mail address of the mail originator (FROM).
• Originator Name
: Enter the name of the mail originator (FROM).
• Originator Information : Enter the reference information to be added to the body of the message.
Info
• POP before SMTP is not supported.
12
Disp_Manager_E_p12-23_old.p65
12
08.4.18, 16:00
Recipient
Up to five recipients can be set up.
• Recipient Addresses : Enter the mail address of the mail recipient (TO).
• Error
: If checked, whenever an error specified in "Error Mail" occurs, an e-mail will be sent
automatically (Error Mail → page 13).
• Periodical
: If checked, a mail message that reports the device status will automatically be sent at
the timing specified in "Periodical Mail" (Periodical Mail → page 14).
• "Send Now" button : If clicked, a mail message that reports the device status will be sent immediately.
Error Mail
Adjustments and Controls
When errors specified here occur, a mail message will be sent to the address specified in "Recipient"
(Recipient → page 13).
• Temperature Error
: The temperature inside the device is above normal.
• Cooling Fan Error
: The cooling fan is broken.
• Filter Cover Error
: The filter cover, air filter or lens cover are not installed correctly.
• Lamp Error
: The lamp/backlight is burned out or malfunctioning.
• Communication Error : No response is received from the device.
• Connection Error
: The device cannot be connected.
• When the device information is updated after an error mail has been sent, even if the same error occurs in the
same device, no more error mail will be sent.
• After the device in which the error occurred has returned into its normal status or when the same error occurs
after Display Manager has been re-started, the error mail will be sent.
13
Disp_Manager_E_p12-23_old.p65
13
08.4.18, 16:00
Periodical Mail
■ The timing for sending a mail message can be specified.
■ One timing option can be selected for setting from among: "Specific Day", "Every Week" and "Every Month".
• Next Mail
: Based on the conditions specified, the date and time for sending the next e-mail will be displayed.
• Specific Day : E-mail will be sent on the specified day of the week (Multiple days of the week can be specified).
• Every Week : E-mail will be sent on the day of the week selected from the pulldown menu (One day/week).
• Every Month : E-mail will be sent on the day selected from the pulldown menu (One day/month).
• Time
: E-mail will be sent at the time selected from the pulldown menu.
• If the day of the month specified in "Every Month" is beyond the last day of a month, the e-mail will be sent on
the last day of the month.
Example) When the day of the month specified is "31":
If the 28th is the last day of the month, the e-mail will be sent on the 28th.
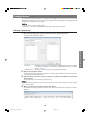
Specifying Alert Settings
Alert settings can be specified in such a way that when certain errors occur, the alert dialog box will be displayed
on the screen and the error logs will be stored.
• For alert information and error recovery, see "Error Messages" (page 26).
1
Select "Alert Setting (A)" from the "Option (O)" menu.
The "Alert Setting" dialog box appears.
2
Place a checkmark in the checkbox for the error item if you wish the alert dialog box to be
displayed when the error occurs.
For error item information, see page 8.
3
4
To store error logs, place a checkmark in the "Save the error log file" checkbox and enter
the storage location in "Log File".
Click the "OK" button.
Info
• When the device information updated after an error alert has been displayed, even if the same error occurs
in the same device, the error alert will not be re-displayed.
• After the device in which the error occurred has returned into its normal status or when the same error
occurs after Display Manager has been re-started, the error alert will be displayed.
14
Disp_Manager_E_p12-23_old.p65
14
08.4.18, 16:00
Creating Groups
All the device information obtained by the Software will be displayed in "All Devices" on the main screen.
Management and settings of devices can be done on a group basis by creating groups for each application and
assigning device information to these groups.
• A device can be assigned to multiple groups.
• "All Devices" on the main screen includes all Sharp devices detected on the network.
To Create a New Group
1
Select "Group Setting (G)" and then "New (N)" from the "Option (O)" menu.
The "Group Setting" dialog box appears.
: Information on "All Devices" on the main screen will be displayed. (Devices not assigned
to this group are displayed if the information is displayed from "Edit (M)" ("To Edit a
Group" → page 16)).
• Assigned Devices : The devices currently assigned to each group will be displayed.
2
Specify "Group Name" settings.
Any name can be entered (using up to 32 characters). The default setting is "GROUPxxx" (where xxx represents
a sequential number beginning with 001).
3
Select the device you wish to assign to a group (or groups) from "All Devices" and click the
"Add>>" button.
The selected device is transferred to "Assigned Devices".
• To remove a device assigned to the group, select the device to be removed from "Assigned Devices" and click
the "<< Delete" button.
4
When a group has been created, click the "OK" button.
The tab for the new group is added to the main screen and the device information assigned to the group is
displayed.
15
Disp_Manager_E_p12-23_old.p65
15
08.4.18, 16:00
Adjustments and Controls
• All Devices
To Edit a Group
The contents on already created groups can be edited.
• The group name cannot be changed when the "All Devices" tab is selected.
• To add or delete a device to or from "All Devices", see "Registering Devices" (page 7).
1
Click the tab for the group you wish to edit and select "Group Setting (G)" and then "Edit
(M)" from the "Option (O)" menu.
The "Group Setting" dialog box appears.
2
3
Using "To Create a New Group" (page 15) as reference, change the group name, and add or
delete a device.
When the editing is completed, click the "OK" button.
To Delete a Group
The already created groups can be deleted. ("All Devices" cannot be deleted.)
1
Click the tab for the group you wish to delete and select "Group Setting (G)" and then
"Delete (D)" from the "Option (O)" menu.
The "Confirmation" dialog box appears.
2
Click the "Yes" button.
The group is deleted.
Customizing the Device Information List
The device information list on the main screen can be customized to make the list easier to use.
To Select Items for Display
The items you wish to include in the device information list can be changed or sorted.
• "Device Name" is always displayed.
Make Changes and Perform Sorting Using the "Column Settings" Dialog Box
1
Select "Choose Columns (N)" from the "View (V)" menu.
The "Column Settings" dialog box appears.
16
Disp_Manager_E_p12-23_old.p65
16
08.4.18, 16:00
2
Place a checkmark in the checkbox for the item you wish to be displayed, or click the item
you wish to be displayed and click the "Show (S)" button.
• For items for display and their information, see "Checking the Device Status" (page 8).
• Remove a checkmark from the item you don't wish to be displayed, or click the item you don't wish to be
displayed and click the "Hide (H)" button.
3
To change the order of items displayed, select an item and click the "Move Up (U)" button or
the "Move Down (D)" button.
• Clicking the "Move Up (U)" button moves the item up by one position (The item moves to the left by one
position on the device information line.)
• Clicking the "Move Down (D)" button moves the item down by one position (The item moves to the right by
one position on the device information line.)
4
5
To change the width of the column for items displayed, enter a numeric value in the "The
selected column should be" field.
When the change is completed, click the "OK" button.
• The change is reflected on the display of the device information list.
Make changes by right-clicking.
1
Right-click a row title.
A popup menu of items for display appears.
2
Place a checkmark for the item you wish to be displayed.
• The checked item will be shown in the device information list. (Added to the right side.)
• Unchecked items will be hidden from the device information list.
To Change the Order of Items Displayed
By using the drag and drop function, the order of items (row) displayed can be changed.
1
Select a row title and drag the title to the position you want.
Example: Move "MAC Address" to the left side of "IP Address".
Drag "MAC Address" to the "Device Name" position on the left side of "IP Address".
"MAC Address" moves to the left side of "IP Address".
17
Disp_Manager_E_p12-23.p65
17
08.4.28, 5:39 PM
Adjustments and Controls
Popup Menu
Row Title
To Sort Device Information
Using a displayed item as a sort key, the device information list can be sorted in ascending or descending order.
Use the "Sort" Dialog Box to Perform Sorting Operations
1
Select "Sort (O)" from the "View (V)" menu.
The "Sort" dialog box appears.
2
3
4
Select an item as a sort key from the pulldown menu.
Click either the "Ascending order" or "Descending order" radio button to place a checkmark.
Click the "OK" button.
Based on the specified rules (ascending order or descending order), the device information list is sorted.
Perform Sorting Operations by Clicking
1
Click the title for any row that can be used as a sort key.
• The device information list is re-sorted in ascending order.
• By clicking the title for the row again, the list is re-sorted in descending order.
To Register a User Name and Password
If a user name and password have been set up on the devices or the network converter, the user name and
password must be entered when connecting to the network. By pre-registering the user name and password,
this input can be omitted.
1
2
Click the "All Devices" tab on the main screen and select the device you wish to register a
user name and password.
Select "Password (W)" from the "Device (D)" menu.
The "Connection User Name & Password" dialog box appears.
3
Enter the user name and password and click the "OK" button.
The user name and password have been registered.
• By right-clicking the device you wish to specify and selecting "Password (W)" from the popup menu, the
"Connection User Name & Password" dialog box can also be displayed.
18
Disp_Manager_E_p12-23_old.p65
18
08.4.18, 16:00
To Refresh the Device Information List
The device information list currently displayed can be manually refreshed.
1
Select "Refresh (R)" from the "View (V)" menu.
The device information list is refreshed.
• By right-clicking on the device information list and selecting "Refresh (R)" from the popup menu, the device
information list can also be refreshed.
To Search Devices on the LAN
Devices on the LAN can be manually searched for and if a new device is found, the new device information will
be added to be shown in the list.
1
Select "Search Devices (S)" from the "View (V)" menu.
The search starts and if a new device is found, the new device information will be added to be shown in the
device information list.
• This device may not be found when the network is busy. In this case, please try to repeat the procedure
several times.
• A security warning may be displayed when a search for a device is performed or device information is
refreshed. In this case, see page 25.
Advanced
To Specify Auto Search Settings
By pre-specifying Auto Search and the search interval, devices on the LAN are automatically searched for at the
specified timing.
1
Select "Setting (P)" from the "Option (O)" menu.
The "Setting" dialog box appears. (The "Communication" tab is selected.)
2
Place a checkmark in the "Auto Search" checkbox and drag the slider to a new position to
set the search interval.
• Auto Search will not be performed if the checkmark is removed.
• The search interval can be set within the range of 1 to 60 minutes (in one minute increments).
• A security warning may be displayed when a search for a device is performed or device information is
refreshed. In this case, see page 25.
19
Disp_Manager_E_p12-23.p65
19
08.5.12, 2:36 PM
Adjustments and Controls
This section describes settings for Auto Search of devices and Auto Refresh of the device information list.
3
Enter the port number for the search in "Search Port".
• Be sure to enter the same number as the number for the search set up on the devices or the network converter.
• The default setting is 5006.
• The setting range is from 1025 to 65535.
4
Enter the range of port numbers for data communication in "Data Port".
• Use this setting when you want to restrict the available data ports on the PC.
• The default setting is 1025 to 65535.
• The setting range is from 1025 to 65535.
5
6
Click the "Apply" button.
Click the "OK" button to finish the settings.
To Specify Auto Refresh Settings for the Device Information List
By pre-specifying Auto Refresh for the device information list and the refresh interval, device information is
automatically collected at the specified timing to refresh the device information list.
1
Select "Setting (P)" from the "Option (O)" menu and click the "General" tab in the "Setting" dialog box.
The "Setting" dialog box appears. (The "General" tab is selected.)
2
Place a checkmark in the "Auto Refresh" checkbox and drag the slider to a new position to
set the refresh interval.
• Auto Refresh will not be performed when the checkmark is removed.
• The refresh interval can be set within the range of 60 to 180 seconds (in one second increments).
3
4
Click the "Apply" button.
Click the "OK" button to finish the settings.
• We recommend to set a shorter time for Auto Logout than Auto Refresh, when the device has an Auto Logout
function. This enables an earlier update following the recovery from network trouble, etc.
20
Disp_Manager_E_p12-23.p65
20
08.4.28, 5:39 PM
To Specify Settings for the Browser to Operate Devices
The browser used for operating the devices through the network can be specified.
• The browser is used only when devices that can be operated using the browser are selected.
1
2
Select "Setting (P)" from the "Option (O)" menu and click the "General" tab in the "Setting"
dialog box.
Enter the Browser location in the "Path Name" field of "Browser used for accessing to
device".
The default setting is the location of the Internet Explorer.
3
4
Click the "Apply" button.
Click the "OK" button to finish the settings.
To Specify Power On Settings
Set either a simultaneously ON signal is sent ("At once"), or individual ON signals are sent one after another in
fixed intervals, when the power of the devices is switched on collectively.
1
2
Click the "At once" or "Turn on the devices one at a time in order every [xx] second(s)"
radio button in "Power ON Setting" to place a checkmark.
If the checkmark is placed in "Turn on the devices one at a time in order every [xx] second(s)",
select the time interval from the pulldown menu.
• The time interval can be set within the range of 1 to 10 seconds (in one second increments).
4
5
Click the "Apply" button.
Click the "OK" button to finish the settings.
21
Disp_Manager_E_p12-23_old.p65
21
08.4.18, 16:01
Adjustments and Controls
3
Select "Setting (P)" from the "Option (O)" menu and click the "General" tab in the "Setting" dialog box.
List of Functions
List of Right Click Menu
This section describes the menu functions of the popup menu that appears when right-clicking on the device information list.
Properties (P)
Displays the Properties screen of the selected device.
• For displayed items other than "Power",
see "Checking the Device Status" (page 8).
• "Power" : ON
→ Normal (The power is ON.)
Standby → In standby mode
• Clicking the "Close" button closes the Properties screen.
Controller (C) (page 9)
Controls a single device selected from the device information list or all the devices in a group from the controller window on the
PC.
Add (A) (page 7)
IP addresses can be manually entered to gather device information for additional inclusion in the information list.
Delete (D) (page 7)
Deletes the registered device information from the information list.
Password (W) (page 18)
If a user name and password have been set up on the devices or the network converter, the user name and password must be
entered when connecting to the network. This function allows the registration of the user name and password to skip this input.
Refresh (R) (page 19)
Manually refreshes the device information list currently displayed to the latest one.
• Right-clicking the row title activates the add/change functions for the displayed items. For details, see page 17.
22
Disp_Manager_E_p12-23.p65
22
08.4.28, 5:39 PM
List of Menus
This section describes the menu functions of the menu bar.
"Device (D)" Menu
Properties (P) (page 22)
Displays the Properties screen of the selected device.
Add (A) (page 7)
IP addresses can be manually entered to gather device information for additional
inclusion in the information list.
Delete (D) (page 7)
Deletes the registered device information from the information list.
Password (W) (page 18)
If a user name and password have been set up on the devices or the network converter,
the user name and password must be entered when connecting to the network. This
function allows the registration of the user name and password to skip this input.
Exit (X) (page 6)
Exits from the Software.
"View (V)" Menu
Choose Columns (N) (page 16)
Changes or sorts items displayed in the device information list.
Sorts the device information list in ascending or descending order using a displayed
item as a sort key.
Refresh (R) (page 19)
Manually refreshes the device information list currently displayed to the latest one.
Search Devices (S) (page 19)
Devices on the LAN can be manually searched for and if a new device is found, the
new device information will be added to be shown in the list.
"Option (O)" Menu
Group Setting (G) (page 15)
Assigns devices to groups.
• New (N) : Creates a new group.
• Edit (M) : Modifies already created groups.
• Delete (D) : Deletes already created groups.
Mail Setting (M) (page 12)
Specifies mail message settings for automatic sending of mail messages to the
specified address when errors occur or when the device status is periodically reported.
Alert Setting (A) (page 14)
Displays the alert dialog box on the screen when certain errors occur and stores error
logs.
Setting (P) (page 19)
Specifies Auto Search settings, Auto Refresh settings for the device information list,
browser settings for device control and Power ON settings.
"Window (W)" Menu
Controller (C) (page 9)
Controls a single device selected from the device information list or all the devices in
a group from the controller window on the PC.
"Help (H)" Menu
About This Software (A)
Indicates the version of the Software you are using.
23
Disp_Manager_E_p12-23_old.p65
23
08.4.18, 16:01
Adjustments and Controls
Sort (O) (page 18)
Troubleshooting
If a problem as mentioned below is encountered, take the actions indicated in the list. If the problem cannot be
solved, contact the Sharp authorized projector dealer or Service Center.
Problem
Cause and Solution
No devices are found or
communication is impossible.
• Check that the cable’s connector is firmly inserted in the LAN terminal of the device.
• Check that the cable is firmly inserted into a LAN port for a PC or a network device
such as a hub.
• Check that the LAN cable is a Category 5 cable.
• Check that the LAN cable is a cross-over cable when connecting the device to a PC
directly.
• Check that the LAN cable is a straight-through cable when connecting the device with
a network device such as a hub.
• Check that the power supply is turned on for the network device such as a hub
between the device and a PC.
• Check the following network settings for the device.
IP Address
Check that the IP address for the device is not duplicated on the network.
Subnet Mask
When the gateway setting for the projector is "0.0.0.0" (Not Used), or the gateway
setting for the device and the default gateway setting for the PC are the same:
- The subnet masks for the device and the PC should be the same.
- The IP address parts shown by the subnet mask for the device and the PC should
be the same.
(Example)
When the IP address is "192.168.150.2" and the subnet mask is "255.255.255.0" for
the device, the IP address for the PC should be "192.168.150.X" (X=3-254) and the
subnet mask should be "255.255.255.0".
Gateway
When the gateway setting for the device is "0.0.0.0" (Not Used), or the gateway
setting for the device and the default gateway setting for the PC are the same:
- The subnets for the device and the PC should be the same.
- The IP address parts shown by the subnet mask for the device and the PC should
be the same.
(Example)
When the IP address is "192.168.150.2" and the subnet mask is "255.255.255.0" for
the device, the IP address for the PC should be "192.168.150.X" (X=3-254) and the
subnet mask should be "255.255.255.0".
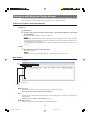
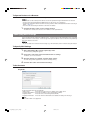
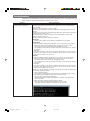
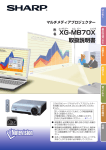
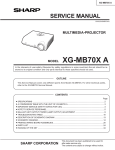
• Check if the "TCP/IP" protocol is operating correctly using the "PING" command and it
is communicating with the device.
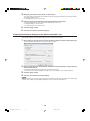
1. Open a command prompt.
Click "START" ➔ "All Programs" ➔ "Accessories" ➔ "Command Prompt" in order.
2. After launching the command prompt enter a command "PING".
Entry example C:\>Ping XXX.XXX.XXX.XXX
"XXX.XXX.XXX.XXX" should be entered with an IP address to be connected to,
such as the device.
3. When connecting normally, the display will be as follows.
(The screen may be slightly different depending on the OS type).
<Example> when the IP address connected to is "192.168.150.1"
24
Disp_Manager_E_p24-28.p65
24
08.5.2, 2:47 PM
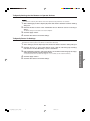
4. When a command cannot be sent, "Request time out" will be displayed.
Check the network setting again.
If communication can still not be established properly, contact your network
administrator.
5. To return to the Windows® screen, enter "exit" and then press the "Enter" key.
• When the device cannot be connected, even though the "PING" command is checked:
1. When there is a setting for an "Accept IP Address" in the device, set the IP address
of the PC to be connected.
2. When a security software is installed on the PC, or when a fire wall has been set
up for the network system, connection may not be possible.
Consult the system administrator in order to enable use of the UDP/TCP port set
as the search port, and TCP port set as the data port.
3. When neither of the above two items applies, change the settings for either the
search port or the data port (page 19). When the setting for the search port for the
Software is changed, the settings for the search port on the device must also be
changed accordingly.
The security alert window is
displayed.
• A security warning may be displayed when a search for a device is performed. To ensure
that the Software communicates via the search port (UDP), click "Unblock" and search
for the device again.
Troubleshooting
25
Disp_Manager_E_p24-28.p65
25
08.4.28, 5:39 PM
Error Messages
If the following messages appear, take the actions indicated in the list. If the problem cannot be solved, contact
the Sharp authorized projector dealer or Service Center*.
Message
Cause and Solution
The internal temperature is high.
[Causes]
The exhaust and intake vents are blocked. / The air filter is clogged. /
The cooling fan is broken. / The internal circuit is malfunctioning.
[Solutions] a. Move the product to a well-ventilated location.
b. Replace the air filter.
c. Request your nearest Sharp authorized projector dealer or Service
Center* to make repairs.
The internal temperature is
abnormally high.
The cooling fan is not operating.
[Cause]
[Solution]
The cooling fan is broken.
Request your nearest Sharp authorized projector dealer or Service Center*
to make repairs.
The filter cover is open.
[Cause]
[Solution]
The filter cover, air filter or lens cover is not installed correctly.
Install the filter cover, air filter and lens cover correctly.
Time to change the lamp
[Solutions] a. Replace the lamp and reset the lamp timer. (Be careful when replacing the
lamp.)
b. Request your nearest Sharp authorized projector dealer or Service
Center* to make repairs.
The lamp is burnt-out.
[Solutions] a. Replace the lamp and reset the lamp timer. (Be careful when replacing the
lamp.)
b. Request your nearest Sharp authorized projector dealer or Service
Center* to make repairs.
The lamp does not ignite.
[Causes]
No response from the device
[Cause]
There is no response from the device.
[Solutions] a. Check the power supply of the device.
b. Check the connection of the LAN cable (link LED is ON).
c. Check the correct functioning of interconnected communication devices.
Can not connect to the device
[Cause (1)]
The lamp/backlight has burned out. / The lamp/backlight circuit is
malfunctioning.
[Solutions] a. Replace the lamp and reset the lamp timer. (Be careful when replacing the
lamp.)
b. Request your nearest Sharp authorized projector dealer or Service
Center* to make repairs.
The user name or password you have entered is different from the one for
the device.
[Solution (1)] Use the same user name and password as the ones for the device (page 18).
[Cause (2)] Either search port or data port cannot be used.
[Solutions (2)] a. When there is a setting for an "Accept IP Address" in the device, set the
IP address of the PC to be connected.
b. When a security software is installed on the PC, or when a fire wall has
been set up for the network system, consult the security supervisor in
order to enable use of the UDP/TCP port set as the search port, and TCP
port set as the data port.
c. When neither of the above two items applies, change the settings for
either the search port or the data port (page 19). When the setting for the
search port for this software is changed, the settings for the search port
on the device must also be changed accordingly.
[Cause (3)] The device is currently accessed from another PC.
[Solution (3)] Check the PC connected to the data port on the device.
*For contacting Sharp authorized projector dealer or Service Center, see the operation manual supplied with the device.
Compatible Devices
• XG-MB70X, XG-PH50X, XG-PH50X-NL, XG-PH70X, XG-PH70X-N, XG-P610X, XG-P610X-N,
TL-M4600, TL-M5200
Using an optional AN-LS1 enables you to connect the following projectors as well.
• PG-A10S, PG-A10X, PG-A20X, PG-C45S, PG-C45X, XG-C50X, XG-C55X, XG-C60X,
XG-P20X, XG-P25X
IMPORTANT
• AN-LS1 may not be available depending on the region. Please check with your nearest Sharp authorized
projector dealer or Service Center.
26
Disp_Manager_E_p24-28.p65
26
08.4.28, 5:39 PM
Index
A
M
About This Software ................................................ 23
MAC Address ............................................................ 8
Add ............................................................................ 7
Mail Setting ............................................................. 12
Alert Setting ............................................................ 14
Error Mail ......................................................... 13
Auto Refresh ........................................................... 20
Originator ......................................................... 12
Auto Search ............................................................ 19
Periodical Mail .................................................. 14
AV Mute ................................................................... 11
Recipient .......................................................... 13
Main Screen .............................................................. 6
B
Menu ....................................................................... 23
Black Screen ........................................................... 11
Device .......................................................... 7, 18
Browser ............................................................. 12, 21
Help .................................................................. 23
Option .............................................. 12-16, 19-21
C
View ..................................................... 16, 18, 19
Controller Window ..................................................... 9
Window .............................................................. 9
Controlling Devices ................................................... 9
Model ........................................................................ 8
Mute ........................................................................ 11
D
Device Information .................................................... 8
P
Device Information List ........................................ 8, 16
Password ................................................................. 18
Device Name ............................................................. 8
Power ON Setting .................................................... 21
Properties ................................................................ 22
E
Error Messages ....................................................... 26
R
Exit ............................................................................ 6
Remaining Lamp Life ................................................ 8
Right Click Menus ................................................... 22
G
Group ...................................................................... 15
S
Search Devices ....................................................... 19
H
Search Interval ........................................................ 19
Help ......................................................................... 23
Serial Number ........................................................... 8
Standby Mode ......................................................... 11
INPUT ....................................................................... 8
Start Up ..................................................................... 6
INPUT Signal ............................................................ 8
Status ........................................................................ 8
Install ......................................................................... 4
Status Icon ................................................................ 8
IP Address ................................................................. 8
T
L
Troubleshooting
Shutter ..................................................................... 11
I
Tab ............................................................................ 6
Lamp Life .................................................................. 8
All Devices ......................................................... 7
Lamp Status .............................................................. 8
Group ............................................................... 15
U
User Name .............................................................. 18
27
Disp_Manager_E_p24-28.p65
27
08.5.12, 2:37 PM
Appendix
Uninstall .................................................................... 5
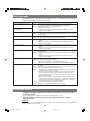
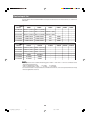
Device input list
The input buttons on the controller window act as input selector buttons for the various devices, as shown in the
table below.
Button
Device
RGB1
RGB2
RGB3
RGB4
RGB5
RGB6
-
-
-
-
XG-MB70X
INPUT 1 (RGB1) INPUT 2 (RGB2)
XG-PH50X
INPUT 1 (RGB1) INPUT 2 (RGB2) INPUT 3 (DVI)
-
-
-
XG-PH70X
INPUT 1 (RGB1) INPUT 2 (RGB2) INPUT 3 (DVI)
-
-
-
XG-P610X
COMPUTER1
COMPUTER2
DVI
HDMI
-
-
TL-M4600
COMPUTER1
COMPUTER2
DVI
HDMI
-
-
TL-M5200
COMPUTER1
COMPUTER2
DVI
HDMI
-
-
Video3
Video4
Video5
Video6
Button
Device
Video1
Video2
XG-MB70X
INPUT 3 (Video) INPUT 4 (S-Video)
-
-
-
-
XG-PH50X
INPUT 4 (Video) INPUT 5 (S-Video)
-
-
-
-
XG-PH70X
INPUT 4 (Video) INPUT 5 (S-Video)
-
-
-
-
XG-P610X
VIDEO
S-VIDEO
-
-
-
-
TL-M4600
S-VIDEO
VIDEO
-
-
-
-
TL-M5200
S-VIDEO
VIDEO
-
-
-
-
• The input buttons on the controller window trigger the "IRGB****" and "IVED****" RS-232C commands used to
switch between input devices.
RGB1 to RGB6 buttons: "IRGB_ _ _1" to "IRGB_ _ _6" commands
Video1 to Video6 buttons: "IVED_ _ _1" to "IVED_ _ _6" commands
• For more information on the input selection commands for each device, refer to the Operation Manual or Setup
Manual supplied with the device.
28
Disp_Manager_E_p24-28.p65
28
08.5.7, 7:40 PM
SHARP CORPORATION
Disp_Manager_E_Hyo4.p65
1
08.4.28, 5:40 PM