1
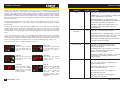
355 Old Road
Clacton On Sea
Essex CO15 3RH
Tel: +44 (0)1255 422807
Fax: +44 (0)1255 436342
www.bowens.co.uk
ʻBowensʼ ® and ʻthe power behind the pictureʼ ® are registered trademarks of Bowens International Ltd.
OPERATING INSTRUCTIONS
ESPRIT GEMINI DIGITAL
USER GUIDE BWL-0410 (10/06)
BOWENS INTERNATIONAL LIMITED
Introduction
Table of Contents
Dear Valued Customer,
Description
Page
Introduction and Safety Notes
3
Thank you for choosing the Bowens Esprit Gemini Digital professional flash system.
Control Panel Guide
4
Connecting & Using the Esprit Gemini
5
Mounting
5
Fitting the Modelling Lamp
6
Accurate, ergonomic, powerful and simple to use, the Esprit Gemini Digital was designed by working
closely with photographers to develop a flash that meets the standards demanded in professional
studios today. All ʻS-Typeʼ accessories from the Bowens range can be used with the Esprit Gemini
Digital. For details of all related products, please contact your local distributor, a list of which can be
found at www.bowens.co.uk. In order to obtain the full benefit from your purchase, please take a few
moments to familiarise yourself with this user manual.
Fitting / Removing Reflectors
6
Fuse
6
Synchronisation
6-7
Flash Power Control
7
Modelling Lamp Control
7
Functions Overview
7-8
Normal Functions
9
Advanced Functions
10
Functions Menu System
11
Modelling Lamp Ready Indicator
12
Photocell
12 - 13
Audible Ready Beep
13
Information & Error Codes
13
Additional Information
14
Flash Tube Replacement
14
Battery Power
14 - 15
Pulsar Radio Transmitter
15
Pulsar Clip-On Platform
16
Gemini Accessories
16 - 17
Specifications
18 - 19
2 www.bowens.co.uk
Thank you.
Bowens International Ltd.
Safety Notes
DO NOT:
• Use in an environment where moisture or flammable vapour is likely to come in contact with the
unit.
• Plug the Gemini Esprit Digital into a mains supply and a battery at the same time.
• Restrict air vents while in use.
• Use a unit with damaged housing, mouldings, flash tube or modelling lamp.
If the unit is dropped or damaged in any way, always have it checked out before using.
DO:
• Read Instructions before use
• Switch power off and disconnect from the supply before changing modelling bulb or flash tube.
• Disconnect the supply before changing the fuse. Never replace with a fuse of a different rating. A
spare fuse is fitted in the fuse holder.
• Exercise care when handling equipment that has been in use. The reflector and front end of the
unit can become very hot.
• Avoid placing cables where they can be tripped over. Protect from heavy, sharp or hot objects,
which may cause damage and replace damaged cables immediately.
• Due to the high voltage / high energy used in all Esprit units, all servicing must be carried out
by an authorised Service Centre.
• Remove the power cord by gripping the plug. NEVER pull the cord.
• Ensure that any extension cord used has a suitable current rating to prevent overheating and
never use coiled extension cords.
• ALWAYS remove the flash head covers before using.
www.bowens.co.uk 3
Connecting & Using the Esprit Gemini Digital
Control Panel Guide
!!! WARNING HIGH VOLTAGE !!!
Rear Control Panel
Mains /
Battery Power
Select
Carry Handle
NEVER CONNECT THE ESPRIT GEMINI DIGITAL TO BOTH A MAINS SUPPLY AND
A BATTERY SUPPLY AT THE SAME TIME.
THIS APPLIANCE MUST BE EARTHED WHEN USED WITH MAINS.
DISCONNECT THE MAINS LEAD WHEN CHANGING MODELLING LAMPS &
FLASH TUBES.
The Esprit Gemini Digital unit may be operated either on a mains supply or with a Bowens battery
source such as the Bowens Travel-Pak, Turbo-Pak or the Explorer 1500.
Mains Inlet
Sync Socket
Fuse
(and spare fuse)
Battery Power
Inlet
Side Control Panel
For mains operation, the mains switch (page 4) should be in the upper position (I).
For battery operation the switch should be in the lower position (II).
The centre position is OFF (O).
NOTE: When operated from a battery source, the modelling lamp functions are not available.
When connecting a power supply ensure the power is OFF.
Connect the unit using the appropriate cabling.
If using a battery source, ensure the connector locks are fully tightened.
Switch the power source on, then switch on the unit.
The unit will charge and indicate it is ready for use.
Press the TEST button to check the unit fires.
Mounting
Photocell
Mount the Esprit Gemini Digital unit on selected support system.
The mounting bush on the 'L' bracket allows for two possible ways of mounting to the stand / support.
Method B may be found useful if the light is required to point down.
Latch Release
LED Display
Flash Test /
Done Button
Menu Button
Rotary Dial
A
4 www.bowens.co.uk
B
www.bowens.co.uk 5
Synchronisation cont.
Fitting the Modelling Lamp
Switch off and disconnect from the supply. Screw modelling lamp into ES lampholder in the centre of
the reflector. Allow lamp to cool before removing.
Note: It is recommended that a Photoflood or Halostar bulb with a maximum wattage of 275W is used.
Bowens will not accept liability on the use of any lamp with a greater wattage than 275W.
Fitting / Removing Reflectors
A wide range of reflectors are available for the Esprit range. To fit, slide the neck of the reflector over
the front of the unit. Align the three pegs on the reflector with the three slots in the retaining ring. Press
down and turn clockwise to lock.
To remove reflector, pull back Latch Release Key (page 4), turn the reflector fully anti-clockwise and
withdraw.
If an umbrella is to be used a 'Wide Angle Reflector' should be fitted and the umbrella fitted through the
mounting hole in the mounting bracket and locked in position with the knurled screw.
Note: Take care when fitting / removing reflectors not to damage the flashtube assembly. The flashtube
is very delicate, avoid unnecessary handling of the glass tube. Always switch off and disconnect from
the mains supply before fitting and changing reflectors.
Sync Socket:
The standard quarter inch jack type socket on the rear panel of the unit may be used for direct
connection to a camera set to 'x' synchronisation. Two Esprit units may be connected together using a
'y' connector. An Infra Red Receiver, Omnicell or Pulsar Radio Trigger systems may also be plugged
into this socket. The socket operates at +5V and is safe for use on digital cameras.
Open Flash:
For testing or multiple flash applications the Open Flash Push button can be used.
Flash Power Control
The flash power output is variable over five f-stops from full to 1/32 power, in 1/10 stop increments.
The maximum power available depends upon the model (See specification table). The Flash Power
output value which is shown on the side of the unit can be set to be displayed in either f-stops or Joules
(Ws). The Flash Power display setting can be changed via the ʻAdvanced Functionsʼ in the menu
system.
The Flash Power display can also be ʻinvertedʼ so it is displayed upside down. This is a useful feature
when using the unit from a ceiling mounted rail system when the unit will be upside down. This feature
is available through the Advanced Functions menu.
Note: If the unit is subjected to rapid operation over extended periods, it may automatically go into an
overheat condition. In this condition the charging and modelling functions are disabled in order to allow
the unit to cool. The unit will automatically resume operation once cooled sufficiently.
Warning High Voltage!
Do not touch the flashtube assembly for thirty minutes after disconnecting from supply.
Modelling Lamp Control
Fuse
The modelling and flash circuitry is protected by a single 20mm fuse mounted on the rear panel. Never
replace the fuse with one of a different rating. As the fuse may blow when the modelling lamp fails
always check the fuse when replacing the bulb. A spare fuse is supplied and located in the fuse holder
at the back of the unit. Always switch OFF and disconnect the Esprit Gemini unit from the power supply
before changing the bulb or fuse.
The modelling lamp control options are available within the ʻnormal functionsʼ through the digital
display on the side of the unit. The modelling lamp options that are available are either OFF, USER (in
USER mode the modelling lamp output can be set from F5.0 to F10.0), PROPORTIONAL (modelling
lamp automatically adjusts itself to be in proportion to the flash power output), or FULL (the modelling
lamp is set to maximum power output).
Note: The modelling lamp can only be used when the unit is operating from mains power, when the unit
is working from battery power the modelling lamp options are disabled.
Synchronisation
Functions Overview
There are several ways to trigger the Esprit Gemini Digital
GEMINI Digital User Controls
Photocell:
The Esprit Gemini has a built in switchable photocell enabling the unit to be triggered by the flash from
any other flash unit or a small camera mounted flash gun. The photocell is mounted behind the red
transparent cover on the top of the unit. The Photocell has various trigger modes, see page 12 for full
details.
6 www.bowens.co.uk
The ʻFlash Powerʼ, ʻModelling Lampʼ and ʻOther Optionʼ settings are all available by using the ʻrotary
controlʼ on the side of the unit in combination with the ʻMENUʼ and the ʻDONEʼ button; all of the options
and settings can be seen via the 7-segment LED display above the buttons. All of the various options
and settings are stored to the unitʼs memory.
www.bowens.co.uk 7
Normal Functions
Functions Overview
During normal use simply rotate the dial to adjust the power to the required level. The unit ready
indication is by means of a ʻsteadyʼ display and a sounder beep (if on) as well as the modelling lamp
indication function when the unit reaches ready (if switched on). While changing the power level the
display flashes at different rates to indicate whether the unit is charging or if there is excess power that
needs dumping. The display will flash ʻquicklyʼ while the unit is charging and flash ʻslowlyʼ to indicate
that there is excess power that needs to be dumped. To test the flash and/or dump any excess power
press the ʻTESTʼ button.
Function
Display
*Lamp
LP
Off (OFF) - Lamp remains ʻoffʼ during operation.
USER (USR) - In ʻuserʼ mode the modelling lamp
can be adjusted from f5.0 to f10.0
Proportional (PRO) - In ʻproportionalʼ mode
the modelling lamp will automatically adjust itself
to the same output level as the flash.
The unit can be triggered via the ʻsync socketʼ connected to the relevant system or via the ʻPhotocellʼ
as required. Other displays may occur during operation to provide warnings of problems or to indicate
the unit status.
To change any of the unitʼs settings first press the ʻMENUʼ button on the side of the unit; ʻSETʼ will be
displayed briefly showing that the unit is entering the user setup options followed by ʻLPʼ (for ʻLamp
settingsʼ) as the first item. Each press of the ʻMENUʼ button takes you down one level of the menu
structure until you cannot go any further; at this point the sounder (if switched on) will provide a warning
beep.
Description
Full (FUL) - When the modelling lamp is set
to ʻfullʼ the power output will remain at the
maximum level.
*Lamp Ready
Indication
IND
Off (OFF) - No lamp ready indication.
Intermittent (INT) - If modelling lamp is on it goes
off after the unit has fired and comes back on at
the set level once the unit has recharged.
At any menu level turning the rotary control will either select another function/option or change the
setting of the chosen function. Each press of the ʻDONEʼ button takes you up one level until you exit
the user setup mode, at which point ʻEndʼ is displayed. Any altered user setting will be saved to the units
memory. See below illustration for example of how to change the Modelling Lamp settings to off.
Pulse (PUL) - Modelling lamp pulses when the
unit has recharged after firing.
Example Illustration: How to change the Modelling Lamp to off.
Ready Sounder
Step One.
During normal operation
press the MENU button to
enter the normal functions
menu.
Step Four.
Next turn the rotary dial again
to find the desired option of
the setting you wish to
change.
Step Two.
Next, turn the rotary dial to
scroll through the normal
functions.
Step Five.
Scroll through the available
options until the desired
setting is shown.
SND
Off (OFF) - The Ready Sounder beep
remains off and does not indicate when
the unit has charged.
Intermittent (INT) - The unit emits a short beep
when it has fully recharged to indicate
that it is ready to fire again.
Continuous (CON) - The unit emits a continuous
beep while it is recharging and stops once
fully recharged.
Photocell
PHO
Off (OFF) - Photocell remains ʻoffʼ.
1st (1st) - Photocell is set to trigger unit on
the first flash detected.
Step Three.
Once the desired setting is
shown press the MENU
button again to enter the
available functions for that
particular setting.
8 www.bowens.co.uk
Step Six.
Next press the TEST/DONE
button to confirm your
selection and go up one
menu level. Repeat as
necessary
with
other
functions.
Finally
press
TEST/DONE until END is
displayed.
2nd (2nd) - Photocell is set to trigger on
the second flash detected.
3rd (3rd) - Photocell is set to trigger on
the third flash detected.
4th (4th) - Photocell is set to trigger on
the fourth flash detected.
* Only available when operating from mains power.
www.bowens.co.uk 9
Functions Menu System
Advanced Functions
Menu
Top Level
Function
Display
Description
Press ‘Menu’
*LP
Audio (Key Clicks
& Warnings)
AUD
Off (OFF) - All audible beeps/clicks are turned off
during normal operation i.e. while scrolling
through the functions menu.
On (ON) - All audible beeps/clicks are enabled
while unit is powered on.
Power Display
UNT
to enter options
Press ‘Test/Done’
OFF, USR, PRO, FUL
to exit options
Rotate Dial to scroll
through functions
set from F-5 to F-10
*IND
OFF, INT, PUL
SND
OFF, INT, CON
f-stops (F-S) - Power output is displayed
in f-stops.
Joules (JOU) - Power output is displayed in
Joules (Ws).
OFF, 1st, 2nd, 3rd, 4th
PHO
Display Invert
INV
Off (OFF) - LED display invert option
remains ʻoffʼ during operation.
On (ON) - LED display is inverted and
is shown upside down.
Flash Dump
Fld
set time window from 10 to 990ms
ADV
Off (OFF) - Unit will not automatically dump
any excess power.
AUD
OFF,
ON
On (ON) - The unit will automatically dump
any excess power stored in the capacitors after
the user has turned down the power.
UNT
F-S,
JOU
INV
OFF,
ON
FLD
OFF,
ON
* Only available when operating from mains power.
10 www.bowens.co.uk
www.bowens.co.uk 11
Photocell
Modelling Lamp Ready Indicator
The modelling lamp can be used as an indicator of when the unit has flashed, and also when it has
charged and is ready to fire again. All modelling lamp options are only available when the unit is
operating from mains power. The available options for the modelling lamp ready indicator are:
Off (OFF) -
No lamp ready indication; the modelling lamp remains on or off during operation
depending on ʻLampʼ settings.
Intermittent (INT) - Modelling lamp goes off after unit has fired and comes back on when fully
recharged. Intermittent indication is only available if the lamp setting is ʻonʼ.
Pulse (PUL) -
Now press ʻMENUʼ again to go back to displaying ʻPhoʼ. Press ʻTESTʼ to save the settings. If the camera
or camera settings are ever changed just repeat the procedure to check and/or set the flash unit again.
This system may require some experimentation by the user to get the correct flash in the sequence and
the timeout sensitivity right for a give camera and flash situation.
E.G. The Canon EOS10D gives an exposure measuring pre-flash first, followed 75mS later by the main
flash. This means that if the unit is set to trigger on the first flash then the unit will always trigger but the
Canon shutter will not open until 75mS later resulting in an incorrect exposure. If the unit is set to 2nd
flash then the exposure will be correct. Setting it to 3rd or 4th means that the unit will never trigger and
any exposure will again be incorrect.
Lamp pulses once fully recharged after firing. The pulse ready indicator
option is available whether the ʻLampʼ settings are on or off.
Audible Ready Beep
Photocell
The Photocell is a light sensitive trigger which allows the photographer a way of triggering their stand
alone flash heads that are not syncʼd by a cable. The photocell (when on) triggers the unit when another
flash or light source is detected (i.e. when another flash head is fired and the photocell detects this it
will fire the unit in synchronisation with the original light source).
The Photocell on the Gemini Digital has an option to enable camera pre-exposure flashes to be
ignored. These are used for exposure measurement and/or red eye reduction. This allows the flash unit
to be synchronised to the camera shutter on the 1st, 2nd, 3rd or 4th flash selected by the user. (this
option is for those who wish to trigger theIr flash heads without a radio or IR triggering system or without
a sync cable). 1st is the normal ʻinstantʼ trigger where only one flash is used coincident with the shutter.
Where two or more flashes are to be detected a ʻtime windowʼ is started on detection of the first flash
in the sequence. If the required number of flashes are detected within the ʻtime windowʼ then the unit
is triggered on the last flash and the system is reset to wait for the next flash. If fewer than the required
flashes are detected then the system is reset at the end of the time window. The ʻtime windowʼ can be
set by the user from 10mS to 990mS for 2, 3 or 4 flashes. For obvious reasons there is no actual time
window for a single flash since the unit triggers as soon as the flash is detected. As well as being able
to select the number of flashes manually, the unit can also ʻlearnʼ the number of required pre-exposure
flashes produced by any camera. This is done by setting the number of flashes to 1st. This provides
the maximum detection window of 990mS when in ʻlearnʼ mode.
While carrying out the following procedure ensure that no other flash is likely to be used in the vicinity
until the settings have been saved. To allow the flash unit to learn the camera characteristics first set
up the camera in the required mode (i.e. flash, pre-flash, red-eye reduction etc). Now press ʻMENUʼ on
the flash head and rotate the dial to select the ʻPhoʼ function and press ʻMENUʼ again, the current ʻPhoʼ
option will now be shown; set the unit to 1st flash.
Now press the shutter release fully with the camera facing the unit. The number of pre-flashes detected
will be shown on the display. N.B. if more than 4 flashes are detected within the time window then the
photocell will be turned off. Press the ʻMENUʼ button and the flash detection timeout period will now be
shown (2,3 and 4 only). Rotate the dial to obtain the required value - typically the default of 300mS
should be adequate for most cases.
12 www.bowens.co.uk
There is an Audible Ready Beep signal which is available to provide either a short beep to indicate
when the unit is charged and ready to fire at the desired power output or sound continuously when
charging. The Audible Ready Beep options are available through the Normal Functions on the unit.
Information & Error Codes .
The following normal displays and error codes are displayed together with a sound if appropriate and if
ʻSoundʼ & ʻAudioʼ are switched ʻonʼ.
Display
X-X
or
XX-
Description
Power display in either digital f-stops or Joules (Ws), in Lamp User setup mode this shows the
equivalent power setting of the modelling lamp but always in digital f-stops. If this display is steady
then this indicates the unit is READY and can be flashed. If this display is flashing quickly then this
indicates that the unit is charging to the required setting. If this display is flashing slowly then this
indicates the flash power needs to be dumped.(this can be done automatically by setting ʻFldʼ to
ʻonʼ or manually by pressing the ʻTESTʼ button).
ʻChrʼ
Displayed after a successful flash whilst charging.
ʻHotʼ
Unit is in overheat and will automatically reset when cooled.
ʻEr1ʼ
Failure to charge correctly at ʻswitch-onʼ. Long sounder if on. This could be due to low mains input
or leaky capacitors. After retrying and rechecking a number of times the unit will automatically lock
out with the display showing ʻEr1ʼ but with the sounder silenced.
ʻEr2ʼ
Failure to charge correctly after a flash (sound if on). The most likely cause here is that the tube
glowed on. After retrying for a number of times and each time applying a longer glow stop period
the unit will automatically lock out with the display showing ʻEr2ʼ but with the sounder silenced.
ʻEr3ʼ
Failure of the tube to fire (sound if on).
www.bowens.co.uk 13
Battery Power
Additional Information
Notes: Setting ʻFldʼ to ʻonʼ will automatically flash the unit to dump any excess energy if the user reduces
the power output setting and makes no further adjustments within 2 seconds.
The modelling lamp has a micro controlled soft ʻonʼ and ʻoffʼ to prolong the life of the bulb.
The ʻkey clickʼ & ʻwarning sounderʼ can be turned ʻonʼ or ʻoffʼ independently of the ʻreadyʼ sounder. This
option is available within the Advanced Functions.
The Bowens Explorer 1500 represents the state-of-the-art in portable
battery generator technology. Weighing just under 12kg, this petite powerpack boasts an enviable power-to-size ratio and recycling capacity while
providing photographers with the flexibility of two independent digitally
controlled channels for use with Bowens Quad heads, both with 1/10 stop
increment and accuracy.
In addition, two Bowens Gemini sockets allow the photographer anything
up to four light sources and a massive 3000Ws from this feature rich pack.
Total freedom and flexibility, whenever and wherever quality light is
required.
Flashtube Replacement
Explorer Battery Generator
Ensure that the unit is switched off and disconnect from
the mains supply and then wait thirty minutes before
touching/removing the flashtube.
BW7640
Also Available for the Bowens battery range:
Remove the protective cap and unwind the twisted wire
from the flashtube support.
Travel-Pak Boost Battery
Spare Explorer Battery
Travel-Pak/Explorer to Gemini Spare Cable
Bowens Universal 2Amp SLA Charger
Car Charger
Gently pull the flashtube assembly out of the unit.
To replace the assembly, hold the flashtube as shown
and taking care to support both legs gently but firmly
push the flashtube into position. Next wind the trigger
wire around the flashtube support. Always replace with
the correct flashtube assembly.
BW7635
BW7642
BW7632
BW1227
BW1245
Pulsar Radio Trigger
With the Esprit Gemini Digital monolights you are free from mains power.
With the Pulsar Radio Trigger system you can be free from sync cables
too.
Spare/Replacement Flashtubes.
BW2032 UV coated BW2030 Clear
This multifunctional device can be used to trigger flash units, film and
digital cameras and light meters up to 100m away.
Battery Power
The Esprit Gemini Digital is great studio monolight, but what about if you need to work out on location?
Thanks to Bowens handy battery packs, your Bowens Esprit Gemini Digital
units can leave the studio to go on location anytime, anywhere.
Included in Bowens range of battery packs are the Travel-Pak and the larger
Travel-Pak+. With a fast / slow charge option to prolong the life of the battery
as well as a stylish carry bag offering protection from the elements and up to
3 inches of water; no location photographer should be without these handy
packs.
Travel-Pak
Travel-Pak+
14 www.bowens.co.uk
Because the Pulsar is a radio transmitter rather than IR, it allows for
triggering around corners or through walls and is not affected by high
ambient light situations. Choose from four individual channels and six
studio setting per channel, each providing a unique ID for different flash
devices or combine them to trigger all equipment within a given setup or
studio.
Because of its low-voltage operation, it is perfect for digital cameras. Each unit can be used as either a
transmitter or receiver and operates using only two AAA batteries.
Pulsar
Pulsar (Twin Pack)
BW5150
BW5160
BW7631
BW7638
www.bowens.co.uk 15
Accessories
Pulsar Clip-On Platform
With The Pulsar clip-on platform is a handy way of attaching your radio
trigger units to almost anything around your studio or even whilst out on
location. Simply attach your loose Pulsar unit to the platform and clip onto
whatever you need to. A great way of saving valuable time and effort in the
studio.
65° Maxilite Reflector
This is a good general-purpose direct reflector
with an even coverage and a high light output.
Since it has a small 20cm (8”) diameter, the light it
produces is moderately high in contrast. The
stippled surface ensures a smooth and even light
distribution. BW1887
BW5155
Accessories
Backlite Reflector
75° Softlite Reflector
This 15” matt-finished reflector is supplied with
a double diffuser cap that covers the flash tube
and modelling lamp for added softness. The
softest of Bowensʼ direct reflectors, it is perfect
for portraiture, beauty and small product
photography. The diffuser cap can be removed,
making it an excellent large-diameter direct
reflector. BW1899
With its 20 x 30.5cm (8 x 12”)
elliptical shape, this reflector
produces an oval pool of light
that can be used to create a
natural
vignette
on
a
background or other areas. Two
fitted spring clips allow colour
gels to be fitted. BW2560
A set of colour gels including seven popular colours, a neutral-density filter and two diffusers for
heightened lighting creativity is also available for the Backlite reflector. BW2552
Grid Diffuser
This is an accessory to the 75° Softlite
reflector that creates a unique lighting effect
by including a Perspex outer diffuser with a
honeycomb and grid in the centre. The Grid
Diffuser gives a pool of direct light in the
centre of the image, surrounded by softdiffused light. The ratio between the centre
and edge is 3:1 - ideal for portrait
applications. BW1866
40° Sunlite Reflector
A 43cm (17”) white-painted
reflector designed to replicate
sunlight for photographing items
such as architectural models. The
white painted interior of the
Sunlite helps to ensure that an
even light is delivered. BW1868
High-Performance Reflector
This 32cm reflector achieves the
maximum amount of light output
possible for lighting large groups
and bouncing light off of high
ceilings. The efficient parabolic
design delivers a narrow, bright
beam of light with intense shadows
and high contrast. A must where
sheer power is required. BW1878
16 www.bowens.co.uk
DID YOU KNOW? that Bowens have over 40 light shaping tools
and accessories available for all their monolights that use the
current ʻSʼ type accessory fitting. Included among the range of
accessories are a wide variety of reflectors and softboxes. For
more information visit the website on www.bowens.co.uk
www.bowens.co.uk 17
Specifications
Specifications
Unit
GMD250
GMD500
BW3700
BW3705
BW3710
BW3715
Stored Energy (max)
250Ws
500Ws
Sync Voltage
5V
5V
Flash Colour Temperature
5600K ±300K
5600K ±300K
Circuit Protection
230V - 5A (F) (117V - 10A (T))
230V - 5A (F) (117V - 10A (T))
Supply Voltage Range 230V
(117V)
190-250V AC 50Hz
(95-130V AC 60Hz)
190-250V AC 50Hz
(95-130V AC 60 Hz)
56.1
79.8
0.81 (1.1) secs
1.54 (1.95) secs
Modelling Power Control
Full / Intermittent / Off
Full / Intermittent / Off
Flash Duration (t=0.5)
(Full power)
1/1315
1/925
Flash Power Control
Full to 1/32 5 stops
Full to 1/32 5 Stops
Modelling Lamp
Max 275W
Max 275W
Ready Indication
100%
100%
User Replaceable Flash Tube
Clear = BW2030
UV = BW2032
Clear = BW2030
UV = BW2032
Photocell
On/Off
On/Off
Audio Ready Signal
On/Off
On/Off
Recommended Modelling
Lamps
275W Photoflood
250W Halostar
275W Photoflood
250W Halostar
Weight
2.9Kg
3.4Kg
Dimensions (l x w x h)
365 x 145 x 130mm
365 x 145 x 130mm
Part Number
(230V)
(117V)
Guide Number
(Full power, 50° Keylite, ISO 100)
Typical Recycle Time
Full Power, 230V, 50Hz (117V 60Hz)
Due to our policy of constant product improvement, Bowens International reserves the right to change equipment
specifications at any time and without notice.
18 www.bowens.co.uk
www.bowens.co.uk 19