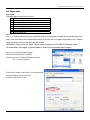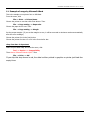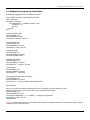
1
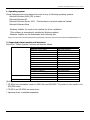
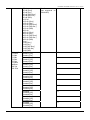
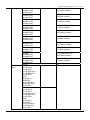
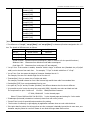
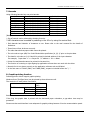
Windows Driver Guide
(Windows 2000 or later, Installer version)
6-1-12 Tanashi-cho, Nishi-Tokyo-shi, Tokyo 188-8511 JAPAN
Tel 81-424-68-4631
Fax 81-424-68-4740
[email protected]
http://www.citizen-systems.co.jp
http://www.citizen-systems.co.jp/english/support/download/printer/driver/windows/En
CITIZEN SYSTEMS Windows Driver Guide
Revision history
Date
05/08/01
05/09/01
Version
050420(V1.00)
050901 (V1.40)
05/11/16
06/1/28
051116 (V1.51)
V1.53
06/7/30
V1.56
07/3/20
V1.57
07/04/30
V1.57a
07/11/26
V1.581
08/07/02
1.582
08/12/25
1.582a
09/04/08
1.583
Details
This document is released
CT-S280 driver is added.
FontAxx / FontBxx are added to CD-S500 series driver
The problem with longer data than full column is corrected.
Fewer columns problem with Font 15cpi Size 80 is corrected.
The problem with mixed font lines between printer font and TrueType font is corrected.
The problem with custom size paper for CT-S300 is fixed.
CT-S2000 driver is added
Printing garbage problem with parallel I/F is fixed.
High resolution CD-S500 graphic printing problem is fixed.
CD-S500 longer than full column printing problem is fixed.
Automatic line feed is added to the end of CT-S280 printing.
The problem of feed length after barcode printing is fixed.
The problem of divided TrueType font is fixed.
The print speed down by above change is improved.
Graphic print method of CT-S300 is changed.
CT-S4000 driver is added.
Another problem of feed length after barcode printing is fixed.
Problem of unstable character size is fixed.
CT-S4000 Label driver is added.
BD2-2220/2221 is added.
“Printer Features“ function is added to print in fixed length.
Drivers are adapted to Windows Vista
Euro mark problem is solved.
CT-S310 driver is added
PMU2xxx driver is added.
64 bit drivers are available.
Installer version is available.
CT-S2000Label is added.
CT-S4000 Compress driver is added.
Partial cut is added to Cut method of PMU-2xxx
NV logo transaction by ESC ( L can be chosen for CT-S2000/4000/PPU700
Graphic print method of CT-S280 is changed.
The problem of printing some Unicode characters is fixed.
The width information of FontA88 is corrected.
The width information of 6.25cpi and 48point is corrected.
The problem of wrong position logo by multiple page printing is fixed.
Problem of wrongly printed printer font at the end of page is fixed.
The problem of paper length by multiple page of upside down printing is fixed.
Installing/Uninstalling driver becomes easier by the driver installer.
POS Printer Utility can be called from [Tool] property of driver.
File transfer function is added to [Tool] property of driver
Strange print position problem of printer font with UpsideDown function is fixed.
Missing last vertical dot-line problem in high quality graphic printing is fixed.
Actual printing area for CD-S500series is expanded.
The problem of white gap in horizontal direction printing is fiexed.(This solution requires
firmware upgrade as well. Applicable model is CT-S2000, CT-S4000, CT-S310 and succeeding
models.)
The command for cut for CT-S300 & 310 is changed from GS V to ESC i, ESC m.
Font Bxx size of CT-S2000/4000/S28x/BD2-2xxx/PMU-2xxx/CBM1000II is corrected.
CT-S281 driver is added.
The problem of not printed last line data on label driver is fixed.
The problem of white gap in horizontal direction causes garbage printing with old version
CT-S310 firmware. So the function was removed from CT-S310 driver.
CT-S281L driver is added.
Custom paper definition in GPD file is changed as follows.
Deleted left margin (*MinLeftMargin): All models
Changed max defined size (*MaxSize):
CT-S4000: from (640,32767) to (896,26182)
Others from (???,32767) to (???,26182)
No change: CT-S500 series
Changed minimum defined size (*MinSize):
Label type (203,203)
Non label type (20,20)
PPU700 (203,719)
No change: CD-S500series and CT-S4000 compressed.
Solution for white gap in horizontal direction is added to CT-S281standard driver.
The problem of disappeared button for POS Printer Utility by changing driver name is fixed.
-1-
CITIZEN SYSTEMS Windows Driver Guide
Caution
(1) You are hereby notified that any dissemination, distribution or copying of this document
without written consent is strictly prohibited.
(2) The contents of this document are subject to change without prior notice.
(3) We tried to ensure the content of this document but if you find any mistakes, please let us
know.
(4) Regardless of article 3, we cannot be responsible for any damages/influences caused by the
use of this driver.
(5) If you do not agree any of above, you are not allowed to use the driver.
Microsoft, Microsoft Windows. Microsoft Word, Microsoft Access and TrueType are trademarks of Microsoft Corporation.
ESC/POS is a trademark of SEIKO EPSON Corporation.
CITIZEN is a registered trade mark of CITIZEN Holdings Co., Japan
CITIZEN es una marca registrada de CITIZEN Holdings Co, Japón
-2-
CITIZEN SYSTEMS Windows Driver Guide
1. Operating system
Citizen Systems drivers are designed to work on any of following operating systems.
Microsoft Windows 2000 (SP4 or later)
Microsoft Windows XP
Microsoft Windows Server 2003 (The functions in terminal mode are limited.)
Microsoft Windows Vista
Windows Installer 3.x needs to be installed for driver installation.
(This software is automatically installed by Windows update.)
Windows Installer can be downloaded from following site.
http://www.microsoft.com/downloads/details.aspx?FamilyID=5fbc5470-b259-4733-a914-a956122e08e8&displaylang=en
2. Supported printer models and interfaces.
Drivers for “Citizen Systems” printers are listed as follows.
Thermal printer
Dot impact printer
Control Board
CBM1000 Type II
CBM1000 Type II Label
CT-S2000
CT-S2000 Label
CT-S280
CT-S281
CT-S300
CT-S300 Black Mark
CT-S310
CT-S310 Black Mark
CT-S4000
CT-S4000 Label
CT-S4000 Compress
PMU2xxxx (including Type II)
PPU-700
CD-S500
CD-S501/503
BD2-2220/2221
Standard driver
With label function
Standard driver
With label function
No cutter, No drawer
With cutter, No drawer
Standard driver
With black mark function
Standard driver
With black mark function
Standard driver
With label function
1/2 compression
No drawer
No drawer
No cut function
With cut function
For LT2xxx mechanism
[Note]
* CD-S50x have emulation mode for CBM, Star and ESC/POS. The driver for the model is for
ESC/POS mode.
* CD-S501 and CD-S500 use same driver.
* Japanese driver is available separately.
-3-
CITIZEN SYSTEMS Windows Driver Guide
Supported interfaces are
Serial interface
Parallel interface
USB
(If you need to use Ethernet interface, please use non-installer type driver.
Non-installer type driver can be downloaded from our Web site.)
Caution
USB Virtual com driver
If you use CT-S280/PMU2xxx/BD2-222x USB interface model or CT-S2000/4000/310/281/PMU2xxxII
with setting for V-COM, USB drivers need to be installed before Windows driver installation.
Please refer to the separate manual for USB driver.
Status function
For the driver with the status function (language monitor) to get the changed status of printer,
another document is available. Please refer to the document for the function..
Because the driver with status function could make the printing software unstable, if you do not
have any demand to use status function, please use the standard driver.
Multiple drivers on one PC
This driver installer does not allow installing more than two same printers to the one PC. If you
want to connect multiple same printers to one PC, please use non-installer type driver..
-4-
CITIZEN SYSTEMS Windows Driver Guide
3. Install and uninstall the
driver
These instructions use Windows XP
as the example operating system.
Windows 2000, Windows Server
2003 and Vista are similar.
Please uninstall the older drivers
prior to the installation.
3-1. Install the driver
Run the driver installer “Setup.exe”.
Welcome window shows up. Press
“Next” button.
If you can accept the our License
Agreement, choose “I accept…” and
press “Next”.
Choose the model to install the
driver for.
You can choose only 1 model here.
-5-
CITIZEN SYSTEMS Windows Driver Guide
Choose the interface to connect the
printer.
Actual installation starts by pressing
“Install”.
This kind of warning may show up
once or twice.
Please press “Continuous Anyway”
on this screen.
-6-
CITIZEN SYSTEMS Windows Driver Guide
The installation is finished.
If the interface is serial, these steps finish the installation.
If the interface is USB or parallel, when the printer is connected to the PC, following additional
steps automatically starts.
Choose “No, not this time” here.
-7-
CITIZEN SYSTEMS Windows Driver Guide
This kind of message shows up.
As this driver does not have any
problem, please go ahead by
pressing
“Continue
Anyway”
button.
Then installation is finished with the message of “Finish”.
Please check if the driver is added in “Printers and Faxes” windows.
3-2. Uninstall the driver
If the driver is installed by this
way, driver appears in “Add or
Remove Programs” of “Control
Panel”. To remove the driver,
please press “Remove” button.
When this message shows up, please press YES to
proceed with the driver uninstall.
3-3. Remarks for the driver installation
1. Please make sure that the communication condition of serial interface matches between PC
and printer.
2. This installer does not allow multiple driver installation for same model on one PC.
If you need to install multiple same drivers on one PC, please contact us.
3. If the old driver installed without installer exists on the PC, the installer does not install the
new driver on the PC. Please delete the old driver prior to the installation.
Steps to delete the old driver
On the "Printers and Faxes” windows, choose the diver and delete it.
And on the menu of “Printers and Faxes”,
File => Server Properties => “Drivers” tab
Then you see the list of installed drivers. Choose the driver and press “Delete” button.
(A tool to delete drivers can be supplied. Please contact us for the tool.)
-8-
CITIZEN SYSTEMS Windows Driver Guide
4. DIP/Memory switch setting of printer and port settings of Windows
The printer drivers are designed to work with the factory default settings for the printer.
To set the printer to the factory default settings please check the printer’s users manual.
If you are having trouble with a serial port printer (RS-232) please refer to appendix A.
5. Using the printer
5.1 Printer User Interface
Follow the steps bellow to change the function setting of the printer driver:
Select the printer properties of the
printer driver by right clicking on the
printer icon.
5-1 “General” tab
Then press the “Printing Preferences”
button in the General Tab.
-9-
CITIZEN SYSTEMS Windows Driver Guide
Then press the “Advanced” button.
There are some items for the printer
setting.
Paper size: You can choose the paper size.
Please refer to the explanation of paper
width and paper length in this document.
-10-
CITIZEN SYSTEMS Windows Driver Guide
NV Logo process
There are 2 ways for logo registration.
Depending on the method, logo printing
method is different as well. This setting
choose which way should be used.
Usually, “FS q” should be OK.
GS ( L is supported by CT-S2000/4000/310 only.
Printer Features: You can choose Receipt or
Ticket as paper types. Receipt allows
flexible paper length according to the data
length. Ticket is for the fixed length.
Label version driver does not have this choice.
-11-
CITIZEN SYSTEMS Windows Driver Guide
Open the “Printer functions” selection
Then you will see more items to change the setting of the driver.
Upside down printing: Allows Upside Down
Printing but all print data must be stored in
the printer once. Therefore, there is a
limitation of data length due to the printer
memory size.
Also it takes little time to start printing.
Cutter Mode (Page/Job): Specifies whether
what kind of cut should be applied at end of
page and end of Job.
The full cut /partial cut/no cut can be chosen
but type of cut may be limited by the printer
setting.
-12-
CITIZEN SYSTEMS Windows Driver Guide
Cash Drawer: Specifies when Cash Drawer
#1 will be opened. The pulse width can be
specified to match the cash drawer
specifications.
Two cash drawers can be connected to one
printer but do not open two cash drawers
same time to avoid any trouble.
Buzzer: Specifies if the buzzer should be
sounded at the beginning or end of the print
job and how many times the printer beeps.
-13-
CITIZEN SYSTEMS Windows Driver Guide
Bar Code Printing: Allows the user to change
the default Human Readable Interpretation
(HRI) positioning. The HRI can be added to
the top, bottom or top and bottom of the
barcode.
Logo Printing: Allows the user to select
when and which logos should be printed.
Logo data must be first to 5th data in the NV
memory and it can be printed in 6 positions
(top of first paper, bottom of first page, top
of middle page, bottom of middle page, top
of last page and bottom of last page)
-14-
CITIZEN SYSTEMS Windows Driver Guide
Label paper: Allows the user to select to
enable/disable for label or black mark
function. This is only for the driver with
Black mark or label function
5-2 Tool tab
File sender: You can send the data file to printer by this
function.
External Too: If the software “POS Printer Utility” is
installed, this item shows up on this tab. The software
can be started from the button. If the software is
installed after driver installation, this button is also
shown.
5-3 Other tab
The items not explained above are basically not necessary to change.
If you change those items, please change it at your own risk.
-15-
CITIZEN SYSTEMS Windows Driver Guide
6. Printer fonts
Following printer fonts can be selected by using Windows driver.
Printing by printer font is much faster than printing by Windows font. Therefore, we recommend using these
printer fonts for faster printing.
Driver
CBM1000II
CT-S2000
CT-S280
CT-S281
CT-S300
CT-S310
CT-S4000
PMU2xxx
PPU-700
BD2-222x
Font
15 cpi
15 cpi [Euro]
15 cpi [Ext.]
15 cpi [RED Euro]
15 cpi [RED Ext.]
15 cpi (RED)
7.5 cpi
7.5 cpi [Euro]
7.5 cpi [Ext.]
7.5 cpi [RED Euro]
7.5 cpi [RED Ext.]
7.5 cpi (RED)
3.75 cpi
3.75 cpi [Euro]
3.75 cpi [Ext.]
3.75 cpi [RED Euro]
3.75 cpi [RED Ext.]
3.75 cpi (RED)
1.8 cpi
1.8 cpi [Euro]
1.8 cpi [Ext.]
1.8 cpi [RED Euro]
1.8 cpi [RED Ext.]
1.8 cpi (RED)
20 cpi
20 cpi [Euro]
20 cpi [Ext.]
20 cpi [RED Euro]
20 cpi [RED Ext.]
20 cpi (RED)
10 cpi
10 cpi [Euro]
10 cpi [Ext.]
10 cpi [RED Euro]
10 cpi [RED Ext.]
10 cpi (RED)
5 cpi
5 cpi [Euro]
5 cpi [Ext.]
5 cpi [RED Euro]
5 cpi [RED Ext.]
5 cpi (RED)
2.5 cpi
2.5 cpi [Euro]
2.5 cpi [Ext.]
2.5 cpi [RED Euro]
2.5 cpi [RED Ext.]
2.5 cpi (RED)
Font A
Font B
-16-
Font size
12 / 24 / 36 / 48 / 60 / 72 / 80
CITIZEN SYSTEMS Windows Driver Guide
CBM1000II
CT-S2000
CT-S280
CT-S281
CT-S300
CT-S310
CT-S4000
PMU2xxx
PPU-700
BD2-222x
25 cpi
25 cpi [Euro]
25 cpi [Ext.]
25 cpi [RED Euro]
25 cpi [RED Ext.]
25 cpi (RED)
12.5 cpi
12.5 cpi [Euro]
12.5 cpi [Ext.]
12.5 cpi [RED Euro]
12.5 cpi [RED Ext.]
12.5 cpi (RED)
6.25 cpi
6.25 cpi [Euro]
6.25 cpi [Ext.]
6.25 cpi [RED Euro]
6.25 cpi [RED Ext.]
6.25 cpi (RED)
3 cpi
3 cpi [Euro]
3 cpi [Ext.]
3 cpi [RED Euro]
3 cpi [RED Ext.]
3 cpi (RED)
FontA11
FontA11 [255]
FontA11 [Ext.]
FontA12
FontA12 [255]
FontA12 [Ext.]
FontA21
FontA21 [255]
FontA21 [Ext.]
FontA22
FontA22 [255]
FontA22 [Ext.]
FontA24
FontA24 [255]
FontA24 [Ext.]
FontA42
FontA42 [255]
FontA42 [Ext.]
FontA44
FontA44 [255]
FontA44 [Ext.]
FontA48
FontA48 [255]
FontA48 [Ext.]
FontA84
FontA84 [255]
FontA84 [Ext.]
FontA88
FontA88 [255]
FontA88 [Ext.]
Font C
(Not supported on
CBM1000II)
Font A
9.5
19
9.5
19
38.5
19
38.5
77
38.5
77
-17-
CITIZEN SYSTEMS Windows Driver Guide
CD-S500
series
FontB11
FontB11 [255]
FontB11 [Ext.]
FontB12
FontB12 [255]
FontB12 [Ext.]
FontB21
FontB21 [255]
FontB21 [Ext.]
FontB22
FontB22 [255]
FontB22 [Ext.]
FontB24
FontB24 [255]
FontB24 [Ext.]
FontB42
FontB42 [255]
FontB42 [Ext.]
FontB44
FontB44 [255]
FontB44 [Ext.]
FontB48
FontB48 [255]
FontB48 [Ext.]
FontB84
FontB84 [255]
FontB84 [Ext.]
FontB88
FontB88 [255]
FontB88 [Ext.]
Control
16 cpi
16 cpi [Euro]
16 cpi [Ext.]
16 cpi [RED Euro]
16 cpi [RED Ext.]
16 cpi (RED)
8 cpi
8 cpi [Euro]
8 cpi [Ext.]
8 cpi [RED Euro]
8 cpi [RED Ext.]
8 cpi (RED)
12 cpi
12 cpi [Euro]
12 cpi [Ext.]
12 cpi [RED Euro]
12 cpi [RED Ext.]
12 cpi (RED)
6 cpi
6 cpi [Euro]
6 cpi [Ext.]
6 cpi [RED Euro]
6 cpi [RED Ext.]
6 cpi (RED)
Font B
7 (CT-S3x0/PPU-700)
9.5 (Other models)
13.5 (CT-S3x0/PPU-700)
19 (Other models)
7 (CT-S3x0/PPU-700)
9.5 (Other models)
13.5 (CT-S3x0/PPU-700)
19 (Other models)
27 (CT-S3x0/PPU-700)
38.5 (Other models)
13.5 (CT-S3x0/PPU-700)
19 (Other models)
27 (CT-S3x0/PPU-700)
38.5 (Other models)
54.5 (CT-S3x0/PPU-700)
77 (Other models)
27 (CT-S3x0/PPU-700)
38.5 (Other models)
54.5 (CT-S3x0/PPU-700)
77 (Other models)
7x9 dot
9x9 dot
-18-
12
12 / 24 / 36 / 48 / 60 / 72 / 80
CITIZEN SYSTEMS Windows Driver Guide
FontA11
FontA11
FontA12
FontA12
FontA21
FontA21
FontA22
FontA22
FontB11
FontB11
FontB12
FontB12
FontB21
FontB21
FontB22
FontB22
Control
7x9 dot
[255]
9
18
[255]
9
[255]
18
[255]
9x9 dot
9
[255]
18
[255]
9
[255]
18
[255]
12
[Note]
* The difference of “xx cpi”, “xx cpi [Euro]” and “xx cpi [Ext.]” is characters/functions assigned to 80 ~ FF
hex. The details of difference are as follows.
Font
xxx cpi
80-9F(hex)
A0-FF(hex)
Special function
WPC1252
xxx cpi [Euro]
WPC1252
xxx cpi [Ext.]
Code Page 437
Special function: Special functions are assigned. (Refer to section 9 for the special functions. )
Windows Code:
Characters from Windows code table are assigned.
Code Page 437:
Characters from code page 437 are assigned.
* “xx cpi” font: If the number is smaller, character width is larger. 4 different size (Standard size, x2/x4/x8
width) can be chosen from each font..
For example, “7.5 cpi” is double width font of “15 cpi”.
* “xx cpi” font: Font size mean the height of character. Standard size is 12.
For example, Font size 24 is double high font of font size 12.
* “FontAxx(Bxx)” font: xx means size of height and width.
For example, FontA48 is based on font A and 4 times high and 8 times wide from standard size.
* FontAxx(Bxx)[255] font uses downloaded font by user
* Line pitch by “xx cpi” and by “FontAxx (FontBxx)” are different because the font size is different.
* It is possible to print 2colors by using font name with (RED). Normally two colors are black and red.
The requirement to print 2 colors are
CD-S500
Black/Red ribbon cassette
CT-S28x, CBM1000II 2 color thermal paper
Other CT-Sxxxx PMU2xxx PPU-700 BD2-222x
2 color thermal paper and setting for 2 color mode
* If landscape (horizontal) orientation is selected, these fonts will not be printed.
* “Control” font is only for special functions and not for printing.
* The function of centering or right aligning by application software does not work with the driver.
* If the print data for printer font is longer than one line, extra part is basically ignored but in some case, one
character may be printed in next line. Please do not send the longer data than one line.
-19-
CITIZEN SYSTEMS Windows Driver Guide
7. Barcode
Using following barcode font can print barcode.
Barcode font
Codabar
Code128
Code39
Code93
JAN13 (EAN)
JAN8 (EAN)
ITF
UPC-A
UPC-E
Font size
20 / 40 /
20 / 40 /
20 / 40 /
20 / 40 /
20 / 40 /
20 / 40 /
20 / 40 /
20 / 40 /
20 / 40 /
42 /
42 /
42 /
42 /
42 /
42 /
42 /
42 /
42 /
60
60
60
60
60
60
60
60
60
/
/
/
/
/
/
/
/
/
64
64
64
64
64
64
64
64
64
/
/
/
/
/
/
/
/
/
80
80
80
80
80
80
80
80
80
/
/
/
/
/
/
/
/
/
84
84
84
84
84
84
84
84
84
Applicable driver
All thermal printers
All thermal printers
All thermal printers
All thermal printers
All thermal printers
All thermal printers
All thermal printers
All thermal printers
All thermal printers
[Note]
* Size of barcode can be selected by choosing font size.
* HRI characters can be added by selecting in the UI or by using the control font.
* Each barcode has limitation of characters to use. Please refer to the user’s manual for the details of
limitations.
* These fonts will not be shown correctly.
* The wider barcode than paper width cannot be printed.
* The sub code set type A/B/C for Code128 should be specified as {A, {B, {C prior to the print data.
* The data for sub code set C of Code128 is printed in decimal address of the input character.
For example,
Input data “1” => Output 49 (”1” address = 31h = 49dec)
* Printer font and barcode cannot be printed in the same line.
* The function of centering or right aligning by application software does not work with the driver.
* Barcode font is not shown correctly on the application software such as MS-Word.
* In the font name of “JAN13 (EAN)” and “JAN8 (EAN)”, a space is included before the “ ( “.
8. Graphic printing function
Following printer drivers support graphic printing.
Windows fonts (TrueType fonts) can be printed by these drivers as well.
The resolution of each printer is as follows.
CD-S500 series
Thermal Printers
High quality
Standard
Draft
Resolution
(DPI)
144 x 144
144 x 72
72 x 72
203 x 203
Remarks
If the long size graphic data is printed with the horizontal paper orientation, a gap about 1mm may be
generated.
Please note that serial interface is not adequate for graphic printing because of its slow communication speed.
-20-
CITIZEN SYSTEMS Windows Driver Guide
9. Special functions
To use special function of printer, it is necessary to send specified character in “Control” font or to send
specified character in “xx cpi“ font. Both “xx cpi [Euro]”, “xx cpi [Ext.]” font.
Windows font (TrueType font) does not work for the special functions.
“Control”
Model
All
All
All
All
All
All
All
All
All
All
All
All
All
All
All
All
All
All
All
All
All
All
All
All
All
All
All
All
All
All
All
All
All
All
All
drawer models
drawer models
drawer models
drawer models
drawer models
drawer models
drawer models
drawer models
drawer models
drawer models
Models
Models
Models
cutter models
cutter models
Models
Models
Models
Models
Models
Models
Models
Models
Models
Models
Models
Models
Models
Models
Models
Models
Models
Models
Models
Models
Printer Function
50ms pulse to drawer #1
100ms pulse to drawer #1
150ms pulse to drawer #1
200ms pulse to drawer #1
250ms pulse to drawer #1
50ms pulse to drawer #2
100ms pulse to drawer #2
150ms pulse to drawer #2
200ms pulse to drawer #2
250ms pulse to drawer #2
Horizontal Tab (HT)
Line Feed (LF)
Carriage Return (CR)
Receipt paper Full Cut
Receipt paper Partial Cut
NV Bitmap data ID:1 Normal printing
NV Bitmap data ID:2 Normal printing
NV Bitmap data ID:3 Normal printing
NV Bitmap data ID:4 Normal printing
NV Bitmap data ID:5 Normal printing
NV Bitmap data ID:1 Double Width printing
NV Bitmap data ID:2 Double Width printing
NV Bitmap data ID:3 Double Width printing
NV Bitmap data ID:4 Double Width printing
NV Bitmap data ID:5 Double Width printing
NV Bitmap data ID:1 Double Height printing
NV Bitmap data ID:2 Double Height printing
NV Bitmap data ID:3 Double Height printing
NV Bitmap data ID:4 Double Height printing
NV Bitmap data ID:5 Double Height printing
NV Bitmap data ID:1 Quadruple printing
NV Bitmap data ID:2 Quadruple printing
NV Bitmap data ID:3 Quadruple printing
NV Bitmap data ID:4 Quadruple printing
NV Bitmap data ID:5 Quadruple printing
“xx cpi”
ASCII
Hex
Hex
Character
Value
Value
A
B
C
D
E
a
b
c
d
e
5
6
7
F
P
G
H
I
J
K
Q
R
S
T
U
V
W
X
Y
Z
[
}
^
_
`
41
42
43
44
45
61
62
63
64
65
35
36
37
46
50
47
48
49
4A
4B
51
52
53
54
55
56
57
58
59
5A
5B
5D
5E
5F
60
81
82
83
84
85
89
8A
8B
8C
8D
95
96
97
9D
9E
Remarks: Depending on the printer’s specification and setting, not all the function work.
-21-
CITIZEN SYSTEMS Windows Driver Guide
10. Paper sizes
A) Length
Followings paper length can be chosen.
a)
b)
c)
d)
e)
f)
g)
Paper length
A4 length (297 mm)
B5 length (257 mm)
6 in Page (6 in)
Letter length (11 in)
Executive length (10.5 in)
Receipt (3240 mm) *** This is default setting
User-Defined size
[Note]
Size a – f,) Printing will stop before the specified length if the print data is finished before reaching end of the
page. If the print data is more than specified length, the printer will cut on paper length that pre-set. 3240mm
length cannot be used from MS-Word and MS-ACCESS.
(Exception: Ticket is set for Paper Type in driver property and CT-S4000 Compress driver
In these cases, the length of printed paper is fixed for the selected paper length.)
Size g) User can set the paper length.
Please make custom form as follows.
Then from menu of “Printer and Faxes” window,
File -> Server Properties
Then check “Create A New Form” on Form tab and
enter the settings for the new form.
And click “Save Form” or OK.
-22-
CITIZEN SYSTEMS Windows Driver Guide
B) Width
Paper width depends on the printer and the setting.
Model
CBM1000II
CT-S2000
CT-S280(281)
CT-S300(310)
CT-S4000
PMU2xxx
PPU-700
CD-S500 series
BD2-2220/2221
Paper width
80mm(48col.)
80mm(42col.)
58mm(36col.)
58mm(30col.)
83mm (53col.)
80mm (48col.)
80mm (42col.)
58/60mm (36col.)
58mm(30col.)
58mm(32col.)
58mm(30col.)
80mm(48col.)
80mm(42col.)
58mm(32col.)
58mm(30col.)
112mm(69col.) *1
83mm(55col)
80mm(48col)
80mm(42col)
80mm(48col.)
80mm(42col)
58mm(32col)
58mm(30col)
80mm(48col.) *1
80mm(42col)
58mm(32col)
58mm(30col)
76mm
69.5mm
58.5mm
80mm(48col)
80mm(42col)
58mm(36col)
58mm(32col)
*1 Printer supports more paper width. For other paper width, use need to define the paper size.
-23-
CITIZEN SYSTEMS Windows Driver Guide
11. Example of usage by Microsoft Word
This is the sample to use printer font on MS-Word.
From the menu, click
File--> Print --> Printer Name
Choose the printer to use then click Close button. Then
File --> Page setting --> Paper size
Choose the paper size to use. Then
File --> Page setting --> Margin
Set the proper margins. (If you set the margins to zero, it will be corrected to minimum number automatically
after the error message.)
Choose the printer font in the font list box
Choose the printer font size 12 or 24 in the font size list box.
Step from here is important.
Make the print data ready and from the menu, click
Tool --> Option --> Compatibility
Then choose “Microsoft Word 6.0/95”. Then
File --> Print --> OK
If you skip this step shown in red, the data is either printed in graphics or printer just feed few
empty lines.
-24-
CITIZEN SYSTEMS Windows Driver Guide
12. Example of program by Visual Basic
Following program list is for “CITIZEN CT-S2000”.
‘Set “CITIZEN CT-S2000“ as default printer driver
Dim X As Printer
For Each X In Printers
If X.DeviceName = “CTIZEN CT-S2000” Then
Set Printer = X
Exit For
End If
Next
‘Printing Windows font”
Printer.FontSize=10
Printer.FontName=”Ariel”
Printer.Print “Font Ariel / Size 10”
‘Printing Printer font
Printer.FontSize=12
Printer.FontName=”15 cpi”
Printer.Print “15 cpi / Size 12”
‘Printing Barcode
Printer.FontSize=20
Printer.FontName=”Code39”
Printer.Print “ABC123456”
‘Opening cash drawer
Printer.FontSize=12
Printer.FontName=”Control”
Printer.Print “A” ‘Drawer 1 at 50ms
‘Cutting paper”
Printer.FontSize=12
Printer.FontName=”Control”
Printer.print “P” ‘Partial cut
‘Printing graphic data from NV memory
Printer.FontSize=12
Printer.FontName=”Control”
Printer.print “G” ‘Print #1 graphic data in NV memory
Printer.EndDoc
Also you can send commands through driver but it is necessary to choose printer font first.
(Please use this way at your own risk. We do not recommend this usage.)
Printer.FontSize=12
Printer.FontName=”15 cpi”
Printer.Print CHR$(&H1B) + “V” + CHR$(1) ‘90 degrees right turned.
Printer.Print “15 cpi / Size 12”
Printer.EndDoc
Caution: PrintDocument object of Visual Basic.Net etc does not support printer font. Therefore the above method
using printer font cannot be used.
-25-
CITIZEN SYSTEMS Windows Driver Guide
Addendum 1. Serial Port Settings
The serial port settings on both the printer and Windows need to match. To check the current
port settings on the printer please run a printer self test. The printer will run a self test by holding
down the feed key while turning the printer on. To change the settings on the printer, please
consult the printer’s users manual. You can follow the steps below to change the port settings for
the driver.
To change the baud rate settings from the
printer driver, right click on the printer icon
and select “Properties”.
Then select the “Ports” tab.
-26-
CITIZEN SYSTEMS Windows Driver Guide
Then press the “Configure Port…” button.
Please configure the port setting from device
manger on Vista.
The COM Properties dialog will pop up and
you
can select the correct setting for your printer
based on the self test. If the printer
Handshake is
set to DTR/DSR then use “Hardware” for Flow
Control on PC. When done press the “Apply”
button and then the OK button.
Addendum 2. USB port
Once a USB port is used for driver installation, please do not use other USB port. If other USB
port is used, it may not be possible to print. In that case, it may be necessary to change USB port
of printer driver or install the driver again.
-27-