1
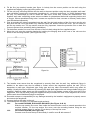
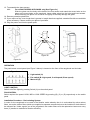
600mm
Glass Canopy
Manual
MODEL
EUC60GS - Glass
Installation and Operation
IMPORTANT: THIS APPLIANCE MUST BE INSTALLED AND SERVICED BY A LICENSED ELECTRICIAN
IMPORTANT: PLEASE READ FULLY PRIOR TO INSTALLATION OR OPERATION
•
•
•
•
•
•
•
•
•
This canopy rangehood is an indoor appliance and has been manufactured and tested to comply with
Australian Standard/New Zealand AS/NZS3350 with Electrical Approval Number V06076.
Always switch power off prior to installing, servicing or cleaning the appliance.
Never use the appliance without filters.
Please read the notes on maintenance / cleaning, especially the filters.
Exhaust air must not be discharged into a heating flue or wall cavity, which may carry combustion products
from other sources, unless the cavity is designed for that purpose.
If the rangehood is to be installed in an area that also has gas, oil or coal fired heaters, the area must be
well ventilated to prevent a partial vacuum in the room. This includes gas hobs. (A partial vacuum in the
room could result in too high a concentration of gas in the atmosphere and excessive consumption of
oxygen).
The appliance is supplied with an approved power cable which must not be changed. If the supply cord of
this equipment is damaged, it must only be replaced by the manufacturer, its service agent or similarly
qualified person in order to avoid hazard.
Care and attention should always be taken when cooking with oils, alcohol, etc; which give off flammable
vapours. Pre-used oil is especially dangerous in this respect. Do not use any uncovered electrical grill with
this rangehood.
To avoid possible risks of fire always comply with the maintenance instruction below.
ATTENTION: THIS APPLIANCE MUST BE EARTHED
When making the electrical connection, check that the socket has an earth connection and that the voltage
values correspond to those indicated on the rating plate inside the appliance. The power socket connection is
to be easily accessible after installation.
WARNING: FOR YOUR SAFETY
•
•
•
•
•
•
•
•
•
•
•
•
•
This appliance is not intended for use by young children or infirm persons without supervision.
Children should be supervised to ensure that they do not play with the appliance.
There shall be adequate ventilation of the room when the rangehood is used at the same time with
appliances burning gas or other fuels.
You must read the details concerning the method and frequency of cleaning.
There is a fire risk if cleaning is not carried out in accordance with the instructions.
Do not flambé (pour alcohol over food and set fire to it during cooking) under the rangehood.
Exhaust air must not be discharged into an existing flue which is used for exhausting fumes from
appliances burning gas or other fuels.
The minimum distance between the hob surface and the lowest part of the rangehood must be 600mm.
Attention should be given to ensure that any applicable regulations concerning the discharge of exhaust air
is fulfilled.
Before attempting cleaning or maintenance, ISOLATE / UNPLUG THE UNIT FROM THE POWER
SUPPLY.
Do not use a solid state speed control device with this rangehood.
Do not remove cooking vessels from the hob unit without turning off the burner or heating element. The
rangehood must not be exposed to direct heat from a flame or heating element.
Beware of sharp edges when opening and installing.
INSTALLATION
Notes
•
•
•
•
•
•
•
Prior to installation. Please ensure that any existing or proposed roof ducting installation for connection to
this appliance is suitable and complies with local municipal building codes and other statutory / building
regulations. If you are unsure, please check with appropriate authorities or a qualified roof ducting installer.
Attention should be given to ensure that any applicable regulations concerning the discharge of exhaust air
is fulfilled.
Ensure that the fully installed canopy has the clearance of at least 600mm between the lowest part of the
hood and the cooking hob.
Before drilling any holes check the wall and ceiling are clear of any electrical cables, pipes etc.
The canopy rangehood is of wall-mount type. It must not be mounted / suspended from the ceiling.
The unit is supplied with mounting brackets that must be fixed onto the wall first. If the wall where the
rangehood is to be mounted on is a cavity wall then a solid noggin or stud (horizontal or vertical
timber/metal house framing behind the wall) is required for the mounting bracket to screw into. Due to the
heavy weight of the rangehood, it must not be mounted onto the plasterboard wall without solid support
from behind the wall surface.
For dimensions, see “Product Dimensions” diagrams below.
This rangehood is designed for operation in either one of the following ways:
• Ducted System – The cooking exhaust fumes are extracted and released external to the building.
Requires professional installation of flue piping to external of the house through ceiling or wall cavity space
prior to installation of rangehood. A flexible flue duct (150mm dia.) is supplied with the rangehood
• Recirculating System – The cooking exhaust fumes are extracted and recirculated internally within the
kitchen. Requires two additional (charcoal / carbon type) filters to be installed within the rangehood, which
is sold as a separate accessory.
Product Dimensions
EUC60GS
EUC90GS
EUC90SS
EUC91SS
Installation Procedure – Ducted System
1. Engage an authorised person to install the ducting to the required position.
2. Measure and mark the position on the wall for the flue (top-most section, see figure 3c below, marked ‘C’)
mounting bracket to be fixed. This mounting bracket is to be located at the top rear of the flue cover.
3. Measure and mark the position on the wall for the rangehood main unit (see figure 1a, & 1b) mounting
bracket to be fixed. A suitable method is to measure the distance from the base of the rangehood to the
hanging slots as shown in Figure (2a) below.
4. Fix the flue (top section) bracket (see figure 1c below) into the correct position on the wall using the
supplied self-tapping (nylon type) fixing screw sets.
5. Fix the unit body mounting bracket onto the wall to the exact position using the three supplied ‘wall mate’
type self-drilling (metal type) screws sets (consisting of 1 x screw-in socket and 1 x 30mm flathead screw
per set). For instructions on how to install the ‘wall mate’ screw sets, contact the manufacturer. The
supplied ‘wall mate’ self-drilling screw sets are suitable for plasterboard walls with supporting timber stud
or noggin. Where specialised fixing bolts / screws are required for tiled, concrete or masonry walls, these
must be obtained separately.
6. Prior to mounting the canopy rangehood onto the wall, first slot both sections of the flue cover onto the unit
body with the flue cover top section fully retracted inside the bottom section flue cover. Do not extend or
pull the top section out. The top section must be fully (lmportant: Leave the protective film on both flue
covers to prevent from scratching during installation).
7. Fix the bottom section flue cover onto the rear of the unit body using the four supplied screws.
8. Mount the unit onto the mounting bracket by hooking the hanging slots at the rear of the unit onto the
hooks of the mounting bracket. (See Figure 2a & 2b)
Figure 1a
Figure 1b
Figure 2a
Figure 2b
Figure 1c
9. The installer must ensure that the rangehood is securely fixed onto the wall. Any additional fixings in
addition to the above may also be added to further secure the rangehood against the wall. This is
dependent on wall type, rangehood type, fixing type and any other circumstance which may affect its
stability. Usually this can be achieved by screwing the back plate against the wall using suitable fixings (not
supplied). Optional rubber stops are also supplied for fixing to the bottom corners at the rear side of the
rangehood. This may be fixed (using the supplied screws) to enable the back of the rangehood to be level
with the wall should additional fixings be employed.
10. Euromaid accepts no responsibility for any damage caused by the installer’s negligence to properly mount
and secure the rangehood.
11. Connect the flue duct pipe to the unit.
12. To assemble the flue cover (2 x standard length sections):
12.1.
For model EUC90SS, EUC90GS & EUC60GS (See Figure 3a & 3c)
Slide the top section flue cover from inside the bottom section cover to extend upwards to the
required location. Fix the top section flue cover onto the mounting bracket using the two
supplied screws (figure 3c, screws ‘D’) at the top of the top flue cover.
12.2.
For model EUC91SS (See Figure 3b)
Connect cover B onto the top of hood body A. and fix cover B with screws C
13. To assemble the glass canopy:
13.1.
For model EUC90GS & EUC60GS only (See Figure 3c)
Slide the glass over the body at the base of the flue section and match the screw holes on the
glass to the screw holes on the ranghood. Insert rubber plugs into the holes and insert screws.
Screw securely into place. Do not screw too tightly as this may damage the glass.
14. Remove protective plastic film.
15. If you require a flue cover length that is greater in length than that supplied, extended flue kits are available
as an accessory. Please contact your place of purchase.
16. Plug the power cord into the power point.
B
C
A
Figure 3b
Figure 3c
Figure 3a
OPERATION
The push-button control panel (see Figure 3 below) is located on the front of the rangehood and includes:
Figure 3
1. Light switch (A)
2. Fan switch (B- high speed, C-mid speed, D-low speed)
3. Motor-off (E)
LIGHT CONTROL
Switch on/off the lights by pressing Switch (A) on the switch panel.
FAN CONTROL
Select required fan speed: HIGH, MID or LOW SPEED by pressing (B), (C) or (D) respectively on the switch
panel.
Installation Procedure – Recirculating System
In order for the rangehood to be used in the filtration mode whereby the air is recirculated by active carbon
filters, two active carbon filters (which are supplied as separate accessories) must be installed on both sides of
the exhaust fan. Under regular use of the rangehood, the carbon filters must be replaced at least once every
three (3) months to maintain its filtration efficiency.
To install the carbon filter:
Place the carbon filter onto the side end of the fan. To place into proper position, match the slot (which is
located around the side of the carbon filter) to the pin on the side of the fan. Turn the filter in an anticlockwise
direction (from “B” to “A” on the left hand side, and from “A to “B” on the right hand side) until a ‘click’ is heard,
to lock into position. Repeat this step to install the remaining carbon filter on the other side of the fan.
Figure 4
Repeat steps (2) to (10) and steps (12) to (15) as described in the above “Installation Procedure – Ducted
System” to install the rangehood.
MAINTENANCE / CLEANING
•
•
•
•
•
•
•
•
Prior to undertaking any cleaning or maintenance on the rangehood, ensure that the power source is
disconnected.
Particular care must be taken with any sharp edges on the rangehood.
When cleaning stainless surfaces, use a damp cloth and mild detergent. Never use products containing
abrasives (e.g. scouring pads, steel wool, abrasive liquid cleaner etc.)
In high humidity and coastal environments, cleaning should be carried out frequently.
Ensure the canopy rangehood is switched off before cleaning.
Wipe the rangehood body and flue with mild detergent or soapy water using a sponge or soft cloth. Do not
use oven cleaners, caustic solutions or abrasive materials.
Ensure the fan and light switches are switched off before removing and replacing filters. To maintain
efficiency and reduce fire risk, the filters should be cleaned monthly. To clean the filters, soak and agitate
the filters in hot soapy water or washing soda. Rinse, dry well and replace. Do not use oven cleaners,
caustic solutions or corrosive agents.
Ensure the fan and light switches are set to ‘Off’ before removing and replacing the light globe. Replace
the globe with a 10 Watt Halogen light globe.
SPECIFICATIONS
MODEL
EUC60GS
EUC90GS
Width
S/S & Tempered
Glass
600mm
S/S & Tempered
Glass
900mm
Motor
170W
Halogen Lamps
Air Outlet
Finish
EUC90SS
EUC91SS
Stainless Steel
Stainless Steel
900mm
915mm
170W
170W
170W
2 x 10W
2 x 10W
4 x 10W
2 x 10W
∅150mm
∅150mm
∅150mm
∅150mm
3
3
3
Air Capacity
660m /hr
660m /hr
660m /hr
660m3/hr
Exhaust Pipe
2.0m
2.0m
2.0m
2.0m
Net Weight
17.0kg
21.0kg
23.5kg
14.0kg
EUROMAID will not be liable in respect of any misuse of this appliance not in accordance with the instructions
and precautions specified in this booklet.
FOR SERVICE AND ENQUIRY, PLEASE CONTACT:
EUROMAID
Electrical Distributors of Australia Pty Ltd
8 / 92A Mona Vale Road, WARRIEWOOD NSW 2102
Tel: (02) 9999 2124 Fax: (02) 9999 1684
Electrical Distributors of Australia Pty Ltd
8 / 92A Mona Vale Road
WARRIEWOOD NSW 2102
AUSTRALIA
Tel: (02) 9999 2124 Fax: (02): 9999 1684
WARRANTY CERTIFICATE – Customer Copy
MODEL No.:____________________________________ SERIAL No.:____________________________________________
Euromaid warrants that the above appliance is free from manufacturing defects in material and workmanship and will repair or replace at our option
at our designated service points without charge within 24 MONTHS from the date of purchase any part or parts which in our judgement shall be a
manufacturing defect. This certificate and the relevant invoice must be presented for any warranty claim.
This warranty does not apply for the following:
(a) If the appliances has been misused or tampered with by unauthorised personnel.
(b) If the defects is caused by misuse, wear and tear and accidental damage.
(c) Replacements of light globes, lamp covers, oil collectors, filters and other accessories.
Note: a charge shall be made if the service person finds the product is functioning correctly.
PLACE OF PURCHASE ___________________________________________________________________________________
DATE OF PURCHASE:____________________________________________________________________________________
Please Keep Above Section With Your Invoice For Warranty Service.
- - - - - - - - - - - - - - - - - - - - - - - - - - - - - - - - - - - - - -- - - - - - - - - - - - - - - - - - - - - - - - - - - - - - - - - - - - - - - - - - - - - - - - - - - - (Cut along the above dotted line & return the section below to Euromaid.)
WARRANTY REGISTRATION FORM – to be retuened to Euromaid
To validate the warranty, this form must be completed and returned to us within 30 days from the date of purchase. We may contact you, your
supplier and the installer to collect information and the opinions for products and services improvement.
NAME: _______________________________________________
PHONE: (
)_____________________________________
ADDRESS:______________________________________________________________________________________________
PLACE OF PURCHASE: __________________________________________________________________________________
DATE OF PURCHASE: _________________________________
INVOICE No.:____________________________________
INSTALLER: __________________________________________
PHONE: (
)_____________________________________
MODEL No.:___________________________________________ SERIAL No.:______________________________________
Returning address:
Electrical Distributors of Australia Pty Ltd
8 / 92A Mona Vale Road
WARRIEWOOD NSW 2102
AUSTRALIA
Or Fax to:
(02) 9999 1684