1
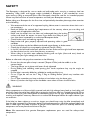
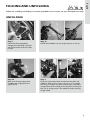
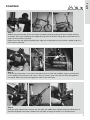
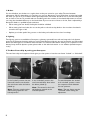
EN 14764
CITY AND TREKKING BICYCLES
Owner’s
Manual
English
INTRODUCTION
Before using your Brompton, please read this manual noting the sections on safety and folding in
particular. While this manual is intended as a guide, it is not a comprehensive guide to cycling or
bicycle maintenance.
After purchasing your Brompton, it is advisable to register your bike in the My Brompton section
of our website to record the details of your bike(s); that way, if your bike is stolen or we have any
need to contact you, we will have a record to refer to.You will be asked to enter your serial and
frame numbers: the serial number is located on a label at the back of the main frame; the frame
number is stamped on the main frame near the bottom bracket. The information remains on the
Brompton database and will not be passed on to third parties (www.brompton.co.uk/my/register.
asp).
If you carry out any adjustments or maintenance work yourself, please read the relevant sections of
this manual first, as it’s quite easy to get things wrong, and to impair the folding process or damage
your bike. This manual contains some tips and advice for using your Brompton but if you are ever
unsure of how to maintain your bike, visit an authorised Brompton dealer for expert advice. For a
list of dealers, please visit our website: www.brompton.co.uk/dealers/search.asp
This manual conforms to EN 14764
CONTENTS
Safety
Folding and Unfolding
Using the Brompton
page 2
page 3
page 7
Basic adjustments for Comfort and Safety
Warranty
page 10
page 13
1
SAFETY
The Brompton is designed for use on roads and well-made paths, carrying a maximum load not
exceeding 110kg (rider and luggage weight included). A Brompton is not intended for stunts,
cross-country riding or extreme sports. Your Brompton should be used for its intended purpose.
Misuse may lead to failure of some components and void your Brompton warranty.
Before riding your Brompton for the first time, and periodically thereafter, please pay close attention
to the following:
•We recommend the use of an approved cycling helmet, even in countries where their use is
not mandatory
•Read and follow the national legal requirements of the country where you are riding, and
comply with all applicable traffic laws
•Make sure the wheel rims are clean and undamaged along the braking
surface, and check for excess rim wear. If you doubt the safety of your
rims, have them inspected by an authorised Brompton dealer
• Check brakes, tyres and steering regularly
•Keep brakes and gears properly adjusted and operating cables in good
condition
• In rain, the brakes may be less effective and roads more slippery so brake sooner
• Check that all wheel nuts are properly tightened (Torque 15Nm)
•In the UK, the left hand brake lever operates the rear brake and the right hand lever operates
the front brake, but this varies from country to country
•When riding in the dark, wear reflective clothing and use lights (front and rear); check to
ensure that your lights comply with local laws
Before or after each ride, pay close attention to the following:
•Ensure that the seat pillar clamp is secured (Torque 4-7Nm) and the saddle is at the
correct height
• The hinge clamps are in place, with levers firmly tightened
•During folding and unfolding, avoid putting your hands anywhere they may be caught or
trapped
• Ensure bike is correctly folded or unfolded to avoid possible injury
•On an S Type, do not use the T Bag, C Bag or Folding Basket (which may interfere with
steering)
• On a P Type, remember you have no brakes to hand when using the lower grips
• Never try to alter the height of the handlebar stem where it enters the front forks
WARNING
Many components on a bike are highly stressed, and with high mileage, heavy loads or hard riding, will
eventually reach the end of their design life; in particular, aluminium alloy has a limited fatigue life. Failure
in use can cause injury. You should check all load-bearing parts for any signs of damage, corrosion, or
cracking, and replace if necessary. Please visit an authorised Brompton dealer for expert advice if you
are uncertain.
If the bike has been subject to a crash or impact you should stop using the bike immediately and
have the bike inspected by a Brompton dealer. Damaged components should be replaced before the
bike is ridden again. Any deep scratches or gouges in the aluminium parts can severely weaken the
component and cause premature failure of the part.
Note: We recommend that genuine Brompton replacement parts are used for safety-critical
components.
2
English
FOLDING AND UNFOLDING
Follow the unfolding and folding instructions provided to be sure you use your Brompton correctly.
UNFOLDING
Step 1
Unfold the left hand pedal by
swinging the pedal body outwards
and the latch plate locks the pedal
in place.
Step 2a
Unfold the handlebar into the upright position as shown.
Step 2b
Make sure the hinge clamp plate
straddles both hinge plates and
tighten firmly.
Step 3
Undo the quick release lever and pull the seat pillar and
saddle up, either until it comes to a stop, or is at a height
that suits you. Tighten the quick release lever; it should be
wrapped around the outside of the seat pillar touching the
frame in its closed position. The saddle should be pointing
straight ahead.
3
Step 4a
Standing to the left of the bike, right hand on the saddle,
left hand on the handle bar stem (as pictured), rock the
bicycle back slightly and unhook the front wheel from
the rear frame. Then, using a “stirring” action, front wheel
facing forward, move the front wheel out and round to its
unfolded position.
Step 5
Lift the bike by the saddle allowing
the rear frame & wheel to rotate
into their unfolded position.
Depending on the rear frame clip
setting [see page 8], the rear frame
may lock in place.
4
Step 4b
Ensure that the locking plate
straddles both hinge plates and
firmly tighten the main frame hinge
clamp.
Step 6
Your Brompton is now unfolded and
ready to ride.
English
FOLDING
Step 1
Release the rear frame clip (if the rear frame is locked in place) by pushing the lever towards the front
of the bike. Then raise the bike by the saddle, allowing the rear wheel to swing down and forward to lie
under the main frame as pictured.
Please ensure that the right hand pedal (chain side) points backwards once the wheel is folded under the
main frame, as pictured.
Step 2
Unscrew the hinge clamp on the main frame (about 4 turns). Grip the handlebar support, pushing back
on the saddle at the same time and, using a “stirring” motion, move it around until it lies alongside the
rear wheel. Make sure the hook engages the tube on the rear frame.
Step 3
Undo the quick release lever and push the seat pillar and saddle down. Tighten the quick release lever; it
should be wrapped around the outside of the seat pillar, touching the frame in its closed position.
5
Step 4
Undo the hinge clamp and swing the handlebars down alongside the front wheel and engage in the clip;
alternatively, let the handlebar drop into position on its own.
Step 5
Rotate the crank so that the right
hand pedal touches the front
wheel.
Step 6
Press the outer part of the pedal
latch plate downwards, so that it
clears the top of the pedal, and fold
the pedal.
Note:
1.When folded, the seat pillar locks the folded package together; the Lower Stop Disc acts as both a guide
and a block to prevent the rear frame from rotating, and must be correctly adjusted to ensure it fulfils
both functions.
2.Carry your Brompton by gripping the front of the saddle or the main frame.
3.The left hand pedal should not be folded when turning the cranks, as it can catch on parts of the rear
frame and cause damage to your bike.
6
1.Tyre pressures
Tyre pressure is important for both comfort and safety. Please note the following tips for ensuring a safe and
comfortable ride.
•It is important to keep your tyres well-inflated; soft tyres increase pedalling effort (which takes the fun out
of riding), wears tyres down quickly and has an adverse effect on handling. Keeping your tyres wellinflated is highly recommended.
•The most appropriate pressure depends on your weight and preference. On rough roads, it’s often more
comfortable to keep the pressures near the lower end of the ranges. However, for minimum pedalling effort,
higher pressures are ideal.
•Brompton bikes are fitted with Schrader (American) valves, allowing various methods of inflation:
-The Brompton pump is well suited, and comes installed on the rear frame of all-steel Bromptons.
When replacing the pump on the bike, make sure that its seal doesn’t prevent the pump-spring from
giving full engagement with the pump locators on the rear frame.
-You can also use a standard foot or hand-pump, or an air-line found at petrol/gas service stations.
The table below shows recommended tyre pressures for tyres supplied on Brompton bicycles.
Front
Rear
Brompton Kevlar
Min (psi)
Max (psi)
75 - 90
100
85 - 100
100
Schwalbe Marathon
Min (psi)
Max (psi)
60 - 75
85
70 - 85
85
Schwalbe Kojak
Min (psi)
Max (psi)
90 - 105
115
100 - 115
115
2. Gears
Brompton uses two gearing solutions: a derailleur system (left hand trigger) and a hub gear system (right hand
trigger). These systems are used independently on two- and three-speed Bromptons. When combined, the
derailleur and hub gear system create a 6-speed gearing system. Whatever your Brompton, keep pedalling while
changing gears, taking pressure off the pedals as you do so; this will ensure efficient gear changes.
From time to time, derailleurs, hub gears and triggers need adjustment; if you feel the gears are not running
smoothly or have trouble changing gears, please refer to the technical section on our website (www.brompton.
co.uk) or have them adjusted by a Brompton dealer or qualified bicycle technician as soon as possible, to avoid
any damage to the gears.
7
English
USING THE BROMPTON
3. Brakes
You should adjust your brakes on a regular basis as they are critical to your safety. The time between
adjustments will vary depending on how often you use your Brompton; if your brake lever touches the handle
bar when you pull on it, your brakes need urgent adjustment. The brakes should be set so that the brake pads
are as close to the rims as possible without interfering with the rotation of the wheels. Adjustment is carried
out using the threaded cable stop on the brake lever. If you are unsure of how to do this, have it adjusted by a
Brompton dealer or qualified bicycle technician.
•When setting the rear brake, the bicycle should be unfolded.
•When setting the front brake, do not set the pads so close that they bind on the rim when the wheel is
turned to the right or left.
•Replace your brake pads if the grooves on the brake pad surface are less than 1mm deep.
4. Lighting
Two lighting options are available on Bromptons; a battery-operated front and rear lamp and a hub dynamo
system that generates electricity while you cycle. These Brompton lighting sets can be fitted to any bike model.
Please use these lights in accordance with local laws. For technical information relating to the operation of the
battery lamps and hub dynamo system, please refer to the technical section on our website (www.brompton.
co.uk).
5.The Rear Frame Clip & parking your Brompton
The rear frame clip and suspension block gives you the option to have the rear frame “Locked” or “Unlocked”.
In the “locked” position, the rear In the “unlocked” position, the
frame will remain connected to
rear frame will drop down when
the main frame when the bike is the bike is picked up.
picked up.
Note: The recess for the hook
Note: The two raised notches
will be facing upwards in the
will be facing upwards in the
unlocked position.
locked position.
8
To switch between the “locked”
and “unlocked” position, rotate
the suspension block between
the two positions.
Note: The rear frame must be
“unlocked” while making this
adjustment.
English
6. Wheeling the folded bike around
The small rollers fitted as standard on a Brompton are useful for pushing the
folded bike into tight spaces. Using the raised handlebar as a handle, the folded
bike may also be pulled around on these rollers, though this only works over
short distances on a smooth surface.
When fitted with the optional Eazy Wheels, rolling it around becomes much
easier. Remember to raise the seat pillar slightly from the fully-down position so
that it does not hinder the bike from rolling along, but not so high that the bike
unfolds.
Note:
•Do not use the raised saddle as a handle to push the Brompton along; with the bike not locked together by
the seat post, the risk of unfolding is very great.
•On bikes fitted with Eazy Wheels, remember to push the seat pillar down completely when not wheeling so
that the rubber bung in the base acts as a brake to stop unwanted rolling.
7. Luggage
Brompton has a selection of luggage accessories that you may fit to your
Brompton. They allow one to carry loads of up to 10kg on the front and 10kg
on the rear rack.
Note:
•All Brompton front luggage is suitable for use on M and P Type Bromptons,
but the T Bag, C Bag and Folding Basket are not suitable for use on S Type
Bromptons.
•Please pay attention to the instructions that come with all luggage before
use. Using incorrect luggage may interfere with steering and could be
dangerous.
8. Lubrication
As with any machine, it is important to lubricate components to keep them
running safely and efficiently. We recommend you do this annually, though some parts will need more frequent
lubrication.
Chain:The chain has to be well-lubricated for smooth pedalling. Apply oil while turning the pedals
backwards, making sure the oil flows both onto the rollers and between the side plates; allow
the oil to work in, then wipe off any excess.
Hinge clamps:The thread of the clamp bolt and its washer should be greased occasionally. A thin smear of
grease on the inside faces of the clamp plates also help them release more easily.
Folding pedal:The main bearing, which is grease packed, should not be oiled. However, if the bearing is not
running freely, some oil fed in past the seal will extend its useful life.
Hub gears:The gears and bearings are sealed; greasing need only be carried out during a major service
by a bicycle technician.
When lubricating your Brompton, avoid getting oil or grease on the seat pillar or the wheel rims. Any good
quality general purpose grease is satisfactory, but lithium-based grease is recommended. For the chain, chain
lubricants with good penetrating properties give the best results.
9
BASIC ADJUSTMENTS FOR COMFORT AND SAFETY
1. Saddle height adjustment
Saddle adjustment is an important factor in getting the best performance from your bicycle in comfort. Saddle
position is a personal choice and one saddle cannot suit everyone, but with some adjustment, a comfortable
saddle position can be found. If you are not comfortable on your saddle, ask a qualified Brompton dealer to set
the saddle to your optimal riding position.
Vertical adjustment
To check for correct saddle height, sit on the saddle with one heel on
a pedal and the crank arm running parallel to the seat pillar. If your leg
is not completely straight, your saddle height needs to be raised; i.e. if
your leg is bent at the knee in this position, the saddle is too low.
When riding normally, with the ball of your foot on the pedal, your
knee should be slightly flexed at the bottom of the pedal stroke.
Fore and aft adjustment
The saddle can be adjusted forwards or backwards to help you get the optimal position on the bike. Move
it forwards to get closer to the handlebars and backwards to increase the reach. Always tighten the bolt
to the correct torque of 15-17Nm before riding your Brompton.
Saddle angle adjustment
Most people prefer a horizontal saddle, but some riders like the saddle nose angled slightly upwards while
others prefer it pointing slightly down. Always tighten the bolt to the correct torque of 15-17Nm before
riding your Brompton.
Note:
•For the maximum height, draw the seat pillar up until it reaches a positive stop. At the minimum height the
seat pillar should not protrude below the main frame.
10
English
2. Additional height
If you can’t gain enough height by re-positioning the saddle, there are two Brompton options which give more
height: a telescopic seat pillar and a longer pillar extended by 60mm. The telescopic pillar can accommodate the
needs of taller riders, with little change to the folded size.
3. Handlebar & control positions
The handlebars and control levers on the Brompton are factory-set to provide a compromise between
compactness and riding comfort. Should you choose to make any changes, the folded handlebar or stem cannot
lie as close to the front wheel as normal and increases the folded package. If the handlebar stem assembly
has to be moved for any reason, it is highly recommended that any adjustments are made by an authorised
Brompton dealer or certified bicycle technician. The clamp bolt should be tightened to a torque of 18Nm.
4. Routine replacements
Planned replacement is advised to ensure both safety and good performance. The suggested intervals between
replacements are for bicycles subjected to normal use; the most appropriate timing depends on the conditions
of use and riding style. We recommend genuine Brompton replacement parts for safety-critical components.
•
luminium components: As on other lightweight machines, aluminium alloy is used in the construction
A
of the Brompton, and this material has a finite design life before failure. In normal use, the risk of aluminium
fatigue failure is remote, even after many thousands of miles. However, the risk of failure increases with
use, especially with hard riding or other severe loading. As such a failure could cause injury, the hinge clamp
plates, handlebar, chain set, seat pillar and pedals should be replaced every 5,000 miles (more frequently if
they are subjected to hard use), and we recommend that these items are checked regularly.
•
ransmission: All Brompton bicycles have a self-adjusting, sprung chain tensioner to maintain correct
T
chain tension. Over time, the chain and sprockets will wear, commonly known as chain stretch; this will
result in inefficient and rough power transmission. We recommend replacing the chain and sprockets every
2,000 – 3,000 miles, but regular cleaning and lubrication will prolong the chain’s life. Never use a new chain
on worn sprockets or vice versa. To measure chain stretch, you may wish to use a chain stretch tool.
•
rakes Cables do not have an indefinite life, and to reduce the risk of failure, replace the cables at
B
intervals of 4,000 miles or less. New outer-cables should be exactly the same length as the original; for best
results, use genuine Brompton-specific cables and have them fitted by an authorised Brompton dealer or
certified bicycle technician. Cables that are the incorrect length could affect the safety and performance of
your bicycle.
•
ear cables should be replaced at the same interval as brake cables. As Brompton cables are specifically
G
designed for Brompton bikes, only genuine Brompton cables should be used. Have them fitted by an
authorised Brompton dealer or certified bicycle technician. Cables that are the incorrect length could affect
the safety and performance of your bicycle.
•
rake blocks: When brake blocks are new they have grooves on the braking surface; once those grooves
B
are less than 1mm deep or no longer visible, the pads should be replaced. As brake pads are critical to the
safe function of your brakes, we recommend you have them fitted by a qualified bicycle technician, using
genuine Brompton replacement brake pads.
11
•
yres: The risk of punctures increases with mileage and as the tyre tread starts to wear away. Once
T
you notice your tyre tread wearing thin, replace the tyre. This will reduce your chances of puncture and
increase pedalling efficiency.
•
Dynamo lighting: The electric cables used in dynamo lighting wear out with the folding and unfolding
of the Brompton. When the cables become worn, replace them immediately to avoid any damage to your
dynamo hub. If your lights are faulty, have them inspected by a qualified bicycle technician to keep yourself
visible and safe on the roads.
•
uspension block and bush: Check the bush and suspension block for wear annually. If you notice any
S
cracks in the suspension block, have it replaced immediately.
•
heel rims: When either groove in the braking surfaces is no longer visible, the
W
rim should be replaced. Look for this symbol on the wheel rims.
100-mile service
Certain items on any bicycle take time to bed in; to avoid damage, these need attention soon after you have
bought the bike. The dealer that sold you your bike will be happy to perform this first important service
without charge, but it must be redeemed within three months of purchase. They will pay particular attention to
the following items:
SpokesThe tension of the spokes should be checked and adjustments made to
suit. If a spoke becomes loose for any reason, neighbouring spokes will be
carrying extra load and may fail.
Crank Axle Bolts & PedalsThese must be checked for tightness. The correct torque is 30Nm; the
thread for the LH pedal is left hand).
CablesAlthough the cables are pre-stretched, inevitably there is further initial
stretch. As this affects hub-gear control, the gears should be checked for
correct adjustment. It’s well worth setting the brakes at the same time.
12
English
WARRANTY
If your bicycle has a manufacturing defect, we will replace the defective part free of charge if we are notified
within five years (in the case of the frame) or two years (in the case of other parts) of the date of first purchase
of the bicycle. The Brompton is for use on roads and well-made paths. It is not designed for cross-country
riding: this can overstress the frame, and the tyres and wheels are unsuitable.
My Brompton
This section of the Brompton website allows owners to record the details of their bike(s), so that they can be
contacted if the need arises, and we would encourage all new and existing owners to register. The information
will remain on the Brompton database and will not be passed on to third parties (www.brompton.co.uk).
Serial and Frame Numbers
The label at the back of the seat tube on the main frame carries the 10 digit serial number. The 6 digit frame
number is stamped on the main frame just forward of the rear suspension pivot: it’s a good idea to keep a
record of both numbers. Record your numbers in the boxes provided.
13
Serial Number:
10 digit number
Frame Number:
6 digit number
Date Purchased:
dd / mm / yyyy
BROMPTON BICYCLE LTD
Kew Bridge DC, Lionel Road,
Brentford, Middlesex, TW8 9QR
www.brompton.co.uk
© Brompton Bicycle Ltd January 2011