1
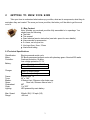
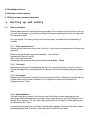
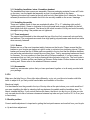
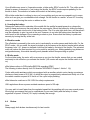
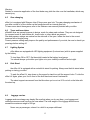
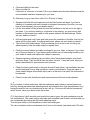
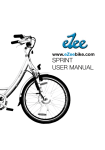
All bikes
model year 2008
user manual
0
Contents:
1. Introduction
1.1
Read me first!
1.2
Approval and bike conformities
2. Getting to know your bike
2.1
Box contents
2.2
Technical specifications
2.3
Bike overview
2.4
Battery and charger
2.5
Handlebar and stem
2.6
Position of serial numbers
2.7
Filling out your warranty information
3. Setting up and safety
3.1 bike assembly
3.2 Fit
3.3 Saddle position
3.4 Handlebar height and angle
3.5 Safety check
3.6 Safe and responsible riding
4. Power Assisted Cycling
4.1
Loading the battery
4.2
Pedelec mode
4.3
E-Bike mode
4.4
Brakes
4.5
Gear changing
4.6
Tyres and Inner tubes
4.7
Lighting system
4.8
Kick stand
4.9
Luggage carrier
4.9.1 Transporting your eZeebike
5. Service and Maintenance
5.1
General
5.2
Battery disposal
6. Precaution and procedures
6.1
Emergency equipment and knowledge
6.2
If you get a flat tyre
6.3
Spoke breakage
6.4
Accidents while cycling
6.5
Additional accessories
7.
Self Diagnostic System
7.1 Things to avoid
8. Guarantee regulations
1
3
3
3
4
4
4
5
6
6
6
7
8
9
9
9
10
1. INTRODUCTION
Hello! Congratulations and welcome to the exciting world of power assist cycling. Your eZee,
besides being a full-featured bicycle, is integrated with an electric drive system that will increase the
benefits and pleasures of cycling.
eZeebikes are designed for your comfort and safety. It is a zero emission environmentally
friendly vehicle, an ergonomically designed bicycle for comfortable cycling and an economically
efficient vehicle, giving you ideal mileage and mobility at a fraction of regular transportation costs. The
electrical consumption is about 1.0 Kwh for 100 km (62 miles) on e-bike mode.
While cycling an eZee will be simple to use, fun and works much like a standard bike. Please
remember it is also a sophisticated commuting and electronic machine. It is unique, if you haven’t
ridden a bicycle in ages… cycling has changed so much! Therefore please take the time to go
through information on this manual. It will help you maximize your bicycle’s performance, safety and
enjoyment.
So read this manual thoroughly, understanding your eZee will give you the best out of every
ride and for years to come.
While we made this manual to be comprehensive, it might not help you out in all situations you might
encounter during the lifetime of your bike. You should never attempt to repair, adjust or modify unless
you’re sure how it’s done properly. Failure to do so could cause damage to the motor, battery set or
the entire bicycle. So if in doubt, consult your local professional bike mechanic, your eZee dealer, or
us direct!
www.ezeebike.com
www.ezeebike.net
[email protected]
1.2 Approval and bike conformities
This eZee LiV power assist cycle fulfils the requirements of the following:
EC Directive: Electro Magnetic Compatibility directive (89/336/EEG)
EU Directive: 2002/24/EC Chapter 1 Article 1 1(h)
ISO 4210:1996 – Safety requirement for bicycles
2
2
GETTING TO KNOW YOUR BIKE
Take your time to understand what makes up your bike, what are its components, what they do
and where they are located. The more you know your bike, the better you’ll be able to get the most
out of it.
2.1 Box Content
Note: Whether you received your bike fully assembled or in a package. You
should have the following.
a. The bike!
b. This manual
c. Gear technical service instruction (see tech. specs for more details)
d. User manuals for accessories
e. 2 x fuses, set of nylon ties
f. Hex keys 6mm, 5mm, 2.5mm
g. Heat shrink tubing
2.2 Technical Specifications
Classification:
Motor:
Controller:
Battery:
Charger:
Electric powered assist cycle
DC Brush permanent magnet motor with planetary gears. Nominal 250 watts.
Overload protection 18 amps
Low voltage protection 31.5 V
Nickel Metal Hydride 36V 9Ah
Li Ion 37V 10Ah
NiMH 2 amps charger
Li Ion 2 amps charger
Frame:
Tyres:
Brakes:
Gears:
Chainwheel:
Chain:
Lighting:
Al Alloy 6061 T6
26” x 1.95”
V-Brakes front, Shimano roller brake rear
Rear hub, Shimano Nexus Inter 3
48T
½ x 3/32”
LED powered by main battery
Max. Speed:
Range
25km/h (EU) / 20 mph (US)
~40 kms
3
2.4
Battery and charger operation
4
Battery detachment, charging & installation
General
Battery
There are no parts inside the battery that you can service. If you suspect a problem, take your battery
to your authorized eZee dealer.
CAUTION:
Please read the following general safety tips for care and maintenance of eZeebike battery.
.
Do not place the battery into a fire or near any heat source.
.
For cleaning the battery casing, use a cloth moistened with water only. Do not use solvents or
cleaning fluids of any kind.
.
Do not attempt to open the casing of the battery. This immediately voids your warranty. There
are no parts inside that you can service.
Danger:
Please note that improper handling poses a high risk of fatal accidents, serious injury or damage to
product and property.
.
Do not short-circuit the charger’s plugs and sockets by using metallic objects.
.
Do not attempt to disassemble or modify the charger. There are no parts inside that you should
attempt to service, if you suspect a problem, take the charger back to your authorized eZee dealer.
.
Do not use the charger to charger batteries other than genuine eZee batteries. Overheating,
fire or electric shock may be the result.
5
.
Do not subject the charger to shocks, e.g. by dropping. Do not expose the charger to liquids.
.
Do not use a damaged charger or components (e.g. charger casing, cable, plug).
.
Do not touch a plug with wet hands (electric shock may be the result).
.
Do not apply too much pressure to the cables or the plugs.
.
Keep the charger out of reach of children or pets.
.
Be sure that the plug is completely inserted into an electric point.
.
Do not use the charging plug and/or the plug for a power source when they are dusty. Moisture
absorbed by the dust may conduct electricity, causing fire. Clean with a dry cloth.
.
Do not apply voltage other than the rated value to the charger. Do not use sockets, connectors
and other wiring devices with a power source other than standard AC 220~230 volts.
.
Do not place the charger in an unstable position.
Using the charger upside-down or stretching the cable tight may result in malfunction, fire or
electric shock. Place the charger firmly on a flat surface.
.
Do not cover the charger or put things on it. Overheating or fire may be the result.
1.
2.
3.
4.
Plug the charging pin into the battery charging socket.
Plug the power cord to the a/c outlet
Turn the power on the a/c outlet
Switch the charger “on”
Ensure that the grooves on the charging pin match the socket.
Red
Yellow
Green
-
Indication that charger is connected to an a/c outlet
Charging
Full
When the fuse is blown, the battery will not charge. Remove the fuse cap and the blown fuse (if the
wire in the fuse has snapped) and replace the blown fuse. While spare fuses will be provided with the
purchase of your bicycle, you may wish to purchase extra 30 A fuses from any electrical hardware
store. If you are unsure of which fuse to buy, we strongly recommend you call up your distributor for
advise.
The charging is automatic and there is no danger of over charging. There is no memory effect and the
battery can be charged at any battery level. However, we advise disconnecting the battery and
turning off the charger as soon as the charging process has been completed.
6
2.5 Handlebar and stem
2.6 Position of serial numbers
2.7 Filling out your warranty information
3. Setting up and safety
3.1
How to assemble
Please read instructions carefully before proceeding. Do not attempt to fix the bicycle until you
are sure. Any damage on the bicycle resulting from proper assembly will not be covered under
our warranty scheme.
It is your bicycle. You’ll enjoy using it over and over again, so please start by assembling it
correctly.
3.1.1 Tools required check
Ensure that you have the correct tools for the job. If you are not sure please do not attempt the
assembly.
Proper tools are the first step in safe assembly. You will need
Screwdriver Philips #1 and #2
Allen / Hex Keys metric set
Open-ended flat wrenches with metric measurements 6mm – 17mm
3.1.2 Get ready
Begin removing bicycle from packaging and lay it on a clean flat surface, be sure to remove
any part packages that comes along with the bicycle. Discard the box and packaging material
only.
3.1.3 Front wheel
Make sure the front wheel is securely inserted into the front fork. Tighten the nuts alternatively
on both sides until the wheel is secured, do not tighten one side only with huge force.
Tightening torque 35 Nm.
3.1.4 Seat Installation
Take the seat post and insert it into the seat tube of the bicycle frame and align the seat
accordingly while tightening the seat clamps. Ensure that the seat is securely fastened to the
bracket of the seat post. For your own safety and comfort do not adjust the seat post beyond
its “Maxmimum Ext.” mark.
An over-extended seat post can result in fracture and breakage of the seat tube due to stress
exceeding design load. Warranty of the frame will be voided in such cases.
7
3.1.5 Installing handlebar / stem / threadless headset
The handlebar and stem comes pre-assemble. Remove packaging material, loosen all 3 bolts
on the stem, turn the handle bar assembly so that it is perpendicular to the frame.
Tightening the stem bolt located at the top with hex key, then tighten the 2 side bolts. Wrong or
reversed procedure will not enable the fork to be securely seated on the crown / bearings.
3.1.6 Installing the pedals
There are 2 pedals, each of them are marked with either “R” or “L” indicating right and left
pedals respectively. Screw in clockwise for the right pedal and counter-clockwise for the left,
then tighten both with a wrench. The thread in the crank is made of Al Ally and could be easily
damaged during riding if the pedals are not tightened.
3.1.7 Front mudguard
The supports are attached to the sides and the top of the front fork, ensure all nuts and bolts
are fastened. The mudguards are made from high quality polycarbonates and should not rattle
when securely fastened.
3.1.8 Brakes
Brakes are one of the most important safety features on the bicycle. Please ensure that the
brakes on your bicycle are always set right in order to minimize your risk being injured. Tighten
brakes and ensure that the V-Brake pads are parallel to the rim and that the distance between
rim and brake pad should not exceed by more than 2mm. Test by squeezing brakes and check
for firmness. You may continue to fine tune with a Philips screwdriver. If you are unsure, we
recommend that you visit your local professional bike mechanic to help you. The front brake is
a rim brake / V-brake and the rear brake is a Shimano Roller brake. Ensure brakes are firm an
working well. Please refer to the attached Shimano manual.
3.1.9 Accessories
Install any accessories options that you have purchased together or is all ready provided with
your package.
3.2 Fit
Make sure the bike fits you. Every bike rides differently, so try out your bike at a location with little
traffic to adjust it till you find yourself comfortable and confident on the bike.
Standover height.
It is the distance from the ground to the top of the top tube at the point where your crotch would be if
you were straddling the bike by standing half way between the saddle and the handlebar stem. To
check, straddle the bike. If your crotch touches the frame, the bike is too big for you. A bike you ride
only on-road should offer a minimum clearance between top tube and your crotch of 2.5 to 5 cm (one
to two inches).
3.2 Saddle position
Correct saddle adjustment is important in getting the best performance and comfort from your bicycle.
a. Up and down adjustment
8
Your leg length determines the correct saddle height. To check for correct saddle height:
- sit on the saddle
- place one heel on a pedal
- rotate the crank until the pedal with your heel on it is in the lowest positions and the crank is parallel
to the seat tube.
- your leg should be almost straight. If not, your saddle height needs adjusting.
To adjust the saddle height, loosen the seat post fixing bolt and move the seat post up or down as
required. Then, make sure that the saddle is parallel to the top tube of the bike, retighten the seat
post fixing bolt tight enough so that you cannot twist the saddle out of adjustment.
b. Front and back adjustment.
To find the most comfortable position, loosen the saddle clamp and adjust the saddle forwards or
backwards to suit you. Retighten the saddle clamp.
c. Saddle tilt adjustment.
Most people prefer a horizontal saddle, while some prefer to have their saddle tilted up or down
slightly.
Very small changes in saddle position will make a big difference. Take your time and adjust the
position in small steps till you find something you’re most comfortable with.
WARNING:
Periodically check the saddle adjusting mechanism and fixing bolts.
.
Do not adjust the seat post beyond its Minimum extension mark. Doing so may cause undue
stress on the frame, resulting in breakage and injury during riding.
3.3. Handlebar height and angle
a.
Handlebar stem height.
You can raise or lower the handlebars. Loosen the stem height adjuster bolt by turning it anticlockwise three or four turns. If the bolt rises but the stem doesn’t move, tap the bolt carefully down,
using a plastic or wooden hammer. Set the handlebar stem at the correct heigh and perpendicular to
the front wheel. Fasten the bolt to the correct torque 20-22 Nm, so that you cannot twist the stem and
handlebars. The Minimum Insertion mark must NOT be visible.
b.
Handlebar angle.
by tilting the handlebar you can direct the grips more upward or downward. This is a matter of
personal taste. Loosen the bolt at the front side of the handlebar stem (handlebar clamp bolt). Tilt the
handlebar to the required positions. Fasten the bolt to the correct torque 13~15 NM.
After changing the position of the handlebar or the stem, check to make sure that the handlebars can
rotate freely in both directions without the brake cables catching. Be sure to thoroughly check the
bars and stem are tight and canot be moved after you have adjusted and tightened them.
3.4
Safety equipment
9
3.4.1. Lights
Lights are important safety devices. If you must ride your bike after dusk or during poor visibility
conditions, you must turn on the lights so that you can see the road, also that others see you.
3.4.2. Reflectors
Reflectors are designed to pick up and reflect street lights and car lights in a way that helps you to be
seen as a moving cyclist.
3.4.3. Helmet
In some countries, wearing bike helmets are mandatory. We always recommend you ride with a
helmet that’s approved by ANSI or an equivalent standard.
3.5
Mechanical safety checks
3.5.1 Nuts & Bolts
Inspect the bike closely from front to rear for any obvious signs of worn or broken components. While
riding, if anything sounds, feels or looks loose, do a quick inspection of the whole bike. Try to find the
source of noise or any obvious loose components and secure them. Ask someone with experience, or
check with your authorized eZee dealer.
3.5.2 Tyres & Wheels
Check proper tyre inflation by placing your hand directly on top of each tyre individually. With a
straight arm and direct downward pressure, push on the tyre with downward body weight and watch
the spot where the tyre is contacting the ground. There should be very little tyre compression. If your
tyres need inflating, use a standard bicycle floor pump. If you must use a high-volume compressor
like those found at automotive service stations, add air in small amounts. Adding too much pressure
all at once could cause the inner tube to explode, which can cause severe damage to the tyre and
serious injury.
Spin each wheel slowly and look for cuts in the tyre’s tread and side wall. Replace damaged tyres
before riding the bike.
Spin each wheel and check for brake clearance and side-to-side wobble of the rim. if a wheel
wobbles side to side or contacts the brake shoes, take the bike to a qualified bike mechanic to have it
realigned.
CAUTION:
“True” (aligned) wheels are crucial when riding. The increases the effectiveness of brakes and
stability whilst riding. Truing is a skill which requires special tools and experience. Do not attempt to
true a wheel unless you have the knowledge and tools needed to do the job correctly.
3.5.3 Brakes
Visually inspect the brakes for proper cable routing. Brake cables should not be hampered or
obstructed in anyway while you rotate the handlebars or squeeze on the brake levers.
Squeeze the brake levers. Brake levers should engage brake shoes at approximately half way
through their arc.
10
Make sure that the brake’s brake shoes are contacting the rim’s braking surface. Also check the
shoes are not rubbing the tyre’s side wall whilst applying the brake. Do not ride the bike until the
brakes are properly adjusted.
3.6
Safe and Responsible Riding
Like any sport, bicycling involves risk of injury and damage. By choosing to ride a bicycle, you
assume the responsibility for that risk, not the people who sold you the bicycle, not the people who
made it, nor the people who distribute it. Nor the people who manages the roads you ride on, but
YOU. So you need to know – and to practice – the rules of safe and responsible riding.
Because eZeebikes are designed as comfort city bikes, they are made for commuting purposes. We
strongly do not recommend you treat this bicycle for other purposes such as going on mountain trails,
speed cycling, downhill and stunt biking. There are other bicycles designed for such purpose, and the
purpose of an eZeebike is for quiet, easy and efficient commuting with fun.
3.6.1 The Basics
1.
Always do mechanical and electronics inspections of the bicycle before you get on.
2.
Always wear a cycling helmet that meets the latest Snell, ANSI or other approved
standards.
3.
Be careful to keep body parts away from the sharp teeth of the chainwheel, the moving chain;
the turning pedal and cranks; and the spinning wheels of the bicycle.
4.
Always wear shoes that will stay on your feet and will grip the pedals. Never ride barefooted or
wearing sandals.
5.
Be thoroughly familiar with controls of your bicycle.
6.
Wear bright, visible clothing that is not so loose that it will catch unto the moving parts of the
bicycle or be snagged by objects at the side of the road.
7.
Think about your speed and keep your speed at a consistent level that meets with road
conditions.
8.
Be reminded that during wet weather conditions, brake distance will vary quite differently from
dry weather conditions. We advise you pay extra attention during these conditions and brake
earlier than you usually do during dry weather conditions.
9.
Always follow road safety regulations in the country you are riding in, especially those
applicable to bicycles. Avoid as much as possible riding a bicycle in wet weather conditions
and in poor visibility conditions such as night cycling or cycling in a fog.
10.
The electronic controls are installed with overload protections. When the power gets cut off in
an overload situation, you have to turn the power off with the keys and start again. The
second level overload protection is the 30 amps fuse installed at the battery box. If restarting
fails, check the fuse. Replace fuse if it has blown, or otherwise check the number of blinks on
the red LED with the self diagnostic system of the controller.
11.
Low voltage protection. To prevent the battery from deep discharge that will irreversibly
damage the battery, the power will cut off when it reaches a certain low voltage protection.
When you see that the battery level indicator shows the yellow/orange warning light it is
necessary to charge your battery again. When the minimum battery level is reached the
electric motor will not function smoothly
4 Power Assisted Cycling
11
Your eZeebike may come in 2 operative modes, e-bike and/or EPAC mode for EU. The e-bike mode
allows for power on demand i.e. just turning the throttle, the EPAC mode requires pedaling for the
throttle to work. The selection is made at the switch at the battery gauge.
With e-bike mode there’s nothing to stop you from pedaling and you are encouraged to put in some
effort as it can give you considerable more mileage. On the throttle is a switch “on and off” for safety
reasons to avoid turning the motor on without a rider.
4.1 Loading the battery
Release the cache at the underside of the saddle life the saddle forwards/upwards or release the
quick fit clamp and remove the seat tube as the case maybe. Mount the battery by sliding the battery
along the guide plate into the slot of the battery holder. The fit is quite tight when new, and therefore it
may be necessary to give it a push at the end. However, do not ram the battery down hard as this
could result in the damage of the connecting sockets or pins. Ensure that the battery is positioned
securely by turning the key at the lock.
4.2 Pedelec mode
The eZeebike is powered by the motor an/or is activated by a motion sensor and the throttle. For the
EPAC mode – As you pedal, the signal is picked up by the sensor at the bottom bracket which allows
the power to be “on”, power on demand could then be made by the twist of the throttle. The activated
motor will reduce the load required for you to pedal by assisting you. Making pedaling long distances
and gradients easy, this makes traveling more pleasant without compromising on speed.
4.3 E-bike mode
For the e-bike mode, the motor will run as soon as you turn the throttle, ensure that you are seated
and ready to ride off before you activate the throttle. (US version will require the throttle switch to be
on)
eZee bikes conform to CEN draft prEN15194 regarding EPAC.
The following is taken directly from EU directive 2002/24/EC Chapter 1 Article 1 1(h)
Cycles with pedal assistance which are equipped with an auxiliary electric motor having a maximum
continuous rated power of 0.25 kW, of which the output is progressively reduced and finally cut off as
the vehicle reaches a speed of 25 km/h or if the cyclist stops pedaling.
eZee bikes also conforms to EN 14764 for safety requirements.
USA regulations allows a power assisted maximum speed of 20 mph.
You may wish to travel faster than the regulated speed limit by pedaling with your own muscle power.
We strongly recommend that you be considerate for your own safety and the safety of others
regardless of speed. 25 km/h (15.6 mph) is already fast enough.
4.4
Brakes
Note:
Always apply both brakes simultaneously for best results.
12
Warning:
Sudden or excessive application of the front brake may pitch the rider over the handlebar, which may
cause injury.
4.5
Gear changing
eZee Liv is equipped with Shimano Inter 3 Nexus rear gear hub. The gear changing mechanism of
your bike consist of a Revo shifter on the handle bar and an internal gear hub.
To learn more about these gears, refer to the Shimano user manual provided with your bike.
4.6
Tyres and inner tubes
eZeebike tires are general purpose in design, made for urban road surfaces. They are not designed
for unpaved roads or trails where dirt, loose rocks, or other debris are present.
Size and pressure ratings are marked on the side wall of the tyres. Inflate the tires to the correct
pressure with a bicycle pump.
Correct pressure setting really improve the quality and performance of your ride, be sure to check tyre
pressings before setting off.
4.7
Lighting System
eZee bikes are equipped with LED lighting equipment (front and rear) with its power supplied
by the battery.
To turn them ON or OFF, flip the switch located at the battery level gauge.
You should always cycle when your lights on in poor visibility conditions and at night.
4.8
Kick Stand
the eZee LiV is equipped with a central kick stand for parking. Always use the kick stand when
parking or storing your bike.
To park the eZee LiV, step down on the support’s stand toe until the support locks. To ride the
eZee LiV again, place your foot in front of the kick stand and move it backwards.
The stand supports are meant from the bike when you’re not on it! Do not sit on the bike with
the stand up.
4.9
Luggage carriers
Luggage racks are always very handy. Be sure that when you do use them, your luggage and
contents are secure and free from the rear wheel. The total weight of the luggage should never
exceed the maximum weight of 25 kgs.
Never carry a passenger, unless it is a child in a proper child seat.
13
4.9.1 Transporting your eZeebike
Remove your battery first, this makes the bike lighter for you to maneuvers.
There are many companies that make special carriers for all sorts of bicycles, be sure to
consult with the dealer before purchasing one to attach your eZeebike.
Always be sure that the bike during transportation is secure and stable.
5
Service & Maintenance
5.1
General
eZeebike are always continually evolving as we look to technological advances in electric
bicycle components. As a result, manuals like this might not provide you with all the information
required for the lifetime of your bike. In order to help minimize the chances of an accident and
possible injury, it is critical that you have repairs, which are not described in this manual performed by
your dealer.
Your individual maintenance requirements depend on your riding style and geographical location.
Consult your dealer for help in determining your maintenance.
The amount of kinds of maintenance you can do yourself depends on the level of skill and
experience, and also whether you have the tools required.
To learn more about the services available for your bike,
1.
Ask your dealers whether copies of the manufacture’s installation and service
instructions
for the components on your bike are available.
2.
Ask your dealer to recommend a book on bicycle repair.
3.
Ask your dealer about the availability of bicycle repair courses in your area.
4.
Visit our website periodically to learn more about our products.
Simple service and maintenance can be done by you, these require no special tools or
knowledge beyond what’s explained in this manual.
A) Break-in period: your bike will last longer and work better if you break it in before riding it
hard. Control cables and wheel spokes may stretch or “seat” when a new bike is first used
and may require
B) Before every ride: mechanical safety checks
C) After every long ride; if the bike has been exposed to water or grit; or at least every 150
km or 100 miles:
• Clean the bike, incl. chain ring and rear wheel sprocket.
14
•
•
Clean and lightly oil the chain.
Wipe of excess oil.
Lubrication is a function of climate. Talk to your dealer about the best lubricants and the
recommended lubrication frequency for your area.
D) After every long or hard ride or after 10 to 20 hours of riding:
•
•
•
•
Squeeze and hold the front brake and rock the bike forward and back. If you feel a
clanking or looseness with each forward or backward movement of the bike, you may
have a loose headset. Have your dealer check it.
Life the front wheel off the ground and turn the handlebar to the left and to the right a
few times. If you feel any binding or roughness in the steering, you may have a tight
headset or the headset may need to have grease added to the ball bearings. Please
ask your dealer to check it.
Hold one pedal and rock it back and forth across the centerline of the bike then do the
same with the other pedal. If anything feels loose, please ask your dealer to check it.
Take a look at the brake shoes. If they’re starting to look worn or are not hitting the
wheel squarely, have the dealer adjust or replace them.
•
Check the control cables and cable housings for any rust, kinks, or fraying. If you notice
any of these problems or if your brakes and/or shifter are not functioning smoothly, ask
your dealer to check and replace the cables if necessary.
•
Squeeze spokes in adjoining pairs on either side of each wheel between your thumb
and index finger. They should all have the same “tension”. If any feel loose, have your
dealer check wheel for spoke tension and trueness.
•
Check the frame (particularly in the area around all weld joints), the handlebar, the stem
and the seat post for any deep scratches, cracks or discoloration These are signs of
stress-related fatigue and indicate that a part is at the end of its useful life and needs to
be replaced.
•
Check to make sure that all parts and accessories are still secure and tightened.
•
(E) As required: If either brake lever fails the mechanical safety checks, restore brake lever
travel by turning the brake cable adjusting barrel anti-clockwise then lock the adjustment in by
turning the barrel’s lock nut clockwise as far as it will go. If the lever still fails the mechanical
safety checks, have your dealer check the brakes.
(F) If the bike won’t shift smoothly and quietly from gear to gear, the gear mechanism may be
out of adjustment. The cause may be as simple as a stretched control cable, in which case you
can compensate by rotating the shift cable adjusting barrel.
Turn the gear shifter on the handlebar to select the middle gear.
The colour indicator must be set between the 2 lines on the winder (rear wheel axle, RH side)
15
(G) For every 50 hours of riding. Take your bike to your dealer for a check-up.
5.2
Battery disposal
Depending on the way your battery is treated and on the number of charges you have made, your
battery will begin to deteriorate. At this point, the battery will lose its capacity rapidly and cannot be
recovered by refresh charging.
Think to the environment when you dispose of your battery. As regulations for battery disposal may
differ from place to place. Check with your local town council or eZee dealer.
6
Precautions and procedures
6.1
Emergency equipment and knowledge
Its always a good idea to go for a bike ride with the following emergency equipment and
knowledge.
• Allen wrenches 4mm, 5mm and 6mm, used to tighten various clamping bolts that may
have loosened.
• Patch kit and a spare inner tube.
• Tyre levers
• Tyre pump or cartridge inflator with correct head to fit your tyre valves.
• Identification (address, phone number, insurance company, emergency contact, blood
type, medical allergies and conditions)
6.2
If you get a flat tyre
(a)
(b)
(c)
(d)
Familiarize yourself with wheel removal (see section).
Let all air out of the innter tube (see section).
Remove one side of the tyre from the rim by inserting a tyre lever in between the rim
and the base of the tyre’s side wall (“bead”).
Pry the bead away from the rim by pushing down on the tyre lever.
Take another tyre lever and pry the bead off the rim approximately 10-15 cm
(four to six inches) away from where you started. At this point you should be able to
begin levering the bead off the rim so that the entire circumference of one side of the
tyre bead comes off the rim.
Remove the inner tube. Remove the valve from the rim’s valve hole, then remove the
inner tube.
Carefully check the outside and inside of the tyre for the cause of the puncture (thorn,
glass shard, nail etc..) and remove the object if its still there.
If the tyre is cut, line the inside of the tyre around that area with something that will
resist the inner tube forcing its way out of the cut when inflated: a spare patch, a piece
of inner tube, a business card etc..
Either patch the tube, or use a new inner tube.
Before replacing the new/repaired inner tube, put just enough air to give it some shape.
Then starting at the valve, slip the exposed tyre bead into the rim using downward
pressure. Make sure the bead seats down below the valve’s rubber base.
16
Next push the tyre’s bead down into the rim and your thumbs along either side of the
circumference of the rim. Make sure the bead is not pinching the inner tube. If you have
trouble getting the last few cm./inches of the bead over the edge of the rim with thumb
pressure, use a tyre lever.
Maintenance Tip:
Use a tyre lever! If you use a screwdriver or any other tool, you are likely to pinch and puncture
the inner tube.
Check to make sure that the tyre is evenly seated around both sides of the rim, and that the
inner tube is inside the tyre beads. Push the valve stem into the tyre to make sure that its base
is seated within the tyre’s beads.
Inflate the tube gently to the recommended pressure (see section).
WARNING: Riding your eZee LiV with a flat or under-inflated tyre can seriously damage the
rim, tyre, tube and bicycle, and can cause you to lose control and fall.
Put the valve cap back in place.
Place the wheel back into the bike (see section).
6.3
Spoke breakage
A wheel with a loose or broken spoke is much weaker than a fully tensioned wheel. If you
break a spoke while on a ride, you will have to ride much more slowly and carefully as the
weakened wheel could experience additional broken spokes and become useless.
WARNING: A broken spoke seriously weakens the wheel and may cause it to wobble, striking
the brakes of the frame. Riding with a broken spoke(s) can cause you to lose control and fall.
Twist the broken spoke around the spoke next to it to keep it from flopping around and getting
caught between the wheel and the frame. Spin the wheel to see if the rim clears the
brake/shoes/frame. If the wheel will not turn because it is rubbing against the brake shoe, try
turning the brake cable adjusting barrel(s) clockwise to slacken the cable and open up the
brakes.
Walk the bike, or if you must ride it with care. It is strongly recommended that you do not ride
with only one functioning brakes, and never with two non-operational brakes.
6.4
Accidents while cycling
Check yourself for injuries, seek medical help if necessary. If you are involved with another
vehicle, get as much information as possible from the involved party and any witnesses.
Check your bike for damage and fix what you can.
When you get home, carefully perform the checks for damaged parts. All bent, scored or
discoloured parts are suspect and should be replaced.
6.5
Additional accessories
17
There is a wide range of accessories available for you bike. However, before you install them
be sure to read any instructions enclosed with the product. Be sure to read and understand,
the instructions that accompany the accessories you purchase for your bike. If you have
doubts as to your ability to install them correctly, ask your dealer for assistance.
7
Self diagnostic system
The controller is programmed with a self diagnostic system to monitor the type of failure below, count
the number of continuous blinks on the red LED located at the left of the controller box. The red LED
stays lighted when everything is functioning normally when the power is turned on.
No. of blinks
LED on
2
3
4
5
6
7
8
9
10
11
12
No light
Fault
Correction
Function is normal
brake lever cut-off in contact
check brake lever spring
brake lever cut-off in contact
check brake lever / wire connection
throttle not returned to position
check throttle if spring is faulty
throttle failure
check throttle connections or replace
low voltage
charge battery
excessively high voltage
measure voltage with multi-tester
hall wires to motor disconnection check motor hall wires for connection
wrong motor connected
contact distributor
temp. too high, thermostat activated
will return to normal when cooled
thermostat failure
replace controller
amps control, controller failure
replace controller
Power wires disconnected, controller
Check power wires or replace controller
failure
This however does not necessarily cover every possible failure.
In the event of water or moisture affecting the control board, haphazard signals may appear.
eZeebikes have triple layer coated electronic boards with a top coat of military grade Silicone
insulating and water repelling compound.
7.1
Things to Avoid
1.
Avoid sitting on the bicycle when the bicycle is parked with the central stand on. This is not
designed to support the weight of a person on the bicycle when parked.
Avoid excessively loading items on the rear carrier, it is designed for a maximum weight of 25
kgs.
2.
18
3.
4.
5.
6.
7.
8.
9.
Avoid riding the bike in heavy rain.
Avoid sudden and hard braking.
Avoid dropping the battery
Avoid short circuiting the battery
Avoid deep discharge of battery.
Avoid carrying or lifting the bicycle by the saddle, this will cause damage to the plastic
structure of the saddle.
Avoid excessively loading the motor on steep hills, climbs or during maximum acceleration as
this will reduce the life span of motor and battery.
8
GUARANTEE REGULATIONS
1.
The guarantee regulations of eZee bikes are exclusively valid for the first owner of the eZee bicycle. In case of a
guarantee claim according to the guarantee regulations, the owner is obligated to bring forth the proof of purchase
and/or the eZee guarantee card.
2.
The guarantee periods mentioned hereafter are always valid as of the date of purchase for the said bicycle.
3.
eZee guarantees the owner of the eZeebike, that the frame and the fork are free of material and/or construction
defects for a period of 2 years.
4.
eZee guarantees the owner of the eZeebike that the lacquer on the frame and the fork are resistant to corrosion
and will not peel-off for a period of 2 years.
5.
eZee guarantees the owner of the eZeebike that the parts are free of material and/or construction defects for a
period of 2 years.
6.
Parts from the original manufacturers applied to the eZeebike will be guaranteed according to the terms and
conditions of the manufacturer of the mentioned parts. eZee will keep the owner informed in regards to
applicability, the terms and the conditions
upon request.
7.
The only bicycles that will be taken into consideration for guarantee are those approved by an eZee dealer and
that were assembled and made ready for riding.
8.
All guarantee claims need to be exclusively filed by an approved eZee dealer.
9.
If the eZee bicycle displays any material and/or construction defects that are mentioned in the guarantee within 60
days from the purchase date, the owner has a right to a repair free of charge and/or a replacement of the part.
After 60 days, the owner has a right to a repair and/or a replacement of which incurred charges from service and
labour are on the owner’s account.
10.
eZee will continuously repair and/or replace parts with at least an equivalent part. eZee exclusively reviews the
make and model of the specific part.
11.
Excluded from the guarantee are defects resulting from consumables, as well as defects resulting from accidents,
irregular use, respectively a usage for which the bicycle was not intended for.
19
12.
This guarantee does not apply if the bicycle is not correctly assembled, repaired by someone other than an
approved eZee dealer, and/or if the bicycle has not been supplied with the original parts.
13.
Battery warranty claims must be tested with eZee authorized equipment. 1 year 70% DOD for Sanyo Li+
batteries. 6 months 80% DOD for Phylion Li+ and NiMH batteries
13.
eZee exclusively makes the decision whether or not this guarantee applies.
20