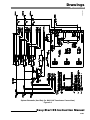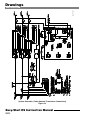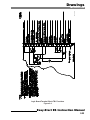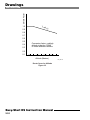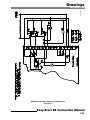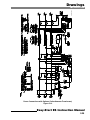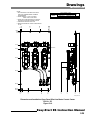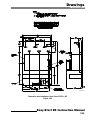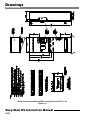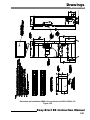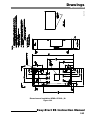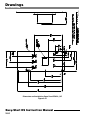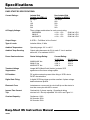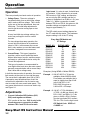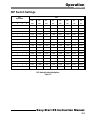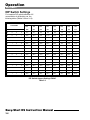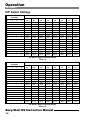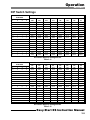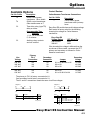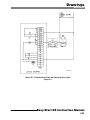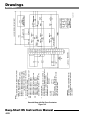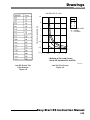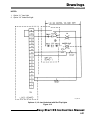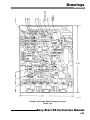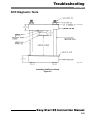
1
Instruction Manual
For Model Easy-Start ES Solid State Reduced Voltage Motor Starter
Easy-Start ES
Solid State Reduced Voltage Motor Starter
Easy-Start ES
Solid State Reduced Voltage
Cutler-Hammer
Motor Starter
This product discussed in this literature is subject to terms and conditions outlined
in appropriate Cutler-Hammer selling policies. The sole source governing the
rights and remedies of any purchaser of this equipment is the relevant CutlerHammer selling policy.
NO WARRANTIES, EXPRESS OR IMPLIED, INCLUDING WARRANTIES OF
FITNESS FOR A PARTICULAR PURPOSE OR MERCHANTABILITY, OR WARRANTIES ARISING FROM COURSE OF DEALING OR USAGE OF TRADE, ARE
MADE REGARDING THE INFORMATION, RECOMMENDATIONS AND
DESCRIPTIONS CONTAINED HEREIN. In no event will Cutler-Hammer be
responsible to the purchaser or used in contract, in tort (including negligence),
strict liability or otherwise for any special, indirect, incidental or consequential damage or loss whatsoever, including but not limited to damage or loss of use of equipment, plant or power system, cost of capital, loss of power, additional expenses in
the use of existing power facilities, or claims against the purchaser or user by its
customers resulting from the use of the information, recommendations and
descriptions contained herein.
Table of Contents
Page
Safety . . . . . . . . . . . . . . . . . . . . . . . . . . . . . . . . . . . . . . . . . . . . . . . S-1
The Meaning of Safety Statements . . . . . . . . . . . . . . . . S-2
Easy-Start ES Safety Statements. . . . . . . . . . . . . . . . . . S-2
Introduction . . . . . . . . . . . . . . . . . . . . . . . . . . . . . . . . . . . . . . . . . 1-1
Installation. . . . . . . . . . . . . . . . . . . . . . . . . . . . . . . . . . . . . . . . . . . 2-1
Pre-Installation . . . . . . . . . . . . . . . . . . . . . . . . . . . . . . . . . . . . 2-3
Drawings. . . . . . . . . . . . . . . . . . . . . . . . . . . . . . . . . . . . . . . . . . 2-19
Specifications . . . . . . . . . . . . . . . . . . . . . . . . . . . . . . . . . . . . . 2-45
Operation . . . . . . . . . . . . . . . . . . . . . . . . . . . . . . . . . . . . . . . . . . . . 3-1
Operation . . . . . . . . . . . . . . . . . . . . . . . . . . . . . . . . . . . . . . . . . 3-2
Adjustments. . . . . . . . . . . . . . . . . . . . . . . . . . . . . . . . . . . . . . . 3-2
DIP Switch Settings . . . . . . . . . . . . . . . . . . . . . . . . . . . . . . . 3-3
Options . . . . . . . . . . . . . . . . . . . . . . . . . . . . . . . . . . . . . . . . . . . . . . 4-1
Available Options. . . . . . . . . . . . . . . . . . . . . . . . . . . . . . . . . . 4-2
Application Notes. . . . . . . . . . . . . . . . . . . . . . . . . . . . . . . . . . 4-13
Drawings. . . . . . . . . . . . . . . . . . . . . . . . . . . . . . . . . . . . . . . . . . 4-21
Troubleshooting . . . . . . . . . . . . . . . . . . . . . . . . . . . . . . . . . . . . . 5-1
Troubleshooting Guide . . . . . . . . . . . . . . . . . . . . . . . . . . . . 5-2
SCR Diagnostics Tests . . . . . . . . . . . . . . . . . . . . . . . . . . . . 5-5
Renewal Parts List . . . . . . . . . . . . . . . . . . . . . . . . . . . . . . . . 5-13
Easy-Start ES Instruction Manual
i
List of Illustrations
Figure
2-1
2-2
2-3
2-4
2-5
2-6
2-7
2-8
2-9
2-10
2-11
2-12
2-13
2-14
2-15
2-16
2-17
Description
Page
Block Diagram . . . . . . . . . . . . . . . . . . . . . . . . . . . . . . . . . . . . . . . . . . . . . . . 2-20
System Schematic
(Hevi-Duty Co. - Multi Volt Transformer Connections) . . . . . . . . . . . . . 2-21
System Schematic (Cutler-Hammer Transformer Connections) . . . . . . . . . 2-22
Logic Board Terminal Block TB1 Functions . . . . . . . . . . . . . . . . . . . . . . . . 2-23
Derate Curve For Altitude . . . . . . . . . . . . . . . . . . . . . . . . . . . . . . . . . . . . . . 2-24
Momentary Contact Start/Stop Pushbuttons . . . . . . . . . . . . . . . . . . . . . . . . 2-25
Hand-Off-Auto Selector Switch . . . . . . . . . . . . . . . . . . . . . . . . . . . . . . . . . . 2-26
Start-Stop Pushbuttons with Hand-Off-Auto Selector Switch . . . . . . . . . . . 2-27
Power Connections with Options
(Hevi-Duty Co. Multi Volt Transformer) . . . . . . . . . . . . . . . . . . . . . . . . . 2-28
Power Connections with Options (Cutler-Hammer Transformer) . . . . . . . . 2-29
Dimension and Installation Open Panel ES045-_EP, ES070-_EP,
ES120-_EP . . . . . . . . . . . . . . . . . . . . . . . . . . . . . . . . . . . . . . . . . . . . . . 2-30
Dimension and Installation Open Panel Slim Line Motor Control Center
ES070-_EC . . . . . . . . . . . . . . . . . . . . . . . . . . . . . . . . . . . . . . . . . . . . . . 2-31
Dimension and Installation NEMA-12 Regular Enclosure
ES045-_ER, ES070-_ER . . . . . . . . . . . . . . . . . . . . . . . . . . . . . . . . . . . 2-32
Dimension and Installation NEMA-12 Large Enclosure
ES045-_EL, ES070-_EL, ES120-_EL . . . . . . . . . . . . . . . . . . . . . . . . . . 2-33
Dimension and Installation Open Panel ES180-_NP, ES260-_NP,
ES560-_NP, ES250-_EP, ES360-_EP, ES500-_EP . . . . . . . . . . . . . . . 2-34
Dimension and Installation Open Panel Slim Line
Motor Control Center ES120-_EC . . . . . . . . . . . . . . . . . . . . . . . . . . . . . 2-35
Dimension and Installation Open Panel Slim Line
Motor Control Center ES180-_NC, ES250-_NC . . . . . . . . . . . . . . . . . . 2-36
Easy-Start ES Instruction Manual
iii
List of Illustrations
Figure
2-18
2-19
2-20
2-21
2-22
2-23
2-24
2-25
3-1
4-1
4-2
4-3
4-4
4-5
4-6
4-7
4-8
4-9
4-10
4-11
4-12
4-13
4-14
4-15
4-16
4-17
4-18
4-19
4-20
5-1
5-2
5-3
5-4
Description
Dimension and Installation NEMA-1 Regular Enclosure
ES180-_NR, ES260-_NR, ES560-_NR . . . . . . . . . . . . . . . . . . . . . . . . . . . 2-37
Dimension and Installation NEMA-1 Large Enclosure, ES180-_NL,
ES260-_NL, ES560-_NL . . . . . . . . . . . . . . . . . . . . . . . . . . . . . . . . . . . . 2-38
Dimension and Installation Open Panel ES750-_NP . . . . . . . . . . . . . . . . . 2-39
Dimension and Installation NEMA-1 Large Enclosure ES750-_NL . . . . . . 2-40
Dimension and Installation NEMA-12 Large Enclosure ES250,
ES360-_EL . . . . . . . . . . . . . . . . . . . . . . . . . . . . . . . . . . . . . . . . . . . . . . 2-41
Dimension and Installation NEMA-12 Large Enclosure ES500-_EL . . . . . . 2-42
Dimension and Installation NEMA1 ES950-_NL . . . . . . . . . . . . . . . . . . . . . 2-43
Dimension and Installation Open Panel ES950-_NP . . . . . . . . . . . . . . . . . 2-44
Over-Load Time-Current Characteristics . . . . . . . . . . . . . . . . . . . . . . . . . . 3-14
NEMA-1 Current Vs. Time Ratings . . . . . . . . . . . . . . . . . . . . . . . . . . . . . . . 4-22
NEMA-12 Current Vs. Time Ratings . . . . . . . . . . . . . . . . . . . . . . . . . . . . . . 4-23
Extended Start Time with By-Pass Contactor . . . . . . . . . . . . . . . . . . . . . . . 4-24
Option E1- Extended Start Time with Ramp-Up Door Light . . . . . . . . . . . . 4-25
Smooth Stop with By-Pass Contactor . . . . . . . . . . . . . . . . . . . . . . . . . . . . . 4-26
Smooth Stop ÒS1Ó Option . . . . . . . . . . . . . . . . . . . . . . . . . . . . . . . . . . . . . . 4-27
Smooth Stop with Remote Maintained 2-Wire Contact . . . . . . . . . . . . . . . . 4-28
Jam DIP Switch Trip Point Settings . . . . . . . . . . . . . . . . . . . . . . . . . . . . . . 4-29
Jam Trip Time Curves . . . . . . . . . . . . . . . . . . . . . . . . . . . . . . . . . . . . . . . . . 4-29
Underload DIP Switch Trip Point Settings . . . . . . . . . . . . . . . . . . . . . . . . . . 4-30
Underload Trip Time Curves . . . . . . . . . . . . . . . . . . . . . . . . . . . . . . . . . . . . 4-30
Options J1, J2 Jam-Underload with Red Trip Lights . . . . . . . . . . . . . . . . . . 4-31
Daughter Board Connections . . . . . . . . . . . . . . . . . . . . . . . . . . . . . . . . . . . 4-32
Printed Circuit Logic Board Component Layout . . . . . . . . . . . . . . . . . . . . . 4-33
Option E - Printed Circuit Board Component Layout Extended Start Time . . . . . . . . . . . . . . . . . . . . . . . . . . . . . . . . . . . . . . . 4-34
Option S - Printed Circuit Board Component Layout - Smooth-Stop . . . . . 4-35
Option J - Printed Circuit Board Component Layout - Jam-Underload . . . . 4-36
Option U - Printed Cirucit Board Component Layout - Shorted
SCR Detector . . . . . . . . . . . . . . . . . . . . . . . . . . . . . . . . . . . . . . . . . . . . 4-37
Option D - Printed Circuit Board Component Layout - Daughter Board . . . 4-38
Dimension For Logic Board, Daughter Board, Cover Board Assembly . . . 4-39
Typical SCR Clamp Used in ES180, ES260 . . . . . . . . . . . . . . . . . . . . . . . . . 5-7
Typical SCR Clamp Used In ES180, ES250, ES260: 1 Leaf
ES360, ES500, ES560: 2 Leaves . . . . . . . . . . . . . . . . . . . . . . . . . . . . . 5-7
Assembly Sink-Device Clamp . . . . . . . . . . . . . . . . . . . . . . . . . . . . . . . . . . . . 5-9
Stack Loading . . . . . . . . . . . . . . . . . . . . . . . . . . . . . . . . . . . . . . . . . . . . . . 5-10
Easy-Start ES Instruction Manual
iv
Page
List of Tables
Table
Description
Page
2-1
2-2
2-3
2-4
2-5
2-6
2-7
2-8
2-9
2-10
2-11
3-1
3-2
3-3
3-4
3-5
3-6
3-7
3-8
3-9
3-10
3-11
3-12
3-13
4-1
4-2
4-3
5-1
Starts-Per-Hour ES045 . . . . . . . . . . . . . . . . . . . . . . . . . . . . . . . . . . . . . . . . 2-10
Starts-Per-Hour ES070 . . . . . . . . . . . . . . . . . . . . . . . . . . . . . . . . . . . . . . . . 2-10
Starts-Per-Hour ES120 . . . . . . . . . . . . . . . . . . . . . . . . . . . . . . . . . . . . . . . . 2-11
Starts-Per-Hour ES180 . . . . . . . . . . . . . . . . . . . . . . . . . . . . . . . . . . . . . . . . 2-11
Starts-Per-Hour ES250 . . . . . . . . . . . . . . . . . . . . . . . . . . . . . . . . . . . . . . . . 2-12
Starts-Per-Hour ES260 . . . . . . . . . . . . . . . . . . . . . . . . . . . . . . . . . . . . . . . . 2-12
Starts-Per-Hour ES360 . . . . . . . . . . . . . . . . . . . . . . . . . . . . . . . . . . . . . . . . 2-13
Starts-Per-Hour ES500 . . . . . . . . . . . . . . . . . . . . . . . . . . . . . . . . . . . . . . . . 2-13
Starts-Per-Hour ES560 . . . . . . . . . . . . . . . . . . . . . . . . . . . . . . . . . . . . . . . . 2-14
Starts-Per-Hour ES750 . . . . . . . . . . . . . . . . . . . . . . . . . . . . . . . . . . . . . . . . 2-14
Starts-Per-Hour ES950 . . . . . . . . . . . . . . . . . . . . . . . . . . . . . . . . . . . . . . . . 2-15
Dip Switch Setting Multipliers . . . . . . . . . . . . . . . . . . . . . . . . . . . . . . . . . . . . 3-3
Dip Switch Ampere Settings ES045 . . . . . . . . . . . . . . . . . . . . . . . . . . . . . . . 3-4
Dip Switch Ampere Settings ES070 . . . . . . . . . . . . . . . . . . . . . . . . . . . . . . . 3-5
Dip Switch Ampere Settings ES120 . . . . . . . . . . . . . . . . . . . . . . . . . . . . . . . 3-5
Dip Switch Ampere Settings ES180 . . . . . . . . . . . . . . . . . . . . . . . . . . . . . . . 3-6
Dip Switch Ampere Settings ES250 . . . . . . . . . . . . . . . . . . . . . . . . . . . . . . . 3-6
Dip Switch Ampere Settings ES260 . . . . . . . . . . . . . . . . . . . . . . . . . . . . . . . 3-7
Dip Switch Ampere Settings ES360 . . . . . . . . . . . . . . . . . . . . . . . . . . . . . . . 3-7
Dip Switch Ampere Settings ES500 . . . . . . . . . . . . . . . . . . . . . . . . . . . . . . . 3-8
Dip Switch Ampere Settings ES560 . . . . . . . . . . . . . . . . . . . . . . . . . . . . . . . 3-8
Dip Switch Ampere Settings ES750 . . . . . . . . . . . . . . . . . . . . . . . . . . . . . . . 3-9
Dip Switch Ampere Settings ES950 . . . . . . . . . . . . . . . . . . . . . . . . . . . . . . . 3-9
Voltage Plugs and Jumper Positions . . . . . . . . . . . . . . . . . . . . . . . . . . . . . 3-10
Thermal-Magnetic Breaker . . . . . . . . . . . . . . . . . . . . . . . . . . . . . . . . . . . . . . 4-5
Magnetic Breaker . . . . . . . . . . . . . . . . . . . . . . . . . . . . . . . . . . . . . . . . . . . . . 4-6
Circuit Breaker Interrupting Rating and Terminal Sizes . . . . . . . . . . . . . . . . 4-7
J4 Connector Test Voltages . . . . . . . . . . . . . . . . . . . . . . . . . . . . . . . . . . . . 5-12
Easy-Start ES Instruction Manual
v
Safety
Cutler-Hammer has made every effort to provide you with the
safest motor starters on the market but wishes to point out how to
safely operate and troubleshoot your starter.
After you review this section you will:
¥ Understand the meaning of the Safety Alert Symbol, Danger,
Warning, Caution, and Notice safety statements.
¥ Know what safety statements you should be aware of when
you operate and troubleshoot Cutler-Hammer motor starters.
Easy-Start ES Instruction Manual
S-1
Safety
The Meaning of Safety Statements
Easy-Start ES Safety Statements
You will find various types of safety information
on the following pages and on the labels
attached to the equipment. This section explains
their meaning.
The following safety statements relate to the
installation, operation and troubleshooting of
Cutler-Hammer Motor Starters.
Notice - Make sure you read and understand
The Safety Alert Symbol means
ATTENTION! BECOME ALERT!
YOUR SAFETY IS INVOLVED!
the installation procedures in this manual
before you attempt to operate or troubleshoot
the equipment.
Danger High Voltage
Danger
Danger means that failure to follow this safety
statement will result in serious personal injury
or death.
Non-isolated heat sink frames are electrically
hot when line voltage is connected, which may
result in death or personal injury if touched. Do
not touch heat sink frames unless line side
power is disconnected and locked out.
Warning
Warning
Warning means that failure to follow this
safety statement could result in serious
personal injury or death.
Caution
This instruction manual should be used for
proper installation, operation and maintenance
of the equipment. Improperly installing and
maintaining these products can result in death
or serious personal injury. Before attempting
installation or maintenance, read and
understand all instructional materials related to
the product. If further information is required,
you should consult Cutler-Hammer Corporation.
Caution means that failure to follow this
safety statement may result in minor or
Notice - Select proper voltage plug and install
moderate personal injury or property damage.
into socket J5 on the logic board.
Notice - means that failure to follow these
instructions could cause damage to the
equipment or cause it to operate improperly.
Easy-Start ES Instruction Manual
S-2
Safety
Caution
Danger
Isolated heat sink frames must be grounded with
the grounding lugs provided.
Do not connect any additional control circuits,
such as lamps and relays, across K2 coil (TB1-4
and TB1-12 on the logic board).
All electrical codes must be followed which may
require additional conduit and enclosure
grounding.
Caution
Danger High Voltage
There can be line voltage potential at the motor
load terminals even with the starter in the offstate. This is due to the RC snubber network
across the SCRÕs and leakage across SCRÕs.
The fan control power transformer is pre-wired
at the factory (refer to Section 2). Be sure to
check compatibility to line voltage before
applying line power to the Easy-Start.
Always disconnect input power before servicing
starter or motor.
Notice - Power factor capacitors: Do not
connect power factor correcting capacitors to the
load side of the starter. They will cause the
starter to fail. If capacitors are used they must
be connected to the line side of the starter, at
least 10 feet upstream of the starter.
Easy-Start ES Instruction Manual
S-3
SECTION 1
Introduction
About This Manual
Congratulations! You have purchased one of the most
sophisticated Solid State Reduced Voltage Starters in the
industry. Models are available from 45 to 950 Amp applications.
This manual provides a check list, drawings, specifications and
pre-installation information, and the various available options to
help you select the right equipment and properly install your EasyStart ES Reduced Voltage Starter.
To assure successful installation, thoroughly read and understand
the material presented in each section before you attempt to
install the drive. If this is your first installation, we suggest that you
read each section in the sequence they are presented since they
assume you know the material presented previously. Once you
are an experienced installer, you can use the manual as a source
of reference.
Easy-Start ES Solid State Reduce Voltage Starters are designed
to provide reduced voltage starting of three phase motors. The
Easy-Start ES has standard features which can be adjusted to
tailor your starterÕs performance to suit your needs.
Easy-Start ES Instruction Manual
1-1
About This Manual
SECTION 1
Note that throughout the manual, titles of sections and specific
parameters are shown in italics. Items in bold italics are important.
If you have any questions or comments, please feel free to contact us.
We at Cutler-Hammer are proud to have you as a customer and can
assure you that you will have many productive years from your new
Easy-Start ES Solid State Reduced Voltage Starter.
Easy-Start ES Instruction Manual
1-2
SECTION 2
Installation
About This Section
This section of the Easy-Start ES Instruction manual provides preinstallation information, drawings and specifications to help you
properly install your Easy-Start ES Solid State Reduced Voltage
Starter.
To ensure successful installation, thoroughly read and understand
the material presented in this section before you attempt to install
the Starter. If this is your first installation, we suggest that you
read these sections in the sequence they are presented. Once
you are an experienced installer, you can use this section as a
source of reference.
Easy-Start ES Instruction Manual
2-1
Pre-Installation
This part of the Installation section of this Instruction Manual
provides guidelines to consider before you install your drive:
¥ Description.
¥ Easy-Start ES Model Designation.
¥ Application Considerations.
¥ Considerations for Field Wiring.
Easy-Start ES Instruction Manual
2-3
Pre-Installation
INSTALLATION
Description
The Easy-Start ES solid state unit is a complete
reduced voltage 3-phase AC motor starter with
motor protection. It is available in basically 9
different sizes, NEMA-12/NEMA-1:
45 Amps...........................NEMA-12
70 Amps ...........................NEMA 12
120 Amps.........................NEMA-12
180 Amps...........................NEMA-1
250/260 Amps ...NEMA-12/NEMA-1
360 Amps .........................NEMA 12
500/560 Amps ...NEMA-12/NEMA-1
750 Amps...........................NEMA-1
950 Amps...........................NEMA-1
Each size
is rated
for a
starting
duty
for 20
seconds.
There are 3 AC line voltage combinations for
each size:
208/230/460V
380/415V
460/500/575V
50/60 Hz
50/60 Hz
50/60 Hz
This solid state starter incorporates 6 SCRÕs in
the power section. It provides a soft-start for 3phase induction motors either with voltage ramp,
or current ramp mode, and with current limit over
ride.
A built in energy saving circuit reduces the motor
voltage and current at light loads, and saves
power.
Block Diagram Description (Figure 2-1)
System Schematic (Figures 2-2 and 2-3)
The line current is sensed by using three current
transformers. These AC signals are converted
to DC through a rectifier. Also, each phase
current is signal conditioned to produce a DC
signal for that phase or power line.
DIP switches are used to calibrate the current
rating and match it to the motor name plate for
these functions:
A. Current Feedback for energy saving load
sensing.
B. Over-Current protection:
1. Inverse-Time Trip
2. Instantaneous Trip
C. Current Limit
By using voltage feedback, the Easy-Start ES
senses the motor load and slip-speed and
adjusts the motor voltage and current to conserve
power whenever the motor is lightly loaded. Line
voltage is also sensed in order to give motor
voltage regulation; this is especially useful at high
line voltages which could cause excess motor
temperature rises.
Easy-Start ES Instruction Manual
2-4
Pre-Installation
INSTALLATION
Description
Sensing the line voltage provides important
information for diagnostics and motor protection.
The features include the following:
Phase Rotation Protection:
Inhibits starting of the motor unless rotation is
A-B-C.
Phase Loss Protection:
Trips starter off line if one or more phases are
lost.
Under-Voltage Protection:
Trips starter off line if line voltage drops
below 75% of nominal rating.
The Easy-Start ES has a built-in adjustable
ramp which can be used in either voltage mode
or current mode. It also has an adjustable initial
step which represents initial voltage or initial
current depending on the position of the
voltage/current ramp DIP switch ÒDS3-1.Ó The
ramp and initial step functions are in the circuit
only in the start mode.
The amplifier also has a stability adjustment
which can be used to handle difficult motor load
applications. It is marked STAB and is factory
set to approximately midpoint.
A digital trigger is used on the SCR gates. It
gives near perfect balance of motor voltage
between phases. Its hard firing and fast rise-time
gate pulses insure positive firing of the SCRÕs. Its
wide range insures motor voltage control from
zero to full line voltage with power factors from
0.1 to 1.0.
The current unbalance circuit senses each line
current and the signals are sent to comparators.
The circuit senses when the line currents are
unbalanced and trips the starter off line whenever
the unbalance is greater than 20% from the
average. This feature is useful in diagnostics and
will be covered more in the troubleshooting
section of this manual.
The lockout is an input to the digital trigger. It is
at a logic ÒhighÓ during normal operation. It is
forced to a logic ÒlowÓ by any one of the
protective or alarm functions. In this low state the
gates of the digital trigger are inhibited or Òlocked
outÓ to prevent firing of the SCRÕs.
The ramp and voltage/current signals are fed into
a main amplifier. This amplifier is biased by an
adjustment marked MIN. This adjustment is used
to set the minimum motor voltage at no load. It is
factory set to about 50% of nominal line voltage.
Easy-Start ES Instruction Manual
2-5
Pre-Installation
INSTALLATION
Model Designation
ES 120 - 4EL
---Options
Easy-Start 120Type Enclosure/Panel:
Ampere Rating:
045
070
120
180
250
260
360
500
560
750
950
Line Volts:
3 380/415V
4 208/230/460V
5 460/500/575V
ER
NR
EL
NL
EP
NP
EC
NC
Regular NEMA-12
Regular NEMA-1
Large NEMA-12
Large NEMA-1
Open Panel Isolated Heat Sink *
Open Panel Non-Isolated Heat Sink
Open Panel Isolated Heat Sink 14.0" Wide
Open Panel Non-Isolated Heat Sink 18.5" Wide
Notice * ES045_EP, ES070_EP, EC, and ES120_EP, EC are isolated heat sinks.
All other open panel models are non-isolated heat sinks.
Easy-Start ES Instruction Manual
2-6
Pre-Installation
INSTALLATION
Application Considerations
Installation
1. Ventilated NEMA 1 enclosures should be
mounted so that enough clearance is
available for air to enter and exit the
enclosure. Specific clearance requirements
are shown on enclosure dimension drawings.
Ambient Temperature
Easy-Start ES is rated for 40¡C (104¡F) ambient
temperature. For above 40¡C derate by 5% for
every 5¡C rise over 40¡C up to 50¡C (122¡F)
max.
EXAMPLE: ES180-4N is rated 180 Amps @
40¡C. For 50¡C the rating would be 180 x 0.9
= 162 Amps
2. NEMA 12 enclosures should be mounted so
that heat sink fins are vertical. For wall
mounted units a minimum clearance of 6" on
top and bottom is required.
Altitude
3. Open panel units should be mounted in a box
so the temperature inside the box does not
exceed 50¡C (122¡F).
Multi-Motor Operation
For sizing the enclosure the heat loss in watts
can be estimated at 3 times the full load
current.
EXAMPLE: For ES180-4N the maximum
current rating is 180 amps. The approximate
watts loss at maximum current rating is
3 x 180 = 540 watts.
For units with non isolated heat sinks, all the watt
loss must be dissipated thru box surface.
For units with isolated heat sinks; the heat sink
fins should be brought out in open air thru a
properly gasketed cut out in the enclosure.
Approximately 50% watt loss is dissipated thru
the heat sinks and the remaining 50% should be
dissipated thru the remainder of the box surface,
not counting the heat sink.
Easy-Start ES is rated for 3300 ft. [1000 meters].
Use Figure 2-5 for derating above 3300 ft.
Easy-Start ES can be used to control multiple
motors if the following conditions are met:
The current rating of Easy-Start ES should be
equal to or greater than the total of individual
motor full load amps and DIP switches must
be set for the cumulative full load amps of the
motors.
Individual motor overcurrent protection is
provided by others.
Energy Saver circuit should be turned OFF.
The motors should not be mechanically
coupled together, i.e. two motors on same
shaft.
NEC and local code requirement for
individual motor protection and branch circuit
protection are met.
Easy-Start ES Instruction Manual
2-7
Pre-Installation
INSTALLATION
Application Considerations
The number of starts and stops depends upon
many factors. The most important ones are:
The percent off-time is therefore 12/60 X 100 =
20%. We next look at the starts per hour Table
2-2 for a 70 amp starter (ES070). We can see
that the model ES070 can do only 40 starts per
hour at 350 amps with a start time of 5 seconds
and an off-time of 20%.
1. Position of current limit potentiometer which
can be anywhere from 200-500% of the
current rating set by the DIP switches.
2. Start time.
3. Run time.
4. Off time before next start.
Therefore, we need to use the next larger size
starter, (ES120). From Table 2-3 we can see that
80 starts per hour are allowed at a starting
current of 360 amps with a start time of 5
seconds and a 20% off-time, by using the model
ES120.
The following tables (Table 2-1 thru Table 2-11)
can be used for guidance in frequent
starting/stopping application. These tables are
based on worst case condition that the controller
will be running at the indicated starting current
during the entire start time.
Notice - The Easy-Start ES may trip due to
Frequent Starting/Stopping
The number of starts-per-hour in the following
tables is based on the current carrying capacity
of the Easy-Start ES. If a high number of multiple
starts is used, the starter may trip due to the
inverse-time overload current protection function.
If a trip should occur, due to multiple starts, it is
advisable to wait a period of 10 minutes before re
starting to avoid damage to the Easy-Start ES.
Notice - The motor manufacturer should be
consulted about the effect of a high number of
multiple starts on motor life.
Zero % off-time in the starts per hour tables,
indicates jog duty.
EXAMPLE: If an application requires 1 start per
minute, 60 starts per hour, for a 460V, 50 HP, 70
Amp motor; the cycle time is 60 seconds
between starts. Assume a start time of 5
seconds, at a starting current of 500% (350
amps) is needed, with an off-time between run
and start of 12 seconds, and a run time of 43
seconds.
overcurrent, if repeated starts at high current and
long starting times, are used.
Starting Torque
The reduced voltage applied to the motor results
in reduced inrush current and soft start.
However, it reduces the starting torque of the
motor. The relationship is as follows:
Torque at Reduced
Current
Torque at Full Current
[
Current at Reduced
Voltage 2
Current at Full Voltage
]
EXAMPLE: A 100 HP 1800 RPM 460V NEMA B
motor draws six times full load amps for starting
and starting torque is 150% of full load torque.
If the same motor is started with Easy-Start ES at
300% current limit.
Starting Torque at 300% Current Limit =
[ ]
300
2
600
x starting torque at 600% current = 1/4 x 150%
full load torque = 37.5% full load torque
Easy-Start ES Instruction Manual
2-8
=
Pre-Installation
INSTALLATION
Application Considerations
NEMA Design C and D Motors, Wound
Rotor Motors
These motors are used due to their high starting
torque characteristics. When high starting
currents and high starting torques are required,
the extended time current option must be
supplied and the unit must be oversized (see
Section 4).
Reversing Starters
If all the limitations are understood and accepted
the Easy-Start ES can be used on line side of an
electro mechanical reversing starter. The
operation should be to start the motor in forward
or reverse after a complete stop. Plug reversing
i.e. going from forward to reverse directly will
damage the starter. It is recommended that
enough time delay be built into the reversing
starter circuit (by others) to prevent restarting
until the motor has come to complete stop.
Wye Delta (Six Lead) Motors
These should be connected in Delta and can
then be started with Easy-Start ES.
Part Winding Motors
Part winding motors are started by applying full
voltage to part of the winding and after a time
delay full voltage is applied to the remaining
winding.
For part winding motors the Easy-Start ES can
be used by connecting the two windings in
parallel.
2-Speed 2-Winding Motor
If all the limitations are understood and accepted
Easy-Start ES may be used on the line side of a
electromechanical 2-speed 2-winding motor but
will provide soft start only if the motor is started in
either speed from complete stop. The ramp (soft
start) can be optimized for one speed only.
Going directly from low speed to high speed or
high speed to low speed would not give smooth
transition and may cause a current surge. It is
recommended that enough time delay be built
into the 2-speed 2-winding starter circuit (by
others) to prevent changing speeds without
coming to full stop.
Another way is to connect Easy-Start ES
between low speed contactor of
electromechanical 2-speed starter and low speed
winding of the motor. This will provide a soft start
on low speed only.
2-Speed Single Winding Motors
The Easy-Start ES is not recommended for use
with 2-speed single winding motors.
Capacitors
Notice - Power factor correction capacitors
should not be connected between load side of
Easy-Start ES and the motor. This will cause
damage to the starter.
When the Easy-Start ES is operating at reduced
voltage on the motor, there may be small
amounts of harmonic current drawn from the AC
power line. There may be a resonant circuit
caused by capacitors across the line. The
capacitors may therefore have a higher
temperature rise than normal. This situation can
be minimized by the following:
-
If a contactor is used to switch the capacitors,
it should have a time delay built in the circuit
so that the contactor closes after the EasyStart ES has ramped up to full voltage.
-
The capacitors should be mounted as far
upstream from the solid state starter as
possible. If capacitors must be used they
must be connected on the line side of the
Easy-Start ES with at least 10 feet of cable
between starter and the capacitors.
Easy-Start ES Instruction Manual
2-9
Pre-Installation
INSTALLATION
Application Considerations
Starting Time
The Easy-Start ES is designed to operate at
500% of its current calibration setting, (set by the
DIP switches) for 20 seconds. If longer starting
times are used, the Easy-Start ES will trip due to
the overcurrent protection feature; (see Figure
3-1).
amps. From Figure 4-1, Model ES180 will supply
900 amps but only for 40 seconds; therefore a
larger unit such as ES260 is required. Using
Figure 4-1, we see that ES260 will handle 900
amps for almost 200 seconds. So ES260 with
extended start time option can be used for this
application.
Circuit Breakers
If longer starting times are required, the extended
start-time option must be purchased. This option
inhibits the inverse-time current trip during the
extended start time.
The Easy-Start ES is capable of 500% current
limit for 20 seconds. The circuit breakers, or
protective devices used upstream, should be
sized so that they can handle the maximum
current for 20 seconds, or longer where extended
start times are required.
Notice - Consult Motor Manufacturer for Effect
Automatic Reset
of Longer Starting Time on Motor Life.
Suppose we have a 150 HP, 180 FLA motor
which is driving a load with 120 second start time
and the current limit is set for 500%, i.e. 900
Model Number ES045
Curr.
Limit
250%
300%
400%
500%
Starts-Per-Hour
Model Number ES070
Starting
Current
AC Amps
Start
Time
Sec.
Percent Off-Time
0%
10%
20%
30%
113
2
5
10
20
180
80
50
20
240
120
70
30
360
160
85
40
480
200
100
50
135
2
5
10
20
150
60
40
16
220
100
50
25
300
130
60
30
360
150
70
35
180
2
5
10
20
100
40
20
10
160
60
30
16
200
80
40
20
240
100
50
24
225
2
5
10
20
80
30
12
1
120
40
16
4
150
50
20
8
180
60
24
12
Starts-Per-Hour ES045
Table 2-1
Automatic reset normally is not used with the
Easy-Start ES due to its 5 cycle ride-through
capability. The control is wired for manual reset
as standard.
Curr.
Limit
250%
300%
400%
500%
Starting
Current
AC Amps
Start
Time
Sec.
0%
10%
20%
30%
175
2
5
10
20
180
80
40
20
240
120
60
30
320
150
70
35
480
180
80
45
210
2
5
10
20
120
40
20
8
200
60
30
16
240
100
40
20
320
120
60
30
280
2
5
10
20
60
30
12
4
120
40
20
8
160
60
30
16
200
80
40
20
350
2
5
10
20
40
12
4
-
80
24
8
4
120
40
16
8
140
60
20
12
Percent Off-Time
Starts-Per-Hour ES070
Table 2-2
Easy-Start ES Instruction Manual
2-10
Starts-Per-Hour
Pre-Installation
INSTALLATION
Application Considerations
Model Number ES120
Curr.
Limit
250%
300%
400%
500%
Starts-Per-Hour
Model Number ES180
Starting
Current
AC Amps
Start
Time
Sec.
Percent Off-Time
0%
10%
20%
30%
300
2
5
10
20
120
70
30
15
180
90
50
20
240
120
60
25
360
150
70
30
360
2
5
10
20
100
40
20
10
120
60
30
16
180
80
40
20
240
100
50
24
750
2
5
10
20
60
30
4
-
80
40
8
2
100
50
16
4
120
60
20
6
600
2
5
10
20
12
8
-
20
12
2
-
40
20
4
-
50
24
6
1
Starts-Per-Hour ES120
Table 2-3
Curr.
Limit
250%
300%
400%
500%
Starts-Per-Hour
Starting
Current
AC Amps
Start
Time
Sec.
Percent Off-Time
0%
10%
20%
30%
450
2
5
10
20
100
40
20
10
160
60
30
15
240
80
45
20
300
100
60
30
540
2
5
10
20
80
30
12
8
120
40
20
10
180
60
30
12
220
80
40
16
720
2
5
10
20
40
20
8
4
60
30
12
8
90
40
16
10
120
50
20
12
900
2
5
10
20
24
12
4
-
40
20
8
2
80
30
12
4
100
40
16
6
Starts-Per-Hour ES180
Table 2-4
Easy-Start ES Instruction Manual
2-11
Pre-Installation
INSTALLATION
Application Considerations
Model Number ES250
Curr.
Limit
250%
300%
400%
500%
Starts-Per-Hour
Model Number ES260
Starting
Current
AC Amps
Start
Time
Sec.
Percent Off-Time
0%
10%
20%
30%
625
2
5
10
20
120
50
25
12
180
70
40
20
240
100
50
24
300
120
60
30
750
2
5
10
20
80
40
20
10
120
60
30
15
160
80
40
20
220
100
50
25
1000
2
5
10
20
60
24
12
4
90
35
16
8
120
50
20
12
140
60
30
15
1250
2
5
10
20
30
16
8
2
50
20
10
4
70
30
15
6
100
35
20
8
Starts-Per-Hour ES250
Table 2-5
Curr.
Limit
250%
300%
400%
500%
Starting
Current
AC Amps
Start
Time
Sec.
0%
10%
20%
30%
650
2
5
10
20
120
40
20
10
180
60
30
15
240
100
50
25
300
120
60
30
540
2
5
10
20
60
30
12
8
120
50
20
12
160
70
30
16
220
90
40
20
720
2
5
10
20
40
20
8
4
60
30
12
6
100
40
16
8
120
50
24
12
900
2
5
10
20
20
8
4
-
40
12
8
2
60
20
12
4
80
30
16
6
Percent Off-Time
Starts-Per-Hour ES260
Table 2-6
Easy-Start ES Instruction Manual
2-12
Starts-Per-Hour
Pre-Installation
INSTALLATION
Application Considerations
Model Number ES360
Curr.
Limit
250%
300%
400%
500%
Starts-Per-Hour
Model Number ES500
Starting
Current
AC Amps
Start
Time
Sec.
Percent Off-Time
0%
10%
20%
30%
900
2
5
10
20
120
60
30
16
200
100
50
25
300
120
60
30
400
160
80
40
1080
2
5
10
20
100
40
20
10
150
60
30
20
200
100
45
25
250
120
60
30
1440
2
5
10
20
60
30
15
8
100
40
20
10
140
50
25
12
180
60
30
16
1800
2
5
10
20
40
20
10
4
60
30
15
8
80
40
20
10
100
50
25
12
Starts-Per-Hour ES360
Table 2-7
Curr.
Limit
250%
300%
400%
500%
Starts-Per-Hour
Starting
Current
AC Amps
Start
Time
Sec.
Percent Off-Time
0%
10%
20%
30%
1250
2
5
10
20
200
80
40
20
240
120
60
30
360
160
80
40
480
200
100
50
1500
2
5
10
20
120
60
30
15
200
80
40
20
240
100
50
25
300
120
60
30
2000
2
5
10
20
80
40
20
10
120
60
30
15
160
80
40
20
200
100
50
25
2500
2
5
10
20
60
25
10
4
80
30
15
8
100
40
20
12
120
50
25
16
Starts-Per-Hour ES500
Table 2-8
Easy-Start ES Instruction Manual
2-13
Pre-Installation
INSTALLATION
Application Considerations
Model Number ES560
Curr.
Limit
250%
300%
400%
500%
Starts-Per-Hour
Model Number ES750
Starting
Current
AC Amps
Start
Time
Sec.
Percent Off-Time
0%
10%
20%
30%
1400
2
5
10
20
100
50
24
12
180
80
40
20
300
100
60
30
400
120
80
40
1680
2
5
10
20
80
40
16
8
140
60
20
16
200
80
30
20
240
100
40
24
2240
2
5
10
20
50
20
8
4
100
30
16
8
120
40
20
12
140
60
24
16
2800
2
5
10
20
30
12
4
-
40
20
8
2
60
30
12
4
100
40
16
6
Starts-Per-Hour ES560
Table 2-9
Curr.
Limit
250%
300%
400%
500%
Starting
Current
AC Amps
Start
Time
Sec.
0%
10%
20%
30%
1875
2
5
10
20
180
80
40
20
240
100
50
25
320
120
70
30
400
150
80
40
2250
2
5
10
20
120
60
30
10
200
80
40
20
240
100
50
25
300
120
60
30
3000
2
5
10
20
80
30
15
8
120
40
25
10
150
50
30
12
180
60
35
16
3750
2
5
10
20
60
25
10
4
80
30
15
8
100
40
20
10
120
50
25
12
Percent Off-Time
Starts-Per-Hour ES750
Table 2-10
Easy-Start ES Instruction Manual
2-14
Starts-Per-Hour
Pre-Installation
INSTALLATION
Application Considerations
Model Number ES950
Curr.
Limit
250%
300%
400%
500%
Starts-Per-Hour
Starting
Current
AC Amps
Start
Time
Sec.
Percent Off-Time
0%
10%
20%
30%
2375
2
5
10
20
150
60
30
15
200
90
45
20
300
120
60
30
360
150
70
35
2850
2
5
10
20
100
40
20
10
150
60
30
15
200
80
40
20
250
100
50
25
3800
2
5
10
20
60
25
10
4
100
40
20
8
120
50
25
12
150
60
30
15
4750
2
5
10
20
30
15
6
1
50
20
8
2
80
30
10
4
100
40
12
8
Starts-Per-Hour ES950
Table 2-11
Easy-Start ES Instruction Manual
2-15
Pre-Installation
INSTALLATION
Considerations For Field
Wiring
The Easy-Start ES requires the following basic
electrical connections: (Refer to Section 2 for
connection diagrams.)
1. Three-phase line power. (Install proper
voltage plug, see Section 3.)
2. Three-phase AC motor connection.
3. Ground connections.
4. 120 VAC control power, and RESET
Pushbutton.
5. Check CPT connections on fan cooled
models.
The three-phase line power can be from a
suitable disconnect switch or a circuit breaker.
By checking your particular options on your
starter, or by visual inspection, you can determine
if your starter has a factory installed circuit
breaker.
The motor must be a three-wire AC induction
motor.
The 120 VAC can be supplied from a separate
source, or from a control transformer such as a
480V/120V connected to the three-phase line.
By checking your particular options on your
starter, or by visual inspection, you can determine
if your starter has a factory installed isolation
transformer. See option section for CPT
connections.
After a trip, the Easy-Start ES must be reset by
momentarily opening the 120 VAC on the logic
board transformer T2. This is done by using a
normally closed RESET pushbutton between TB1
3 and TB1-17 on the logic board. Should
incoming power to the Easy-Start ES be lost for a
period of time (over 10 seconds) the Easy-Start
ES will automatically reset itself and be prepared
for a normal start upon restoration of power.
(This point is important should a customer
choose to start the Easy-Start ES by an external
contact closure rather than by standard threewire pushbutton controls.)
Fan Control Power Transformer
Easy-Start ES models rated 250 amps and above
are supplied with fans. The fans operate at
110/120 VAC supplied by a factory installed multivoltage control power transformer. Two primary
fuses FU-1 and FU-2 are supplied.
Notice - K102 relay is used to control the fans.
The relay is turned on and off by the start/stop
120 VAC control voltage.
A thermostat (close on temperature rise) is
connected across relay K102 contact and keeps
the fans running after the motor is turned off, if
the temperature in the enclosure is above the
thermostat specified limit. (Refer to Figures 2-9
and 2-10.)
Easy-Start ES Instruction Manual
2-16
Pre-Installation
INSTALLATION
Considerations For Field
Wiring
Hevi-Duty Company - Multi Volt
Transformer Connections
Wiring Practices
The fan CPT is factory connected as follows:
Easy-Start ES
Voltage Rating
Voltage Rating
Used For
Transformer Connections
208/230/460
380/415
460/500/575
460V
380V
575V
If the incoming line voltage is different than the
factory connected rated voltage shown in
previous paragraph, reconnect the multi-voltage
transformer primary and secondary as follows for
Hevi-Duty Company:
Primary
Line
FU-2
Secondary Secondary
Voltage Connection Connection Voltage
208 VAC
230 VAC
380 VAC
415 VAC
460 VAC
500 VAC
575 VAC
H2
H2
H3
H3
H4
H5
H5
X4
X3
X4
X3
X3
X4
X3
The primary to FU-1 is factory connected to H1.
One secondary lead is factory connected to X1.
The X1 and H1 connections remain the same for
all line voltages.
110 VAC
115 VAC
120 VAC
120 VAC
115 VAC
110 VAC
115 VAC
Care should be taken to see that all
interconnecting wiring and ground wiring is sized
and installed in conformance with the National
Electric Code (NEC) published by the National
Fire Protection Association or the Canadian
Electrical Code (CEC) as applicable and other
appropriate local codes. Refer to controller and
motor nameplates for electrical data.
Phase Rotation
The Easy-Start ES has built-in phase rotation
protection. If the 3-phase incoming lines that are
connected to the Easy-Start ES line terminals
(marked A, B, C) are not A-B-C rotation, the fault
light Òphase rotÓ will light up on the logic board,
and front door if mounted in a standard
enclosure. This feature also inhibits starting of
the motor. In order to correct the rotation,
reverse any two lines going into the Easy-Start
ES line terminals. Once the phase rotation is
determined, and if the motor is running in the
wrong direction, reverse any two motor leads on
the load side of the Easy-Start ES.
Easy-Start ES Instruction Manual
2-17
Pre-Installation
INSTALLATION
Considerations For Field
Wiring
Cutler-Hammer Transformer Connections
The fan CPT is factory connected as follows:
Easy-Start ES
Voltage Rating
Voltage Rating
Used For
Transformer Connections
208/230/460
380/415
460V
380V
If the incoming line voltage is different than the
factory connected rated voltage shown in
previous paragraph, reconnect the multi-voltage
transformer primary and secondary as follows for
Cutler-Hammer transformers:
Line
Voltage
Primary
FU-2
Connection
Secondary
Connection
208 VAC
380 VAC
415 VAC
H5
H4
H5
X3
X3
X3
H1 to H3 & H2 to H5
H2 to H3
H2 to H3
110 VAC
120 VAC
120 VAC
460 VAC
230 VAC
H4
H4
X2
X2
H2 to H3
H1 to H3 & H2 to H4
115 VAC
115 VAC
Secondary
Voltage
Jumper
The primary to FU1 is factory connected to H1.
One secondary lead is factory connected to X1.
The X1 and H1 connections remain the same for all line voltages.
Diagram 2
H1
X3
H3
Diagram 1
H2 H4
X2
Volts
B
416
380
208
115
95
H5
H1
X1
X2
Connect
Lines
H2 to H3
H2 to H3
H1 to H3 & H2 to H4
H1 to H3 & H2 to H5
H1-H5
H1-H4
H1-H4
H1-H5
X1-X3
X1-X2
Volts
460
230
115
Easy ES-050
Easy-Start ES Instruction Manual
2-18
H3
H2
H4
X1
Connect
H2 to H3
H1 to H3 & H2 to H4
Lines
H1-H4
H1-H4
X1-X2
Easy ES-051
Drawings
This part of the Installation section of this Instruction Manual presents
the following series of drawings:
¥ Overload Characteristics.
¥ Control Connection and Schematic Diagrams.
¥ Outline dimensions and options for mounting each chassis.
Easy-Start ES Instruction Manual
2-19
Drawings
INSTALLATION
Easy ES-001
Block Diagram
Figure 2-1
Easy-Start ES Instruction Manual
2-20
Drawings
Easy ES-002
INSTALLATION
System Schematic (Hevi-Duty Co. Multi Volt Transformer Connections)
Figure 2-2
Easy-Start ES Instruction Manual
2-21
Drawings
(230V-460V)
(XF HR)
(208V-380V-415V XF HR)
Easy ES-003
INSTALLATION
System Schematic (Cutler-Hammer Transformer Connections)
Figure 2-3
Easy-Start ES Instruction Manual
2-22
Drawings
Easy ES-004
INSTALLATION
Logic Board Terminal Block TB1 Functions
Figure 2-4
Easy-Start ES Instruction Manual
2-23
Drawings
Derate Factor
INSTALLATION
1.0
T= 4
0° C
0.9
0.8
0.7
0.6
0.5
Conversion factor—multiply
altitude in feet by 0.3048
to obtain altitude in meters
0.4
0.3
0.2
0.1
500
1500
2500
Altitude (Meters)
3500
Easy ES-005
Derate Curve for Altitude
Figure 2-5
Easy-Start ES Instruction Manual
2-24
Drawings
Easy ES-006
INSTALLATION
Momentary Contact Start/Stop Pushbuttons
Figure 2-6
Easy-Start ES Instruction Manual
2-25
Drawings
Easy ES-007
INSTALLATION
Hand-Off-Auto Selector Switch
Figure 2-7
Easy-Start ES Instruction Manual
2-26
Drawings
Easy ES-008
INSTALLATION
Start-Stop Pushbuttons With Hand-Off-Auto Selector Switch
Figure 2-8
Easy-Start ES Instruction Manual
2-27
Drawings
Easy ES-009
INSTALLATION
Power Connections with Options (Hevi-Duty Co. Multi Volt Transformer)
Figure 2-9
Easy-Start ES Instruction Manual
2-28
Drawings
Easy ES-010
INSTALLATION
Power Connections with Options (Cutler-Hammer Transformer)
Figure 2-10
Easy-Start ES Instruction Manual
2-29
Drawings
Easy ES-011
INSTALLATION
Dimension and Installation Open Panel ES045-_EP, ES070-_EP, ES120-_EP
Figure 2-11
Easy-Start ES Instruction Manual
2-30
Drawings
INSTALLATION
NOTES
1. PANEL MATERIAL: 14 GA (.074) STEEL
FINISH: ASA 61 LIGHT GRAY
2. PANEL SHOULD BE MOUNTED IN A VERTICAL
POSITION TO PROVIDE PROPER COOLING.
3. WHEN DAUGHTER BD. OPTION IS USED DEPTH
IS 7.50".
FIELD WIRING LUGS
WEIGHT
LBS
WIRE GAUGE RANGE
MODEL
LINE / LOAD LUGS GROUND LUGS
ES070-_EC
50
AWG 14-1 0
AWG 14-2
2.00
0.00
3.75
6.25
14.00
B
B
13.69
13.25
B
B
#4 AWG
(6´ FT LG)
B
#4 AWG
(6´ FT LG)
10.13
.219
DIA.
B
B
B
B
.68
B
B
B
B
3.88
.75
.31
0
.50
0
3.42
4.50
9.63
15.00
14.75
14.63
DWG NO 3D17438
Easy ES--012
Dimension and Installation Open Panel Slim Line Motor Control Center ES070-_EC
Figure 2-12
Easy-Start ES Instruction Manual
2-31
Drawings
Easy ES-013
INSTALLATION
Dimension and Installation NEMA-12 Regular Enclosure ES045-_ER, ES070-_ER
Figure 2-13
Easy-Start ES Instruction Manual
2-32
Drawings
Easy ES-014
INSTALLATION
Dimension and Installation NEMA-12 Large Enclosure ES045-_EL, ES070-_EL, ES120-_EL
Figure 2-14
Easy-Start ES Instruction Manual
2-33
Drawings
Easy ES-015
INSTALLATION
Dimension and Installation Open Panel ES180-_NP, ES260-_NP, ES560-_NP,
ES250-_EP, ES360-_EP, ES500-_EP
Figure 2-15
Easy-Start ES Instruction Manual
2-34
Drawings
INSTALLATION
FIELD WIRING LUGS
WEIGHT
LBS
WIRE GAUGE RANGE
MODEL
LINE / LUGS
GROUND LUGS
ES120-_EC AWG #6-250MCM
60
AWG 14-2
13.69
14.00
9.25
0
.31
.68
4.75
NOTES
1. EACH INCOMING LINE CABLE MUST PASS
THRU THE CORRESPONDING CURRENT
TRANSFORMER.
2. PANEL MATERIAL: 14 GA (.074) STEEL
FINISH: ASA 61 LIGHT GRAY
3. PANEL SHOULD BE MOUNTED IN A VERTICAL
POSITION TO PROVIDE PROPER COOLING.
4. USER MUST PROVIDE LOAD LUGS.
5. WHEN DAUGHTER BD. OPTION IS USED DEPTH
IS 7.50".
.000
.25
.38
6.38
.257 DI A
8.63
12.38
18.38
24.38
2.00
0.00
3.75
6.25
13.25
10.13
3.88
.75
0.00
26.50
27.00
Easy ES-016
Dimension and Installation Open Panel Slim Line Motor Control Center
ES120-_EC
Figure 2-16
Easy-Start ES Instruction Manual
2-35
Drawings
INSTALLATION
Easy ES-017
Dimension and Installation Open Panel Slim Line Motor Control Center
ES180-_NC, ES250-_NC
Figure 2-17
Easy-Start ES Instruction Manual
2-36
Drawings
INSTALLATION
Easy ES-018
Dimension and Installation NEMA-1 Regular Enclosure
ES180-_NR, ES260-_NR, ES560-_NR
Figure 2-18
Easy-Start ES Instruction Manual
2-37
Drawings
Easy ES-019
INSTALLATION
Dimension and Installation NEMA-1 Large Enclosure
ES180-_NL, ES260-_NL, ES560-_NL
Figure 2-19
Easy-Start ES Instruction Manual
2-38
Drawings
INSTALLATION
Easy ES-020
Dimension and Installation Open Panel ES750-_NP
Figure 2-20
Easy-Start ES Instruction Manual
2-39
Drawings
Easy ES-021
INSTALLATION
Dimension and Installation NEMA-1 Large Enclosure ES750-_NL
Figure 2-21
Easy-Start ES Instruction Manual
2-40
Drawings
Easy ES-022
INSTALLATION
Dimension and Installation NEMA-12 Large Enclosure ES250, ES360-_EL
Figure 2-22
Easy-Start ES Instruction Manual
2-41
Drawings
Easy ES-023
INSTALLATION
Dimension and Installation NEMA-12 Large Enclosure ES500-_EL
Figure 2-23
Easy-Start ES Instruction Manual
2-42
Drawings
Easy ES-024
INSTALLATION
Dimension and Installation NEMA-1 ES950-_NL
Figure 2-24
Easy-Start ES Instruction Manual
2-43
Drawings
Easy ES-025
INSTALLATION
Dimension and Installation Open Panel ES950-_NP
Figure 2-25
Easy-Start ES Instruction Manual
2-44
Specifications
This part of the Installation section of this Instruction Manual presents
the following specifications:
¥ General Specifications.
Easy-Start ES Instruction Manual
2-45
Specifications
INSTALLATION
EASY-START ES SPECIFICATIONS:
Current Ratings:
Isolated Sink
Suitable for NEMA-12
45 Amps
70
120
250
500
Non-Isolated Sink
Suitable for NEMA-1
180 Amps
260
560
750
950
AC Supply Voltage:
Three voltage combinations for each current rating:
208/230/460
+10% - 15%
50/60 Hz 3-PH
380/415
+10% - 15%
50/60 Hz 3-PH
460/500/575
+10% - 15%
50/60 Hz 3-PH
Output Stage:
6-SCRÕs....Full-Wave In-Line Control
Type of Loads:
Induction Motor; 3-Wire
Ambient Temperature:
Operating range: -20¡ to +40¡C
Ambient Temp Derating:
Output rating decreases by 5% for each 5¡ rise in ambient
above 40¡, to a maximum of 50¡C.
Power Semiconductors:
Starter Voltage Rating:
Current Rating:
208/230/460 Vac
380/415 Vac
460/500/575 Vac
45-260 Amp
1200 V
1200 V
1500 V
360-950 Amp
1500 V
1500 V
1500 V
Transient Voltage
Suppression:
Integral MOV (Metal Oxide Varistor) protects SCR
against most short term voltage spikes.
RC Snubber:
RC snubber networks prevent false firing of SCRÕs due to
DV/DT characteristics.
Digital Gate Firing:
A digital SCR firing trigger provides excellent 3-phase voltage
balance between phases.
Electronic Fuse:
Instantaneous overcurrent trip circuit will trip out the starter in
less than one-cycle with 900% current.
Inverse-Time Current
Trip:
Overload trip, 3-phase sensing. Operational during
start and run. Run-trip adjustable 100-120% see Figure 3-1.
Overload Capacity:
Continuous: 120%
30 Seconds: 350%
20 Seconds: 500%
Easy-Start ES Instruction Manual
2-46
Specifications
INSTALLATION
EASY-START ES SPECIFICATIONS:
Starting
Current Limit:
Continuous 3-phase sensing, adjustable from 200 to 500%.
Energy Saving:
The Easy-Start ES senses the motor load and slip speed and adjusts
the motor voltage to conserve power whenever the motor is lightly
loaded.
Power Wiring:
Straight through configuration.
Undervoltage Protection:
Trips at 75% of nominal line voltage. Time delay 2 seconds
approximately.
Phase Rotation
Protection:
Inhibits starting of motor unless input line voltage is ABC rotation.
LED indicates wrong rotation.
Phase-Loss Protection:
Trips if one or more phases are lost. Time delay 0.5 second
approximately.
Alarm Relay:
N.O. contact non-isolated, 120 VAC 1 Amp is provided for remote
indication of tripped condition.
Auxiliary Contact:
(K2) 1-Form C Isolated, 120 VAC, 5 Amps.
Standard Adjustments:
●
Potentiometer Adjustments:
Clockwise rotation
increases value.
●
Energy-Saving:
●
Current Unbalance:
Trips starter off at 20% line current unbalance from the average
current.
6-Cycle Delayed Stop:
Phases the SCRÕs off over a period of approximately 6 line cycles
during a normal motor stop command.
5-Cycle Ride-Through:
Starter will retain control of motor during a short line power
interruption, when both 3-phase line power and 120 Vac control
power are lost.
Overtemperature
Protection:
Thermostat sensors, on heat sinks of fan cooled starters activate
and shut down starter in case of high ambient or lack of proper
air flow.
Current calibration DIP switches: set at time of installation.
See Section 3.
Current Trip: 100-120%
Current Limit: 200500%
● Voltage/Current Ramp: Selectable with switch DS3-1
Open: Voltage Ramp Mode
Closed: Current Ramp Mode
● Ramp Time: 1-40 seconds
● Initial Step: (Torque)
Voltage Ramp Mode: 20-90%
Current Ramp Mode: 100-200%
●
Energy-Saving On/Off: Selectable with switch DS3-2
Open: Energy Saving On
Closed: Energy Saving Off
Easy-Start ES Instruction Manual
2-47
SECTION 3
Operation
About This Section
This section of the Instruction Manual provides information about
the operation of the Easy-Start ES solid state reduced voltage
motor starter. After you review this section you will understand:
¥ Operation of the Easy-Start ES Motor Starter.
¥ Adjustments.
Caution
Make sure you read, understand and follow all
of the Safety Statements in the Safety section of
this guide and all of the operation instructions in
this manual before you operate your
Adjustable Frequency Drive.
Easy-Start ES Instruction Manual
3-1
Operation
SECTION 3
Operation
There are primarily two basic modes of operation.
1. Voltage Ramp - The motor voltage is
increased linearly from an initial step voltage,
until it reaches full line voltage. This is done
by the use of the two adjustments, time and
initial step. The initial step adjustment is
used to get the motor turning upon a start
command.
At very low initial step voltage settings, the
motor may not begin to turn for several
seconds.
For true voltage time-ramp operation, the
current limit should be set to its maximum
value ie. 500%, in this manner the current
limit is only used as an over-ride feature and
provides a safeguard from overcurrent.
2. Current Ramp - This type of operation
provides a motor current profile that starts
with an initial step of current, and then ramps
up linearly to a level which can be set by the
current limit adjustment.
This type of operation is recommended for
most high inertia loads since the motor speed
generally responds better with a current ramp
than it does with a voltage ramp.
In both the above modes of operation, the current
limit remains in the circuit to over-ride the ramp.
The current limit is adjustable from 200 to 500%.
A precaution must be advised here, that if the
current limit is adjusted too low, the motor may
start to rotate, but never reach rated speed. This
may cause the electronic current over-load to trip;
see Figure 3-1.
Adjustments
1. Current Calibration DIP Switches (DS1,
DS2) work together as follows:
DS1 is active all the time. DS2 is only in the
circuit whenever a connection is made
between TB1-2 and TB1-8 on the main
logic board. If a relay is used, it should have
dry contacts. If this connection is not made,
DS2 reverts to Ò000Ó setting, and therefore
we use only the DS1 settings and the 1st
column of multipliers from 0.282 to 1.00; (see
Table 3-1). When a connection is made
between TB1-2 and TB1-8, this gives us 128
possible settings and extends the current
range to approximately 7:1.
The DIP switch current settings depend on
the CT used with the starter. The maximum
ampere setting is 1/6 of the CT rating.
Easy-Start ES Models and
CT Ratings
MODEL NO.
ES045-E
ES070-E
ES120-E
ES180-N
ES250-E
ES260-N
ES360
ES500
ES560-N
ES750-N
ES950-N
45
70
120
180
250
260
360
500
560
750
950
CT
270:1
420:1
720:1
1080:1
1500:1
1560:1
2160:1
3000:1
3360:1
4500:1
5700:1
Examples: (Using NEMA-12 Model ES250)
Example - 1 200 HP 235 FLA: To find the
multiplier divide 235/250=0.940
From tables use multiplier that is
equal or slightly less than 0.940
(use 0.934 DS1=Ò1101Ó
DS2=Ò000Ó) this gives us
0.934 x 250 = 234 amps.
Example - 2 100 HP 117 FLA: Multiplier =
117/250 = 0.468 (we select 0.460
DS1=Ò1001Ó and DS2=Ò111Ó) this
gives us 0.460 x 250=115 amps.
In order to activate DS2, connect
TB1-2 to TB1-8 on the logic board.
Easy-Start ES Instruction Manual
3-2
RATING AMPS
DIP Switch Code: OPEN = 0
CLOSED = 1
Operation
SECTION 3
DIP Switch Settings
DS1
POSITIONS
DS2
123
123
123
123
123
123
123
123
1
2
3
4
000
001
010
011
100
101
110
111
0
0
0
0
0.282
0.247
0.223
0.201
0.179
0.164
0.153
0.142
0
0
0
1
0.364
0.321
0.291
0.263
0.234
0.215
0.202
0.187
0
0
1
0
0.432
0.382
0.348
0.315
0.282
0.260
0.243
0.227
0
0
1
1
0.501
0.445
0.407
0.369
0.331
0.306
0.287
0.268
0
1
0
0
0.544
0.485
0.444
0.404
0.363
0.336
0.316
0.295
0
1
0
1
0.605
0.541
0.497
0.454
0.408
0.379
0.356
0.333
0
1
1
0
0.656
0.589
0.542
0.496
0.448
0.416
0.392
0.367
0
1
1
1
0.709
0.640
0.589
0.540
0.489
0.455
0.430
0.403
1
0
0
0
0.743
0.672
0.620
0.570
0.516
0.481
0.454
0.426
1
0
0
1
0.790
0.717
0.663
0.611
0.555
0.517
0.489
0.460
1
0
1
0
0.830
0.754
0.700
0.646
0.558
0.549
0.520
0.489
1
0
1
1
0.871
0.794
0.738
0.682
0.623
0.583
0.552
0.520
1
1
0
0
0.897
0.819
0.762
0.706
0.645
0.604
0.572
0.540
1
1
0
1
0.934
0.856
0.798
0.740
0.677
0.635
0.602
0.569
1
1
1
0
0.967
0.888
0.829
0.770
0.706
0.663
0.630
0.595
1
1
1
1
1.000
0.920
0.860
0.801
0.736
0.692
0.658
0.622
DIP Switch Setting Multipliers
Table 3-1
Easy-Start ES Instruction Manual
3-3
Operation
SECTION 3
DIP Switch Settings
For complete DIP switch calibration AC
current tables of all Models, see the
following tables (Tables 3-2 thru 3-12).
DS1
POSITIONS
DS2
123
123
123
123
123
123
123
123
1
2
3
4
000
001
010
011
100
101
110
111
0
0
0
0
12.7
11.1
10.1
9.0
8.0
7.4
6.9
6.4
0
0
0
1
16.4
14.4
13.1
11.8
10.5
9.7
9.1
8.4
0
0
1
0
19.4
17.2
15.6
14.2
12.7
11.7
10.9
10.2
0
0
1
1
22.5
20.0
18.3
16.6
14.9
13.8
12.9
12.1
0
1
0
0
25.5
21.8
20.0
18.2
16.3
15.1
14.2
13.3
0
1
0
1
27.2
24.4
22.4
20.4
18.4
17.0
16.0
15.0
0
1
1
0
29.5
26.5
24.4
22.3
20.2
18.7
17.6
16.5
0
1
1
1
31.9
28.8
26.5
24.3
22.0
20.5
19.3
18.1
1
0
0
0
33.4
30.2
27.9
25.6
23.2
21.7
20.4
19.2
1
0
0
1
35.6
32.2
29.8
27.5
25.0
23.3
22.0
20.7
1
0
1
0
37.4
34.0
31.5
29.1
26.5
24.7
23.4
22.0
1
0
1
1
39.2
35.7
33.2
30.7
28.0
26.2
24.8
23.4
1
1
0
0
40.4
36.9
34.3
31.8
29.0
27.2
25.8
24.3
1
1
0
1
42.0
38.5
35.9
33.3
30.5
28.6
27.1
25.6
1
1
1
0
43.5
39.9
37.3
34.6
31.8
29.9
28.2
26.8
1
1
1
1
45.0
41.4
38.7
36.0
33.1
31.1
29.6
28.0
DIP Switch Ampere Settings ES045
Table 3-2
Easy-Start ES Instruction Manual
3-4
Operation
SECTION 3
DIP Switch Settings
DS1
POSITIONS
DS2
1
2
3
4
123
000
123
001
123
010
123
011
123
100
123
101
123
110
123
111
0
0
0
0
19.7
17.3
15.6
14.1
12.5
11.5
10.7
9.9
0
0
0
1
25.5
22.4
20.4
18.4
16.4
15.1
14.1
13.1
0
0
1
0
30.2
26.8
24.3
22.0
19.7
18.2
17.0
15.9
0
0
1
1
35.1
31.2
28.5
25.8
23.2
21.4
20.1
18.8
0
1
0
0
38.1
34.0
31.1
28.3
25.4
23.5
22.1
20.6
0
1
0
1
42.4
37.9
34.8
31.8
28.6
26.5
24.9
23.3
0
1
1
0
45.9
41.2
37.9
34.7
31.4
29.1
27.4
25.7
0
1
1
1
49.6
44.8
41.2
37.8
34.2
31.9
30.1
28.2
1
0
0
0
52.0
47.0
43.4
39.9
36.1
33.7
31.8
29.9
1
0
0
1
55.3
50.2
46.4
42.7
38.8
36.2
34.2
32.2
1
0
1
0
58.1
52.8
49.0
45.2
41.2
38.5
36.4
34.2
1
0
1
1
61.0
55.6
51.6
47.7
43.6
40.8
38.7
36.4
1
1
0
0
62.8
57.3
53.4
49.4
45.1
42.3
40.1
37.8
1
1
0
1
65.4
59.9
55.8
51.8
47.4
44.5
42.2
39.8
1
1
1
0
67.7
62.1
58.0
53.9
49.4
46.4
44.1
41.6
1
1
1
1
70.0
64.4
60.2
56.1
51.5
48.4
46.1
43.5
DIP Switch Ampere Settings ES070
Table 3-3
DS1
POSITIONS
DS2
1
2
3
4
123
000
123
001
123
010
123
011
123
100
123
101
123
110
123
111
0
0
0
0
33.8
29.6
26.8
24.1
21.4
19.7
18.4
17.1
0
0
0
1
43.7
38.5
34.9
31.5
28.1
25.9
24.2
22.5
0
0
1
0
51.8
45.9
41.7
37.8
33.8
31.2
29.2
27.2
0
0
1
1
60.1
53.4
48.8
44.3
39.7
36.7
34.4
32.2
0
1
0
0
65.3
58.2
53.3
48.4
43.5
40.3
37.9
35.4
0
1
0
1
72.6
65.0
59.6
54.5
49.0
45.4
42.8
40.0
0
1
1
0
78.7
70.7
65.0
59.5
53.8
49.9
47.0
44.0
0
1
1
1
85.1
76.7
70.7
64.8
58.7
54.6
51.6
48.3
1
0
0
0
89.2
80.6
74.4
68.4
62.0
57.8
54.5
51.2
1
0
0
1
94.8
86.0
79.5
73.3
66.5
62.1
58.7
55.2
1
0
1
0
99.6
90.5
84.0
77.5
70.6
65.9
62.3
58.7
1
0
1
1
104.5
95.3
88.5
81.8
74.7
69.9
66.3
62.4
1
1
0
0
107.6
98.3
91.5
84.7
77.4
72.4
68.7
64.8
1
1
0
1
112.1
102.7
95.7
88.8
81.3
76.2
72.3
68.3
1
1
1
0
116.0
106.5
99.4
92.4
84.7
79.6
75.5
71.4
1
1
1
1
120.0
110.4
103.2
96.1
88.3
83.0
79.0
74.6
DIP Switch Ampere Settings ES120
Table 3-4
Easy-Start ES Instruction Manual
3-5
Operation
SECTION 3
DIP Switch Settings
DS1
POSITIONS
DS2
1
2
3
4
123
000
123
001
123
010
123
011
123
100
123
101
123
110
123
111
0
0
0
0
50.8
44.5
40.2
36.2
32.1
29.5
27.6
25.6
0
0
0
1
65.5
57.7
52.4
47.3
42.1
38.8
36.3
33.7
0
0
1
0
77.8
68.8
62.6
56.7
50.7
46.7
43.8
40.8
0
0
1
1
90.2
80.2
73.2
66.5
59.6
55.1
51.7
48.2
0
1
0
0
97.9
87.3
79.9
72.7
65.3
60.4
56.8
53.1
0
1
0
1
108.9
97.5
89.4
81.7
73.5
68.2
64.1
60.0
0
1
1
0
118.1
106.0
97.5
89.3
80.6
74.9
70.5
66.0
0
1
1
1
127.6
115.1
106.1
97.2
88.1
81.9
77.3
72.5
1
0
0
0
133.7
120.9
111.7
102.6
92.9
86.7
81.7
76.8
1
0
0
1
142.2
129.0
119.3
109.9
99.8
93.1
88.0
82.8
1
0
1
0
149.4
135.8
125.9
116.2
105.9
98.9
93.5
88.0
1
0
1
1
156.8
143.0
132.8
122.8
112.1
104.9
99.4
93.6
1
1
0
0
161.5
147.4
137.2
127.1
116.1
108.7
103.0
97.2
1
1
0
1
168.1
154.0
143.6
133.2
121.9
114.3
108.4
102.4
1
1
1
0
174.1
159.8
149.2
138.6
127.1
119.4
113.3
107.0
1
1
1
1
180.0
165.6
154.8
144.2
132.5
124.6
118.4
112.0
DIP Switch Ampere Settings ES180
Table 3-5
DS1
POSITIONS
DS2
1
2
3
4
123
000
123
001
123
010
123
011
123
100
123
101
123
110
123
111
0
0
0
0
70.5
61.8
55.8
50.3
44.6
41.0
38.3
35.5
0
0
0
1
91.0
80.2
72.7
65.7
58.5
53.9
50.4
46.9
0
0
1
0
108.0
95.6
86.9
78.7
70.4
64.9
60.8
56.7
0
0
1
1
125.3
111.3
101.7
92.3
82.8
76.5
71.8
67.0
0
1
0
0
136.0
121.3
111.0
100.9
90.7
83.9
78.9
73.7
0
1
0
1
151.3
135.4
124.2
113.4
102.1
94.7
89.1
83.3
0
1
1
0
164.0
147.3
135.5
124.0
112.0
104.0
97.9
91.7
0
1
1
1
177.3
159.9
147.3
135.1
122.3
113.8
107.4
100.7
1
0
0
0
185.8
167.9
155.1
142.5
129.1
120.4
113.5
106.6
1
0
0
1
197.5
179.1
165.7
152.7
138.6
129.4
122.3
114.9
1
0
1
0
207.5
188.6
174.9
161.4
147.1
137.4
129.9
122.2
1
0
1
1
217.8
198.6
184.4
170.5
155.7
145.7
138.1
130.0
1
1
0
0
224.3
204.7
190.6
176.5
161.2
150.9
143.1
135.0
1
1
0
1
233.5
213.9
199.4
184.9
169.3
158.8
150.6
142.2
1
1
1
0
241.8
221.9
207.2
192.4
176.5
165.8
157.4
148.7
1
1
1
1
250.0
230.0
215.0
200.3
184.0
173.0
164.5
155.5
DIP Switch Ampere Settings ES250
Table 3-6
Easy-Start ES Instruction Manual
3-6
Operation
SECTION 3
DIP Switch Settings
DS1
POSITIONS
DS2
1
2
3
4
123
000
123
001
123
010
123
011
123
100
123
101
123
110
123
111
0
0
0
0
73.3
64.2
58.1
52.3
46.4
42.6
39.8
37.0
0
0
0
1
94.6
83.4
75.6
68.3
60.9
56.0
52.4
48.7
0
0
1
0
112.3
99.4
90.4
81.9
73.2
67.5
63.2
59.0
0
0
1
1
130.3
115.8
105.8
96.0
86.1
79.6
74.6
69.7
0
1
0
0
141.4
126.2
115.4
104.9
94.3
87.3
82.0
76.7
0
1
0
1
157.3
140.8
129.1
118.0
106.2
98.5
92.6
86.7
0
1
1
0
170.6
153.2
140.9
128.9
116.5
108.1
101.8
95.3
0
1
1
1
184.3
166.3
153.2
140.5
127.2
118.3
111.7
104.7
1
0
0
0
193.2
174.6
161.3
148.2
134.3
125.2
118.0
110.9
1
0
0
1
205.4
186.3
172.3
158.8
144.2
134.5
127.1
119.5
1
0
1
0
215.8
196.2
181.9
167.9
153.0
142.9
135.1
127.1
1
0
1
1
226.5
206.5
191.8
177.3
161.9
151.5
143.6
135.2
1
1
0
0
233.2
212.9
198.2
183.5
167.7
157.0
148.8
140.4
1
1
0
1
242.8
222.4
207.4
192.3
176.1
165.1
156.6
147.9
1
1
1
0
251.4
230.8
215.5
200.1
183.5
172.5
163.7
154.6
1
1
1
1
260.0
239.2
223.6
208.3
191.4
179.9
171.1
161.7
DIP Switch Ampere Settings ES260
Table 3-7
DS1
POSITIONS
DS2
1
2
3
4
123
000
123
001
123
010
123
011
123
100
123
101
123
110
123
111
0
0
0
0
101.5
0
0
0
1
131.0
88.9
80.4
72.4
64.3
59.0
55.1
51.2
115.4
104.7
94.6
84.3
77.6
72.6
67.5
0
0
1
0
155.5
0
0
1
1
180.4
137.6
125.2
113.4
101.4
93.5
87.6
81.6
160.3
146.5
132.9
119.2
110.2
103.3
96.5
0
1
0
0
0
1
0
1
195.8
174.7
159.8
145.3
130.6
120.8
113.6
106.1
217.8
194.9
178.8
163.4
147.0
136.3
128.3
120.0
0
1
1
0
1
1
0
236.2
212.1
195.1
178.5
161.3
149.7
141.0
132.0
1
255.2
230.2
212.1
194.5
176.1
163.9
154.7
145.0
1
0
1
0
0
0
267.5
241.8
223.3
205.2
185.9
173.3
163.4
153.5
0
1
284.4
258.0
238.6
219.8
199.6
186.3
176.0
165.5
1
1
0
1
0
298.8
271.6
251.9
232.5
211.8
197.8
187.0
176.0
0
1
1
313.6
286.0
265.6
245.5
224.2
209.8
198.8
187.2
1
1
0
0
322.9
294.8
274.5
254.1
232.2
217.3
206.0
194.4
1
1
0
1
336.2
308.0
287.1
266.3
243.8
228.6
216.9
204.8
1
1
1
0
348.1
319.6
298.3
277.1
254.1
238.8
226.6
214.1
1
1
1
1
360.0
331.2
309.6
288.4
265.0
249.1
236.9
223.9
DIP Switch Ampere Settings ES360
Table 3-8
Easy-Start ES Instruction Manual
3-7
Operation
SECTION 3
DIP Switch Settings
DS1
POSITIONS
DS2
1
2
3
4
123
000
123
001
123
010
123
011
123
100
0
0
0
0
141.0
123.5
111.7
100.5
89.3
0
0
0
1
182.0
160.3
145.4
131.4
117.0
0
0
1
0
216.0
191.2
173.9
157.5
140.8
0
0
1
1
250.5
222.7
203.4
184.6
165.6
0
1
0
0
272.0
242.6
222.0
201.8
0
1
0
1
302.5
270.7
248.4
226.9
0
1
1
0
328.0
294.5
270.9
0
1
1
1
354.5
319.8
294.6
1
0
0
0
371.5
335.8
1
0
0
1
395.0
358.3
1
0
1
0
415.0
1
0
1
1
435.5
1
1
0
0
1
1
0
1
123
101
123
110
123
111
81.9
76.6
71.1
107.7
100.8
93.7
129.8
121.6
113.4
153.1
143.5
134.0
181.4
167.8
157.8
147.4
204.2
189.4
178.2
166.7
248.0
224.0
208.0
195.8
183.4
270.1
244.6
227.6
214.8
201.4
310.2
284.9
258.2
240.7
227.0
213.2
331.4
305.3
277.3
258.7
244.5
229.9
377.2
349.8
322.9
294.2
274.7
259.8
244.4
397.2
368.9
341.0
311.4
291.3
276.1
260.0
448.5
409.5
381.2
353.0
322.5
301.8
286.1
270.0
467.0
427.8
398.8
369.9
338.6
317.6
301.2
284.4
1
1
1
0
483.5
443.9
414.4
384.9
353.0
331.7
314.8
297.4
1
1
1
1
500.0
460.0
430.0
400.5
368.0
346.0
329.0
311.0
DIP Switch Ampere Settings ES500
Table 3-9
DS1
POSITIONS
DS2
1
2
3
4
123
000
123
001
123
010
123
011
123
100
123
101
123
110
123
111
0
0
0
0
157.9
138.3
125.1
112.6
100.0
91.8
85.8
79.6
0
0
0
1
203.8
179.6
162.9
147.2
131.1
120.7
112.9
105.0
0
0
1
0
241.9
214.1
194.7
176.4
157.7
145.4
136.2
127.0
0
0
1
1
280.6
249.4
227.8
206.8
185.5
171.4
160.8
150.1
0
1
0
0
304.6
271.7
248.6
226.0
203.2
188.0
176.7
165.1
0
1
0
1
338.8
303.2
278.2
254.1
228.7
212.1
199.6
186.7
0
1
1
0
367.4
329.9
303.4
277.7
250.9
232.9
219.3
205.4
0
1
1
1
397.0
358.1
329.9
302.5
274.0
254.9
240.6
225.5
1
0
0
0
416.1
376.1
347.4
319.1
289.2
269.6
254.2
238.8
1
0
0
1
442.4
401.3
371.2
342.0
310.6
289.8
273.8
257.5
1
0
1
0
464.8
422.5
391.8
361.6
329.5
307.7
291.0
273.8
1
0
1
1
487.8
444.8
413.1
381.9
348.7
326.3
309.2
291.2
1
1
0
0
502.3
458.6
427.0
395.3
361.2
338.1
320.5
302.4
1
1
0
1
523.0
479.1
446.7
414.2
379.2
355.7
337.4
318.5
1
1
1
0
541.5
497.1
464.1
431.0
395.3
371.5
352.5
333.0
1
1
1
1
560.0
515.2
481.6
448.6
412.2
387.5
368.5
348.3
DIP Switch Ampere Settings ES560
Table 3-10
Easy-Start ES Instruction Manual
3-8
Operation
SECTION 3
DIP Switch Settings
DS1
POSITIONS
DS2
1
2
3
4
123
000
123
001
123
010
123
011
123
100
123
101
123
110
123
111
0
0
0
0
211.5
185.3
167.5
150.8
133.9
122.9
114.8
106.6
0
0
0
1
273.0
240.5
218.1
197.1
175.5
161.6
151.2
140.6
0
0
1
0
324.0
286.7
260.8
236.2
211.2
194.7
182.4
170.1
0
0
1
1
375.8
334.0
305.1
276.9
248.4
229.6
215.3
201.0
0
1
0
0
408.0
363.9
332.9
302.7
272.1
251.7
236.6
221.1
0
1
0
1
453.8
406.1
372.5
340.3
306.3
284.0
267.3
250.0
0
1
1
0
492.0
441.8
406.4
372.0
336.0
311.9
293.7
275.0
0
1
1
1
531.8
479.6
441.9
405.2
366.9
341.4
322.2
302.0
1
0
0
0
557.3
503.8
465.3
427.4
387.3
361.1
340.5
319.9
1
0
0
1
592.5
537.4
497.1
458.0
415.9
388.1
366.8
344.8
1
0
1
0
622.5
565.9
524.8
484.3
441.4
412.1
389.7
366.7
1
0
1
1
653.3
595.8
553.3
511.5
467.1
437.0
414.2
390.0
1
1
0
0
672.8
614.2
571.8
529.5
483.7
452.8
429.2
405.0
1
1
0
1
700.5
641.7
598.2
554.8
507.9
476.3
451.8
426.6
1
1
1
0
725.3
665.8
621.5
577.3
529.4
497.5
472.1
446.0
1
1
1
1
750.0
690.0
645.0
600.8
552.0
519.0
493.5
466.5
DIP Switch Ampere Settings ES750
Table 3-11
DS1
POSITIONS
DS2
1
2
3
4
123
000
123
001
123
010
123
011
123
100
123
101
123
110
123
111
0
0
0
0
267.9
234.7
212.2
191.0
169.6
155.6
145.5
135.0
0
0
0
1
345.8
304.6
276.3
249.7
222.3
204.7
191.6
178.1
0
0
1
0
410.4
363.2
330.4
299.2
267.6
246.7
231.1
215.5
0
0
1
1
476.0
423.1
386.5
350.8
314.6
290.8
272.7
254.6
0
1
0
0
516.8
461.0
421.7
383.5
344.7
318.9
299.7
280.1
0
1
0
1
574.8
514.4
471.9
431.1
388.0
359.8
338.5
316.7
0
1
1
0
623.2
559.6
514.8
471.1
425.6
395.1
372.1
348.4
0
1
1
1
673.6
607.5
559.7
513.2
464.7
432.4
408.2
382.6
1
0
0
0
705.9
638.1
589.4
541.4
490.6
457.4
431.3
405.2
1
0
0
1
750.5
680.7
629.7
580.1
526.9
491.6
464.6
436.8
1
0
1
0
788.5
716.7
664.7
613.5
559.0
522.0
493.6
464.4
1
0
1
1
827.5
754.6
700.9
647.9
591.6
553.6
524.6
494.0
1
1
0
0
852.2
778.0
724.3
670.6
612.7
573.5
543.7
513.0
1
1
0
1
887.3
812.8
757.8
702.7
643.3
603.4
572.3
540.4
1
1
1
0
918.7
843.3
787.3
731.2
670.6
630.2
598.0
565.0
1
1
1
1
950.0
874.0
817.0
761.0
699.2
657.4
625.1
590.9
DIP Switch Ampere Settings ES950
Table 3-12
Easy-Start ES Instruction Manual
3-9
Operation
SECTION 3
The plugs are stamped with voltage ratings
according to Table 3-13; and upon initial
inspection.
DIP Switch Settings
2. DIP Switch 3 (DS3)
DS3-1 Set to OPEN position for voltage
ramp mode.
Set to CLOSED position for current
ramp mode.
DS3-2 Set to OPEN position for energy
saving ON.
Set to CLOSED position for energy
saving OFF.
The DS3 switch is factory
set with:
DS3-1 OPEN
DS3-2 OPEN
3. Voltage Plugs
The Easy-Start ES is shipped with two
voltage plugs in a separate envelope
packaged with the unit. The Easy-Start ES
will not operate until the appropriate voltage
plug is installed.
EASY-START ES
RATING
Notice - A voltage plug selected from Table
3-13, must be installed into the socket (J5) on
the logic board prior to start-up. (See Figure
4-14.)
There is also a jumper on the logic board that
must be in one of two positions. These
positions are marked LO HI. (See Figure
4-14.) The jumper is factory installed in
the “HI” position.
This jumper can remain in the HI position
except when operating at the lowest line
voltage rating of the two models rated:
208/230/460 and 460/500/575 volts. The
jumper is then moved to the LO position to
accommodate the low voltage end of the
voltage combination. Refer to Table 3-13 for
jumper positions.
LINE VOLTAGE
PLUG TYPE
JUMPER
POSITION
380/415 VAC
380V
415V
380
415
HI
HI
208/230/460 VAC
208V
230V
460V
230
230
460
LO
HI
HI
460/500/575 VAC
460V
500V
575V
500
500
575
LO
Voltage Plugs and Jumper Positions
Table 3-13
Easy-Start ES Instruction Manual
3-10
HI
HI
Operation
SECTION 3
DIP Switch Settings
4. Time - The ramp time is adjustable from 1 to
40 seconds. The maximum setting is at the
full clockwise position. In the voltage-ramp
mode, this function ramps the motor voltage
up from an initial step to full line voltage. The
motor may come up to speed before the
voltage ramp is finished; this depends on the
application and the type of load on the motor.
The voltage ramp will continue until full motor
voltage is reached. This is called END OF
RAMP. (Factory setting of ÒTimeÓ is
approximately 20 secs.)
If the energy-saving switch is in the OPEN
position, and if the motor is not fully loaded,
the motor voltage will then be reduced, while
still maintaining the motor rated slip speed.
The starter will now be running in the
ÒEnergy-SavingÓ mode.
If the energy-saving switch is in the CLOSED
position, the motor voltage will remain at full
voltage and will be essentially running across
line.
In the current-ramp mode, this function ramps
the motor current up from an initial step to a
point where the current limit is set, or to the
point where break-away torque occurs. The
motor may come up to speed in a shorter
time period than the ramp ÒTimeÓ setting.
This depends on the type of load on the
motor. Whenever the motor comes up to
rated speed, the current will decrease from a
starting current to a running current. The
current ramp will automatically terminate and
the motor will either run in the energy-saving
mode or, across-line, depending on the
position of the energy-saving switch.
5. Initial Step - This adjustment sets the initial
voltage which is applied to the motor when
the start command is given. The maximum
setting is at the full clockwise position.
This adjustment should be set in conjunction
with the ÒTimeÓ adjustment. With the ÒTimeÓ
adjustment set to mid-range, and the ÒInitial
StepÓ set to minimum (CCW), start the motor
and check its response in your particular
application. If a higher initial voltage is
needed to start the motor turning quicker,
increase the ÒInitial Step.Ó
It may require several adjustments and
several motor starts in order to optimize the
ÒTimeÓ and ÒInitial StepÓ settings. A
combination of these adjustments is what
gives us a ÒSoft-Start.Ó
The “Initial Step” is factory set as follows:
Approximately 50% on initial voltage and
150% on initial current.
6. Current Limit - The current limit is
adjustable from 200 to 500% of the DIP
switch current setting.
The maximum setting is at the full clockwise
position. It can over-ride both initial step and
ramp time in the start mode.
This adjustment can control the available
starting torque.
It is also used to limit the inrush current on
the power lines, or generator, feeding the
starter.
It is also used to limit the locked rotor current,
in case of a stalled motor condition on startup.
The current limit adjustment should always
be set high enough to insure starting of the
motor under the worst case load conditions.
Notice - The Cur Lim is factory set to 450%.
Easy-Start ES Instruction Manual
3-11
Operation
SECTION 3
DIP Switch Settings
7. Current Trip - The current trip is adjustable
from 100 to 120% of the DIP switch current
setting.
It is active all the time; during start and run.
The maximum setting is at the full clockwise
position.
This adjustment is used to accommodate the
service factor rating of the motor. For
example, for a service factor of 115%, the
control should be set to 3/4 clockwise.
The current trip adjustment will affect the
entire overload trip-time curve. (See Figure
3-1.)
Notice - The Cur Trip is factory set to
approximately 100%.
8. The following adjustments are done at the
factory:
A. MIN volts
B. MAX volts
C. STAB
A. Minimum volts is set to 50% of line
voltage. This adjustment should only be
made with DS3-2 OPEN.
Example: The motor volts is set to 240
volts when running from a 480V power
line. This is done at the factory with the
motor running at no load.
It is important to note that the voltage
applied to the motor by the Easy-Start ES
is entirely dependent on the motor load.
For example, take the extreme case when
the motor is running at 100% of rated
load; the motor voltage should not be
reduced since it could cause the motor to
overheat due to excessive current.
The Easy-Start ES automatically adjusts
the motor voltage to the value necessary
to maintain normal operation at the most
efficient energy usage. If the motor
voltage is not as low as it was expected to
be, it is most likely that the motor is not
fully unloaded.
Notice - The factory setting of 50%
should be satisfactory for the majority of
applications.
B. The maximum volts is set at the factory
for 100% motor voltage at 100% motor
load.
Notice - This factory setting does not
normally require readjustment.
The MIN VOLTS adjustment must be
made first, before attempting to adjust the
MAX VOLTS.
Here is a procedure that can be followed
if it becomes necessary to adjust the max
volts:
This adjustment should only be made with
DS3-2 OPEN. Connect a voltmeter to the
line side and another voltmeter to the load
side of the starter. Use an ammeter to
monitor the motor current. Increase the
motor load to 100% of rating by observing
when the motor current reaches its FLA
rating; adjust the MAX VOLTS until the
motor voltage is nearly equal to the line
voltage. There will be approximately a
one or two volt loss in the power
semiconductors.
Notice - Maximum volts adjustment is
to optimize energy savings and will not
protect starter against abnormally high
line voltages.
Easy-Start ES Instruction Manual
3-12
Operation
SECTION 3
DIP Switch Settings
The MIN VOLTS and MAX VOLTS
adjustments enable the Easy-Start ES to
automatically follow the motor load and
adjust the motor voltage to the value
necessary to maintain normal operation at
the most efficient energy usage.
C. Stability Adjust - Every system has its
own unique inertial response. It is the job
of the Easy-Start ES starter control circuit
to regulate over a very broad range of
systems. Failure of a controller to
regulate can result in very large current
surges while the load is constant.
The Easy-Start ES control performs this
job very well for nearly every application.
There are, however, a few stubborn
cases. For these special cases a stability
adjustment STAB has been included to
compensate the control to match the
system response.
PROCEDURE: Connect a voltmeter
between any two phases at the load
terminals. If the voltage remains
constant, or, if it varies proportional to
load changes, the starter is regulating and
no adjustment is required.
If the load is constant but the voltage
changes erratically, adjust STAB until the
voltage is steady.
Caution
Caution should be taken to determine whether
the voltage is changing because of instability or
load changes. If there is a doubt, the system is
most likely operating properly. If it is unstable
there is usually very little doubt, as the changes
will produce very violent surging.
Easy-Start ES Instruction Manual
3-13
Operation
SECTION 3
10000
8000
6000
5000
4000
3000
2000
ENCLOSURE AMBIENT
TEMPERATURE 40° C
1000
800
CURRENT
TRIP POT
600
500
CW
400
TRIP TIME IN SECONDS (COLD START)
300
CCW
200
100
80
60
50
40
ENCLOSURE AMBIENT
TEMPERATURE 25° C
30
20
CURRENT
TRIP POT
10
8
CW
6
5
CCW
4
3
2
1
0.6 0.8 1
2
3
4
5 6
8 10
20
MULIPLES OF CURRENT SET BY DIP SWITCHES
Over-Load Time-Current Characteristics
Figure 3-1
Easy-Start ES Instruction Manual
3-14
Easy ES-026
SECTION 4
Options
About This Section
This section of your Easy-Start ES Instruction Manual identifies
options which are available factory installed for enclosed models
only. After reviewing this section you will understand:
¥ Easy Start ES options that are available.
¥ Application notes for available options.
Easy-Start ES Instruction Manual
4-1
Options
SECTION 4
Available Options
All Easy-Start ES options are available as
factory installed for enclosed models only and
must be ordered with Easy-Start ES. By
checking the nameplate or by visual inspection it
can be determined what options are supplied with
a unit.
Operator Devices:
Following is a list of
available options.
Cat. No. Suffix
Description
A
Start (Green), Stop (Red),
Reset (Gray) pushbuttons.
B
Hand-Off-Auto Selector
Switch (Gray), Reset
(Gray) pushbutton.
A2
Start (Green), Stop (Red),
Reset (Gray) pushbuttons
and Hand-Off-Auto Selector
Switch (Gray). In Hand
position the unit is
controlled by start stop
pushbuttons and in Auto
position it is controlled by a
remote maintained contact
input.
F2
Control Devices:
Cat. No. Suffix
Y
Ammeter 3-Phase with
Switch.
G2
Voltmeter 1-Phase.
G3
Voltmeter 3-Phase with
Switch.
H
Elapsed Time Meter.
L5
Power ON - Red push-totest pilot light.
L6
RUN - Green push-to-test
pilot light.
L4
TRIP - Amber push-to-test
pilot light.
R
RESET - Pushbutton
(Gray)
Auxiliary run relay 2 N.O. 2
N.C. contacts, unwired.
Coil rating 110/120 VAC
Contact Rating 10 Amps AC
Hevi-Duty Company Transformer Connections
T
150VA control power
transformer with 2 primary
fuses.
Easy-Start ES models have multi-voltage ratings.
Each model is factory wired for the following
incoming line voltage for Hevi-Duty Company
transformer:
Easy-Start ES
Voltage Rating
208/230/460
380/415
460/500/575
Line
Voltage
460V
380V
575V
Primary
FU-2
Secondary Secondary
Connection Connection Voltage
208 VAC
230 VAC
380 VAC
415 VAC
460 VAC
500 VAC
575 VAC
H2
H2
H3
H3
H4
H5
H5
X4
X3
X4
X3
X3
X4
X3
110 VAC
115 VAC
120 VAC
120 VAC
115 VAC
110 VAC
115 VAC
The primary to FU-3 is factory connected to H1.
One secondary lead is factory connected to X1.
The X1 and H1 connections remain the same for
all line voltages.
Easy-Start ES Instruction Manual
4-2
CPT Wired For
If the incoming line voltage is different than the
one shown in above table, reconnect the CPT
primary and secondary as follows:
Ammeter 1-Phase.
F3
Description
Options
SECTION 4
Available Options
Control Devices:
Cat. No. Suffix
Description
Cutler-Hammer Transformer Connections
T2
300VA control power
transformer. Other details
Cat. No. Suffix
T4
500VA control transformer.
Other details same as T.
Y2
Time delay relay, (type TR)
delay on make.
T
150VA control power
transformer with 2 primary
fuses.
Easy-Start ES models have multi-voltage ratings.
Each model is factory wired for the following
incoming line voltage for Cutler-Hammer
transformer:
Programmable Time
Settings:
1, 3, 6, 10, 60 seconds
5, 10 minutes
Y3
Description
Auxiliary relay, contacts
and coil unwired.
Easy-Start ES
Voltage Rating
CPT Wired For
208/230/460
380/415
460V
380V
If the incoming line voltage is different than the
one shown in above table, reconnect the CPT
primary and secondary as follows for CutlerHammer transformers:
Line
Voltage
Primary
FU-4
Connection
Secondary
Connection
208 VAC
380 VAC
415 VAC
H5
H4
H5
X3
X3
X3
H1 to H3 and H2 to H5
H2 to H3
H2 to H3
110 VAC
120 VAC
120 VAC
460 VAC
230 VAC
H4
H4
X2
X2
H2 to H3
H1 to H3 & H2 to H4
115 VAC
115 VAC
Secondary
Voltage
Jumper
The primary to FU-3 is factory connected to H1.
One secondary lead is factory connected to X1.
The X1 and H1 connections remain the same for all line voltages.
Diagram 1
H1
X2
Volts
460
230
115
Diagram 2
H3
H2
H4
H1
X1
X3
Connect
H2 to H3
H1 to H3 & H2 to H4
Lines
H1-H4
H1-H4
X1-X2
Easy ES-052
H3
H2 H4
X2
Volts
B
416
380
208
115
95
H5
X1
Connect
Lines
H2 to H3
H2 to H3
H1 to H3 & H2 to H4
H1 to H3 & H2 to H5
H1-H5
H1-H4
H1-H4
H1-H5
X1-X3
X1-X2
Easy ES-053
Easy-Start ES Instruction Manual
4-3
Options
SECTION 4
Circuit Breakers
Available Options
Available Plug-In Option Kits
Description
Catalog
Number
Extended Start Time
KITESE
The circuit breakers offered with Easy-Start ES
are listed in Tables 4-1 and 4-2. The interrupting
rating and terminal sizes are listed in Table 4-3.
Caution
Notice -
May require oversized Easy-Start ES
and may require changing thermal magnetic
molded case circuit breaker (if optionally ordered)
to magnetic trip only.
Extended Start Time With Light
KITESE1
Smooth Stop
KITESS
Smooth Stop With Light
KITESS1
Smooth Stop With Two Lights
(Smooth Stop & Ramp-up)
KITESS2
Jam and/or Underload
KITESJ
Jam and/or Underload With
Jam Light
KITESJ1
Jam and/or Underload With
Underload Light
KITESJ2
Daughter Board Assembly
KITESD
The nominal HP is listed for reference only. The
circuit breaker should be selected based on
motor full load and locked rotor KVA Code and
meet all requirements of National Electrical
Code.
The adjustable trip circuit breakers should be set
at time of installation for the specific motor in
accordance with above. For most applications
the following guidelines should be sufficient.
- Thermal trip should not exceed 2.5 times the
motor FLA.
- Magnetic trip should not exceed thirteen
times the motor FLA.
- Breaker trip time should be greater than 20
seconds at 5 times the motor FLA.
Easy-Start ES Instruction Manual
4-4
Options
SECTION 4
Available Options
Circuit Breakers
Option No.
Thermal
Magnetic
With
Shunt
Trip
Easy-Start
ES Model
Frame
Size
Breaker
Type
Amps
Mag.
Trip
Adj.
C01
C30
ES045(1)
F
HFD
30
C02
C31
ES045(1)
F
HFD
C03
C32
ES070(1)
F
C22
C51
ES070(1)
C04
C33
ES120
C05
C34
C06
Nominal HP
208
230V
460
575V
(1)---
5
15
60
(1)---
15
30
HFD
100
(1)---
20
40
F
HFD
150
(1)---
25
50
J
HJD
150
5X-10X
25
50
ES120
J
HJD
200
5X-10X
40
75
C35
ES120
J
HJD
250
5X-10X
50
100
C07
C36
ES180(2)
K
HKD
200
5X-10X
40
75
C08
C37
ES180(2)
K
HKD
250
5X-10X
50
100
C09
C38
ES180(2)
K
HKD
300
5X-10X
75
150
C10
C39
ES250(2)
K
HKD
400
5X-10X
100
200
C10
C39
ES260(2)
K
HKD
400
5X-10X
100
200
C11
C40
ES360
MC
HMC
800 (3)
3X-10X (5)
150
300
C11
C40
ES500
MC
HMC
800 (3)
3X-10X (5)
200
450
C11
C40
ES560
MC
HMC
800 (3)
3X-10X (5)
200
450
C12
C41
ES750
NC
HNC
1200 (4)
2X-8X (5)
300
600
C13
C42
ES950
NC
HNC
1200 (4)
2X-8X (5)
400
800
Thermal-Magnetic Breaker
Table 4-1
(1) All ratings shown above for HFD type can be used with either ES045 or ES070 models. Magnetic
trip adjust is not available on HFD type. Magnetic trip is set at approximately 10 times the circuit
breaker trip rating.
(2) All ratings shown above for HKD type can be used with either ES180, 250 or ES260 models.
(3) Adjustable rating plug 400-800 Amps.
(4) Adjustable rating plug 600-1200 Amps.
(5) When adjustable rating plugs are used, short delay pickup (magnetic) settings track the selected
position of the adjustable rating plug. For example, with an adjustable 800 amp rating plug set at
50%, and the short delay pickup (magnetic) set at 4X, the short delay pickup is 800 x 50% x
4=1600 amps.
Easy-Start ES Instruction Manual
4-5
Options
SECTION 4
Available Options
Circuit Breakers
Option No.
Thermal
Magnetic
With
Shunt
Trip
Easy-Start
ES Model
Frame
Size
Breaker
Type
C14
C43
ES045(1)
F
HMCP
30
C15
C44
ES070(1)
F
HMCP
C16
C45
ES120
J
C17
C46
ES180(2)
C18
C18
C47
C47
C19
C19
C19
Amps
Mag.
Trip
Adj.
Nominal HP
208
230V
460
575V
3X-10X
5
15
100
3X-10X
25
50
HMCP
250
3X-6X
50
100
K
HMCP
400
2.5X-5X
75
150
ES250(2)
ES260(2)
K
K
HMCP
HMCP
400
400
3.75X-7.5X
3.75X-7.5X
100
100
200
200
C48
C48
C48
ES360
ES500
ES560
MC
MC
MC
HMC
HMC
HMC
800
800
800
3X-10X
3X-10X
3X-10X
150
200
200
300
450
450
C20
C49
ES750
NC
HNC
1200
2X-8X
300
600
C21
C50
ES950
NC
HNC
1200
2X-8X
400
800
Magnetic Breaker
Table 4-2
(1) Both ratings shown above for ÒFÓ frame size can be used with either ES045 or ES070 models.
(2) Both ratings shown above for ÒKÓ frame size can be used with either ES180, 250 or ES260 models.
Easy-Start ES Instruction Manual
4-6
Options
SECTION 4
Available Options
Circuit Breakers
Circuit
Breaker Type
UL489 Interrupting Capacity Rating
Max Breaker
Amps
Wire Range
Terminals
240V
480V
600V
HFD
100
100,000
65,000
25,000
#14 -1/0
HFD
150
100,000
65,000
25,000
#4 - 4/0
HJD
250
100,000
65,000
25,000
#4 - 350 MCM
HKD
200
100,000
65,000
25,000
#3 - 350 MCM
HKD
250
100,000
65,000
35,000
250-500 MCM
HKD
300
100,000
65,000
35,000
250-500 MCM
HKD
400
100,000
65,000
35,000
3/0-250 MCM (2)
HMC
800
65,000
50,000
25,000
500-750 MCM (2)
HNC
1200
65,000
50,000
25,000
4/0 - 500 MCM (4)
Circuit Breaker Interrupting Rating and Terminal Sizes
Table 4-3
Easy-Start ES Instruction Manual
4-7
Options
SECTION 4
Available Options
Notice - IQ Data Plus II Ampere Display
Special Functions
Range:
Minimum: 2% of CT used with IQ
Maximum: 500% of Easy-Start ES Maximum
Ampere Rating
Cutler-Hammer ÒIQ Data Plus IIÓ Monitoring
Device, catalog suffix ÒQ8Ó, provides the following
readings:
AC Ampere
Phase A
Phase B
Phase C
If local codes or customer preference prohibit line
voltage on the door, do not use this option.
Cutler-Hammer ÒIQ DataÓ Monitoring Device,
catalog suffix ÒQ7Ó, provides the following
readings:
AC Voltage
Phase A-B Phase A-Neutral
Phase B-C Phase B-Neutral
Phase C-A Phase C-Neutral
Megawatts
Megavars
Power Factor
Frequency
Megawatt Demand
AC Ampere
Phase A
Phase B
Phase C
AC Voltage (Motor)
Phase A-B
Phase B-C
Phase C-A
The IQ Data Plus II is offered as a monitoring
device only and all protective functions are
disabled, or set so they do not race with EasyStart ES protective functions.
The following CTÕs are supplied with the IQ Data:
Easy-Start ES Cat. No.
CT
ES045, ES070
Three 100:5 CTÕs
The following CTÕs are supplied with the IQ Data
Plus:
ES120
Three 200:5 CTÕs
Easy-Start ES Cat. No.
ES180, ES250,
ES260, ES360
Three 300:5 CTÕs
ES500, ES560
Three 800:5 CTÕs
ES750, ES950
Three 1000:5 CTÕs
CT
ES045, ES070
Three 100:5 CTÕs
ES120
Three 200:5 CTÕs
ES180, ES250, ES260
Three 300:5 CTÕs
ES360
Three 500:5 CTÕs
Notice - IQ Data Ampere Display Range:
ES500, ES560
Three 800:5 CTÕs
Minimum: 2% of CT used with IQ
Maximum: 500% of Easy-Start ES Maximum
Ampere Rating
ES750, ES950
Three 1000:5 CTÕs
If local codes or customer preference prohibit line
voltage on the door, do not use this option.
Easy-Start ES Instruction Manual
4-8
Options
SECTION 4
Available Options
Special Function (Option Boards)
Special function option boards E, S and J plug
into main logic board.
Catalog Suffix:
OPTION
DESCRIPTION
ÒEÓ
ÒSÓ
ÒJÓ
Extended start time
Smooth-Stop
Jam-Underload
The Extended Time-Current feature is
accomplished by calibrating the starting current
with main DIP switch DS1, and after the motor
has accelerated to full speed, (end of ramp-up)
by calibrating the Easy-Start ES for the normal
running current, based on the settings of both
DS1 and DS2.
Option ÒE1Ó
This option includes the printed circuit board with
its three functions plus a ramp-up red light. (See
this section for option ÒEÓ and ÒE1Ó application
considerations.)
Extended Start Time:
Special Function:
Option ÒEÓ
Smooth Stop
The printed circuit board contains three functions:
Option ÒSÓ
1. Extended Start Time (adjustable 0.5 to 10.5
minutes).
2. End of Ramp-Up Relay (Form-C contacts,
rating: 1 amp 120V ac).
3. Extended Time-Current (end of ramp-up D.C.
signal voltage).
These functions may be used together or
independently. The board is factory set with all
functions de-activated. DIP switch DS22, with its
2-positions, is used to activate the extended start
time and the end of ramp-up relay functions.
Extended Start Time
Function
DS22-1 Open Ò0Ó
Closed Ò1Ó
OFF
ON
End of Ramp-Up Relay
Function
DS22-2 Open Ò0Ó
Closed Ò1Ó
OFF
ON
The printed circuit board contains three functions:
1. Smooth-Stop (adjustable 1 to 30 seconds
with potentiometer SS time).
2. End of Ramp-Up Relay (Form-C contacts,
rating: 1 amp 120V ac).
3. Extended Time-Current (end of ramp-up D.C.
signal voltage).
These functions may be used together or
independently. The board is factory set with all
functions de-activated. DIP switch DS31, with its
2-positions, is used to activate the smooth-stop
and/or end of ramp-up relay functions.
Smooth-Stop
Function
DS31-1 Open Ò0Ó
Closed Ò1Ó
OFF
ON
End of Ramp-Up Relay
The third function, Extended Time-Current, is
activated by connecting a wire between the
option board (TB22-1) and the main logic board
(TB1-8). This connection activates DS2 on the
logic board at the end of ramp-up.
DS31-2 Open Ò0Ó
Closed Ò1Ó
Function
OFF
ON
Easy-Start ES Instruction Manual
4-9
Options
SECTION 4
Available Options
Special Function
The third function, Extended Time-Current, is
activated by connecting a wire between the
option board (TB37-1) and the main logic board
(TB1-8). This connection activates DS2 on the
logic board at the end of ramp-up.
The Extended Time-Current feature is
accomplished by calibrating the starting current
with main DIP switch DS1, and after the motor
has accelerated to full speed, (end of ramp-up)
by calibrating the Easy-Start ES for the normal
running current, based on the settings of both
DS1 and DS2.
Option ÒS1Ó
This option includes the printed circuit board with
its three functions plus a red light that lights when
the smooth-stop is activated, and goes out
whenever the smooth-stop is completed.
Option ÒS2Ó
This option includes the printed circuit board with
its three functions plus a red light that lights when
the smooth-stop is activated, and goes out
whenever the smooth-stop is completed; plus a
red light that lights during ramp-up and goes out
at the end of ramp-up. (See this section for
option ÒSÓ, ÒS1Ó, and ÒS2Ó application
considerations.)
Special Functions: Option ÒJÓ
The printed circuit board contains two functions:
JAM and UNDERLOAD TRIP
There are four DIP switches mounted on the
Option J Board:
DS40: (4-Position switch; 16 calibration points)
sets JAM trip level.
Adjustable 100-250%; as set by DS1 &
DS2 DIP switch calibration settings on
main logic board.
DS41: (3-Position switch)
1. Turns JAM trip function ON or
OFF; closed ON, open OFF.
2. Adjusts the JAM trip time; close to
increase JAM trip time.
3. Adjusts the JAM trip time; close to
increase JAM trip time.
(See this section for JAM trip time
curves.)
DS42: (4-Position switch; 16 calibration points)
sets underload trip level. Adjustable 25-90%; as
set by DS1 & DS2 DIP switch calibration settings
on main logic board.
DS43: (3-Position switch)
1. Turns the underload function on or off;
closed ON, open OFF.
2. Adjusts the underload trip time; close to
increase trip time.
3. Adjusts the underload trip time; close to
increase trip time.
(See this section for underload trip time
curves.)
Easy-Start ES Instruction Manual
4-10
Options
SECTION 4
There are 5 LED indicators on the Printed Circuit
Board:
Available Options
Special Functions: Option ÒJÓ
POWER ON
The board is factory set with both functions deactivated. The table below gives instructions on
how to activate the two functions:
Jam Trip
DS411
Open Ò0Ó
Closed Ò1Ó
PHASE A
GREEN
OFF
ON
PHASE B
GREEN
PHASE C
GREEN
Function
DS431
OFF
ON
JAM: Extra Form-C contacts, rated 1 amp, 120V
ac available at TB41.
UNDERLOAD: Extra Form-C contacts, rated 1
amp, 120V ac available at TB43.
Option ÒJ1Ó
This option includes the printed circuit board, plus
a door mounted ÒJAM TRIPÓ red light.
Option ÒJ2Ó
This option includes the printed circuit board, plus
a door mounted ÒUNDERLOAD TRIPÓ red light.
Options: Shorted SCR Detector (Hard Mounted,
not a plug-in board)
Ò120 Volts AC is
applied to the
board.Ó
SHORTED SCR RED
Function
Underload Trip
Open Ò0Ó
Closed Ò1Ó
GREEN
In order for the three LED indicators PHASE A,
B, and C to operate, three phase line power must
be applied to the Line Terminals of the Easy-Start
ES. The three indicators PHASE A, B, and C will
be on, whenever the SCRs are not fully on, or not
shorted. The LED indicators will be off whenever
the SCRs are fully on, or when shorted. During
normal operation of the starter, if full voltage is
applied to the motor, the three LEDs, PHASE A,
B, and C will be off.
If an SCR in one phase is shorted, that phase
indicator will remain off, while the other two
indicators will remain on. If an SCR shorts, a
signal is sent to the Easy-Start ES main logic
board, which trips the Starter off line, and a red
LED is illuminated on the shorted SCR Detector
Board.
Option ÒU1Ó
This option includes the Printed Circuit Board as
described above, plus a door mounted
SHORTED SCR red light.
Option ÒUÓ
The shorted SCR detector will operate on line
voltages from 208V to 575V ac.
Easy-Start ES Instruction Manual
4-11
Options
SECTION 4
Available Options
Daughter Board
Option ÒDÓ
The Option Daughter Board is used whenever
two or more Special Option Boards are supplied
with the Easy-Start ES.
These option boards must be the plug-in type.
The Daughter Board will accommodate any two
of the following boards:
E Option - Extended Start Time
S Option - Smooth-Stop
● J Option - Jam/Underload
●
●
Whenever there are two or more plug-in option
boards needed, one of the boards is plugged into
the Mother Board (Main Logic board). The
second and third boards, if necessary, are
plugged into the Daughter Board.
The Daughter Board contains a 12 volt D.C.
power supply. This power is used to supply the
extra D.C. current needed for the additional
option boards. The Daughter board is connected
to 120 VAC on the Main Logic Board.
See Figure 4-13, for connection diagram.
Notice - A ribbon cable must be installed
between the option board, which is plugged into
the main logic board, and the daughter board.
Easy-Start ES Instruction Manual
4-12
Options
SECTION 4
Application Notes
Extended Start Time Option
This option is used to extend the starting time. It
inhibits the Inverse Time Trip function output, on
the Easy-Start ES Logic Board during this time
period. The total time, for which the Inverse Time
Trip function is inhibited, is adjustable from 2 to
12 minutes in discrete intervals, by using a DIP
switch on the option board. All other protective
features, such as Instantaneous Overcurrent Trip,
Under-Voltage Trip, Phase Loss, are still able to
function.
The Easy-Start ES must be sized to handle the
expected starting current for up to 12 minutes.
Use the rating curves (Figures 4-1 and 4-2) in the
Instruction Manual in order to determine the
Current rating vs Time.
During the extended start time period, there is no
motor overload protection provided by the EasyStart ES. The user should also consult with the
motor manufacturer and make sure that the
motor can handle the long starting duty at the
prescribed current set by the Easy-Start ES. The
current limit is in effect during this extended
starting time and is adjustable from 200 to 500%
of the DIP switch setting.
The Inverse-Time Current Trip Circuit is
accumulating the Current Signals at all times,
and has a built-in thermal memory on Òcool-
down.Ó This cool-down period of time can be as
long as 1.5 minutes. Therefore, it is necessary to
set the extended start time for 1.5 minutes longer
than the anticipated starting time of the motor.
This permits the Inverse-Time Current Trip Circuit
to be cooled down after start, so that when the
Inverse-Time Trip is re-activated, nuisance trips
will be avoided.
Example: If the motor starting time is anticipated
to be 5 minutes with the selected current limit
setting, the extended time on the option board
should be set to 6.5 minutes.
Notice - At the end of 6.5 minutes, if the motor
has not started, and is still in current limit, the
Easy-Start ES will immediately shut off and
indicate a ÒCurrent TripÓ condition.
DIP switch DS22 is a 2-position switch located on
the option board. It is used to turn the options on
or off, since there may be more than one option
on a single board.
The EXTENDED START TIME function can be
turned on and off with the first position on this
switch, DS22-1 (OPEN=off, CLOSED=on).
DS22-1 is factory set to the OFF position.
DIP switch DS21 is a 4-position switch and can
be used to set the total EXTENDED START
TIME in discrete steps.
Easy-Start ES Instruction Manual
4-13
Options
SECTION 4
Some typical applications for this option are:
Application Notes
The table below shows the DIP SW DS21
settings along with the user determined start
time, cool down time, and the total time in
minutes:
DIP Switch DS21 Code
Ò1Ó = Closed
Ò0Ó = Open
DS21
1234
USER
DETERMINED
START TIME
COOL
DOWN
TIME
TOTAL
TIME
MINUTES
1111
0111
1011
0011
1101
0101
1001
0001
1110
0110
1010
0010
1100
0100
1000
0000
0.5
0.6
0.7
0.8
1.0
1.2
1.4
1.5
2.5
2.8
3.6
4.2
5.0
6.0
8.5
10.5
1.5
1.5
1.5
1.5
1.5
1.5
1.5
1.5
1.5
1.5
1.5
1.5
1.5
1.5
1.5
1.5
2.0
2.1
2.2
2.3
2.5
2.7
2.9
3.0
4.0
4.3
5.1
5.7
6.5
7.5
10.0
12.0
Easy-Start ES End-of-Ramp Option
This option is supplied on the same PC board as
the Extended Start Time Option. It senses the
SCR trigger analog voltage and sends out a
signal to tell us whenever the End of Ramp is
reached. This signal indicates that the motor has
reached 100% voltage and the SCRs are FULL
ON. This output signal is sent to a relay with 2
Form-C contacts (rated 1 amp 120V ac) which
change state at the END-OF-RAMP. These 2
Form-C contacts are brought out to 2 terminal
blocks on the Option Board; (TB21 and TB23).
- By-Pass Contactor control signal.
(Figure 4-3.)
- Sequential Starting of other motors, or
process functions.
This END-OF-RAMP option will operate with the
Easy-Start ES in either the Voltage Ramp or
Current Ramp mode. However, it will only send
out a signal whenever the motor voltage reaches
100%. Therefore, when running in the Current
Ramp mode, there may be a time lapse before
the END-OF-RAMP signal is executed. The
reason being that the current will usually reach
the end of its ramp-up before the motor reaches
full voltage. This depends on the type of loadtorque and inertia being impressed on the motor.
The END-OF-RAMP option can be turned on and
off with DIP switch DS22-2 (OPEN=off,
CLOSED=on) located on the option board.
DS22-2 is factory set to the off position.
Extended Time-Current Option
This option enables the Easy-Start ES to extend
the time and current during Motor Starting. It is
supplied on the same PC board as the Extended
Start Time option.
This feature is helpful when a customer wishes to
start a motor under a current limit which is
beyond the normal current limit range of 200% to
500% of the Easy-Start ES DIP switch setting,
but when the customer still wishes to have
accurate overcurrent protection during normal
ÒrunÓ conditions.
By using an oversized Easy-Start ES model,
starting currents of 600% and greater can be
obtained, and still maintain motor protection
during starting and running.
Easy-Start ES Instruction Manual
4-14
Options
SECTION 4
Notice - When using the Extended Time-
Application Notes
Current option, do not make a connection
between TB1-2 and TB1-8 on the main logic
board.
Extended Time-Current Option
This option would enable the Easy-Start ES to be
used on NEMA A, B, C, D, or any three-phase
induction motor with locked rotor codes up to 8.0
KVA per horsepower.
This EXTENDED TIME-CURRENT feature is
accomplished by calibrating the starting current
with main DIP switch DS1, and after the motor
has accelerated to full speed, by re-calibrating
the Easy-Start ES for the normal running current,
based on the settings of both DS1 and DS2.
(See Example-1.)
Terminal TB1-8 on the main logic board is the
enable terminal for DS2. It can be enabled with a
+12V dc signal.
The Extended Time-Current option cannot be
turned on and off with a DIP switch. In order to
enable this option, a connection must be made
between TB22-1 on the option board and TB18 on the main logic board. The option board
then applies +12V dc to TB1-8 on the logic board
at the End-Of-Ramp, and electrically switches the
ac current calibration from STARTING current to
RUNNING current.
Example-1:
Motor: 150 HP, 180 Amps, 460V ac 3-phase,
service factor=1.00
Locked rotor code-G
(5.6 - 6.29 KVA per HP)
Max Locked Rotor Current
= 6.29 KVA/HP X HP /460 X 1.732
= 6.29 X 1000 X 150/460 X 1.732
= 1184 AMPS (658% FLA)
To determine which Easy-Start ES rating will be
needed:
Divide 1184 by 5
1184/5 = 236.8 Amps
Use a model rated equal or greater than 236.8
amps.
Select Model ES260: Rated at 260 amps
continuous
Rated at 5 X 260
= 1300 amps 20 seconds,
which is more than the
1184 amps required.
Easy-Start ES Instruction Manual
4-15
Options
SECTION 4
Application Notes
Example-1 Continued:
How to Select Settings for DIP Switches DS1 and
DS2 on Logic Board:
(Refer to Instruction Manual, Table 3-1). Select
DS1 by looking in first column (DS2=000). Use a
rating that is equal or slightly higher than 236.8
amps. Since we must satisfy both starting and
running current, we must look at the same row,
reading across, to find a setting equal or slightly
less than the FLA (180 amps). We select 242.8
from the 1st column and 176.1 in the same row,
reading across to the right.
DS1 Setting Ò1101Ó
(Note: The 1st column
must always be used for
the Starting Current
Calibration.)
242.8 Amps: ÒStartingÓ Current Calibration
- Current Limit Adjust (200-500%) 486-1214
amps.
This setting of DS1 would permit starting
under full locked rotor conditions because
when utilizing the Extended Time-Current
option, only DIP switch DS1 is in effect during
start.
176.1 Amps: ÒRunningÓ Current Calibration
- Current Trip Adjust (100-120%) 176-211
Amps.
- The normal factory setting is 100%. The
Current Trip can be adjusted for other service
factors if desired.
The Extended Time-Current option
automatically enables DIP switch DS2 at the
End-Of-Ramp, and therefore the electronic
overcurrent circuit would be calibrated to the
combined settings of the two DIP switches
DS1 and DS2.
DS1
1101
DS2
100
- Set Current Limit full CW 1214 amps, which
exceeds the Max Locked Rotor Current of
1184 amps. This is 658% of motor full load
amps. At this ac current level, and with a
current trip setting of 1.00, the trip time will be
approximately 15 seconds.
Easy-Start ES Instruction Manual
4-16
Amps
176.1
Options
SECTION 4
Application Notes
Example-2:
This is an application where a motor may require
starting current of less than 500%, but for a
longer period of time.
Below is a table showing trip time in seconds vs.
percent current limit: points were taken from
Figure 3-1 of the Instruction Manual. Data was
taken from the 40¡C ambient curves.
Curr Trip 1.00
Curr Trip 1.15
Curr Trip 1.20
200%
60 Sec
95 Sec
100 Sec
PERCENT CURRENT LIMIT
250%
300%
350%
40 Sec
30 Sec
24 Sec
60 Sec
40 Sec
30 Sec
70 Sec
45 Sec
35 Sec
Motor: 150 HP, 180 FLA, 460V ac 3-Phase,
Service Factor = 1.00
Assume the starting requirement for the motor in
this application is 350% current limit for 40
seconds.
3.5 X 180 = 630 Amps
If we select Easy-Start ES Model ES180 and set
the DIP switch for the maximum of 180 amps, we
conclude from the table above that the unit would
trip in 24 seconds, at a curr trip setting of 1.00.
You must select an oversized starter; Select
Model ES260.
DS1 Setting Ò1111Ó
(Note: The 1st column
must always be used for
the Starting Current
Calibration.)
400%
20 Sec
25 Sec
27 Sec
500%
14 Sec
18 Sec
20 Sec
260.0 Amps: ÒStartingÓ Current Calibration
- Current Limit Adjust (200-500%) 520-1300
amps.
- Set Current Limit at 630 amps
242% of Easy-Start ES rating, (about 1/6
CW) this is 350% of motor full load amps. At
this ac current level, the trip time will be
slightly greater than 40 seconds.
179.9 Amps: ÒRunningÓ Current Calibration
- The Extended Time-Current option
automatically enables DIP switch DS2 at the
End-Of-Ramp, and therefore the electronic
overload current circuit would be calibrated to
the combined settings of the two DIP
switches DS1 and DS2.
DS1
1111
DS2
101
Amps
179.9
Easy-Start ES Instruction Manual
4-17
Options
SECTION 4
Application Notes
Smooth-Stop Option
The input-output functions and relays are brought
out to the seven terminal blocks on the printed
circuit ÒSÓ option board:
The Smooth-Stop option is available with the
following variations:
(See Figure 4-16 for component layout.)
Option ÒSÓ
TB31-1, TB31-2 Input: Momentary N.O.
pushbutton for smooth-stop.
Option ÒS1Ó
Option ÒS2Ó
Printed circuit board with smoothstop pushbutton and wired relay
contact which opens the 120V ac
control to the logic board at the
end of the smooth stop.
Printed circuit board with smoothstop pushbutton and red light that
lights when the smooth-stop is
activated and goes out whenever
the smooth stop is completed.
Printed circuit board with smoothstop pushbutton, smooth-stop red
light, and a red light that lights
during ramp-up and goes out at
the end of ramp-up.
Check the product label on the Easy-Start ES to
confirm which option package was supplied.
The smooth-stop printed circuit board contains
the electronic logic for three different functions:
1. Smooth-Stop (1-30 seconds adjustable with
potentiometer SS time)
2. End of Ramp-Up Relay
3. Extended Time-Current; (End of Ramp-Up
DC Signal Voltage)
TB32-1, TB32-2 1A contact, N.O., closes during
smooth-stop.
TB33-1, TB33-2 N.C. contact, changes state at
end of smooth-stop.
TB33-2, TB33-3 N.O. contact, changes state at
end of smooth-stop.
TB34-1, TB34-2 N.C. contact, changes state at
end of smooth-stop.
TB34-2, TB34-3 N.O. contact, changes state at
end of smooth-stop.
TB35-1, TB35-2 N.C. contact, changes state at
end of ramp-up.
TB35-2, TB35-3 N.O. contact, changes state at
end of ramp-up.
TB36-1, TB36-2 N.C. contact, changes state at
end of ramp-up.
TB36-2, TB36-3 N.O. contact, changes state at
end of ramp-up.
TB37-1 output: +12V dc output at end of rampup.
TB37-2 Logic Ground
Both smooth-stop and end of ramp-up option
functions can be turned on and off with one of
two switches on the option ÒSÓ printed circuit
board. These switches are identified as follows:
DS31-1 and DS31-2.
Easy-Start ES Instruction Manual
4-18
Options
SECTION 4
Smooth-Stop Option When Used With ÒBÓ
Option (HOA Switch)
Application Notes
Smooth-Stop
Function
DS31-1 Open Ò0Ó
Closed Ò1Ó
OFF
ON
1.1 Start motor by moving HOA switch from
off to ÒHÓ position.
End of Ramp-Up Relay
DS31-2 Open Ò0Ó
Closed Ò1Ó
1.0 Operating with HOA switch in ÒHÓ position.
OFF
ON
The end of ramp-up relay can be used to control
a by-pass contactor; see Figure 4-5. The
interface relays K12 and K13 supply the proper
120V ac control logic to the by-pass contactor
coil. Relay K12 activates at the end of ramp-up
and relay K13 activates at the beginning of rampdown (smooth-stop). When K13 opens, this
opens K12 at the beginning of smooth-stop and
this de-energizes the by-pass contactor coil.
The solid state starter is thus under control during
the ramp-up (soft-start) and ramp-down (smoothstop) portions of the motor control cycle.
The by-pass contactor is in control during the run
mode (the period between the ramp-up and
ramp-down). However, if a fault trip occurs, both
the SCRÕs and contactor are turned off, and
motor protection is still maintained. The ÒRESETÓ
button can be activated, once the fault is cleared,
and the motor may be restarted.
1.2 To stop motor using smooth-stop function,
momentarily press the smooth-stop
button, and then move the HOA switch to
the ÒOFFÓ position.
Notice - The HOA switch must be moved to the
ÒOFFÓ position after the smooth-stop button is
pressed, or the motor will restart again after the
smooth-stop is finished.
Smooth-stop is factory set to 30 seconds;
adjustment can be made using potentiometer
(SSTIME) on the smooth-stop board.
2.0 Operating with HOA switch in ÒAÓ position.
2.1 Start motor by closing contact across
TB20-1 and TB20-2. (Located on back
panel.)
2.2 To stop motor using smooth-stop function,
momentarily press the smooth-stop
button, and then open the remote contact
across TB20-1 and TB20-2.
Easy-Start ES Instruction Manual
4-19
Options
SECTION 4
Application Notes
Smooth-Stop Option With Remote Maintained
2-Wire Contact
Figure 4-7 shows how a 2-wire remote contact is
used to SOFT-START and SMOOTH-STOP the
motor.
JAM Option
(Close DIP switch DS41-1 to activate the JAM
Trip option.)
The JAM option is used to provide an immediate
trip if there is an overload on the motor during the
run mode. The JAM trip is de-activated during
the START and STOP modes of the solid state
motor starter operation.
If the motor current exceeds a preset value (set
by DS40 on the J option board), the starter will
trip.
The JAM overcurrent trip point is selectable
between 100% and 250% of the Easy-Start ES
main logic board current setting, by means of the
4-position DIP switch DS40; this switch is located
on the JAM option printed circuit board.
(See Figure 4-8 below for DS40 settings and %
trip points.)
Also, the inverse time delay of the JAM trip can
be adjusted; DS41-2 and DS41-3 are used to
adjust the trip time delay. The trip time delay
works on an inverse-time-trip mode; ie. the
greater the amount of overload, the faster the trip
time. (See Figure 4-9 for trip time curves.)
Underload Option
(Close DIP switch DS43-1 to activate the
ÒUnderloadÓ option.)
The Underload option is used to provide a trip
when the motor goes from a loaded to an
unloaded condition. The ÒUnderload TripÓ is deactivated during the ÒStartÓ and ÒStopÓ modes of
the solid state motor starter operation.
The underload trip point is adjustable between
25% and 90% of the Easy-Start ES main logic
board current setting by means of the 4-position
DIP switch DS42; this switch is located on the
underload option printed circuit board. (See
Figure 4-10 below for DS42 settings and % trip
points.)
Also, the inverse time delay of the underload trip
can be adjusted; DS43-2 and DS43-3 are used to
adjust the trip time delay. The trip time delay
works on an inverse-time-trip mode; ie the
greater the amount of underload, the faster the
trip time. (See Figure 4-11 for trip time curves.)
Easy-Start ES Instruction Manual
4-20
Drawings
This part of the Options section of this Instruction Manual presents the
following series of drawings:
¥ Current vs. time ratings.
¥ Option schematics.
¥ Trip point settings and trip time curves.
¥ Connection diagrams.
¥ Component layouts.
¥ Dimension of option boards.
Easy-Start ES Instruction Manual
4-21
4-22
1
Easy-Start ES Instruction Manual
NEMA-1 Current Vs. Time Ratings
Figure 4-1
100 1
0.1
2
3
4
8
7
6
5
1,000 19
2
3
4
8
7
6
5
10,000 9
1
2
3
4
8
7
6
5
100,000 19
A.C. AMPS (COLD START)
2
3
4
1.0
5 6 7 8 91
2
3
10
5 6 7 8 91
2
3
4
100
5 6 7 8 91
TIME (SECONDS) (COLD START)
4
NEMA-1 CURRENT VS. TIME RATINGS
2
3
4
1,000
5 6 7 891
2
3
4
ES180
ES260
ES560
ES750
ES950
Easy ES-027
10,000
5 6 7 891
Drawings
SECTION 4
10
1,000
10,000
A.C. AMPS (COLD START)
1
0.1
1
2
3
4
1
9
8
7
6
5
2
3
4
1
9
8
7
6
5
2
3
4
1
9
8
7
6
5
2
3
4
1.0
5 6 7 8 91
2
3
4
2
3
4
100
5 6 7 8 91
TIME (SECONDS) (COLD START)
10
5 6 7 8 91
NEMA-12 CURRENT VS. TIME RATINGS
2
3
4
1,000
5 6 7 8 91
2
3
4
ES45
ES70
ES120
ES250
ES360
ES500
Easy ES-028
10,000
5 6 7 8 91
Drawings
SECTION 4
NEMA-12 Current Vs. Time Ratings
Figure 4-2
Easy-Start ES Instruction Manual
4-23
Drawings
SECTION 4
Easy ES-029
Extended Start Time with By-Pass Contactor
Figure 4-3
Easy-Start ES Instruction Manual
4-24
Drawings
SECTION 4
Easy ES-030
Option E1 - Extended Start Time with Ramp-Up Door Light
Figure 4-4
Easy-Start ES Instruction Manual
4-25
Drawings
Easy ES-031
SECTION 4
Smooth-Stop with By-Pass Contactor
Figure 4-5
Easy-Start ES Instruction Manual
4-26
Drawings
Easy ES-32
SECTION 4
Smooth-Stop ÒS-1Ó Option
Figure 4-6
Easy-Start ES Instruction Manual
4-27
Drawings
SECTION 4
120 VAC
120 VAC
FAULT TRIP RELAY
K1
K2
16
TB1-17
1
12
11
2
1
13
2
4
K2
K13A
14
K34
1
2
TB34-1
TB34-2
SMOOTH STOP BOARD
TB31-1
TB31-2
21
K13C
22
(USER SUPPLIED)
REMOVE CONTACT
START/SMOOTH-STOP
1
1
2
2
OSL4-22A
AUX RELAY
RESET
1
K13
3
T2
2
K13B
43
44
NOTES:
3
1.
INDICATES TB1-3 ON MAIN LOGIC BOARD.
2. FOR SAFTEY REASONS. THE REMOTE STARTING CONTACT MUST BE OPENED
BEFORE THE STARTER CAN BE RESET, AFTER A FAULT TRIP OCCURS.
3. ADDITIONAL COMPONENT NEEDED, AUX RELAY, MFGR PART NO. DSL4-22A
OLDSMAR PART NO.6711C90G30
4. FOR FUTURE INFORMATION REFER TO EASY-START INSTALLATION MANUAL 9085-8550
Easy ES-033
Smooth-Stop with Remote Maintained 2-Wire Contact
Figure 4-7
Easy-Start ES Instruction Manual
4-28
Drawings
SECTION 4
JAM TRIP SET AT 150%
10
DS412 3
0 0
0 1
1 0
1 1
DIP SWITCH CODE:
“0” = OPEN
“1” = CLOSED
TRIP TIME IN SECONDS
5
2
1
0.5
11
10
01
00
0.2
0.1
Easy ES-034
1
1.5
2
3
4
Multiples of Full Load Current
Set by DIP Switches DS1 and DS2
Easy ES-035
Jam DIP Switch Trip
Point Settings
Figure 4-8
Jam Trip Time Curves
Figure 4-9
Easy-Start ES Instruction Manual
4-29
Drawings
SECTION 4
UNDERLOAD TRIP SET AT 50%
10
DS432 3
0 0
0 1
1 0
1 1
DIP SWITCH CODE:
“0” = OPEN
“1” = CLOSED
TRIP TIME IN SECONDS
5
2
1
11
0.5
10
01
0.2
0.1
00
0.1
0.2 0.3 0.4 0.5 1.0
Easy ES-036
Underload DIP Switch
Trip Point Settings
Figure 4-10
Underload Trip Time Curves
Figure 4-11
Easy-Start ES Instruction Manual
4-30
Easy ES-037
Drawings
SECTION 4
NOTES:
1. Option ÒJ1Ó Jam Light
2. Option ÒJ2Ó Underload Light
Easy ES-038
Options J1, J2 Jam-Underload with Red Trip Lights
Figure 4-12
Easy-Start ES Instruction Manual
4-31
Drawings
SECTION 4
Easy ES-039
Daughter Board Connections
Figure 4-13
Easy-Start ES Instruction Manual
4-32
Drawings
SECTION 4
Easy ES-040
Printed Circuit Logic Board Component Layout
Figure 4-14
Easy-Start ES Instruction Manual
4-33
Drawings
SECTION 4
Easy ES-041
Option E - Printed Circuit Board Component Layout - Extended Start Time
Figure 4-15
Easy-Start ES Instruction Manual
4-34
Drawings
SECTION 4
Easy ES-042
Option S - Printed Circuit Board Component Layout - Smooth-Stop
Figure 4-16
Easy-Start ES Instruction Manual
4-35
Drawings
SECTION 4
Easy ES-043
Option J - Printed Circuit Board Component Layout - Jam-Underload
Figure 4-17
Easy-Start ES Instruction Manual
4-36
Drawings
SECTION 4
Easy ES-044
Option U - Printed Circuit Board Component Layout - Shorted SCR Detector
Figure 4-18
Easy-Start ES Instruction Manual
4-37
Drawings
SECTION 4
Easy ES-045
Option D - Printed Circuit Board Component Layout - Daughter Board
Figure 4-19
Easy-Start ES Instruction Manual
4-38
Drawings
SECTION 4
45, 70 & 120 AMPS
180 AMPS AND UP
Easy ES-046
Dimensions for Logic Board, Daughter Board, Cover Board Assembly
Figure 4-20
Easy-Start ES Instruction Manual
4-39
SECTION 5
Troubleshooting
This section of your Instruction Manual describes what to do if
your drive indicates there is a problem. After you review this
section, you will understand:
¥ Troubleshooting Guide.
¥ SCR Diagnostic Tests.
¥ Renewal Parts List.
Caution
Make sure you read, understand and follow all
of the Safety Statements in the Safety section of
this manual before you troubleshoot your
Motor Starter.
If further assistance is needed please feel free to contact CutlerHammer. Please have the following information ready:
G.O. No.
Model No.
Serial No.
DIP Switch Setting
Easy-Start ES Instruction Manual
5-1
Troubleshooting
SECTION 5
Troubleshooting Guide
A. Equipment Required
1. Multimeter Simpson 260 or Equivalent.
2. Clamp-On Ammeter.
Danger High Voltage
When making any measurements other than
voltage or current readings, be sure that the line
power is disconnected.
Never use a grounded voltmeter or oscilloscope
to make measurements.
5. Check the diagnostic LEDÕs. These are
located on the main logic board and also
on the front door on standard factory
supplied enclosures:
Front Door Status Panel:
Run
End of Ramp
Current Limit
Phase Rotation
Phase Loss
Under Voltage
Current Unbalance
Current Trip
Overtemperature
Logic Board:
Run
End of Ramp
Curr Lim
Phase Rot
Phase Loss
Under Volt
Curr Unbal
Curr Trip
PHASE ROT LED
Do not use a megger for checking
semiconductors.
B. Problem: The Motor Does Not Rotate
CHECK:
1. Measure the 3-phase line voltage.
2. Measure the 120 VAC control voltage at
TB1-4 and TB1-17.
3. Check that all the connectors and plugs
are securely fastened and snapped into
place:
J-1 Current input from CTÕs.
J-2 Line voltage input.
J-3 Ribbon cable connector for LED
status panel board.
J-4 Option connector (used for options).
J-5 Voltage plug (installed by user).
J-6 Option connector (used for options).
J-101 A-Phase SCR gate control leads.
J-201 B-Phase SCR gate control leads.
J-301 C-Phase SCR gate control leads.
4. Observe that all interwiring between the
logic board, SCRÕs, heat sinks, and
current transformers are intact and are
not pinched.
On initial installations and start-up, the ÒPhase
RotÓ LED may come on, indicating that the
incoming line phase rotation is not A-B-C. This
can be corrected by reversing any two lines that
are connected to the line terminals of the EasyStart ES.
The direction of motor rotation must be corrected
at the load terminal side of the Easy-Start ES; if
the motor is not running in its correct rotation,
reverse any two motor leads.
PHASE LOSS LED
Check voltages at the line terminals.
Phase-A to Phase-B
Phase-B to Phase-C
Phase-C to Phase-A
Usually one or more of the other diagnostic LEDÕs
may come on if there is a phase loss; the reason
is that the logic board is not receiving voltage
from all three phases of the proper magnitude.
If all 3-phase voltages are present at the line
terminals, and only the ÒPhase RotÓ LED remains
on, the phase rotation must be corrected as
described in the preceding paragraph.
Easy-Start ES Instruction Manual
5-2
Troubleshooting
SECTION 5
Troubleshooting Guide
If the RUN LED comes on and the motor does
not rotate; check the following:
UNDER VOLT LED
-
Measure the voltage at test point TP-6 on the
logic board; it should be greater than 5 VDC.
-
Check DIP switch DS1 and DS2 settings
against motor FLA. Remember, DS2 is only
activated if there is a connection made
between TB1-2 and TB1-8 on the logic board.
-
Curr Lim LED - The motor may be in a
current limit; check the Curr Lim adjustment.
Turn Curr Limit adjust CW. If the motor does
not start, change the logic board.
Check voltages at the line terminals.
The under-voltage circuit will activate if the line
voltage is below 75% of nominal line voltage.
(The under-voltage LED will not activate if the line
voltage is disconnected from the starter, this is
not treated as an under-voltage case.)
If the correct voltages are measured at the line
terminals, check to see if the proper voltage plug
is installed in the logic board. An example would
be, if the 460V voltage plug is installed in the
logic board and you are operating from a 230V
supply line. Make sure the ÒHIÓ ÒLOÓ jumper is
properly installed on the logic board. (See Table
3-13.)
When giving a start command, if a fault trip LED
comes on, check the following:
-
Again, as stated in a previous paragraph, the
under voltage LED may also come on if there is a
phase loss.
Curr Trip LED May indicate a wrong DIP
switch DS1 and DS2 setting, or a short at the
load or motor.
-
Curr Unbal LED May indicate one of the
following:
If all voltages read properly, and none of the
LED's are on, you are now ready to give the start
command to the motor.
a. Open gate-cathode lead connection,
check the wires and also see if
connectors are seated properly.
The RUN LED should come on, and stay on,
whenever you give the start command. If it does
not, check the 120 VAC control voltage at the
terminal strip TB1. Read 120 VAC between TB112 and TB1-4 while holding the start button or
switch, in the on position.
b. Open motor lead.
Visually check to see if the relay (K2) on the logic
board is activating.
c. Open SCR gate (refer to SCR diagnostic
tests Section 5-D.)
d. Shorted SCR (refer to SCR diagnostic
tests.)
e. Open CT, or open lead in connector J-1.
If the run LED does not come on, check the start,
stop, reset, 120 VAC control circuit and all
customer interlocks.
Easy-Start ES Instruction Manual
5-3
Troubleshooting
SECTION 5
Troubleshooting Guide
D. SCR Diagnostic Tests
C. Problem: The motor rotates but does not
reach full speed. The RUN LED is on; but
the END OF RAMP LED does not come on.
Check:
1. DIP switch DS1 and DS2 settings against
motor FLA.
2. Current limit adjustment may be set too
low and will not provide enough starting
torque; turn Curr Lim adjustment CW to
increasing starting current. Measure the
motor current with a clamp-on ammeter.
3. Curr Trip LED - If the current limit
adjustment has been turned to its full CW
position and the current trip LED comes
on, before the motor reaches full speed,
the Easy-Start ES may be undersized for
the motor application. (See Over-Load
Time-Current Characteristics Figure 3-1.)
Try turning curr trip adjustment full CW.
Try starting the motor in a reduced load
condition; or if possible, remove the load
from the motor completely and try for a
successful start. This will help confirm
that the Easy-Start ES is operating to its
specifications. After a normal start has
been completed, both the RUN LED and
END OF RAMP LED will be on, and
generally, for most normal applications,
this will take less than 20 seconds. If the
motor cannot be started, change the logic
board.
Caution
All power should be turned OFF when making
ohmmeter measurements.
1. Shorted SCR - Measure from:
Line-A to Load-A
Line-B to Load-B
Line-C to Load-C
The resistance reading should be high or
near infinity. A near zero reading
indicates a shorted SCR. If any phase is
shorted, replace the defective SCR.
There are two basic types of SCRÕs used
in Easy-Start ES:
Isolated block SCRÕs containing 2 SCRÕs
internally connected; the entire SCR block
should be replaced in this case.
Non-isolated hockey puk SCRÕs externally
connected; in order to determine which
SCR to replace, the copper strap or bussbar connected between heatsinks, will
have to be removed so that the SCRÕs can
be measured individually.
2. Open or Shorted Gate - Remove the 3
gate plugs, J-101, J-201, J-301, from the
logic board. The ohmmeter
measurements should be made between
pins 1 to 4 and pins 3 to 6 of each plug.
The typical ohmic value should be
between 5 and 200 ohms. If readings of
near zero ohms, or near infinity, are
measured, replace the SCR.
Hockey puks should always be measured
installed in pressure clamps, or false
readings may result.
Easy-Start ES Instruction Manual
5-4
Troubleshooting
SECTION 5
SCR Diagnostic Tests
E. Logic Board Digital Trigger Output:
7. Measure the 6 digital trigger SCR gate
pulse outputs using a multimeter on the
DC voltage range. These points are
available on the connectors on the logic
board.
Pin Number Pin Number
Cathode (-)
Gate (+)
Caution
Voltage is applied to the starter during this test.
Exercise safe operation procedures.
Procedure:
J101
J101
J201
J201
J301
J301
1
3
1
3
1
3
4
6
4
6
4
6
1. Turn off all power to the Easy-Start ES.
2. Remove plugs J101, J201, and J301 from
the logic board.
3. Place a short jumper across resistors
R177 and R233. (This inhibits the phase
rotation and phase loss trip circuits.)
4. Close DS3-2. This defeats the energy
saver circuit.
5. Turn on the 120 VAC control voltage and
three-phase power.
6. Energize the start or HOA switch to turn
the starter on. (Make sure the RUN and
END OF RAMP LEDÕs are on when
taking measurements. Turning the TIME
pot full CCW will give a fast ramp-up for
taking measurements; remember to
return the TIME pot to the normal running
condition when the measurements are
completed.
The voltages should be approximately 0.7
volts DC.
Replace the logic board if the correct
readings are not obtained.
Logic Board Voltage Measurements
The connector marked ÒJ4Ó on the logic board
can be used for options and test point voltage
measurements. J4 pin number identification and
typical test point voltage readings are shown on
Table 5-1. These readings can also be taken
directly on the logic board. The associated
components and test points are listed under the
column marked ÒLocation.Ó Whenever a test
point terminal is supplied, example TP1, its
location is also shown on Figure 4-14. There are
two ÒLogic CommonÓ test points on the board;
they are TB1- 1 and a terminal marked ÒGND.Ó
One of these points must be used for the
negative lead of the voltmeter.
If any of the above trigger output or test voltage
measurements are not correct, the logic board
should be replaced.
Easy-Start ES Instruction Manual
5-5
Troubleshooting
SECTION 5
SCR Diagnostic Tests
SCR Service Procedures: (Hockey-Puk
Type)
When changing SCRÕs in the field, it is best to
remove the entire heat sink and lay it in a
horizontal position. However, if this is not
convenient, the following procedure can be used:
1. Remove the printed circuit logic board.
2. Remove the line power cable.
3. Remove the power strap between the two
short heat sinks.
7. Place the SCR against the side of the sink
that has the locating pin and make sure it
engages and is seated properly. Place the
other half of the heat sink against the SCR,
and holding the assembly together, tighten
the nuts on the compression clamp equally
until they are finger tight. Check that the
same number of threads are visible on both
clamp studs.
8. Tighten both nuts alternately in quarter-turn
increments until the correct pressure is
obtained. See Figures 5-1 and 5-2 for SCR
clamps.
SCR Mounting Clamp Pressure Can Be
Determined by the Pole Face Dimension
4. Loosen the two bolts (or nuts) on the
pressure clamp until there is enough
clearance between the two heat sinks to
remove the SCR.
5. Remove the SCR.
6. Before installing the new SCR the old thermal
compound should be removed from the heat
sink and the mating surfaces should be
inspected for burrs or voids. If it is necessary,
use an extra fine grit emery cloth to smooth
the mating heatsink surfaces. Coat the
surfaces of the SCR with a thin coat of
thermal compound (Alcoa-2 or an equivalent
electrical joint compound). Wipe off the
excess compound.
Easy ES-054
The Pole Face Is The Surface
Area in Contact With The Sink
Typical Dimension
of SCR Pole Face
Dimension ÒAÓ Inches
Mounting
Pressure
Lbs.
0.75" 1.15" 1.75" 2.5" -
1200
2000
5000
10000
1.0"
1.34"
1.85"
3.0"
Notice - Use sparingly - Apply only a thin
coat of compound.
Easy-Start ES Instruction Manual
5-6
Troubleshooting
SECTION 5
SCR Diagnostic Tests
500 kg.
(1,100 lb.)
1/4" - 20
1-1/4 - turn
1000 kg.
(2,200 lb.)
1/4" - 20
2-1/4 - turns
S + 50.80
(S + 2")
”S“s Heatsink
•Scr.
Nut Holder
Bolt 69.85 90.40
(2.75") (3.56")
Washers (2)
Bolt Length S + 40 mm (1.5")
19.05
(0.75")
Spring Insulator
Easy ES-046
Typical SCR Clamp Used In ES180, ES260
Figure 5-1
SPRING
BOTTOM EDGE OF LEAF
USED AS INDICATING
REFERENCE POINT
NUMERALS 1, 2 & 3 INDICATE
1000 LB. INCREMENTS PER LEAF
1 LEAF
2 LEAVES
STUD BAR
Easy ES-047
Typical SCR Clamp Used In
ES180, ES250, ES260: 1 Leaf
ES360, ES500, ES560: 2 Leaves
Figure 5-2
Easy-Start ES Instruction Manual
5-7
Troubleshooting
SECTION 5
SCR Diagnostic Tests
Pre-Start
-
Review Cutler-Hammer recommended
procedures for mounting ÒdiscÓ power
semiconductors (refer to W SCD Mounting Kit
instructions).
-
CAUTION: Deficient heat sink materials may
creep or cold flow, relax, deflect with time and
temperature under these high load forces.
Stack assemblies must be thoroughly
checked at design ratings.
-
Spring load bar epoxy insulation coating is
rated at 130¡C NEMA B, 5000V RMS.
Maximum sink temperature is restricted to
90¡C maximum because of the high load
forces used in clamping (high current) power
semiconductors.
Stack Pre-Assembly
Step 1: Assemble sink-device clamp parts
(reference clamp drawing, Figure 5-1).
Notice - It is recommended that a lubricant be
used on the clamp bolt threads. Never-Seez,
Anti-Seize lubricant compound, Type NSBT, is
suitable material for this purpose.
Stack Pre-Load
Step 2: If an inch-pound torque wrench is
available, torque each clamp nut to 20
in-lbs.
Step 3: Check to make sure that load bars and
heat sinks are parallel; equal lengths to
thread may not show through each nut
because of bolt length tolerances. (If
load bars/sinks are not parallel, redo
Step 2).
Stack Loading
Step 4: Insert a set of "vernier calipers" or other
suitable depth gauging instrument
through the hole in the uncoated bar.
This gauge must be long enough to
extend through the load bar and touch
the hardened disc (approximately 2.30").
See Figure 5-4.
Step 5: Measure and record an initial reading of
this distance ÒXÓ.
Step 6: Turn each nut 1/4 turn at a time until a
relative displacement at ÒXÓ of 0.034" is
obtained. This results in 10,000+
pounds force.
Stack Inspection
Step 7: Check load bars and heat sinks for
parallelism. Apply a hi-temp paint over
the clamp bolt/nut mating surfaces to fix
their properly tightened original position
(tamper indicator).
Step 8: Check stack assembly electrical values
per device specifications.
Notice -
This torque value is valid for welllubricated threads only.
Should a torque wrench not be available,
finger tighten each nut until snug; then
turn each nut 1/4 turn with a wrench.
Parts should now be held firmly.
Easy-Start ES Instruction Manual
5-8
Troubleshooting
SECTION 5
SCR Diagnostic Tests
Easy ES-S048
Assembly Sink-Device Clamp
Figure 5-3
Easy-Start ES Instruction Manual
5-9
Troubleshooting
SECTION 5
SCR Diagnostic Tests
Easy ES-S049
Stack Loading
Figure 5-4
Easy-Start ES Instruction Manual
5-10
Troubleshooting
SECTION 5
SCR Diagnostic Tests
Notice - Use sparingly - Apply only a thin coat of
compound.
Changing Isolated Block SCRÕs:
The following procedure can be used for
changing isolated block SCRÕs.
1. Remove the printed circuit logic board.
2. Remove the power and control connections
from the SCR and identify the wires.
3. Remove the SCR block.
4. Before installing the new SCR block, the old
thermal compound and any foreign matter
should be removed from the heat sink mating
surface. If necessary, use an extra fine grit
emory cloth to smooth the heat sink surface.
Coat the bottom surface of the SCR block
with a thin coat of thermal compound (Alcoa2 or an equivalent electrical joint compound).
Wipe off the excess compound.
5. Place the SCR block into position on the heat
sink. Insert bolts and tighten them finger
tight, or use a wrench until all the bolts are
just snug. Tighten the bolts alternately in
quarter-turn increments until the SCR block is
tight. Keep equal pressure on all the
mounting hardware. Visually inspect the
SCR block to make sure it's lying flat on the
heat sink.
6. Securely fasten the power and control wiring
on the SCR block. Tug on the leads gently to
make sure there are no loose connections.
Check to make sure the SCR block is wired
with the correct polarity.
Easy-Start ES Instruction Manual
5-11
Troubleshooting
SECTION 5
SCR Diagnostic Tests
J4 PIN #
FUNCTION
LOCATION
CONDITION
TEST VOLTAGE
1
+10VDC
VR1-2
3-PH VOLTAGE ON
10V +.5
2
CURRENT SIG
CURRENT SIG
TP1
TP1
START
RUN/AT FULL LOAD
0 TO 4.5 VDC
0.90V + .04 VDC
3
TRIGGER VOLTS
TP6
RUN FULL LOAD
RUN NO LOAD
6 TO 8 VDC
3 TO 3.5 VDC
4
CURR SIG
CURR SIG
03 COLL
03 COLL
START
RUN
0
0.1 TO .9 VDC
5
CURR TRIP V
U7-11
START
RUN NO LOAD
0 TO 7 VDC
0 TO 1 VDC
6
SPARE
7
END OF RAMP
END OF RAMP
R253
R253
START
RUN
0
10V +2 VDC
8
RAMP V
RAMP V
Z5 CATHODE
Z5 CATHODE
START
RUN/STOP
0 TO 6.8 VDC
0
9
TRIP LINE
D44 CATHODE
FAULT TRIP
8V +2 VDC
10
LOAD SENSE
LOAD SENSE
U2-1
U2-1
START
RUN F LOAD ES-ON
0
-3.1 TO -3.7 VDC
11
INV INPUT
U2-6
START/RUN/STOP
INPUT ONLY
12
NON-INV INPUT
NON-INV INPUT
TP5
TP5
START
RUN
0 TO 2.5 VDC
1 V +.2 VDC
13
+12C
+12C
TP8
TP8
START
RUN/STOP
11V +1V
0
14
+12A
TB1-2
START/RUN/STOP
12V +.5
15
+12B
+12B
TP12
TP12
START/RUN
STOP
12V +.8
0
16
+12D
TP13
STOP
12V PULSE
17
STOP SIG
D45 ANODE
STOP
0-6V RAMP PULSE
18
LOCKOUT
LOCKOUT
TP14
TP14
START/RUN
STOP
+10V +.8V
0
19,20,21
SPARES
22
AUX +12B
+12V +.9V
23
AUX +12A
+12V +1V
24
-12A
VR3-3
25
LOGIC GROUND
TB1-1
START/RUN/STOP
J4 Connector Test Voltages
Table 5-1
Easy-Start ES Instruction Manual
5-12
-12V +.5 VDC
Troubleshooting
SECTION 5
Renewal Parts List
Here is a recommended spare parts list for a
typical Easy-Start ES installation:
The renewal parts are listed by an abbreviated
Easy-Start ES model number, showing the
current and voltage rating. The parts listed apply
to both open panel and enclosed models.
One Logic Board.
One Stack Assembly, or Two SCRÕs.
One set of MOVÕs.
Example:
ES180-4N
On multiple Easy-Start ES installations, it is
recommended that several parts of each are to
be kept on hand, and the exact quantity to be
determined by the user.
The parts listed are for all standard
ES180-4N models, open-panel or
enclosed.
The complete part number of the renewal part
requires the prefix shown at the top of each
column. Please observe whether a hyphen is
used or omitted.
Examples:
SCR
Logic Board
For model ES560-4N is
9029-254AT
For model ES560-4N is
2D66806G01
The number of parts required per model are as
follows:
Logic Board:
SCRÕs:
One required.
Six required for nonisolated heat sink
models.
Three required for
isolated heat sink
models.
Stack Assembly:
Three required.
Current Transformers: (Three required, 180
amp and above.) (One
required below 180A.)
DV/DT Snubber:
Three required.
MOV's:
Three required except
on models rated 750
amps and above; (six
required).
Fan CPT:
One required.
If no part number appears under the SCR
column, then the SCR is not sold separately, and
the stack assembly must be purchased.
The date code of your Easy-Start ES is on the
name plate.
The date code of the logic board is on the logic
board.
Protective Cover:
Order part No.
2D66881H01
LED Status Printed
Circuit Board
Assembly:
Order part No.
7881C82G01
Status View LED Panel: Order part No.
7881C83H01
Plug-In Relay K2
on logic board:
Order part No.
0041-149A
Fan Control Relay K102 Order part No.
on panel:
0041-119
Easy-Start ES Instruction Manual
5-13
Troubleshooting
SECTION 5
Renewal Parts List
Fuses for Fan Control Power Transformers
(2 Required per Model):
208/230/460 and 380/415V Models up to 560
Amps: BUSS FNQ-2, 2 Amp
460/500/575V Models up to 560 Amps:
BUSS KTK-1-1/2, 1-1/2 Amp
208/230/460 and 380/415V Models 500 and
750 Amps and above: BUSS FNQ5, 5 Amp
Option Boards:
Extended Start Time:
Jam/Underload:
Smooth Stop/End of Ramp:
Shorted SCR Detector:
The following is a list of MOVÕs and their ratings:
MOV Number
AC Volts
Joules
0088219B
0088219A
0088102
0088103
510 V
600 V
490 V
600 V
80
80
300
300
460/500/575V Models 500 and 750 Amps
and above: BUSS KTK4, 4 Amp
Easy-Start ES Instruction Manual
5-14
Part Number:
7882C10G01
7882C38G01
7882C15G01
9032334A
Troubleshooting
SECTION 5
Renewal Parts List
The following is a list of Easy-Start ES models, their SCR stack assemblies or back-to-back SCRÕs.
The list indicates whether the DV/DT snubber or MOV components are included when the stack or
back-to-back SCRÕs are ordered.
MODEL NO.
STACK ASSÕY
BACK-TO-BACK SCRÕs
DV/DT SNUBBER
MOV
ES045-4E
ES045-3E
ES045-5E
NO
NO
NO
9029-194
9029-194
9029-194AA
NO
NO
NO
NO
NO
NO
ES070-4E
ES070-3E
ES070-5E
NO
NO
NO
9029-438
9029-438
9029-438AA
NO
NO
NO
NO
NO
NO
ES120-4E
ES120-3E
ES120-5E
NO
NO
NO
9031-382H
9031-382H
9031-382J
NO
NO
NO
NO
NO
NO
ES180-4N
ES180-3N
ES180-5N
7881C65G01
7881C65G01
7881C65G02
NO
NO
NO
YES
YES
YES
YES
YES
YES
ES250-4E
ES250-3E
ES250-5E
7881C65G03
7881C65G03
7881C65G04
NO
NO
NO
YES
YES
YES
NO
NO
NO
ES260-4N
ES260-3N
ES260-5N
7881C65G03
7881C65G03
7881C65G04
NO
NO
NO
YES
YES
YES
NO
NO
NO
ES360-4E
ES360-3E
ES360-5E
7881C65G05
7881C65G05
7881C65G05
NO
NO
NO
YES
YES
YES
NO
NO
NO
ES500-4E
ES500-3E
ES500-5E
7881C65G05
7881C65G05
7881C65G05
NO
NO
NO
YES
YES
YES
NO
NO
NO
ES560-4N
ES560-3N
ES560-5N
7881C65G05
7881C65G05
7881C65G05
NO
NO
NO
YES
YES
YES
NO
NO
NO
ES750-4N
ES750-3N
ES750-5N
7882C28G01
7882C28G01
7882C28G01
NO
NO
NO
YES
YES
YES
NO
NO
NO
Easy-Start ES Instruction Manual
5-15
Troubleshooting
SECTION 5
Renewal Parts List
MODEL #
LOGIC
BOARD
2D66806
SCR
9029-
SCR STACK
ASSY
BACK-TO-BACK
SCRÕs
C.T.
DV/DT
SNUBBER
9010-
MOV
FAN
0088-
FAN
CPT
9010-
0034-
9071A17
ES045-4E
ES045-3E
ES045-5E
G01
G02
G03
None
None
None
9029-194
9029-194
9029-194AA
457A
457A
457A
G02
G02
G04
219B
219B
219A
NONE
NONE
NONE
NONE
NONE
NONE
ES070-4E
ES070-3E
ES070-5E
G01
G02
G03
None
None
None
9029-438
9029-438
9029-438AA
457B
457B
457B
G02
G02
G02
219B
219B
219A
NONE
NONE
NONE
NONE
NONE
NONE
ES120-4E
ES120-3E
ES120-5E
G01
G02
G03
None
None
None
9031-382H
9031-382H
9031-382J
457C
457C
457C
G02
G02
G02
219B
219B
219A
NONE
NONE
NONE
NONE
NONE
NONE
ES180-4N
ES180-3N
ES180-5N
G01
G02
G03
260
260
260A
7881C65G01
7881C65G01
7881C65G02
458A
458A
458A
G02
G02
G04
219B
219B
219A
NONE
NONE
NONE
NONE
NONE
NONE
ES250-4E
ES250-3E
ES250-5E
G01
G02
G03
260
393
393A
7881C65G03
7881C65G03
7881C65G04
458B
458B
458B
G01
G01
G03
102
102
103
392R
392R
392R
12
12
12
ES260-4N
ES260-3N
ES260-5N
G01
G02
G03
260
260
260A
7881C65G03
7881C65G03
7881C65G04
458E
458E
458E
G01
G01
G03
102
102
103
392R
392R
392R
12
12
12
ES360-4E
ES360-3E
ES360-3E
G01
G02
G03
254AT
254AT
254AT
7881C65G05
7881C65G05
7881C65G05
458G
458G
458G
G03
G03
G03
103
103
103
392R
392R
392R
12
12
12
ES500-4E
ES500-3E
ES500-5E
G01
G02
G03
254AT
254AT
254AT
7881C65G05
7881C65G05
7881C65G05
458C
458C
458C
G03
G03
G03
103
103
103
392R
392R
392R
12
12
12
ES560-4N
ES560-3N
ES560-5N
G01
G02
G03
254AT
254AT
254AT
7881C65G05
7881C65G05
7881C65G05
458F
458F
458F
G03
G03
G03
103
103
103
392R
392R
392R
12
12
12
ES750-4N
ES750-3N
ES750-5N
G01
G02
G03
264A
264A
264A
7882C28G01
7882C28G01
7882C28G01
459A
459A
459A
G03
G03
G03
103
103
103
392T
392T
392T
106
106
106
ES950-4N
ES950-3N
ES950-5N
G01
G02
G03
264A
264A
264A
9031-377C
9031-377C
9031-377C
459B
459B
459B
G03
G03
G03
103
103
103
392T
392T
392T
106
106
106
Easy-Start ES Instruction Manual
5-16
Troubleshooting
SECTION 5
Renewal Parts List
Voltage Plugs:
Line
Voltage
Plug
Part Number
Voltage
Stamped On Plug
208/230/460V Models:
208/230V
460V
Plug 9028-460A
Plug 9028-460C
230
460
380/415V Models:
380V
415V
Plug 9028-460G
Plug 9028-460H
380
415
460/500/575V Models:
460/500V
575V
Plug 9028-460J
Plug 9028-460K
500
575
Easy-Start ES Instruction Manual
5-17
Cutler-Hammer Solid State Reduced Voltage Motor Starter
Aftermarket Services
•
•
•
•
•
•
Technical/telephone support.
Resident service engineers in major trading centers.
Factory repair services.
Warranty administration.
Equipment modification and upgrading services.
Training seminars.
For service or more information call
1-800-322-4986
A response network that gives new meaning to customer service
• Personalized
• Comprehensive
• Professional
Cutler-Hammer
110 Douglas Road E
Oldsmar, FL 34677
0IM-530029-1000/4
APR 97
Printed in U.S.A.