1
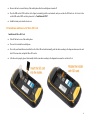
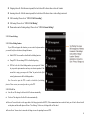
User’s Manual for TS3 Mobile Phone Contents User’s Manual for TS3 Mobile Phone ............................................................................................................................................1 Contents ..................................................................................................................................................................................................1 1. Introduction to the Mobile Phone ....................................................................................................................................................1 1.1 Hard Keys ........................................................................................................................................................................................................................ 1 1.2 Standby Display ............................................................................................................................................................................................................... 3 1.2.1 Status Bar .................................................................................................................................................................................................................. 4 1.2.2 Applications ............................................................................................................................................................................................................... 4 1.2.3 Three Fixed Soft Icons .............................................................................................................................................................................................. 4 1.3 Installation and Removal of Battery ................................................................................................................................................................................ 4 1.4 Installation and Removal of SIM Card ............................................................................................................................................................................ 6 1.5 Installation and Removal of Micro SD Card ................................................................................................................................................................... 8 1.6 Battery Charging .............................................................................................................................................................................................................. 9 2. Function Introduction .....................................................................................................................................................................10 2.1 Power-on ........................................................................................................................................................................................................................ 10 2.2 Power-off ....................................................................................................................................................................................................................... 10 2.3 Making Calls .................................................................................................................................................................................................................. 10 2.4 Answering Calls ............................................................................................................................................................................................................. 11 2.5 Input Method ................................................................................................................................................................................................................. 12 2.6 Contacts ......................................................................................................................................................................................................................... 12 2.7 Bluetooth Earphone ....................................................................................................................................................................................................... 12 2.8 Micro SD Card ............................................................................................................................................................................................................... 13 3. Menu Operation ..............................................................................................................................................................................13 3.1 3D Gallery ..................................................................................................................................................................................................................... 13 3.2 SIM Toolkit .................................................................................................................................................................................................................... 13 3.3 Wi-Fi P2P Connect Wizard ............................................................................................................................................................................................ 14 3.4 Dialing ........................................................................................................................................................................................................................... 14 3.5 Sending E-mails ............................................................................................................................................................................................................. 14 3.6 Pedometer ...................................................................................................................................................................................................................... 14 3.7 Calculator ....................................................................................................................................................................................................................... 15 3.8 NotePad.......................................................................................................................................................................................................................... 15 3.9 Browser .......................................................................................................................................................................................................................... 15 3.10 Sound Recorder ........................................................................................................................................................................................................... 15 3.11 Calendar ....................................................................................................................................................................................................................... 15 3.12 Settings ........................................................................................................................................................................................................................ 16 3.12.1 Management of SIM Card ..................................................................................................................................................................................... 16 3.12.2 Wireless & networks ............................................................................................................................................................................................. 16 3.12.3 Call Settings .......................................................................................................................................................................................................... 18 3.12.4 Audio profiles ........................................................................................................................................................................................................ 21 3.12.5 Display................................................................................................................................................................................................................... 21 3.12.6 Location ................................................................................................................................................................................................................. 22 3.12.7 Security.................................................................................................................................................................................................................. 22 3.12.8 Applications ........................................................................................................................................................................................................... 22 3.12.9 Account and Sync .................................................................................................................................................................................................. 22 3.12.10 Privacy ................................................................................................................................................................................................................. 23 3.12.11 Storage ................................................................................................................................................................................................................. 23 3.12.12 Language & Keyboard ........................................................................................................................................................................................ 23 3.12.13 Voice input & output ........................................................................................................................................................................................... 23 3.12.14 Accessibility ........................................................................................................................................................................................................ 23 3.12.15 Date & Time ........................................................................................................................................................................................................ 23 3.12.16 Schedule power on/off......................................................................................................................................................................................... 23 3.12.18 About Phone ........................................................................................................................................................................................................ 24 3.13 Clock ............................................................................................................................................................................................................................ 24 3.14 FM Radio ..................................................................................................................................................................................................................... 24 3.15 Torch ............................................................................................................................................................................................................................ 24 3.16 Search .......................................................................................................................................................................................................................... 25 3.17 Call Log ....................................................................................................................................................................................................................... 25 3.18 Contacts ....................................................................................................................................................................................................................... 25 3.19 File Manager ................................................................................................................................................................................................................ 25 3.20 Downloads ................................................................................................................................................................................................................... 26 3.21 Camera ......................................................................................................................................................................................................................... 26 3.22 Messaging .................................................................................................................................................................................................................... 27 3.23 Music ........................................................................................................................................................................................................................... 28 3.24 E-Compass ................................................................................................................................................................................................................... 28 4 Accessories .........................................................................................................................................................................................28 4.1 Charger........................................................................................................................................................................................................................... 28 4.2 Data Cable ..................................................................................................................................................................................................................... 29 4.3 Earphone ........................................................................................................................................................................................................................ 29 5 Notice .................................................................................................................................................................................................29 6 Troubleshooting ................................................................................................................................................................................33 This Manual, designed to help you properly use the mobile phone of this model provided by our company, does not contain any information about software and hardware configuration of this product. For information about product configuration, please refer to contracts (if any) in relation to this product, or consult the distributor selling the product to you. Our company follows a sustainable development strategy, so we reserve the right to modify and improve this document without any prior notice. Within the sphere permitted by law, our company, under any situation, will not make compensation for any special, incidental, indirect or secondary damage, or for any loss of profit, data, goodwill or expected saving. Many network functions introduced in this manual are special services provided by network service providers; it is up to the network service provider whether these network functions can be used or not. 1. Introduction to the Mobile Phone 1.1 Hard Keys Keys for this mobile phone include “Menu”, “Standby”, “Backward”, “Search”, left-side “Power” key, left-side push key, and right-side “Volume” key (up/down). “Menu” (a yellow icon, on the leftmost bottom of the screen) When this key is pressed, a menu bar corresponding to the current interface will appear. In a case when no option menu is available on an interface there will be no response when this key is pressed. “Standby” (on the right of the “Menu” key) In the state of menu or editing, short press this key to go back to the default standby interface, and long press this key to display the applications recently used. “Backward” (on the right of the “Standby” key) You can go back to the last operation or the previous menu interface by pressing this key; in the state of editing, you can tap this key to hide the keyboard. “Search” (on the right side of the “Backward” key, the rightmost bottom of the screen) 1 You can use this key to open the mobile phone search interface. Side “Volume” Key: It is on the right side of the mobile phone, consisting of an “Up” key and a “Down” key. It can be used to adjust the ring volume. In case of an incoming call, it can be used to turn off the ring tone. During conversation, it can be used to adjust the voice volume. During audio/video playback, it can be used to adjust the audio/video volume. “Power” Key: It is on the left top of the mobile phone: When the mobile phone is off/on, long press this key to power it on/off. When the mobile phone is not in the sleep mode, long press this key to open the mobile phone options, where you can select a corresponding mode. When the mobile phone is not locked, short press this key to activate the keypad lock, lock the screen and enter the sleep mode. When the mobile phone is in the sleep mode, press this key to cancel the sleep mode and lighten the screen. When the mobile phone is locked but not in the sleep mode, short press this key to lock the screen and switch the mobile phone into the sleep mode. Side Push Key: It is on the left bottom of the mobile phone: The default setting is the “Torch” menu interface. For shortcut setting of the Side Push Key, you can enter the menu of “Settings for Side Push Key”. For functions of the “Side Push Key”, please refer to “3.12.17 Settings for Side Push Key”. 2 1.2 Standby Display This mobile phone is a bar phone with single LCD. The size of the display is 3.5". Every character displayed on the screen is a complete graph block, the size of which depends on the font of the character. The icons shown on the status bar of the mobile phone are used to indicate the current status of the mobile phone, such as current battery level and network signal. You can tap a certain standby screen and slide the standby display from left to right or from right to left, but cyclic sliding is not supported. In the standby interface, you can press the “Menu” button to open the option menu bar, where you can add screen display and carry out wallpaper setting, and other setting, detailed as below:. Add: You can add a menu icon for the current standby interface. Wallpaper: You can set the wallpaper for the mobile phone. Search: Open the search interface. Notice: new messages, missed calls will be listed. You can tap to view. You can also tap the [Clear] icon to delete notice(s). Setting: Please refer to “3.12 Settings”. Style Switch: You can switch the style of the current standby interface. If a standby interface is not fully occupied by application icons, you can long press a blank area in the standby interface to open a menu list; four menus, namely, Shortcut, Widget, Folder and Wallpaper, can be displayed on this list interface. You can carry out the following operations. Shortcut: Enter the shortcut list and you can tap to select a certain shortcut. Widget: Enter this menu, tap to select a certain application, and it can be displayed on this standby interface. Folder: You can tap to select a folder and display it on this standby interface. 3 Wallpaper: You can set the wallpaper for the standby interface. 1.2.1 Status Bar The first line on the screen of the mobile phone is the status bar. Icons of the current status of the mobile phone are shown on this status bar, including signal strength, battery level, whether alarms are set currently, and other information. If there is an icon shown on the left side of the status bar, it means a missed call, a new message, etc.. Press the status bar and slide downwards to open the notice menu list: The notice list will display the current prompt messages given by the mobile phone, including new messages, missed calls and other information. You can tap to enter the view interface. You can also tap the [Clear] icon to delete the notice. 1.2.2 Applications When tapping an application icon shown on the standby screen, you will enter the menu interface of this application and can carry out relevant operations; long press an application icon to select this application, where a dustbin icon will be shown in the lower part of the screen; drag the selected icon to the dustbin, and the selected application will disappear from the standby screen. You can long press the blank area after the foresaid icon is deleted and select in the displayed menu list interface to add a new application icon. 1.2.3 Three Fixed Soft Icons There are three fixed soft icons in the lower part of the standby screen. You can use these three soft icons to create shortcuts. Note: These three soft icons are shown only in the standby interface. 1.3 Installation and Removal of Battery Installation of Battery 4 Turn the back of the mobile phone upwards; hold the mobile phone body with a hand; align the 3 small metal pieces of the battery with the 3 small metal columns of the battery compartment, and put the battery in correspondingly; then press the other end of the battery to fasten it to the mobile phone, and installation is completed. Removal of Battery 5 Grab with fingers the bulging part at the connection between the battery and the top of the mobile phone, and press it downwards (towards the bottom of the mobile phone); apply force outwards at the same time to separate the battery from the mobile phone body, and then take the battery out. 1.4 Installation and Removal of SIM Card Installation of SIM Card Please buy an SIM card from the network service provider. Your mobile phone number and user’s registration information are saved in your SIM card. The SIM card can be used in any GSM mobile phone, and your phone number and registration information will remain the same. Make sure the mobile phone is powered off. Remove the back cover of the mobile phone (pick up the mobile phone, and loosen the screws fastening the mobile phone and the back cover in the counter-clockwise direction with the accompanying small tool for opening the shell; at this moment, the top of the back cover will be separated from the mobile phone, then the back cover can be removed easily. Remove the battery of the mobile phone. There are two card slots, namely, SIM1 and SIM2. You can select either of them to put the card in. SIM1 card slot simultaneously supports 2G and 3G networks. 6 SIM1: Turn the metal face of the SIM card downwards (facing the mobile phone); please push the SIM card horizontally into SIM1 card slot according to the diagram shown near the card slot. SIM2: The card slot for SIM2 is covered by an iron sheet. You can press the iron sheet with your thumb and push it horizontally according to the diagram shown near the card slot; lift the iron sheet, and insert the SIM card into the iron sheet according to the diagram shown inside the iron sheet; then gently move the SIM card to close the iron sheet, and push the iron sheet to lock it according to the diagram. Install the battery. Close the back cover (align the two small bulges at the bottom of the back cover with the two grooves at the corresponding positions of the mobile phone; then press the back cover to close it, and use the accompanying small tool for opening the shell to fasten the screws fastening the mobile phone and the back cover in the clockwise direction). Removal of SIM Card 7 Remove the back cover and battery of the mobile phone after the mobile phone is turned off. Press the SIM card in SIM1 card slot with a finger, horizontally push the card outwards, and you can take the SIM card out. As to how to take out the SIM card in SIM2 card slot, please refer to “Installation of SIM2”. Install the battery and close the back cover. 1.5 Installation and Removal of Micro SD Card Installation of Micro SD Card Take off the back cover of the mobile phone. The card slot is inside the mobile phone. Press with your thumb the iron sheet that fixes the Micro SD card and horizontally push the sheet according to the diagram shown near the card slot; lift the iron sheet, and put the Micro SD card in. After the card is properly placed, horizontally slide the iron sheet according to the diagram shown near the card slot to fix it. 8 Removal of Micro SD Card Take out the Micro SD card (for operation, please refer to “Installation of Micro SD Card”). 1.6 Battery Charging Warning: The battery, charger and accessories used should be special for this model of mobile phone. The use of other types of battery, charger or accessories may affect acknowledgement of the mobile phone or violate the warranty terms and conditions, and may lead to dangers. Do not put the battery in a place where it is too hot or too cold. Please put the battery in a place out of the reach of children. Insert the charger plug into a 220V AC socket. Insert the adapter of the charger into the interface slot at the top of the mobile phone. If the mobile phone is charged when it is powered on, the battery level icon on the screen will show a flashing charging status, indicating the mobile phone is being charged. If the mobile phone is charged when it is powered off, the charging status will be shown on the screen. After the battery is fully charged, the flashing icon at the battery icon on the status bar will disappear, and now you can disconnect the adapter of the charger from the mobile phone interface. Note: The only way to stop charging after charging begins is to disconnect the charger. Please use a power socket convenient for plugging whenever possible. 9 2. Function Introduction 2.1 Power-on Long press the “Power” key to power on the mobile phone. Before inserting the USB cable, please make sure the mobile phone has been in the on or off status. Please do not insert the USB cable when it is being powered on, or the playing of boot music will be affected. Input PIN To prevent others from randomly using your SIM card, you can set a protection password (PIN). Once PIN is set, each time the mobile phone is powered on, the user will be required to first input the PIN to unlock the mobile phone. Tap the input box and open the virtual keyboard; tap the numbers on the keyboard to input the PIN. (To keep confidential, “•” is used to represent the numbers input on the screen.) Tap the [OK] icon; when the mobile phone confirms the PIN as correct, it will begin network registration. Note: If the PIN is wrongly input for successive three times, the SIM card will be locked. In this case, please contact the SIM card provider. 2.2 Power-off Long press the “Power” key at the top to open the option list, under which you can select Power-off. 2.3 Making Calls Making calls through the dial menu This function can be used only when the network name is shown on the screen; 10 Select the [Dial] menu, or tap the phone icon in the lower part of the standby interface; open the number input screen, tap the numbers, and input the phone number; Tap the green [Call] icon in the lower part of the input screen to directly dial. Making calls through the call log Tap the “Call log” menu, or tap the [Dial] menu; select the [Call log] to show the list of call log. Select one from the list, and now you can dial directly by tapping the number of this contact. Making calls through the Contacts Enter the Contacts, select a contact, and tap to enter the next screen which displays the detailed information. Now you can tap the phone icon on the right of the number of this contact to dial directly. Ending calls You can tap the [End] icon to end a call. Making international calls Long press [0] and input “+” on the number input screen. Tap the numbers and input the country code. Tap the numbers and input the district code (generally not including the first number “0”) and the phone number. Dial the number 2.4 Answering Calls Answer a call You can slide rightwards the green [Answer] icon on the left side of the incoming call screen to answer the call. Decline a call 11 You can slide leftwards the red [Decline] icon on the right side of the incoming call screen to reject the call. Also, you can press the “Menu” key, select “Send message”, and this call will be rejected and you will enter the next screen; you can select the default rejection message or edit a relevant message (if the menu function of [Edit before sending] is already enabled), and send this message to the caller. For the function of declining with message, please refer to “3.12.3.3.6 Settings of the Mobile Phone”. Answer a second call (requiring network support) If the call waiting function is set for the mobile phone, there will be a prompt when a second call comes. Now you can: Hold the current call and answer the second call. Reject the second call. 2.5 Input Method When using the mobile phone, you will often need to input text information such as names in the contacts, messages and text in the notepad. The default input method of this mobile phone is Android keyboard input method. 2.6 Contacts This mobile phone provides the Contacts function which enables you to save the frequently used numbers and information in the SIM card or in the contacts of the mobile phone. It also offers such functions as Search, Create, Edit, Delete, Dial and Send message. Note: When the mobile phone is just powered on, the contacts of the mobile phone cannot be used temporarily because it is being initialized. Please wait. 2.7 Bluetooth Earphone This mobile supports the Bluetooth earphone function. You can establish wireless connection between the mobile phone and the Bluetooth earphone. After connection is established, you can answer, reject or hang up a call by pressing the buttons on the Bluetooth earphone. Prior to use of the Bluetooth earphone function, you need to enable the Bluetooth function of the mobile phone, and turn on the Bluetooth earphone. When the Bluetooth earphone is on, put the Bluetooth earphone and the mobile phone together. Open the Bluetooth menu of the mobile phone, and search the Bluetooth device. When the mobile phone completes searching, all Bluetooth devices searched will be listed on the screen. Select the name of the Bluetooth earphone from the device list, and then select Connection. 12 During connection, you may need to input the authentication password to connect the Bluetooth earphone to the mobile phone. For the password and detailed operations of the Bluetooth earphone, please refer to the operation instructions for the Bluetooth earphone. 2.8 Micro SD Card This mobile phone supports Micro SD card. You can insert a Micro SD card, and view and operate files in the Micro SD card through the mobile phone. 3. Menu Operation Note: This is a dual SIM card dual standby mobile phone; its SIM1 card slot simultaneously supports 2G and 3G networks. The menu functions introduced hereinafter can be used normally only after an effective SIM card is inserted. If the mobile phone fails to identify the SIM card, it will enter the restricted standby state after being powered on, and limited menus can be used. When there is no SIM card, you can also dial emergency numbers through the [Phone] menu. Tap a certain menu to enter the next submenu of this menu. Press the “Backward” key to go back to the previous menu; press the “Standby” key to directly go back to the standby interface. In some menu interfaces, when you long press an element, a corresponding menu list will pop up, and you can carry out relevant operations. For example, when you long press a contact in the Contacts, a menu list will pop up. You can view and edit the information of this contact through this list. 3.1 3D Gallery This menu makes it convenient for you to view and manage photos saved in the memory card of the mobile phone. This menu cannot be used normally if there is no memory card inserted in the mobile phone. 3.2 SIM Toolkit The SIM toolkit is a value-added service provided by the network operator. If the SIM card or the network operation company does not support this service, this function will not be applicable. Besides, since different operators provide different services, please contact the network operation company for more information. 13 3.3 Wi-Fi P2P Connect Wizard The mobile phone supports Wi-Fi P2P function. Wi-Fi Direct will be enabled automatically when you enter this menu. You can tap the [Start scan] icon in the lower part of the screen to search and scan the wireless network. 3.4 Dialing Please refer to “2.3 Making Calls”. 3.5 Sending E-mails Through this function, you only need to go through several steps to configure e-mail settings for most accounts and to receive and send e-mails. When entering this menu for the first time, you need to input the e-mail account name and password, and then to tap [Next] for settings. You can also set the e-mail account through the [Manual setup] submenu. 3.6 Pedometer This mobile phone is equipped with an intelligent pedometer which is an effective tool for improving the exercise effect. With the high-sensitivity acceleration sensor of the mobile phone, the number of times of walk or run of the user can be automatically sensed, and exercise speed and strength can be measured, and the quantity of heat consumed during exercise under different intensities can be automatically calculated. During step counting, the menu interface can display various exercise parameters such as walking speed, exercise distance and energy consumption in a real-time manner. When entering this menu, you can tap the yellow icon in the middle of the bottom line of the screen to make settings for the pedometer, including sensitivity level, step length and body weight. 14 3.7 Calculator This mobile phone offers you a calculator with basic functions to facilitate simple calculations. You can tap the numbers and calculation symbols on the calculator interface to carry out relevant calculations. During calculation, you can tap the [Clear] icon to clear the numbers. 3.8 NotePad You can create notes through this menu, which facilitates your viewing. After you enter this menu, the note list you have created will be displayed. You can tap to view the detailed information or carry out editing. If the notepad is empty at this moment, you can open the option menu bar by pressing the “Menu” key, and tap the “Add note” soft key to add a note. 3.9 Browser You can visit the Internet via the browser. When entering this menu, you can open the option menu bar by pressing the “Menu” key; select [More] option menu to making settings for homepage, etc. When using the browser for the first time, you can first carry out relevant configurations. 3.10 Sound Recorder This mobile phone supports the function of long-time recording. As long as your mobile phone has enough storage space, you can record as much as you like. When entering the [Sound Recorder] menu, you can tap the dot icon in the lower part of the screen to start recording. During recording, you can stop recording by tapping the square icon at the lower right corner of the screen, and then you can select to save or cancel the recorded file. You can also tap the middle arrow icon to play this recorded file. If the “Standby” key is pressed during recording, the mobile phone will return to the standby interface and the system will automatically stop recording. 3.11 Calendar This section is based on month view. Operations under other views are basically identical, and following can be taken as reference. You can switch 15 the default view among [Day], [Week] and [Month] on the option menu bar. Through this menu, you can view, create, edit or delete an event. In this interface, you can slide the screen upwards or downwards to select a month. Select any date and tap to view the event list of that day. When it is long pressed, a corresponding option menu list will pop up. In the calendar interface, press the “Menu” key to open the option menu bar, and you can enter six option menus including [Day], [Week], [Month], [Agenda], [Today] and [More]. Through the [More] option menu, you can carry out settings and other relevant operations. 3.12 Settings 3.12.1 Management of SIM Card Through this menu, you can manage SIM cards. You can also set the default SIM card for making calls, sending messages and data connection. 3.12.2 Wireless & networks Through this menu, you can make settings related to network. 3.12.2.1 Airplane mode When you enable the “Airplane mode”, the network function will be disabled. Any operation related to network will be forbidden, but you can make emergency calls like 112. 3.12.2.2 WLAN You can select to enable or disable the WLAN function. Generally, as long as there is wireless network, your mobile phone will be able to connect the wireless network based on its own WLAN so that you can surf the Internet. However, if the wireless network enables the security function, you will need to ask the wireless network administrator for the key. When the mobile phone is successfully connected with the WLAN device, the corresponding WLAN icon will be shown on the status bar. Note: The use of WLAN will consume extra power of the mobile phone. If you do not need the wireless network, please disable it to effectively 16 prolong the standby time. 3.12.2.3 WLAN Settings You can select to enable or disable WLAN; you can also set and manage the wireless network access point. When WLAN is enabled, the mobile phone will automatically detect WLAN signal sources nearby. In the network list searched, select a WLAN you want to connect. You can also add other networks. However, if the settings of the newly added network are improper or the system of this mobile phone does not support this network, you will fail to realize successful connection. 3.12.2.4 WLAN Direct Settings Through this menu, you can set and manage WLAN Direct. 3.12.2.5 Bluetooth You can select to enable or disable the Bluetooth function. You can use relevant functions only when the Bluetooth function is enabled. After the Bluetooth function is enabled, the corresponding Bluetooth icon will be shown on the status bar. 3.12.2.6 Bluetooth Settings Tap to enter this menu. You can select to enable/disable the Bluetooth function through the [Bluetooth] submenu. When the Bluetooth function of this mobile phone is enabled, you can select whether the Bluetooth device of this mobile phone can be searched by other Bluetooth devices through the [Discoverable] submenu. Safety tip: Please disable the Bluetooth function when it is not needed; please do not pair the Bluetooth device of this mobile phone with any other unknown device. When the Bluetooth function of this mobile phone is enabled, you can tap the [Device name] submenu and change the device name in the popping up input box. After successful change, other device will show the new name when this mobile phone is searched. When the Bluetooth function of this mobile phone is enabled, you can view the list of all Bluetooth devices searched by this mobile phone in the Bluetooth range through the [Scan for devices] submenu. When you select a certain device, you can tap to pair it with the Bluetooth device of this mobile 17 phone. To cancel such pairing, you can long press the name of this device and tap [Unpair] on the popping up interface. Note: Some devices, especially the Bluetooth earphone, may have a fixed Bluetooth password such as 0000. To bind this device with the mobile phone, you need to input this Bluetooth password. 3.12.2.7 Tethering & portable hotspot Through this menu, you can share the mobile connection of your mobile phone as WLAN hotspot. 3.12.2.8 VPN Settings This mobile phone supports the virtual private network (VPN) function, and you can make relevant settings through this menu. The VPN is capable of establishing reliable safe connection with remote users, corporate affiliates, business partners and suppliers and for the intranet of companies, with safety of transmission of data guaranteed. 3.12.2.9 Mobile Network Through this menu, you can make relevant settings for the mobile network. 3.12.2.10 GPRS transfer prefer You can select to activate the phone prefer or GPRS transfer prefer. 3.12.3 Call Settings Through this menu, you can make relevant settings for the call function of the mobile phone. 3.12.3.1 Voice Call 3.12.3.1.1 Voice Mail Through this menu, you can set the number of the voice mail. 18 Normally, you can get the number of the voice mail from the network provider. This number is used for the caller to receive messages. 3.12.3.1.2 Call Forwarding When it is inconvenient for you to answer a call or in some other situations, you can forward the incoming call to other phone (or fax machine), and you can also set the forwarding conditions. This function requires network support. Always forward: When this function is enabled, all incoming calls will be forwarded to a pre-designated phone number. Forward when busy: If the user is busy, the incoming call will be forwarded to a preset phone number. Forward when unanswered: If there is no answer, the incoming call will be forwarded to a preset phone number. Forward when unreachable: If the called party is not reached, the incoming call will be forwarded to a preset phone number. 3.12.3.1.3 Call Barring (Requiring Network Support) This function enables you to restrict call making or call answering of the mobile phone. Before using this function, you need to input the barring password provided by the service provider, and this password will be sent to the network for validation. Note: This function only supports GSM calling. 3.12.3.1.4 General settings My phone number: When you make a call, the caller ID will be shown according to the default settings of the operator. Call waiting: You can tap the selection box to enable or disable this function. After this function is enabled, if there is a new incoming call during conversation, the mobile phone will enter the call waiting status; if this function is disabled, the mobile phone will ignore the new incoming call. This function requires network support. 3.12.3.2 Video Call (Requiring Network Support) Picture for replacing local video: you can set the picture shown to the other side when the local camera is turned off. Enable back camera: Camera switching is allowed after this menu is opened. Peer video bigger than local video: after this menu is opened, the view of the other side will be larger than the local view. 19 Outgoing video call: After this menu is opened, the local video will be shown when a video call is made. Incoming video call: After this menu is opened, the local video will be shown when a video calling is answered. Call forwarding: Please refer to “3.12.3.1.2 Call Forwarding”. Call barring: Please refer to “3.12.3.1.3 Call Barring”. Phone number and call waiting settings: Please refer to “3.12.3.1.4 General Settings”. 3.12.3.3 General Settings 3.12.3.3.1 Fixed Dialing Numbers If your SIM card supports this function, you can restrict the phone numbers you can call (only the selected ones) through this menu. Enable FDN: You can enable or disable the fixed dialing function. Change PIN2: You can change PIN2 for fixed dialing setting. FDN list: In the list of fixed dialing numbers, you can press the “Menu” key to open the option menu bar and carry out relevant operations. If the current list is empty, you can press the “Menu” key and select the [Add contact] option menu to add fixed dialing numbers. Note: You need to input the PIN2 to enable or disable the fixed dialing function. Please contact your network provider to get the PIN2. 3.12.3.3.2 Call Cost Last call cost: The charge for the last call will be shown automatically. Total cost: The charge for all calls will be shown automatically. Max cost: You are allowed to set the upper limit of call charge (protected with PIN2). If the communication time exceeds the limit, you will not be allowed to talk on the phone, and the mobile phone will show “No call charge”. In this case, all charged calls will be ended. Reset call cost: You can select to return the call charge to zero after inputting the correct PIN2. 20 Set currency and price per unit: You can modify the price and rate per unit after inputting the correct PIN2. 3.12.3.3.3 Cell Broadcast Cell broadcast means the public information sent by the network operator. The support of the network operation company is required to realize this function. Please contact the network operation company for details. The cell broadcast service allows you to receive text messages containing all kinds of content such as news and traffic information. These messages are sent to all users in a certain district via the network. If this service has been activated, the network will provide you with available information channel numbers. 3.12.3.3.4 Minute Reminder When this menu is opened, there will be a beep sound when the communication time reaches 50s. 3.12.3.3.5 Dual Mic Noise Reduction This mobile phone adopts the technology of dual microphone noise reduction, which guarantees high-quality communication in a harsh environment. You can tap the input box on the right side of the menu and select to enable or disable this function. 3.12.3.3.6 Phone Settings Edit default message: you can edit rejection messages through this menu, which will be sent to the calling number when you reject an incoming call with SMS. Edit before sending: When this menu function is opened, you can edit rejection messages before sending these messages 3.12.4 Audio profiles This mobile phone provides several phone profiles so that you can customize the ring, volume and other items of the mobile phone according to different events and environments. The mobile phone provides four preset modes, including Normal (Default), Silent, Meeting and Outdoor. Every mode has a set of default values; you can tap a certain mode, enter the next screen and make settings of individualized phone profile. Also, you can add a new phone profile or reset the phone profile to return it to the default by pressing the “Menu” key. 3.12.5 Display Brightness: You can change the backlight brightness of the screen. 21 Auto-rotate screen: You can tap the selection box to enable the automatic screen rotating function of the mobile phone. Animation: You can set whether windows animation is displayed or not. Screen timeout: You can set the time after which the mobile phone will enter the sleep mode when there is no manual operation. On the default screen lock interface, you can see a string of flashing arrow icons; now you can release the screen lock by pressing this icon and sliding it rightwards. 3.12.6 Location Through this menu, you can select a mobile positioning method: use wireless network or GPS satellite positioning; you can enable GPS EPO assistance at the same time. When GPS EPO assistance is used, data will be transmitted via the network of the service provider. Data transmission may result in traffic cost; for the charge standard, please contact your service provider. After you enable network aid, the device can receive useful satellite information from the secondary data server via the cellular network. With the auxiliary information, the device can acquire the GPS location faster. 3.12.7 Security Screen unlock: through this menu, you can set the screen lock of the mobile phone. Screen unlocking protection for the mobile phone can be carried out by using image, PIN or password. SIM card locking: You can enable or disable the PIN protection function. When this function is enabled, you will be required to input the correct PIN to power the mobile phone on; or else, the SIM card will stay in the state of being locked. Passwords: You can select to enable or disable the function of visible password when inputting the password in the input box. Device administration: You can add or delete the device manager. Credential storage: You can make relevant settings for credential storage. Note: If you input the wrong PIN for successive three times, the SIM card will be deadlocked. In this case, you will need PUK to unlock. For information about PIN and PUK, please contact your network provider. 3.12.8 Applications Through this menu, you can set and manage the applications of the mobile phone. 3.12.9 Account and Sync Through this menu, you can make relevant settings for account and sync. You can also add and manage accounts. 22 3.12.10 Privacy Through this menu, you can restore the mobile phone to its factory settings and restart it. 3.12.11 Storage Through this menu, you can check the storage condition of the SD card (if the memory card has been inserted currently) and the phone memory. You can also select to uninstall the memory card and remove it safely. 3.12.12 Language & Keyboard Through this menu, you can set the language of the display menu and prompt messages of the mobile phone, and you can also set the input method. 3.12.13 Voice input & output This mobile phone supports the function of voice input and output. You can make relevant settings after entering this menu. 3.12.14 Accessibility Through this menu, you can make relevant settings for the accessibility of the mobile phone. 3.12.15 Date & Time Automatic: You can tap the right-side selection box to enable or disable the function of automatic updating of date and time. However, the support of the local network operator is needed to use this function normally. Set date: You can set the date shown on the mobile phone. On the date editing screen, you can select the date by pressing the input box (scroll bar) and slide it upwards or downwards. After selection, tap the [Settings] icon. Select time zone: You can select the time zone for the mobile phone. Set time: You can set the time shown on the mobile phone. See the [Set date] submenu for operation information. Use 24-hour format: You can select 24-hour format as the time display mode of the mobile phone. Select date format: You can set the date format shown on the mobile phone. 3.12.16 Schedule power on/off This mobile phone supports the function of automatic schedule power on/off. You can set to enable or disable this function. When this function is enabled, the mobile phone will be powered on/off automatically according to the time point you set. 23 3.12.17 Side key setting Entering this menu, you can select a menu function from the list as the default shortcut menu of the side push key. After setting, if the side push key (at the left bottom of the mobile phone body) is pressed, the mobile phone will enter the set shortcut menu. The default shortcut menu of the side push key according to the factory settings of the mobile phone is Torch. 3.12.18 About Phone Through this menu, you can check the status, battery use and relevant legal information of this mobile phone as well as the version of the mobile phone. 3.13 Clock Entering this menu, you can carry out relevant operations and settings of the clock. 3.14 FM Radio This mobile phone supports the function of FM radio reception. The radio reception quality is related to the local radio network coverage. Since earphones are taken as the radio antenna, the matching earphones must be inserted into the earphone port at the top of the mobile phone so that you can use the function of FM radio normally. 3.15 Torch This mobile phone provides the function of Torch and SOS signal light. Entering this menu, you can tap the red dot icon to turn on the Torch. You can also tap the yellow SOS icon and the mobile phone will enable the internationally universal SOS rescue signal light mode. 24 3.16 Search Tap this menu to enter the next screen; you can input the content you want to search in the search input box shown on the screen; after inputting, tap the search icon on the left side of the input box and select a certain search range. For instance, you can search the call log of the mobile phone or search via the Internet; then tap the arrow icon on the right side of the input box, and the mobile phone will automatically begin searching according to the range you have selected. 3.17 Call Log The call log list will be shown after you enter this menu. Under this list, you can view relevant call log; different types of call log will be shown distinctively with arrow icons of different colors, including recently dialed, answered and missed calls. Select a call log, tap the right-side circle icon, and enter to view detailed information or carry out other operations. If there is call log currently, press the “Menu” key to open the option menu bar and you can carry out the following operations: Clear call log: A prompt box asking whether you want to delete the call log will pop up; tap the [OK] icon to delete. Speed dial: Through this menu, you can set the speed dial function of the numeric keyboard on the dial screen. When this function is enabled, you can long press a numeric key on the dial screen to dial the phone number corresponding to this numeric key (except the numeric key “0”). For example: move the cursor to a certain line (if it is the fourth line, the corresponding numeric key is 4); tap to enter the contacts list; tap a phone number and this number will be saved to the speed dial list. In the speed dial list, the option menu list will pop up when you long press a number; you can carry out relevant operations. After setting of the numeric key “4” for speed dial, you can directly call the phone number you have set by long pressing the numeric key “4” on the dial screen. 3.18 Contacts Please refer to “2.6 Contacts” for details. 3.19 File Manager This menu is used to manage all photos, videos, audios and other types of files saved in your memory card (if a memory card has been inserted). You can carry out such operations as delete and copy. 25 You can create new folders under each folder. Note: When copying or deleting a file, please make sure the data cable is not inserted; or else, the file may be damaged or lost. In the file list interface, press the “Menu” key to open the option menu bar and you can carry out relevant operations. You can select one or several files, and copy it (them) between folders or delete it (them); you can also sort the files under the current folder through the “Sort” option. 3.20 Downloads Relevant downloading information of the mobile phone can be displayed in this menu. 3.21 Camera This is mobile phone has a built-in HD 5 megapixels camera, with which you can take photos or shoot anytime and anywhere and save the files to the [DCIM]/[Camera] folder under the [File manager] menu. 26 Note: You need to properly insert the memory card into the mobile phone to use this menu function normally. 3.22 Messaging You can edit short messages or multimedia messages or view the received messages through this menu. The Short Messaging Service (SMS) provides a communication mode which is cheaper and more convenient, through which you can quickly send text messages to others. You can use this menu to send messages to other mobiles phones or devices that can receive short messages. The Multimedia Messaging Service (MMS) is the latest service developed according to the standard of 3GPP. The MMS is a high-level application based on Wireless Application Protocol (WAP). Apart from the text content of SMS with which we are familiar, the MMS can send multimedia messages containing pictures, audios, videos, etc.. You can send a multimedia message to other mobile phones or e-mail boxes via your mobile phone. Tap to enter this menu; the message menu is the default menu. Now tap “Compose new message” on the first line to create a message. You can also 27 open the option menu bar to carry out relevant operations by pressing the “Menu” Key. 3.23 Music This mobile phone supports the audio playback function. Note: You need to properly insert the memory card into the mobile phone to use this menu function normally. Four tabs will be displayed after you enter this menu, namely, Artist, Album, Song, and Playlist. You can tap to enter one of the tabs and carry out relevant operations. In the music playback interface, you can tap relevant function icons to pause/play, fast forward, fast rewind, etc. At this moment, you can press the “Menu” key to open the option menu bar and carry out relevant operations. 3.24 E-Compass This mobile phone provides the compass function; you can carry out relevant operations according to the prompts on the screen. A barometer is built in the mobile phone. After calibration of the compass, you can check the temperature, altitude and air pressure of the current environment at the same time. The direction of the red needle of the compass is north. 4 Accessories 4.1 Charger Properly insert the plug of the charger into the jack at the top of the mobile phone; the mobile phone will automatically enter the charging mode; the battery bar icon will show the flashing charging status. The battery will be fully charged when the flashing icon disappears. The mobile phone can be charged no matter it is on or off. 28 4.2 Data Cable You can connect the mobile phone to the computer through the data cable. After successful connection, press the status bar and slide it downwards to open the notice menu list; tap “USB connected”, and then you can select “Open USB storage device”. After the USB storage device is opened, you can copy files between the computer and the SD card of the mobile phone or carry out other operations. After operations are complete, tap “Close USB storage device”. Note: When the Micro SD card is used as the USB storage device, it will be impossible to use some applications like Camera. 4.3 Earphone The following descriptions about earphone are only valid for earphone with only one push button. If there is an incoming call, you can short press the button on the earphone to answer the call and long press it to reject the call. During conversation, you can long press the earphone button to end the call. 5 Notice Radio Wave Your mobile phone is a wireless transmitter and receiver with low power, which shall emit and receive radio wave during operation. The radio wave will transmit your voice/data signals to the base station connected with the telephone network, which control the emission power of mobile phones. Your mobile phone transmits/receives the radio wave with the GSM frequency (900/1800/1900MHz). The GSM network shall control the transmission power within 0.01W~2W. Your mobile phone complies with all the relevant safety standards. The CE label on your mobile phone indicates that the phone complies with the European electromagnetic compatibility (Refer to the 89/336/EEC; for low-voltage provisions, refer to the 73/23/EEC). The CCC label on your mobile phone indicates that the phone complies with the China Compulsory Certification (CCC). You shall be liable for using your own mobile phones. To avoid risks to yourself, other people or the mobile phone, please carefully read and abide by the following instructions for safety, which shall be notified to anyone who may borrow your mobile phone. Please put your mobile phone at a safe place where children can not reach. Please remember your PIN code. 29 Turn the mobile phone off and dismantle its battery if you will not use it for a long time. The design of the mobile phones shall comply with all the applicable laws and regulations. However, the mobile phones may disturb other electronic devices. So you must abide by the local suggestions and regulations when using the mobile phone at home or outgoing. Especially, you must comply with the provisions strictly when using mobile phones in cars or airplanes. The public have been paying attention to the health hazards caused by mobile phones for a long time. Currently, the research of radio wave technologies (including the GSM technology) which have passed verification already, together with the safety standards formulated, are dedicated to ensure the public shall be free from the radiation hazards caused by the radio wave. Your mobile phone complies with all the applicable safety standards, as well as the provisions of 1999/5/EC, which is used for wireless equipments and telecommunication terminal equipments. Turn Your Mobile Phone Off Under the Following Conditions: Electronic devices with insufficient protection or high sensitivity may be interfered by the radio wave, which may cause accidents. In airplanes, even when you put your mobile phone in the luggage. Using mobile phones in airplane may impede the operation of airplane or even violate laws. In hospitals, clinics, health centers or any other place where medical facilities are installed. The place with potential explosive gas (such as gas stations or the area with particles of metal powder in the air). For vehicles transporting flammable products (even they have been parked already) or driven by liquefied petroleum gas (LPG), please firstly check whether you can use the mobile phone under current safety provisions. The areas where it is required to turn the wireless transmitter off, such as a quarry or a place undergoing the blasting operation. Please consult with your car manufacturer to confirm the electronic devices in your car shall not be affected by radio wave. Pacemaker Users If you are a pacemaker user: Keep a distance of more than 15cm between the pacemaker and the mobile phones when turning it on to avoid potential interference. Do not put the mobile phone in the chest pockets. Hear phone calls via the ear which is further with the pacemaker to reduce potential interference. Turn the mobile phone off if you feel there is any interference. Hearing Aid User If you are a hearing aid user, please consult with doctors or relevant manufacturers to learn whether such device is sensitive with the interference of mobile phones. Performance Improvement Please abide by the following instructions, in order to improve the performance of the mobile phone, reduce the radiation of radio wave and reduce the power 30 consumption by batteries. To enable the mobile phone to achieve optimum performance, we recommend you to use the mobile phone in proper ways (when you are not using hand-free mode or handhold-free accessories): Please do not keep the mobile phones under extra temperature conditions. Use the mobile phones carefully, for any misuse may invalid the customer service regulations. Clean the mobile phone with soft cloth. The power consumption is the same when calling or receiving phone call. However, in the mode of standby, it will still consume lower power if keeping the mobile phone at one place persistently. Under the condition of standby and moved, the power of the mobile phone shall be consumed by transmitting updated information to the network. Reducing the backlight duration or avoiding unnecessary browse among the various menus can reduce the power consumption to enable longer time for phone calls and standby. Information Presented on Battery Your mobile phones can be powered by rechargeable batteries Only use the appointed charger. Do not throw the battery into fire. Do not deform or dismantle the battery. Take care not to short circuit battery terminals with metal goods (such as keys in pockets) . Avoid exposing the mobile phones in extra hot (>60°C or 140°F)/wet/corrosive circumstances. You should always use the genuine accessories, for any other ones may damage your mobile phone. In this case, the warranty will be void. Please ensure that the damaged parts are replaced only with genuine ones by qualified technicians. Please do not use your phone when driving This is dangerous, for it may distract your attention. Please follow the instructions below: Concentrate on driving. Please park your car on the roadside before using mobile phones. Please abide by the local decrees on driving and using GSM mobile phones. If you want to use the mobile phones in cars, please install the hand-free system which is designed for such purpose. But you must ensure that you can concentrate on driving while making a phone call.. Please ensure that your mobile phone and the hand-free system will not impede the operation of any airbag or other safety instruments. Some countries may prohibit using the alarm system to control lamps or the horn to prompt callings. Please abide by the local decrees. 31 Children Safety Notice Keep your mobile phone away from children who shall be told all the safety notice. Some small parts may be dismantled or swallowed by children, such as SIM card, sealing retaining ring, lens ring, lens cover, etc. So please keep mobile phones beyond reach of children. EN 60950 Standards In hot weather or if exposed in sunlight for a long time (such as behind windows or windshields), the temperature of the shells of mobile phones may increase, especially with metal painting. Under such conditions, hold the mobile phone carefully, and avoid using it when the temperature is more than 40°C. Responsibility for Environment Protection Please abide by the local decrees on packaging materials, depleted batteries and used mobile phones. Such materials shall be recycled or disposed of properly. The batteries and packaging material have been marked with the standard symbols to facilitate the recovery and proper disposal of wastes. Warning: The manufacturer shall not be liable for the users who do not obey the above mentioned suggestions or misuse mobile phones. Note: please send the used lithium batteries to the appointed places or your dealer, instead of throwing into the garbage can. Certification Information (SAR) This device meets guidelines for exposure to radio waves. Your device is a low-power radio transmitter and receiver. As recommended by international guidelines, the device is designed not to exceed the limits for exposure to radio waves. These guidelines were developed by the independent scientific organization International Commission on Non-Ionizing Radiation Protection (ICNIRP) and include safety measures designed to ensure safety for all users, regardless of age and health. The Specific Absorption Rate (SAR) is the unit of measurement for the amount of radio frequency energy absorbed by the body when using a device. The SAR value is determined at the highest certified power level in laboratory conditions, but the actual SAR level of the device when being operated can be well below the value. This is because the device is designed to use the minimum power required to reach the network. The SAR limit also adopted by Europe is 2.0 W/kg averaged over 10 grams of tissue. The highest SAR value for this device type when tested at the ear is 0.188 W/kg, and when properly worn on the body is 0.498 W/kg. EU Regulatory Conformance 32 Hereby, We declares that this device is in compliance with the essential requirements and other relevant provisions of Directive 1999/5/EC. Notice: Observe the national local regulations in the location where the device is to be used. This device may be restricted for use in some or all member states of the European Union (EU). 6 Troubleshooting Fail to turn mobile phones on Remove the battery and then reinstall it. Charge the battery until the battery icon stops flicking. Finally, unplug the charger, and then try to turn the mobile phone on again. The screen shows locked information when turning the mobile phone on Someone has tried to use your mobile phone, but he/she does not know your PIN cod or unlock code (PUK). Please contact with the service provider. The screen shows IMSI error Such problem is in connection with the subscribed service. Please contact with the operator. Mobile phones fail to return to the standby interface After turning the mobile phone off, check whether the SIM card and battery are installed correctly, and then turn the mobile phone on again. There is no signal symbol You are disconnected from the network, the signal is blocked (such as in tunnels or among high-rise buildings), or you are beyond the coverage area of network. Please go to another place, and then try again or reconnect with network (especially when staying abroad). If your mobile phone has external antenna, check whether the antenna is at proper place, or contact with the network operator to seek help or obtain relevant information. The screen has no/slow response after pressing keys The screen will respond slowly in extra low temperature, which is normal phenomenon. Go to a warmer place and try again. For any other notice, please consult with your dealer. 33 Your battery seems to overheat Maybe you have used an unauthorized charger. Please use the genuine accessories all the time. The mobile phone fails to show the number of incoming calls This function depends on the network and subscribed service. If the network does not send the number of calling phone, the screen will show Call1 or Anonymous. For detailed information, please contact with your operator. Fail to transmit text messages Some networks do not allow exchanging SMS with other ones. Please ensure that you have entered correct number of SMS center or contact with your operator to obtain detailed information. Fail to receive and/or save JPEG images Your mobile phone may not be able to receive JPEG images with large size, too-long name or incorrect format. You are not sure whether the mobile phone can receive calling normally Check the option of call forwarding. When charging, the battery icon does not show the indicator bars, while its edge flicking The battery shall be charged when the temperature is no less than 0°C (32°F) or more than 50°C(113°F). For other notices, please consult with your dealer. The screen shows SIM error Please check whether the SIM card has been plugged in correctly. If the problem still exists, your SIM card may be damaged. Please contact with your network operator. When trying to use some functions in the menu, the mobile phone shows such functions are prohibited. Some functions depend on the network, for they are available when supported by the network or the subscribed service. For detailed information, please contact with your operator. The screen shows “Please plug in the SIM card” Please check whether the SIM card has been plugged in correctly. If the problem still exists, your SIM card may be damaged. Please contact with your network operator. 34 Power-saving of the mobile phone seems to be less efficient than stipulated in the user’s manual. The power saving capacity of the mobile phone depends on your setting (such as the volume of ring or the duration of backlight) and the functions you are using. Please disable all the functions you do not need in order to improve the power saving capacity of the mobile phone. The mobile phone can not be operated normally in cars There are some metal parts which may absorb the electromagnetic wave in cars. Such parts may affect the performance of your mobile phone. You can purchase a hand-free system with external antenna, which allows you to make a hand-free phone call. You should learn from the local departments about whether it is allowed to use mobile phones when driving. Fail to charge the mobile phone Please make sure plug the connector of the adaptor into the jack at the bottom of the mobile phone correctly. If the battery of mobile phone is depleted, wait several minutes (no more than 5 minutes normally), and then the charging icon shall be show on the screen of mobile phone. 35