1
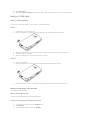
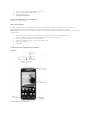
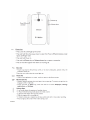
Alcatel ONE TOUCH Evolve Product Information Color of Device Black Kit Contents Battery, charger, USB cable, Alcatel ONE TOUCH Evolve SIM Type SIM card Specifications Adobe Flash Yes, Flash Player 11 Usage time: 13.5 hours (2G), up to 13 hours (3G)* Standby time: up to 16 days* Battery life Dimensions of handset *Talk and standby times and other specifications are provided by the manufacturer and are approximate. Actual performance varies based upon features or services used, network configuration, signal strength, operating temperature, customer use, and other factors. 121.5 x 64 x 11.8 mm 4.0” WVGA 480 x 800 pixels Main display TN, 16M color display Memory Internal Memory: 512MB/1GB (ONE TOUCH 5020W) MicroSD Card: up to 32GB End User Memory: 1.4GB Frequency bands GSM 850/900/1800/1900;UMTS 900/2100;UMTS 850/1900/2100UMTS 850/1900/AWS Phone style Bar Operating system Android Jelly Bean 4.1 Weight 136.5g Call Management Picture caller ID No External CLI Yes Ringer caller ID No Speed dial/One Yes Touch Dial Speakerphone Yes Vibrate Yes Voice dialing Yes Speaker Independent Voice Recognition (SIVR) No Camera Modes Multiple shooting modes available Multi shot Yes Resolution 5MP (rear facing) Video capture 720@30fps Zoom Digital zoom Flash No Connectivity Bluetooth 4.0, A2DP (stereo Bluetooth), OPP (Object Push Profile), HFP, AVRCP, PBAP Type: Android browser Supports: HTML 5.0 (Partial), XHTML 1.2 Browser CSS 1.0/2.1 (Partial)/3.0 (Partial) RTP/RTSP ECMAScript 3rd edition Near Field Communication Yes (NFC) Location Base Services (LBS) Google Maps USB support Micro USB • • • Wi-Fi Wi-Fi 802.11 a/b/g/n Wi-Fi Web browsing Wi-Fi Sharing Messaging Email client POP3, IMAP, Exchange, Gmail Voice Notes Yes Instant messaging client Can be downloaded from Play Store Picture messaging Yes Video messaging Yes Text messaging Yes Personalization & Fun FM Radio Yes Games Downloadable (Via Play Store) Music player Yes Ringtones Preloaded and downloadable Themes No Wallpaper Preloaded and downloadable Call Basics Answer calls To answer a call, follow these steps: When receiving a call touch the phone icon and slide to the right to answer. Reject calls To reject a call, follow these steps: When receiving a call touch the phone icon and slide to the left to reject. Block calls - Not available This feature is not available. Call Forwarding Cancel call forwarding To cancel call forwarding, follow these steps: 1. 2. 3. 4. 5. 6. From any Home screen, tap the Phone icon. Tap the Menu icon in the bottom right. Tap Voice call. Tap Call forwarding. Tap Always forward to cancel Tap Disable. Note: By disabling Always forward, the three options below re-appear on the device: • Forward when busy • Forward if unanswered • Forward if unreachable Forward all calls (unconditional) To enable call forwarding for all calls, follow these steps: 1. 2. 3. 4. 5. 6. From any Home screen, tap the Phone icon. Tap the Menu icon in the bottom right. Tap Settings. Tap Voice call. Tap Call forwarding. Tap Always forward to enable. Note: By enabling Always forward, the three options below will become grayed out on the device: • Forward when busy • Forward if unanswered • Forward if unreachable Call Log Reset call log To reset or clear the call log or history, follow these steps: 1. 2. 3. From any Home screen, tap the Phone icon. Tap Call log at the top of the screen. Tap the red diagonal down arrow to reset call log. View call log Call logs may approximate the amount of time you have spent on phone calls. To view call logs or history, follow these steps: 1. 2. 3. From any Home screen, press the Phone icon. Tap Call log at the top of the screen. You can view call logs for the following. o Incoming calls (blue arrows) o Outgoing calls (green arrows) o Missed calls (red arrows) Call Settings Turn on / off touch tones (DTMF) Your device can send a number to the network as dual tone multi-frequency (DTMF) tones. DTMF tones are used to communicate with automated systems that require you to type a number such as a code, password, or credit card number. To turn off DTMF tones (touch tones), follow these steps: 1. 2. 3. 4. From any Home screen, tap the Apps icon. Tap Settings. Scroll down to 'SYSTEM.' Clear the Dial pad touch tones check box. Voicemail Call voicemail To call voicemail, follow these steps: Using the Phone icon 1. 2. 3. From any home screen, tap the Phone icon. Tap the Dialer tab to display the keypad. Press and hold the 1 key. Using the Voicemail application 1. 2. 3. 4. From any Home screen, tap the All apps icon. Tap Visual Voicemail. Tap the Menu key. Tap Call Voicemail. Set voicemail number This feature is not available. You cannot change your voicemail number. Bluetooth Pair/Unpair Bluetooth device To turn on Bluetooth and pair with a headset or other device, follow these steps: 1. 2. 3. 4. 5. 6. 7. 8. 9. From any Home screen, tap the All apps icon. Tap Settings. Tap Bluetooth. Move the Bluetooth switch to the ON position. If necessary, make the device you want to pair with visible now so it will appear in your device list. If the device appears in the list, tap it to pair with handset. Otherwise tap SEARCH FOR DEVICES at the bottom of screen. When the device appears in the list, tap it to pair with handset. Once it is connected, it shows as 'Connected' under Paired Devices. Unpair Bluetooth device To turn off Bluetooth and unpair with a headset or other device, follow these steps: 1. 2. 3. 4. 5. From any Home screen, tap the All apps icon. Tap Settings. Tap Bluetooth. Locate the paired device and tap the Settings icon to the right of it. Tap unpair. Turn on / off Bluetooth To turn on or turn off Bluetooth, follow these steps: 1. 2. 3. 4. 5. From any Home screen, tap the All apps icon. Tap Settings. Tap Bluetooth. To turn on, tap Bluetooth switch to ON position. To turn off, tap Bluetooth switch to OFF position. Data Synchronization Data usage indicator To turn on, set, or turn off the data usage indicator, follow these steps: 1. 2. 3. 4. 5. From any Home screen, tap the All Apps icon. Tap Settings. Tap Data Usage. If necessary, move the Mobile data switch to the ON position. Choose from the following options: o Turn on a data usage limit Select the Limit mobile data usage check box. A new horizontal red bar appears in the graph. Touch the red bar and slide up or down to the desired data amount. When you reach this data amount, your data connection will be automatically disabled. o Set the data usage limit Touch the red bar and slide up or down to the desired data amount. When you reach this data amount, your data connection will be automatically disabled. o Turn off a data usage limit Clear the Limit mobile data usage check box. The red bar will disappear from the graph. o Set the usage warning Touch the orange bar and slide up or down to set the data usage warning. This will not automatically disable your data connection; select a very high value to avoid receiving a warning. View data use by app To view how much data certain apps are using, follow these steps: 1. 2. 3. 4. 5. 6. From any Home screen, tap the All Apps icon. Tap System settings. Tap Mobile data. If necessary, touch the blue bars on the graph and slide left or right to edit the time period included. Scroll down to view a list of applications sorted from most data used to least data used. Select an application to view more details. Emergency Alerts Turn on / off Emergency Alerts To turn on or turn off Emergency Alerts, follow these steps: 1. 2. 3. 4. 5. 6. From any Home screen, tap the All apps icon. Tap Emergency Alerts. Tap Settings. Tap the Menu icon in button right of screen. Tap Settings. Enable or turn off the following: o Show imminent threat Show extreme threat Show severe threat o Show AMBER alert Note: Presidential alerts cannot be turned off. Global Positioning System (GPS) Turn on / off GPS To turn on or turn off GPS, follow these steps: 1. 2. 3. 4. 5. From any Home screen, tap the All apps icon. Tap Settings. Scroll down to 'PERSONAL,' then tap Location access. To turn GPS on, move the GPS satellites slider to the ON position. To turn GPS off, move the GPS satellites slider to the OFF position. Internet Browser Browser cache To clear the mobile browser cache, follow these steps: 1. 2. 3. 4. 5. 6. 7. From any Home screen, tap the All Apps icon. Tap Chrome to launch the browser. Tap the Menu icon. Tap History. Tap CLEAR BROWSING DATA at bottom of screen. The following options display o Clear browsing history o Clear the cache o Clear cookies, site data o Clear saved passwords o Clear autofill data Select Clear the cache. 8. Tap Clear. Browser cookies To clear the mobile browser cookies, follow these steps: 1. 2. 3. 4. 5. 6. 7. 8. From any Home screen, tap the All Apps icon. Tap Chrome to launch the browser. Tap the Menu icon. Tap History. Tap CLEAR BROWSING DATA at bottom of screen. The following options display o Clear browsing history o Clear the cache o Clear cookies, site data o Clear saved passwords o Clear autofill data Select Clear cookies, site data. Tap Clear. Browser history To clear the mobile browser history, follow these steps: 1. 2. 3. 4. 5. 6. 7. 8. From any Home screen, tap the All Apps icon. Tap Chrome to launch the browser. Tap the Menu icon. Tap History. Tap CLEAR BROWSING DATA at bottom of screen. The following options display o Clear browsing history o Clear the cache o Clear cookies, site data o Clear saved passwords o Clear autofill data Select Clear browsing history. Tap Clear. Browser tabs open / close To open a new browser tab or close one, follow these steps: Open first window 1. 2. From any Home screen, tap the All Apps icon. Tap Chrome to launch the browser. Open additional windows 1. 2. 3. From any Chrome browser, tap the Menu icon. Tap New tab to add a new standard tab. Tap New incognito tab to add a new incognito tab. Navigate between open windows 1. 2. From any Chrome browser, tap the Tabs icon. From here you can navigate between: o Standard and Incognito tabs o Tabs created within each section Close an open window 1. 2. 3. From any Chrome browser, tap the Tabs icon. Tap the X next to any individual tabs to close them. Tap the Menu icon then tap Close all tabs to close all. Turn on / off JavaScript This feature is not available. Network APN & data settings To add a new APN, follow these steps: 1. 2. 3. 4. 5. 6. 7. 8. 9. From any Home screen, tap the All apps icon. Tap Settings. Under 'WIRELESS & NETWORKS,' tap More... to expand the menu. Tap Mobile networks. Tap Access Point Names. Tap the Menu icon in button right of screen. Tap New APN and edit the settings. Tap the Menu icon in button right of screen. Tap Save to confirm. Manual network selection To manually select the wireless network the device connects to, follow these steps: 1. 2. 3. 4. 5. 6. 7. 8. 9. From any Home screen, tap the All apps icon. Tap Settings. Under 'WIRELESS & NETWORKS,' tap More… to expand the menu. Tap Mobile networks Scroll to and select Network operators. Under 'Available networks,' tap Select manually. Tap OK. After a few moments, tap the desired network. Tap OK. The device detects and registers on wireless networks inside Walmart Family Mobile’s calling area, but roaming networks are usually restricted to Walmart Family Mobile SIM cards. You can manually select a network only in areas where Walmart Family Mobile does not own GSM spectrum. Turn on / off Airplane mode Airplane mode turns off wireless connections. This allows you to use apps and menus, but not make calls or use the internet. To turn on or turn off airplane mode, follow these steps: 1. 2. 3. From any Home screen, tap the All apps icon. Tap Settings. Under WIRELESS & NETWORKS: o Select Airplane mode to turn on. o Clear Airplane mode to turn off. Turn on / off data roaming To turn on or turn off data roaming, follow these steps: 1. 2. 3. 4. 5. 6. 7. 8. From any Home screen, tap the All apps icon. Tap Settings. Under 'WIRELESS & NETWORKS,' tap More... to expand the menu. Tap Mobile networks Scroll to and tap Data roaming. Under Roaming mode, tap Disable to turn off. To enable data roaming choose either: o National roaming only o All networks Tap OK to confirm. System Manager This feature is not available. Wi-Fi This feature is not supported. Home Screen Add widget or shortcut To add a widget or shortcut to a home screen, follow these steps: 1. 2. 3. 4. From any Home screen, tap the All apps icon. Tap Settings. Tap APPS or WIDGETS to display a list of current apps or widgets. Tap and hold the desired app or widget to add it to the home screen. Delete widget or shortcut To delete a widget or shortcut to a home screen, follow these steps: 1. 2. From the home screen, tap and hold a widget or shortcut. When the Remove (trashcan) icon appears, slide the widget or shortcut to the trashcan to remove. Home screen wallpaper To change the Home screen wallpaper picture, follow these steps: 1. 2. 3. 4. 5. 6. 7. From any Home screen, tap the All apps icon. Tap Settings. Scroll down to 'DEVICE,' then tap Display. Scroll to 'PERSONALIZE,' then tap Wallpaper. Tap the desired location of the wallpaper image: o Gallery o Live wallpapers o Video wallpaper o Wallpaper gallery Navigate to the desired wallpaper image and tap it to select. Tap Set wallpaper to change the Home screen wallpaper image. Keyboard Change default keyboard To change the default keyboard, follow these steps: From any Home screen, tap the All apps icon. 1. 2. 3. 4. 5. 6. 7. Tap Settings. Scroll down to 'PERSONAL,' then tap Language & input. Scroll down to 'KEYBOARD & INPUT METHODS,' then tap Default. Select input mode: o English US (Android keyboard) o Swype For additional options, tap Configure input methods. Choose between these three options: o English US (Android keyboard) o Google voice typing o Swype Tap the Settings icon next to chosen input method to customize the keyboard. Text entry mode To change the text entry or predictive text mode, follow these steps: 1. 2. 3. 4. 5. From any Home screen, tap the All apps icon. Tap Settings. Scroll down to 'PERSONAL,' then tap Language & input. Tap the Settings icon next to chosen input method to customize the keyboard. o English US (Android keyboard) o Google voice typing o Swype Follow the steps to change the text entry or predictive text mode Turn on / off haptic feedback To turn on / off haptic feedback, follow these steps: 1. 2. 3. 4. 5. From any Home screen, tap the All apps icon. Tap Settings. Scroll down to 'DEVICE,' then tap Audio Profiles. Tap the Settings icon next to General. Scroll down to 'SYSTEM,' then select or deselect the check box next to Haptic feedback. Ringtones Notifications To change the notification sounds, follow these steps: 1. 2. 3. 4. 5. From any Home screen, tap the All apps icon. Tap Settings. Scroll to 'DEVICE,' then tap Audio profiles. Under 'PREDEFINED PROFILES,' tap desired choice: o General o Meeting o Outdoor o Indoor For General, tap the Settings icon and customize the notification. o [GENERAL] Phone vibrate (on/off) Volumes (adjust sliders for each) Ringtone 6. Notifications Media volume Alarms o [INCOMING CALLS] Phone ringtone Music o [NOTIFICATIONS] Select default notification Silent Cue Doorbell Drop Grotto Hello Interrogation Sign Somewhere Upshot o [SYSTEM] Dial pad touch tones (on/off) Audible selection (on/off) Screen lock sound (on/off) Haptic feedback (on/off) Select power on ringtone Silent Alcatel Start Up T-Jingle Select power off ringtone Silent Alcatel Shut Down Under 'SOUND ENHANCEMENT,' check or clear Audio Enhancement. Ringtones To change the ringtone, follow these steps: Ringtone for all calls 1. 2. 3. 4. 5. 6. 7. 8. From any Home screen, tap the All apps icon. Tap Settings. Scroll to 'DEVICE,' then tap Audio profiles. Under 'PREDEFINED PROFILES,' tap General. Tap the General Settings icon. Scroll to '[INCOMING CALLS],' then tap Phone ringtone. Tap the desired ringtone from the scrolling list. Tap OK to confirm. Ringtone for calls from one contact This feature is not available. Transfer music or sounds to use Some devices require you to transfer music, sounds, or other audio files to the device in a certain way for it to be used for ringtones and notifications. To transfer these files, follow these steps: 1. 2. 3. Connect a USB cord to your phone, then to a computer. On the computer, click Sync digital media files to this device. Drag desired music to the sync window on the right. 4. 5. Click Start sync. When the Sync Completed message displays, safely disconnect the phone from the computer. Battery / SIM Card Insert / remove battery To insert or remove the battery in your device, follow these steps: Insert 1. 2. If necessary, turn the phone off. Remove the back cover using the notch located at the bottom edge of the phone. 3. 4. 5. Align the gold contacts on the battery with the gold contacts in the battery compartment. Press the battery into place. Replace the back cover by pressing it onto the phone. Remove 1. 2. Power the phone off. Remove the back cover using the notch located at the bottom of the phone. 3. Lift the battery out of the compartment using the notch located above the battery slot. Battery saving mode - Not available This feature is not available. Tips to save battery life To save and extend battery life, follow these steps: Lower screen brightness and timeout duration 1. 2. 3. From any Home screen, tap the All Apps icon. Tap Settings. Scroll down to 'DEVICE,' then tap Display. 4. 5. 6. 7. 8. 9. 10. 11. Tap Brightness. Tap to clear the Automatic brightness check box, if desired. Touch and drag the Brightness slider to the desired level. Tap OK. Tap the back button to return to the previous menu. Return to 'DEVICE,' then tap Display. Tap Sleep. Tap the desired timeout setting: o 15 seconds o 1 minute o 2 minute o 5 minutes o 10 minutes o 30 minutes o Never Turn off Bluetooth and GPS 1. 2. From any Home screen, pull down the notification window from the top Tap the Bluetooth and GPS icons so they are in the OFF setting. Toggle from 3G to 2G 1. 2. 3. 4. 5. 6. From any Home screen, tap the All Apps icon. Tap Settings. Under 'WIRELESS & NETWORKS,' tap More... to expand the menu. Tap Mobile networks. Tap Network mode. Select WCDMA only or GSM only, which are both 2G. Note: 2G uses less battery than 3G. Update to the latest software 1. 2. 3. 4. 5. 6. From any Home screen, tap the All Apps icon. Tap Settings. Scroll down to 'SYSTEM,' then tap About phone. Tap System Update. Tap Check for software updates. Follow any additional prompts. Insert / remove SIM card To insert or remove the SIM card, follow these steps: Insert 1. 2. Turn the phone off. Remove the back cover using the notch located at the bottom edge of the phone. 3. Lift the battery out. 4. Slide the SIM card into the slot with the gold contacts facing down. 5. 6. Replace the battery while ensuring the gold contacts are aligned. Replace the back cover. Remove 1. 2. Turn the phone off. Remove the back cover using the notch located at the bottom edge of the phone. 3. 4. Lift the battery out. Slide the SIM card out of the slot. Delete SIM messages To delete SIM messages, follow these steps: 1. 2. 3. 4. From any home screen, tap the Messaging icon. Select the desired message thread. Tap the Settings icon. Tap Delete messages. View free SIM space - Not available This feature is not available. SIM unlock phone The SIM subsidy unlock code allows the device to use a SIM card from another wireless carrier. This may be necessary when traveling internationally. To enter the SIM subsidy unlock code, follow these steps: Important: Stop if you receive an error message. The device may lock permanently if you enter the incorrect code multiple times. 1. 2. 3. 4. 5. 6. See if your phone is eligible to unlock: Unlock Your Phone with a SIM Subsidy Unlock Code. Contact Customer Care to request the SIM subsidy unlock code for your phone. Insert the blocked SIM and turn on the phone. . The phone displays a screen to enter the unblock code. Enter the unblock code. Select OK. Indications/Functions/Menu Buttons Icons IMEI To find the IMEI serial number of your device, follow these steps: 1. 2. From the Home screen, enter *#06#. The IMEI number will automatically display. Liquid Damage Indicator (LDI) Walmart Family Mobile devices have an indicator that shows if it has been subjected to liquid damage. To read the Liquid Damage Indicator (LDI), follow these steps: 1. 2. Remove the back cover and battery from your device. View the image to read the label: White LDI (indicates no liquid damage) Pink or red LDI (indicates liquid damage) Status lights To understand what the status light indicators and charging lights mean, refer to the following: Memory Manage memory (RAM) To manage the internal memory, follow these steps: Restart your device regularly You should restart the phone at least once a day: 1. 2. Press and hold the Power button. The device turns off. Press and hold the Power button again to turn the device on. Manage applications Keep your applications updated: 1. 2. 3. 4. From any Home screen, tap the All apps icon. Tap Settings. Scroll down to 'DEVICE,' then tap Applications. Select the desired application and review for any updates. Task manager To use Task Manager to free up memory space, follow these steps: 1. 2. 3. 4. 5. 6. From any Home screen, tap the All Apps icon. Tap Settings. Scroll down to 'DEVICE,' then tap Applications. Tap the following tabs near the top of the screen: o DOWNLOADED to view and uninstall downloaded applications o SD CARD to view applications installed on the SD card o RUNNING to view applications that are currently running o ALL to view all applications Tap the application you want to stop or uninstall. Tap Stop, Force stop, or Uninstall, if available. View free memory To view free memory, follow these steps: 1. 2. 3. 4. From any home screen, tap the All Apps icon. Tap Settings. Scroll down to 'DEVICE,' then tap Storage. View memory by following: o Phone storage o Total space o Available space o Apps (app data, etc.) o Pictures, videos o Audio (music, etc.) o Downloads o Cached data o Misc. Manage memory (ROM) To manage the internal storage space, follow these steps: Clear the storage at least once a week. • • • • Delete unnecessary text messages (SMS) and picture messages (MMS). Transfer pictures and media stored on the phone memory to your computer. Clear the browser cache, cookies, or history. Delete the call logs. Set the device to manage some memory Prevent the storage from being filled as quickly. Change the setting for email synchronization to download only a few days 1. 2. 3. 4. 5. From any home screen, tap the All Apps icon. Scroll to and tap Settings. Scroll down to 'ACCOUNTS,' then tap Account settings. Tap the email account. Scroll down to 'DATA USAGE,' then tap Days to sync. 6. Tap the desired setting: o One day o Three days o One week o Two weeks o One month o All View free storage space To view the amount of free internal storage, follow these steps: 1. 2. 3. From any home screen, tap the All Apps icon. Tap File Manager. View the following under Phone storage: o Available o Total space SD Card & Transfer Format SD card Formatting the SD card deletes all data on it. You may wish to format the SD card if you want to delete the files, if files or apps on the SD card are not working, or if the SD card is not working. To format the SD card while inserted in the device, follow these steps: 1. 2. 3. 4. 5. From any home screen, tap the All Apps icon. Tap Settings. Scroll down to 'DEVICE,' then tap Storage. Scroll down to 'SD CARD,' then tap Format SD card. Tap Format SD card below the warning message to confirm. Note: This action will erase the SD card in the phone. You will lose ALL data on the card! Insert / remove SD card Memory cards add extra storage space for your music, pictures, videos, and more. This phone uses a microSD memory card size, which are sold separately. To insert or remove the microSD card, follow these steps: Install microSD card 1. 2. 3. 4. Power off your phone. Remove back cover by pulling cover up and remove battery. Slide the metal microSD card tray to right unlock position. The tray will click and release when unlocked. Place microSD card into the slot with the gold contacts facing downward. Remove microSD card 1. 2. 3. 4. Slide the metal card tray to right unlock position. The tray will click and release when unlocked. Remove microSD card from slot. Once microSD card is removed from slot, close the card tray. Slide tray to left lock position. The tray will click when locked. Open or delete files using a computer To open or delete files on the SD card using a computer, follow these steps: 1. 2. 3. 4. 5. 6. Connect the USB cord to your phone, then to a computer. Click Open device to view files. Note: You will see two Removable Disk folders open. One is for your internal device memory and the other is for your SD card. Open the Removable Disk folder representing your SD card. Click to open the desired folder(s). To delete a file, click the file, press Ctrl + D, and then click Yes. When finished, safely disconnect the phone from the computer. Open or delete files using the device To open or delete files on the SD card using the device, follow these steps: 1. 2. 3. 4. 5. 6. 7. From any home screen, tap the All Apps icon. Tap File Manager. Tap SD Card. Navigate to and tap the file(s) you want to open or delete. To open tap the file(s). Tap the trashcan icon to delete. Tap OK to the Delete selected item? message. Set default memory storage By default, the device stores data on the either the SD card or the internal storage. To set the default memory storage to another location, follow these steps: 1. 2. 3. 4. From any home screen, tap the All Apps icon. Tap Settings. Scroll down to 'DEVICE,' then tap Storage. Under 'Default write disk,' set the storage location: o SD Card o Phone Storage Transfer files between computer & SD card To transfer files and pictures between the computer and SD card, follow these steps: 1. 2. 3. 4. 5. 6. 7. Connect the USB cord to your phone, then to a computer. Click Open device to view files. Note: You will see two Removable Disk windows. One represents your device's internal memory and the other your SD card. On the computer, navigate to and open the phone’s disk drive. Locate and copy the desired file(s) on the computer. Paste the files in the desired location on the phone’s disk drive. When finished, safely disconnect the phone from the computer. Transfer files between internal storage & SD card To transfer files and pictures between the internal storage and SD card, follow these steps: 1. 2. 3. 4. 5. 6. 7. 8. 9. From any Home screen, tap the All apps icon. Tap File Manager. Tap Phone storage. Scroll Phone to enter your phone's internal memory. Locate the file you want to move Select Options and then select Select. Select each file you want to transfer or else select Select all. Select Options. Scroll to and select Copy selected. Note: Select Move selected to move the files without duplicating them. 10. Scroll to and select SD Card. 11. Select Open. 12. Navigate to where you want to transfer the files. Select Options and then select Select. View free SD card space To view the amount of free SD card storage, follow these steps: 1. 2. 3. 4. 5. From any Home screen, tap the All apps icon. Tap Settings. Scroll down to 'DEVICE,' then tap Storage. Scroll down to 'SD CARD,' then tap SD card. View the Free value. Apps Clear app cache and data Clearing cache or data from an app can fix some software problems. If you clear data, any data stored in that app is lost, such as settings, login information, and saved games. If you don't want to clear the data, try just clearing cache first. If you still experience problems, then clear data too. To clear the cache and data for an app, follow these steps: 1. 2. 3. 4. 5. 6. 7. 8. From any Home screen, tap the All Apps icon. Tap Settings. Scroll down to 'DEVICE,' and then tap Applications. If necessary, touch the screen and slide left to view the 'ALL' screen. Select the desired app. Tap Clear cache. Tap Clear data. If necessary, tap OK. Uninstall app To uninstall third-party apps, follow these steps: 1. 2. 3. 4. 5. 6. 7. From any Home screen, tap the All Apps icon. Tap Settings. Scroll down to 'DEVICE,' and then tap Applications. If necessary, touch the screen and slide left to view the 'ALL' screen. Select the desired app. Tap Uninstall. Tap OK. Hide apps Although you may be unable to uninstall some preloaded apps, you may be able to hide and disable them. This causes them to hide from the Apps menu and not perform updates. To hide or disable preloaded apps, follow these steps: 1. 2. 3. 4. 5. From any Home screen, tap the All Apps icon. Tap Settings. Scroll down to 'DEVICE,' and then tap Applications. If necessary, touch the screen and slide left to view the 'ALL' screen. Tap the desired app. 6. 7. Tap Disable. Tap OK. Show apps To show or enable preloaded apps you have hidden, follow these steps: 1. 2. 3. 4. 5. 6. From any Home screen, tap the All Apps icon. Tap Settings. Scroll down to 'DEVICE,' and then tap Applications. If necessary, touch the screen and slide left to view the 'ALL' screen. Tap the desired app. Tap Enable. Pre-installed apps The following apps are pre-installed on the device: • • • • • • • • • • • • • • • • • • • • • • • • • • • • • • • • • • • • • Calculator Calendar Camcorder Camera Chrome Clock Downloads Email Emergency Alerts File Manager Gallery Gmail Google Google Settings Google+ Local Lookout Security Maps Messaging Messenger Mobile HotSpot Movie Studio Music Navigation News & Weather Notes People Phone Play Books Play Magazines Play Movies & TV Play Music Play Store Radio Settings Setup Sound Recorder • • • • • • • • • • • • T-Mobile My Account T-Mobile Name ID T-Mobile TV Talk Time ToDo Twitter Video Player Visual Voicemail Voice Dialer Voice Search YouTube Sync apps & accounts To add or edit apps and accounts to sync, follow these steps: Google Account 1. 2. 3. 4. From any Home screen, tap the All Apps icon. Tap Settings. Scroll down to 'ACCOUNTS,' then tap Google. Under the Sync menu, select the check boxes for any of the following: o Sync app data o Sync Calendar o Sync Chrome o Sync Contacts o Sync Gmail o Sync Google Photos o Sync Google Play Books o Sync Google Play Magazines o Sync Google Play Music o Sync People details Camera Camera settings Before using the Camera, please be sure to remove the protective lens cover before use to avoid it affecting your picture quality. Below is an overview of the camera settings. To change the settings for taking and displaying pictures, follow these steps: 1. 2. 3. 4. From any Home screen, tap the All apps icon. Tap Camera. Adjust the slider bar to either camera or video mode: o Camera o Video mode In Camera mode, you can adjust these settings: [General settings] o o o o o Scene mode Exposure White balance Capture mode Grid [Camera settings] o o o o o o 5. Store location Shutter sound Timer Picture size ISO Anti banding In Video mode, you can adjust these settings: [General settings] o o o o Scene mode Exposure White balance Time lapse interval [Video settings] o o o o o o Store location Shutter sound Microphone EIS Duration Video quality Set default camera storage To change if the camera stores pictures on the internal memory (ROM) or SD card, follow these steps: 1. 2. 3. 4. From any Home screen, tap the All apps icon. Tap Settings. Scroll down to 'DEVICE,' then tap Storage. Under 'DEFAULT WRITE DISK, tap the desired storage setting: o o SD Card Phone storage Delete a picture or video To delete pictures or videos from the gallery, follow these steps: 1. 2. 3. 4. 5. From any Home screen, tap the All apps icon. Tap Gallery. Tap Photo Album see the individual pictures in the album. Select the image(s) you wish to delete. Tap the trashcan icon to delete. Take a screen shot This feature is not available. Email Accounts Add an email account manually To set up an email account and manually enter the settings, follow these steps: 1. 2. 3. 4. 5. 6. 7. 8. From any Home screen, tap the All apps icon. Tap Settings. Scroll down to 'ACCOUNTS,' then tap + Add account. To add an Exchange email account, tap Corporate. To add any other email account type, tap Email. Enter your email address and password. Tap Next. Select email checking frequency: o Never o Every 5 minutes o Every 10 minutes o Every 15 minutes o Every 30 minutes o Every hour 9. Check or clear these email settings: o Send email from this account by default. o Notify me when email arrives. o Sync email from this account. o Automatically download attachments when connected to Wi-Fi. 10. Tap Next. 11. If desired, edit the account name (displayed on outgoing messages). 12. Tap Next to complete setup. Add a Hotmail, Gmail, AOL, or Yahoo account To set up a Hotmail, Gmail, AOL, or Yahoo email account, follow these steps: 1. 2. 3. From any Home screen, tap the All apps icon. Tap Email. Tap the desired account type: o Hotmail o Gmail o AOL o Yahoo 4. Enter user name and password. 5. Tap Next. 6. Select email checking frequency: o Smart push o Automatic push o Never o Every 5 minutes o Every 10 minutes o Every 15 minutes o Every 30 minutes o Every hour 7. Choose days to sync: o One day o Three days o One week o Two weeks o One month o All 8. Check or clear these email settings: o Send email from this account by default. o Notify me when email arrives. o Sync email from this account. o Automatically download attachments when connected to Wi-Fi. 9. If desired, edit the account name (displayed on outgoing messages). 10. Tap Next to complete setup. Delete an email account To delete an email account, follow these steps: 1. 2. 3. 4. 5. 6. 7. From any Home screen, tap the All apps icon. Tap Settings. Scroll down to 'ACCOUNTS,' then tap Email. Tap Account settings. Tap the email account you wish to delete. Scroll down to 'REMOVE ACCOUNT,' then tap Remove account. Tap OK to confirm. Attach a file and send an email To attach files to email messages, follow these steps: 1. 2. 3. 4. 5. 6. 7. 8. From any home screen, tap the All Apps icon. Tap the file location: o Gallery o File Manager o Downloads Tap the file, image, or picture you wish to attach to the email. Tap Email. Enter the email address or contact name. If available, select the email address or contact name when it pops up. Scroll down and enter a subject. Scroll down and enter the text of your email. Tap the send message > icon at top of screen. Delete emails To delete email messages, follow these steps: 1. 2. 3. 4. From any home screen, tap the All Apps icon. Select the email account: o Gmail o Email Select the emails you wish to delete. Tap the trash can icon at the bottom of screen to delete emails. SMS (Text) / MMS (Picture/Video) Add SMS service center number This feature is not available. Delete picture messages (MMS) To delete picture messages (MMS), follow these steps: 1. 2. 3. 4. From any home screen, tap Messaging. Tap and hold the message you wish to delete. Tap the trashcan to delete the message. Tap Delete to confirm. Delete text messages (SMS) To delete text messages (SMS), follow these steps: 1. 2. 3. From any home screen, tap the Messaging. Tap and hold the message you wish to delete. Tap the trashcan to delete the message. 4. Tap Delete to confirm. Save pictures received in a message (MMS) To save a picture you received as a picture message (MMS), follow these steps: 1. 2. 3. 4. From any home screen, tap Messaging. Tap and hold the picture you wish to save. Tap Save attachment. Tap Download icon to confirm. An Attachment saved message will briefly appear. Send a group text message (SMS) To write and send text messages (SMS) to a group, follow these steps: Create a custom group 1. 2. 3. 4. 5. 6. 7. 8. From any home screen, tap All Apps. Scroll to and tap People. Tap + plus sign at the bottom right. Choose the account under which you wish to create the group: o Corporate o Google o USIM o Phone Edit the group name. Tap + plus sign to add contacts, or type a person's name. Tap OK. Tap Done once you have added the desired people to the group. Send to a Group (already created) 1. 2. 3. 4. 5. 6. 7. From any home screen, tap Messaging. Tap the + plus sign at the bottom to create a new message. Tap + plus sign at the top to expand the menu. Tap Groups. Tap the desired group. Scroll down and enter your message. Tap Send. Send a new picture or video in a message (MMS) To take a new picture or video and send it as a picture message (MMS), follow these steps: 1. 2. 3. 4. 5. 6. 7. 8. 9. From any home screen, tap Messaging. Tap the + plus sign to create a message. Tap the + plus sign to expand the menu. Tap Capture picture to take a new picture. Tap Capture video to take a new video. Follow the instructions for the picture or video. Tap the check mark icon to insert the picture or video into the message. Scroll down and enter a message. Note: You are not required to enter a message. However, you must scroll down to the message field for the Send icon to become available. When finished, tap Send MMS to send. Send a saved picture or video in a message (MMS) To send pictures or videos you have saved on your device as a picture message (MMS), follow these steps: 1. 2. 3. 4. 5. 6. 7. 8. 9. From any home screen, tap Messaging. Tap the + plus sign to create a message. Tap the + plus sign again to expand the menu. Tap Pictures to insert a saved picture. Tap Videos to insert a saved video. Tap the desired picture or video. Tap the check mark to insert the picture or video into the message. Scroll down and enter a message. Note: You are not required to enter a message. However, you must scroll down to the message field for the Send icon to become available. When finished, tap Send MMS to send. Text to Speech Set up & turn on To set up and use text to speech, follow these steps: 1. 2. 3. 4. 5. 6. 7. 8. 9. From any Home screen, tap the All apps icon. Tap Settings. Scroll down to 'PERSONAL,' then tap Language & input. Scroll down to 'SPEECH,' then tap Text-to-speech settings. Under 'PREFERRED ENGINE,' make selection: o Google Text-to-speech Engine o Pico TTS Tap the Settings icon. Tap Language, and then select the desired language. Tap Install voice data. Tap Download next to the desired language: o Spanish (Spain) o French (France) o German (Germany) o Italian (Italy) Settings Text to speech reads messages out loud, allowing you to listen to text or messages instead of reading them. To change text to speech settings, follow these steps: 1. 2. 3. 4. 5. 6. From any Home screen, tap the All apps icon. Scroll down to 'PERSONAL,' then tap Language & input. Scroll down to 'SPEECH,' then tap Text-to-speech settings. Under 'GENERAL,' tap Speech rate. Select one of the following options: o Very slow o Slow o Normal o Fast o Very fast If necessary, tap Listen to an example to play a preview of your current settings. Voice Commands This feature is not available. Content Management Add contact To add a new contact to the phone book, follow these steps: 1. 2. 3. 4. 5. 6. From any home screen, tap the green Phone icon. Tap the Contacts tab. Tap the + Add Contact icon. Choose the desired option: o Google o USIM o Phone Enter the contact’s information. Tap Done to save contact. Add contact to speed dial To add a contact to speed dial, follow these steps: 1. 2. 3. 4. 5. 6. From any home screen, tap the green Phone icon. Tap the Dialer tab. Tap the Menu icon. Tap Speed dial. Tap a number (2 through 9) to add a contact to that number. Note: Speed dial number 1 is reserved for voicemail and cannot be changed. Tap the contact to select for desired speed dial number (2 through 9). Copy contact: import/export from SD card To copy contacts between the device memory and SD card, follow these steps: Phone to SD card 1. 2. 3. 4. 5. 6. 7. 8. 9. 10. 11. From any home screen, tap the All apps icon. Tap People. Tap the Contacts tab. Tap the Menu icon. Tap Import/Export. Under 'COPY CONTACTS FROM,' tap Phone. Tap Next. Under 'COPY CONTACTS TO,' tap SD Card. Select the contact(s) to copy. Tap the Export contacts icon. Tap OK to confirm. SD card to phone 1. 2. 3. 4. 5. 6. 7. 8. 9. 10. 11. From any home screen, tap the All apps icon. Tap People. Tap the Contacts tab. Tap the Menu icon. Tap Import/Export. Under 'COPY CONTACTS FROM,' tap SD Card. Tap Next. Under 'COPY CONTACTS TO,' tap Phone. Select the contact(s) to copy. Tap the Export contacts icon. Tap OK to confirm. Copy contact: import/export from SIM card To copy contacts between the device memory and SIM card, follow these steps: Phone to SIM card 1. 2. 3. 4. 5. 6. 7. 8. 9. 10. 11. From any home screen, tap the All apps icon. Tap People. Tap the Contacts tab Tap the Menu icon in the bottom right. Tap Import/Export. Under 'COPY CONTACTS FROM,' tap Phone. Tap Next. Under 'COPY CONTACTS TO,' tap SIM Card. Select the contact(s) to copy. Tap the Export contacts icon. Tap OK to confirm. SIM card to phone 1. 2. 3. 4. 5. 6. 7. 8. 9. 10. 11. From any home screen, tap the All apps icon. Tap People. Tap the Contacts tab. Tap the Menu icon. Tap Import/Export. Under 'COPY CONTACTS FROM,' tap SIM Card. Tap Next. Under 'COPY CONTACTS TO,' tap Phone. Select the contact(s) to copy. Tap the Export contacts icon. Tap OK to confirm. Delete contact To delete contacts from the phone book, follow these steps: 1. 2. 3. 4. 5. 6. 7. 8. From any home screen, tap the All apps icon. Tap People. Tap the Contacts tab. Tap the Menu icon in the bottom right. Tap Delete contact. Select the contact(s) you wish to delete. Tap the trashcan icon. Tap OK to confirm. Groups Add contacts to a caller group To add contacts to a caller group, follow these steps: 1. 2. 3. 4. 5. 6. 7. 8. 9. 10. 11. From any home screen, tap the All apps icon. Tap People. Tap the Groups tab. Tap the Menu icon. Select Options. Scroll to and select Groups. Select the desired group. Select Options and then select Add. Select the desired contacts to select the check box. When finished, select Done. Select Yes to confirm. Create a caller group To create a caller group, follow these steps: 1. 2. 3. 4. 5. 6. 7. 8. 9. 10. 11. From any home screen, tap the All apps icon. Tap People. Tap the Groups tab. Tap the Menu icon. Select Options. Scroll to and select Groups. Select Add New Group. Enter a name for the group. Select Options. Select Save. Select Yes to confirm. Backlight Brightness To make the screen backlight brighter or darker, follow these steps: 1. 2. 3. 4. 5. 6. 7. From any Home screen, tap the All apps icon. Tap Settings. Scroll down to 'DEVICE,' then tap Display. Scroll down to 'DISPLAY,' then tap Brightness. If necessary, clear the Automatic brightness check box. Scroll left or right to the desired setting. Tap OK to save. Timeout To change the time before the backlight times out, follow these steps: 1. 2. 3. 4. 5. From any Home screen, tap the All apps icon. Tap Settings. Scroll down to 'DEVICE,' then tap Display. Scroll down to 'DISPLAY,' the tap Sleep. Select the desired setting: o 15 seconds o 30 seconds o 1 minute o 2 minutes o 5 minutes o 10 minutes o 30 minutes o Never Backup & Restore Back up apps Back up application data, Wi-Fi passwords, and other settings to Google servers. To back up data, follow these steps: 1. 2. 3. 4. 5. From any Home screen, tap the All Apps icon. Tap Settings. Scroll down to 'PERSONAL,' then tap Backup and reset. Select the check box next to Back up my data. Tap Backup account. 6. 7. Tap +Add account to set the backup account. Follow the steps wizard to add a new Google account or use an existing one. It may take a few minutes Backup contacts - Not available This feature is not available. Back up media & pictures To back up your media and pictures, follow these steps: Using computer 1. 2. 3. 4. 5. Connect a USB cord to your phone, then to a computer. On the computer, click Import Pictures and Videos. If desired, tag pictures (optional) Click import. When finished, safely disconnect the phone from the computer. Using device This feature is not available. Restore apps Automatic restore To set device to perform an automatic restore, follow these steps: 1. 2. 3. 4. From any Home screen, tap the All Apps icon. Tap Settings. Scroll down to 'PERSONAL,' then tap Backup and reset. Select the check box next to Automatic restore. Restore contacts This feature is not available. Restore media & pictures To restore backed up media and pictures, follow these steps: Using computer 1. 2. 3. 4. 5. 6. 7. 8. Connect a USB cord to your phone, then to a computer. On the computer, click Open device to view files. Navigate to the files you backed up. Navigate to and open the phone’s internal memory. If you have an SD card installed, you will see two Removable Disk drives. Copy and paste the desired files or folders stored in your computer to the desired location inside your device's internal memory. If you have an SD card installed, you can also restore the files to your SD card. When finished, safely disconnect the phone from the computer. Using device This feature is not available. Software Version Check software version To check the current software version, follow these steps: 1. 2. 3. 4. From any Home screen, tap the All Apps icon. Tap Settings. Scroll down to 'SYSTEM,' then tap About phone. View the Software version. Device Setup Setup wizard After turning on your device the first time, you may see a setup wizard to help you set up your device. To do this initial setup, follow these steps: 1. 2. 3. 4. 5. 6. 7. 8. 9. 10. 11. 12. 13. 14. From any Home screen, tap the All apps icon. Tap Setup. To skip the Setup guide, tap Skip all. Tap Get started. Select desired language: o English o Espanol Tap Next. If desired, follow instructions to set up Wi-Fi. Tap Skip to bypass Wi-Fi setup. If desired, follow instructions to set up Google account. If desired, check the following boxes: o Google's location service o Location and Google search Tap Next. If desired, follow instructions to: o Set up Voicemail o Sign in to Email o Sign in to Social Network Tap Go to Home screen to complete setup. To return to setup at any time, tap the Setup icon in the app tray. Language Change language To change the language of the device and menus, follow these steps: 1. 2. 3. 4. 5. From any Home screen, tap the All apps icon. Tap Settings. Scroll down to 'PERSONAL,' then tap Language & input. Tap Language. Select the desired language: o English o Espanol Reset Wipe cache partition - Not available This feature is not available. Master reset from settings menu A master reset restores the original factory settings and may delete your personal data on the internal storage, such as downloaded content, ringtones, images, apps, and contacts. It does not delete data stored on the SIM card or SD card. To perform a master reset, follow these steps: 1. 2. 3. 4. 5. 6. Back up all data on the internal memory. From any Home screen, tap the All Apps icon. Tap Settings. Scroll down to 'PERSONAL,' then tap Backup and reset. Scroll down to 'Personal data,' then tap Factory data reset. Tap Reset phone. Note: If the handset is locked, frozen, or unresponsive, you can perform a master reset using the hardware keys instead of the menu. Master reset with hardware keys A master reset restores the original factory settings and may delete your personal data on the internal storage, such as downloaded content, ringtones, images, apps, and contacts. It does not delete data stored on the SIM card or SD card. If the device menus are frozen or unresponsive, you can master reset using hardware keys. To perform a master reset, follow these steps: 1. 2. 3. 4. 5. 6. 7. 8. 9. Back up all data on the internal memory. Turn off the device. Remove the back cover. Remove the battery. Remove the SIM card. Wait several seconds then reinstall the battery and SIM card and replace the back cover. Press and hold down the Pound (#) key and the red End key at the same time until a menu screen appears. Select the green Check mark. The phone will reset. Safe mode - Not available This feature is not available. Security Change device lock password / PIN To change device lock password or PIN, follow these steps: 1. 2. 3. 4. 5. 6. 7. 8. From any Home screen, tap the All Apps icon. Tap Settings. Scroll to 'PERSONAL,' then tap Security. Scroll to and select Activate Phone Code. Select Change phone code. Enter the old password. Select OK. Enter your new password. Select OK. Enter your new password again. Select OK. Turn on/off device lock To turn on or turn off the device lock password or PIN, follow these steps: Turn on 1. 2. 3. 4. 5. 6. From any Home screen, tap the All Apps icon. Tap Settings. Scroll to 'PERSONAL,' then tap Security. Tap Set up screen lock. Chose screen lock type: o None o Slide o Pattern o PIN o Password Follow the instructions for Pattern, PIN, or Password. Turn off 1. 2. 3. 4. 5. From any Home screen, tap the All Apps icon. Tap Settings. Scroll to 'PERSONAL,' then tap Security. Tap Set up screen lock. Change from selected screen lock to None from the list below: o o o o o None Slide Pattern PIN Password PUK code unlock If you enter a PIN code incorrectly several times in a row, the device blocks you from attempting again. To enter a PUK code and unblock the PIN, follow these steps: Important: You must call Customer Care for the PUK code. Entering the wrong code can permanently damage your SIM card. 1. 2. 3. 4. 5. 6. 7. Contact Customer Care to request your PUK code. Enter the PUK code. Select OK. Enter your new PIN. Select OK. Re-enter your new PIN. Select OK Change SIM PIN - Not available This feature is not available. Turn on / off SIM PIN To lock and unlock the SIM card, follow these steps: Turn on 1. 2. From any Home screen, tap the All Apps icon. Tap Settings. 3. 4. 5. 6. 7. Scroll to 'PERSONAL,' then tap Security. Scroll to 'SIM card lock,' then tap Set up SIM card lock. Tap Lock SIM card. Enter the password. Note: The default password is 1234. Select OK. 'Phone locked' appears on the screen. Turn off 1. 2. 3. 4. 5. 6. 7. From any Home screen, tap the All Apps icon. Tap Settings. Scroll to 'PERSONAL,' then tap Security. Scroll to 'SIM card lock,' then tap Set up SIM card lock. Tap Lock SIM card. Enter the password. Note: The default password is 1234. Select OK. 'Phone Unlocked' appears on the screen. Time & Date Auto-update time (NITZ) To set the device clock to automatically update based on what time zone it is in, follow these steps: Note: When you enter a different time zone and turn on your device, it automatically updates to the new time. This feature is network-dependent and may not be available in all areas. Turn on 1. 2. 3. 4. 5. 6. From any Home screen, tap the All apps icon. Tap Settings. Scroll down to 'SYSTEM,' then tap Date & time. Tap Automatic date & time. Choose one of the following: o Use network provided time o Use GPS provided time Check the box next to Automatic time zone. Turn off 1. 2. 3. 4. 5. 6. From any Home screen, tap the All apps icon. Tap Settings. Scroll down to 'SYSTEM,' then tap Date & time. Tap Automatic date & time. Tap Off. Clear the box next to Automatic time zone. Set time & date To set the time and date of the device clock, follow these steps: 1. 2. 3. 4. 5. 6. 7. 8. 9. From any Home screen, tap the All apps icon. Tap Settings. Scroll down to 'SYSTEM,' then tap Date & time. Tap Automatic date & time. Tap Off. Clear the box next to Automatic time zone. Tap Set date and enter the date. Tap Set time and enter the time. Tap Select time zone and choose time zone. 10. If desired, check or clear 24-hour format. 11. If desired, tap Select date format and choose format.