1
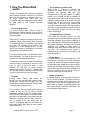
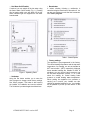
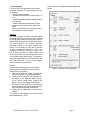
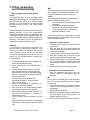
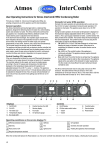
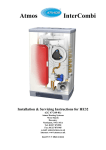
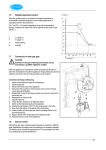
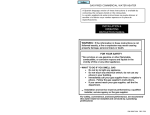
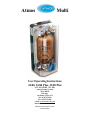
Atmos
Multi
User Operating Instructions
24/80, 24/80 Plus, 32/80 Plus
(GC 41-249-02, -03, -04)
Atmos Heating Systems
West March
Daventry
Northants, NN11 4SA
Tel: 01327 871990
Fax: 01327 871905
e-mail: [email protected]
internet: www.atmos.uk.com
MK2 Revised (Side Pipe kit) 14.3.07
Amended 18.6.10
Overview of Atmos Multi Boiler Components
1
2
3
4
5
6
7
8
9
10
11
12
13
14
15
16
17
18
19
20
21
22
23
24
25
26
27
28
FAN
GAS/AIR MIXING CHAMBER
CATCHMENT PLATE
GAS INJECTION NOZZLE
GAS VALVE
AUTOMATIC AIR VENT
CASING
HIGH LIMIT THERMOSTAT
IONISATION PROBE
INLET CASTING
IGNITION ELECTRODE
IGNITION TRANSFORMER
AIR SEPARATOR
BURNER
WATER HEATER VESSEL
HEAT EXCHANGER
FLUE GAS RESTRICTOR
INSULATION SHELL
HOT WATER TEMPERATURE
SENSOR
HEATING WATER
TEMPERATURE SENSOR
CENTRAL HEATING PRESSURE
SENSOR
THREE-WAY VALVE
CENTRAL HEATING PUMP
SIPHON TRAP
OUTLET CASTING
CONTROL UNIT
HEAT EXCHANGER FOR
EXTRA HOT WATER
TEMP. & PRESSURE RELIEF
VALVE
Note: The ignition transformer (12) is now fitted to the gas valve (5).
ATMOS MULTI Mk 2 version 2007
Page 3
Overview of Atmos Multi Boiler with optional Pre-Assembled Pipework kit
View with Pipework Assembly cover removed
Pipework Assembly Components
ATMOS MULTI Mk 2 version 2007
Page 4
Table of contents
Introduction
Overview of Atmos Multi components
3
Overview of Atmos Multi with optional
Pre-Assembled Pipework kit
4
Introduction
5
Congratulations...
on the purchase of your new Atmos Multi. We are
sure that it will give you many years of pleasure
and comfort. We recommend that you read these
operating instructions carefully, as they contain a
lot of important information. Put away the operating
instructions carefully, next to the appliance for
example, so that they are always within reach. At
the back of these Operating Instructions is your
proof of guarantee. Please don't forget to complete
the Guarantee Registration Card and send it
back to Atmos.
1. How the Atmos Multi works
- Central heating circuit
- Hot water
- The 'Continuous Comfort' mode
- The High Efficiency operation
- Closed design
- Cleaner combustion
- The control system
- Most Efficient Start
6
6
6
6
6
6
6
7
7
2. Operating the Atmos Multi
- The room thermostat
- The operating panel
- Diagnosis display
- Central heating water display
- Hot water On/Off switch
- Set button
- Reset button
- Factory settings
- User’s program
7
7
7
7
8
8
8
8
9
Product description
The Atmos Multi is a continuously modulating
condensing (High Efficiency) central heating boiler
with an 80-litre hot water storage tank. You have
made an excellent choice as the Atmos Multi will
heat your home comfortably and economically
with minimal harm to the environment, and also
provide you with abundant hot water.
3. Filling, de-aerating & commissioning
- Filling or topping up the central heating
circuit
- Filling the hot water system
- Starting the central heating circuit
- Starting the water heater
10
10
10
11
4. Shutting down and draining
- Shutting down the central heating circuit
- Shutting down the water heater
- Draining the hot water system
- Draining the central heating circuit
- Decommissioning the appliance
11
11
11
11
12
The appliance is very economical in energy
consumption and heats your home with an
average efficiency of over 90%. The Atmos Multi
burns natural gas in an environmentally friendly
manner so that the discharge of harmful
substances, such as carbon dioxide and NOX , is
kept to a minimum. To you as a consumer this
implies a cleaner environment in addition to lower
gas bills.
5. Inspection and maintenance
12
6. What to do if a malfunction occurs
12
7. Information on guarantee
13
Proof of guarantee
Should you have any questions after reading these
Operating Instructions, please consult your
Installer.
Warning!
You are not permitted to apply changes to the unit
and discharge system. Neither must the
condensate siphon trap be changed or drained.
Rear cover
ATMOS MULTI Mk 2 version 2007
Page 5
1. How the Atmos Multi
works
Central to the appliance is an aluminium condensing
heat exchanger especially designed for the Atmos
Multi. The heat exchanger is completely built in to
the 80-litre copper water heater tank. This
construction makes the central heating boiler and the
hot water heater a very compact combined
appliance.
• Central heating circuit
The central heating water (primary circuit) is
pumped through narrow channels in the wall of the
heat exchanger and thus takes the heat from the hot
combustion gases.
When there is a demand for heating from the room
thermostat, the hot central heating water is pumped
via the three-way valve to the radiators, thus heating
the home. The maximum central heating water
temperature is set as standard at 90°C. You can
read off the pressure or temperature of the central
heating water on the operating panel.
The central heating pump runs automatically when
heat is demanded. The pump continues to run for a
while after the heat demand has been met.
The appliance will carry out a self-test when the
electrical supply is switched on and then once
every 24 hours (if there has been no heat
demand). For this test, the boiler's integral
central heating pump will run for 3 minutes and
the three-way valve will switch to central heating
in order to prevent the pump from seizing
• Hot water
Pumping central heating water around the
appliance via the three-way valve indirectly heats
the tap water. The tap water can never come into
contact with the central heating water because there
is a double partition between them.
The hot water in the water heater tank is kept as
standard at 60°C so that hot water is always
immediately available for use. The insulation shells
ensure that the heat is retained in the water heater
tank. When the temperature sensor detects that the
temperature of the tap water has fallen below 55°C
due, for example, to hot water being used, the
burner is automatically started by the control unit
and the tap water is taken back up to the required
temperature of 60°C.
ATMOS MULTI Mk 2 version 2007
• The 'Continuous Comfort' mode
When there is demand for heating and
domestic hot water at the same time, the
appliance will generally deal with both
simultaneously. In this case, approx. 7 to 22kW
(24/80) or 9 to 29kW (32/80) is available for
heating the home, depending on the hot water
demand. The three-way valve is then set at the
mid-position, so that one part of the heated
primary water is pumped to the radiators and
one part to the water heater. This unique threeway valve output regulation prevents a drop in
the temperature of the home when the water
heater is heating up.
• The High Efficiency operation
A fan blows the combustion gases in the heat
exchanger from the top to the bottom through the fins
of the heat exchanger. They are then cooled down in
such a way that some of the water vapour present in
these gases condenses in the lowest part of the heat
exchanger. This releases an extra quantity of
condensing heat, which takes the efficiency to well
over 90%. The condensate water formed is
discharged to the waste system via the siphon trap
under the appliance.
• Closed design
The Atmos Multi is of the 'closed design' type. This
means that a fan draws the air for the combustion
process from outside and that the combustion gases
are then blown back outside via the heat exchanger
and flue gas discharge. The closed design and the
special construction of both the heat exchanger and
the burner depend on the use of a fan. The fan is
hence an essential part of the appliance.
• Cleaner combustion
A specially designed burner has been fitted into the
top of the heat exchanger. The gas-air mixture is
completely mixed before arriving at the burner. The
result of this is a very low flame height at the burner
which makes a compact construction possible and
also ensures that full combustion takes place in an
environmentally friendly manner.
Page 6
• The control system
The appliance is controlled by an electronic control
unit with a display for operating and malfunction
reports.
The appliance also has a continuously modulating
burner control system. A pneumatic mechanical
gas-air connection automatically adjusts the amount
of gas to the amount of combustion air. The control
unit adjusts the speed of the fan to the output
demanded. This provides' perfect output control for
both the central heating and the hot water.
• Most Efficient Start
MES is a comfortable energy saver that keeps the
home at the set temperature as accurately as
possible using the lowest possible output (and
therefore the highest possible efficiency).
When central heating is demanded, the appliance
always starts heating the home on a low burner heat
input. The appliance is switched by a standard
on/off room thermostat system. The amount of time
that the burner remains at low capacity depends on
the heat demand. The control unit constantly
recalculates this low capacity combustion time. The
control system is therefore 'intelligent' in that it
learns from itself.
• Weather dependent control
Using an extra kit available from Atmos,
comprising an external temperature sensor and
a central heating return temperature sensor, the
Multi can be easily controlled in a weather
dependent manner by changing a number of
control settings
2. Operating the Atmos
Multi
• The room thermostat
The central heating is controlled by a room
thermostat*. You can set your room thermostat at the
temperature you require. The room thermostat
switches on the Atmos Multi, which in turn
automatically starts the electronic regulating unit. The
appliance will then use the radiators to heat the home
until the desired temperature is reached. The room
thermostat then switches the appliance off. The room
thermostat will then periodically turn the appliance
on and off so that the home remains constantly at
the desired temperature.
* Other arrangements are also possible.
• The operating panel
The operating panel of the Atmos Multi is located on
the front of the control unit at the bottom centre of the
appliance. Located on the operating panel are two
displays (see figure 1). The upper one, the
diagnostic display, shows the operating or
malfunction reports. The lower display gives the
current central heating pressure or central heating
water temperature. The hot water on/off switch is
situated at the bottom right of the operating panel.
• Diagnostic display
The number on the diagnostic display indicates the
operating status of the appliance. The various status
reports are explained in Table 1. If, for example, you
see number 1, it means that there is a hot water
demand at that moment. A dot (e.g. 1.) after the
number means that the appliance is occupied with
the relevant activity (in this case meeting the water
demand).
The
same
diagnostic
display
indicates
malfunctions. Further information on this subject is
given in section 6.
• Central heating water display
The central heating water display indicates the
current central heating water pressure (standard
setting). If the central heating water pressure is too
low or too high, this is indicated by a warning letter
‘C’ on the diagnostic display. Further information
on this subject is given in section 6.
This display can also indicate the central heating
water temperature instead of the central heating
water pressure. See ‘User’s program’.
ATMOS MULTI Mk 2 version 2007
Page 7
• Hot Water On/Off switch
If required, you can switch off the hot water using
the water heater On/Off switch (Fig. 1). Pressing
this hot water switch once will switch off the hot
water indication light and suppress the hot water
heat demand.
• Reset button
A lockout situation following a malfunction is
cancelled using the Reset button. See section 6. You
can also use this button to exit the User’s program.
See ‘User’s program’.
Table 1 : Status Reports
Figure 1 : Operating Panel
• Set button
Using the Set button enables you to enter the
User’s program to change certain factory settings.
See 'User’s program'. This button is also used by
the installer for installation and service activities.
The Set button is protected against accidental use.
ATMOS MULTI Mk 2 version 2007
• Factory settings
The appliance is pre-programmed in the factory.
The central heating temperature and the tap water
temperature, for example, are set as standard to
0
0
90 C and comfort 1 (60 C) respectively. Although
these standard settings are suitable for 90% of
situations, you can use the User’s program to set
the hot water temperature (comfort 1, 2 or 3) and
select the reading for central heating water
pressure or central heating water temperature.
When putting the appliance into operation or
carrying out a service, your installer can also
change the standard settings for you. Your installer
will be pleased to provide you with advice on this
subject.
Page 8
• User’s program
The control unit of the Atmos Multi comes with an
inbuilt User’s program. This can be used to carry out
the following:• Change the factory settings:
- hot water tank temperature (comfort setting 1, 2
or 3).
- central heating water display to indicate pressure
or temperature.
- weather-dependent arrangement (if fitted).
• Indicate the most recent block or malfunction
report.
• Return to the standard factory settings, if one or
more settings have been changed.
Table 2 shows the possible/ standard settings and
reports.
Operation
The User’s program is initially protected against
accidental operation. The user’s program is entered
by pressing the Set button for longer than 5 seconds
until the letter 'b.' appears on the diagnostic display.
The current setting for the selected operational
parameter appears on the central heating water
display. The next setting or report can be selected
by again pressing the Set button - this is the
procedure for selecting all settings or reports. If you
wish to change the value of a certain setting, press
the hot water button until the desired value is given
on the central heating water display. The program is
terminated automatically five minutes after the last
action was carried out. You can exit the program
earlier by pressing the Reset button.
Example
The procedure for displaying the central heating
water temperature instead of the central heating
water pressure is as follows:
a. Press the Set button for at least 5 seconds (the
letter 'b.' will appear on the diagnostic display).
b. Briefly press the set button once (the letter 'C.'
will appear on the diagnostic display and the
current central heating water pressure will
appear on the central heating water display).
c. Press the hot water button once (the reading of
the central heating water display will then give the
current central heating water temperature).
d. Finally press the reset button to exit the User’s
program.
The reading has now changed to the central heating
water temperature (e.g. 65°C).
ATMOS MULTI Mk 2 version 2007
Table 2 : Overview of User’s program
Page 9
3. Filling, de-aerating
and commissioning
• Filling or topping up the central heating
circuit
The Atmos Multi does not have an integral central
heating filling and drainage tap. Your installer will have
filled the boiler and system to its effective working
pressure of 1.5 bar, and shown you where the filling
and draining point is found in your central heating
installation.
The water pressure of the central heating circuit at the
appliance should be 1.5 bar. If the central heating
water pressure is lower than 0.5 or higher than 3 bar,
a warning will appear on the diagnostic display (the
letter 'C' alternating with the operating status of the
appliance). If this warning is given, the appliance will
run at minimum capacity. See also section 6.
Warning!
For the constant correct operation of the appliance, it is
important that the central heating installation is clean
and free of air. Only fill the installation with clean tap
water. If additives such as anti-freeze or leak sealer
are used, the guarantee will become null and void in its
entirety. The only permitted additive is Sentinel X100
corrosion inhibitor.
1. The central heating pump must be switched off remove the plug from the socket.
2. Check that the cap of the automatic vent is
loosened.
3. Connect one end of the filler hose to the water
pipe. First allow the hose to fill with water and
then connect the other end to the central heating
filler tap. This will prevent air from getting into the
central heating circuit.
Alternatively if using the optional PreAssembled Pipework kit : Open the cold fill
valve in the filling loop.
4. Slowly fill the installation to a pressure of 1.5
bar and check for water leakage.
5. Open all vents on the central heating radiators
and close them when the air has escaped.
6. If the pressure after de-aeration falls below 1.5
bars, refill the installation to a pressure of
approximately 2 bars.
7. Close the water tap and disconnect the filler
hose.
Alternatively if using the optional Pre-Assembled
Pipework kit : Close the cold fill valve in the filling
loop.
ATMOS MULTI Mk 2 version 2007
NB!
The water pressure must never be lower than 1 bar
at the appliance. If the pressure drops below 1 bar,
top up the installation yourself or contact your
installer.
The following procedure should be followed when
filling the installation for the first time:• De-aerate the system regularly during the first
few weeks.
• Check that the automatic de-aerator is
working correctly and not leaking any water.
• Top up the system if the pressure at the
appliance falls below 1.5 bars.
If the pressure drops on a regular basis, the central
heating installation must be leaking water. The leak
must be traced and repaired.
• Filling the hot water system
1. Close the stopcock of the cold water (CW) inlet
combination.
2. Open the main tap of the water system and
check the pipes and connections to the CW inlet
combination for leakage.
3. Open the stopcock of the CW inlet combination.
4. Open the hot water taps so that the air can
escape from the water heater and the pipes.
5. Wait until water comes out of all hot water taps
and is clear of impurities. The water heater has
now been filled and the hot water taps can be
closed.
6. Check the pipes and connections for leaks.
• Starting the central heating circuit
1. With the appliance gas tap in the ‘Off’
position, switch on the electrical supply to
the boiler.
NB!
If an 'L' appears on the display, the live and neutral wires
have been wrongly connected and must be swapped
over at the plug.
2. Check the water pressure of the central heating
circuit. This should be approximately 1.5 bar at
the appliance.
3. Open the appliance gas tap.
4. Switch off the hot water heater by pressing the
hot water button on the control panel. The
indication light 'On' will go out.
5. Set the room thermostat at the highest position.
Page 10
6. The appliance will now start up (status report code
2. on the diagnostic display). If the hot water
temperature is below 10°C, the frost protection will
cut in and the water heater temperature will firstly
be heated above 15°C (status report code 3.). The
appliance will now burn for 3 minutes at the lowest
capacity, and then switch to its maximum capacity
until the central heating water temperature
reaches 80°C. The appliance modulates between
80°C and 90°C (unless the factory setting has
been changed).
7. Now set the room thermostat at the desired
temperature.
• Starting the water heater
Switch on the hot water heating by pressing the hot
water button. The indication light 'On' will come on.
The hot water will be heated until the set
temperature is reached.
NB!
If there is a demand for central heating at the same
time, the hot water and central heating demand will
work simultaneously (status report 4.)
4. Shutting down and
draining
• Shutting down the central heating circuit
1. Leave the appliance connected to the electrical
supply.
2. Set the room thermostat at the minimum
temperature. The domestic water heater will
remain at its set temperature setting.
Recommendation
We recommend not to set the room thermostat lower
than 10°C during the winter months. To prevent the
installation from freezing, it is recommended that all
radiator valves be left fully or partially open.
• Shutting down the water heater
1. Leave the appliance connected to the electrical
supply.
2. Switch off the hot water heating by pressing the
‘Hot water’ button. The indication light 'On' will
go out. (The stored water is protected
against freezing in winter months by an
automatic frost protection that activates on
a water temperature of 15ºC).
Warning!
The heating and domestic hot water installation must
be independently protected from frost. The boiler's
built-in frost protection facility will only safeguard the
appliance itself.
• Draining the hot water system
1. Turn off the cold feed to the Multi and open the
domestic hot taps.
2. Connect a flexible hose from the drain cock
in the pipe from the cold water inlet
combination (or from the cold water drain
cock in the optional Pre-Assembled Pipework
kit), into the tundish or nearest waste outlet.
Open the drain cock, and the water from the
hot water tank will flow into the waste pipe.
• Draining the central heating circuit
1. Switch off the electrical supply to the
appliance.
2. Drain the installation via the drainage tap
located at the lowest point of your central
heating installation.
ATMOS MULTI Mk 2 version 2007
Page 11
• Decommissioning the appliance
Besides environmentally friendly operation,
Atmos also aims to restrict harm to the
environment to a minimum in both the production
and recycling phases. The Atmos Multi is made of
a number of primary materials, especially copper,
aluminium and steel. These materials can easily
be separated and recycled at the end of the life
span of the appliance.
Therefore do not throw away the appliance, but
make enquiries at your local council or a scrap
dealer about disposal.
5. Inspection and
Maintenance
To ensure continued efficient operation of the
Atmos Multi, it must be checked and serviced as
necessary at regular intervals. The frequency of
servicing
depends
upon the individual
installation conditions and usage, but must be a
minimum of once per year.
The extent of the servicing required is
determined by the operating condition of the
appliance when tested by a fully qualified
engineer.
Only competent engineers, such as a Corgi
registered installer, must carry out any service
work.
Ask your installer to register the inspections and
work on the service card on the inside of the
installation.
The casing can be cleaned with a non-abrasive
water based domestic cleaning agent.
6. What to do if a
malfunction occurs
• Block report
A block is an error that occurs without causing a
malfunction. The appliance waits until the block
has been resolved and then returns to normal
operation. A block is indicated by a constantly
displayed letter on the diagnostic display.
• Malfunction report
A malfunction is a fault that causes the
appliance to be shut down by the control unit
and locked. The appliance can only be
unlocked by pressing the 'Reset' button. A
flashing number or letter on the status display
indicates a malfunction
If a warning, block or malfunction report is
displayed, first check:
• That the room thermostat is set correctly
• That the power socket is providing current (check
the fuse/ circuit breaker in the meter cupboard)
and supply connected to the appliance.
• That the gas tap is open
• That the valves on the radiators are open
• That the water pressure in the central heating
installation is between 1 and 2 bars.
• That the central heating installation has been
properly de-aerated.
• That the hot water heating has been switched on.
If the malfunction persists, proceed as follows:
1. Try to resolve the malfunction by pressing the
‘Reset’ button once. If the appliance does not
unlock, try again after approx. 15 seconds.
2. If the appliance remains locked up or, if the
same malfunction occurs repeatedly, check
the diagnostic display and note the code
displayed.
3. Consult your installer. Make sure that you
have the following information available:
- Malfunction report
- Appliance manufacture number (see back
page of this document).
A malfunction can be caused if the central heating
installation or the appliance are not working
correctly. The Atmos Multi has three types of
reports :• Warning report
This can be identified by a letter that appears once
every 5 seconds for 1 second on the diagnostic
panel. The appliance continues operating, but the
function to which the warning report relates is
switched off or ignored.
ATMOS MULTI Mk 2 version 2007
Page 12
7. Information on guarantee
instructions and the general and local regulations
applicable at the time of installation.
• What is covered by the guarantee?
Atmos boiler warranty is, subject to conditions, two
years from date of invoice or 12 months from date
of installation, whichever is the later. The warranty
shall be 2 years for replacement parts and
associated labour; thereafter any warranty period
shall cover parts only. The heat exchanger
warranty is 5 years in total, including the first two
years parts and labour warranty. Excluded parts
are: ignition probe, ionisation probe, glass fuse,
and air vent.
This guarantee implies that the buyer of this
appliance is entitled to free delivery of the part to
be replaced. Your installer may charge for the
costs of dismantling and fitting the defective part.
Repairing or replacing parts during the guarantee
period does not extend the length of the guarantee.
Atmos gives a 1 year guarantee on replacement
parts. Parts or appliances sent to the factory for
repair or replacement must always be sent
postage paid.
Defects caused by corrosion - both internally and
externally - of any nature whatsoever, whatever
their cause, and defects resulting from scale
deposits are not covered by the guarantee.
Secondary damage, including water damage
resulting from the appliance leaking, loss of
earnings resulting from the failure of the appliance
to perform correctly, fire, legal liability of the user
to third parties and so on, do not come under the
guarantee. The right to assess guarantee claims
is reserved to Atmos, who must always be given
the opportunity of inspecting the appliance on
site.
• Who conducts the guarantee?
The provision of service and the execution of this
guarantee is the responsibility of the installer
from whom you bought the appliance.
The user must operate the appliance in
accordance with these Operating Instructions.
The guarantee becomes null and void if the
appliance is used incorrectly, or in the event of
proven negligence, or incorrectly implemented
repairs. The guarantee also becomes null and
void if changes are made to the appliance without
our knowledge. The same applies if the data plate
on the appliance is removed, crossed out or
made illegible.
Repairs should be carried out be a recognised
installer. Exclusively Atmos parts must be used.
The annual inspection and maintenance must be
carried out by a recognised installer in accordance
with the maintenance advice provided by Atmos.
If a defect occurs, the appliance will be assessed
as it was originally set up and connected.
• Receipt, Guarantee Registration Card
and Proof of Guarantee
Claims can only be made on the guarantee
described above, upon submission of the receipt
invoice together with the fully completed Proof of
Guarantee. You must retain this Proof of
Guarantee, which you will find at the back of
these operating instructions. The appliance
manufacture number is also stated on the back of
this document. The purchase date and the name
of your supplier must be clearly stated on your
receipt.
This is an summary from the full Atmos
Warranty document which is available to
download from the Atmos web site
www.atmos.uk.com or by calling 01327
871990. Atmos Terms & Conditions apply.
• Guarantee stipulations
Claims can only be made on the guarantee if the
enclosed Guarantee Registration Card has
been completed and signed and returned to
Atmos within 14 days of the installation date. The
appliance should be installed by a recognised
installer according to the Atmos installation
ATMOS MULTI Mk 2 version 2007
Page 13
Proof of guarantee
This is your proof of guarantee. Please complete the enclosed Guarantee Registration Card and return it to Atmos
within 14 days of installation (no stamp required) so that you will be entitled to make a claim on our service and
guarantee, should a defect occur. This will enable us to provide you with fast, efficient service.
You should, however, always report the defect to your installer first.
Manufacture Number
: ..................................................................................
Installation Date
: ..................................................................................
Installer’s Name
: ..................................................................................
Address
: ..................................................................................
: ..................................................................................
Post Code
: .................................................
Telephone
: .................................................
Fax
: .................................................
Atmos Heating Systems
West March
Daventry
Northants, NN11 4SA
Tel: 01327 871990
Fax: 01327 871905
e-mail: [email protected]
internet: www.atmos.uk.com
ATMOS MULTI Mk 2 version 2007
Page 14