1
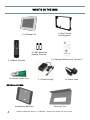
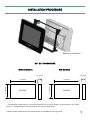
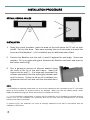
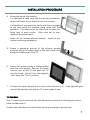
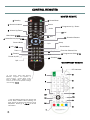
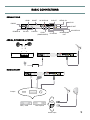
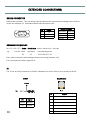
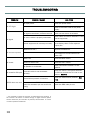
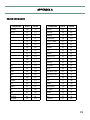
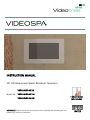
INSTRUCTION MANUAL
19” HD Widescreen Water Resistant Television
VSPA19LCD-AE1B
Model No. VSPA19LCD-AE1M
VSPA19LCD-AE1W
IMPORTANT: Please read these instructions before installing and operating the unit.
Retain them for future reference.
FINGER TOUCH
TECHNOLOGY
RATED
CONTENTS
Safety Precautions ………………….………………………………………………..……. 3
What’s In The Box ………………….……………………………….………………..…… 4
Installation Procedure …………….……………………………………………..……... 5
Control Remotes ………………….……………………………………………...……….. 8
Basic Connections ……………...…….………..………………………………...……… 9
Extended Connections …………..…….………………………………...……………… 10
Touch Control Settings ………………………………………………..…………..……. 11
TV Operation ………………………………………………………………………………….. 13
Technical Specifications ………………………………………………………………… 17
Troubleshooting ……………………………………………………………………………. 18
Appendix A - RS232 Commands …………………………………………………….. 19
2
SAFETY PRECAUTIONS
Handling the Power Supply Unit
(PSU)
Ensure the PSU is disconnected
from the mains supply before
connecting to the TV.
Ensure the Earth pin on the mains
plug is connected correctly.
Do not use any PSU other than the
one provided by Videotree.
Ensure there is always easy
access to the mains supply of the
PSU.
Do not remove the back cover
There is risk of electric shock.
There are no user serviceable
parts inside.
Do not expose to direct sunlight
Avoid exposing the TV to direct
sunlight. This can cause damage
to the LCD.
2 persons installation required.
Power source
The TV requires an AC power
source between 100-240V,
50/60Hz
Do not expose rear of the TV to water
or moisture
The TV is IP65 rated against water
from the front, only after it has
been correctly installed.
See installation instructions for
more information.
The TV is heavy and requires 2
person handling.
Do not insert or remove the TV
from the wall frame with just 1
person.
Backbox
The Backbox is essential for
environments where the TV will be
subject to direct water e.g. under a
shower.
The Backbox is recommended for
use with concrete walls.
WARNING: THIS TV MUST BE EARTHED.
DO NOT INSTALL WITHOUT A SAFE EARTH CONNECTION.
3
WHAT’S IN THE BOX
1 x Wall Frame
with Magnets
1 x Videospa TV
2 x AAA Batteries
( Master Remote )
1 x Master Remote
1 x Silicone Grease Tube
1 x Videospa Waterproof Remote *
1 x Power Supply
1 x Power Lead
OPTIONAL EXTRAS
Installation Backbox
4
Removal Tool
* Battery inside the remote (1 x CR2332). Remove the safety tab prior to use.
INSTALLATION PROCEDURE
Backbox ( Optional ) *
CUT OUT DIMENSIONS
Without Backbox
With Backbox
D x 75mm
D x 80mm
Cut Out
L x 530mm
H x 335mm
H x 330mm
L x 525mm
Cut Out
* The Backbox is essential for environments where the TV will be subject to direct water e.g. under a
shower. The Backbox is recommended for use with concrete walls.
Please contact Videotree for information about an installation training course.
5
INSTALLATION PROCEDURE
OPTIMAL VIEWING ANGLES
60°
60°
INSTALLATION
1. Using the cutout template, mark the area on the wall where the TV will be positioned. Cut out this area. Take care ensuring the cut is accurate to ensure the
frame and the Backbox* ( if it’s installed) are not distorted when fitted.
2. Position the Backbox into the wall, it must fit against the wall edge. Screw into
position. Fill in any gaps with grout, between the Backbox and wall, and leave to
set before continuing.
3. Run a generous amount of silicone sealant along
the back of the lip of the wall frame. Insert the
frame into the wall**. It is extremely important the
silicone completely fills the entire gap between wall
and the frame. Failure to do so will invalidate your
guarantee and will null and void the manufacturer’s
NOTE:
* If a Backbox is installed, please take into account the cables that are connected to the TV. Give some
space to let the cables run properly without any damage. Make sure that the cables (power, aerial,
HDMI) are passed through the holes, before the box is fitted into the wall.
** It is the installer’s responsibility to ensure that the Videotree unit is installed and sealed correctly.
Failure to do so will invalidate your guarantee and will null and void the manufacturer’s 12 month
warranty from date of purchase.
To prevent injury, the Videotree unit must be securely attached to the wall in accordance with the
installation instructions.
6
INSTALLATION PROCEDURE
4. Screw the frame into position.
If a Backbox is used then use the screws provided to
fix the wall frame to the Backbox at the 4 corners.
If a Backbox is not used then fix the wall frame straight
to the wall using the multiple fixing holes that are
available. The frame must be fitted with at least one
fixing hole in each corner. Take care not to over
tighten & bend the frame.
Clean off the excess silicone sealant. Leave to set
before continuing installation.
5. Smear a generous amount of the silicone grease
provided along the inside edge of the wall frame and
along the rubber seal of the TV.
6. Ensure the power supply is disconnected
from the main supply. Connect the leads
into the rear of the TV and push the TV
into the frame. You will hear the magnets
'click' when the TV is in position.
7. Connect the power supply to the main outlet and turn it on. A red light will glow
around the standby icon and the TV is now ready to use.
TV REMOVAL
The TV must only be removed with the Videotree removal tool, following the instructions provided with it.
Contact your distributor for information about purchasing a removal tool.
7
CONTROL REMOTES
MASTER REMOTE
1 Standby
8 Sound Mute
2 Numeric buttons
Return
Audio
3 Volume Up/Down
9 Programme Up / Down
10 OK
Main Menu P 9-12
11 Exit
12 Direction Buttons
4 Select Source/Input P 13
Picture Mode
N/A
Sleep
Sound Mode
5 Info P 13
Zoom
13 TV / Radio
6 Teletext
N/A
Freeze On/Off
Favourite Channel List
14 Programme Guide P 12
15 Subtitles P 13
N/A
WATERPROOF REMOTE
4
LED Indicator
7
Red, Green, Yellow, Blue Buttons:
Selection, navigation and operation of
various services. *Factory Reset, Touch,
Beep & POWER LED’s Flashing control
buttons (the TV must be off/STBY to change
these settings) P 9-10
1
8
2
3
5
10
* Only the Master Remote can access the
Touch, Beep, POWER LED’s Flashing settings. These are active only when the TV is
OFF/STBY. Please go to P 9-10 for all the
information.
8
12
9
15
11
6
14
2
7
BASIC CONNECTIONS
CONNECTIONS
HDMI
SCART
AV AUDIO IN
CI SLOT
AERIAL IN
RS232
RJ12
IR OUT
POWER IN
PC VGA
S-VIDEO
YPbPr
PC AUDIO
(COMPONENT)
AV VIDEO IN
HEADPHONE
OUT
AERIAL, SPEAKERS & POWER
L R
+- - +
HDMI & SCART
Output
DVD / VCR
Set Top Box
Aerial Input
9
EXTENDED CONNECTIONS
RS232 CONNECTOR
DB9 female connector. This port allows external equipment to send and acknowledge commands for
control the Videospa TV. A standard RS232 cable should be used.
DB-9
Pin
2
3
5
1
6
Signal
Tx
Rx
Ground
RS232 Protocol
Baud Rate: 9600 bps
Bits:
8
Parity:
None
Stop Bit:
1
COMMAND SEQUENCE
A0 + F0 + 55 + FF + Code + Check-Sum. Code + Check Sum = 100 Hex
e.g. :
Turn On: Code
Checksum
Complete Sequence
1F
A0 F0 55 FF E1 1F
E1
Every valid command is acknowledged with the two string character “OK”.
Full commands are listed in Appendix A.
IR
The TV use an RJ12 connection for IR OUT & Standby Line, and a 3.5mm mono socket for IR OUT.
IR OUT
RJ12 Socket
Sleeve
6 .. 1
Tip
10
Pin
Signal
1
N/A
Pin
Signal
2
N/A
Sleeve
Ground
3
N/A
Tip
IR OUT
4
Standby (On=5V , Standby = 0V)
5
Ground
6
IR OUT
TOUCH CONTROL SETTINGS
The Videospa TV has 3 different settings that improves the customer experience. To have access to these
settings, the TV must be in STANDBY/OFF mode and only the master remote can be used. The waterproof
remote has been locked to prevent any changes from unauthorised users.
Red : Restore Factory Settings
Blue : LED’s Flash Setting
Green : Touch Sensitivity
Yellow : Audio Beep Setting
RESTORE FACTORY SETTINGS
1. Ensure TV is in standby. Press the RED button on the MASTER remote.
2. All the LED’s go off and after 2 seconds the standby LED’s go on (all red).
TOUCH SENSITIVITY SETTING
The touch system has 7 different levels from off to maximum sensitivity. The factory default setting is 5.
1. Ensure TV is in standby. Press the GREEN button on the MASTER remote.
2. Scroll up or down with the arrow keys and save the changes with the OK button.
3. All the LED’s go off and after 2 seconds the standby LED’s go on (all red).
1
2
3
4
5
6
7
Level 1 - Touch control is disabled.
The touch will not respond to anything.
Level 2 - Touch control is at its least sensitive.
There is minimum risk of false activation. A strong finger press is required to activate.
Level 5 - This is the default setting.
This level is suitable for most environments. A change of level from this is only required if you
experience false activation of the touch control.
Level 7 - Touch control is at its maximum sensitivity.
There is maximum risk of false activation, so only use for clean & dry environments. The touch
will respond to a very light finger press
11
TOUCH CONTROL SETTINGS
AUDIO BEEP SETTING
For this setting there are 4 levels that enable/disable the audio beep response to touch and remote uses.
The factory default setting is 2.
1. Ensure TV is in standby. Press the YELLOW button on the MASTER remote.
2. Scroll up or down with the arrow keys and save the changes with the OK button.
3. All the LED’s go off and after 2 seconds the standby LED’s go on (all red).
1
2
3
4
Level
1
2
3
4
Action
Beep Off
Only with the remote
Only with the touch
Touch and remote
LED’s FLASH SETTING
For this setting there are 4 levels that enable/disable the LED’s flash response to touch and remote uses.
The factory default setting is 4.
1. Ensure TV is in standby. Press the BLUE button on the MASTER remote.
2. Scroll up or down with the arrow keys and save the changes with the OK button.
3. All the LED’s go off and after 2 seconds the standby LED’s go on (all red).
1
2
3
4
Level
1
2
3
4
Action
Flash Off
Only with the remote
Only with the touch
Touch and remote
CLEANING MODE
The touch control can be temporarily disabled to allow for the glass to be cleaned without activating the TV.
1. Ensure TV is in standby. Press the BLUE button on the WATERPROOF remote.
2. The LED’s will flash red and purple for 30 seconds while the touch control is disabled. Normal operation
will resume automatically.
12
TV OPERATION
AUTO TUNING (Analogue and Digital TV)
1. Press LCD MENU button.
2. Scroll left or right until reach
CHANNEL menu.
3. Scroll down with the arrow keys
and select Auto Tuning with the
OK button.
4. Select the country with the left
and right arrow keys and press
the OK button twice .
PROGRAMME EDIT
1. Press LCD MENU button.
2. Scroll down with the arrow keys and
select Programme Edit with the OK button.
3. To Delete a channel, select the channel
scrolling up or down with the arrow keys.
Press the Red button twice.
4. To Move a channel, select the channel
scrolling up or down with de arrow keys.
Press the Yellow button to select the channel and with arrow keys move it and place
it with the LCD MENU button.
5. To Skip a channel from the programme,
scroll with arrow keys and press the Blue
button. The channel will still appear in the
programme list and the channel list.
6. To select a Favourite channel, scroll the
channels and press the FAV button. These
channels will appear when the FAV button
is pressed.
13
TV OPERATION
PICTURE SETTINGS
1. Press LCD MENU button.
2. Scroll left or right until reaching the
PICTURE menu.
3. Scroll with the arrow keys and
save the changes with the OK button.
Some modes are predefined and
cannot be modified.
SOUND SETTINGS
1. Press LCD MENU button.
2. Scroll left or right until reaching the
SOUND menu.
3. Scroll with the arrow keys and
save the changes with the OK button.
Some modes are predefined and
cannot be modified.
TIME SETTINGS
1. Press LCD MENU button.
2. Scroll left or right until reaching the
TIME menu.
3. Scroll with the arrow keys and save
the changes with the OK button.
4. This menu allows for the TV to be
automatically turned ON and OFF at
required times.
14
TV OPERATION
SETUP SETTINGS
1. Press LCD MENU button.
2. Scroll left or right until reaching the
SETUP menu.
3. Scroll with the arrow keys and
save the changes with the OK button.
4. This menu allows the menu language, the default audio language
and default subtitle language to be
changed.
LOCK SETTINGS
1. Press LCD MENU button.
2. Scroll left or right until reaching the
LOCK menu.
3. Scroll with the arrow keys and save
the changes with the OK button.
4. This menu allows for specific
channels to locked. The default password is “0000”.
CHANGING INPUT SOURCE
1. Press the INPUT button on the
master remote, or SOURCE button on
the waterproof remote.
2. Scroll down with the arrow keys
and select input source with the OK
button.
15
TV OPERATION
PROGRAMME GUIDE
1. Press EPG/LIST button on the master remote or GUIDE on the waterproof remote.
2. Scroll with the arrow keys the move between channels and programmes.
3. To retrieve information of a programme,
press the INFO button.
4. To Schedule a programme, scroll over the
guide and press the Blue button. The Reminder Menu appears and change the details
of the selected programme using the arrow
keys. Once all the options have been set,
press the OK button. The Schedule menu
appears and the selected programmes will be
displayed.
5. To display the Schedule programmes,
press the Green button from the PROGRAMME GUIDE menu.
INFO
1. Press the INFO button.
2. Scroll right to see information of
the next programme with the arrow
keys and return with the left key.
SUBTITLE LANGUAGES
1. Press SUBTITLE button.
2. Scroll up & down with the arrow
keys and select the language available on your region.
16
TECHNICAL SPECIFICATIONS
Model: VIDEOSPA19-AE1
TV Unit Dimensions: W x H x D: 568 x 390 x 78mm
VIDEO & AUDIO
Input:
(1) TV
Format:
DVB-T, PAL, SECAM
Terminal:
IEC 75 Ω
Resolution:
480i, 480p, 576i, 576p,
720p, 1080i, 1080p
Terminal:
3RCA green, blue and red colour
(1) S-VIDEO
Terminal:
S-Video terminal black colour
(1) CVBS
Terminal:
RCA Yellow colour
(1) PC-RGB
Format:
Up to 1360*768@60Hz
Colour:
1920*1080@60Hz
16bit, 24bit, 32bit
Terminal:
Video:
VGA
Sound:
PC: Earphone input
(1) YPbPr/YCbCr
(COMPONENT)
(1) HDMI Resolution:
480i, 480p, 576i, 576p,
720p, 1080i, 1080p
(1) SCART
Full Scart
(1) AV Audio
Output:
(1) Audio Terminal
Terminal:
2 x RCA, red and white colour.
4 x Spring Speaker connector.
3.5w (4 Ω)
17
TROUBLESHOOTING
PROBLEM
POSSIBLE CAUSE
No input power.
No LED Light
No signal transmitted / different source.
Check correct source is selected
No source cable is properly connected.
Check cable connection between TV and
source equipment.
Source equipment is not setup correctly.
Check the external equipment is on and
set to display video on the required
output port.
Batteries ran out.*
Replace the Batteries.
No remote response
No sound for PC input
The waterproof remote comes with
power LED .
Mute is on.
Press the Mute button.
Volume is set too low.
Press the VOL+ button.
No Speaker is connected.
Check connection between TV and
speaker.
The audio cable is not connected
correctly.
Check the cable is connected between
the PC line out and the TV’s line in connection. See P.9.
Transmission protocol is incorrect.
Check the transmission protocol. See
P.10.
RS232 does not work If a non standard RS232 cable is not
used, the connector pin out could it be
wrong.
* It is possible to check the remotes’ IR transmitters are working. If
the remotes’ IR emitter is viewed through a digital camera (phone
camera works too) and a button is pressed, this will flash. If it does
not then replace the batteries.
18
Check the power cable.
Check if the Green LED on the power
supply.
No signal
No sound
SOLUTION
Check the DB9 male pin out.
APPENDIX A
RS232 COMMANDS
DATA
CHECK
DATA
CHECK
POWER
COMMAND
0A
F6
MENU
COMMAND
0D
F3
MUTE
0F
F1
PMODE
1A
E6
1
01
FF
SMODE
51
AF
2
02
FE
TV/RADIO
4D
B3
3
03
FD
SLEEP TIMER
0C
F4
4
04
FC
INFO
42
BE
5
05
FB
ZOOM
12
EE
6
06
FA
TTX
44
BC
7
07
F9
GUIDE
1C
E4
8
08
F8
SUBTITLES
19
E7
9
09
F7
RED
16
EA
0
00
FF
GREEN
17
E9
CH+
1F
E1
YELLOW
18
E8
CH-
1E
E2
BLUE
19
E7
VOL+
58
A8
DISCREET ON
E0
20
VOL-
4B
B5
DISCREET OFF
E1
1F
UP
0B
F5
DTV
E8
18
DOWN
0E
F2
ATV
E7
19
LEFT
10
F0
SCART
EA
16
RIGHT
11
EF
YPbPr(HD)
D3
2D
OK
4A
B6
PC-RGB
E9
17
EXIT
4C
B4
HDMI
EB
15
SOURCE
41
BF
AV
EC
14
RETURN
1D
E3
S-VIDEO
E5
1B
19
Please make a note of the model and serial numbers:
Model Number
Serial Number
Sales and Support Information
ESC House
South Road
Weybridge
Surrey
KT13 9DZ
Phone: +44 (0) 1932 856 382
Fax:
+44 (0) 1932 856 649
E-mail: [email protected]
.com