1
INSTRUCTION MANUAL
PLEASE READ ALL THE INSTRUCTIONS COMPLETELY BEFORE USE
AND SAVE THIS MANUAL FOR FUTURE REFERENCE.
Before Use
Please read IMPORTANT SAFETY
INSTRUCTIONS on page 23 before
use. It is important to read and
understand all instructions.
WARNING: TO PREVENT FIRE OR ELECTRIC SHOCK HAZARD, DO NOT EXPOSE THIS PRODUCT TO RAIN OR MOISTURE.
CAUTION
RISK OF ELECTRIC
SHOCK DO NOT OPEN
THE LIGHTNING
FLASH AND ARROWHEAD WITHIN THE
TRIANGLE IS A WARNING SIGN ALERTING
YOU OF “DANGEROUS VOLTAGE”
INSIDE THE RADIO.
CAUTION: TO REDUCE THE
RISK OF ELECTRIC
SHOCK, DO NOT REMOVE
THE RADIO BACK. NO
USER SERVICEABLE
PARTS INSIDE. REFER
SERVICING TO QUALIFIED
SERVICE PERSONNEL.
THE EXCLAMATION
POINT WITHIN THE
TRIANGLE IS A WARNING SIGN ALERTING
YOU OF IMPORTANT
INSTRUCTIONS
ACCOMPANYING THIS
RADIO.
For your future reference:
Serial No.
(found inside battery compartment)
Date of purchase
Name & address of dealer
Unpacking
The box should contain the CCRadio SW, the AC Adapter, (2) PAL Antenna Connectors, and this
manual. If anything is missing or damaged, please contact your dealer immediately. We recommend
you keep the box in the unlikely event your radio will need servicing.
Copyright © 2007-2009 by C. Crane Company, Inc., Fortuna, CA 95540
Phone: 1-800-522-8863 Web: ccrane.com
All rights reserved. No part of this booklet may be reproduced, in any form or means whatsoever,
without permission in writing from C. Crane Company, Inc.
Rev. 1209
Table of Contents
Unpacking ....................................................................................................... 2
Quick Start ..................................................................................................... 4
Radio Identification .................................................................................. 5-7
Front View ............................................................................................. 5
Side Views ............................................................................................. 6
Back View ............................................................................................... 7
Features and Operation Explained
Introduction ......................................................................................... 8
Sleep Mode ............................................................................................. 8
Clock Set .......................................................................................... 10-11
Saving Stations to Memory ................................................................. 11
Alarm Set ......................................................................................... 11-12
Battery Charging ............................................................................. 12-13
Shortwave Band .................................................................................. 13
AM RF Gain ...................................................................................... 15-16
LCD Display .......................................................................................... 17
Audio Line Out ...................................................................................... 18
AM IF Output ........................................................................................ 20
Specifications .................................................................................................. 21
Troubleshooting Guide ................................................................................. 22
PAL Connector Assembly .............................................................................. 22
Safety Instructions .......................................................................................... 23
Quick Start
Turn “AM RF GAIN” control knob
y full clockwise.
3.
Slide “FM/SW ANTENNA” switch
J to “INTERNAL” position.
4.
Select band by rotating band selection knobs:
1.
2.
Slide “AM SENSITIVITY” switch
H to “DISTANT” position.
a) For AM band turn “AM/SW” knob
to “WIDE”.
b) For FM band turn “AM/SW” knob
c) For SW turn “AM/SW” knob
“AM/SW–FM” knob
5.
i to “AM” and “AM/SW–FM” knob o
o to “MONO”.
i to “SW1”, “SW2” or “SW3” and
o to “WIDE.”
Apply power:
a) Use AC ADAPTER by connecting the adapter to “DC IN” jack
D; or
b) Install batteries by sliding “BATTERY SIZE” switch S to type of battery
being used. Insert 4 batteries into Battery Compartment L, paying
close attention to orientation of the batteriesʼ + and – ends.
6.
7.
8.
9.
Turn on the radio by pressing the POWER button
Press the “DIAL SPEED FAST” button
Use the “TUNING” knob
Adjust “VOLUME” knob
desired levels.
Q.
w above the tuning knob.
q to locate a station.
e, “TREBLE” knob t and “BASS” knob r to
For Button and Knob locations, see Radio Identification diagrams on pages 5-7.
Page 4
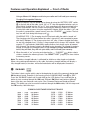
CCRadio SW
Radio Identification — Front View
p
[ ]
Q
W
E
R
Y
o
T
U
I
i
O
P
{
u
y
t
r
e w
q
}
Front/Top Identification
Q
W
E
R
T
Y
U
POWER or • SLEEP Timer
DUAL TIME Button
LOCK Button
Down or • MINUTE
Up or • HOUR or
12/24 Hour Clock
MEMORY SET or
• CLOCK SET
ALARM
I • TIMER A
O • TIMER B
P MEMORY or • CHARGE
{ SW BAND Selection
} RESET
q TUNING Knob
w DIAL SPEED Selection
e VOLUME Control
r BASS Control
t
y
u
i
o
p
[
]
TREBLE Control
AM RF GAIN
Headphone Jack
AM/SW BAND Selection
AM/SW–FM Band Selection
LCD Display
SNOOZE Button
LIGHT Button
NOTE: The “•” next to a button description means “press and hold” for a second
function.
CCRadio SW
Page 5
Radio Identification — Side Views
Left
Right
F
A
G
S
H
D
J
Left View
A
S
D
F
Page 6
LINE OUT Jacks
BATTERY SIZE Switch
DC POWER IN Jack
Radio Handle
Right View
G
H
J
KEY LIGHT Switch
AM SENSITIVITY Switch
FM/SW ANTENNA Switch
CCRadio SW
Radio Identification — Back View
K
d
s
a
:
L
Inside Battery Compartment
Back View
K
L
:
a
s
d
f
Whip Antenna
Battery Compartment
SIZE AA
1.5V
SIZE AA
1.5V
SIZE D
1.5V
SIZE AA
1.5V
SIZE AA
1.5V
9K
AM IF OUTPUT
AM EXTERNAL ANTENNA
GROUND
SIZE D
1.5V
SIZE D
1.5V
10K
SIZE D
1.5V
FM/SW EXTERNAL ANTENNA
AM Tuning Step Switch
f
CCRadio SW
Page 7
Features and Operation Explained — Front of Radio
Introduction
The CCRadio-SW can receive weaker signals, with superior audio, than perhaps any portable
radio ever made. You are given much more control over how the radio works, sounds and
picks up a signal. You can even deliver a digital signal to a computer for decoding. Learning
how the radio works will help you with your audio experience.
Please refer to the Radio Identification diagrams on pages 5-7 as you read through this
instruction manual. Radio controls and their functions are listed numerically in this manual.
NOTE: The “•” next to a button description on the radio means that button has a dual function.
“Press and hold” briefly to activate the second function. The dual functions are usually done
with the power “off”, while AC power is connected or batteries installed.
POWER
• SLEEP
Q
The “POWER • SLEEP” button has nine operational settings: 90, 60, 45, 30, 15, 10, 5, 1 (minutes) and “ON” (continuous).
When you press and release the “POWER” button the first time you will see “60” minutes displayed for about two seconds. This indicates the radio is set to operate for 60 minutes and
then shut off. A SLEEP icon
will also be displayed continuously during this timed playing
mode. When the radio shuts “off”, the SLEEP icon
will disappear. This is the radioʼs
“SLEEP” operation. The radio will function with this “60” minute “SLEEP” time limit every time
you turn the radio “on” until you change it to a different one of the nine SLEEP settings.
To change to a different setting, press and release the “POWER • SLEEP” button while any
one of the nine “SLEEP” settings is displayed. They are only displayed for two seconds at a
time. Each press of the button will display the next setting respectively. Stop on the setting you
desire and it will be remembered for your convenience each time you turn the radio “on”. If you
select any one of the sleep settings, except “ON”, the SLEEP icon
will be displayed while
the radio is “on”. When “on” is selected, the radio will simply turn on and off when the power
button is pushed.
Pressing the “POWER • SLEEP” button while the radio is operating on any of the settings will
turn the radio off.
W
DUAL TIME
The “DUAL TIME”
button has two functions:
1) It toggles between “WORLD” and “LOCAL” time clock with the radio “on” or “off”. The
radio displays the word LOCAL or WORLD indicating which clock time is the default
display time clock. Press and release this button and the alternate time clock will
display its time for two seconds, along with the word LOCAL or WORLD.
Page 8
CCRadio SW
Features and Operation Explained — Front of Radio
2) It sets the “WORLD” or “LOCAL” time clock to the default time clock when the radio is
“off”.
To change the default display time clock, with the radio “off”, hold the button down for
five seconds. The radio display will change displaying the word LOCAL or WORLD
indicating the time clock that will now be the new default time clock. See “CLOCK SET”
(page 10) to set the time on the default clock.
Tip: Many people set the ʻWORLD” time clock to “UTC” (Universal Time Coordinated) because
SW radio broadcasts are scheduled on this time. “UTC” is broadcast on a 24-hour format.
Tune into 10,000 kHz or 15,000 kHz to hear the time in UTC.
E
LOCK
The “LOCK” button locks out the operation of all the buttons on the radio except the display
“LIGHT” button E and the “KEY LIGHT” switch G.
• MINUTE
The “ • MINUTE
” button performs four functions:
<
R
<
Press and release the “LOCK” button and the “KEY LOCK” icon
will be displayed. When
the “KEY LOCK” icon
is displayed, all radio buttons become locked off except for the LCD
display light and the key light. Press and hold the “LOCK” button for one second to turn off this
feature. This button “LOCK” is normally used for travel so the radio does not turn on accidentally.
When the radio is “on”:
1) It will decrease the frequency one step at a time with each press and release of the
button.
2) It will automatically search “down” in frequency until it finds a relatively strong station to
stop on when you press and hold the button for two seconds.
3) When used with “MEMSET” button Y it toggles memory number positions for storing
stations to memory. See “MEMORY SET” (page 11) to set stations to memory.
When the radio is “off ”:
4) It is used with “CLOCK SET” on button Y to set the minutes for the clocks and timers.
See “CLOCK SET” (below) and “ALARM SET” (page 11) to set clock and alarm times.
• HOUR
<
The “ • HOUR
<
T
” button performs five functions:
When the radio is “on”:
CCRadio SW
Page 9
Features and Operation Explained — Front of Radio
1) It will increase the frequency one step at a time with each press and release of the
button.
2) It will automatically search “up” in frequency until it finds a relatively strong station to
stop on, when you press and hold the button for two seconds.
3) When used with “MEMSET” button Y it toggles memory number positions for storing
stations to memory. See “MEMORY SET” (page 11) to set stations to memory.
When the radio is “off”:
4) It is used with “CLOCK SET” on button Y to set the hours for the clocks and timers.
See “CLOCK SET” (below) and “ALARM SET” (page 12) to set clock and alarm times.
<
5) Press and hold the “HOUR ” button T for five seconds to toggle the clock time on
the display between 12 or 24 hour modes. “AM” and “PM” indicators will be displayed
when the clock is set to 12 hour mode.
Note: This sets both “LOCAL” and “WORLD” time clocks to the same hour format.
Y
CLOCK SET
The
button has two functions:
1) When the radio is “off”, the
CLOCK SET
See “DUAL TIME”
time clock.
button sets the time on the default clock.
(page 8) to set “WORLD” or “LOCAL” time clock to the default
<
<
<
To set the time, press and hold the “CLOCK SET” button Y until the Hour begins to flash.
While the Hour is flashing use the “HOUR ” button T or “TUNING” dial knob q to set
the hour. Then press the “MINUTE ” button R to select the minutes. The Minutes will
flash on the display. While the Minutes are flashing use the “MINUTE ” button or the
“TUNING” dial to set the minutes. To complete setting the time, you must press the
“CLOCK SET” button while the time is flashing. If you donʼt press “CLOCK SET” while the
time is flashing, the time will change back to the time you started with and you will have to
start over.
<
<
NOTE: Pressing the “HOUR ” or “MINUTE ” buttons will increase the numbers only. Using
the “TUNING” dial will allow you to increase and decrease the numbers with the change of
direction of the dial.
<
CLOCK TIPS: You can also use the “TUNING” dial after pressing “HOUR” or “MINUTE”. Read
“DUAL TIME”
(page 8) to use the clocks the way you prefer. See also the “HOUR ”
button (page 10) to change the hour to 12/24 hour format.
NOTE: Setting the “LOCAL” time clock also sets the “WORLD” time clock. Next to the
“WORLD” clock you will see Time DIFF and a number displayed. If you set the “WORLD” time
Page 10
CCRadio SW
Features and Operation Explained — Front of Radio
clock to “UTC” (Universal Time Coordinated) the Time DIFF number is the number of hours
between “LOCAL” time and “WORLD” time. As an example, San Francisco, CA, is 8 hours
behind UTC. Set the “WORLD” time clock 8 hours ahead of “LOCAL” time, rotating the “TUNING” dial until the Time DIFF number is “+8”.
2) When the radio is “on”, the
button stores stations to a Memory Preset number.
MEMORY SET
The CCRadio SW has 10 memories per band: AM, FM, SW1, SW2, and SW3.
<
<
To memorize a station, tune to it, then press the
button. The word Preset will flash
with a memory number below it. If this is the memory number you want for this station,
press
to complete while Preset is flashing. If this is not the memory number you want
press the
or
button to pick a memory number between 1 to 10 then press
to
complete. You must do this while Preset is flashing or you will have to start over.
MEMORY TIPS: You have only four seconds to perform this action or you will have to start
over. It is best to write down your memory stations and numbers to make entering them easier.
Note: When a station is stored to memory, whenever the radio is tuned to that station, the
word Preset and its number are always displayed. If you press
to store a station, Preset
will begin flashing and the number will increment to the next number.
U
The CCRadio SW is equipped with dual alarms and there are two different alar modes to
choose from. You can choose to wake up to the radio
or to a buzzer tone
. The
button is used with
or
buttons to set the alarms and to turn the alarms off.
ALARM SET
I
1) To set the alarm time, press and hold
alarm hour begin to flash on the display.
<
” button to set the hour and the
<
2) While they are flashing, press the “HOUR
“MINUTE ” button to set the minutes.
button until word “Timer A” and the
3) With the word “Timer A” still flashing, press and release the “ALARM”
button
to set the alarm mode. The first icon to appear on the display next to the word
“Timer A” will be
. This sets the alarm to Buzzer mode. Press this button again
and the
will display, setting the alarm to Speaker mode. This activates the
radio to play a radio station. Press the button again and both icons will disappear
from the display, indicating that the alarm is “off”. You have about four seconds
between pressing buttons or you must start over.
4) When you have finished setting your alarm, you must confirm your settings by
CCRadio SW
Page 11
Features and Operation Explained — Front of Radio
pressing the
“Timer A” button.
Alarm Modes:
On “Buzzer”, the alarm will sound for three minutes and the
will flash.
On “Speaker”, the radio will come on to the station and volume setting that you listened
to before turning the radio “off”. The radio will play for 60 minutes. While the radio is
playing, the
will flash and the
will also be displayed.
To stop a “Timer” for the day but retain the alarm setting, press the “POWER” button.
The “Timer” will then come on automatically the next day.
Snooze:
To snooze, press and release the “SNOOZE” bar [ on top of the radio, while the
alarm is sounding. The alarm icon will flash on the display. Each press on the snooze
bar will pause the alarm for five minutes. You can snooze up to four times, then the
alarm will automatically shut off until the next day.
ALARM TIPS: Set the time on the alarms first. A timer will not be activated until the
alarm mode is selected. You must select
or the
. The mode you have selected
will appear on the LCD display. To turn a timer “off” permanently, press and hold the
timer button that is active until “Timer A” or “Timer B” and the clock flash and then
press the
button until both icons disappear. When no icon is displayed on the
LCD, the “Timer” will not go off even though an alarm time has been set.
Timer A and Timer B work in either the “WORLD” or “LOCAL” time that has been
selected as the default time clock, not in the alternate time clock. If you want to change
the “Timers” to function on the alternate time clock, you must use the “DUAL TIME”
button to change it to be the default time clock. See “DUAL TIME”
on page 8.
O
Repeat the same procedure as described for “TIMER A”.
P
The “MEMORY”
button has two functions:
1) When the radio is “off” and plugged into the AC Adapter, this button turns “on” the
radioʼs battery charging mode.
BATTERY CHARGING
There is a built in charging system on the CCRadio-SW. WARNING: DO NOT CHARGE
ALKALINE BATTERIES OR OTHER NON-RECHARGEABLE BATTERIES. If you
charge alkaline batteries, they will leak, they will ruin your radio and it will void your
warranty. Only use the supplied AC Adapter for charging batteries in this radio.
Page 12
CCRadio SW
Features and Operation Explained — Front of Radio
Using a different AC Adapter could ruin your radio and it will void your warranty.
Charging Rechargeable Batteries:
Select the battery size you would like to charge by using the “BATTERY SIZE” switch
S on the left side of the radio. Install “AA” or “D” size rechargeable batteries such as
Nickel Metal Hydride into the “AA” or “D” slots according to the diagram etched in the
battery compartment. Be very careful to orientate the batteries correctly as labeled.
Connect the radio to power using the supplied AC Adapter. While the radio is “off” and
the radio is connected to a power source, press the “CHARGE”
button. The battery icon will flash during the charge cycle
.
CHARGING TIPS: 1) The charging circuit will not work while the radio is turned “on”.
The charging cycle will resume when the radio is turned “off” and connected to power
with the AC Adapter. 2) The charge cycle shuts “off” after 12 hours whether the batteries are fully charged or not. 12 hours is long enough to fully charge “AA” batteries. High
capacity “D” size batteries (9000 MAh) require three or four charge cycles to become
fully charged. The charge system is designed to stop charging if an attempt is made to
charge an already fully charged battery. If you attempt to charge dead alkaline batteries, they will leak, they will ruin your radio, and it will void your warranty.
2) When the radio is “on”, pressing and releasing the
“CHARGE”
button selects
stations stored to the memory presets. See “MEMORY SET” (page 11) to store stations
to memory presets.
Note: The battery strength indicator is calibrated for alkaline or other single-use batteries.
When using rechargeable batteries in this radio, the battery strength indicator will display a
fully charged battery at two bars, while alkaline batteries will be displayed at three bars.
{
SW BAND
<
This button is best used to quickly step to the beginning of each of the commonly designated
SW broadcast bands. Example: In the evening turn the “AM/SW BAND” knob r to “SW1”.
Press the “SW BAND” button until it reads 9400 on the LCD display. Press and hold the
button to start scanning through this SW band. Different SW Bands work better at different
times of the day, year and even solar cycle. (See “Common Shortwave Broadcast Bands”
below.) This button can also be used to increment through the AM band by 100 kHz steps and
the FM band by 1000 kHz steps.
2300
3200
3900
4750
5900
7100
9400
CCRadio SW
–
–
–
–
–
–
–
COMMON SHORTWAVE BROADCAST BANDS
2495
3400
4000
5060
6200
7450
9900
120 Meters
90 Meters
75 Meters
60 Meters
49 Meters
41 Meters
31 Meters
11600
13570
15100
17480
18900
21450
25670
–
–
–
–
–
–
–
12100
13870
15800
17900
19020
21850
26100
25 Meters
22 Meters
19 Meters
16 Meters
15 Meters
13 Meters
11 Meters
Page 13
Features and Operation Explained — Front of Radio
}
RESET
“RESET” is used to clear up the radio if it should become scrambled and the buttons do not
respond, or if you wish to change “AM Tuning Steps”. To push the “RESET”, use the end of a
paperclip and push it into the hole briefly. Stations stored in Memory are saved after you
“reset” the radio.
If you change the “AM Tuning Step” switch from 10 kHz to 9 kHz tune spacing, you must press
the “RESET” to activate the change after you flip the switch. 9 Kilohertz spacing is used in
Europe and many other countries. See “BATTERY COMPARTMENT” L on page 20 for more
information on the “AM Tuning Step” switch.
q
TUNING DIAL KNOB
The “TUNING” dial has two functions:
1) When the radio is “on”, it is used to tune in stations; and
2) When the radio is “off”, it can be used to adjust the time for time clocks and alarms.
See “CLOCK SET” (page 10) and “ALARM SET” (page 11).
w
DIAL SPEED
Press and release the
button to disable the “TUNING” dial q. The word Stop will appear
on the display, indicating the “TUNING” dial has been disabled. This is used to prevent frequency changes with accidental bumps of the dial.
Press and release the
button and the word Slow will appear on the display. When the
radio is in AM or SW band the “TUNING” dial will the tune in 1kHz steps. In FM band it will
tune in 10 kHz steps.
This feature is good for fine tuning AM reception. You may find the best reception of some AM
stations is one or two KHz off of the frequency you would expect. It is also good for tuning
away from a strong offending station that is next to the station you want on the dial.
Page 14
CCRadio SW
Features and Operation Explained — Front of Radio
Press and release the
button and the word Fast will be displayed. When the radio is in
AM band, the “TUNING” dial q will now tune in 10 kHz or 9 kHz steps, depending on the “AM
Step Switch” f setting in the battery compartment (page 21). In SW band, tuning is 5 kHz
steps, and in FM band tuning is 100 kHz steps.
This setting may take some time to get use to. It allows fast access across the dial in all frequency ranges.
e
VOLUME KNOB
The “VOLUME” dial adjusts volume for the speaker and “HEADPHONE” jack. It does not
adjust volume for “LINE OUT” jacks A. Turn the volume down before plugging in headphones.
r
BASS KNOB
The best bass response is achieved when the radio is connected to the AC Adapter because
of the greater power available. If you turn the bass up full while operating on batteries, the
audio will distort. If the bass is kept at a lower level while operating on batteries, distortion will
be kept to a minimum. To turn the bass up, rotate the “BASS” knob clockwise.
t
TREBLE KNOB
Treble can be used to raise the range of highs to improve music fidelity. It can also be used to
adjust for your hearing to make voices more legible. To turn the treble up, rotate the “TREBLE”
knob clockwise.
y
AM RF GAIN KNOB
The “AM RF GAIN” control is used to:
1) Reduce overload from an overly strong nearby station. If you have background
CCRadio SW
Page 15
Features and Operation Explained — Front of Radio
distortion, try reducing the “AM RF GAIN” for a clearer signal; and
2) Reduce static. When a signal is amplified by the RF amplifier, background noise is generally amplified out of proportion to the audio signal. This is due to the inherent nature
of solid state chips. By reducing the “AM RF GAIN” control you can reduce static while
keeping a decent audio signal.
TUNING TIP: The “AM RF GAIN” knob should be set to full clockwise to begin. AM and SW
station signal strengths are indicated on the display with signal bar graph. If you
experience background noise or overlapping stations when tuning to your station, turn the “AM RF GAIN” down or counter clockwise and it will reduce interference in many cases.
u
HEADPHONE JACK
The “HEADPHONE” jack output will be in stereo for FM stations that broadcast in stereo. Set
“AM/SW–FM” band switch o to “FM STEREO” position to hear FM stations in stereo with
headphones.
will be displayed when the “AM/SW–FM” band switch is set to “FM
STEREO” and a stereo signal is received.
HEADPHONE JACK TIP: When using headphones, turn down the volume before plugging in
headphones.
i
AM/SW SWITCH
This switch is used with “AM/SW–FM” band switch o to select AM band or SW band ranges
“SW1”, “SW2” and “SW3”.
o
AM/SW–FM BAND SWITCH
This switch is used to select AM and SW “WIDE” and “NARROW” modes. It is also used to
select FM “MONO” and “STEREO” modes. The “MONO” setting will give the best reception
while listening to a weak station.
TUNING TIP: To tune to SW, set this switch to AM “WIDE.” Then using the “AM/SW BAND”
switch i, select either “SW1”, “SW2” or “SW3”. To tune to AM, set this switch to AM “WIDE”.
Then set the “AM/SW BAND” switch i to AM. If you experience overlapping stations or background noise, try setting the switch to “NARROW”. When tuning FM stations, set the switch to
“STEREO” only when you are listening with headphones. The word
will be displayed
when a stereo signal is received.
Page 16
CCRadio SW
Features and Operation Explained — Front of Radio
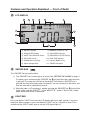
p
LCD DISPLAY
1
2
3
4
6
5
12
7
11
10
9
1) BATTERY Symbol
2) AC ADAPTER Symbol
3) SLEEP Timer/SNOOZE Status
7) MEMORY Location (1 - 10)
8) DIAL SPEED Indicators
9) FREQUENCY / CLOCK Display
4) KEY LOCK On/Off
10) DUAL TIME Indicator
6) Signal Strength Meter
12) STEREO Reception
5) ALARM Status and Type
[
8
11) Indicates BAND In Use
SNOOZE BAR
The “SNOOZE” bar has two functions:
1) The “SNOOZE” bar is used to pause an alarm. See “SETTING THE ALARM” on page 11.
To snooze, press and release the “SNOOZE” bar [ on top of the radio, while the alarm
is going off. The alarm icon will flash on the display. Each time the “SNOOZE” bar is
pressed, the alarm will be paused for five minutes. You can snooze up to four times and
then the alarm will be automatically shut off.
]
<
<
2) When the radio is “off” but power is applied, pressing the “SNOOZE” bar [ turns off the
“beep” while using the “HOUR
” or the “MINUTE
” buttons. There is still a “beep”
when reaching the end of a radio band.
LIGHT BAR
Press and release “LIGHT” bar to turn the LCD display light on for eight seconds. If you want
the display light to remain on, press and hold the “LIGHT” bar for 2 seconds or more. Press
and release the “LIGHT” button again to turn the LCD display light off.
CCRadio SW
Page 17
Features and Operation Explained — Left Side
A
LINE OUT
“LINE OUT” is used to send the radioʼs audio to an external amplified speaker or stereo system. It is a fixed output level designed to work with external systems. The radioʼs “VOLUME”,
“BASS” and “TREBLE” controls do not function when using “LINE OUT” to an external system.
An optional patch cord to your amplified speakers or stereo system will be needed for this connection.
LINE OUT TIPS: When using “LINE OUT”, set “AM/SW–FM” switch o to FM “STEREO” position to hear FM stations in stereo with external systems. The word
will be displayed
when a stereo sign is received.
S
BATTERY SIZE SWITCH
The “BATTERY SIZE” switch is used to select between “AA” and “D” size batteries. To power
the radio with batteries, slide “BATTERY SIZE” switch S to the size of battery being used.
Insert 4 batteries into the Battery compartment L, paying close attention to THE orientation of
the batteriesʼ + and – ends. The LCD will display a
with fresh, new batteries. When the
batteries are low, the
icon will display. If the batteries are too low to run the radio, the
icon will flash on the display, and ultimately, the radio will automatically shut “off”.
Batteries are also used to maintain clocks, alarms and station memory settings. When replacing batteries in the radio, it is not necessary to have the AC Adapter plugged in as the radio
will hold its memory for several hours before losing them without power.
BATTERY TIPS: Never mix new and used batteries. If you are not going to use the radio for a
long time, remove the batteries.
WARNING: Battery charging can be dangerous and can cause batteries to overheat and
explode and or leak. THIS RADIO HAS A CHARGING CIRCUIT for both AA and D size batteries. NEVER CHARGE ALKALINE BATTERIES or other non-rechargeable batteries.
Pressing the “MEMORY/CHARGE” button on the front of the radio while the radio is off
and the AC Adapter is connected to power, the radio will start the charging process!
See “BATTERY CHARGING” (page 12) for proper operation of the charging circuit. See Safety
Instructions on page 23.
D
DC IN
The “DC IN” jack is used to power the radio with the AC Adapter. Only use the AC Adapter
supplied by the manufacturer to power this radio. When the AC Adapter is used the
will
appear on the LCD display. If batteries are installed and the AC Adapter is plugged in, the
icon will be replaced by the Adapter icon . If power to the AC Adapter is cut off, the radio will
automatically switch to batteries and the
will again reappear in the display.
Page 18
CCRadio SW
Features and Operation Explained — Left, Right & Back
F
RADIO HANDLE
The handle is made of a special, high-tensile strength plastic to resist breakage. It is designed
to fold down when not in use.
G
KEY LIGHT SWITCH
Setting the “KEY LIGHT” switch to “on” turns the button back light function “on”. When this
switch is “on”, the front panel buttons will light for 8 seconds when any button is pressed.
KEY LIGHT TIP: If you are running the radio on batteries, you may want to keep the key light
switch “off” to conserve battery power.
H
AM SENS (SENSITIVITY) SWITCH
The “AM SENSITIVITY” switch has two positions: “DISTANT” and “LOCAL”.
Set “AM SENSITIVITY” switch to “DISTANT” to enhance signal strength for weak and long distance stations. If you have distortion or stations overlapping, set the switch to “LOCAL”.
J
FM/SW ANTENNA SWITCH
The “FM/SW ANTENNA” switch has two positions: “INTERNAL” and “EXTERNAL”.
When “FM/SW ANTENNA” switch is set to “INTERNAL” the radio uses the “Whip Antenna K
to receive FM and SW stations. For best reception, extend the “Whip Antenna” fully and try
rotating it into different positions. It is best to try the radio with the “Whip Antenna” first. Then
try using external antennas if stations are weak or hard to receive.
When the “FM/SW ANTENNA” switch is set to “EXTERNAL” you must connect another antenna to the “FM/SW EXTERNAL ANTENNA” jack d. For best reception, different types of antennas are used for FM and SW. For FM we recommend beginning with C. Craneʼs FM Reflect
Antenna. SW can be greatly improved with the addition of a simple antenna. A small diameter
stranded wire, about 60 feet in length is a good place to start.
FM/SW ANTENNA TIP: Set “AM SENSITIVITY” switch H to “DISTANT” to start when using
external antennas.
K
WHIP ANTENNA
The “Whip Antenna” is used to receive FM and SW stations. For best reception with the “Whip
CCRadio SW
Page 19
Features and Operation Explained — Back of Radio
Antenna”, set “FM/SW ANTENNA” switch J to “INTERNAL”, extend the “Whip Antenna” fully
and try rotating it into different positions. It is best to try the radio with the “Whip Antenna” first.
While on FM, try collapsing the last two telescopic elements for better reception. This length
resonates better with FM band frequencies. Then try using external antennas if stations are
weak or hard to receive.
L
BATTERY COMPARTMENT
The battery compartment will accept 4 “AA” or 4 “D” size batteries. Recommendation: Use “D”
size if you plan to operate the radio primarily on battery power. You can use “AA” size for
emergency backup when you plan to operate the radio primarily with the AC Adapter. See
“BATTERY SIZE” switch S on page 18 for battery size selection.
WARNING: Battery charging can be dangerous and can cause batteries to overheat and
explode and or leak. THIS RADIO HAS A CHARGING CIRCUIT for both AA and D size
batteries. NEVER CHARGE ALKALINE BATTERIES or other non-rechargeable batteries.
Pressing the “MEMORY/CHARGE” button on the front of the radio while the radio is
connected to the AC Adapter will start the charging process! See BATTERY CHARGING
on page 12 for proper operation of the charging circuit. See Safety Instructions on page
23.
The “AM TUNING STEP” switch f is also located in the battery compartment. Set this switch
to 10K tuning steps for the United States. 9 K tuning steps are used in Europe and many other
countries.
NOTE: If you change the “AM TUNING STEP” switch you must press the “RESET” to activate
the change. See “RESET” } on page 14 for more information.
:
AM IF OUT JACK
The “AM IF OUT” jack is used for AM, SW1, SW2, and SW3 only.
This an interesting feature if you are a radio experimenter. There are many different digital formats that are currently being broadcast such as weather, marine, aeronautical information, and
a digital SW format called DRM. You can use the CCRadio SW to tune in these digital broadcasts and input them into your computer for deciphering. You can search the internet for free
utility programs to decode these broadcasts. For long range broadcasts, SW is the only frequency range that can cover hundreds and even thousands of miles.
To connect to this jack, a PAL type connector is needed. See PAL connector assembly on
page 22.
a
MW (AM) EXTERNAL ANTENNA
If you are in a brick or metal building, AM can be greatly improved with the addition of a simPage 20
CCRadio SW
Features and Operation Explained — Back of Radio
ple antenna. A small diameter insulated stranded wire, about 60 feet in length is a good place
to start. Antenna wire can be attached by pressing the spring loaded lever and inserting the
wire. See “GROUND” jack s to complete the antenna. If you are not familiar with external
wires we recommend hiring a qualified installer. See Safety Instructions on page 23.
NOTE: AM as we commonly call it in the United States is MW or Medium Wave in the rest of
the world.
s
GROUND JACK
The “GROUND” jack is used with the “MW (AM) EXTERNAL ANTENNA” jack a. Attach one
end of a length of wire to the “GROUND” jack and the other end to a good earth ground. See
“MW (AM) EXTERNAL ANTENNA” jack a above for more information.
d
FM/SW EXTERNAL JACK
See “FM/SW ANTENNA” switch J on page 19 for more information. To connect to this jack, a
PAL type connector is needed.
Specifications
DIMENSIONS
11.4" W x 7.3" H x 2.75" D
(290mm x 185mm x 70mm)
WEIGHT
4.5 pounds without batteries
INPUT POWER
4 “AA” or 4 “D” size batteries
9V DC 500mA tip negative
AUDIO OUTPUT
2.5 Watt
SPEAKER
5 Watt 8 ohm
HEADPHONE JACK
3.5mm 32 ohm
AM DUAL CONVERSION
55.845 MHz 1st IF
455 kHz 2nd IF
AM IF OUTPUT
For expansion of
CW, SSB, DRM, SSTV, etc.
FREQUENCY COVERAGE
FM Band:
AM (MW) Band:
AM (MW) Band:
SW1 Band:
SW2 Band:
SW3 Band:
87.00 - 108 MHz Stereo
522 - 1620 kHz (9 kHz step)
520 - 1710 kHz (10 kHz step)
1711 - 10010 kHz
9990 - 20010 kHz
199901 - 29999 kHz
TUNING
AM — 10 kHz - 9 kHz
FM — 50 kHz
SENSITIVITY
FM > 5uv
MW > 0.2 mV/m
SW >20 uv
SELECTIVITY
Wide > 40 db (100x)
Narrow > 60 db (1000x)
MEMORY PRESETS
50 Total (10 Per Band)
Note: Specifications are subject to change without notice.
CCRadio SW
Page 21
Troubleshooting Guide
The CCRadio SW will not turn on:
1. Make sure the “LOCK” is off.
2. Check the “BATTERY SELECTION” switch to make sure it is in the proper position.
3. Be sure that the batteries are installed correctly.
4. Make sure all batteries are good.
5. If using the AC Adapter, make sure that it is plugged fully into the power jack.
The CCRadio SW has poor reception on FM and SW:
1. Check the “FM/SW ANTENNA” switch on the right side of the radio for the proper setting.
2. Check the position of the “AM SENSITIVITY” switch for “LOCAL” or “DISTANT” setting.
3. Check the position of the “AM RF GAIN” control. It should be fully clockwise.
The CCRadio SW has poor reception on AM:
1. Check the position of the “AM RF GAIN” control. It should be fully clockwise.
2. Rotate the radio for the best reception.
3. Concrete, brick, and metal buildings can greatly reduce radio reception. Try the radio outside. If the reception is improved, add an external AM antenna like C. Craneʼs Twin Coil
Ferrite™ AM Antenna or see feature a on page 20.
I changed the “AM Tuning Steps” from 10 kHz to 9 kHz, but my radio does not respond:
You must press the “RESET” to activate the change. To press the “RESET”, use the end of a
paperclip and push it into the hole briefly.
The Battery Strength Indicator does not display a full battery icon when using rechargeable batteries:
The battery strength indicator is calibrated for alkaline or other single-use batteries. When
using rechargeable batteries in this radio, the battery strength indicator will display a fully
charged battery at two bars, while alkaline batteries will be displayed at three bars.
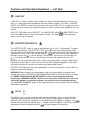
PAL Connector Assembly
1
RG 59 Cable
2
3
4
1/2"
1/4"
Page 22
1/4"
1/2"
CCRadio SW
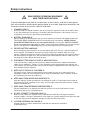
Safety Instructions
Ꮨ
READ BEFORE OPERATING EQUIPMENT
SAVE THESE INSTRUCTIONS
To prevent damage to your radio or possible injury to you or others, read these safety precautions and instructions entirely before applying power to your radio. Keep these precautions and
instructions where all who use this radio will read them.
1)
2)
3)
4)
5)
6)
7)
8)
9)
Check the radio, AC adapter, batteries and any accessories regularly. Do not use the radio if there
is any sign of damage. Only operate in accordance with the instructions in this manual. Only use
attachments or accessories specified by the manufacturer.
COMMON CARE
Battery charging can be dangerous and can cause batteries to overheat and explode and/or leak.
THIS RADIO HAS A CHARGING CIRCUIT for both AA and D size batteries. NEVER CHARGE
ALKALINE BATTERIES OR other non-rechargeable batteries. Pressing the “MEMORY/CHARGE”
button on the front of the radio while the radio is connected to the AC Adapter will start the charging
process! See BATTERY CHARGING (page 13) for proper operation of the charging circuit.
BATTERY CHARGING
Never mix different type of batteries or use old batteries with new. This may cause the batteries to
leak or explode. Dead batteries are prone to leakage. Remove the batteries when no charge
remains. Orientate the batteries correctly in the unit according to the diagram. Do not store batteries
with metal objects like paper clips. We recommend you remove batteries from the radio if you are
not going to use the radio for one month or more.
PROPER BATTERY HANDLING
If you smell or notice smoke, disconnect the AC adapter and remove the batteries immediately
taking care to avoid burns. Contact C. Crane Company or their representative for inspection and
service before any future operation. Only use the AC adapter supplied with the unit and replace it if
wires become frayed or exposed.
DISCONNECT THE RADIO IN CASE OF MALFUNCTION
The radio is heavy, especially when batteries are installed. Use only on a stable level surface.
Dropping the radio can cause damage or injury. Keep the AC Adapter cord in a position so someone cannot trip and cause the radio to fall.
KEEP OUT OF REACH OF CHILDREN
Keep the radio dry. Liquids and moisture can damage the radio. If a liquid leaks into the radio do
not operate and seek a qualified service shop. To clean radio, remove the power and use a damp
cloth on the exterior only.
KEEP AWAY FROM WATER AND MOISTURE
Extreme temperatures can damage the radio. Do not leave or use the radio where it can be
subjected to high or very cold temperatures.
KEEP AWAY FROM EXTREME TEMPERATURES
Refer all service work to a qualified service shop when the radio does not appear to operate
normally, exhibits a change in performance or the radio has received damage. Never open the radio
as this may expose you to dangerous voltages and this will void all warranties.
DO NOT ATTEMPT TO SERVICE RADIO
Outside antennas or cables should not be used with this radio unless installed by
qualified personnel.
OUTSIDE ANTENNAS OR CABLES
CCRadio SW
Page 23
Model: CCRadio SW
ANSI C63.4: 2003
THIS DEVICE COMPLIES WITH PART 15 OF THE FCC RULES.
OPERATION IS SUBJECT TO THE FOLLOWING TWO CONDITIONS.
1) THIS DEVICE MAY NOT CAUSE HARMFUL INTERFERENCE, AND
2) THIS DEVICE MUST ACCEPT ANY INTERFERENCE RECEIVED,
INCLUDING INTERFERENCE THAT MAY CAUSE UNDESIRED
OPERATION.
Notice: Any changes or modifications not expressly approved by the
party responsible for compliance could void the user’s authority
to operate the equipment.