1
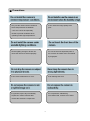
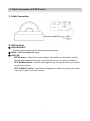
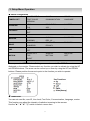
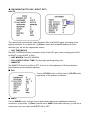
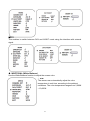
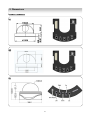
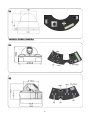
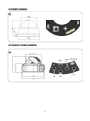
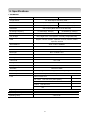
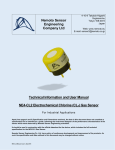
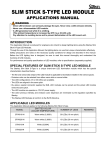
High Resolution / Day & Night COLOR DOME TYPE CAMERA MANUAL 680 TVL 960H, UTC, Defog The lightning flash with an arrowhead symbol, within an equilateral triangle is intended to alert the user to the presence of uninsulated dangerous voltage within the product's enclosure that may be of sufficient magnitude to constitute a risk of electric shock to persons. The exclamation point within an equilateral triangle is intended to alert the user to the presence of important operating and maintenance (servicing) instructions in the literature accompanying the appliance. INFORMATION - This equipment has been tested and found to comply with limits for a Class A digital device, pursuant to part 15 of the FCC Rules. These limits are designed to provide reasonable protection against harmful interference when the equipment is operated in a commercial environment. This equipment generates, uses, and can radiate radio frequency energy and, if not installed and used in accordance with the instruction manual, may cause harmful interference to radio communications. Operation of this equipment in a residential area is likely to cause harmful interference in which case the user will be required to correct the interference at his own expense. WARNING - Changes or modifications not expressly approved by the manufacturer could void the user’s authority to operate the equipment. CAUTION : To prevent electric shock and risk of fire hazards: Do NOT use power sources other than that specified. Do NOT expose this appliance to rain or moisture. This installation should be made by a qualified service person and should conform to all local codes 2 ■ Warning The camera needs periodic inspection. Contact an authorized technician for inspection. Stop using your camera when you find a malfunction. If you use your camera around smoke or unusual heat for a long time, fire may be caused. Do not Install the camera on a surface that can not support it. Unless the surface is suitable, it could cause falling or other hazards. Do not hold plug with wet hands. It could cause an electric shock. Do not disassemble the camera. It may result in fire, electric shock or other hazards. Do not use the camera close to a gas or oil leak. It may result in fire or other hazards. 3 ■ Precautions Only use the camera under conditions It can cause the image quality to be where temperatures are between poor. -10°C and +50°C. Be especially careful to provide ventilation when operating under high temperatures. Severe lighting change or flicker can It is one of the most important parts of cause the camera to work improperly. the camera. Be careful not to be stained by fingerprint. It can cause malfunctions to occur. It can damage the CCD. If it gets wet, wipe it dry immediately. If it is exposed to radioactivity, Liquids can contain minerals that For heated CCD, it will be out of order. corrode the electronic components. 4 ■ Contents 1.Features 2. Cable Connection & OSD Control 3. Setup Menu Operation 4. Troubleshooting 5. Dimensions 6. Specifications 5 --------------------------------- 6 --------------------------------- 7 --------------------------------- 8 --------------------------------- 18 --------------------------------- 19 --------------------------------- 22 1. Features ■ 1/3" 520K/610K Sony Super-HAD CCD II Minimum Low Illumination (F1.2, 50 IRE) ■ High Resolution 680 TV Lines This camera has realized high resolution of 680 TV lines using the top-notch full digital image processing, 10 Bit A/D serial signal processing and special algorithm technologies. ■ DNR(Digital Noise Reduction) The DNR technology removes low-light gain noise and afterimage to provide distinct and clear images even in dark environments. ■ DAY&NIGHT This camera has the Day/Night function which outputs the filter changing signal with detecting the illumination condition. DayNight operation features an ‘auto’ mode which automatically switches between day and night mode based on the level of illumination on the scene. The EXT mode changes between day and night operation upon triggering from an external source. The DAY mode operates in daytime conditions to provide optimum colors, and the NIGHT mode operates in night-time conditions to enhance the definition of the image. ■ SMART IR This camera supports SMART IR function which automatically adjust the infrared light required in a scene as the subject moves closer to or further away from the camera, resulting in a clear image that is not washed out or too dark. ■ DEFOG This camera supports DEFOG function which does a process of clearing blurred image caused by fog and snow by analyzing the brightness of input image and compensating the color of the image. ■ OSD(On Screen Display) This camera supports the OSD function which is used to control the camera with multi languages. The camera can be controlled by selecting text displayed on the monitor screen. ■ CCVC(Camera Control Via Coaxial cable) This is a remote control function that overlaps the coaxial cable (for a transfer of the video signal) with the control signal. In installation or repair, this helps you control the communication controller(optional) without additional cabling. 6 2. Cable Connection & OSD Control 1) Cable Connection 2) OSD Control ① 3AXIS BRACKET - Please loosen screws and fix tilted and panned position. ③ LENS : Vari-Focal Auto Iris Lens ③ OSD PCB - SETUP button : Used for the menu display. This button can be used to confirm settings after changing the value of the selected function or current conditions. - UP & DOWN buttons : Used for selecting items by moving the cursor up or down on the menu screen. - LEFT & RIGHT buttons : Used when changing item values, by moving the cursor to the left or right on the menu screen 7 3. Setup Menu Operation ◆ Menu configuration CAMERA SET CAMERA TITLE CAM ID ID DISP FONT COLOR COMMUNICATION LANGUAGE LENS BRIGHTNESS SHUTTER FLK AGC AUTO NIGHT DAY ATW MANUAL PUSH GAMMA CHROMA SHARPNESS SHADING PED. LV. BLACKLIGHT CONTRAST H-MIRROR PRIVACY LOW HIGH MIDDLE SENSITIVITY AREA NO. AREA USE TOP BOTTOM LEFT INITIAL RESTORE VERSION EXPOSURE DAY/NIGHT WHITE BAL. MONITOR IMAGE DNR MOTION EXT. POSI/NEGA OFF RIGHT EXIT SAVE Please press the SETUP button, Settings can now be made. The SETUP menu is displayed on the monitor. Please select any function you wish to activate by using the UP and DOWN buttons. The arrow can be moved up or down by using the UP and DOWN buttons. Please position the arrow to point to the function you wish to operate. ◆ CAMERA SET You can set cam title, cam ID, Line Lock, Font Color, Communication, Language, version This function can adjust the intensity of radiation incoming to the camera. Use the "▲" "◀" "▶" "ⓔ" switch to select a menu item. 8 ■ CAM TITLE Make a set camera title using below numbers and alphabets (0,1,2,3,4,5,6,7,8,9,A,B,C,D,E,F,G,H,I,J,K,L, M,N,O,P,Q,R,S,T,U,V,W,X,Y, Z) ◇OFF: disable CAMERA TITLE. ◇ON: display CAMERA TITLE. ■ CAM ID You can set CAMERA number from 1 to 255. ■ ID DISP ◇OFF: disable CAMERA NO/ID. ◇ON: display CAMERA NO/ID ■ FONT COLOR You can set CAMERA OSD Color. (white, cyan, green, magenta, red, blue, yellow, gray) ■ COMMUNICATION (COAXIAL) This camera can be adjust by remote controller via coaxial. You can select the Protocol as 15BIT, 32BIT. ■ LANGUAGE You can set language. (English, Chinese, Korean, Japanese, French, Deutsch, Italian, Spanish, Russian ) ■ VERSION Version of the camera will be display on the monitor. ◆ EXPOSURE ■ ALC (Automatic Light Control) 9 ◇ BRIGHTNESS(1~20) The BRIGHTNESS menu is used to adjust the overall brightness, where "▶" will increase the brightness and "◀" will decrease it. ◇ SHUTTER The SHUTTER menu is used to set the fixed high-speed electronic shutter, auto high speed electronic shutter. You can select one of 13 options from 1/100( PAL:1/120 ) for the fixed high speed electronic shutter, which is mostly used for imaging a fast moving object. You can select one of shutter speed, 1/120(1/100), 1/250, 1/500, 1/700, 1/1K, 1/1.6K, 1/2.5K, 1/5K, 1/7K, 1/10K, 1/30K, 1/60K, 1/120K. ◇ FLK (FLICKER LESS) If set to ON, the shutter speed will be fixed to 1/100(PAL:1/120) second. This will prevent possible screen distortion to a mismatch between the vertical sync frequency and the blinking frequency of the lighting. ◇ AGC(Automatic Gain Control) LEVEL : AGC max level from 0 to 20.( 6dB to 40dB ) The AGC LEVEL menu is used to adjust the overall AGC max level, where "▶" will increase the AGC max level and "◀" will decrease it. ■ ELC(Electronic Light Control) ◇ BRIGHTNESS The BRIGHTNESS menu is used to adjust the overall brightness, where "▶" will increase the brightness and "◀" will decrease it. ◇ SHUTTER The SHUTTER menu is used to set the fixed highspeed electronic shutter, auto high speed electronic shutter. You can select one of 13 options from 1/100( PAL:1/120 ) for the fixed high speed electronic shutter, which is mostly used for imaging a fast moving object. You can select one of shutter speed, 1/120(1/100), 1/250, 1/500, 1/700, 1/1K, 1/1.6K, 1/2.5K, 1/5K, 1/7K, 1/10K, 1/30K, 1/60K, 1/120K. ◇ FLK(FLICKER LESS) If set to ON, the shutter speed will be fixed to 1/100(PAL:1/120) second. This will prevent possible screen distortion to a mismatch between the vertical sync frequency and the blinking frequency of the lighting. ◇ AGC(Automatic Gain Control) LEVEL : AGC max level from 0 to 20.( 6dB to 40dB ) The AGC LEVEL menu is used to adjust the overall AGC max level, where "▶" will increase the AGC max level and "◀" will decrease it. 10 ◆ DAY/NIGHT(AUTO, DAY, NIGHT, EXT) ■ AUTO The camera will automatically switch between DAY and NIGHT mode, according to the lighting condition. If you press the ⓔ( Enter ) switch with an AUTO based sub menu selected, you will see the appropriate screen. ◇ AGC THRESHOLD Set AGC THRESHOLD that is standard value of the AGC gain, when changing from DAY to NIGHT or from NIGHT to DAY. ◇ AGC MARGIN: Set AGC MARGIN. ◇ DAY & NIGHT DELAY TIME: Set day/night switching delay time. ◇ SMART IR Set SMART IR function as ON or OFF. If set to on, the brightness of IR and saturation phenomenon is automatically adjusted. ■ DAY If set to COLOR mode, it will be fixed to COLOR mode regardless of the ambient conditions. ■ NIGHT If set to NIGHR mode, it will be fixed to black-and-white mode regardless of ambient conditions. If you press ⓔ( Enter ) switch with a NIGHT sub menu selected, you will see a menu where you can select set BURST ON or OFF. 11 ■EXT. This enables to switch between DAY and NIGHT mode using the interface with external signal. ◆ WHITE BAL.(White Balance) Use the White Balance function to adjust the screen color. ◇ ATW The camera can automatically adjust the color temperature in real time, according to the ambient conditions. The color temperature ranges from 2,000K ~ 10,000K. 12 ◇ PUSH If you press the ⓔ( Enter ) switch in the appropriate item position, Auto White Balance will perform once. ◇ MANUAL In this mode, you can set the color temperature of RED and BLUE. ◆ MONITOR Please change the settings value of video appropriate to your monitor. ◇ GAMMA 0.4,0.45,0.5,0.55,0.6,0.65 13 ◇ CHROMA: Color Gain Set ◇ SHARPNESS: Aperture (Horizontal,Vertical) Set ◇ SHADING: Lens Shading ◇ PED. LV.:Pedestal Level Set ◆ IMAGE ■ BACK LIGHT ◇ BLC Adjusts the area to be enhanced and sets the level. ◇ HLC If the scene contains extremely bright light areas such as; from car headlight, the light can mask out much of the on-screen detail. - LEVEL: Adjusts the brightness level of a monitoring area. 14 ■ CONTRAST ◇ D-WDR When there are both bright and dark areas at the same time, this mode makes both areas distinctive. ◇ DEFOG This camera supports DEFOG function which does a process of clearing blurred image caused by fog and snow by analyzing the brightness of input image and compensating the color of the image ◇ POSI / NEGA Switch to negative color. 15 ■ H - MIRROR ◇ H – MIRROR You can flip the picture - MIRROR: Horizontal reverse pictures on the monitor. ◇ PRIVACY You may conceal specific area on the screen with this ‘PRIVACY’ function. You can set masking areas up to 8 zones. ◆ DNR(Digital Noise Reduction): OFF, LOW, MIDDLE, HIGH You can configure the DNR(Digital Noise Reduction) related settings. It reduces the noise on the screen. This is especially useful for a severely distorted screen ◆ MOTION You can specify a detection area. Select area number and specify the sensitivity and size. 16 ◇ SENSITIVITY Set the sensitivity of the motion detection from 0(Highest) to 15(Lowest). ◇ AREA NO Specify a detection area. You can set the area from 1 to 4. ◇ AREA USE With the DISPLAY option set to ON, a motion function will be displayed on the screen, if detected. ◇ TOP/ BOTTOM/LEFT/ RIGHT -. TOP: extends or reduces upper detection area. -. BOTTOM: extends or reduces lower detection area. -. LEF: extends or reduces detection area on the left. -. RIGHT: extends or reduces detection area on the right ◆ EXIT Select a desired EXIT mode using the switch depending on the camera purpose ◇ RESTORE: not saves the current ◇ INITIAL: reset the camera settings settings. 17 ◇ SAVE: save the current settings 4. Troubleshooting If there are problems in operation, please refer to the items below. If the problem persists, please contact the agent you purchased this product from . Problems Nothing appears on the screen. Troubleshooting • Please check the power connection. • Please check the video signal line connection. • Please check and make sure that the auto lens switch is set to DC (VIDEO) when using a VIDEO(DC) lens. The video image is not clear. • Please check if the lens is clean. Please clean the lens with a clean cloth or brush. • Please adjust the contrast feature of the monitor. • Please readjust the back focus of the camera. The screen is dark. • Please adjust the contrast feature of the monitor. • If you have an intermediate device, set the 75 / Hi-z properly, and check the terminals. • Please check if an auto iris lens is being used and adjust the brightness level. There is a problem with the camera operation. • Please check if an appropriate power source to the camera complies with the manufacturer's standard requirement, or if the voltage keeps changing. The MOTION DETECTION function • Please check if 'MOTION DETECTION' mode is turned is not working. on. • Please check if the MD LEVEL is too low. • Please check the setting of the MD AREA. Colors are not quite right. • Please check the 'WHITE BAL' setting The screen is flickering. • Please check if the camera is facing directly into sunlight or fluorescent light. • Please check if an auto iris lens is being used. • Please check the connection of the lens connector cable. COLOR mode is not working. • Please check if the AGC menu is set to the OFF position. SENS-UP function is not • Please check if the AGC menu is set to the OFF working. position. • Please check if the SHUTTER menu is set to MANUAL mode. 18 5. Dimensions DOME CAMERA N1 N2 N3 19 N4 VANDAL DOME CAMERA N5 N6 20 IR DOME CAMERA N7 IR VANDAL DOME CAMERA N8 21 6. Specifications ▪ GENERAL Signal system NTSC PAL 1/3” 960H Super HAD Sony CCD∥ Image Sensor Total Pixels 1028(H)X508(V) 1028(H)X596(V) Effective Pixels 976(H)X494(V) 976(H)X582(V) Resolution Scanning Frequency 680 TV lines (B/W 750 TV Lines with ICR) 15.734KHz(H), 60Hz(V) Min. Illumination Day & Night OSD 15.625KHz(H), 50Hz(V) 0.08Lux(50IRE) Day / Night / Auto / EXT (Option: True Day & Night with ICR) English, Chinese, Korean, Japanese, French, Deutsch, Italian, Spanish, Russian White Balance ATW / PUSH / MANUAL ATW 2000~10000K AGC Level setting BackLight BLC / D-WDR / HLC DNR Off / 2D Privacy Zone / Motion 8 Areas / 4 Areas Camera ID OFF / ON Defog OFF / ON UTC( CCVC) Avaible S/N Ratio More than 52dB Day & Night Day / Night / Auto / EXT (Option: True Day & Night with ICR) Video Output Composite video output 75 ohm terminated Lens 3.6 mm Fixed Lens 2.8~12mm 9~22mm 4~9mm Auto Iris Lens ( ICR: Option ) Auto Iris Lens Auto Iris Lens mm Sync. System Internal Operating Humidity 30 % ~ 90 % RH Operating Temp. - 10°C to 50° 22 Dome type 1 2 3 4 Indoor Indoor Indoor Indoor 120x95(H) 100x103(H) 81x87(H) 2 Axis 2 Axis 3Axis 3Axis Plastic Body & Plastic Body & PC Bubble & PC Bubble & Bubble Bubble Plastic Body Plastic Body 300g 560g 600g 300g Max 1.8W Max 2.5W Max 2.5W Max 2.5W Number Install Type Dimension(mm) 100x76.5(H) 3 Axis Material Weight Power Consumption Power DC12V DC 12 V 500mA(10.2V~14.5 V) Supply (10.2V~14.5 V) Dual Voltage(Option) : AC24V / DC12V Vandal dome type IR Dome IR Vandal Dome Number 5 6 7 8 LED x x 24LEDs(750nm) 30LEDs(750nm) Visibility Range x x 15m 30m Install Type Outdoor/Indoor Outdoor/Indoor Indoor Outdoor/Indoor Dimension(mm) 100 x 145(H) 100 x 144.4(H) 81x87(H) 100 x 144.4(H) 3 Axis 3Axis 3 Axis 3 Axis Aluminum Body PC Bubble & Aluminum Body & PC Bubble Plastic Body & PC Bubble 560g 600g 350g 650g Max 2.5W Max 2.5W Max3.2W Max3.5W 3 Axis Material Aluminum Body & PC Bubble Weight Power Consumption Power Supply DC 12 V (10.2V~14.5 V) Dual Voltage(Option) : AC24V / DC12V 23