1
User’s Manual
© 2011 All Rights Reserved
Acer M310 Smartphone User’s Manual
Model: M310
First issue: 10/2011
Acer M310 Smartphone
Model number: __________________________________
Serial number: ___________________________________
Date of purchase: ________________________________
Place of purchase: ________________________________
Table of Contents
End User License Agreement
Features and functions . . . . . . . . . . . . . . . . . . . . . . . . . . . . . . . . . . . . . . . . . . . . 7
Product registration . . . . . . . . . . . . . . . . . . . . . . . . . . . . . . . . . . . . . . . . . . . . . . 7
Setting up
Unpacking your smartphone . . . . . . . . . . . . . . . . . . . . . . . . . . . . . . . . . . . . . . . 8
Getting to know your smartphone . . . . . . . . . . . . . . . . . . . . . . . . . . . . . . . . . . . 8
Installing or removing the battery . . . . . . . . . . . . . . . . . . . . . . . . . . . . . . . . . . . . 9
Installing a SIM card . . . . . . . . . . . . . . . . . . . . . . . . . . . . . . . . . . . . . . . . . . . . . 10
Using your smartphone
Turning on for the first time . . . . . . . . . . . . . . . . . . . . . . . . . . . . . . . . . . . . . . . 12
Using the touchscreen . . . . . . . . . . . . . . . . . . . . . . . . . . . . . . . . . . . . . . . . . . . 12
The Start screen . . . . . . . . . . . . . . . . . . . . . . . . . . . . . . . . . . . . . . . . . . . . . . . . 13
Hubs . . . . . . . . . . . . . . . . . . . . . . . . . . . . . . . . . . . . . . . . . . . . . . . . . . . . . . . . . 14
Additional menus . . . . . . . . . . . . . . . . . . . . . . . . . . . . . . . . . . . . . . . . . . . . . . . 15
Status icons . . . . . . . . . . . . . . . . . . . . . . . . . . . . . . . . . . . . . . . . . . . . . . . . . . . 15
Adjusting the volume . . . . . . . . . . . . . . . . . . . . . . . . . . . . . . . . . . . . . . . . . . . . 16
Entering text . . . . . . . . . . . . . . . . . . . . . . . . . . . . . . . . . . . . . . . . . . . . . . . . . . . 16
Using voice commands . . . . . . . . . . . . . . . . . . . . . . . . . . . . . . . . . . . . . . . . . . 17
People
The people Hub . . . . . . . . . . . . . . . . . . . . . . . . . . . . . . . . . . . . . . . . . . . . . . . . 18
Making calls
Before making a call . . . . . . . . . . . . . . . . . . . . . . . . . . . . . . . . . . . . . . . . . . . . . 20
Making a call . . . . . . . . . . . . . . . . . . . . . . . . . . . . . . . . . . . . . . . . . . . . . . . . . . 20
The voice call screen . . . . . . . . . . . . . . . . . . . . . . . . . . . . . . . . . . . . . . . . . . . . 22
Messaging
Creating a new message . . . . . . . . . . . . . . . . . . . . . . . . . . . . . . . . . . . . . . . . . 24
Replying to a message . . . . . . . . . . . . . . . . . . . . . . . . . . . . . . . . . . . . . . . . . . . 25
MMS messages . . . . . . . . . . . . . . . . . . . . . . . . . . . . . . . . . . . . . . . . . . . . . . . . 25
Dictating messages . . . . . . . . . . . . . . . . . . . . . . . . . . . . . . . . . . . . . . . . . . . . . 26
Messaging settings . . . . . . . . . . . . . . . . . . . . . . . . . . . . . . . . . . . . . . . . . . . . . 26
Going online
Browsing the Internet . . . . . . . . . . . . . . . . . . . . . . . . . . . . . . . . . . . . . . . . . . . . 27
3
Setting up email . . . . . . . . . . . . . . . . . . . . . . . . . . . . . . . . . . . . . . . . . . . . . . . . 28
Maps and navigation . . . . . . . . . . . . . . . . . . . . . . . . . . . . . . . . . . . . . . . . . . . . 29
Using the camera
Camera icons and settings . . . . . . . . . . . . . . . . . . . . . . . . . . . . . . . . . . . . . . . . 30
Taking a photo . . . . . . . . . . . . . . . . . . . . . . . . . . . . . . . . . . . . . . . . . . . . . . . . . 31
Shooting a video . . . . . . . . . . . . . . . . . . . . . . . . . . . . . . . . . . . . . . . . . . . . . . . . 31
Viewing photos and videos . . . . . . . . . . . . . . . . . . . . . . . . . . . . . . . . . . . . . . . 31
Advanced settings
Activating or deactivating connections . . . . . . . . . . . . . . . . . . . . . . . . . . . . . . 32
Security and privacy . . . . . . . . . . . . . . . . . . . . . . . . . . . . . . . . . . . . . . . . . . . . . 33
Personalizing your phone . . . . . . . . . . . . . . . . . . . . . . . . . . . . . . . . . . . . . . . . . 34
Connecting to a PC . . . . . . . . . . . . . . . . . . . . . . . . . . . . . . . . . . . . . . . . . . . . . 34
Multimedia playback . . . . . . . . . . . . . . . . . . . . . . . . . . . . . . . . . . . . . . . . . . . . 34
Date, time and alarms . . . . . . . . . . . . . . . . . . . . . . . . . . . . . . . . . . . . . . . . . . . 35
Updating your phone’s operating system . . . . . . . . . . . . . . . . . . . . . . . . . . . . 36
Restoring to factory settings . . . . . . . . . . . . . . . . . . . . . . . . . . . . . . . . . . . . . . 36
Accessories and tips
Using the headset . . . . . . . . . . . . . . . . . . . . . . . . . . . . . . . . . . . . . . . . . . . . . . 37
Creating a new access point . . . . . . . . . . . . . . . . . . . . . . . . . . . . . . . . . . . . . . 37
Sharing your Internet connection . . . . . . . . . . . . . . . . . . . . . . . . . . . . . . . . . . . 37
Appendix
FAQ and troubleshooting . . . . . . . . . . . . . . . . . . . . . . . . . . . . . . . . . . . . . . . . . 39
Other sources of help . . . . . . . . . . . . . . . . . . . . . . . . . . . . . . . . . . . . . . . . . . . . 40
Warnings and precautions . . . . . . . . . . . . . . . . . . . . . . . . . . . . . . . . . . . . . . . . 40
Emergency calls . . . . . . . . . . . . . . . . . . . . . . . . . . . . . . . . . . . . . . . . . . . . . . . . 43
Disposal and recycling information . . . . . . . . . . . . . . . . . . . . . . . . . . . . . . . . . 43
Taking care of your smartphone . . . . . . . . . . . . . . . . . . . . . . . . . . . . . . . . . . . 43
4
End User License Agreement
IMPORTANT-READ CAREFULLY: THIS END USER LICENSE AGREEMENT ("AGREEMENT") IS A LEGAL AGREEMENT
BETWEEN YOU (EITHER AN INDIVIDUAL OR A SINGLE ENTITY), AND ACER INC. INCLUDING ITS SUBSIDIARIES ("ACER")
FOR THE SOFTWARE (WHETHER PROVIDED BY ACER OR BY ACER'S LICENSORS OR SUPPLIERS) THAT ACCOMPANIES
THIS AGREEMENT, INCLUDING ANY ASSOCIATED MEDIA, PRINTED MATERIALS AND RELATED USER ELECTRONIC
DOCUMENTATION WHICH MAY BE BRANDED "ACER" ("SOFTWARE"). AGREEMENTS RELATING TO ANY OTHER PRODUCT
OR TOPIC ARE NEITHER INTENDED NOR SHOULD THEY BE IMPLIED. BY INSTALLING THE ACCOMPANYING SOFTWARE
OR ANY PORTION THEREOF, YOU AGREE TO BE BOUND BY THE TERMS AND CONDITIONS OF THIS AGREEMENT. IF YOU
DO NOT AGREE TO ALL OF THE TERMS AND CONDITIONS OF THIS AGREEMENT, DO NOT CONTINUE THE INSTALLATION
PROCESS AND IMMEDIATELY DELETE ALL INSTALLED FILES, IF ANY, OF THE ACCOMPANYING SOFTWARE FROM YOUR
PHONE.
IF YOU DO NOT HAVE A VALIDLY-LICENSED COPY OF THE APPLICABLE SOFTWARE, YOU ARE NOT AUTHORIZED TO
INSTALL, COPY OR OTHERWISE USE THE SOFTWARE, AND HAVE NO RIGHTS UNDER THIS AGREEMENT.
The Software is protected by U.S. and international copyright laws and conventions as well as other intellectual property laws
and treaties. The Software is licensed, not sold.
GRANT OF LICENSE
Acer grants to you the following non-exclusive and non-transferable rights with respect to the Software. Under this Agreement,
you may:
1. Install and use the Software only on a single designated phone. A separate license is required for each phone on which
the Software will be used;
2. Make one copy of the Software solely for backup or archival purposes;
3. Make one hardcopy of any electronic documents included in the Software, provided that you receive the documents
electronically.
RESTRICTIONS
You may NOT:
1. Use or copy the Software except as provided in this Agreement;
2. Rent or lease the Software to any third party;
3. Modify, adapt, or translate the Software in whole or in part;
4. Reverse engineer, decompile, or disassemble the Software or create derivative works based upon the Software;
5. Merge the Software with any other program or modify the Software, except for your personal use; and
6. Sublicense or otherwise make the Software available to third parties, except that you may, after prior written notification
to Acer, transfer the Software as a whole to a third party so long as you do not retain any copies of the Software and such
third party accepts the terms of this Agreement.
7. Transfer your rights under this Agreement to any third parties.
8. Export the Software in contravention of applicable export laws and regulations, or (i) sell, export, re-export, transfer,
divert, disclose technical data, or dispose of, any Software to any prohibited person, entity, or destination including,
without limitation, Cuba, Iran, North Korea, Sudan and Syria; or (ii) use any Software for any use prohibited by the laws or
regulations of the United States.
SUPPORT SERVICES
Acer is not obligated to provide technical or other support for the Software.
ACER LIVE UPDATE
Certain of the software contains elements that enable the use of the Acer Live Update service, which allows for updates for such
software to be automatically downloaded and installed on your phone. By installing the software, you hereby agree and consent
that Acer (or its licensors) may automatically check the version of such software that you are using on your phone and may
provide upgrades to such software that may be automatically downloaded on to your phone.
OWNERSHIP AND COPYRIGHT
Title, ownership rights and intellectual property rights in and to the Software and all copies thereof shall remain with Acer or
Acer's licensors or suppliers (as applicable). You do not have or shall not gain any proprietary interest in the Software (including
any modifications or copies made by or for you) or any related intellectual property rights. Title and related rights in the content
accessed through the Software is the property of the applicable content owner and may be protected by applicable law. This
license gives you no rights to such contents. You hereby agree
1. Not to remove any copyright or other proprietary notices from the Software;
2. To reproduce all such notices on any authorized copies you make; and
3. To use best efforts to prevent any unauthorized copying of the Software.
TRADEMARKS
This Agreement does not grant to you any rights in connection with any trademarks or service marks of Acer or of Acer's
licensors or suppliers.
DISCLAIMER OF WARRANTIES
TO THE MAXIMUM EXTENT PERMITTED BY APPLICABLE LAW, ACER, ITS SUPPLIERS, AND ITS LICENSORS, PROVIDE THE
SOFTWARE "AS IS" AND WITH ALL FAULTS, AND HEREBY DISCLAIM ALL OTHER WARRANTIES AND CONDITIONS, EITHER
EXPRESS, IMPLIED OR STATUTORY, INCLUDING, BUT NOT LIMITED TO, ANY IMPLIED WARRANTIES, DUTIES OR
CONDITIONS OF MERCHANTABILITY, OF FITNESS FOR A PARTICULAR PURPOSE, OF ACCURACY OR COMPLETENESS OF
RESPONSES, OF RESULTS, OF WORKMANLIKE EFFORT, OF LACK OF VIRUSES, AND OF LACK OF NEGLIGENCE, ALL
WITH REGARD TO THE SOFTWARE AND THE PROVISION OF OR FAILURE TO PROVIDE SUPPORT SERVICES. ALSO,
5
THERE IS NO WARRANTY OR CONDITION OF TITLE, QUIET ENJOYMENT, QUIET POSSESSION, CORRESPONDENCE TO
DESCRIPTION OR NON-INFRINGEMENT WITH REGARD TO THE SOFTWARE.
EXCLUSION OF INCIDENTAL, CONSEQUENTIAL AND CERTAIN OTHER DAMAGES
TO THE MAXIMUM EXTENT PERMITTED BY APPLICABLE LAW, IN NO EVENT SHALL ACER, ACER'S SUPPLIERS, OR
ACER'S LICENSORS, BE LIABLE FOR ANY SPECIAL, INCIDENTAL, INDIRECT, PUNITIVE, OR CONSEQUENTIAL DAMAGES
WHATSOEVER (INCLUDING, BUT NOT LIMITED TO, DAMAGES FOR LOSS OF PROFITS OR CONFIDENTIAL OR OTHER
INFORMATION, FOR BUSINESS INTERRUPTION, FOR PERSONAL INJURY, FOR LOSS OF PRIVACY, FOR FAILURE TO MEET
ANY DUTY INCLUDING OF GOOD FAITH OR OF REASONABLE CARE, FOR NEGLIGENCE, AND FOR ANY OTHER
PECUNIARY OR OTHER LOSS WHATSOEVER) ARISING OUT OF OR IN ANY WAY RELATED TO THE USE OF OR INABILITY
TO USE THE SOFTWARE, THE PROVISION OF OR FAILURE TO PROVIDE SUPPORT SERVICES, OR OTHERWISE UNDER OR
IN CONNECTION WITH ANY PROVISION OF THIS AGREEMENT, EVEN IN THE EVENT OF THE FAULT, TORT (INCLUDING
NEGLIGENCE), STRICT LIABILITY, BREACH OF CONTRACT OR BREACH OF WARRANTY OF ACER OR ITS SUPPLIERS OR
LICENSORS, AND EVEN IF ACER AND ITS SUPPLIERS AND LICENSORS HAVE BEEN ADVISED OF THE POSSIBILITY OF
SUCH DAMAGES.
LIMITATION OF LIABILITY AND REMEDIES
NOTWITHSTANDING ANY DAMAGES THAT YOU MIGHT INCUR FOR ANY REASON WHATSOEVER (INCLUDING, WITHOUT
LIMITATION, ALL DAMAGES REFERENCED ABOVE AND ALL DIRECT OR GENERAL DAMAGES), THE ENTIRE LIABILITY OF
ACER, ITS SUPPLIERS, AND ITS LICENSORS, UNDER ANY PROVISION OF THIS AGREEMENT, AND YOUR EXCLUSIVE
REMEDY FOR ALL OF THE FOREGOING, SHALL BE LIMITED TO THE AGGREGATE AMOUNT PAID BY YOU FOR THE
SOFTWARE. THE FOREGOING LIMITATIONS, EXCLUSIONS AND DISCLAIMERS (INCLUDING DISCLAIMER OF WARRANTIES
AND EXCLUSION OF INCIDENTAL, CONSEQUENTIAL AND CERTAIN OTHER DAMAGES ABOVE) SHALL APPLY TO THE
MAXIMUM EXTENT PERMITTED BY APPLICABLE LAW, EVEN IF ANY REMEDY FAILS ITS ESSENTIAL PURPOSE; PROVIDED,
HOWEVER, THAT BECAUSE SOME JURISDICTIONS DO NOT ALLOW THE EXCLUSION OR LIMITATION OR LIABILITY FOR
CONSEQUENTIAL OR INCIDENTAL DAMAGES, THE ABOVE LIMITATION MAY NOT APPLY TO YOU.
TERMINATION
Without prejudice to any other rights, Acer may immediately terminate this Agreement without notice if you fail to comply with
any terms and conditions of this Agreement.
In such event, you must:
1. Cease all use of the Software;
2. Destroy or return to Acer the original and all copies of the Software; and
3. Delete the Software from all phones on which it was resident.
All disclaimers of warranties and limitation of liability set forth in this Agreement shall survive termination of this Agreement.
GENERAL
This Agreement represents the complete agreement between you and Acer relating to this license for the Software and
supersedes all prior agreements, communications, proposals and representations between the parties and prevails over any
conflicting or additional terms of any quote, order, acknowledgement or similar communication. This Agreement may only be
modified by a written document signed by both parties. If any provision of this Agreement is held by a court of competent
jurisdiction to be contrary to law that provision will be enforced to the maximum extent permissible and the remaining provisions
of this Agreement will remain in full force and effect.
ADDITIONAL PROVISIONS APPLICABLE TO THIRD PARTY SOFTWARE AND SERVICES
Software provided hereunder by Acer's licensors or suppliers ("Third Party Software") is made available to you for your personal,
non-commercial use only. You may not use the Third Party Software in any manner that could damage, disable, overburden, or
impair the services provided by Acer's licensors or suppliers hereunder ("Third Party Services"). Furthermore, you may not use
the Third Party Software in any manner that could interfere with any other party's use and enjoyment of the Third Party Services,
or the services and products of Acer's licensors' or suppliers' third party licensors. Your use of the Third Party Software and
Third Party Services is also subject to additional terms and conditions and policies which can be accessed through our global
website.
Privacy policy
During registration you will be asked to submit some information to Acer. Please refer to Acer’s privacy policy at www.acer.com
or your local Acer website.
6
Getting to know your smartphone
Features and functions
Your new smartphone offers leading, easy-to-access multimedia and entertainment
features. You can:
• Access your email while on the move.
• Connect to the Internet at high speed, via HSDPA (7.2 Mbps), HSUPA (2
Mbps) or Wi-Fi.
• Keep in touch with your friends via your Contacts and social networking
applications.
Product registration
When using your product for the first time, it is recommended that you immediately
register it. This will give you access to some useful benefits, such as:
• Faster service from our trained representatives.
• Membership in the Acer community: receive promotions and participate in
customer surveys.
• The latest news from Acer.
Hurry and register, as other advantages await you!
How to register
You can register directly from your smartphone by tapping Acer Registration from
the applications list, or visit our website at http://registration.acer.com and
choose your country and follow the simple instructions.
After we receive your product registration, you will be sent a confirmation email with
important data that you should keep in a safe place.
Features and functions
7
Setting up
Unpacking your smartphone
Your new smartphone comes packed in a protective box. Carefully unpack the box
and remove the contents. If any of the following items is missing or damaged,
contact your dealer immediately:
•
•
•
•
•
•
Acer M310 Smartphone
Battery
Quick Guide
USB cable
AC adapter
Headset
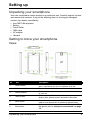
Getting to know your smartphone
Views
No.
Item
Description
1
Power button
Press to turn the screen on/off or enter sleep mode;
press and hold to turn the smartphone on or off.
2
3.5 mm headphone jack
Connect to stereo headphones.
3
Phone speaker
Emits audio from your smartphone; suitable for holding
to your ear.
4
Touchscreen
3.6-inch, 480 x 800 pixel capacitive touchscreen to
display data, phone content and enter information.
5
Back button
Go back one menu step; close the keyboard; press and
hold to view thumbnails of previously opened steps.
6
Start button
Return to the Start screen; press and hold to open Tell
Me (please refer to "Using voice commands" on page
17).
Unpacking your smartphone
8
No.
Item
Description
7
Search button
Open the search function.
8
Charge indicator
Indicates battery charge status.
Dim the display and deactivate the touchscreen when
the device is brought near the face during a call.
9
Proximity and light sensor
and IR LED
10
Volume up/down buttons
Increase or decrease the phone volume.
11
Camera button
Activate the camera or take a picture.
12
Camera
A 5-megapixel camera for taking high-resolution
images.
13
Handsfree speaker
Emits audio from your smartphone; suitable for
handsfree use.
Adjust the display brightness depending on lighting
conditions.
14
Microphone
Internal microphone.
15
Micro USB connector
Connect to a USB cable/charger.
LED indicators
Charge indicator:
LED state
Color
Description
Red
Device plugged in: Battery is charging.
Green
Device plugged in: Battery is fully charged.
Red
Device unplugged: Battery is low and should be
charged.
Off
Normal status.
Constantly on
Slow flashing
Fast, double flash
Green
Missed call; voice mail; new message.
Red
Battery is critically low and needs to be charged
urgently.
Important: The low battery warnings override all other LED indications.
Tip: If your phone is being used (i.e. unlocked), the indicator does not show missed event
notifications.
Installing or removing the battery
Your smartphone uses a replaceable battery to provide power. It is packed
separately from your smartphone and needs to be inserted and charged before you
can use the smartphone.
Installing or removing the battery
9
Installing the battery
Insert your fingernail into the cutout between
the battery cover and the phone. Unclip the
cover and lift off the battery cover.
Place the battery into the battery
compartment, lining up the battery connectors with those at the
bottom of the compartment.
Align the tabs on the cover into the slots on the phone.
Gently press the cover until it snaps in place.
CAUTION: RISK OF EXPLOSION IF BATTERY IS REPLACED BY AN INCORRECT
TYPE.
DISPOSE OF USED BATTERIES ACCORDING TO THE INSTRUCTIONS.
Charging the battery
For initial use, you need to charge your smartphone for eight hours. After that you
can recharge the battery as needed.
Connect the AC adapter cord to the micro USB connector on your smartphone.
Removing the battery
Open the battery compartment as shown in "Installing the battery" on page 10.
Lift the battery out of the compartment using the clip on the top of the battery.
Replace the battery cover as described above.
Installing a SIM card
To take full advantage of your smartphone’s telephony capabilities, you must install
a SIM card. The SIM card holder is located at the bottom of the battery bay.
1. Turn off the phone by pressing and holding the power button; follow the
onscreen instructions to turn off your phone.
Installing a SIM card
10
2. Open the cover and remove the battery as described
in "Removing the battery" on page 10.
3. Insert the SIM card as shown.
4. Replace the battery and battery cover.
SIM card lock
Your smartphone may come with a SIM card lock, i.e., you will only be able to use
the SIM card provided by your network provider.
To cancel the SIM lock, contact your network provider.
Installing a SIM card
11
Using your smartphone
Turning on for the first time
To turn on your smartphone for the first time, press and hold the power button until
the screen turns on. You will then be asked to configure some settings before you
can use your smartphone.
Follow the onscreen instructions to complete setup.
Note: You will be asked for your Windows Live ID during setup. A Windows Live ID is
necessary to use some features on your phone.
Entering your PIN
When you install a SIM card for the first time, you may need to enter a PIN using the
onscreen number pad.
Important: Depending on your settings, you may be required to enter your PIN each time
you switch on the phone function.
Activating a new SIM card
If you are using your SIM card for the first time, it may require activation. Contact
your network provider for details on how to do this.
Using the touchscreen
Your smartphone uses a touchscreen for selecting items and entering information.
Use your finger to tap the screen.
Tap: Touch the screen once to open items and select options.
Drag: Hold your finger on the screen and drag across the screen to select text and
images.
Tap and hold: Tap and hold an item to see a menu of actions available for that item.
On the pop-up menu that appears, tap the action you want to perform.
Scroll: To scroll up or down the screen, simply drag your finger up or down the
screen in the direction that you want to scroll.
Locking your smartphone
If you will not use your smartphone for a while, briefly press the power button to
lock access. This saves power and ensures your smartphone does not
unintentionally use any services. Your smartphone will lock automatically if it is not
used for one minute.
Turning on for the first time
12
Waking your smartphone
If the screen is off and the smartphone does not react to
any taps on the screen or front panel button, then it has
been locked and is in sleep mode.
Press the power button to wake your smartphone. Swipe
the lock screen up to unlock the phone.
Note: If you have set a phone password, you will need to enter it to unlock the phone.
Please refer to "Security and privacy" on page 33.
Changing the lock screen wallpaper
You can change your lock screen wallpaper to an image of your choice.
1. Open the applications list and tap Settings > lock + wallpaper > change
wallpaper.
2. Choose where the image you want to use is: Preset wallpapers; camera
photos; or a photo album.
Note: If the photo is larger than the allowed size, you will be able to crop it. Position the
area you want to use as your wallpaper in the crop box and tap
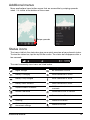
The Start screen
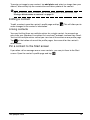
The first screen you see after starting up the phone is the
Start screen. This screen displays a selection of
information in live tiles which update in real time. Tap a tile
to open the corresponding application or Hub (please see
"Hubs" on page 14 for more information).
Tiles show you things like how many new messages you
have, missed calls, your photo album, and XBOX LIVE.
The Start screen
13
Tip: There may be more tiles at the top or bottom of the screen, swipe your finger up or
down the screen to display them.
Swipe your finger to the left to view the full menu of applications and settings
available on your phone.
Rearranging the tiles on the Start screen
1. Press and hold a tile until it floats.
2. Drag the tile to where you want to move it; tap the tile to dock it.
Tip: Pause at the top or bottom of the screen to move the tile to the extended Start
screen.
Pinning items to the Start screen
You can pin items to the Start screen, applications, files or contacts. You will see
any updates for contacts pinned to the Start screen.
Tap and hold the item to open a menu and tap pin to start.
Unpinning a tile
Tap and hold the tile you want to unpin, then tap the unpin icon.
Hubs
You can arrange items into Hubs to simplify everyday tasks. There are some predefined Hubs that group items with similar themes together, such as the People
Hub. In this Hub, you can view your contacts, social networking updates.
Other pre-defined Hubs include:
• Office
• Pictures
• Music + Videos
Viewing currently open applications
Tap and hold the Back button to display thumbnails of
applications that are currently open.
Tap an icon to jump to the open application.
Hubs
14
Additional menus
Many applications have further menus that are accessible by swiping upwards
when ... is visible at the bottom of the screen.
Swipe upwards
Status icons
The icons visible in the status bar give you a quick overview of your phone’s status.
To view the status bar, tap the top of the screen. The status bar disappears after a
few seconds.
The most commonly seen icons are listed below.
Icon
Description
Icon
Description
Signal strength
3G connection is active
Battery is charging
GPRS connection is active
Battery is fully charged
EDGE connection is active
Battery status unknown
HSPA connection is active
Airplane mode is turned on
Wi-Fi is enabled, but not connected to
a network
No SIM card found
Connected to a Wi-Fi network
SIM card is locked
Connected to a Bluetooth headset
Roaming
Phone set to vibrate
Calls are being forwarded, based on
the network settings
Phone set to silent
Additional menus
15
Note: The Wi-Fi icon only indicates a connection, it does not indicate signal strength. To
find out how to determine the signal strength, please refer to "Determining Wi-Fi signal
strength" on page 32.
Adjusting the volume
Use the Volume up or Volume down buttons on the side of the phone to adjust the
volume. The volume bar appears at the top of the screen to indicate the set level.
Tip: Tap the icon to the right of the volume bar to quickly change to ring or vibrate.
Note: If you wish to have silent as an option, you need to turn vibrate off. Please refer to
"Changing the ringtone" on page 34.
Entering text
This is a standard onscreen QWERTY keyboard that
allows you to enter text. Tap and hold a key with
numbers at the top to select alternative characters, such
as letters with accents.
Tap the &123 button to see numbers and special
characters.
You can switch between multiple input languages by tapping the
key. The
keyboard layout will change accordingly. To select your preferred languages, tap
Settings > keyboard and select your preferred alternate languages.
Notes:
The keyboard layout will change according to the text box type selected.
The language selection key will change according to the language selected.
Tips:
To type in ALL CAPS, tap and hold the
key.
To type special characters, such æ or ê, tap and hold the letter to open a list of available
special characters.
Adjusting the volume
16
Predictive text
Windows Phone provides predictive text input. As you tap
the letters of a word, a selection of words are displayed
above the keyboard that continue the sequence of letters
tapped, or are a close match allowing for errors. The word
list changes after every key press. If the word you need is
displayed, you can tap on it to insert it into your text.
Using voice commands
Press and hold the Start button to launch Tell Me, which
allows you to perform certain actions using voice
commands.
For example, you can call some one by saying "Call
<contact name>, <contact number>;" for example Call Ann Smith, mobile to call
Ann Smith’s mobile phone.
You can also search online for something by saying "Find <object>" or open an app
with "Open <application name>."
Tip: If you are unsure what commands you can use, say "What can I say?" for guidance.
Using voice commands
17
People
The people Hub
Once you have set up an email or Facebook account on
your phone (please see "Setting up email" on page 28)
any contacts stored for that account will be imported to
your phone.
Your friends’ Windows Live and Facebook feeds will
appear in the People Hub, their photos appear in your
Pictures Hane and your own feeds in the Me tile.
When you tap a contact’s name, their profile page opens,
displaying contact details. You can call, send a text
message, or send an email to the contact.
Slide the profile page to the left to see what’s new with the
contact, provided you’re signed in to your Windows Live
and/or Facebook account(s), and the contact is also your
friend in Windows Live and/or Facebook.
Adding a contact
Open the people Hub to the all page.
Tap
then new contact to create a contact, you will be
asked where you wish to store the new contact:
• Phone
• <Email account>
Enter the information for the contact by tapping
to each field.
next
when you are finished entering
You will need to tap
information for each category, and then again when you
have finished entering the contact’s information.
The people Hub
18
To assign an image to your contact, tap add photo and select an image from your
albums, alternatively tap the camera icon and take a photo of the contact.
Tip: You may also create a contact from an already dialed or received number, see
"Saving a dialed number to contacts" on page 21.
Editing a contact
To edit a contact, open the contact’s profile page and tap
make changes to the contact’s information.
. This will allow you to
Linking contacts
You may find that there are multiple entries for a single contact, for example an
entry from your Windows Live contact list, one from Facebook, and one from Gmail.
You can link multiple entries so that you can view all the entries on one profile page.
Tap
at the bottom of one of the profile pages, then search for the contact’s
other entries.
Pin a contact to the Start screen
If you often call or message one or more contacts, you can pin them to the Start
screen. Open the contact’s profile page and tap
The people Hub
.
19
Making calls
This chapter shows you how to make phone calls, and the various options available
to you during your call.
Before making a call
Check that the phone function is on before you make a call. You can confirm the
phone status from the status bar (please refer to "Status icons" on page 15).
Notes:
Most SIM cards come with a pre-set PIN from the provider. If you are asked to enter a
PIN, enter it and tap OK.
To change your PIN, please refer to "Setting a SIM PIN" on page 33
Making a call
1. Tap the Phone tile on the Start screen.
2. Tap
to open the onscreen number pad and enter the number you wish to
dial.
3. Tap call.
4. To end the call, tap End.
Making an emergency call
You can make emergency calls, even if your phone does not have a SIM installed,
or if the SIM has been blocked.
1. Turn on the phone and tap emergency call on the screen.
2. Enter the emergency number for your area.
Tip: GSM carriers all recognize 112 as an emergency number. This will usually connect
you to an operator who will be able to connect you to the emergency services in your
area. In North America, dialling 112 will redirect you to 911.
SIM cards may come with other emergency numbers, contact your network provider for
details.
Important: If you have enabled the phone lock and/or SIM lock, and you have forgotten
the unlock code or SIM PIN, you can still make emergency calls by tapping emergency
call.
Dialing an international number
When dialing international numbers, there is no need to enter the international
direct dialing prefix (‘00’ etc.) before the country code. Simply tap and hold 0+ on
the onscreen number pad until + appears onscreen.
Before making a call
20
Warning: International call rates can vary greatly depending on the country you are
calling and your network provider. We suggest you check all call rates with your
network provider, to avoid excessive phone bills. If you are using your smartphone
abroad, roaming charges will apply. Consult your network provider for roaming rates
specific to the country you are visiting before you leave.
Dialing a number from your call history
Your call history can be viewed by tapping the Phone tile. It displays recent
received, dialed, and missed calls.
Tap the number to open the number’s profile then tap call number or tap text to
SMS the number.
Saving a dialed number to contacts
You can save a number you have dialed to your contacts for future use.
1. Tap the Phone tile to open your call history, then tap the number you want to
save.
at the bottom of the screen. You will be asked to Choose a contact to
2. Tap
associate the number with, or you can create a new contact by tapping the + at
the bottom of the screen.
3. Enter the contact information and tap
.
Making a call to one of your contacts
You can make a call to one of your contacts by tapping either the Phone tile, or the
People tile.
• From the Phone tile, tap
at the bottom of the page to open your list of
contacts.
• In the People Hub your contacts will be visible.
1. Tap the contact you want to call to open their contact card.
2. Tap the number you wish to use to call them.
Answering or declining a call
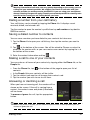
When you have an incoming call, the number will be
shown on the screen. If the call is coming from a
contact, the contact name and photo (if available)
will be shown.
To answer or ignore the call, tap the appropriate
button.
Note: If the phone is locked, you will need to swipe the lock screen up before you can
answer or ignore the call.
Making a call
21
Muting the ringer
If you wish to mute the ringer without ignoring the call:
• Press the volume up or down button.
• Press the power button.
Ending a call
To end a call, press End call from the voice call screen.
The voice call screen
Once you have dialed your number the voice call screen
appears, which displays the number/contact you are
talking to, the call duration and tiles to open the onscreen
number pad, put the call on hold, route audio to the
speaker, mute the call or add another call (please refer to
"Conference calls" on page 23).
Using the speakerphone
The speakerphone function allows you to make calls
without having to hold your smartphone. This handsfree
function is especially useful for multitasking.
To activate the speakerphone, tap speaker
. Tap
again to disable the speakerphone.
speaker
Accessing the onscreen number pad
• To access the onscreen number pad while in a call, tap
• Tap
.
to close the onscreen number pad.
Muting a call
To mute a call, tap mute
on the voice call screen to switch off the
microphone (the button background changes color to your selected accent color to
indicate that mute is active). Tap mute
again to switch the microphone back
on.
Putting a call on hold
To put a call on hold, tap hold
The voice call screen
. To return to the call, tap hold
again.
22
Tip: The hold function only works if you have more than one call.
Conference calls
If you have one call on hold and another online, you can
combine both calls to create a conference call.
to
After the first call is established, tap Add call
dial the second number. When both calls are connected,
tap Merge calls
to start the conference call.
Tips:
To hear the conference call on speakerphone, tap Speaker.
To mute your microphone when you just want to listen in to the conference call, tap Mute.
Note: You may need to have conference calls activated on your SIM card. Contact your
network provider for details.
Having a private conversation with one participant
During a conference call, you can have a private conversation with one person on
the call. The other people can't hear you until you merge everyone back onto the
conference call.
1. During a conference call, tap Private
.
2. Tap the person's name or phone number to have a private conversation with
them. Their name or phone number appears near the top of the screen. The
other people on the conference call won't be able to hear your conversation.
3. Tap Merge calls
to merge the other people back and continue the
conference call.
4. Tap End call to end the conference call and hang up.
The voice call screen
23
Messaging
This chapter shows you how to set up and use the messaging functions of your
smartphone.
All SMS and MMS messages are accessed via Messaging. Messaging
automatically arranges received and sent messages into conversations by contact
name or phone number.
To access Messaging tap the Messaging tile on the Start screen.
Creating a new message
You can use your phone to compose SMS and MMS
messages.
Tap
to compose a new message.
Enter one or more recipients. Use a semicolon to separate
recipients:
• Enter the phone number directly.
• Enter a contact’s name. As you enter letters, your
phone will suggest contacts.
on the right of the recipient field to open your
• Tap
contact list and tap a contact to send the message to.
Once you have entered the recipient, enter your message
in the text box labeled type a message.
to open your albums so that you can attach a picture and convert the
Tap
message to an MMS message.
• Tap the camera icon to open the camera and take a photo.
Tap
to send the message.
Note: SMS messages may be up to 160 characters long. If your message is longer than
160 characters, it will be sent as multiple linked messages. Most phones will automatically
join the linked messages to present the recipient with a single long message, however,
some older phones do not have this ability.
Creating a new message
24
Replying to a message
When a new text message arrives the phone will play a sound and the indicator LED
will flash. Please refer to "LED indicators" on page 9 for more information.
A summary of the message and sender information will appear briefly in the Status
bar.
Tap Messaging on the Start screen to open the message list.
To reply to an SMS or MMS message, open the message from the message list and
enter your text in the text box labeled type a text message.
MMS messages
MMS messages are similar to text messages but also allow you to attach
multimedia files such as pictures, audio or video clips. Each MMS message can be
up to 300 kB in size.
Note: Your phone can receive MMS messages with picture, video or audio attachments,
however, you can only attach a picture to an MMS message when sending.
Note: You need to set up an MMS profile before you can send MMS messages. Normally,
your smartphone will set up the profile for you based on information retrieved from your
provider.
Tip: Ask your network provider for the necessary information if you need to manually set
up the MMS profile.
Receiving MMS messages
When a new MMS message arrives, a message icon appears at the top of the
screen and a notification message is displayed.
1. Open Messaging to view a summary of the message.
2. Tap Download to download the message content.
Note: Downloads can take a long time, depending on your connection quality. If you reply
or open another application, the download will be stopped.
Important: You may be charged to download message content, especially if you are
roaming. Please contact your provider if you have any questions.
3. Tap the message to view the content.
4. To reply to the message, enter your text in the text box labeled type a text
message and tap
Replying to a message
. Plain text replies will be sent as SMS messages. If you
25
wish to attach a file, tap
message" on page 24.
to attach a file as described in "Creating a new
Dictating messages
Your phone allows you to dictate message content.
1. Enter the recipient(s) as described in "Creating a new message" on page 24.
2. Tap
and speak your message. The phone will use voice recognition
technology to convert your spoken words to text.
3. Review the text and tap
to send the message.
Tip: Voice recognition technology is affected by accents and personal speech patterns. It
is important to review the text closely before sending the message to avoid
misunderstandings and embarrassment.
Messaging settings
You can adjust some settings for Messaging. Tap the Messaging tile and then
swipe the ... upwards; tap Settings.
Here you can enable or disable SMS delivery confirmation or Group text by tapping
the appropriate slider.
Group text
This automatically groups text messages by sender.
Emergency messages
You can enable or disable receiving emergency messages, also known as Amber
alerts.
The default setting is to receive all alerts.
Dictating messages
26
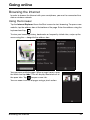
Going online
Browsing the Internet
In order to browse the Internet with your smartphone, you must be connected to a
data or wireless network.
Using the browser
Tap the Internet Explorer tile on the Start screen to start browsing. To open a new
website, tap the address box at the bottom of the page. Enter the address using the
keyboard and tap
.
To view your browsing history, bookmarks or frequently visited sites, swipe up the
menu using the ... alongside the address box.
You may open multiple pages. When a page is open, open
the Menu and tap tabs. This will display thumbnails of all
the open tabs. Tap
to open a new tab.
You can zoom in or out of pages using a pinch action.
Browsing the Internet
27
Tap and hold an item on a page to open a context menu
that lists the available options for that item.
Setting up email
Your smartphone enables you to access your email. Most
popular ISPs can be set up in a few easy steps. Tap Email
setup on the Start screen to start.
If necessary, enter your email address and tap other
account or advanced setup, and enter your email
address and password. Tap Next to finish the setup
process.
Marketplace
Note: Marketplace may not be available in all countries and regions.
Note: You need to have a Windows Live account and a Microsoft account for Marketplace
account set up and active on your phone before you can use Marketplace.
You will be prompted to set up the account(s) the first time you use Marketplace.
Tap Marketplace from the Start screen to begin. Here you can obtain a variety of
add-on programs and applications to enhance the functionality of your
smartphone.
You can browse by category or tap the search icon to search for a specific
application.
Once you have selected an application, tap the Try, Buy or Install button to
download and install the application.
Tip: Some paid-for applications will allow you to try the application before purchase.
Setting up email
28
Maps and navigation
You can obtain easy-to-follow directions using Bing Maps, view real-time traffic
conditions and navigate by using spoken, turn-by-turn driving instructions with
Navigation, view where your friends are and places of interest and local businesses.
Tap Maps from the applications list.
Swipe up to open menu
Search
Local information
Get directions
Get current location
Important: Maps does not have information about every location.
Using the map
Tap the Maps icon in the applications list. Drag the map with your finger to move
the map around.
You can zoom in or out using a pinch action, or double tap a location on the map to
zoom in on the location.
Important: Not all zoom levels are available for all locations.
Maps and navigation
29
Using the camera
Your smartphone features a 5-megapixel digital camera mounted on the rear. This
section will take you through all the steps in taking photos and videos with your
smartphone.
To activate the camera, press the camera button, or open the applications list and
tap Camera.
Camera icons and settings
In the camera window, three icons allow you to switch between camera and
camcorder, adjust the zoom, or change settings. Furthermore, there is an arrow
visible in the lower left-hand corner of the screen if you have taken any photos.
Tap the arrow to view any photos you have taken. Tap and hold on the picture to
open a menu that provides options to:
•
•
•
•
•
•
share... the image via Messaging.
share on SkyDrive.
use as wallpaper.
delete the image.
add to favorites.
auto-fix the image.
Camera settings
Tap the settings icon in the lower left-hand corner of the screen to open the camera
settings menu. Here you can adjust settings to suit your needs.
• Save settings: Saves the changes you have made to settings.
• Restore default settings: Returns the settings to the defaults.
• Photo Resolution: Sets the resolution for photos you take. You can also set
the aspect ratio (4:3 or 16:9).
• White Balance: Changes white balance settings for different lighting
conditions.
• Image Effects: Applies an effect to change the appearance of your photo.
Camera icons and settings
30
• ISO Gain: Sets the ISO level.
• Exposure Metering Mode: Sets how the camera determines the optimum
exposure to take the photo.
• Contrast: Sets the contrast level.
• Brightness: Sets the brightness level.
• Saturation: Sets the color saturation level.
• Best shot mode: Enables or disables image stabilization.
• Exposure Compensation: Adjusts the exposure compensation.
• Quality: Sets the image quality. Higher settings result in larger files.
• Sharpness: Sets the sharpness for the photo.
• Anti-banding: Reduces bands on pictures of television sets or monitors.
Taking a photo
1.
2.
3.
4.
5.
Ensure you have adjusted the parameters described above.
Frame your subject and steady your smartphone.
Zoom in or out as needed.
Press the camera button half-way down to focus.
Press the camera button the rest of the way to take the photo.
Shooting a video
Turn on camcorder mode by tapping the video icon.
1.
2.
3.
4.
Ensure you have adjusted the parameters described above.
Frame your subject and steady your smartphone and zoom in or out as needed.
Press the camera button down fully to begin recording.
Press the camera button down fully to stop recording.
Supported formats
Type
Formats
Image
JPEG
Video
MPEG-4
Viewing photos and videos
After you have taken your photo or video, it is automatically saved.
Once you have taken a photo or video, you can view it by tapping the Pictures or
Music + Videos tile on the Start screen. Scroll through the collections to find the
item you wish to view. Tap the thumbnail to view the file.
Taking a photo
31
Advanced settings
Activating or deactivating connections
The quickest way to activate or deactivate a connection is via Quick Setup from
the Start screen.
This gives you one-tap access to airplane mode, Wi-Fi, Bluetooth, and cellular
settings.
Putting your smartphone in airplane mode
You can enter airplane mode (also known as flight mode) to turn off cellular, Wi-Fi,
Bluetooth, and FM radio functions and use your smartphone as a handheld device
during a flight. Check with your airline to make sure this is permitted onboard.
Switch your smartphone off during takeoff and landing as it may interfere with
aircraft electronic systems.
1. Tap Quick Setup on the Start screen.
2. Tap airplane mode and then tap the slider to turn airplane mode On or Off.
Note: When airplane mode is active, the
icon will be displayed in the status bar.
Setting up Wi-Fi
Tap Wi-Fi to set up your wireless connection. You can turn Wi-Fi On or Off by
tapping the slider.
When Wi-Fi is On, you will see a list of available access points. Tap the desired
access point to connect.
Tap advanced to add an SSID for an access point that is hidden.
Determining Wi-Fi signal strength
To determine the signal strength of available Wi-Fi networks, tap Quick Setup on
the Start screen, then tap Wi-Fi. Your phone will search for available networks and
display their signal strength.
Setting up Bluetooth
Tap the slider to turn Bluetooth On or Off. Once you have turned Bluetooth On it will
search for available devices.
Tap a device to pair.
Note: You may need to enter a PIN to pair with a device.
Activating or deactivating connections
32
cellular
cellular allows you to turn data On or Off. You can also disable the data connection
when you are roaming.
You can also turn 3G On or Off.
Tip: Turning 3G Off will force your phone to use 2G networks and prolong battery life.
Manually selecting a network
If you are travelling, it may be useful to set your phone to use one carrier. To do this,
tap automatic under Network selection. Tap tap to select to search for, and list,
available carrier.
Tap an carrier’s name to force your phone to connect to that network.
Important: Your network provider may have agreements with more than one carrier in the
country you are visiting. These agreements will affect how much you will be charged for
services provided whilst travelling. Check with your network provider before leaving to see
which carrier at your destination offers the most favorable rates for your needs.
Security and privacy
You can enable or disable your SIM PIN and set a password for the lock screen.
Setting a lock screen password
Tap Settings > lock + wallpaper and tap the slider next to Password to set the
password. A number pad will open to allow you to enter the password. Enter your
preferred password and tap done.
You will now be asked to enter the password before the screen is unlocked.
Setting a SIM PIN
Tap the Phone tile, then tap the ... at the bottom of the screen. Tap call settings
and scroll down the page to SIM security. Tap the slider to activate the SIM PIN.
Important: You will be asked to enter the SIM PIN before you can make any changes,
EVEN IF THE SIM PIN IS CURRENTLY DISABLED. You have three attempts before the
SIM is blocked. You will need to contact your network provider for the PIN unlock key
(PUK).
Find my phone
Find my phone is a service offered by Microsoft that allows you to call, lock, erase,
or find your phone online if you have misplaced it or it has been stolen.
Tap Settings > find my phone and enter your Windows Live ID information to start
the setup procedure. Once setup is complete, you can log on to
Security and privacy
33
www.windowsphone.com to locate your phone on a map, or send instructions to
lock or erase your phone.
Important: This function uses SMS messages to issue instructions to the phone. The
SMS do not appear in Messaging. However, you won’t be able to lock, erase, or locate
your phone if the SIM card has been removed or the phone is turned off.
Personalizing your phone
Changing the theme
You can change your phone’s theme to suit your mood or personality. Tap Settings
> theme.
You can change the Background and select a different Accent color.
Changing the ringtone
Tap Settings > ringtones + sounds to select a new ringtone and change
notification sounds, or turn sounds on or off.
You can also turn vibrate On or Off by tapping the slider next to Vibrate.
Connecting to a PC
You can synchronize your phone’s contents with your PC via Zune. Download the
latest version of Zune from www.zune.com.
Zune will automatically launch when you connect your phone using a USB cable,
and allow you to drag-and-drop music, video and image files to your phone. You
can also use the program to purchase apps and DRM-protected media.
Multimedia playback
Media server
Your phone can act as a digital media server using uPnP
technology. This means that you can use it to send media
content to other uPnP-enabled home entertainment
devices that are connected to a home wireless network.
To set up the media server, tap the media remote tile on
the Start screen.
Tap play media to search your home network for available
media and play it back on the phone. Tap share media to
allow other devices to play media from your phone.
Tap help for detailed help on using this feature and stepby-step instructions for setting up media sharing on your
home network.
Personalizing your phone
34
Note: All devices must be on the same network (i.e., connected to the same router or
wireless AP) for media sharing to work. It will not work across different networks.
Listening to the radio
You can listen to FM radio broadcasts by tapping the Music + Video tile on the
Start screen, then tapping radio.
Use the slider to select the station you want to tune in to. Tap the play icon to start
listening.
You can add a station to your favorites by tapping the add to favorites icon in the
upper left-hand side of the screen. Tap the favorites icon in the lower left-hand
corner to see your pre-set stations.
Important: You need to plug in the supplied headset to the 3.5 mm jack at the top of the
phone. FM radio will not work with Bluetooth headsets.
Date, time and alarms
Setting the date and time
To set the date and time, or switch to a 24-hour clock, tap Settings > Date + time.
Tip: If you travel frequently or live in an area that uses daylight saving time, activate Set
automatically from this menu. This will enable your smartphone to set the date and time
based on information it receives from the network.
Setting alarms
Tap Alarms, then tap
•
•
•
•
set one or more alarms. You may:
Set the alarm Time.
Set which days on which the alarm Repeats.
Set a Sound.
Give it a Name.
When you have set the parameters, tap
to save the alarm.
Once you have set an alarm, tap it to edit the alarm. From the edit screen, you can
tap
to delete the alarm.
Date, time and alarms
35
Updating your phone’s operating system
From time to time, operating system updates will be available from your phone.
These updates include improvements and other changes as the operating system
evolves.
Updates are pushed to your phone over Wi-Fi, 3G or when you connect your phone
to a computer.
Restoring to factory settings
You may perform a clean boot to restore your smartphone to the factory settings.
Note: Before performing a reset, ensure that your smartphone is not locked. Press the
power button to unlock the phone.
Warning! This will erase all your personal information, any contacts stored on your
phone and any programs you installed.
If your phone is responding to screen input
Open Settings from the applications list, then tap about > reset your phone; click
yes when you see the warning messages.
Updating your phone’s operating system
36
Accessories and tips
This chapter shows you how to use accessories with your smartphone, as well as
provide useful tips for when you are using your smartphone.
Using the headset
Your smartphone comes packaged with a headset with built-in microphone for
handsfree use when making calls.
To use the headset, plug it into the phone’s 3.5 mm headphone jack.
When the headset is plugged in, all audio is routed to the headset, and the
speakers are turned off.
• To answer an incoming call, press the button on the microphone.
• Adjust the volume using the volume up/down keys on the smartphone.
• End the call by pressing the button on the microphone again.
You may also use a Bluetooth headset to make and receive calls. Please refer to
"Setting up Bluetooth" on page 32.
Creating a new access point
When you need to add another GPRS/3G/EDGE connection on your phone, obtain
the access point name and settings (including username and password if required)
from your wireless service provider.
1. Open the Applications menu and tap Quick Setup > cellular > add apn.
2. Enter the APN settings. Tap an item to adjust it.
3. When you have finished tap
.
Important: Some providers and countries do not allow the use of a smartphone as a
modem. Please check with your provider before attempting to do so.
Sharing your Internet connection
Your phone supports Internet connection sharing with up
to five clients or computers. You can set the connection
name and an optional password for security (using WPA2).
Tap Settings > internet sharing, then tap the slider next
to Sharing.
Tap Setup to set a password and define the access point
name for the phone (the AP SSID that other devices will
use for connecting).
Using the headset
37
Note: Internet sharing and Wi-Fi are mutually exclusive. If you have a Wi-Fi connection
enabled, and turn on Internet sharing, the Wi-Fi connection will be terminated.
Important: Some providers and countries do not allow the use of a smartphone as a
modem over cellular networks. Please check with your provider before trying to do so.
Sharing your Internet connection
38
Appendix
FAQ and troubleshooting
This section lists frequently asked questions that may arise during the use of your
smartphone, and gives easy answers and solutions to these questions.
Aspect
Question
Answer
Audio
Why is there no sound
coming from the
device?
If the headset is plugged into the device, the
speaker is automatically shut off. Disconnect
the headset.
Check that the device volume setting is not
muted.
Check that the volume control is not at its
lowest setting.
Multimedia files
System information
and performance
Why can’t I view my
picture files?
You may be trying to view an image that is not
supported. Refer to "Supported formats" on
page 31 for more information.
Why can’t I view my
video files?
You may be trying to view a video that is not
supported. Refer to "Multimedia" on page 44
for more information.
Why can’t I play my
music files?
You may be trying to play a file that is not
supported. Refer to "Multimedia" on page 44
for more information.
How do I check the OS
version of my device?
Tap Settings > about > more info to view the
OS version and other hardware and software
information.
You may also tap Settings > device
information.
Power
I couldn’t turn on the
device.
Storage
How do I check the
To check storage status, go to Settings >
RAM and ROM memory about.
status?
Heat
The phone heats up
when charging or
making long duration
calls.
FAQ and troubleshooting
The battery power may be depleted. Recharge
the device. Refer to "Charging the battery"
on page 10 for more information.
It is normal for the phone to heat up when
charging. When charging is complete, it will
return to its normal temperature.
It is also normal for the phone to heat up
during long periods of use, such as watching
a video or a long phone conversation.
39
Other sources of help
For information on:
Refer to:
Up-to-date information regarding your
smartphone
www.acer.com
Service enquiries
www.acer.com/support
Warnings and precautions
• Do not use this product near water.
• Do not place this product on an unstable cart, stand or table. If the product falls, it
could be seriously damaged.
• Slots and openings are provided for ventilation to ensure reliable operation of the
product and to protect it from overheating. These openings must not be blocked or
covered. The openings should never be blocked by placing the product on a bed,
sofa, rug or other similar surface. This product should never be placed near or over a
radiator or heat register, or in a built-in installation unless proper ventilation is
provided.
• Never push objects of any kind into this product through cabinet slots as they may
touch dangerous voltage points or short-out parts that could result in a fire or electric
shock. Never spill liquid of any kind onto or into the product.
• To avoid damage of internal components and to prevent battery leakage, do not
place the product on a vibrating surface.
• Never use this product when engaging in sporting activities, exercising, or in any
vibrating environment which may cause a short circuit or damage, and even a risk of
explosion from the battery pack.
CAUTION when listening to music
To protect your hearing, follow these instructions.
• Increase the volume gradually until you can hear clearly and comfortably.
• Do not increase the volume level after your ears have adjusted.
• Do not listen to music at high volumes for extended periods.
• Do not increase the volume to block out noisy surroundings.
• Decrease the volume if you can’t hear people speaking near you.
Battery information
This product uses a Lithium Polymer battery. Do not use it in a humid, wet and/or corrosive
environment. Do not put, store or leave your product in or near a heat source, in a high
temperature location, in strong direct sunlight, in a microwave oven or in a pressurized
container, and do not expose it to temperatures over 60 C (140 F). Failure to follow these
guidelines may cause the battery to leak acid, become hot, explode or ignite and cause injury
and/or damage. Do not pierce, open or disassemble the battery. If the battery leaks and you
come into contact with the leaked fluids, rinse thoroughly with water and seek medical
attention immediately. For safety reasons, and to prolong the lifetime of the battery, charging
will not occur at low (below 0C/32F) or high (over 40C/104F) temperatures.
The full performance of a new battery is achieved only after two or three complete charge and
discharge cycles. The battery can be charged and discharged hundreds of times, but it will
eventually wear out. When the talk and standby times are noticeably shorter than normal, buy
Other sources of help
40
a new battery. Use only Acer approved batteries, and recharge your battery only with Acer
approved chargers designated for this device.
Unplug the charger from the electrical plug and the device when not in use. Do not leave a
fully charged battery connected to the ac charger, since overcharging may shorten its lifetime.
If left unused, a fully charged battery will lose its charge over time. If the battery is completely
discharged, it may take a few minutes before the charging indicator appears on the display or
before any calls can be made.
Use the battery only for its intended purpose. Never use any charger or battery that is
damaged.
Do not short-circuit the battery. Accidental short-circuiting can occur when a metallic object
such as a coin, clip, or pen causes direct connection of the positive (+) and negative (-)
terminals of the battery. (These look like metal strips on the battery.) This might happen, for
example, when you carry a spare battery in your pocket or purse. Short-circuiting the
terminals may damage the battery or the connecting object.
Leaving the battery in hot or cold places, such as in a closed car in summer or winter
conditions, will reduce the capacity and lifetime of the battery. Always try to keep the battery
between 15C and 25C (59F and 77F). A device with a hot or cold battery may not work
temporarily, even when the battery is fully charged. Battery performance is particularly limited
in temperatures well below freezing.
Do not dispose of batteries in a fire as they may explode. Batteries may also explode if
damaged. Dispose of batteries according to local regulations. Please recycle when possible.
Do not dispose as household waste.
Replacing the battery pack
Your smartphone uses lithium batteries. Replace the battery with the same type as that which
came bundled with your product. Use of another battery may present a risk of fire or
explosion.
Warning! Batteries may explode if not handled properly. Do not disassemble or
dispose of them in fire. Keep them away from children. Follow local regulations
when disposing of used batteries.
Additional safety information
Your device and its enhancements may contain small parts. Keep them out of the reach of
small children.
Operating environment
Warning! For safety reasons, turn off all wireless or radio transmitting devices when
using your smartphone device under the following conditions. These devices may
include, but are not limited to: wireless LAN (WLAN), Bluetooth and/or 3G.
Remember to follow any special regulations in force in any area, and always switch off your
device when its use is prohibited or when it may cause interference or danger. Use the device
only in its normal operating positions. To successfully transmit data files or messages, this
device requires a good quality connection to the network. In some cases, transmission of data
files or messages may be delayed until such a connection is available. Ensure that the above
separation distance instructions are followed until the transmission is completed. Parts of the
device are magnetic. Metallic materials may be attracted to the device, and persons with
Warnings and precautions
41
hearing aids should not hold the device to the ear with the hearing aid. Do not place credit
cards or other magnetic storage media near the device, because information stored on them
may be erased.
Medical devices
Operation of any radio transmitting equipment, including wireless phones, may interfere with
the functionality of inadequately protected medical devices. Consult a physician or the
manufacturer of the medical device to determine if they are adequately shielded from external
RF energy or if you have any questions. Switch off your device in health care facilities when
any regulations posted in these areas instruct you to do so. Hospitals or health care facilities
may be using equipment that could be sensitive to external RF transmissions.
Pacemakers. Pacemaker manufacturers recommend that a minimum separation of 15.3 cm
(6") be maintained between wireless devices and a pacemaker to avoid potential interference
with the pacemaker. These recommendations are consistent with the independent research
by and recommendations of Wireless Technology Research. Persons with pacemakers should
do the following:
• Always keep the device more than 15.3 cm (6") from the pacemaker.
• Not carry the device near your pacemaker when the device is switched on. If you
suspect interference, switch off your device, and move it.
Hearing aids. Some digital wireless devices may interfere with some hearing aids. If
interference occurs, consult your network provider.
Vehicles
RF signals may affect improperly installed or inadequately shielded electronic systems in
motor vehicles such as electronic fuel injection systems, electronic anti-skid (anti-lock)
braking systems, electronic speed control systems, and air bag systems. For more
information, check with the manufacturer, or its representative, of your vehicle or any
equipment that has been added. Only qualified personnel should service the device, or install
the device in a vehicle. Faulty installation or service may be dangerous and may invalidate any
warranty that may apply to the device. Check regularly that all wireless equipment in your
vehicle is mounted and operating properly. Do not store or carry flammable liquids, gases, or
explosive materials in the same compartment as the device, its parts, or enhancements. For
vehicles equipped with an air bag, remember that air bags inflate with great force. Do not
place objects, including installed or portable wireless equipment in the area over the air bag or
in the air bag deployment area. If in-vehicle wireless equipment is improperly installed, and
the air bag inflates, serious injury could result. Using your device while flying in aircraft is
prohibited. Switch off your device before boarding an aircraft. The use of wireless teledevices
in an aircraft may be dangerous to the operation of the aircraft, disrupt the wireless telephone
network, and may be illegal.
Potentially explosive environments
Switch off your device when in any area with a potentially explosive atmosphere and obey all
signs and instructions. Potentially explosive atmospheres include areas where you would
normally be advised to turn off your vehicle engine. Sparks in such areas could cause an
explosion or fire resulting in bodily injury or even death. Switch off the device at refueling
points such as near gas pumps at service stations. Observe restrictions on the use of radio
equipment in fuel depots, storage, and distribution areas; chemical plants; or where blasting
operations are in progress. Areas with a potentially explosive atmospheres are often, but not
always, clearly marked. They include below deck on boats, chemical transfer or storage
Warnings and precautions
42
facilities, vehicles using liquefied petroleum gas (such as propane or butane), and areas where
the air contains chemicals or particles such as grain, dust or metal powders.
Follow any restrictions. Do not use the device where blasting is in progress.
Emergency calls
Important: Wireless phones, including this device, operate using radio signals, wireless
networks, landline networks, and user-programmed functions. Because of this,
connections in all conditions cannot be guaranteed. You should never rely solely on any
wireless device for essential communications like medical emergencies.
If certain features are in use, you may first need to turn those features off before you can make
an emergency call. Consult this guide or your network provider for more information.
When making an emergency call, give all the necessary information as accurately as possible.
Your wireless device may be the only means of communication at the scene of an accident.
Do not end the call until given permission to do so.
Disposal and recycling information
Do not throw this electronic device into the trash when discarding.
To minimize pollution and ensure utmost protection of the global environment,
please recycle. For more information on the Waste from Electrical and Electronics
Equipment (WEEE) regulations, visit
www.acer-group.com/public/Sustainability/sustainability01.htm
Mercury advisory
For projectors or electronic products containing an LCD/CRT monitor or display:
Lamp(s) inside this product contain mercury and must be recycled or disposed of
according to local, state or federal laws. For more information, contact the
Electronic Industries Alliance at www.eiae.org. For lamp-specific disposal
information, check www.lamprecycle.org.
Taking care of your smartphone
1. DO take care not to scratch the screen of your smartphone. Keep the screen clean. When
working with your smartphone, use your finger or fingernail. Never use an actual pen or
pencil or other sharp object on the screen surface.
2. DO NOT expose your smartphone to rain or moisture. Do not let water enter the circuitry
through the front panel buttons or expansion slots. In general, treat your smartphone as
you would a mobile phone or other small electronic device.
3. DO be careful not to drop your smartphone or subject it to any strong impact. Do not place
your smartphone in your back pocket.
4. DO NOT expose your smartphone to extreme temperatures. For example, do not leave
your smartphone on the dashboard of a car on a hot day or when temperatures are below
freezing point. Also, keep it away from heaters and other sources of heat.
5. DO NOT use or store your smartphone in any location that is dusty, damp or wet.
6. DO use a soft, damp cloth to clean your smartphone. If the surface of the screen becomes
soiled, clean it with a soft cloth moistened with diluted window-cleaning solution.
7. DO NOT press down on the screen with force, otherwise you may crack the screen.
Emergency calls
43