1
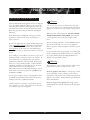
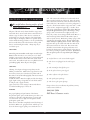
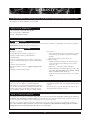
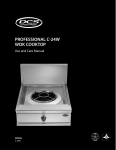
CARE & INSTALLATION
MANUAL
PROFESSIONAL
A
DCS-C-24W
WOK COOKTOP MODEL
DESI GN
R I CAN
ME
A
A
S
®
N
G S
S
O
O
TI
CE C I A D
R TIFIE
Retain this manual for future reference.
TABLE OF CONTENTS
I N S TA L L AT I O N I N S T R U C T I O N S :
USE AND CARE INSTRUCT I O N S :
STEP 1: Safety Precautions ..............................2
Warning....................................................10
STEP 2: Cabinet Preparation
Cooktop Installation .........................3-4
Section One: Precautions
Safety....................................11-12
STEP 3: Placing & Anchoring...........................5
Section Two: Before using your appliance
Operation...........................13
STEP 4: Electrical
Connection & Grounding......................5-6
Section Three: Using the Wok
General Use........................14
STEP 5: Gas Requirements
LP Conversion.....................................7
STEP 6: Backguard Installation.........................8
Section Four: Care & Maintenance
Cleaning............................15
STEP 7: Test and Adjustment.....................8
Adjustable Low Setting .....................8-9
Section Five: Warranty.................................16
STEP 8: Final Checklist....................................9
WARNING: If the information in this manual is not followed exactly, a fire or explosion may
result, causing property damage, personal injury, or death.
- Do not store or use gasoline or other flammable vapors and liquids in the vicinity
other appliance.
of this or any
- WHAT TO DO IF YOU SMELL GAS
•
Do not try to light any appliance.
•
Do not touch any electrical switch; do not use any phone in your building.
•
Immediately call your gas supplier from a neighbor’s phone. Follow the gas supplier’s instructions.
•
If you cannot reach your gas supplier, call the fire department.
- Installation and service must be performed by a qualified installer, service agency or the gas supplier.
1
SAFETYHEADER
PRECAUTIONS
STEP 1: PRECAUTIONS
CAUTION
WARNING:
When connecting unit to LP gas make certain the LP gas tank is equipped with its own
high pressure regulator in addition to the
pressure regulator supplied with the cooktop.
The maximum gas pressure to this appliance
is not to exceed 14.0 inches water column
from LP gas tank.
Disconnect power before installing Before turning power on, be sure that all controls are in the
“off ” position.
Read entire instructions before proceeding
installation must comply with all applicable
codes.
FOR YOUR SAFETY:
* All top covers and chopping blocks must be
removed before using the appliance.
* No cooking utensil should be used on top of
the grill.
* Never block the front face of the unit as it
will affect the flow of combustion and ventilation of air.
Important Installation Information:
Tested in accordance with ANSI Z21.1 - 1987
Standard for Household Cooking Gas
Appliances.
Check local building codes for the proper
method of cooktop installation. In the absence
of local codes the cooktop should be installed in
accordance with the National Fuel Code #Z2231-1984 and National Electrical Code
ANSI/NFPA No. 70-1987.
2
CABINET PREPARATION
STEP 2: COOKTOP INSTALLATION
FIG. 6
1. To ensure professional results, the cabinet and
countertop openings should be prepared by a
qualified cabinet worker.
2. The clearances shown in Fig.1 are required for
installations of cooktop and islands.
Counter-Sunk Screws
3. The cooktop is designed to hang from the countertop by its side flanges. The countertop how
ever, must be strong enough to support this
heavy cooktop. It may be necessary to add a 2
x 4 corner brace (See Figs.3, 4, and 5). Another
alternate would be to construct a deck to set the
cooktop on.
26-3/8"
FIG. 2
12"
Countertop level
9"
4. The cooktop can be installed in various positions
with the front either flush or projecting, depending on the countertop depth. (See Fig.2 side
view of cooktop; see Figs.3-5 for alternate
mounting positions.)
1/2"
3" To Center Line
of Gas Inlet
3/4"
22-5/8"
23-3/8"
2"
Cabinet face for installation with projecting control panel
Cabinet face for installation with flush control panel
777fig07
FIG. 1
VENT HOOD
12" Min. to
Combustible
Material ,
Each Side
30" Min.,
36" Max.
18" Min.
WALL
3" min each side
13"
Min.
0" Rear Clearance
(w/ backguard)
12" (w/out backguard)
counter top level
CAUTION:
36" Min. to
combustible
material , from
cooking surface
0" Side Cutout Clearance
0" Bottom Clearance
777fig12
as defined in the "National Fuel Gas Code" (ANSI Z223.1, Latest Editon).
> The level of the cooktop top must be at the same level or above the
countertop level.
3
CABINET PREPARATION
FIG. 5
5. Establish the centerline of the cooktops desired
location. It should be the same as the center or
the overhead ventilation hood.
Wok Front projects
outward from cabinets
6. Cut the opening for the following installations:
(Typical of standard depth cabinetry)
* Standard countertop installations (See Fig.3).
* Deep counter or island installations (See Fig.4).
777fig08
NOTE: If the deck is used, the sides or bottom of the cutout
may be solid combustible or non material. If the bottom is
solid, provide 5” x 5” cutout in the left rear corner for the gas
inlet and power cord clearance.
If a solid side cabinet wall exists on one or both sides, you will
need to notch the front corner of the cabinet to match the
counter top notch and to allow clearance for the cooktop front
(See Fig.5).
Wok Front
Flush with cabinets
(Minimum of 25-3/8" cabinet depth req'd)
3/4" min.
FIG. 4
Island Installation
24"
22
11/16"
Electrical and Gas
Supply.-(See Figs. 8,
9, 10, 11)
3/8"
2 X 4 Corner Supports
9 1/16"
Counter top backsplash
3/8"
3/8"
24 3/4"
FIG. 3
Standard Installation
24"
23 11/16"
777fig05
4
PLACING & ANCHORING - ELECTRICAL
STEP 3: PLACING & ANCHORING
STEP 4: ELECTRICAL CONNECTIONS
Lift and place the cooktop in the opening. Be careful not to
pinch the power cord or gas inlet between anything. Anchor
the cooktop; ensure that the appliance is in place and level
(See Fig.7).
POWER REQUIREMENTS:
120 VAC, 60 Hz.
7 Amp.
(Use 15 Amp. Circuit)
For cabinets with side access, screw the 2 “L” shaped brackets
(supplied) into the holes provided using the #10 sheet-metal
screws as shown in Fig.7 cooktop. Then using the 1/4 - 20
bolt and nuts (supplied), anchor as shown.
Always disconnect electric supply cord from the wall outlet or
service disconnect before servicing this appliance. Observe all
governing codes and ordinances when grounding, in absence
of which, observe National Electrical Code ANSI / NFPA
No. 70-1987.
For cabinets with no side access, first fasten the brackets to
the cabinet side wall using a suitable fastener. Then drill two
5/32” dia. holes upward into the bottom of cooktop and fasten as shown in Fig 7. countertop.
FIG. 7
Side access anchoring:
RECOMMENDED GROUNDING METHOD
This appliance is factory equipped with a power supply cord
with a three-prong grounding plug (with polarized parallel
blades). It must be plugged into a mating grounding, type
receptacle, connected to a correctly polarized 120 Volt circuit.
If the circuit does not have a grounding type receptacle, it is
the responsibility and obligation of the installer or user to have
the existing receptacle changed to a properly grounded and
polarized receptacle in accordance with all applicable local
codes and ordinances by a qualified electrician. In the
absence of local codes and ordinances the receptacle replacement shall be in accordance with the National Electrical
Code.
Bottom access anchoring:
Cooktop
Countertop
THE THIRD PRONG SHOULD NOT, UNDER ANY
CIRCUMSTANCES, BE CUT OR REMOVED (See Fig. 8).
(See Fig. 9).
777fig09
FIG. 8
Receptacle Box
Cover Plate
Three
Prong
Plug
Three Prong
Receptacle
610 fi 23
5
ELECTRICAL - GROUNDING
ALTERNATE GROUNDING METHOD
CAUTION:
If installation of a properly grounded wall receptacle is
impossible at the time of installation, consult your local electrical inspector for permission to connect a temporary adapter (with
polarized blades) which could be plugged into your present 2wire receptacle; however, this is not recommended. If this is
done, you must attach the lug and/or the green adapter wire
to the receptacle cover plate screw. Ground from it to a
grounded metal cold water pipe* (See Fig.10). Do not ground
to a gas supply pipe. You must permanently ground the adapter
before connecting the appliance to the power supply.
Attaching the adapter ground wire to wall
receptacle cover screw does not ground the appliance unless the cover screw is grounded through
house wiring.
If there is any doubt as to whether the wall
receptacle is properly grounded, the customer
should have it checked by a qualified electrician.
* Cold water pipe must have metal continuity the electrical
ground and cannot be interrupted by plastic, rubber or
other electrically insulating connectors (including water
meter or pump) without adding a jumper wire at these connections (See Fig.9).
TWO PRONG
RECEPTACLE
FIG. 9
COVER
PLATE
GROUND WIRE
FIG. 10
GROUND WIRE
THREE-PRONG
ADAPTER
GROUNDED WATER PIPE
THREE-PRONG PLUG
777fig13
6
GAS REQUIREMENTS
STEP 5: GAS CONVERSION
CAUTION:
Verify the type of gas supplied to the location. The cooktop is shipped from the factory set up and adjusted for natural gas. The unit can be readily converted to LP as
described below.
The appliance must be isolated from the buildingsgas supply piping system by closing its individual manual shut-off
valve during any pressure testing of the gas supply piping
system at test pressure equal to or less than 1/2 psig (3.5
kPa.).
When checking the cooktop manifold gas pressure, the
inlet pressure to the regulator should be at least 6.0” W.C.
for natural gas or 11.0” for LP.
Natural Gas Requirements:
Connection: 1/2” N.P.T.
Pressure: 6” to 14” Water Column
A manual shut off valve must be installed before the regulator.
LP Gas Requirements:
Pressure: 11” to 14” Water Column
A regulator is required at the LP source to provide a maximum of 14” W.C. to the cooktop regulator.
LP CONVERSION:
If propane is desired you must obtain a conversion kit
from the factory for more information on type of conversion kit needed. Call Parts and Service (888) 281-
5698
HOOK UP:
Make sure the gas supply is turned off at the wall valve
before connecting the appliance. All gas supply connections should be made by a qualified technician and in
accordance with local codes or ordinances. In the absence
of a local code, the installation must conform to the
National Fuel Gas Code ANSI 223.1-1984.
Install the 1/2” coupling to the gas inlet at the left rear corner of the unit. Next, install the 1/2” close nipple and regulator (See Fig.11). When installing the regulator, be sure
to have the arrow on the regulator body pointing towards
the cooktop inlet. Only use sealant which is resistant to
the actions of LP. gases.
To operate, push and turn the burner control knob to the
lite position. The gas flowing to the pilot burner will be
ignited by the electric spark igniter. The audible clicking
signal is an indication that the igniter is functioning. The
appliance is equipped with a safety valve which will take
about 30 seconds to heat up before allowing the main
burner to come on, once ignited rotate the dial to the
desired setting.
7
BACKGUARD INSTALLATION-TEST
HEADER
& ADJUSTMENT
STEP 6: BACKGUARD INSTALLATION
STEP 7: TEST & ADJUSTMENT
The backguard must be installed when there is less than a
12” clearance between combustibles and back edge of
cooktop. For island installations and other installations
with over 12” clearance, and optional stainless steel trim
channel is available to cover the backguard mounting
flanges.
Check for proper burner flame characteristics and adjust
the air shutter if necessary. Each burner and valve is individually checked at the factory prior to shipment but variations in local gas supply may make adjustment necessary.
Burner flames should be blue and stable with no yellow
tips, excessive noise or lifting. If any of these conditions
exist, check that the regulator is installed with the arrow
pointing towards the appliance, and that it is 5.0 inches
w.c. Nat. gas; and 10.0 inches for propane.
Refer to Fig.12
A. Slide backguard over the 2 flanges on the rear of the
appliance. Fasten the back with two screws (See A Fig.12)
provided. No screws are required behind the wok section.
B. Fasten the top of the backguard to the wall
with two screws through the backguard (See B.).
C. Place the backguard cap on top and fasten using the
two counter-sunk screws provided.
If this condition persists, the air shutters should be adjusted. Begin by removing the valve panel using the access
hole provided, loosen the air shutter locking screw on the
face of the burners mixing head.
If the flame is too yellow, indicating insufficient air, adjust
the shutter to increase the air inlet.
If the flame is noisy or tends to lift away from the burner,
indicating too much air, adjust the shutter to decrease the
inlet.
The burner flame should be 1-1/2 to 2-1/2 inches high.
FIG. 12
Adjustable - Low Setting:
The open top burner valve used on your cooktop has an
adjustable low setting. Each valve is individually tested
and adjusted on the appliance prior to shipment. Due to
fluctuations in gas pressure and heating valve, you may feel
it necessary to increase or decrease the gas flow at the low
position.
FIG. 13
8
FINAL
HEADER
CHECKLIST
To Adjust:
1) Light burner.
2) Turn knob to lowest setting (all the way
counterclockwise).
3) Remove knob.
4) Hold the valve shaft still. Insert a thin
blade, flat-tipped screwdriver through the
valve shaft and turn to desired setting. Be
careful not to turn it down so low.
To Clean:
The stainless steel surface may be cleaned by wiping with a damp soapy cloth. Any mild glass cleaner will
remove fingerprints and smears. Do not use steel wool as
it will scratch this surface. Small scratches may be removed
by lightly sanding, with the grain, using 100 grit paper.
Gas Supply:
Pressure regulator (shipped with unit)
connected to manifold and is set for 5.0”
W.C. for natural gas and 10.0” W.C. for LP.
Manual gas shut off valve installed in
accessible location.
Unit tested and free of gas leaks.
Operation:
All internal packing material removed.
If used of LP gas, verify that pressure
regulator and orifice hoods have been
modified for use with LP gas.
STEP EIGHT: INSTALLER FINAL CHECKLIST
Placement of Unit:
Bezel centered on burner knob and knob
turn freely.
Specified clearances maintained to cabinet
surfaces.
Burner lights satisfactorily.
Cooktop correctly positioned and
anchored in countertop recess.
Flame adjustment for soft blue cone made on
burner.
Nylon tie straps securing burner to
channel have been removed.
Low flame adjustment verified.
Drip trays are properly in place and pull
out freely.
Backguard attached if less than 12”
clearance to combustibles behind unit.
Electrical:
Polarized 120 VAC, 15 ampere receptacle
with 15 ampere over current protection provided, for service cord connection.
9
USE & CARE
HEADER
INSTRUCTIONS
A Special Message to our Customers,
PROPANE GAS INSTALLATION:
We are glad you selected one or more of these DCS
Professional Appliances. By following a few simple procedures and suggestions in this manual, these appliances will
give you years of service.
Each unit is ready for use with natural gas. It may be converted for use with propane gas by a qualified service technician or installer. Be sure the unit being installed is correct
for the type of gas being used.
This booklet explains the proper use of your new appliances and how to take care of them. Keep this manual in a
handy spot, as it has the answers to the questions that
occur when you start to cook.
Caution:
When connecting the unit to propane gas, make certain
the propane gas tank is equipped with its own high-pressure regulator; in addition, the pressure regulator supplied
with the unit must be on the inlet gas pipe of the unit.
The maximum gas pressure to this appliance is not to
exceed 14.0 inches water column from propane gas tank
pressure regulator.
Let us know if we can help you. When you write, please
include the model number of your appliance.
Sincerely,
DCS
TESTED IN ACCORDANCE WITH ANSZ 21.1-1987
STANDARD FOR HOUSE-HOLD COOKING GAS
APPLIANCES.
WARNING:
To be used in conjunction with a suitable vent hood only. See
page 15.
If the information in this manual is not followed exactly, a
fire or explosion may result causing property damage, personal injury or death.
Check your local building codes when installing this unit.
In the absence of local codes, this unit should be installed
in accordance with the National Fuel Gas Code No.
223.1-1990 and the National Electrical Code ANSI/NFPA
No. 70-1990.
Do not store or use gasoline or other flammable vapors
and liquids in the vicinity of this or any other appliance.
WHAT TO DO IF YOU SMELL GAS
·
·
·
·
Do not try to light any appliance.
Do not touch any electrical switch; do not use any
phone in your building.
Immediately call your gas supplier from a neighbor’s
phone. Follow the gas supplier’s instructions.
If you cannot reach your gas supplier, call the fire
department.
* Installation and service must be performed by a qualified
installer, service agency or the gas supplier.
10
PRECAUTIONS
HEADER
SECTION ONE:SAFETY
Caution:
Your new DCS Professional appliances have been designed
to be safe, reliable appliances. However, use extreme care
when using these restaurant caliber appliances as they provide intense heat and can increase the accident potential.
Basic safety precautions must be followed, including the
following:
Do not store items of interest to children above any of the
units or at the back of them. if children should climb onto an
appliance to reach these items, they could be seriously injured.
When using any of these appliances: DO NOT TOUCH
THEM OR THE AREAS NEAR THEM. Areas adjacent
to these appliances may become hot enough to cause
burns.
Read all instructions carefully before using any of these
appliances to reduce the risk of fire, electric shock, or
injury to persons.
Never let clothing, potholders, or other flammable materials come in contact with or too close to any appliance
while in operation. Fabric may ignite and result in personal injury.
Be sure your appliance/s are properly installed and grounded by a qualified technician in accordance with the installation instructions provided with the unit(s). Have the
technician show you the location of each individual gas
shut-off valve so that you know how and where to turn off
the gas.
For personal safety, wear proper apparel. Loose fitting garments or hanging sleeves should never be worn while cooking. Some synthetic fabrics are highly flammable and
should not be worn while cooking.
If you smell gas, your installer has not done a proper job of
checking for leaks. Connections can loosen in transit. If
the connections are not perfectly tight, you can have a
small leak and, therefore, a faint gas smell. Finding a gas
leak is not a do-it-yourself procedure. Call the installer to
recheck the installation as some leaks can only be found
with the burner control in the ON position.
These units are factory assembled for natural gas. Any of
them may be converted to propane by a qualified service
technician or installer.
Warning:
These appliances are for cooking. Based on safety considerations, never use them to warm or heat a room.
Do not repair or replace any part of the appliances unless
specifically recommended in this manual. All servicing
should be referred to a qualified technician.
Clean any appliance with caution. A wet sponge or cloth
used to wipe spills on a hot cooking area can result in
steam burns. Some cleaners can produce noxious fumes if
applied to a hot surface. Follow directions provided by the
cleaner manufacturer.
Children should not be left alone or unattended in an area
where appliances are in use. They should never be allowed to
sit or stand on any part of the appliance.
Never use any part of an appliance for storage. Flammable materials can catch fire and plastic items may ignite
or melt.
11
PRECAUTIONS
HEADER
Do not use aluminum foil as a shield against food spills or
drippings around any of these appliances. This could obstruct the flow of combustion and ventilation air.
California Proposition 65 Warning: Burning gas cooking fuel generates some byproducts which are on the list of substances which are
known, by the State of California to cause cancer or reproductive harm. California law requires businesses to warn
customers of potential exposure to such substances. To
minimize exposure to these substances, always operate
these units according to the instructions contained in this
booklet and provide good ventilation.
GREASE IS FLAMMABLE. Let hot grease cool before
attempting to handle it. Avoid letting grease deposits collect in the drip tray under the griddle, the grill or the wok.
Clean the tray after each use.
DO NOT USE WATER ON A GREASE FIRE. Use a
dry chemical or foam-type extinguisher, or smother fire
with baking soda.
SAVE THESE INSTRUCTIONS
If the appliances are near a window, be certain the curtains
cannot blow over or near it - they could catch fire.
The ventilator hood and the filters above your appliances
should be cleaned frequently, so grease from cooking vapors
will not accumulate on them.
If a burner goes out and gas escapes, turn the control
knob off. Open a window or door. Do not attempt to use
any appliance until the gas has had time to dissipate. Wait
at least 5 minutes before using a gas appliance.
Be sure all appliance controls are turned off and they are
cool before using any type of aerosol cleaner on or around
any gas appliance. The chemical that produces the spraying action could, in the presence of heat, ignite or cause
metal parts to corrode.
Never leave the wok unattended when using high flame
settings. Greasy spill-overs may ignite. More importantly,
if the burner flames are smothered, unburned gas will be
escaping into the room.
12
BEFORE USING
HEADER
YOUR APPLIANCE
S E C T I O N T W O : O P E R AT I O N
Before using wok remove all packaging and labels before
use or seasoning the wok.
1. Be sure the drip trays are in place before
use.
2. When first using your wok make sure you
clean surface thoroughly with hot, soapy water.
This process is required before use to remove the
rust protective oil coating from the factory. Make
sure you dry surface thoroughly.
777fig02
3. Apply a light coat of vegetable oil (do not use
corn oil) to the entire inside surface of wok with a
paper towel.
4. Begin by heating the wok on a medium setting
until the cooking surface turns a golden brown.
Repeat this procedure several times. This seasoning seals the pores of the metal and keeps food
from sticking.
BACKGUARD
WOK PAN
AND LID
WOK UNIT
5. After using the wok, wash it in hot soapy water.
Do not use abrasives or scour. Apply a light coat
of vegetable oil to the inside surface with a paper
towel. Place the wok over a low setting for
approx. 15 to 30 seconds remove from heat and
let cool. Wipe off excess oil before storing.
WOK PAN
SUPPORT RING
WARNING:
Do not leave wok unattended
while cooking.
777fig.18
CONTROL KNOB
DRIP TRAY
NOTE: It is normal for the wok to discolor and darken with
use. This lets you know that wok has been well seasoned.
Using the wok:
1. Check to be certain the drip tray are in place
2. Place wok pan into support ring before turning on
wok.
the
3. Turn the control knob to the setting preferred and
cook as desired.
13
USING
HEADER
THE WOK
ports are clogged. If the ports are clogged, use a wire, a
straightened paper clip or needle to clear the ports. Do
not use a wood, or objects that could break easily to clear
ports they could break off and clog ports. If the condition persists, contact a service agency for adjustment.
SECTION THREE: GENERAL USE
A VENTILATING HOOD OF ADEQUATE CFM
CAPACITY VENTED TO THE OUTSIDE OF THE
HOUSE MUST BE INSTALLED ABOVE THIS WOK.
FOR MOST KITCHENS WITH A WALL MOUNTED
HOOD, A CERTIFIED HOOD RATING OF NOT LESS
THAN 900 CFM IS REQUIRED. THE HOOD MUST
BE INSTALLED ACCORDING TO INSTALLATION
INSTRUCTIONS FURNISHED WITH THE HOOD.
CONTROL KNOB:
The burner has an infinite number of heat settings and
there are no fixed positions on the control knob
between HI and LO. To turn burner on, push in on the
control knob and turn it counterclockwise to the LITE-HI
position. A single click will be heard as the spark igniter
lights the pilot. The pilot will burn approximately 30 seconds before the main gas safety valve opens and the burner
lights.
BURNER:
Your new DCS Professional wok is equipped with a heavy
cast iron burner typical of those used in restaurants. It is
designed with an electric spark ignition to eliminate the
continuous pilot found on a restaurant wok. The burner is
rated at 30,000 BTU/HR.
DRIP TRAY:
A drip tray is located under the wok burner. Be sure it is
in place before using the wok. Spills should be washed off
as soon as possible to prevent “baked on soil”. When the
tray is cool, pull it for-ward to remove.
NOTE: When used with propane gas, a slight pop or flash
may occur at the burner ports a few seconds after the
burner has been turned off. This usually occurs after the
burner has been on awhile. This is a normal part of operation for your wok.
ELECTRIC SPARK IGNITER:
If the burner does not ignite, Turn the control knob to
“off ”. (See page 16).
BURNER EFFICIENCY
and FLAME CHARACTERISTICS:
The burner flame should be blue in color and stable with
no yellow tips, excessive noise or lifting. It should burn
completely around both rings of the burner. An improper
gas-air mixture may cause either a yellow tipped flame or
burner flutter. Have the flame adjusted by a technician.
Foreign particles in the gas line may cause an orange flame
during initial use. This will disappear with use.
777fig16
DRIP TRAY
For proper lighting and efficient performance of the burner, it is necessary to keep the igniter and burner ports
clean. If the flame is uneven, flutters, makes excessive
noise or lifts, check to see if the burner
14
CARE &HEADER
MAINTENANCE
wok. The venturi tube will release from the orifice hood
that is attached at the front of the wok. Once the venturi
tube is disconnected from the orifice hood the burner may
now be lifted out. Be careful not to bend or pull igniter or
the pilot. Clean burner with hot soapy water and / or with
a piece of wire, straightened paper clip, or needle. Clear
ports of any soil do not use wood or other objects that may
easily break off inside burner ports. Wash using a damp
sponge, cloth, or brush rinse thoroughly and dry. For
heavy soil you may use scouring pads like Scotch Brite or a
wire brush and powdered cleansers (Bon-Ami, Ajax) or
steel wool pads (S.O.S). Wash using a damp sponge, cloth
or brush rinse thoroughly and dry. Be sure venturi tube
drains well before replacing burner in wok. When replacing burner line up the venturi tube with the orifice hood
that located at the front of the wok. The venturi tube
should be centered under the igniter pilot burner and
between the burner support guides located on the support
bar. These posts help to position the burner. If the burner
does not ignite try the seven steps below before calling for
service:
SECTION FOUR: CLEANING
Be careful when cleaning surface of wok
while appliance is
still hot.
All parts of the wok can be cleaned with hot soapy water,
rinsed and dried. Use of brand names is intended only to
indicate a type of cleaner. This does not constitute an
endorsement, nor does the omission of any brand name
cleaner imply its inadequacy. When ever possible always
use the mildest cleaning procedure to do the job effectively.
For best results always rub in the direction of the polish
lines to avoid marring the surface. Always wipe dry to
avoid water spots.
DRIP TRAY:
Do not let grease accumulate in the tray as it can be a fire
hazard. Clean the tube as soon as they are cool. Clean
with hot, soapy water for the tube use a soapy bottle brush.
A mild abrasive cleanser such as Bon-Ami or Soft Scrub
can be used. For stubborn stain use a soap filled steel wool
pad rubbing lightly. Rinse all parts thoroughly.
1) Is a fuse blown or is the circuit breaker tripped?
2) Is the electric cord plugged into the wall receptacle?
WOK PAN:
3) Is the manual gas shut-off valve open?
Cleaning of wok pan and support ring always use the
mildest procedure first. Wash in hot,soapy water for stubborn stains you may use a stainless steel product such as
Bon-Ami or Soft Scrub rubbing lightly. Do not use a steel
wool pad, as it will
scratch the surface. Rinse thoroughly and dry after drying
apply a light coating of vegetable oil to the inside surface
of wok pan only. Apply oil with a
paper towel, heat on low setting for 20 seconds allow to
cool before handling wipe of excess oil.
4) Are the pilot or burner ports clogged?
5) Is there a flame on the pilot burner?
6) Is the spark igniter sparking?
7) Is the electric glow igniter glowing?
If steps 1 thru 7 does not alleviate the problem you may
contact service toll free at:
BURNER:
(888) 281-5698
DCS Parts / Customer service:
For proper lighting and performance of the burner,
keep electric igniter, pilot, and the burner ports clean. It is
necessary to clean these only when there is a severe spill
over, the burner does not light even though the electric
spark igniter sparks. The
flame does not burn blue completely around both rings of
the burner. When cool, grasp the burner, and lift up so it is
above the burner support guide posts towards the rear of
15
WARRANTY
HEADER
*TO ENSURE WARRANTY SERVICE, FILL OUT AND SEND IN YOUR POSTAGE-PAID WARRANTY CARD
This warranty covers the following: DCS-C-24W.
LENGTH OF WARRANTY
One (1) Year Full – Covers the entire product
Five (5) Years Limited – Wok burner
Lifetime – All stainless steel parts.
DCS WILL COVER:
All repair labor and replacement parts, for parts found to be defective due to materials or workmanship. Service must be provided by
Authorized Factory Agent during normal working hours.
DCS WILL NOT COVER:
Installation or start-up
Normal adjustment to burners, gas regulators, etc.
Cleaning of igniters and/or general maintenance
Shipping damage
Service by an unauthorized agency. Damage or repairs due to
service by an unauthorized agency or the use of unauthorized
parts.
Overtime, weekends, holidays
Improper installation, such as: no regulator, improper hookup, etc.
Chipping of porcelain enamel burner.
Service visits to:
• Correct the installation. (You are responsible for providing
electrical wiring, gas installation and other connecting
facilities.)
• Reset circuit breakers, replace home fuses, or
establish gas supply.
• Damage caused from accident, abuse, alteration, misuse,
incorrect installation or installation not in accordance
with local codes.
• Repairs due to other than normal household use.
• Units installed in non-residential applications such as: day
care centers, bed and breakfast centers, churches, nursing
homes, restaurants, hotels, schools, etc.
• Supply the user with operational assistance covered in this
manual.
This warranty applies to appliances used in residential applications; it does not cover their use in commercial situations.
This warranty is for products purchased and retained in the 50
states of the U.S.A., the District of Columbia and Canada. This
warranty applies even if you should move during the warranty
period. Should the appliance be sold by the original purchaser
during the warranty period, the new owner continues to be protected until the expiration date of the original purchaser’s warranty period.
This warranty gives you specific legal rights. You may also have
other rights which vary from state to state.
HOW TO OBTAIN SERVICE
For warranty service, contact your local DCS authorized service agency. Provide him with the Model #, Serial #, gas type and date of
installation, and a brief description of the problem. If you need assistance in locating the authorized service agency in your area, contact your local dealer. He will have a listing of authorized DCS service agents in you area.
We want you to remain a satisfied customer. If a problem does come up that cannot be resolved to your satisfaction, please let us
know. Write: Dynamic Cooking Systems Inc., Customer Service Department, 5800 Skylab Road, Huntington Beach, CA 92647.
Or call Customer Service/Parts (888) 281-5698 or fax us at (714) 372-7004.
16
As product improvement is an ongoing
process at DCS, we reserve the right to
change specifications or design without
notice.
Litho in USA 8-97
Part No. 10777
5800 Skylab Road, Huntington Beach, CA 92647
(714) 372-7000
Fax (714) 372-7001
Customer Service (888) 281-5698
www.dcsappliances.com