1
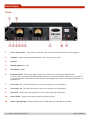
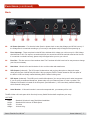
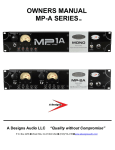
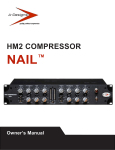
STEREO TUBE MIC PRE
MP-2A
Owner’s Manual
™
WARNING!
Before you start your new MP-2A Series True Tube Microphone preamp please read the following:
ANY real tube product is sensitive to a high SPL environment. This may cause microphonics in a recording situation. Make sure you are able to shock
mount and or place the unit in isolation if need be. Direct light will also affect tubes, as well.
PLEASE, be sure to have at least one rack space between any tube products from the product above and below the unit. This will ensure your tube unit
will not over heat. Over heating will cause damage to the tubes and shorten their life span. If possible place, the MP-2A Series unit in the top rack space
to allow air flow.
If you have received your unit via UPS/Fed-Ex/DHL, or any other courier, your MP-A should have been double boxed for protection. If it was not double
boxed, please contact your dealer and return the unit to them for a replacement.
We demand ALL our units to be double boxed to help prevent damages during shipping.
Thank you,
Peter Montessi
President
A Designs Audio, Inc.
LEGAL NOTICE:
Fill out and Return Warranty Card to A Designs Audio, Inc. Warranty begins the day of purchase. Your name will be placed on our mailing list (unless
otherwise requested) for future updates and new product announcements.
A Designs Audio, Inc. reserves the right to make improvements or changes at any time to this product.
Published by: A Designs Audio, Inc.
P.O. Box 4255, West Hills, CA 91304 U.S.A.
Edition 4.0 2009
Copyright 2013 A Designs Audio, Inc. All Rights Reserved.
WARNING: Removing Cover Will Void Your Warranty.
One Year Limited Warranty Internal Parts, 30-Day Limited Warranty Labor, 30-Day Limited Warranty Tubes
A Designs Audio, Inc. warrants that our hardware conforms substantially to the specifications contained in this manual when used in accordance these
specifications for a period of one year from the date of original purchase from A Designs Audio, Inc. or its authorized dealers. In case of a valid warranty
claim, your sole and exclusive remedy and A Designs’ entire liability under any theory of liability will be, at its option, to repair or replace the product
without charge, or, if not possible, to refund the purchase price to you. The warranty is not transferable and applies only to the original purchaser of the
product.
For warranty service, contact A Designs Audio, Inc. at 818-716-4153 to obtain a Return Merchandise Authorization (RMA) number.
Warranty is void if product serial numbers have been removed or if the product has been damaged by abuse or unauthorized modification and repair.
There are no user serviceable parts inside.
This warranty is in lieu of all warranties whether oral or written, expressed or implied. A Designs Audio, Inc. makes no other warranty either expressed
or implied, including without limitation, any implied warranties of merchantability, unless for a particular purpose or non-infringement. The purchasers’
sole and exclusive remedy under this warranty shall be repair or replacement as specified herein.
In no event will A Designs Audio, Inc. be liable for any direct, indirect, special, incremental or consequential damages resulting from any defect in the
product, including lost profits, damage to property and, to the extent permitted by law, damage for personal injury, even if A Designs Audio, Inc. has
been advised of the possibilities of such damages.
A Designs, A Designs Audio, Inc., and MP-2A are trademarks of A Designs Audio, Inc. All other trademarks are the property of their respective owners.
Introduction
Welcome to the Analog Sound of the MP -2A. This is an all tube product, and there are some basics you should know before
using this product for the first time.
Tubes are a component that have specialized and unique features. If you are a “pre” or baby boomer, born before 1957,
you may recall using tubes in various products, such as radios, amplifiers, and televisions. So, this is just to refresh your
memory. If you are a “post” baby boomer, this could be your first experience with tubes, so please pay close attention!
(You will be tested at the end of this manual).
Tubes are most efficient and effective when “warmed up.” This means, upon starting the MP-2A, you should allow the
tubes to become fully heated before attempting to operate. The minimum amount of warm up time is approximately 15 to
20 minutes.
Set up your instrumentation layout before powering up the MP-2A. Plug in your instrument or microphone while the unit is
off. This will prevent unwanted noise such as “pops.” The same applies when you shut down. Allow a minimum of 25
seconds for the power to drain from the tubes properly. Then you can unplug your instrument or microphone. Always turn
your Phantom switch to the off position before plugging or un-plugging your Microphone.
When placing the MP-2A Series in a rack, we recommend using the first tier or allow one x space in order to properly
ventilate. Avoid overheating! Too much heat will reduce the life-span of your tubes. We also recommend strongly that
you observe SPL and shock mount any tube product.
A Designs Audio, Inc. has scoured the earth for the perfect combination of tubes for this unique quality sound. Go ahead,
get started. Read the following pages carefully to become acquainted with the warmth and clarity that the MP-2A can
deliver to your recordings.
Please feel free to email A Designs Audio, Inc. via the website with any creative applications for the use of the MP-2A. We
included some applications in this manual. We may just include your suggestion on our website!
Congratulations on the purchase of your MP-2A all tube microphone preamplifier! Most of all, have fun!
Peter Montessi, President
A Designs Audio, Inc.
Stereo Tube Mic Pre, MP-2A™
Owner’s Manual
|
3
Features
•
Vacuum-tube design
•
Two (2) Level Volume Controls
•
Two (2) Polarity Switches
•
Two (2) Tone Switches
•
Two (2) Phantom Switch
•
Two (2) Backlit True VU Meters
•
Red Jewel Lamp On/Off
•
Two (2) Neutrik Combo XLR 1/4” Input Connectors
•
Two (2) XLR Output Connectors
•
Zero Feedback Loop
•
Two (2) U-Rack Space
•
Two (2) CineMag Input Transformers
•
Two (2) Custom Wound Output Transformers
•
Two (2) 6NI-P Tubes
•
Two (2) EF86 Tubes
•
Clean and airy high end
•
Warmth, transparency, and quality sound
In line with our company policy of continuous development, the above features are subject to change without notice.
4
|
Stereo Tube Mic Pre, MP-2A™
Owner’s Manual
Specifications
TECHNICAL DATA
Input Impedance. . . . . . . . . . . . . . 1.4k Ohm
Gain Range . . . . . . . . . . . . . . . . 60dB
Noise (EIN) . . . . . . . . . . . . . . . . -128 Weighted
Mic Phantom. . . . . . . . . . . . . . . . Switchable 48 Volt Power Source
Mic Input Phase . . . . . . . . . . . . . . Switchable 0-180
Instrument Jack Input . . . . . . . . . . . 1/4 phono
Input Impedance. . . . . . . . . . . . . . Min > 100k Ohm
Balanced XLR Output:
Output Impedance . . . . . . . . . . . . . 600 Ohm Switchable to 10k
Maximum Level . . . . . . . . . . . . . . +22 dBu
Output . . . . . . . . . . . . . . . . . . . Low-Z, transformer-balanced
Frequency Response . . . . . . . . . . . 20 Hz - 60k Hz
Distortion . . . . . . . . . . . . . . . . . THD: > .08 @ 1 Khz
Power Requirements: . . . . . . . . . . . 100/120/230 VAC - 42 Watts
Dimensions (W x H x D . . . . . . . . . . 19” x 3.5” x 10”
Weight . . . . . . . . . . . . . . . . . . . 18 lbs. 8.16kg (Shipping weight 20 lbs.) MP-1 17 lbs.
In line with our company policy of continuous development, the above specifications are subject to change without notice.
Testing was performed BE Labs Oxnard, CA.
Stereo Tube Mic Pre, MP-2A™
Owner’s Manual
|
5
Functions
Front
1
Level Control Knobs - These knobs are just that. They will control the level/pad of the incoming signals.
2
VU Meters - Meters provide general indication of level. They are set to -4dB.
3
Direct In
4
Polarity Switch (0 to 180)
5
Pad Switch (+20dB)
6
Phantom On/Off - The Phantom Switch gives you the option to use various types of Microphones.
If you are using a Condenser Microphone please make sure you have the Phantom Switch in the on position. If
you turn the Phantom Power Switch off while the Mic is still plugged in there will be a 5 second delay before it is
completely off.
7
Tone Switch 1/2 - This switch will allow you to set your outputs to your configuration.
8
Tone Switch 3/4 - This switch will allow you to set your outputs to your configuration.
9
Heat Vents - Allow the flow and circulation of air to cool the tubes and transformers.
10
Power Switch - Large size for easy operation up and down (on/off).
11
Power Light Indicator - Red Jewel light indicator. When power is on the light will illuminate.
6
|
Stereo Tube Mic Pre, MP-2A™
Owner’s Manual
Functions (continued)
Back
12
AC Power Connector - For electrical outlet (Caution: please check to see what Voltage your MP-2A is set to). If
the Voltage Box is not marked according to your country’s code please notify A Designs before powering up.
13
Fuse Amperage - These are placed on the MP-2A to indicate which voltage your unit is set up for. USA Voltage
should be set to 120v. For export to countries with 220v, the correct box should be marked at the back of the unit.
If not marked or marked incorrectly, please notify A Designs before you turn your unit on!
14
Fuse Box - This box acts as a fuse container draw. The Fuse draw will slide in and out for easy access to change
your fuse, as necessary.
15
Heat Vents - Allow the flow and circulation of air to cool the tubes and transformers.
16
XLR Outputs (balanced) - The XLR output is balanced out and you have the option to change the output
ohms from the face of the MP-2A (600 ohms/ 10k) by using the OUTPUT Switch located on the front panel of
the MP-2A. XLR’s are clearly marked indicating which Channel is being used.
17
XLR Inputs (balanced) - The XLR input is used for Microphones. You can use the inputs for other instruments.
If you are using a condenser Microphone, please make sure your Phantom Power is in the on position. The
Phantom Power switch is located on the front panel. (See Illustration 1). XLR’s are clearly marked indicating
which Channel is being used.
18
Serial Number - If this serial number is removed or tampered with, your warranty will be void.
The MP-2A has a 2U rack space which fits nicely into any Studio Rack and will compliment your array.
UNIT SIZE:
Width:
Height:
Depth:
Weight:
Standard 19 inches for easy Rack Mount installation.
Standard 3.50 inches or 2U Rack Space.
10 inches
18 lbs 8.16 kg.
Stereo Tube Mic Pre, MP-2A™
Owner’s Manual
|
7
Applications
ALWAYS USE GOOD COMMON SENSE WHEN OPERATING ANY ELECTRONIC EQUIPMENT.
IF YOU HAVE QUESTIONS PLEASE CONTACT YOUR DEALER OR THE MANUFACTURER BEFORE
DOING ANYTHING!!!!!
A good, quality microphone preamp will add a full, warm sound to any type of recording or live performance.
Generally, we begin by setting our input signal to unity, then concentrate on other devices such as compressors or effects
for modifying the sound. But, this does not always have to be the case.
You will notice this unit is not cluttered with bells and whistles. Less is more. The MP-2A was designed for simplicity.
This has not restricted the sound, but enhanced it. This unit was designed to free your imagination to create music with
unencumbered tonal qualities.
Mic-pre settings, as a rule, begin with gain structure, unity or 0db. Although this seems a great place to start, this may not
always have the best application for your particular project. Try, what we call, “driving the tubes” on the MP-2A, instead
of introducing effects into a chain. Simply stated, try sending the input signal well into the red. Many producers and
engineers use this technique for bass guitars in rock/pop songs, and more recently, vocals in chorus.
Another technique audio engineers use, when recording an instrument in stereo, is to run one side in-phase and the other
side out-of-phase. This trick tends to deceive the stereo image and also defuses bass boom by canceling out frequencies.
It may sound unusual, but surprisingly, there are large numbers of published Audio CD’s where this technique has been
employed to improve the overall sound.
Apart from creating special effects, the MP-2A can be used to fix problematic recordings. An example of this would be
a drum track that has gone out-of-phase.
Try the following:
(1) Send the individual tracks to the MP-2A.
(2) Change the phase switch on one of the tracks. (3) Compare this with the bass response.
You will then be able to determine which tracks are in-phase and out-of-phase. This allows you to hear how much of the
sound you are missing.
Above all, it is important to experiment. Do not to leave the controls “set in stone.” Most professional audio engineers and
producers modify the mic-pre controls first, before moving on to a secondary unit.
NOTE: If you have a trick or tip that you would like to share with us, contact A Designs Audio, Inc. through our website or
mail us at:
A Designs Audio, Inc.
Attention: Applications
P.O. Box 4255
West Hills, CA 91304.
We will publish it on our website with your name, if you choose.
8
|
Stereo Tube Mic Pre, MP-2A™
Owner’s Manual
A-DESIGNS AUDIO INC.
PRO-AUDIO
P.O. Box 4255
West Hills, CA 91304 USA
(818) 716-4153
www.adesignsaudio.com