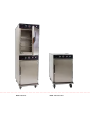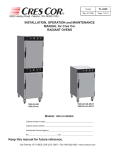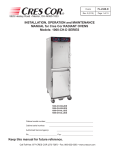
1
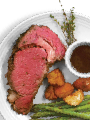
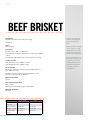
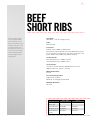
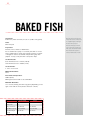
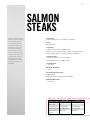
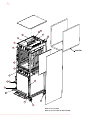
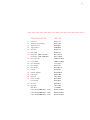
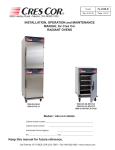
FL-2340-CB Rev. 2 (9/10) COOK-N-HOLD OVEN FOOD PREPARATION GUIDELINES CONTENTS INTRODUCTION3 basic operation low temperature cooking 4 operation instructions 6 Cooking advice 8 food holding basics 9 Cleaning instructions 10 cooking guidelines beef13 lamb27 pork31 poultry39 fish49 bakery55 potluck61 installation and maintenance 71 installation instructions 72 Maintenance instructions 74 replacement parts 75 wiring diagrams 78 how to reverse door opening 82 Index83 model 1000 CH SS Model 1000 CH SS Split 3 INTRODUCTION Chances are you’ve already done quite a bit of research regarding low temperature radiant heat cooking, or you’ve already worked with Cres Cor ovens in the past; either way you already know all about the benefits of having Cres Cor in your kitchen. More flavorful, more nutritious, juicier food and reduced labor and energy costs are not just bullet points in a sales brochure. These are realities in Cres Cor equipped kitchens the world over and will be a reality in your kitchen as well, but there is a learning curve. Cooking with low temperature radiant heat is different than cooking with conventional ovens. Cres Cor ovens are designed differently and demand cooking regimens designed to take full advantage of the benefits afforded by high humidity, ‘Low-N-Slow’ cooking. This book is designed to help you with that learning curve. Keep this book close at hand. It should not be filed with pamphlets like your mandolin warranty information and food processor operation manual. It is more than a run-of-the-mill instruction booklet with step-by-step instructions about how to turn knobs and flip switches. It is your base-line resource for mastering the art and science of low temperature radiant heat cooking in your Cres Cor oven. It will put you on the right track when designing your menu and kitchen regimen; greatly reducing the ‘trial-and-error’ period inherent in commissioning any new equipment. It will also serve you well for years to come as you redesign your menu, refine your kitchen work-flow and evolve your business model. You’ll notice that this book is set up in a format familiar to our customers. We hope that the friendly, cookbook feel will encourage you to use it often and store it among your most valuable reference materials. We also couldn’t resist the opportunity to talk food. You’ll find some interesting culinary tidbits along the way – not because they apply directly to the operation of your oven, but because we’re as passionate about food as you are. Also, we believe that a dry read is as bad as a dry prime rib, at Cres Cor, you’ll find neither. 4 low temperature cooking proteins and nutrition Protein plays a significant role in the diet, therefore, one of the primary goals in food preparation is proper cooking methods. Beef and other red meats are one of the best sources of protein; is a rich source of B vitamins such as thiamine, riboflavin, and niacin; and includes fats, carbohydrates, minerals, pigments, enzymes and water. All of these elements are affected by cooking, but many of them are destroyed by over-cooking. Low temperature cooking helps preserve unstable, heat-sensitive vitamins and nutrients. Fat also contributes greatly to the flavor of meat. With low temperature cooking, there is less chemical change to the fats and less fat melt resulting in a more flavorful finished product. The enzymes found in proteins break down the tissues and act as natural tenderizing agents. Low temperature cooking does not destroy enzymes, and particularly in the hold cycle, creates a natural chemical action to tenderize or age the meat right in the oven. For this reason, it is important to use fresh beef and it is essential to allow the product to remain in the hold cycle for at least the minimum amount of time suggested in the individual procedures. Key Benefit: The longer meat is left in the hold cycle the more tender it becomes, making the purchase of more expensive, aged meat unnecessary to serve at large functions. Meat is seventy-five percent water. Exposure to high temperatures cause this water to evaporate during cooking. Cooking at low temperatures in a Cres Cor Cook-N-Hold Oven retains the maximum amount of water content resulting in a juicier finished product and a higher meat yield. 5 Shrinkage Control and Cooking Time Along with better nutrition, a more tender finished product, less There are two major factors controlling meat shrinkage or cooking losses. the addition of as much salt as needed with conventional 1. Temperature at which meat is cooked: The higher the temperature at which meat is cooked the more shrinkage will result. Over-cooked meat also results in higher losses. Higher temperatures and overcooking draws moisture to the surface and this moisture evaporates or drips out of the meat. 2. Internal temperature of the meat: Like over-cooking, as meat is brought to a higher internal temperature shrinkage is increased. For these two reasons, it is suggested most cuts of red meat be cooked at 250°F (121°C) and that all cooking be based on internal product temperature. There are four major factors involved in determining cooking times for meat. 1. The degree of aging on the meat: Aged meat will cook faster, shrink more, and has a much shorter holding life than fresh meat. 2. Internal temperature before cooking: Meat should be placed in a preheated oven directly from a refrigerated temperature of 38°F to 40°F (3°C to 4°C). Meat cooked from a frozen state will require approximately one and one half to two times the normal cooking time. In addition, freezing ruptures tissue cells creating additional moisture loss during the cooking process and will result in more shrinkage. 3. Desired degree of : The higher the degree of internal temperature required, the longer the necessary cooking time. Cooking times in this guideline are based on the most popular internal product temperatures. 4. Quantity and quality of product. shrinkage, and higher moisture content, meat will not require cooking methods. Natural flavors are preserved. This is a significant factor in today’s health conscious diets. Meat cost reduction Low temperature cooking in a Cres Cor oven will drastically reduce meat shrinkage. For example: A food service operation using eight, 20 pound #168 Top Rounds per day, with an average shrinkage of 25 percent in a forced air convection oven, will lose about 5 pounds (2 kg) of meat from every roast. This results in a total loss of 14,600 pounds (6622 kg) of beef in just one year. Cres Cor ovens could reduce the shrink loss, resulting in an annual savings of 10,512 pounds (4768 kg) of beef. Don’t forget, with the tenderizing capabilities of Cres Cor ovens, less expensive grades of beef can be purchased. Moisture retention is the key to low shrinkage, and a more flavorful product. A long with the reduction of shrinkage, higher moisture content in the meat also reduces caving or serving losses. Labor cost reduction When the food product is placed in the oven and the controls are set, there is no need to check, or adjust the time or the temperature. This makes the Cres Cor ovens easy to operate. Key personnel are available to concentrate on other kitchen tasks. The automatic holding cycle provides consistent results without the need to “baby-sit” the roasting meat as in conventional ovens. Low temperature cooling also results in less grease splatter with quicker clean up times. 6 operation instructions THERMOSTAT “HOLD” TIMER POWER SWITCH THERMOMETER YELLOW LIGHT FOR FIRST-TIME OPERATION ONLY: A new oven needs to “burn off” factory oils and glue before it’s first use. Do NOT load food into oven until this has been done! 1. Push switch to “ON”. 2. Set the Cook thermostat to 325°F/163°C. 3. Set the Hold thermostat to 150°F/66°C. 4. Set the timer to 1 hour. 5. Allow oven to run automatically for 1 hour of Cook cycle and 30 minutes of Hold cycle. 6. Turn oven off and let cool. 7. Wipe inside clean with detergent and hot water. WARNING Air is VERY HOT when door is opened. THERMOSTAT “COOK” GREEN LIGHT 7 HOW TO START UNIT (after first-time operation) Push POWER switch “ON”. For Automatic Operation: 1. Set Cook thermostat to the cooking temperature you need. 2. Set Hold thermostat to the warming temperature you need. Proper food holding temperature is 140°F/60°C or higher. 3. Set Timer for the roasting time. The unit will automatically switch to the pre-set “hold” temperature after roasting time has expired. Holding Operation ONLY: Note: For Cooking or Holding modes, preheat unit to desired temperature for 30 minutes. Cold food is NOT to be added when unit is operating in Hold mode. 1. Set Hold thermostat to the temperature you need. 2. Set Timer at zero. How To Shut down Unit Push Switch to “OFF”. Note: Ventilating fans will continue to run until cabinet is cool. Do NOT disconnect the power supply to the cabinet while the ventilating fan is still operating. 8 Cooking advice • Always preheat the oven before loading food products. Refer to page 8 for specific instructions. • All cooking guidelines are based upon loading cold foods from a 38°F to 40°F refrigerator. Frozen and room tempered items will require adjustments in time. Frozen meats will required 1-1/2 to 2 times the normal time. • The oven doors must remain closed during cooking and the first hour of the holding process. If the door(s) is opened, some additional cooking time may be required. • “Carryover” cooking will take place during the initial hour of holding, following the 250°F cooking cycle. • Always use a sanitized thermometer when checking internal temperatures. • We all know that heat rises and that the top of larger cavity ovens are warmer at the top area. With full loads of roasts, the top pan position may result in a more well done product than the lower shelves. Load larger roasts at the top and the smaller items toward the bottom. • Chefs have used browning agents or carmel coloring on the surface of the raw meats to assist in enhancing the “eye appeal” of the cooked roast. • Expect condensation on the inside of the door during cooking. Some may escape through the vents and this is normal. The external drip tray is positioned to help capture the condensate. • Watch for drip pan overflow in situations where beef roasts are cooked beyond rare and involving full loads or overloading of the oven. • For additional cooking assistance, contact our culinary team at www.crescor.com 9 Preventing Bacteria Growth Cres Cor ovens provide safe, healthful cooking. According to an article printed in the Journal of Environmental Health, several health authorities agree–when cooking whole roasts or holding them for short periods, bacteria in this food is destroyed at an internal temperature of 125°F (51°C). food holding basics Every four years the FDA reviews and updates our FOOD CODE to provide guidelines to ensure the safety of the foods we consume. Many of the basic practices are “Set in Stone” Cres Cor ovens have been tested and results have proven conclusively that foods cooked at 250°F (51°C) are well within defined safety limits. In addition, the development of food-borne illnesses as a result of bacteria growth [such as clostridium perfringens] is greatly minimized by the automatic conversion from the cook to the hold cycle. for the benefit of all. The two critical factors that help us to control our food safety are time Another study conducted by W.L. Brown, Ph. D.; American Bacteriological and Chemical Research Corporation; Gainesville, Florida, titled Fate of salmonella Inoculated into Beef for Cooking. at or above the 140°F (60°C) range for service. Should the internal food temperature drop The surface of raw meat may humidity levels to insure moist holding for extended periods of time. Should you wish to become contaminated in processing, handling by the butcher or chef, or by other means. Food contamination can also be caused by unsanitary personal hygiene and work habits, clean slicers, knives, and probes, or by faulty operational procedures. It is important, therefore, that sanitary procedures be followed at all times during food preparation and handling. This is your main protection in guarding against food contamination. For additional information see the Cleaning and Maintenance section of this manual. reduce the moisture levels to insure moist holding for extended periods of time. Should you and temperature. Both are crucial to deter or destroy harmful bacterias and agents that exist in our every day food supply. The “Danger Zone” is continuously drilled into the repertoire of every food service worker. The most simple temperature range to remember is 40°F (4°C) to 140°F (60°C) as our “Danger Zone”. Cold foods must be held at or below 40°F (4°C) while hot food is to be maintained at or above 140°F (60°C). Between these two temperatures the growth of bacteria if prevalent. Another critical temperature to keeps in mind is the required 165°F (74°C) for reheated or rethermalized foods. These foods must attain the 165°F (74°C) mark, but can then be held below 140°F (60°C) the food MUST be reheated to 165°F (74°C) before service or disposed of. The holding cycle of your new Cres Cor Cook-N-Hold oven utilizes our radiant heat system without the use of circulating fans. As such, the holding environment will maintain the high wish to reduce the moisture levels in the cabinet, the vents on the oven are yours to control. We mentioned the importance of “time” and “temperature” in holding foods. So where does the “time” of holding come into play? Again, we refer to our FOOD CODE and will find the restrictions for roasting and holding of proteins. The only product that we may roast to an internal temperature of 130° is rare roast beef. The key here is that we are REQUIRED to hold that temperature for a minimum of 121 minutes for proper destruction of resident bacterias. Beef that is more well done will require less holding time as a minimum. Refer to the FDA FOOD CODE for detailed information on required times and temperatures for roasting all proteins. Remember, holding foods hot requires no less than 140°F (I60°C). The length of time you can hold and maintain quality will depend on your equipment, the type of food product and the quantity being held. Your personal level of quality or standards that you serve to your clientele is the absolute determining factor to decide if the food goes on a plate to the dinning room or into the compost pile when held to it’s limit. For culinary assistance, contact us at www.crescor.com – Bon Apetite 10 Cleaning instructions Equipment that is kept clean works better and lasts longer. This oven should provide you with many years of trouble-free service. No preventative maintenance is required, however, the following instructions will maximize the potential life and trouble-free operation of your new oven. WARNING Before cleaning the cabinet Unplug cord from wall. Allow cabinet to cool. Do NOT hose cabinet with water. Do NOT get water on controls. Do NOT use abrasives or harsh chemicals. Wipe up spills as soon as possible. Clean regularly to avoid heavy dirt build-up. Cleaning Daily 1. Disconnect the oven from the power source. 2. Remove and clean the wire shelves, side racks, and drip pans. 3. Clean the interior metal surfaces of the oven with a damp, clean cloth and a commercial detergent or oven cleaner. Use the mildest cleaning procedure that will do the job. 4. Use only a soft cloth, sponge, fibrous brushes, plastic or stainless steel pads for cleaning and scouring. 5. Always rub in the direction of polish lines to avoid scratching the surface. 6. Rinse thoroughly with fresh water after every cleaning operation. 7. Always wipe dry to avoid water marks. 8. NEVER Steam clean or powerwash an oven. 9. Always follow state or local health regulations regarding all cleaning and sanitation requirements for equipment. 10. Buy Cres Clean™ cleaner online at www.crescor.com for the best and safest exterior cleaning. exterior cleaning and polishing To help maintain the protective film coating on polished stainless steel, clean the exterior of the cabinet with Cres Clean. Check the condition of the oven periodically Check the oven for physical damage and loose parts. Correct any problems before they may interfere with the operation of the oven. 11 Check the cooling fan for the oven controls While the oven is running, check that the cooling fan in the top rear of the cabinet to make sure it is operating. MODELS: 1000-CH-SS & 1000-CH-SS-SPLIT STAINLESS STEEL CABINET Inside and Outside SOIL CLEANER Routine Cleaning Soap, ammonia or mild detergent* and water METHOD 1. Sponge on with cloth 2. Rinse Stubborn Spots, Stains Mild abrasive made for Stainless Steel 1. Apply with damp sponge or cloth Burnt on Foods or Grease Chemical oven cleaner made for Stainless Steel Follow oven cleaner manufacturer’s directions Hard Water Spots & Scale Vinegar 2. Rub lightly 1. Swab or wipe with cloth 2. Rinse and dry Remember: Cres Clean is the safest most effective exterior cleaning formula on the market. Order at www.crescor.com MODEL: 1000-CH-AL (Aluminum cabinet outside only with stainless steel doors and pan slides) SOIL CLEANER Dirt Mild detergent* and hot water, or mild abrasive cleaner METHOD 1. Use soft, damp cloth 2. Rinse with hot water 3. Wipe dry Steam (no strong alkaline additive) ALUMINUM CABINET 1. Rinse after steam cleaning 2. Wipe dry Fingerprints, Grease, Oil Detergent* and hot water 1. Wipe with soft, damp cloth 2. Rinse with hot water Outer body ONLY 3. Wipe dry Chemical oven cleaner made for aluminum Water Spots Follow oven cleaner manufacturer’s directions Mild abrasive cleaner Oily or waxy cleaner Apply with soft, clean cloth Mild abrasive cleaner Wipe with damp cloth *Mild detergents include soaps and non-abrasive cleaners. beef 14 BEEF BRISKET Ingredients: Fresh Beef Brisket, 9 to 13 lbs. (4 to 6 kg) The Brisket cut is taken from the breast section beneath the first five ribs, just behind the fore shank. Seasoning Vents: One-half open Preparation: Preheat oven to 250° for 30 minutes. Season Brisket and wrap individually in clear plastic wrap for cooking Place wrapped Brisket directly on wire shelves for cooking Set Thermostats: Cook Thermostat set to 250°F (121°C) Hold Thermostat set to 160°F (71°C) Set Cook Timer: 20 minutes per lb. for heaviest roast plus 30 minutes for each additional roast Example: set timer to 4 hours and 10 minutes to cook three (3) ten-pound (10 lb.) Briskets Minimum Hold Time: 6 hours Final Internal Temperature: 165°F (73°C) Overnight Cook–N–Hold highly recommended Maximum Hold Time: 24 hours FULL SIZE Cook-N-Hold SPLIT Cook-N-Hold Shelves / Pans 6 3 Items per Shelf / Pan 2 to 3 Briskets 2 to 3 Briskets Approximate Capacity 12 to 18 Briskets 6 to 9 Briskets Approximate Weight Capacity up to 200 lbs. up to 100 lbs. Brisket is cut in half for marketing and sold as a flat cut or a point cut. The flat cut is leaner, but the point cut has more flavor due to a bit of extra fat (called the deckel). The Cres Cor Cook-N-Hold oven is ideal for preparing Brisket, as the cut requires long, slow cooking at relatively low temperatures to break down the collagen in the connective muscle tissues to achieve tenderness. 15 BEEF short ribs Short ribs are small rectangles of beef, usually taken from the chuck cut. Short ribs consist of layers of fat and meat and contain small pieces of the rib bone. They are usually very tough and are a perfect dish to be cooked in a Cres Cor oven, as the slow and humid cooking environment maximizes the natural enzymatic action to tenderize the ribs. Ingredients: Short Ribs, 1 1/2 lbs. average (.7 kg) Vents: One-half open Preparation: Preheat oven to 250°F for 30 minutes. Season Short ribs as desired. Place ribs side-by-side in pans For an overnight cook and hold, cover pans loosely with clear plastic wrap to retain additional product moisture. Set Thermostats: Cook Thermostat set to 250°F (121°C) Hold Thermostat set to 160°F (71°C) Set Cook Timer: 4 hours for the first pan plus add 30 minutes for each additional pan (e.g. 3 pans = 5 hours) Minimum Hold Time: 6 hours Final Internal Temperature: 170°F (77°C to 88°C) MUST do an overnight Cook–N–Hold Maximum Hold Time: 18 hours FULL SIZE SPLIT Cook-N-Hold Cook-N-Hold Shelves / Pans 8 4 Items per Shelf / Pan 18 Short Ribs 18 Short Ribs Approximate Capacity 144 Short Ribs 72 Short Ribs Approximate Weight Capacity up to 240 lbs. up to 120 lbs. 16 BEEF strip loin Ingredients: Loin, Strip Loin, Short-Cut, Boneless, 8 to 12 lbs. (4 to 5 kg) Vents: One-half open Preparation: Preheat oven to 250°F for 30 minutes. Season roasts as desired. Place roasts directly on wire shelves with the fat side down. Place the larger roasts toward the top of the oven compartment. Set Thermostats: Cook Thermostat set to 250°F (121°C) Hold Thermostat set to 140°F (60°C) Set Cook Timer: 8 to 10 lb. Roasts (4 to 4.5 kg) 8 minutes per pound for the first roast (18 minutes per kilogram) plus add 8 minutes for each additional roast 12 lb. Roasts (5 kg) 10 minutes per pound for the first roast (22 minutes per kilogram) plus add 8 minutes for each additional roast Minimum Hold Time: 6 hours Final Internal Temperature: 130°F (54°C) Overnight Cook–N–Hold optional Maximum Hold Time: 12 hours FULL SIZE SPLIT Cook-N-Hold Cook-N-Hold Shelves / Pans 6 3 Items per Shelf / Pan 3 Roasts 3 Roasts Approximate Capacity 18 Roasts 9 Roasts Approximate Weight Capacity up to 216 lbs. up to 108 lbs. The strip loin comes from the most tender of all wholesale beef cuts, the short loin. It is the top loin muscle with the bone detached and sold under many different names including Kansas City Strip, New York Strip, Delmonico Steak, and when the bone is left in with a portion of the tenderloin, Club Steak, Porterhouse or T-bone. 17 Corned beef Historically, any meat cured with brine was called ‘corned’ (from the Old English word ‘corn’ which referred to any small particle; such as a grain of salt). Today Ingredients: Corned Beef, 9 to 12 lbs. (4 to 5 kg) there are two types of corned beef, the old-fashioned type, which is grayer in color and far saltier and the newer style which is rosy-red and less salty. Preparation: Preheat oven to 250°F for 30 minutes. Vents: One-half open Leave the corned beef in the original plastic bag and place the bag directly on the wire shelf. If desired, corn beef can be removed from the bag and wrapped in clear plastic wrap for cooking. Set Thermostats: Cook Thermostat set to 250°F (121°C) Hold Thermostat set to 160°F (71°C) Set Cook Timer: 20 minutes per pound for the first corned beef (44 minutes per kilogram) plus add 30 minutes for each additional corned beef Minimum Hold Time: 6 or more hours Final Internal Temperature: 175°F (79°C) MUST do an overnight Cook–N–Hold Maximum Hold Time: 24 hours FULL SIZE SPLIT Cook-N-Hold Cook-N-Hold Shelves / Pans 6 3 Items per Shelf / Pan 2 to 3 Roasts 2 to 3 Roasts Approximate Capacity 12 to 18 Roasts 6 to 9 Roasts Approximate Weight Capacity up to 200 lbs. up to 100 lbs. 18 Hamburgers Ingredients: Ground Beef (thawed, not frozen), 4 oz. (.25 kg) per patty (minimum) Vents: One-half open Preparation: Preheat oven to desired temperature for 30 minutes. Place hamburger patties side-by-side directly on sheet pans Set Thermostats: Cook Thermostat set to 250°F to 275°F (121°C to 135°C) Hold Thermostat set to 150°F (66°C) Set Cook Timer: Approximately 1 hour. Cooking time depends on the desired degree of doneness. Check internal product temperature before removing the product from the oven. Always follow local health regulations for internal temperature requirements Minimum Hold Time: None Final Internal Temperature: 165°F (74°C) Overnight Cook–N–Hold not recommended Maximum Hold Time: 4 hours FULL SIZE Cook-N-Hold SPLIT Cook-N-Hold Shelves / Pans 8 4 Items per Shelf / Pan 24 Hamburgers 24 Hamburgers Approximate Capacity 192 Hamburgers 96 Hamburgers Approximate Weight Capacity up to 200 lbs. up to 100 lbs. It is said that 19th Century sailors brought the concept of raw, shredded beef (beef tartare) from the Balkans to the port of Hamburg, Germany. The food caught on quickly and, to make it more palatable, an anonymous German Chef formed it into a patty and cooked it. In America, where the hamburger accounts for 40% of all pre-prepared food sold, history records its first appearance at the Louisiana Purchase Exposition in 1904. 19 Prime rib The term ‘prime rib’ is often incorrectly used as a label for what is actually a rib roast. Culinarily, the term ‘prime’ refers to the highest USDA grade of beef. Very little USDA Prime Beef makes it past the best hotels and restaurants. Whether USDA Prime or Choice, Prime Rib is best cooked low and slow. A Cres Cor oven and humidity-controlled radiant heat is the obvious choice in preparing the best, juiciest Prime Rib. Ingredients: Beef Rib, Roast Ready, with Fat Cap, #109, 20 lb. (9kg) Average Weight Vents: One-half open Preparation: Preheat oven to 250°F for 30 minutes. Season roast as desired. Place Roasts directly on wire shelves. Set Thermostats: Cook Thermostat set to 250°F (121°C) Hold Thermostat set to 140°F (60°C) Set Cook Timer: 10 minutes per pound for the first roast (22 minutes per kilogram) plus add 30 minutes for each additional roast Minimum Hold Time: 4 to 6 hours Final Internal Temperature: 130°F (54°C) Overnight Cook–N–Hold highly recommended Maximum Hold Time: 24 hours FULL SIZE SPLIT Cook-N-Hold Cook-N-Hold Shelves / Pans 6 3 Items per Shelf / Pan 2 Roasts 2 Roasts Approximate Capacity 12 Roasts 6 Roasts Approximate Weight Capacity up to 240 lbs. up to 120 lbs. 20 beef round Ingredients: Beef Round, Top (Inside), Untrimmed, 14 to 23 lb. (6 to 10 kg) Beef Round, Bottom (Gooseneck), Untrimmed, 14 to 23 lb. (6 to 10 kg) Vents: One-half open Preparation: Preheat oven to 250°F for 30 minutes. Season as desired. Place roasts directly on wire shelves with the fat side down. Place the larger roasts toward the top of the oven compartment. Set Thermostats: Cook Thermostat set to 250°F (121°C) Hold Thermostat set to 140°F (60°C) Set Cook Timer: 14 lb. Roasts (6 kg) 10 minutes per pound for the first roast (22 minutes per kilogram) plus add 15 minutes for each additional roast 15 to 23 lb. Roasts (7 to 10 kg) 10 minutes per pound for the first roast (22 minutes per kilogram) plus add 30 minutes for each additional roast Minimum Hold Time: 14 lb. Roasts (6 kg) 4 to 6 hours 15 to 23 lb. Roasts (7 to 10 kg) 8 to 10 hours Final Internal Temperature: 130°F (54°C) Rare Overnight Cook–N–Hold can be done with this cut Maximum Hold Time: 14 lb. Roasts (6 kg) 12 hours 15 to 23 lb. Roasts (7 to 10 kg) 24 hours FULL SIZE Cook-N-Hold SPLIT Cook-N-Hold Shelves / Pans 6 3 Items per Shelf / Pan 2 to 3 Roasts 2 to 3 Roasts Approximate Capacity 12 to 18 Roasts 6 to 9 Roasts Approximate Weight Capacity up to 240 lbs. up to 120 lbs. This section of the hind leg of beef extends from rump to ankle and is not as naturally tender as some cuts. Each of the five major cuts; rump, top round, sirloin tip, bottom round and eye of round are best cooked in the moisturecontrolled, radiant heat of a Cres Cor oven because of the natural enzymatic tenderizing action that this environment fosters. 21 ribeye A Ribeye Roll is the center, most desirable and tender portion of the rib section with the bones removed and rolled and tied into a cylinder. Ingredients: Beef Ribeye Roll, Lip On, #112A, 8 to 12 lb. (3 to 5 kg) Vents: One-half open Preparation: Preheat oven to 250°F for 30 minutes. Season ribeye as desired. Place roasts directly on the wire shelves, fat side down. Place larger roasts toward the top of the oven compartment. Set Thermostats: Cook Thermostat set to 250°F (121°C) Hold Thermostat set to 140°F (60°C) Set Cook Timer: 8 to 11 lb. Roast (4 to 5 kg) 8 minutes per pound for the first roast (18 minutes per kilogram) plus add 10 minutes for each additional roast 12 lb. Roasts (5 kg) 10 minutes per pound for the first roast (22 minutes per kilogram) plus add 10 minutes for each additional roast Minimum Hold Time: 4 hours Final Internal Temperature: 130°F (54°C) Overnight Cook–N–Hold optional Maximum Hold Time: 12 hours FULL SIZE SPLIT Cook-N-Hold Cook-N-Hold Shelves / Pans 6 3 Items per Shelf / Pan 3 Roasts 3 Roasts Approximate Capacity 18 Roasts 9 Roasts Approximate Weight Capacity up to 240 lbs. up to 120 lbs. 22 cafeteria or steamship Ingredients: Any one of a variety of beef round used for carving on a buffet line. Weight Range, 40 to 50 lb. (18 to 23 kg) or 50 to 80 lb. (23 to 36 kg) Vents: One-half open Preparation: Preheat oven to 250°F for 30 minutes. Operator should double up wire shelves due to heavy weight. May be bone-in or boneless and may have a handle on or off as required. Meat should be at a refrigerated internal temperature of 38°F to 40°F (3 to 4°C) when placed in a preheated oven. Set Thermostats: Cook Thermostat set to 250°F (121°C) Hold Thermostat set to 150°F (66°C) Set Cook Timer: 40 to 50 lb. (18 to 23 kg) 10 minutes per pound for the first roast (22 per kilogram) plus add 15 minutes for a second roast 50 to 80 lb. (23 to 36 kg) one roast only, 7 minutes per pound (15 minutes per kilogram) Minimum Hold Time: 40 to 50 lb. (18 to 23 kg) 6 to 8 hours 50 to 80 lb. (23 to 36 kg) 8 to 12 hours Final Internal Temperature: 138°F (54°C) MUST do an Overnight Cook–N–Hold Maximum Hold Time: 24 hours FULL SIZE Cook-N-Hold SPLIT Cook-N-Hold Shelves / Pans 2 1 Items per Shelf / Pan 1 to 2 Roasts 1 to 2 Roasts Approximate Capacity 4 Roasts 2 Roasts Approximate Weight Capacity up to 240 lbs. up to 120 lbs. Steamship or Cafeteria Round is the name butchers give to a cut that includes some of the sirloin, most of the rump, the silverside, the topside, the thick flank and the leg. In other words, pretty much most of the animal’s hind quarter. The cut can be as small as 30 lbs, though cuts up to 50 lbs. would not be uncommon depending on the discretion of the butcher and how heavy handed he is in trimming. The Steamship or Cafeteria Round is a useful cut when feeding a large number of people. It can be pre-portioned or served from a carving station. 23 Tenderloin Tenderloin, along with the top loin cut make up the tenderest of all wholesale cuts of beef, the short loin. Sometimes marketed as chateaubriands, the tenderloin is most often cut into filet mignon or tournedos steaks. Ingredients: Beef Loin, Full Tenderloin, Side Muscle Off, Shinned, 4 to 6 lb. (2 to 3 kg) Vents: One-half open Preparation: Preheat oven to desired temperature for 30 minutes. Season as desired. Place tenderloins directly on wire shelves. Set Thermostats: Cook Thermostat set to 250°F to 275°F (121°C to 135°C) Hold Thermostat set to 140°F (60°C) Set Cook Timer: Full load to rare, 1 hour Minimum Hold Time: 1 hour Final Internal Temperature: 130°F (54°C) Rare Overnight Cook–N–Hold not recommended Maximum Hold Time: 6 hours FULL SIZE SPLIT Cook-N-Hold Cook-N-Hold Shelves / Pans 6 3 Items per Shelf / Pan 5 Tenderloins 5 Tenderloins Approximate Capacity 30 Tenderloins 15 Tenderloins Approximate Weight Capacity up to 180 lbs. up to 90 lbs. 24 Veal loin Ingredients: Veal Loin, Trimmed, 8 to 10 lb. (4 to 5 kg) Vents: One-half open Preparation: Preheat oven to 250°F for 30 minutes. Season as desired and place directly on wire shelves Set Thermostats: Cook Thermostat set to 250°F (121°C) Hold Thermostat set to 140°F (60°C) Set Cook Timer: 12 minutes per pound for the first roast (26 minutes per kilogram) plus add 20 minutes for each additional roast. Minimum Hold Time: 1 hour Final Internal Temperature: 140°F (60°C) Overnight Cook–N–Hold not recommended. Maximum Hold Time: 10 hours FULL SIZE SPLIT Cook-N-Hold Cook-N-Hold Shelves / Pans 6 3 Items per Shelf / Pan 3 Roasts 3 Roasts Approximate Capacity 18 Roasts 9 Roasts Approximate Weight Capacity up to 180 lbs. up to 90 lbs. When selecting veal, color is your best guide to quality. The flesh should be very light (true veal calves are never allowed to eat grain or grasses which would darken the flesh). Creamy white flesh, barely tinged pink is best. The fat should be pure white. So-called veal that is pink to red is older than it should be. Cres Cor ovens are a natural choice for cooking veal; the humid cooking cavity of Cres Cor ovens compensate for veal’s natural lack of fat. lamb 28 lamb leg Ingredients: Lamb Leg, Tied, 8 to 11 lb. (4 to 5 kg) Vents: One-half open Preparation: Preheat oven to desired temperature for 30 minutes. Season as desired. Place directly on wire shelves. Set Thermostats: Cook Thermostat set to 250°F to 275°F (121°C to 135°C) Hold Thermostat set to 140°F (60°C) Set Cook Timer: 10 minutes per pound for the first roast (22 minutes per kilogram) plus add 15 minutes for each additional roast Minimum Hold Time: 2 hours Final Internal Temperature: 130°F (54°C) Rare 135°F (57°C) Medium Rare 145°F (63°C) Medium 150°F (66°C) Medium Well 160°F (71°C) Well Done Overnight Cook–N–Hold optional Maximum Hold Time: 10 hours FULL SIZE SPLIT Cook-N-Hold Cook-N-Hold Shelves / Pans 6 3 Items per Shelf / Pan 4 Roasts 4 Roasts Approximate Capacity 24 Roasts 12 Roasts Approximate Weight Capacity up to 240 lbs. up to 120 lbs. A sheep less than one year old is considered a lamb. Baby lamb and Spring lamb are both milk fed and are typically less than 5 months old. Their flesh should be milky white and very tender. Regular lamb has started feeding on grasses and grains and is between 5 and 12 months old. Its flesh is pinkish-red and less tender than its younger counter-parts. 29 Lamb racks (frenched) A rack of lamb is typically a portion of the rib section of a yearling lamb (between 12 and 24 months old). Ingredients: Lamb Rack, Roast Ready, Single, Frenched 7-bone Vents: One-half open Preparation: Preheat oven to 250°F for 30 minutes. Season as desired. Place on raised wire grids inside sheet pans. Set Thermostats: Cook Thermostat set to 250°F (121°C) Hold Thermostat set to 160°F (71°C) Set Cook Timer: 1 1/2 hours Minimum Hold Time: 1 hour Final Internal Temperature: 135°F to 140°F (57°C to 60°C) Overnight Cook–N–Hold not recommended Maximum Hold Time: 4 hours FULL SIZE SPLIT Cook-N-Hold Cook-N-Hold Shelves / Pans 8 4 Items per Shelf / Pan 20 to 24 Lamb Racks 20 to 24 Lamb Racks Approximate Capacity 192 Lamb Racks 96 Lamb Racks Approximate Weight Capacity up to 240 lbs. up to 120 lbs. pork 32 fresh ham Ingredients: Pork Fresh Ham, 14 to 17 lb. (6 to 8 kg) Vents: One-half open Preparation: Preheat oven to desired temperature for 30 minutes. Season as desired and place directly on wire shelves Set Thermostats: Cook Thermostat set to 250°F to 275°F (121°C to 135°C) Hold Thermostat set to 160°F (71°C) Set Cook Timer: 12 minutes per pound for the first ham (26 minutes per kilogram) plus add 30 minutes for each additional ham Minimum Hold Time: 2 hours Final Internal Temperature: 160°F (71°C) Overnight Cook–N–Hold optional Maximum Hold Time: 10 hours FULL SIZE SPLIT Cook-N-Hold Cook-N-Hold Shelves / Pans 6 3 Items per Shelf / Pan 2 to 3 Hams 2 to 3 Hams Approximate Capacity 12 to 18 Hams 6 to 9 Hams Approximate Weight Capacity up to 240 lbs. up to 120 lbs. The cut of meat from a hog’s hind leg from the middle of the shank to the hip is known as the ham, though the actual length of the cut is widely varied by producer. The final flavor of a ham depends on a number of factors including the hog’s breed and diet. Most hogs are corn-fed, but hogs raised for gourmet markets are fed a variety of treats such as peanuts, acorns, beechnuts and chestnuts. 33 cured and smoked ham Curing can be done through a variety of methods that range from simple salt curing (covering the surface of the ham with salt and allowing it to permeate the flesh) to curing with sugar and sweet brine. Smoke flavor is dependent on the residue (reek) left by the smoke on the flesh. Maple and Hickory are the woods of preference for most smoking, but some producers add more adventurous ingredients such as juniper berries, mesquite, sage, rosemary and peat. Ingredients: Ham, Boneless, Skinless, Cured and Smoked, 10 to 14 lb. (4.5 to 6 kg) Vents: One-half open Preparation: Preheat oven to desired temperature for 30 minutes. Place ham directly on wire shelves for cooking Set Thermostats: Cook Thermostat set to 250°F to 275°F (121°C to 135°C) Hold Thermostat set to 160°F (71°C) Set Cook Timer: 12 minutes per pound for the first ham (26 minutes per kilogram) plus add 30 minutes for each additional ham Minimum Hold Time: 1 to 2 hours Final Internal Temperature: 160°F (71°C) Overnight Cook–N–Hold optional Maximum Hold Time: 10 hours FULL SIZE SPLIT Cook-N-Hold Cook-N-Hold Shelves / Pans 6 3 Items per Shelf / Pan 3 Hams 3 Hams Approximate Capacity 18 Hams 9 Hams Approximate Weight Capacity up to 240 lbs. up to 120 lbs. 34 pork loin Ingredients: Pork Loin, Boneless, Tied, 8 to 10 lb. ( 4 to 5 kg) Vents: One-half open Preparation: Preheat oven to desired temperature for 30 minutes. Season as desired and place roasts directly on wire shelves for cooking. Set Thermostats: Cook Thermostat set to 250°F to 275°F (121°C to 135°C) Hold Thermostat set to 160°F (71°C) Set Cook Timer: 15 minutes per pound for the first roast (33 minutes per kilogram) plus add 30 minutes for each additional roast Minimum Hold Time: 1 to 2 hours Final Internal Temperature: 160°F (71°C) Overnight Cook–N–Hold highly recommended Maximum Hold Time: 10 hours FULL SIZE SPLIT Cook-N-Hold Cook-N-Hold Shelves / Pans 6 3 Items per Shelf / Pan 3 Roasts 3 Roasts Approximate Capacity 18 Roasts 9 Roasts Approximate Weight Capacity up to 180 lbs. up to 90 lbs. 35 Pork shoulder Ingredients: Pork Shoulder, Boston Butt, Boneless, 8 to 10 lb. (4 to 5 kg) Vents: One-half open Preparation: Preheat oven to 250°F for 30 minutes. Season as desired and place in pans. Set Thermostats: Cook Thermostat set to 250°F (121°C) Hold Thermostat set to 160°F (71°C) Set Cook Timer: 15 minutes per pound for the first roast (33 minutes per kilogram) plus add 30 minutes for each additional roast Minimum Hold Time: 2 hours Final Internal Temperature: 165°F to 170°F (74°C to 77°C) Overnight Cook–N–Hold highly recommended Maximum Hold Time: 12 hours FULL SIZE SPLIT Cook-N-Hold Cook-N-Hold Shelves / Pans 6 3 Items per Shelf / Pan 2 Roasts 2 Roasts Approximate Capacity 12 Roasts 6 Roasts Approximate Weight Capacity up to 120 lbs. up to 60 lbs. 36 Pork ribs Ingredients: Spareribs, 1 and 1 half down (38 kg or less) or Pork Loin, Back Ribs 1 and 1 half down (38 kg or less) Vents: One-half open Preparation: Preheat oven to 250°F for 30 minutes. Ribs can be cooked from frozen or thawed. Season as desired. Place ribs on sheet pans, slightly overlapping and cover with clear plastic wrap only if cooking overnight. If desired, barbecue sauce can be included with initial seasoning to allow it to cook into the ribs. Additional barbecue sauce can be added after completing the hold cycle. Set Thermostats: Cook Thermostat set to 250°F (121°C) The origin of the name “spare ribs” is not clear. Charles Perry of the Los Angeles Times has suggested: “In 17th century England, spareribs were also called spear-ribs or even ribspare, a clear tip-off that this wasn’t a native English word. It was Hold Thermostat set to 160°F (71°C) Set Cook Timer: Thawed Ribs 2 1/2 to 3 1/2 hours Frozen Ribs 3 1/2 to 4 1/2 hours Minimum Hold Time: 1 1/2 hours borrowed from the German rippespeer, which is smoked pork loin.”[1] Final Internal Temperature: 160°F to 170°F (71°C to 77°C) Well Done An alternative explanation is that these ribs are ‘spare’ in the sense that they are a secondary set of ribs branching off the primary set of ribs, which are attached directly to the pig’s spine. Overnight Cook–N–Hold optional Maximum Hold Time: 12 hours FULL SIZE Cook-N-Hold Spare ribs are taken from the belly side of the rib cage, below the section of back ribs and above the sternum (breast bone). Spareribs contain more bone than meat and also quite a bit of fat which can make the ribs more tender than back ribs. St. Louis Style spareribs are spareribs where the sternum bone, cartilage and rib tips have been removed. Kansas City style ribs are trimmed even more closely than the St. Louis style ribs, and have the hard bone removed. SPLIT Cook-N-Hold Shelves / Pans 10 5 Items per Shelf / Pan 6 Whole Slabs 6 Whole Slabs Approximate Capacity 60 Whole Slabs 30 Whole Slabs Approximate Weight Capacity up to 240 lbs. up to 120 lbs. poultry 40 chicken breasts Ingredients: Chicken Breasts, Boneless, 8 oz. (227 grams) Vents: Open full Preparation: Preheat oven to 275°F for 30 minutes. Place chicken breasts on sheet pans, side-by-side, not quite touching. Brush chicken with oil, butter or margarine, and lightly sprinkle with salt, pepper, and paprika. Set Thermostats: Cook Thermostat set to 275°F (135°C) Hold Thermostat set to 160°F (71°C) Set Cook Timer: 1 1/2 to 2 hours for the first pan plus add 30 minutes for each additional pan Minimum Hold Time: None Final Internal Temperature: 185°F (85°C) Overnight Cook–N–Hold not recommended Maximum Hold Time: 6 hours FULL SIZE SPLIT Cook-N-Hold Cook-N-Hold Shelves / Pans 16 8 Items per Shelf / Pan 20 to 25 Chicken Breasts 20 to 25 Chicken Breasts Approximate Capacity 400 Chicken Breasts 200 Chicken Breasts Approximate Weight Capacity up to 240 lbs. up to 120 lbs. Chicken as a meat; has been depicted in Babylonian carvings from around 600 BC. Chicken was one of the most common meats available in the Middle Ages. It was widely believed to be easily digested and considered to be one of the most neutral foodstuffs. It was eaten over all of Europe and a number of different kinds of chicken such as capons, pullets and hens were eaten. In the United States, chicken is the #1 most eaten meat. It overtook beef and pork because of shortages during World War II. In Europe, consumption of chicken overtook that of beef and veal in 1996 because of increased consumer awareness of pork and beef-borne illnesses. 41 chicken halves Ingredients: Chicken, 2 1/2 to 2 3/4 lb. (1.1 to 1.2 kg) Vents: Open full Preparation: Preheat oven to desired temperature for 30 minutes. Clean chicken and remove excess fat. Brush chicken with oil, butter or margarine. Season as desired and sprinkle with paprika. Set Thermostats: Cook Thermostat set to 275°F to 300°F (135°C to 149°C) Hold Thermostat set to 160°F (71°C) Set Cook Timer: 2 1/2 to 3 hours Minimum Hold Time: 30 minutes Final Internal Temperature: 185°F (85°C) Overnight Cook–N–Hold not recommended Maximum Hold Time: 8 hours FULL SIZE SPLIT Cook-N-Hold Cook-N-Hold Shelves / Pans 8 4 Items per Shelf / Pan 12 Halves or 40 Pieces 12 Halves or 40 Pieces Approximate Capacity 96 Halves or 320 Pieces 48 Halves or 160 Pieces Approximate Weight Capacity up to 240 lbs. up to 120 lbs. 42 Chicken Ingredients: Chicken, Whole, 2 1/4 to 2 3/4 lb. (1 to 1.2 kg) Vents: Open full Preparation: Preheat oven to desired temperature for 30 minutes. Place 9 Whole Chickens per 1 sheet pan (18in x 26in x 1in) Clean chicken and remove excess fat. Brush chicken with oil, butter or margarine. Season as desired and sprinkle with paprika. For better whole bird appearance, fold chicken wings and tuck under the back of bird. Make a slit in the skin of the chicken at the lower end, cross chicken legs and insert both legs through the slit. Set Thermostats: Cook Thermostat set to 275°F to 300°F (135°C to 149°C) Hold Thermostat set to 160°F (71°C) Set Cook Timer: 3 to 3 1/2 hours for the first pan plus add 30 minutes for each additional pan. Minimum Hold Time: 1 hour Final Internal Temperature: 185°F (85°C) Overnight Cook–N–Hold optional Maximum Hold Time: 8 to 10 hours FULL SIZE SPLIT Cook-N-Hold Cook-N-Hold Shelves / Pans 6 3 Items per Shelf / Pan 9 Chickens 9 Chickens Approximate Capacity 54 Chickens 27 Chickens Approximate Weight Capacity up to 150 lbs. up to 75 lbs. Modern varieties of chicken such as the Cornish Cross, are bred specifically for meat production, with an emphasis placed on the ratio of feed to meat produced by the animal. The most common breeds of chicken consumed in the US are Cornish and White Rock. Chickens raised specifically for meat are called broilers. In the United States, broilers are typically butchered at a young age. Modern Cornish Cross hybrids, for example, are butchered as early as 8 weeks for fryers and 12 weeks for roasting birds. Capons (castrated cocks) produce more and fattier meat. For this reason, they are considered a delicacy and were particularly popular in the Middle Ages. 43 cornish game hen Despite the name, Cornish game hens are neither necessarily hens nor hunted as game. They can be either male or female and a cross-bred domesticated variety with no wild counterpart. Though poultry sold as Cornish Game Hens are often immature Cornish or Rock chickens, the USDA’s only requirement is that chickens sold as Cornish Game Hens be no more than 2 pounds in ready-to-cook weight. Ingredients: Rock Cornish Game Hens 12 oz. (340 grams) each Vents: Open full Preparation: Preheat oven to 275°F for 30 minutes. Place 18 Hens per 1 sheet pan (18in x 26in x 1in) Clean hens and remove excess fat. Fold wings and tuck under the back of the bird. Make a slit in the skin of the hen at the lower end, cross hen legs and insert both legs through the slit. Brush hens with oil, butter or margarine. Season as desired and sprinkle with paprika. Space evenly on sheet pans. Set Thermostats: Cook Thermostat set to 275°F (135°C) Hold Thermostat set to 160°F (71°C) Set Cook Timer: 3 to 3 1/2 hours Minimum Hold Time: 1 hour Final Internal Temperature: 175°F (79°C) Overnight Cook–N–Hold not recommended Maximum Hold Time: 4 to 6 hours FULL SIZE SPLIT Cook-N-Hold Cook-N-Hold Shelves / Pans 8 4 Items per Shelf / Pan 18 Hens 18 Hens Approximate Capacity 144 Hens 72 Hens Approximate Weight Capacity up to 108 lbs. up to 54 lbs. 44 whole duck Ingredients: Duck, Whole, 4 to 5 lb. (2 kg) Vents: Open full Preparation: Preheat oven to 300°F for 30 minutes. Season as desired. Rub with oil and paprika. Place directly on wire shelves. Set Thermostats: Cook Thermostat set to 300°F (149°C) Hold Thermostat set to 160°F (71°C) Set Cook Timer: 2 1/2 to 3 hours The meat of a duck is mostly on the breast and the legs. The meat of the legs is darker and somewhat fattier than the meat of the breasts, although the breast meat is darker than the breast meat of a chicken or a turkey. Being waterfowl, ducks have a layer of heat-insulating subcutaneous fat between the skin and the meat. Boneless duck breast is also called “magret” and can be grilled like steak, usually leaving the skin and fat on. Internal organs such as heart and kidneys may also be eaten; the liver in particular is often used as a substitute for goose liver in foie gras. Minimum Hold Time: 1 hour Final Internal Temperature: 185°F to 190°F (85°C to 88°C) A duck has less meat than a roasting chicken of the same overall size. Cooks when portioning roast duck should give a quarter of a duck per portion. Attempts to get more portions out of a roast duck tend to result in some portions having a fair amount of meat and other portions being mostly skin and bone. Overnight Cook–N–Hold not recommended Maximum Hold Time: 8 hours FULL SIZE SPLIT Cook-N-Hold Cook-N-Hold Shelves / Pans 6 3 Items per Shelf / Pan 4 Ducks 4 Ducks Approximate Capacity 24 Ducks 12 Ducks Approximate Weight Capacity up to 120 lbs. up to 60 lbs. 45 whole turkey Turkeys were taken to Europe by the Spanish who had found them as a favorite domesticated animal among the Aztecs. Since the modern domesticated turkey is a descendant of the Wild Turkey, it is surmised that the Aztecs had chosen to domesticate this species rather than the Ocellated Turkey which is found in far southern Mexico. The Aztecs relied on the turkey (Mexican Spanish guajolote, from Nahuatl huexolotl) as a major source of protein (meat and eggs), and also utilized its feathers extensively for decorative purposes. The turkey was associated with their trickster god Tezcatlipoca, perhaps because of its humorous behavior, an aspect which it has retained up to the present. In Mexico today, turkey meat with mole sauce (mole de guajolote) is widely regarded as the unofficial national dish. Ingredients: Turkey, Whole, 25 lb. (11 kg) Vents: Open full Preparation: Preheat oven to 250°F for 30 minutes. Turkey must be fully thawed. Season as desired. Rub with oil, butter or margarine, and sprinkle with paprika. Place directly on wire selves. Set Thermostats: Cook Thermostat set to 250°F (121°C) Hold Thermostat set to 160°F (71°C) Set Cook Timer: 10 minutes per pound for the first turkey (22 minutes per kilogram) plus add 30 minutes for each additional turkey Minimum Hold Time: 1 to 2 hours Final Internal Temperature: 185°F (85°C) Overnight Cook–N–Hold highly recommended Maximum Hold Time: 10 hours FULL SIZE SPLIT Cook-N-Hold Cook-N-Hold Shelves / Pans 4 2 Items per Shelf / Pan 2 Turkeys 2 Turkeys Approximate Capacity 8 Turkeys 4 Turkeys Approximate Weight Capacity up to 200 lbs. up to 100 lbs. 46 turkey breast Ingredients: Turkey Breast, 10 to 15 lb. (5 to 7 kg) Vents: Open full Preparation: Preheat oven to desired temperature for 30 minutes. Turkey breast should be at a refrigerated temperature of 38°F to 40°F (3°C to 4°C) when placed in a preheated oven. Season as desired. Brush with oil, butter or margarine, and sprinkle with paprika. Place breasts directly on wire shelves. Set Thermostats: Cook Thermostat set to 250°F to 275°F (121°C to 135°C) Hold Thermostat set to 160°F (71°C) Set Cook Timer: 3 1/2 to 4 1/2 hours Minimum Hold Time: 1 hour Final Internal Temperature: 180°F (82°C) Overnight Cook–N–Hold optional Maximum Hold Time: 10 hours FULL SIZE Cook-N-Hold SPLIT Cook-N-Hold Shelves / Pans 6 3 Items per Shelf / Pan 3 Turkey breasts 3 Turkey breasts Approximate Capacity 18 Turkey breasts 9 Turkey breasts Approximate Weight Capacity up to 240 lbs. up to 120 lbs. fish 50 baked fish Ingredients: Fish Fillets, Fresh or Frozen, 6 to 8 oz. (170 to 227 grams) Vents: One-half open Preparation: Preheat oven to 275°F for 30 minutes. Do not thaw fillets. Spray or coat sheet pans with oil. Place fillets side-by-side on sheet pans. Brush fish with oil, butter or margarine. Season as desired and sprinkle lightly with paprika. Loosely cover pans with clear plastic wrap. Set Thermostats: Cook Thermostat set to 275°F (135°C) Hold Thermostat set to 160°F (71°C) Set Cook Timer: 1 1/2 to 2 1/2 hours Minimum Hold Time: None Final Internal Temperature: 180°F (82°C) Overnight Cook–N–Hold not recommended Maximum Hold Time: 3 to 4 hours (holding time will vary greatly depending on the type of fish and the initial product moisture content) FULL SIZE SPLIT Cook-N-Hold Cook-N-Hold Shelves / Pans 16 8 Items per Shelf / Pan 20 to 24 Fillets 20 to 24 Fillets Approximate Capacity 320 to 384 Fillets 160 to 192 Fillets Approximate Weight Capacity up to 240 lbs. up to 120 lbs. When purchasing raw, frozen fish fillets, make sure it’s solidly frozen in a tightly wrapped, undamaged, moisture and vapor-proof material. Unwrapped, it should have no odor. Any icy, dark, dry or white spots indicate deterioration. Avoid any fish that appears to have been thawed and re-frozen. 51 Salmon steaks Salmon are anadromous, meaning that they can survive in both fresh and salt water. Though marine in nature, Salmon return to the same freshwater streams that they were born in to spawn. This has lead to Salmon becoming land-locked in fresh water lakes and rivers. Freshwater salmon do not have the same nuanced flavor as do their marine counterparts. Although farm-raised salmon are typically raised in salt water, they are not as flavorful as their wild brethren. Ingredients: Salmon Steaks, 6 to 8 oz. (170 to 227 grams) Vents: One-half open Preparation: Preheat oven to 275°F for 30 minutes. Spray or coat sheet pans with oil, butter or margarine. Place steaks side-by-side on sheet pans. Season as desired. Set Thermostats: Cook Thermostat set to 275°F (135°C) Hold Thermostat set to 160°F (71°C) Set Cook Timer: 1 1/2 hours Minimum Hold Time: 1 hour Final Internal Temperature: 150°F (66°C) Overnight Cook–N–Hold not recommended Maximum Hold Time: 3 to 4 hours FULL SIZE SPLIT Cook-N-Hold Cook-N-Hold Shelves / Pans 10 5 Items per Shelf / Pan 15 Salmon Steaks 15 Salmon Steaks Approximate Capacity 150 Salmon Steaks 75 Salmon Steaks Approximate Weight Capacity up to 75 lbs. up to 40 lbs. 52 trout Ingredients: Trout, Whole, 1 lb. (454 grams) Vents: One-half open Preparation: Preheat oven to 275°F for 30 minutes. Spray or coat sheet pans with oil. Wipe trout with a damp towel and place side-by-side on sheet pans. Season as desired. Set Thermostats: Cook Thermostat set to 275°F (135°C) Hold Thermostat set to 160°F (71°C) Set Cook Timer: 1 to 1 1/2 hours Minimum Hold Time: None Final Internal Temperature: 150°F (66°C) Overnight Cook–N–Hold not recommended Maximum Hold Time: 4 to 6 hours FULL SIZE SPLIT Cook-N-Hold Cook-N-Hold Shelves / Pans 16 8 Items per Shelf / Pan 12 Trout 12 Trout Approximate Capacity 192 Trout 96 Trout Approximate Weight Capacity up to 200 lbs. up to 100 lbs. Trout are from a large family of fish that include salmon and herring. The best known species, Rainbow Trout, is native to California, but has been transplanted to lakes and streams around the world so prolifically, that the species is thought to be the single most successful species of game fish in the world. bakery 56 sheet cake Vents: Open full Preparation: Preheat oven to 325°F for 30 minutes. Use a favorite cake recipe or mix. Pour batter in pans to one-half the pan depth. Keep oven door closed during the cooking cycle. The cake is done when a toothpick inserted in the center of the cake is clean when removed. Set Thermostats: Cook Thermostat set to 325°F (163°C) Set Cook Timer: 1 1/2 hours Minimum Hold Time: None Final Internal Temperature: N/A NO Overnight Cook–N–Hold Maximum Hold Time: None FULL SIZE SPLIT Cook-N-Hold Cook-N-Hold Shelves / Pans 8 4 Items per Shelf / Pan 1 Cake 1 Cake Approximate Capacity 8 Cakes 4 Cakes 57 Cheesecake The first recorded mention of cheesecake was during the ancient Grecian Olympic games in the occidental world. Cato the Elder wrote of cheesecake preparation in his farming manual “De Agri Cultura”. Modern cheesecakes resemble cakes previously used as offerings to gods in Greek culture. Vents: Open full Preparation: Preheat oven to 250°F for 30 minutes. Use a favorite cheese cake recipe or mix. Pour batter into spring-form pans and bake in a preheated oven. The cheese cake is done when a toothpick inserted in the center is clean when removed. To prevent cracking, allow the cheese cake to remain in the oven until it reaches room temperature. Set Thermostats: Cook Thermostat set to 250°F (121°C) Set Cook Timer: 2 to 3 hours Minimum Hold Time: None Final Internal Temperature: N/A NO Overnight Cook–N–Hold Maximum Hold Time: None FULL SIZE SPLIT Cook-N-Hold Cook-N-Hold Shelves / Pans 8 4 Items per Shelf / Pan 3 Cheesecakes 3 Cheesecakes Approximate Capacity 24 Cheesecakes 12 Cheesecakes 58 cookies Ingredients: Premixed frozen commercial cookie dough at room temperature. Vents: Open full Preparation: Preheat oven at 325°F (163°C) for a minimum of one hour. Line full-size sheet pans with baking pan liners. Use a number 30 scoop to produce a 1 oz. (28 gram) cookie. Evenly space portioned cookie dough on sheet pans and load all pans in the oven at one time. Oven doors must remain closed during baking. Do not over-bake. Set Thermostats: Cook Thermostat set to 325°F (163°C) Set Cook Timer: 2 1/2 hours (do not allow the product to remain in the oven for the full set cooking time) set an independent timer using the following guidelines: 27 to 30 minutes for 1 full-size sheet pan or 35 to 40 minutes for 2 to 3 full-size sheet pans Minimum Hold Time: None Final Internal Temperature: N/A Maximum Hold Time: None FULL SIZE Cook-N-Hold SPLIT Cook-N-Hold Shelves / Pans 16 8 Items per Shelf / Pan 1 full-size sheet pan 1 full-size sheet pan Approximate Capacity 16 full-size sheet pans 8 full-size sheet pans 59 baked egg custard Vents: Closed Preparation: Preheat oven to 250°F for 30 minutes. Use a favorite custard recipe. Pour custard mixture into cups to a depth of 2/3 the container height and place cups on a sheet pan. No water bath is required. Bake in a preheated oven. Custard is done when knife inserted in center of cup is clean when removed. Set Thermostats: Cook Thermostat set to 250°F (121°C) Set Cook Timer: 2 to 3 hours Minimum Hold Time: None Final Internal Temperature: N/A NO Overnight Cook–N–Hold Maximum Hold Time: None FULL SIZE SPLIT Cook-N-Hold Cook-N-Hold Shelves / Pans 10 5 Items per Shelf / Pan 1 full-size sheet pan 1 full-size sheet pan Approximate Capacity 10 full-size sheet pans 5 full-size sheet pans potluck 62 potatoes Ingredients: Potatoes, Baking, 80 to 90 count Vents: Open full Preparation: Preheat oven to 325°F for 30 minutes. Wash potatoes before placing in a preheated oven. Allow oven to preheat for a minimum of 30 minutes. Place potatoes directly on wire shelves. Set Thermostats: Cook Thermostat set to 325°F (163°C) Hold Thermostat set to 190°F (88°C) Set Cook Timer: 1 1/2 to 3 hours Minimum Hold Time: None Final Internal Temperature: 190°F (88°C) Overnight Cook–N–Hold not recommended Maximum Hold Time: 7 hours FULL SIZE Cook-N-Hold SPLIT Cook-N-Hold Shelves / Pans 8 4 Items per Shelf / Pan 20 to 25 Potatoes 20 to 25 Potatoes Approximate Capacity 160 to 200 Potatoes 80 to 100 Potatoes Approximate Weight Capacity up to 240 lbs. up to 120 lbs. The potato has been an essential crop in the Andes since the pre-Columbian Era and actually originated in that region. The Moche culture from Northern Peru made ceramic idols to their gods, which all bear a strange resemblance to potatoes. 63 Quiche The word quiche is derived from the Lorraine Franconian dialect of the German language historically spoken in much of the region, where German word for Cake, ‘Kuchen’ was altered first to “Kuche” where the “ch” is pronounced “sh”, resulting in “kische”, which in standard French orthography became spelled quiche. Vents: Open full Preparation: Preheat oven to 275°F for 30 minutes. Prebake the shells in pie plates at 275°F (135°C) for approximately 40 minutes. Pour the quiche mixture into the prebaked shells and bake in a preheated oven. Set Thermostats: Cook Thermostat set to 275°F (135°C) Hold Thermostat set to 160°F (71°C) Set Cook Timer: Bake approximately 2 hours or until product sets-up. Minimum Hold Time: None Final Internal Temperature: N/A NO Overnight Cook–N–Hold. Maximum Hold Time: 5 hours FULL SIZE Cook-N-Hold SPLIT Cook-N-Hold Shelves / Pans 16 8 Items per Shelf / Pan 3 Quiches 3 Quiches Approximate Capacity 48 Quiches 24 Quiches 64 frozen convenience entrees Vents: Closed Quantity of pans Preparation: Preheat oven to 275°F for 30 minutes. Product must be fully frozen when placed in a preheated oven. Leave product in original container with foil cover in place. Pour 1/2 gallon (1 liter) of hot water into the drip pan located on the bottom surface of the oven compartment. Place containers directly on wire shelves. Set Thermostats: Cook Thermostat set to 275°F (135°C) Hold Thermostat set to 160°F (71°C) Set Cook Timer: See pan placement diagrams and timer settings listed Timer Settings 1 2 hrs 45 mins 2 3 hrs 3 3 hrs 4 3 hrs 45 mins 5 4 hrs 6 4 hrs 40 mins 7 5 hrs 8 5 hrs 9 6 hrs 10 6 hrs Minimum Hold Time: None Final Internal Temperature: 140°F (60°C) Overnight Cook–N–Hold optional Maximum Hold Time: 16 to 18 hours Per Compartment Cook-N-Hold Shelves / Pans 5 Items per Shelf / Pan 2 foil half-size pans Approximate Capacity 10 foil half-size pans Pans 10” x 12” x 2 1/2” FRONT VIEW TOP VIEW 65 frozen portioned entrees Vents: Closed Preparation: Preheat oven to 275°F for 30 minutes. Product must be fully frozen when placed in a preheated oven. Leave product in original container with foil cover in place. Pour 1/2 gallon (1 liter) of hot water into the drip pan located on the bottom surface of the oven compartment. Place containers directly on wire shelves. Set Thermostats: Cook Thermostat set to 275°F (135°C) Hold Thermostat set to 160°F (71°C) Set Cook Timer: Approximately 2 hours. See pan placement diagrams shown below. Do not over-cook. Check internal product temperature. Minimum Hold Time: None Final Internal Temperature: 140°F (60°C) Overnight Cook–N–Hold not recommended Maximum Hold Time: 4 hours Per Compartment Cook-N-Hold FRONT VIEW TOP VIEW Shelves / Pans 3 Items per Shelf / Pan 9 Approximate Capacity 27 Pans 7 3/4” x 5” 66 precooked frozen finger foods Vents: Open full Preparation: Preheat oven to 275°F for 30 minutes. Chicken Nuggets, approximately 40 per full-size sheet pan Corn Dogs, approximately 30 per full-size sheet pan Egg Roll, approximately 40 per full-size sheet pan Mini Pizza, approximately 12 to 15 per full-size sheet pan Line sheet pans with baking pan liners and insert wire pan grid. Place items side-by-side on the wire pan grids. Set Thermostats: Cook Thermostat set to 275°F (135°C) Hold Thermostat set to 160°F (71°C) Set Cook Timer: Corn Dogs, 30 to 45 minutes Egg Rolls, Chicken Nuggets, 45 to 60 minutes Mini Pizza, 60 minutes Minimum Hold Time: None Final Internal Temperature: 150°F (66°C) Overnight Cook–N–Hold not recommended Maximum Hold Time: 1 to 3 hours (holding time varies from product to product) FULL SIZE Cook-N-Hold SPLIT Cook-N-Hold Shelves / Pans 10 5 Items per Shelf / Pan 1 full-size sheet pan 1 full-size sheet pan Approximate Capacity 10 full-size sheet pans 5 full-size sheet pans 67 breakfast sandwiches Vents: Open full Preparation: Preheat oven to 275°F for 30 minutes. Thaw biscuits, croissants or English muffins and slice horizontally. Place each ingredient on the lower half of the bread slice in the following order: 1. Sausage patty, ham slices, or precooked bacon, frozen or thawed 2. Egg patty, frozen or thawed 3. 1/2 oz. (14 grams) slice of American processed cheese Place upper half of bread slice on top of the ingredients and wrap each sandwich in clear plastic wrap. Line sheet pans with baking pan liners and insert wire pan grid. Place wrapped sandwiches side-by-side on the wire pan grids. Set Thermostats: Cook Thermostat set to 275°F (135°C) Hold Thermostat set to 160°F (71°C) Set Cook Timer: 2 1/2 hours (do not allow the product to remain in the oven for the full set cooking time) set an independent timer using the following guidelines: 45 to 60 minutes. Minimum Hold Time: None Final Internal Temperature: 150°F (66°C) Overnight Cook–N–Hold not recommended Maximum Hold Time: 2 to 3 hours FULL SIZE SPLIT Cook-N-Hold Cook-N-Hold Shelves / Pans 10 5 Items per Shelf / Pan 1 full-size sheet pan 1 full-size sheet pan Approximate Capacity 10 full-size sheet pans 5 full-size sheet pans 68 processed meats Ingredients: Sausage or any of a variety of processed meat product including bratwurst, Polish sausage, breakfast links, smoked sausage, hot dogs, etc. Door Vents: Open full Preparation: Preheat oven to 250°F for 30 minutes. Place sausage side-by-side on sheet pans. Add a sufficient amount of hot water so that it just covers the bottom of each pan. Cover each pan with clear plastic wrap. Set Thermostats: Cook Thermostat set to 250°F (121°C) Hold Thermostat set to 160°F (71°C) Set Cook Timer: 1 1/2 to 2 hours Minimum Hold Time: None Final Internal Temperature: 170°F (77°C) Overnight Cook–N–Hold not recommended Maximum Hold Time: 6 hours FULL SIZE Cook-N-Hold SPLIT Cook-N-Hold Shelves / Pans 16 8 Items per Shelf / Pan 1 full-size sheet pan 1 full-size sheet pan Approximate Capacity 16 full-size sheet pans 8 full-size sheet pans Approximate Weight Capacity up to 240 lbs. up to 120 lbs. 69 rice Vents: Closed Preparation: Preheat oven to 275°F for 30 minutes. Use converted, long-grain rice only. Follow package directions for proportional amounts of rice to liquid. Heat liquid or water to 170°F (77°C) and add rice. Fill pans to half the pan depth and cover pans with foil. Set Thermostats: Cook Thermostat set to 275°F (135°C) Hold Thermostat set to 160°F (71°C) Set Cook Timer: 3 1/2 to 4 hours Minimum Hold Time: None Final Internal Temperature: 190°F (88°C) Overnight Cook–N–Hold optional Maximum Hold Time: 8 hours FULL SIZE SPLIT Cook-N-Hold Cook-N-Hold Shelves / Pans 6 3 Items per Shelf / Pan 1 full-size sheet pan 1 full-size sheet pan Approximate Capacity 6 full-size sheet pans 3 full-size sheet pans model 1000 CH SS Model 1000 CH SS Split 71 installation and maintenance 72 installation instructions Venting your oven 1. The purpose for ventilating hoods is to direct and capture smoke, grease-laden vapors, heat, odor or fumes. 2. Low temperature equipment (maximum temperature 250°F/121°C) does not produce heat, odors, fumes, grease-laden vapors or smoke and is not required to be vented. 3. Most jurisdictions consider our low-temperature ovens (maximum temperature is 350°F/177°C) as low-heat appliances not requiring vent hoods. 4. Installation must conform with local codes. The authority having jurisdiction of enforcement of the codes will have the responsibility for making interpretations of the rules. SPECIFICATIONS: All units are rated 3000 watts. MODEL NO. SPLIT ELECTRICAL SPECS (AC SPECS) ELECTRIC LOAD POWER SUPPLY REQUIREMENT VOLTS PH HZ AMPS VOLTS AMPS PH WIRE VOLTS NEMA 1000CHSSSPLIT 208 240 1 1 60 60 14 13 208 240 20 20 1 1 3 3 208 240 6-20P 6-20P 1000CHSSSPLIT3 208 240 3 3 60 60 8 7 208 240 20 20 3 3 4 4 208 240 L15-20P L15-20P SPECIFICATIONS: All units are rated 6000 watts. *USA ONLY. MODEL NO. ELECTRICAL SPECS (AC SPECS) ELECTRIC LOAD POWER SUPPLY REQUIREMENT FULL SIZE VOLTS PH HZ AMPS VOLTS AMPS PH WIRE VOLTS NEMA 1000CHSS 1000CHAL 208 240 1 1 60 60 29 25 208 240 30 30 1 1 3 3 208 240 *6-30P *6-30P 1000CHSS3 1000CHAL3 208 240 3 3 60 60 16 14 208 240 20 20 3 3 4 4 208 240 L15-20P L15-20P Model number “AL” is aluminum outer body with stainless steel doors and interior. All models designed for AC Service. Model number may have the letters: M, S, or Z. 73 IDENTIFYING YOUR CABINET Look for this label on the back of your cabinet. This information is needed when calling for questions or service. R 5925 HEISLEY RD. MENTOR, OHIO 44060 -367 LISTED 565M C MOD. 1000CHSS SER. FAA-K5645C-001 Hz. 60 UL R UL R AMPS 29 VOLTS 208/240 WATTS 3000 PH. 1 COMMERCIAL COOKING APPLIANCE MADE IN THE USA Located in upper right corner of cabinet HOW TO INSTALL CABINETS 1. Remove all packing material from the inside and all vinyl from the outside of oven. 2. Place the oven in a well ventilated area on level floor. Clearance requirements: 3” (76mm) at the back, 2” (51mm) at the top, 1” (25mm) at both sides. 3. Install the pan slide racks on the sidewalls, if necessary. 4. Slide drip pan(s) onto the bottom of the DRIP TRAY compartment(s). 5. Remove (3) screws at the bottom front of the oven, under the door (See Figure). 6. Screw the drip tray bracket to the oven in those holes and place the drip tray onto the bracket. All models are rated at 208/240 Volts. NOTE: OVENS NEED TO BE INSTALLED BY A QUALIFIED PERSON. Check the voltage selector switch which is under an access cover on the back of the oven near the power cord. • Flip the switch “UP” for 208 Volts • Flip the switch “DOWN” for 240 Volts MAKE SURE THE SWITCH POSITION MATCHES YOUR POWER SOURCE. DRIP TRAY BRACKET SCREWS 74 Maintenance instructions WARNING IF UNIT GETS TOO HOT OR WON’T SHUT OFF, DISCONNECT POWER AT BRANCH PANEL. DO NOT UNPLUG CORD! If hot unit is not working, first check the following causes: 1. Cord is unplugged from wall outlet. 2. Circuit breaker/fuse to wall outlet is blown. 3. Switch(es) are turned off. 4. Thermostat(s) are turned off, or are set too low. Note: Vent fans will not operate until the control compartment requires ventilation to limit temperatures. Replacement of electrical components must be done by a qualified electrician. To locate an authorize service center, visit www.crescor.com, call 1-877-crescor (273-7267), or refer to our service agency list, FL-1400 insert. PROBLEM POSSIBLE CAUSE SOLUTION Oven does not heat, or does not heat properly 1. Thermostat(s) defective 2. Heater contactor 3. On/Off Switch 4. Fuses 1. Replace 2. Replace 3. Replace 4. Replace Timer runs down, but oven does not go into hold mode 1. Timer defective 1. Replace Heaters will not shut off 1. Thermostat defective 2. Contactor defective 1. Replace 2. Replace Vent fans do not shut off 1. Vent fan switch defective 2. Control compartment is still hot 1. Replace 2. Wait until it cools check “Heaters will not shut off” Vent fans do not operate 1. Vent fan switch defective 2. Vent fan defective 3. Fuses* 1. Replace 2. Replace 3. Replace *Fuses are in 6000 Watt units only 75 replacement parts (Include all information on nameplate when ordering parts) 3 9 10 1 6 5 2 4 7 front control panel Upper & lower ovens 8 Item Description 1. Switch (On/Off) Part No. 0808-113-01-K 2. Knob, Thermostat & Timer 0595-061 3. Timer 0849-009 4. Thermometer 5238-031 5. Thermostat, Cook 0848-082 6. Thermostat, Hold 0848-086 7. Pilot Light, Yellow 0766-096 8. Pilot Light, Green 0766-097 9. Switch, Fan 0848-034 10. Relay 0857-102 76 15 16 14 12 11 28 13 27 INSULATION 25 17 26 21 18 19 20 29 23 22 24 Model 1000-CH-SS is shown. Model 1000-CH-SPLIT is half-size single door oven. 77 Item Description Part No. 11. Contactor 0857-131 12. Terminal Block (Input) 0852-109 13. Terminal Block 0852-091 14. Toggle Switch 0808-020 15. Vent Fan 0769-174 16. Fan Guard 0769-167 17. Heater Kit, 208V, 195 Watt 0811-291-K Heater Kit, 240V, 1000 Watt 0811-290-K 18. Door Latch Kit 1006-122-01-K 19. Latch Strike 1006-122-02-K 20. Door Assembly 1221-563 21. Door Gasket 0861-267 22. Door Hinge 0519-074-K 23. Casters 0569-306 24. Casters w/brake 0569-306-B 25. Pan Slides 0692-200 26. Drip Pan 1017-099 27. Fuses, 3 Amp 0857-058 Fuse Holder 0857-048 28. Hi-Limit 0848-033 29. Drip Tray 1017-100 Wire Grid 1170-005 Power Cord (3000 Watts, 1-PH) 0810-173-01K Power Cord (6000 Watts, 1-PH) 0810-163-01K Power Cord (6000 Watts, 3-PH) 0810-164-01K 78 wiring diagrams 127 FUSE 3A 10 128 FUSE 3A 9 10 9 TB1 14 20 121 122 118 63 62 64 65 67 SERVICE SWITCH CLOSED 208 V 208 240 66 16 47 11 12 119 120121122 69 68 4 3 2 L1 L4 3 2 L1 1 1 L1 2 C2 C1 5 2 4 3 2 T1 58 19 54 55 56 57 63 120 59 T4 60 61 65 1 3 2 T1 6 3 7 2 62 64 4 L2 G P3 21 18 24 19 23 20 15 14 8 L2 55 59 HL 3 HL 1 125 123 VENT FAN 6-30P 6000 WATT 54 58 118 HL 4 HL 2 119 18 126 124 TB2 VENT FAN To lower control panel or single control panel P1 P2 To upper control panel P4 8 7 6 5 53 4 3 2 1 52 128 127 (2) JUMPER'S AS SHOWN SINGLE PHASE L1 56 57 68 67 125 126 123 TB4 TB5 TB6 TB7 TB8 TB3 124 69 66 61 60 99 100 101 102 88 87 86 85 79 78 77 79 78 77 70 116 117 75 3 P6 115 73 70 1 114 71 P5 113 9 71 75 72 112 111 110 109 108 107 106 P8 105 104 103 73 74 1 3 1 72 74 76 80 80 76 81 P7 82 83 84 81 84 83 82 85 P10 98 89 89 88 P9 97 90 90 9 96 91 87 86 95 92 91 94 93 92 1 5 2 L2 P12 1 93 P11 (1) JUMPER AS SHOWN L1 3 7 X 4 Z 105 109 117 116 115 Lower Oven or single oven 250 Watt 104 Heaters (3) 103 114 1000 Watt 113 Heaters (3) 112 99 98 97 Upper Oven TERMINAL BLOCK 3 PHASE 3 WIRE 1000 Watt101 Heaters (3)100 102 8 G 250 Watt 110 Heaters (3) 111 108 107 106 96 95 94 6 L3 Y L15-20P 6000 WATT 79 Wiring diagram for 1000ch series Upper and lower ovens 80 12 P4 P3 16 18 21 23 20 Fan Switch 19 24 22 17 14 15 17 11 12 Upper Power Switch P2 P1 Lower Power Switch 28 38 51 29 A A 38 30 29 31 40 39 M 49 32 48 41 OUT Timer L2 L1 51 50 35 OUT Timer L2 M 36 42 49 44 Thermostat 45 Hold G 43 A 48 G 34 A 35 33 36 27 Thermostat 26 Hold Roast Roast 119 120121122 16 47 11 21 Fan Switch 22 23 15 L1 37 28 24 47 46 46 Thermostat Roast 25 25 Thermostat Roast 37 50 32 41 33 42 43 40 34 30 27 44 39 Relay Relay 45 26 31 wiring diagram 1000ch series control panel Hold Hold VENT FAN 118 119 16 HI LIMIT 17 12 12 17 11 121 122 120 16 4711 119 VENT FAN 118 122 121 1 2 3 4 51 38 A 53 3 4 1 2 T2 T3 T4 L3 L4 T1 L2 L1 CONTACTOR POWER SWITCH SINGLE PHASE JUMPERS AS SHOWN 40 38 39 120 59 58 61 64 60 65 51 L1 L2 124 123 HI LIMIT 49 48 OUT 50 M TIMER 58 59 64 65 HI LIMIT 69 66 SWITCH 208/240 VOLT 48 A 43 6-20P 3000 WATTS 49 G 42 84 44 COOK T'STAT 46 HOLD T'STAT 47 45 123 87 86 83 82 85 90 89 88 66 69 124 91 93 92 60 61 50 A B 41 84 83 82 93 92 91 90 89 88 87 86 85 1 7 42 43 103 104 105 94 95 96 97 98 99 100 101 102 40 4 44 3 94 95 96 45 39 9 6 103 104 105 RELAY 102 101 100 97 98 99 81 Wiring diagram for 1000ch-split series 82 how to reverse door opening Reverse Door Opening 1. Pop off hinge covers with screwdriver. 2. Remove the screws from the hinges to the cabinet; remove the door and unscrew the latch strike from the oven. Keep all screws. 3. Rotate the door 180° so that the hinges are now on the left side of the door. 4. Re-mount the hinges in the same hole pattern on the opposite sides of the door opening. 5. Remove the latch and rotate it 180°; re-mount it to the right side of the door. 6. Adjust the hinges and latch for proper door seal. 7. Plug all the extra holes with screws and snap on the hinge covers. HINGE DOOR STRIKE PLATE Index 83 Bakery Baked Egg Custard 59 Cheesecake57 Cookies58 Sheet Cake 56 Beef Beef Brisket 14 Beef Round 20 Beef Short Ribs 15 Beef Strip Loin 16 Cafeteria or Steamship 22 Corned Beef 17 Hamburgers18 Prime Rib 19 Ribeye21 Tenderloin23 Veal Loin 24 Fish Baked Fish 50 Salmon Steaks 51 Trout52 Lamb Lamb Leg Lamb Racks (Frenched) 28 29 Pork Cured and Smoked Ham Fresh Ham Pork Loin Pork Ribs Pork Shoulder 33 32 34 36 35 Potluck Breakfast Sandwiches 67 Frozen Convenience Entrees 64 Frozen Portioned Entrees 65 Potatoes62 Precooked Frozen Finger Foods 66 Processed Meats 68 Quiche63 Rice69 Poultry Chicken42 Chicken Breasts 40 Chicken Halves 41 Cornish Game Hen 43 Turkey Breast 46 Whole Duck 44 Whole Turkey 45 5925 Heisley Road • Mentor, OH 44060-1833 • Phone: 877/CRESCOR(273-7267) • Fax: 440/350-7267• www.crescor.com