1
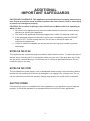
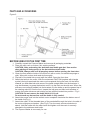
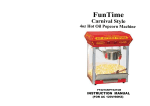
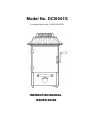
Model No. DCI0041G
Customer Service No. :1-855-540-2875
INSTRUCTION MANUAL
RECIPE GUIDE
IMPORTANT SAFEGUARDS
When using electrical appliances, basic safety precautions should always be followed,
including the following:
1. READ ALL INSTRUCTIONS.
2. Do not touch hot surfaces. Use handles. Always wear oven mitts or use pot holders.
3. To protect against electrical shock, do not immerse cord or plugs in water or other
liquids.
4. This appliance is not intended for use by persons (including children) with reduced
physical, sensory or mental capabilities, or lack of experience and knowledge, unless
they have been given supervision or instruction concerning use of the appliance by a
person responsible for their safety.
5. Close supervision is necessary when any appliance is used by or near children.
6. Unplug from outlet when not in use and before cleaning. Allow to cool before putting
on or taking off parts, and before cleaning the appliance.
7. Do not operate any appliance with a damaged cord or plug or after the appliance
malfunctions, or has been damaged in any manner. Return appliance to the nearest
authorized service facility for examination, repair or adjustment.
8. The use of accessory attachments not recommended by the appliance manufacturer
may cause injuries.
9. Do not use outdoors or for commercial purposes.
10. Do not let cord hang over the edge of table or counter, or touch hot surfaces.
11. Do not place on or near a hot gas or electric burner, or in a heated oven.
12. Never leave the Theatre Popcorn Maker unattended when it is plugged into an outlet.
13. WARNING! After pressing the ON/OFF switch, the stainless steel kettle heats
immediately. After preheating, press the ON/OFF button to OFF (O). Use caution
when adding popcorn kernels and oil to the hot kettle.
14. Make sure popcorn kernels and all ingredients are added to the kettle and the front
door is closed before turning ON to begin corn popping.
15. To turn the Theatre Popcorn Maker OFF, press the ON/OFF button to OFF (O). Then
remove plug from wall outlet.
16. Do not use appliance for other than intended use.
17. Extreme caution must be used when moving an appliance containing hot oil or other
hot liquids.
18. To remove popped popcorn, pull the front serving door handle out to access popped
corn.
WARNING: To avoid popcorn from spilling out, DO NOT OPEN FRONT POPPING
CHAMBER DOOR while corn is popping or to remove cooked popcorn.
19. Do not leave this appliance unattended during use.
20. WARNING: Do not use the stainless steel kettle separately.
21. A corn popper that is plugged into an outlet should not be left unattended.
22. This corn popper will not shut off automatically. To avoid overheating, add corn and oil
before operating.
23. Extreme caution must be used when unloading popped popcorn. Always place the unit
over a counter-top and use the front serving door and so that residual hot oil will not
cause burns.
FOR HOUSEHOLD USE ONLY
SAVE THESE INSTRUCTIONS
2
ADDITIONAL
IMPORTANT SAFEGUARDS
CAUTION HOT SURFACES: This appliance generates heat and escaping steam during
use. Proper precautions must be taken to prevent the risk of burns, fires or other injury
to persons or damage to property.
CAUTION: Do not place anything on top of the Popcorn Maker while it is operating or
while it is hot.
1. All users of this appliance must read and understand this instruction manual before
operating or cleaning this appliance.
2. The cord to this appliance should be plugged into a 120V AC electrical outlet only.
3. If this appliance begins to malfunction during use, immediately press the ON/OFF
button to OFF (O) and unplug the cord. Do not use or attempt to repair the
malfunctioning appliance.
4. Check to make sure handles are secure and front serving door handle is properly
assembled.
NOTES ON THE PLUG
This appliance has a polarized plug (one blade is wider than the other). To reduce the risk of
electric shock, this plug will fit in a polarized outlet only one way. If the plug does not fit fully
into the outlet, reverse the plug. If it still does not fit, contact a qualified electrician. Do not
modify the plug in any way.
NOTES ON THE CORD
The provided short power-supply cord (or detachable power-supply cord) should be used to
reduce the risk resulting from becoming entangled in or tripping over a longer cord. Do not
use an extension cord with this product. Always plug directly into a wall outlet/ receptacle.
ELECTRIC POWER
If the electrical circuit is overloaded with other appliances, your appliance may not operate
properly. It should be operated on a separate electrical circuit from other appliances.
3
GETTING TO KNOW YOUR POPCORN MAKER
Product may vary slightly from illustration.
Figure 1
4
PARTS AND ACCESSORIES
Figure 2
BEFORE USING FOR THE FIRST TIME
1. Carefully unpack the Popcorn Maker and remove all packaging materials.
2. Place the main unit on a clean, flat, working surface.
CAUTION: After preheating, the stainless steel kettle gets hot. Use caution
when adding oil and popcorn to the hot stainless steel kettle.
CAUTION: Always wait until all popping ceases before opening the front door.
3. Clean the floor and the inside of the main unit with a moist, non-abrasive sponge or
cloth. Wipe with a clean cloth and dry thoroughly.
4. Flip both of the kettle lids up and wipe the inside. Open the front door.
5. Attach the kettle to the motor. With the embossed CAUTION (replace with triangle
symbol) facing forward and the motor cord receptacle facing the back, tilt the kettle
towards you and slide both side arms of the kettle straight back into the brackets. It
may be necessary to grasp the bracket and fit it to the track on the side arm. When the
side arms are correctly seated into the brackets, flip the kettle up and the geared top of
the rotating rod will fit into the front. Inspect the top gear and then both brackets to
ensure the kettle side arms and rotating rod are properly locked into position(Fig.1).
CAUTION: Do not remove the kettle while it is in use.
Do not touch any hot surface until the kettle is fully cooled.
6. Attach the power cord into the kettle’s motor receptacle located at the bottom rear of
the kettle unit(Fig.1).
7. Attach the crank, fit the threaded stem of the crankshaft through the hole in the side of
the main unit/popcorn chamber. (See Fig.2) Turn the crank counter-clockwise to
attach. Hold the kettle with the other hand and tighten until the crank is securely
attached to the stainless steel kettle.
8. The Popcorn Maker is now ready for use.
5
Fig.1
Fig.2
OPERATING INSTRUCTIONS
1. Keep the necessary popcorn supplies close at hand: popcorn kernels, popping oil,
seasonings, popcorn kernel measuring cup, and oil measuring spoon, bowls or bags for
serving,
2. Make sure the kettle’s side arms are properly secured in the support brackets.
3. Make sure the power-supply cord is attached to the kettle’s motor receptacle.
4. Make sure the front door is in a secure, closed position. The front serving door must be
folded into place, the popcorn chamber is closed and ready for popping corn.
5. Make sure the power ON/OFF button is in the OFF position.
6. Plug the Theatre Popcorn Maker into a 120V AC electrical outlet.
7. Preheat the kettle. Press the power ON/OFF button ON. The power light will illuminate.
The kettle will begin to heat and rotate. After 3 to 5 minutes, press the power ON/OFF
button OFF.
8. Open the front door. Using the kettle’s lid handle, carefully flip the kettle lid open. Add 1
tablespoon popping oil of your choice to the kettle. Then add 1/4 cup raw popcorn
kernels (standard or gourmet).
WARNING: To avoid damage to the Popcorn Maker, NEVER add more than the
recommended quantities of popcorn kernels or popping oil to the kettle. DO NOT
ADD ANYTHING BUT OIL OR POPCORN KERNELS INTO THE KETTLE.
9. Press the power ON/OFF button ON. The kettle will begin to heat and the stir will rotate.
10. After 3-5 minutes, popping will begin and popped corn will spill from the kettle into the
popping chamber.
11. After popping has ceased, push the power ON/OFF button OFF, pull the crank handle
towards the front to release the last remaining popped kernels from the kettle.
12. Pull the front serving door out and scoop popped corn into serving bags or bowls.
13. Continue popping another batch of popcorn following the Operating Instructions
previously described.
6
USER MAINTENANCE INSTRUCTIONS
This appliance requires little maintenance. It contains no user serviceable parts. Do not try to
repair it yourself. Any servicing requiring disassembly other than cleaning must be performed
by a qualified appliance repair technician.
CARE & CLEANING INSTRUCTIONS
CAUTION: Never immerse the Popcorn Maker main unit/popcorn chamber, cord or plug
in water or other liquid.
1. Unplug The Popcorn Maker and allow the stainless steel kettle to fully cool before
cleaning.
2. The Popcorn Maker should be cleaned after every use.
3. Remove the crank. Hold the kettle and turn the crank clockwise to detach.
4. Remove the kettle from the motor. Slide each side of the rotating rod up and out of the
brackets on each side of the main unit’s popping chamber.
5. Detach the power cord from the kettle’s heating element receptacle located at the bottom
rear of the kettle unit.
6. Use a clean kitchen brush and a small dustpan to sweep the floor of the popcorn
chamber. If needed, use a damp soft cloth or kitchen sponge to wipe down and remove
any debris from the main unit’s main unit. Dry thoroughly before next use.
WARNING: To prevent scratching, never use abrasive scouring pads, steel wool, or
scouring powders.
7. Fill the stainless steel kettle 2/3 full with warm, soapy water. Soak for 15 to 20 minutes,
then empty. Use a soft cloth or sponge to remove any debris. Rinse thoroughly and dry.
CAUTION: To protect against electrical shock, do not immerse stainless steel kettle
or plugs in water or other liquids. Avoid letting the kettle motor cord receptacle
come into contact with water.
CAUTION: Never place the main unit, any parts or accessories of this Popcorn
Maker in the dishwasher.
8. Always attach the Popcorn Maker’s kettle to the motor after cleaning.
STORAGE INSTRUCTIONS
1. Unplug unit and allow to cool.
2. Store the clean Popcorn Maker fully assembled.
3. Store the Popcorn Maker in its box or in a clean, dry place.
7
RECIPES
GENERAL THEATRE POPCORN
POPPING INSTRUCTIONS
1 tablespoon popping oil of your choice
1/4 cup raw popcorn kernels (standard or gourmet)
Seasonings (salt for salted or sugar for kettle popcorn)
––––––––––––––––––––––––––––––––––––––––––––––––––––––––––––––––––
1. Toss in large bowl to combine
––––––––––––––––––––––––––––––––––––––––––––––––––––––––––––––––––
BUTTERED THEATRE POPCORN
1 tablespoon canola, peanut or grapeseed oil (high smoke point oil)
1/4 cup high quality popcorn kernels
1/4 lb. (1 stick) unsalted butter, melted (or to taste)
popcorn salt or fine grain salt (to taste)
––––––––––––––––––––––––––––––––––––––––––––––––––––––––––––––––––
1. Toss in large bowl to combine
2. Drizzle melted butter over popped corn. Salt to taste. Toss to combine.
––––––––––––––––––––––––––––––––––––––––––––––––––––––––––––––––––
Single Batch
Makes: 8 cups popped corn
––––––––––––––––––––––––––––––––––––––––––––––––––––––––––––––––––
8
THEATRE KETTLE CORN
1 tablespoon canola, peanut or grapeseed oil (high smoke point oil)
1/4 cup high quality popcorn kernels
1/4 teaspoon popcorn salt or fine grain salt (to taste)
2 tablespoons granulated sugar
––––––––––––––––––––––––––––––––––––––––––––––––––––––––––––––––––
1. Toss in large bowl to combine
2. Clean kettle well after use.
––––––––––––––––––––––––––––––––––––––––––––––––––––––––––––––––––
Single Batch
Makes: 6 cups popped kettle corn
––––––––––––––––––––––––––––––––––––––––––––––––––––––––––––––––––
Big, bold tangy cheese flavor with fresh-popped taste! Top Cheddar Cheese Soup with this
popcorn for a unique, funtime meal your family will love!
CHEDDAR CHEESE POPCORN
6 cups freshly popped popcorn (popped without added salt or fat)
Butter flavored spray oil (optional)
3/8 to 1/2 cup cheddar cheese powder
1 teaspoon onion powder
1/4 teaspoon cayenne pepper (to taste)
6 tablespoons melted butter
Salt and pepper
––––––––––––––––––––––––––––––––––––––––––––––––––––––––––––––––––
1. In a small bowl, whisk cheddar cheese powder, onion powder, and cayenne pepper.
2. Add the popcorn to a large bowl. Drizzle with melted butter and toss until well combined.
3. Add cheese mixture and toss until popcorn is coated. Serve immediately.
––––––––––––––––––––––––––––––––––––––––––––––––––––––––––––––––––
NOTE: For a drier, less greasy popcorn loaded with flavor, omit melted butter. Instead, spray
butter flavored oil onto the plain popcorn. Sprinkle cheese seasoning mixture onto the
popcorn. Toss to combine. Spray and season for a second final time.
9
FRESH AND DELICIOUS
THEATRECARMEL CORN
10 cups freshly popped popcorn (popped without added salt or fat)
1/4 lb. (1 stick) unsalted butter
1 cup packed dark brown sugar
1/4 cup agave nectar (may substitute Grade B maple syrup)
1/2 teaspoon coarse kosher salt
1/4 teaspoon baking soda
1/2 teaspoon pure vanilla extract
––––––––––––––––––––––––––––––––––––––––––––––––––––––––––––––––––
1. Line full baking pan with parchment paper or aluminum foil.
2. Spread popcorn out onto baking pan.
3. In medium saucepan, combine butter, brown sugar, agave nectar, and salt.
4. Bring to a boil, stirring constantly. Boil without stirring 4 minutes.
5. Remove from heat and stir in baking soda and vanilla.
6. Pour foaming hot caramel over popcorn and toss until evenly coated.
WARNING: Caramel mixture is extremely hot. Wear protective cooking gloves and use
extreme caution when working with hot caramel.
7. Allow to cool for at least 20 minutes, test to make sure popcorn is cooled for safe
handling to serve warm.
8. To harden, bake 60 minutes at 250ºF stirring every 15 minutes. Remove from oven
and allow to cool completely before breaking into pieces.
9. Store caramel corn in an airtight container at room temperature for up 3 weeks.
––––––––––––––––––––––––––––––––––––––––––––––––––––––––––––––––––
10
BBQ POPCORN
6 cups freshly popped popcorn (popped without added salt or fat)
Butter flavored spray oil (optional)
––––––––––––––––––––––––––––––––––––––––––––––––––––––––––––
1 teaspoon paprika
1/2 teaspoon salt
1/2 teaspoon garlic powder
1/4 teaspoon onion powder
1/2 teaspoon ancho chili powder
–––––––––––––––––––––––––––––––––––––––––––––––––––––––––––––
1. Combine all seasonings in a small bowl.
NOTE: BBQ spice mixture can be prepared in larger quantities and saved in an
airtight container for up to 6 months.
2. Add the popcorn to a large bowl.
3. Spray butter flavored oil onto the plain popcorn. Sprinkle BBQ spice mixture over
the popcorn. Toss to combine. Spray and season for a second final time.
–––––––––––––––––––––––––––––––––––––––––––––––––––––––––––––––––––––
11
POPCORN S’MORES
This stovetop recipe adds popcorn to the original campfire version of s’mores and turns the
familiar snack into an easy, portable treat.
Note: Kids can form the popcorn s’mores into balls
using plastic sandwich bags as gloves.
–––––––––––––––––––––––––––––––––––––––––––––––––––––––––––––––––––––
1 cup light brown sugar, firmly packed
1/2 cup butter
1/2 cup corn syrup
1/2 teaspoon baking soda
10 cups freshly popped popcorn, cooled (do not use air-popped popcorn, as the kernels
are too delicate for the hot syrup)
1 (10 1/2-ounce) package mini marshmallows
2 cups mini graham cookies
1 cup chocolate chips
–––––––––––––––––––––––––––––––––––––––––––––––––––––––––––––––––––––
1. Combine the brown sugar, butter, and corn syrup in a medium saucepan
and cook over high heat for 5 minutes (this mixture gets very hot).
Remove from the heat and stir in the baking soda.
2. Combine the popcorn and the marshmallows in a large metal or heat-resistant glass bowl
(not plastic; the heat could damage it). Drizzle the sugar mixture over the popcorn, then gently
stir in the graham cracker cookies and chocolate chips.
3. Let the mixture set until cool enough to handle, then using buttered plastic
sandwich bags on your hands, form the mixture into golf-ball-sized balls.
Store in an airtight container. Makes about 30.
–––––––––––––––––––––––––––––––––––––––––––––––––––––––––––––––––––––
12