1
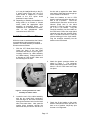
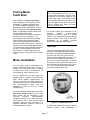
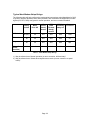
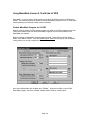
GEH-7275 kV RSX - RS232/RS485 Communications Option Instruction Manual March 10, 1999 Notice: The information contained in this document is subject to change without notice. GE makes no warranty of any kind with regard to this material, including, but not limited to, the implied warranties of merchantability and fitness for a particular purpose. GE shall not be liable for errors contained herein or incidental consequential damages in connection with the furnishing, performance, or use of this material. This document contains proprietary information, which is protected by copyright. All rights are reserved. No part of this document may be photocopied or otherwise reproduced without consent of GE. Copyright (c) 1998 by GE Published in a limited copyright sense, and all rights, including trade secrets, are reserved. Document Edition - First 10/98 kV™, MeterMate™, and OPTOCOM™ are trademarks of GE. MS-DOS and Windows are a trademark of Microsoft Corporation. FCC Notice FCC Part 15: Preventing Radio and Television Interference This device complies with part 15 of the FCC rules. Operation is subject to the following two conditions: 1. This device may not cause harmful interference. 2. This device must accept any interference received, including interference that may cause undesirable operation. Changes or modifications to this equipment not expressly approved by the General Electric Company could void the user’s authority to operate this equipment. This instruction book does not cover all details or variations in equipment nor provide for every possible contingency to be met in connection with installation, operation, or maintenance. The equipment covered by these instructions should be operated and serviced only by competent technicians familiar with good safety practices, and these instructions are written for such personnel and are not intended as a substitute for adequate training and experience in safe procedures for this type of equipment. Should further information be desired, or should particular problems arise which are not covered sufficiently for the purchaser’s purpose, the matter should be referred to GE Meter. Warning Any work on or near energized meters, meter sockets, or other metering equipment can present a danger of electrical shock. All work should be performed only by qualified industrial electricians and metering specialists in accordance with local utility safety practices and the procedures outlined in the Handbook for Electricity Metering, Chapter 14 (available from Edison Electric Institute, 1111 19th Street NW, Washington, DC 20036). The information contained in this instruction book is intended to be an aid to qualified metering personnel. It is not intended to replace the extensive training necessary to install or remove meters from service. Page 2 Related Publications: GEH-5081 GE kV™ Vector Electricity Meter Installation, Operation, and Maintenance Guide GEH-5084 MeterMate™ for DOS Reading and Programming Software for GE Electronic Meters GEH-5082 MeterMate™ for Windows Program Creation Software for GE Electronic Meters GEI-101424 kV RSX Kit Installation Guide GEI-101421 Telephone Line Surge Protection Devices Page 3 Table of Contents INTRODUCTION 6 KV RSX FEATURES, EXTERNAL MODEM MODE 6 Data Rate Setup Strings Pulse/Tone 6 6 6 Call Origination Introduction Programming Phone Numbers Retry Algorithm Call Origination Window Data Calls Event Calls Power Outage Calls (optional) Power Restoration Calls Test Calls 7 7 7 7 7 7 8 8 9 9 Call Answer Answer Window Number of Rings Answer Lockout Timer 9 9 9 9 KV RSX FEATURES, RS-232 SIMPLE SERIAL MODE Data Rate KV RSX FEATURES, 9 10 RS-485 SIMPLE SERIAL MODE Data Rate 10 10 INSTALLING THE KV RSX IN THE KV™ METER 10 kV RSX Installation 10 Installation on S-base Meters 12 Installation on A-base Meters 13 Optional Outage Call-in Battery Installation 14 Option Board Compatibility Introduction RG-1 Revenue Guard Option Board I/O-1 Input/Output Option Board (Obsolete) I/O-2 Input/Output Option LP-1 Load Profile Option Board (Obsolete) LP-2 Load Profile Option Board kV RSX Option Board 15 15 15 15 16 16 16 16 Page 4 MeterMate Software Compatibility 16 TESTING METER CALIBRATION 17 METER INSTALLATION 17 Test Call 17 RENEWAL PARTS 18 kV RSX Kits S-Base kV RSX Kits A-base kV RSX Kits Call-in On Outage Upgrade Kit 18 18 18 19 Other Renewal Parts: 19 APPENDIX 20 External Modem Mode kV RSX Setup Strings Baud Rate Typical External Modem Setup Strings Typical Host Modem Setup Strings 20 20 21 22 23 RS-232 Simple Serial Mode 25 RS-485 Simple Serial Mode 26 Determining the Mode of an Installed kV RSX 28 Using MeterMate Version 2.12 with the kV RSX Default MeterMate Program for kV RSX External Modem Reset Programming to use the Optional RJ-11 Cable 29 29 30 31 Page 5 computer using a null modem cable. It also serves as an RS-232 interface to third party communications devices. The baud rate for this mode is fixed at 9600 bps. Introduction The kV RSX Communications Board is an optional factory-supplied addition to the kV™ Meter, or may be ordered in the form of a retrofit kit to upgrade “Communication Ready” kV™ Meters. Meters that are capable of being upgraded may be identified by the words “Modem Ready” on the upper nameplate of the meter. The kV RSX Option Board is used to provide two-way communication to the kV™ Meter and may be used on S-base, A-base, and switchboard meters. It is available on both TOU and demand versions of the kV™ Meter. The kV RSX Option Board may be used in conjunction with other GE option boards, which provide a three-phase power supply, load profile recording, and input/output functions. If required, the flexibility of the kV™ Meter makes it possible to combine all of the above option boards in a single meter. The kV RSX Option Board has three modes of operation: External Modem mode, RS-232 Simple Serial mode and RS-485 Simple Serial mode. When operating in External Modem Mode, the kV RSX provides an RS232 interface to an external telephone or wireless modem to facilitate remote kV Meter reading and programming. In this mode the kV RSX contains AMRA tables which can be programmed to provide the following basic features: • 300, 1200, 2400, 4800, 9600 baud support. • Supports industry standard protocol and AMRA Tables • Originate call on an event • Originate call on a scheduled basis • Originate (optional) call on power RS-485 Simple Serial Mode provides a halfduplex, 2 -wire, RS-485 interface for remote reading of the kV Meter. The baud rate is fixed at 9600 bps. No multidrop capability is supported. All kV™ Meters, including those with kV RSX boards, are programmed using GE’s MeterMate software program. kV RSX Features, External Modem mode The kV RSX External Modem mode features can be broken down into those features that apply only to when the meter originates a call (call origination), the meter answers a call (call answer), or standard features that apply to all call types. Data Rate The kV™ RSX Option Board can be programmed for a DTE baud rate of 300, 1200, 2400, 4800, or 9600. This is the baud rate at which the option board will communicate to the attached, external, modem. Setup Strings The kV™ RSX Option Board is shipped with default external modem setup strings. However, should it be necessary for you to change the modem’s setup strings, they may be changed by using GE’s MeterMate software program. PSEM Pulse/Tone outage In RS-232 Simple Serial Mode, the kV RSX provides a 3-wire, RS-232 interface. This interface allows the kV Meter to be read by a The kV™ RSX Option Board can support both pulse and tone dialing. It can be configured with the appropriate dialing type when generating a meter program using GE’s MeterMate for Windows Program Creation Software. The type of dialing method which should be used can be Page 6 determined by contacting your local telephone company. Call Origination Introduction The kV™ Meter is capable of originating a phone call for the following reasons: • Scheduled data call • Event (i.e. errors, cautions, diagnostics) • Power outage (optional) • Power restoration • Test call (1-15 minutes) between each call cycle (primary/secondary phone numbers). If a connection cannot be established after the programmed number of call cycles, the modem will wait four (4) hours and repeat the process. A programmable retry limit is provided that can limit the total number of times the above algorithm will be repeated before the meter no longer attempts to call. The kV Meter will default to two (2) times through the retry algorithm unless changed using GE’s MeterMate Software. The retry algorithm does not apply to power outage calls or to test calls. Programming Phone Numbers Call Origination Window The kV™ Meter can store up to three (3) phone numbers that can be selected by the meter to place a call to the host software system. There are five (5) possible ways call origination can take place. These are scheduled data calls, event calls, power restoration calls, test calls, and power outage calls. Each call type may have both a primary and secondary phone number. The primary phone number will be attempted first, and if no connection can be established, the meter may then either try the secondary phone number or go into retry mode (see below) if no secondary phone number exists. Phone numbers may be reused (i.e. a single phone number can be used for all primary numbers). A call origination window can be established that will limit when the kV™ Meter can originate a call. This window can prevent the kV™ Meter from making phone calls when a voice user is likely to need access to the phone. Each phone number may be up to 38 characters in length to allow for credit card calls and other calls requiring long phone numbers. Retry Algorithm If the kV™ Meter attempts to originate a call using the primary phone number but is unable to establish a connection for any reason, it will immediately attempt the secondary phone number, if supplied. If a connection cannot be established using this phone number either, the meter will enter the following retry algorithm: The meter will attempt to dial both the primary and secondary phone number (if present) up to a programmable five (5) times each, waiting a random number of minutes The call origination window is specified as a start and stop time (HH:MM) on a particular day of the week, combination days of the week, or every day of the week. It is not possible to have different call origination windows for different days of the week. Because the kV™ Meter can originate a call for the purpose of communicating data, errors/cautions/diagnostics, and reporting power outages, some control is provided to customize the kV™ Meter to best meet the needs of your customer. The kV™ Meter can be configured to apply the call origination window to data calls, error/caution/diagnostic calls, or both types of calls. The call origination window is not applied to power outage calls or to test calls. Note: Demand only kV meters can not have a call origination window Data Calls The kV™ Meter can be configured to originate a call to report data to the host software. The meter may be programmed to originate a call in one of two ways: 1. Call at a specified time and day of the week - this option enables a call to the host Page 7 software on a particular day of the week, combination of days of the week, or every day of the week at a single specified time. Using this option, the maximum number of data calls per day is one. 2. Call on a specific date and time - this option enables calls to occur on a specified date at a specified time. Only one date and time will be stored in the kV™ Meter, therefore, this field will need to be reprogrammed during each data call. The kV™ will attempt to dial the primary/alternate phone numbers that have been programmed into the “Primary/Alternate Data Phone Number” field using GE’s MeterMate Software. 7.2 Volt Lithium Battery (Safety Precautions) • Do not expose battery to temperatures above 100 degrees C. Do not incinerate, puncture, crush, recharge, over discharge or short circuit the battery • The contents are water reactive and the battery contents can form HCL (hydrochloric acid), SO2 (sulfur dioxide) and H2 (hydrogen), upon contact with water (only when forced open). Do not expose contents of battery to water. Do not expose contents to high humidity for extended periods of time. • Dispose of batteries in accordance with local, state, and federal hazardous waste regulations. To obtain an MSDS, contact Manager - Quality and EHS, GE Meter, 130 Main Street, Somersworth, NH 03878-3194, Telephone number (603) 749-8550. Note: Data calls can not be scheduled on demand only kV™ Meters Event Calls The kV™ Meter can initiate a call to the host software whenever an error, caution, or diagnostic is detected by the meter. Using GE’s MeterMate Software, the kV™ Meter can be customized to call in on all or selected events. The kV™ Meter will attempt to dial the primary/alternate phone numbers that have been programmed into the “Primary/Alternate Event Phone Number” field using GE’s MeterMate Software. Power Outage Calls (optional) The kV™ Meter can be equipped with an optional dual-cell lithium battery to provide power outage notification. The life of the battery will depend on several factors including the number of outages and the duration of outages before an outage call is placed. Under typical use, the battery can be expected to last for at least fifty (50) phone calls. Soft Switch The optional power outage call feature is controlled by a Soft Switch. Unless activated, the power outage feature is not enabled. The Outage Soft Switch can be purchased by contacting your local GE sales representative. All meters ordered with the optional power outage call feature will be supplied with the Outage Soft Switch enabled. Outage Definition The length of time that power must be out before the kV™ Meter places an outage call to the host software is programmable from zero (0) to two hundred fifty-five (255) seconds. The default time is zero (0), which means that an outage call will be attempted as soon as the kV™ Meter goes into power down mode. This timer should be used for reference only and is accurate to ± 10%. Battery Indicator The kV™ Meter will attempt to dial the primary/alternate phone number that have been programmed into the “Primary/Alternate Outage Phone Number” field using GE’s MeterMate Software. It is possible to test the kV™ Meter’s optional power outage battery. This is a pass/fail test and is only performed when initiated by the host software during a communications session with the meter. Page 8 Outage Retry Algorithm If the kV™ Meter outage call to the primary phone number is unsuccessful the meter will delay for 2 minutes, then attempt to call the alternate phone number, if provided. Alternatively, it will retry the primary number. If both calls are unsuccessful, the modem will power down and make no further attempts to dial the host software. on a particular day of the week, combination days of the week, or every day of the week. It is not possible to have different answer window for different days of the week. Note: Demand only kV™ Meter cannot have an answer window and will behave as if the answer window is always open. Number of Rings Power Outage Delay A programmable timer is provided with the optional power outage call feature that can be used to minimize the number of power outage calls made by a particular meter for the same outage. If enabled, the kV™ Meter will only initiate a power outage call to the host software after a programmable timer has expired. The timer will be initiated after power restoration and must expire before a power outage call is initiated. If a power outage occurs before the timer has expired, no outage call will be placed and the timer will be reset. This timer can be configured between zero (0) and two hundred fifty-five (255) minutes with zero (0) disabling this feature. Power Restoration Calls The kV™ Meter will call the host software when power has been restored following an outage if enabled. Test Calls Using GE’s MeterMate software and an optical probe, the kV™ Meter can initiate a test call to a designated phone number. A test call may also be initiated over a remote connection. The call will take place after the remote session has ended. The kV™ Meter can be configured to answer after a programmable number of rings. Separate limits are provided for the number of rings before answering for both inside and outside the answer window. The number of rings is programmable from zero (0) to two hundred fifty five (255) where zero (0) will cause the meter to ignore all incoming calls. Answer Lockout Timer For situations where the kV™ Meter will be sharing the phone line with a voice user, the Answer Lockout Timer may be used. This feature, when enabled using GE’s MeterMate Software, will cause the kV™ Meter to not answer incoming phone calls, for a programmable period of time (0-255 minutes), after it has answered a call but was unable to establish carrier. This feature enables a voice user to gain access to an incoming voice call without having the meter intercept the call. Note: GE recommends that the Answer Lockout Timer be disabled (set to zero) when the meter is not sharing the phone line with a voice user. Call Answer The kV™ Meter is capable of answering calls from the host software. kV RSX Features, RS-232 Simple Serial mode Answer Window An answer window can be established to delay or prevent the answering of a call by the kV™ Meter when it is sharing the phone line with a voice user. The answer window is specified as a start and stop time (HH:MM) The kV RSX Option Board's RS-232 Simple Serial mode provides a means of remotely reading and programming the kV Meter over an electrically isolated RS-232 link. In this mode the kV RSX contains no Page 9 programmable features; there are no AMRA tables in the option board. It simply provides a pass through communications link to the kV Meter. In this mode the kV meter can be communicated with using a 9-pin null modem cable connected between the kV RSX communications cable and the RS-232 compatible communications port of the host device. Refer to the Appendix for connection details. Data Rate The kV RSX Option Board is configured for 8 data bits, 1 stop bit, no parity, and a fixed baud rate of 9600bps in RS-232 Simple Serial mode. kV RSX Features, RS-485 Simple Serial mode The kV RSX Option is configured for 8 data bits, 1 stop bit, no parity, and a fixed baud rate of 9600bps in RS-485 Simple Serial mode. Warning: The kV™ Meter contains lethal voltages. The meter must be completely disconnected from any external circuits and the carryover capacitor completely discharged before disassembly is attempted. Failure to observe this practice can result in serious injury or death. For more information refer to the kV™ Meter Installation, Operation, and Maintenance Guide, GEH 5081A. kV RSX Installation The kV RSX Option Board's RS-485 Simple Serial mode provides a means of remotely reading and programming the kV Meter over an electrically isolated, twisted pair, halfduplex, RS-485 link. In this mode the kV RSX contains no programmable features; there are no AMRA tables in the option board. It simply provides a pass through communications link to the kV Meter. Refer to the Appendix for connection details. Data Rate Installing the kV RSX in the kV™ Meter The kV RSX Option Board can only be installed in “Modem Ready” kV™ Meters. These meters can be identified by the words “Modem Ready” which are printed on the left side of the meter nameplate. Any combination of the four (4) option boards may be installed in the kV™ Meter at one time. These include the I/O-2 Input/Output option board, the LP-2 Load Profile option board, the kV RSX Option Board, and the RG-1 Revenue Guard option board. The I/O-2, LP-2, and kV RSX Option Board can be combined in an option board “stack” if necessary. See Figure 1 for details. Page 10 Figure 1: Option board stack The Revenue Guard option board is not part of this stack and is not affected by the presence of other option boards. Note: The kV RSX Option Board must always be installed as the inner most option board (the board closest to the kV™ Meter’s main board). The kV RSX board is installed as follows: Figure 4: RS-232 Simple Serial Mode 1. If the meter is not disassembled, follow the disassembly instructions described in the kV™ Meter Installation, Operation, and Maintenance Guide (GEH-5081). 2. Place the bezel face down on a soft, clean surface to protect the nameplate and liquid crystal display. 3. Remove the I/O and LP option boards if they are present. 4. The I/O-1 and LP-1 option boards must not be reused with the kV RSX. 5. Select the desired mode of operation by installing the jumper shunts according to the following: Figure 5: RS-485 Simple Serial Mode 6. If the kV RSX Option Board will not be combined with either the I/O or LP option boards proceed to step 3. If the kV RSX Option Board will be installed with the I/O-2 and/or LP-2 option boards proceed to the next step. 7. Place the kV RSX Option Board on a soft clean surface and install the four (4) nylon spacers by gently pushing them into the four (4) holes on the board. Do not reuse nylon spacers. When removed, a slight rounding of the spacer occurs which can greatly decrease the ability of the spacer to hold the option board firmly in place. Figure 2: Location of mode jumpers 8. If both the LP-2 and I/0-2 option boards are to be installed, the LP-2 option board must be installed next. Install it by engaging the 26 pin connector pins between the kV RSX Option Board and the LP-2 option board. Then, after lining up the nylon spacers on the kV RSX Option Board with the four (4) holes on the LP-2 board, snap the option board into place. 9. The I/O-2 option board may be installed directly to the kV RSX Option Board if the LP-2 option board will not be used Figure 3: External Modem Mode Page 11 or, it may be installed directly to the LP2 option board. Either way, the I/O-2 option board is installed in a similar manner to the LP-2 option board described in step 6 above. the slot and up against the base. Make sure that the cable has been brought up on the outside of the shroud. 3. Check the headers on the kV RSX board to make sure that the pins are not bent or out of position. Orient the smallest black connector such that the indexed (filled) hole in the black connector is lined up with the missing pin in the 4 pin header. Plug the connector assembly into the header on the RSX board. Orient the larger black connector such that the indexed (filled) hole in the black connector is lined up with the missing pin in the 6 pin header. Plug the connector assembly into the header on the RSX board. 4. Attach the plastic connector holder as shown in Figure 7. The connector holder snaps should extend through the holes in the kV RSX board and snap into place. 10. Depending on whether the installation is being made to an S-base or A-base meter, install the appropriate cable assembly as described below. For installation on a switchboard kV Meter, refer to the switchboard meter instruction book, GEH-7271. Installation on S-base Meters While the meter is unassembled, the S-base communications cable assembly must be installed. This cable assembly is installed in S-base meters as follows: 1. With the kV™ Meter base facing you, locate the lower of the two small knockouts and remove it (see Figure 6: Locating knockout for cable assembly on S-Base meters). Enlarge the hole to a diameter of 0.290 inches. Make sure the resulting hole is clean. Figure 6: Locating knockout for cable assembly on S-Base meters 2. Locate the end of the cable assembly with the two small black connectors. Pass the larger of the black connectors through the knockout hole from the back side of the meter base. Next, pass the smaller black connector through the same hole and pull until the wire tie is in Figure 7 : Connector holder placement 5. Page 12 Check the 30 pin header on the meter board to make sure that the pins are not bent or out of position. Adjust any pins that are out of alignment. kV™ Meters with 26 pin headers instead of 30 pin headers cannot be retrofitted with the kV RSX Option Board . 6. With the kV RSX Option Board “stack” in hand, insert the tabs on the kV RSX Option Board into the slots in the bezel (see figure 8). Figure 9 : Check "RS" box Installation on A-base Meters While the meter is unassembled, the A-base communications cable assembly must be installed. This cable assembly is installed in A-base meters as follows: 1. Figure 8: Inserting option boards With the kV™ Meter base facing you, locate the knockout on the left side of the base (see Figure 10) and remove it by tapping it with a punch. Make sure the hole is clean and the knockout parts are removed. 7. Gently lower the board until the 30 pin connector on the meter and the kV RSX Option Board are engaged. Make sure that the two snaps engage the board. 8. Reassemble the meter, except for the cover, as described in the kV™ Meter Installation, Operation, and Maintenance Guide (GEH-5081). 9. Insert and tighten a wire tie around the cable assembly on the inside of the meter base to retain the cable assembly. 10. On the right side of the upper nameplate place an “X” in the box marked “RS” and replace the cover. See Figure . 11. The meter is now ready to be programmed using GE’s MeterMate software. Figure 10: Locating knockout for cable assembly on A-Base meters 2. Insert the small connectors end of the cable assembly through the knockout from the outside of the meter base until the grommet contacts the knockout. Make sure that the cable has been brought up on the outside of the shroud. 3. Insert the grommet into the knockout and push until the grommet is fully seated. Page 13 4. 5. Check the headers on the kV RSX board to make sure that the pins are not bent or out of position. Orient the smallest black connector such that the indexed (filled) hole in the black connector is lined up with the missing pin in the 4 pin header. Plug the connector assembly into the header on the RSX board. Orient the larger black connector such that the indexed (filled) hole in the black connector is lined up with the missing pin in the 6 pin header. Plug the connector assembly into the header on the RSX board. Attach the plastic connector holder as shown in Figure 7. The connector holder snaps should extend through the holes in the kV RSX board and snap into place. 6. Follow the steps outlined in the S base installation for inserting the stack into the meter. Then, reassemble the meter. 7. On the right side of the nameplate place an “X” in the box marked “RS” and replace the cover. See Figure 9. 8. The meter is now ready to be programmed using GE’s MeterMate software. Optional Outage Battery Installation Call-in 2. Place the battery into the battery holder with the leads extending through the slot in the battery holder. See Figure 11. 3. Place the battery and battery holder behind the communications cable being careful not to disconnect the cable from the kV RSX board. Insert the top of the battery holder under the two top snaps and press the bottom of the battery holder until the snaps engage. See Figure 12 for details. 4. Place communications cable under cable holder as shown in Figure 13. Dress remaining leads by tucking under bezel. 5. Replace the cover. Figure 11: Battery & battery holder assembly The kV™ Meter can be fitted with an optional battery pack which will power the kV RSX Option Board so it can call in during a power outage. This battery only powers the kV RSX; the external modem connected to the kV RSX must be powered by a customer supplied uninterruptable power source. The optional battery pack is installed as follows: 1. Install kV RSX Option Board and cable per instructions above. Connect the Lithium battery to the kV RSX Option Board battery connector, which is next to where the communications cable connects. This is a keyed connection and should not be forced Figure 12: Battery holder installation Page 14 I/O-1 Input/Output Option Board (Obsolete) The I/O-1 Input/Output option board (GE part # 9938226002) is now obsolete and has been replaced by the I/O-2 Input/Output option board (GE part # 9938226004). The I/O-1 option board cannot be used with the kV™ RSX Option Board. If I/O is needed in a kV™ Meter with a modem, the I/O-2 option board must be used. See Table 1: I/O-1 Compatibility for more details. Figure 13 : Battery cover installation I/O-1 LP-1 LP-2 kV RSX √ Option Board Compatibility √ √ Introduction √ √ Table 1: I/O-1 Compatibility The kV™ RSX Option Board may be used in conjunction with the RG-1 Revenue Guard, I/O-2 Input/Output, and the LP-2 Load Profile option boards. In cannot be used with either the I/O-1 Input/Output, the LP-1 Load Profile option boards or the kV Internal modem board. The RSX is used in lieu of the kV Internal Modem board. The kV™ RSX Option Board is always installed directly onto the kV™ Meter. Either the I/O-2 Input/Output or the LP-2 Load Profile option board may then connect to the kV™ RSX Option Board if desired. If all three option boards are used, the option boards must be installed in the following order: 1. kV™ RSX Option Board 2. LP-2 Load Profile option board 3. I/O-2 Input/Output option board RG-1 Revenue Board Guard Option The RG-1 Revenue Guard option board may be used in conjunction with any other kV™ Meter option board including the kV™ RSX Option Board. Page 15 I/O-2 Input/Output Option The I/O-2 Input/Output option board (GE part # 9938226004) is a direct replacement for the I/O-1 option board (see above) and was designed to be compatible with the kV RSX Option Board. It may be installed directly onto the kV™ Meter, the kV RSX Option Board, or to the LP-2, Load Profile option board. See Table 2: I/O-2 Compatibility for more details. The LP-2 Load Profile option board (GE part # 9938348007) is a direct replacement for the LP-1 option board (see above) and was designed to be compatible with the kV RSX Option Board. It may be installed directly onto the kV™ Meter or the kV RSX Option Board. See Table 4: LP-2 Compatibility for more details. Option Boards LP-2 LP-1 LP-2 √ kV RSX √ √ √ √ √ √ √ Modem Ready kV only Modem Ready kV only The LP-1 Load Profile option board (GE part # 9938348005) is now obsolete and has been replaced by the LP-2 Load Profile option board (GE part # 9938348007). The LP-1 option board cannot be used with the kV RSX Option Board. If load profile information is needed in a kV™ Meter with a kV RSX, the LP-2 option board must be used. See Table 3: LP-1 Compatibility for more details. The kV RSX Option Board may be used in combination with the I/O-2 Input/Output, and LP-2 Load Profile option boards. See Table 5: kV RSX Compatibility for more details. Option Boards KV RSX (Modem Ready kV only) √ √ √ kV RSX √ √ I/O-2 LP-2 √ √ Option Boards I/O-2 √ kV RSX Option Board LP-1 Load Profile Option Board (Obsolete) I/O-1 Modem Ready kV only Modem Ready kV only Table 4: LP-2 Compatibility Table 2: I/O-2 Compatibility LP-1 √ √ √ kV RSX √ √ √ √ I/O-2 √ Option Boards I/O-2 I/O-1 √ √ √ Table 5: kV RSX Compatibility √ √ Table 3: LP-1 Compatibility LP-2 Load Profile Option Board MeterMate Software Compatibility The kV RSX Option Board is compatible with the following software: 1. MeterMate™ Version 2.12 or greater 2. Utility Translation Systems, Inc.’s MV90 Page 16 Testing Meter Calibration If the kV RSX is in simple serial mode, meter calibration can be tested in kV RSX equipped kV™ Meters as outlined in the kV™ Meter Installation, Operation, and Maintenance Guide, GEH 5081B. If the kV RSX is configured in the external modem mode, a compatible external modem must be connected to the kV RSX communications cable before powering on the meter to perform calibration. It is recommended that 20 seconds of settling time be allowed, after applying voltage, before making accuracy measurement or placing the meter into test mode. Users will see “busy” on the LCD display approximately 17 seconds after voltage has been applied to the meter. Once the display returns to its normal scroll, it is safe to begin accuracy measurements or to place the meter into test mode. Meter Installation The kV™ Meter must be connected to the external communications device through a means which will provide both a secure connection and ease of disconnection for troubleshooting, meter change out, etc. Important: Under no condition should the communications line be run in a conduit with power lines or exit the meter enclosure via the same nipple as the power lines. Also, for the case where other optional signal lines are taken from the kV™ Meter, these other lines should not be bundled with either the power lines or the phone line. For A-base meters, the connection to the customer supplied communications equipment should be done in a similar manner. The communications cable for the A-base terminal block should be taken immediately to a separate enclosure dedicated to this specific application. Test Call The kV™ Meter equipped with a kV RSX operating in external modem mode can be prompted, using GE’s MeterMate Software, to place a test call to one of the three (3) phone numbers stored within the meter. The test call may be initiated using the optical port or over a remote connection. A red LED is provided on the kV RSX board that can be seen from the front of the meter (see Figure 14: kV RSX LED location) and is used to monitor the progress of the call. All kV™ Meters with kV RSX option are supplied with an insulated communications cable which extends approximately 30 inches out the base on S-base meters and out of the side of the case on A-base meters. The communications cable may be terminated in either an RJ-11 or a DB-9 connector plug. The communications cable should exit the Sbase meter socket enclosure by the most direct means and be connected to the customer provided communications equipment external to the meter enclosure. Usual practice has a short conduit nipple extending from the meter enclosure to a separate, dedicated enclosure where the external modem is located. Figure 14: kV RSX LED location An LED will illuminate when the kV™ Meter’s external modem has established a Page 17 connection and carrier detected. By monitoring this LED (as well as any LEDs on the external modem), correct operation of the kV RSX, can be verified during meter installation. Note: When the kV™ Meter is first energized at the installation site, the carrier detect LED will illuminate to indicate that the kV RSX is properly powered. After the kV RSX is initialized, the carrier detect LED will go out. If the LED stays illuminated for more than 5 seconds, the kV RSX board is defective and should be replaced. 9938627002. This kit contains the following material: Component kV RSX circuit board Cable assembly Connector holder PC board spacers Wire tie Instruction sheet GE Part # 9938498003 Qty 1 9938583002 9938622001 9935026005 1 1 4 9689597010 GEI-101424 1 1 A-base kV RSX Kits If a communications cable with a DB-9 connector is desired, order GE part number 9938627003. This kit contains the following material: Renewal Parts kV RSX Kits There are four (4) kV RSX kits that may be ordered to retrofit a “Modem ready” kV™ Meter. “Modem ready” kV™ Meters will have “Modem Ready” printed on the meter nameplate. If the kV™ Meter nameplate does not have this designation, the meter can not be retrofitted with a kV RSX board. GE Part # 9938498003 Qty 1 9938583003 9938622001 9935026005 1 1 4 GEI-101424 1 If a communications cable with an RJ-11 connector is desired, order GE part number 938627004. This kit contains the following material: S-Base kV RSX Kits If a communications cable with a DB-9 connector is desired, order GE part number 9938627001. This kit contains the following material: Component kV RSX circuit board Cable assembly Connector holder PC board spacers Wire tie Instruction sheet Component kV RSX circuit board Cable assembly Connector holder PC board spacers Instruction sheet GE Part # 9938498003 Qty 1 9938583001 9938622001 9935026005 1 1 4 9689597010 GEI-101424 1 1 Component kV RSX circuit board Cable assembly Connector holder PC board spacers Instruction sheet If a communications cable with an RJ-11 connector is desired, order GE part number Page 18 GE Part # 9938498003 Qty 1 9938583004 9938622001 9935026005 1 1 4 GEI-101424 1 Call-in On Outage Upgrade Kit Order GE part number 9935143001. This kit contains the following material: Component Outage Battery Battery Holder Instruction Sheet GE Part # 9938346001 9936888001 GEI-101422 Qty 1 1 1 Other Renewal Parts: Component Communications Cable for SBase Meters, DB-9 connector Communications Cable for SBase Meters, RJ-11 connector Communications Cable for ABase Meters, DB-9 connector Communications Cable for ABase Meters, RJ-11 connector Outage Battery Battery Holder PC Board Spacers GE Part # 9938583001 Qty 1 9938583002 1 9938583003 1 9938583004 1 9938346001 9936888001 9935026105 1 1 100 Page 19 Appendix External Modem Mode For correct operation in external modem mode, the kV RSX requires that the operating mode jumpers be positioned correctly, an external modem be connected to the communications cable and the setup strings and baud rate be correct for the modem. At the time of power up, the kV RSX initializes the external modem. If the modem is not present or the set up strings or baud rate are incorrect, the kV RSX will continue to try to configure the modem. The Modem Configuration Error bit, in the End Device Mode and Status table of the kV RSX, will be set if the kV RSX cannot properly configure the external modem. kV RSX Setup Strings In External Modem Mode the kV RSX has programmable setup strings which serve to: reset the external modem device to a known state, initialize it for communications with the kV RSX, setup call answering and call origination configuration parameters. External Modem Reset String The kV RSX is designed to interface with many different external modem devices both domestic and foreign using telephone or wireless technologies. Because there is no common method of resetting these various external modems to a known state, the kV RSX provides a programmable reset string. Connecting the kV RSX to an external telephone modem will require the use of a 9 pin female to 25 pin male D-sub adapter such as Inmac part #37101 or Global Stock No. THC4496. Before putting the kV Meter into service it is important to know the reset string and reset state of the external modem device connected to the kV RSX. The majority of external modem devices can be reset to their user programmed state by the string "ATZ". This 'z' is the default reset string value for the kV RSX. Some modems have several user programmed profiles, in which case the Z is appended with a number to load the desired profile. Most modems can be reset to their factory default state by "AT&F". If this is the case and the factory state is desired the 'z' should be reprogrammed with "&F". Some modems have several factory default profiles, in which case the &F is appended with the number of the desired state. Some wireless modems only emulate the telephone modem AT command set and do a good job of resetting themselves on power up. Sending an AT reset command to these modems may start an undesired, lengthy channel reacquisition process. In these cases it may be best to program the reset string to all blank characters. This will prevent the kV RSX from sending a reset string. In configuring the external modem device to work with the kV RSX it is important to know what resets the modem and what the reset state is. Initialization String The programmable kV RSX initialization string is used to set the external modem to a configuration required by the kV RSX to control the modem. There are six (6) main functions that are programmed through the initialization string. These are listed below along with the AT command that sets the desired configuration in popular telephone modems. Page 20 Local Echo - Local echo of modem commands must be set to off (E0). On/Off Hook Control - The external modem is initialized to on hook (H0). Modem Result Messages - Configure the modem to respond with AT command result messages (Q0 ). Format of Result Messages - Configure the modem to respond with text rather than numeric result messages (V1). Carrier Detection - Configure the modem to control the carrier detect RS-232 signal line based on the presence of the carrier signal (&C1 ). Data Terminal Ready - When using the DB-9 terminated communications cable, configure the modem to go to go on hook and assume the command mode when DTR is toggled (&D2). If the RJ-11 communications cable is used, configure the modem to override the DTR state (&D0) because this cable does not support the DTR signal line. The default setting for the initialization string is E0H0Q0V1&C1&D2. This should be changed for cases where the modem in question does not support the default commands. In these cases, the equivalent command for the modem of interest should be substituted. For external modems that support error control it is necessary to disable the error control. The AT command to disable error control should be appended to the initialization string. For external modems that support data compression and flow control it is necessary to disable both data compression and flow control. The AT commands to disable data compression and flow control may be appended to either the initialization string or the Call Answering and Call Origination Strings. See table 6 for recommendations. Call Answering Strings The kV RSX contains two 20 byte strings which can be programmed to accept AT commands which pertain to configuring the external modem to answer incoming calls. These are initially set to all spaces. Call Origination Strings There are four 20 byte strings which can be programmed to accept AT commands which pertain to configuring the external modem to originate outbound calls. These are initially set to all spaces. CAUTION: The following modem options should NEVER be placed in any meter modem setup string as you may prevent successful communication with the meter: & commands: S-registers: Dial modifiers: E1, H1, Q1 &Sn, &Tn, &Vn, &Wn, &Yn, and &Zn s3, s4, s5, s14, s16, s21, s23, s24, and s27 s=<n> Baud Rate The rate that the kV RSX communicates with the external modem (DTE rate) is configured through programming of the Answer Baud Rate and the Originate Baud Rate in the kV RSX AMRA tables. The initial baud rate used to setup the external modem is the Answer Baud Rate, which is set to 9600 bps at the factory. The Originate Baud Rate also defaults to 9600 bps. Unless the external modem operates at speeds slower than 9600 bps, these values should remain at there initial settings. When using slower speed modems it is necessary to reprogram the Answer and Originate Baud rates to the speed of the modem. For slower DTE speeds it is necessary to put E0 in the modem reset string following the modem reset command(s). Page 21 If the answer (and/or originate) connect baud rate is to be other than the DTE rate or if a particular answer (and/or originate) connect baud rate is desired it must be configured through the answer (and/or originate) modem string. The RSX will not adjust its DTE rate to that of the negotiated connection baud rate. This is not a problem for those modems which fix the DTE rate regardless of the connection rate (DCE rate). For modems that adjust the DTE rate to the connection rate, the connection rate should be fixed to the DTE rate through the use of appropriate Call Answering and Call Origination setup strings. See Table 6 for recommendations. Typical External Modem Setup Strings The following table will help configure the most popular external modems for use with the RSX. In general, modems should be set for error correction disabled, flow control disabled, and data compression disabled. USRobotics Motorola Hayes Other (Boca, Zoom, Cardinal) No Flow Control Data Compression Off No error control Fixed Serial Port Rate Setting the connect rate for fixed 9600 See external modem mfr. manual for other connect baud rates. &H0 &K0 &M0 &B1 &N6 &K0 \Q0 %C0 \N1 Not available N0 S37=9 &Q0 Not available N0 S37=9 1 Not available +MS=9,0,9600,9600 2 &K0 &K0 1 %C0 \N1 Table 6 : External Modem Setup Strings Page 22 Typical Host Modem Setup Strings The following table will help configure the most popular host modems using MeterMate for DOS. In general, modems should be set to factory defaults, with command echo suppressed, modem signals (CD, DTR, DSR) configured for normal operation, and error correction disabled. USRobotics Motorola Hayes Other (Boca, Zoom, Cardinal) Load factory default Command Mode Echo Off CD (Carrier Detect) Normal DTR (Data Terminal Ready) normal DSR (Data Set Ready) always on No error correction &f (&f1) e0 &c1 &d2 &S0 &m0 &f e0 &c1 &d2 &S0 \n1 &f e0 &c1 &d2 &S0 &q0 &f e0 &c1 &d2 &S0 \n1 1 2 1 Table 7 : Host Modem Setup Strings 1) May be referred to as “Normal operation (no error correction, buffered data)” 2) May be referred to as “Selects direct asynchronous mode (no error correction or speed buffer)” Page 23 Figure 15 External Modem Connections for the DB-9 Cable. Figure 16 External Modem Connections for the RJ-11 Cable Page 24 RS-232 Simple Serial Mode RS-232 is used extensively for communications between computers and peripheral devices such as the mouse, keyboard and etc. Another example is the use of the RS-232 port on a computer to communicate with the kV meter using the Smartcoupler. The kV RSX, in RS-232 mode, provides a straightforward, isolated, connection between the kV Meter and the host device. The permanent connection of the kV Meter to a personal computer, for continuous data collection, is an example. The most convenient way to connect the kV RSX to a computer is to connect the kV RSX DB-9 communications cable to the computer's RS-232 port through a 9 pin null modem cable. It is important to select a null modem cable that is shielded and that the end device (computer) provide a path from this shield to ground. The shell of the kV RSX DB-9 connector is connected to the shield which surrounds the wire in this cable. The RS-232 communications distance is limited to 50 feet. Figure 17 RS-232 Connections for the DB-9 Cable. Figure 18 RS-232 Connections for the RJ-11 Cable. Page 25 RS-485 Simple Serial Mode RS-485 communications use differential voltage signals to improve on the noise immunity and distance limitations of RS-232. When fully implemented, RS-485 enables many devices to share a single communications bus. The kV RSX implementation of RS485 is point to point, with no multi-drop capability at this time. It is useful if the communications distance is greater than the 50 feet provided by an RS-232 link. Also, RS-485 communications are more immune to the disturbances that are experienced in an electrically noisy environment. The kV RSX communications cable does not connect directly to a computer port, although some embedded controllers have a dedicated RS-485 port. Typically, an RS-485 Serial Interface Card is installed in the host computer to provide the correct RS-485 signals over a twisted pair of wires. The connection to the kV RSX is half duplex, using two wires. For half-duplex, the signal lines marked RX+ and TX+ must to be connected together and the signal lines RX- and TX- must be connected together, as shown in Figure 20. Terminating resistors are not required for this application and should not be used. The kV RSX, RS-485 communications, have been tested using a host computer and the RS422/485 Serial Interface Plus, Part # IC050C. This serial interface card is made by: Black Box Corporation P.O. Box 12800 Pittsburgh, PA 15241 Though not yet tested with the kV RSX, other serial interface cards and RS-232 to RS-485 signal converters are available from: B & B Electronics Manufacturing Company P.O. Box 1040 Ottawa, IL 61350 http://www.bb-elec.com Telebyte Technology, Incorporated 270 Pulaski Road Greenlawn, NY 11740 http://www.telebyteusa.com The EIA-485 standard does not specify a standard connector for RS-485 communications. There are two styles of communications cables available for the kV RSX. One is terminated with a DB-9 connector and the other with a “telephone type” four conductor RJ-11 connector. If the environment is electrically noisy, use of the kV RSX DB-9 communications cable is recommended. The shell of the DB-9 connector is connected to the shield which surrounds the wire in this cable. Over the run of the cable, the shielding should be continuous to the end device, where it should be grounded. Page 26 Figure 19 RS-485 Connections for the DB-9 Cable. Figure 20 RS-485 Connections for the RJ-11 Cable. Page 27 Determining the Mode of an Installed kV RSX The kV RSX option board is not detected by the meter in either RS-232 or RS-485 simple serial modes. There are no tables in the option board when it is in either of the simple serial modes. There is no way to read the meter and find out what mode the option board is in. The mode can be determined by observing the LED at the time of power up, one (1) blink for external modem mode, two (2) blinks for RS-232 simple serial mode, and four (4) blinks for RS-485 simple serial mode. If it is not possible to cycle the power to observe this LED and the mode is not known, the mode can be determined through process of elimination. First, read the kV meter using the Smartcoupler and determine whether the kV RSX is detected by the meter through reading the GE Device Table, installed options field. If using MeterMate, the presence of the kV RSX will be reported if the board is in external modem mode. If the meter is detecting the kV RSX, then the option board is in external modem mode. Otherwise, the kV RSX is in one of the two (2) simple serial modes. To determine if the kV RSX is in RS-232 simple serial mode, try reading the meter using a null modem cable connected between a PC and the communications option board. If the meter can be read this way, it is in RS232 simple serial mode. If this fails, the kV RSX option board is in the RS-485 simple serial mode. Page 28 Using MeterMate Version 2.12 with the kV RSX MeterMate 2.12 can be used to build programs for both the kV Modem and the kV RSX option boards. The following instructions pertain to building MeterMate programs for the kV RSX option board operating in the external modem mode of operation. Default MeterMate Program for kV RSX Begin by creating a basic kV RSX default program from which all kV RSX programs will be built. This process assumes that the default MeterMate programs have not been modified since MeterMate was installed. Begin by starting the MeterMate Windows program builder. Select Editors, Modem Option Editor, Table Name “Default”. After the Modem Option: Default screen opens, edit the Modem Configuration form so that it appears as follows: Save this modified table with the table name “RSXdef”. Whenever building a new kV RSX MeterMate program, select the “RSXdef” Modem Option Table as a starting point. Page 29 External Modem Reset Under the Call Answering options, the RSX Reset setup string defaults to z. This sends an ATZ to the external modem to set the external modem to its stored profile. If the factory, rather than the stored profile, is desired change the RSX Reset string to &F. In this case the Modem Configuration form will be: Page 30 Programming to use the Optional RJ-11 Cable If the program is being built for a kV RSX that uses a communications cable with the RJ-11 (telephone jack) rather than the DB-9 (9 pin) connector, change the RSX Init setup string in the Modem Configuration form as follows: Page 31 Index A A-base kV RSX kit, 18 A-base meters, 6, 12, 13, 17 Appendix, 20 B retry algorithm, 7 Revenue Guard option board, 10, 15 S S-base kV RSX kit, 18 S-base meters, 6, 12, 17 scheduled data call, 7 setup strings, 6 battery, 8, 9, 14, 15 battery holder, 14, 15 battery test, 9 T C test call, 7, 9, 17 test mode, 17 tone dialing, 6 calibration, 17 E event call, 7 F FCC, 2 I I/O option board, 10, 11, 12, 15, 16 K knockout, 12, 13, 14 L Light Emitting Diodes, 17, 18 Load profile option board, 10, 11, 12, 15, 16 M MeterMate, 2, 3, 6, 7, 8, 9, 16, 17 O option boards, 6, 10, 11, 12, 13, 15, 16 P PC board spacers, 19 phone number, 7, 8, 9, 17 power outage, 6, 7, 8, 9, 14 pulse dialing, 6 R restoration calls, 7 Page 32 Page 33