1
.
II
:
U
n.
VIC
-154'1
[ill
[)]
I
g
11II
II
III
II 11II III
11II
III
II
a
II
..
II
!I'" n
"
II
i"
i.,
I
II
n
:d
:j
~
commodore
COMPUTER
VIC-1541
SINGLE DRIVE FLOPPY DISK
USER'S MANUAL
P/N
~
1540031-02
commodore
COMPUTER
WARNING: This equipment has been certified to comply with the limits for I!,
Class B computing device, pursuant to Subpart J of Part 15 of FCC Rules. Only
computers certified to comply with the Class B limits may be attached to this
printer. Operation with noncertified computers is likely to result in interference
to radio and TV reception,"
This warning is valid for the equipment which has the following FCC label
on its rear.
CERTIFIED TO COMPLY WITH CLASS B LIMITS.
PART 15 OF FCC RULES SEE INSTRUCTIONS IF
INTERFERENCE TO RADIO RECEPTION IS SUSPECTED.
The information in this manual has been reviewed and is believed to be entirely
reliable. No responsibility, however, is assumed for inaccuracies. The material in
this manual is for information purposes only, and is subject to change without
lIotice.
@Commodore BusinessMachines, Inc., September 1981
"All rights reserved."
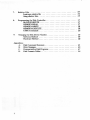
Table of Contents
Page
..............
1.
General Description
2.
Unpacking and Connecting
Contents of Box
3
.
....
Connection of Cables
PoweringOn
........
Insertion of I)jskette . . . . .
Using with VlC 20 or Commodore 64
.
.
9
9
9
9
11
12
13
13
14
3. UsingPrograms
..............
Loading Pre-packaged Software
LOAD
.
Directoryof Disk . . . . . . . . .
Pattern Matching & Wild Cards
SAVE
SAVE and replace.
.
. .
VERIFY.. .. . .. ..
DOS Support Program
4.
14
14
IS
16
16
17
17
17
18
18
18
Disk Commands . . . . . . . .
OPEN AND PRINT #
NEW ...
COpy.. ..
RENAME.
SCRATCH
INITIALIZE
VAUDATE.
DUPUCATE
Reading the Error Channel
CLOSE .. .. . .. . .. .. .
S.
19
19
20
22
23
SequentialFiles . . . . . . . . .
OPEN
.
PRINT # and INPUT #
GET#
..
Reading the Directory
6.
RandomFiles ..........
.
Opening a channel for random access data
BLOCK-READ. . . . .
BLOCK-WRITE . . . .
BLOCK-ALLOCATE.
BLOCK-FREE . . . .
BUFFER-POINTER
USER 1 and USER2
6
6
7
7
8
8
26
27
27
28
29
29
31
32
7. Relative
Files. . . . . . . . . . . . . . .
Creating arelative fde ..
. . . .,
.. .. .
.. .. .
.
Usingrelativefdes. . . . . . . . . . . . . . . . . . . . . . . . . . . . . ..
8.
9.
Programming the Disk Controller.
BLOCK-EXECUTE
3S
37
37
MEMORY-READ.. . . . . . . . . . . . . . . . . . . . . . . . . . . . ..
37
MEMORY-WRITE
MEMORY-EXECUTE . . . . . . . . . . . . . . . . . . . . . . . . . . ..
38
USERCommands
39
Changing the Disk Device Number
Software
. . . . . . . . . . . . . . . . . . . . . . ..
.. . . . . . . . . . . . . . . . . . . . . . . . . . . . ..
Method
HardwareMethod
38
39
39
40
Appendices
A. DiskCommandSummary.
41
B.
ErrorMessages
. . . . . . . . . . . . . . . . . . . . . . . . . . . . . . . ..
42
C.
Demonstration
47
D.
2
33
34
Disk Programs
. . . . . . . . . . . . . . . . . . . . . ..
DiskFormatsTables . . . . . . . . . . . . . . . . . . . . . . . . . . . .. S4
1.
GENERAL DESCRIPTION
Introduction
Welcome to .the fastest, easiest, and most efficient filing system available
for your Commodore 64 or VIC 20 computer, your 1541 DISK DRIVE. This
manual has been designed to show you how to get the most from your drive,
whether you're a beginner or an advanced professional.
If you are a beginner, the first few chapters will help you through the
basics of disk drive installation and operation. As your skill and programming
knowledge improves. you will find more uses for your disk drive and the more
advanced chapters of this manual will become much more valuable.
If you're a professional, this reference guide will show you how to put the
1541 through its paces to perform just about all the disk drive jobs you can
th ink of.
No matter what level of expertise you have, your 1541 disk drive will
dramatically improve the overall capabilities of your computer system.
Before you get to the details of 1541 operation, you should be aware of a
few important points. This manual is a REFERENCE GUIDE, which means that
unless the information you seek directly pertains to the disk or disk drive you
will have to use your Commander 64 or VIC 20 User's Guides and Programmer's
Reference Guides to find programming information. In addition, even though we
give you step-by-step instructions for each operation, you should become
familiar with BASIC and the instructions (called commands) that help you
operate your disks and drives. However. if you just want to use your disk drive
unit to load and save prepackaged software, we've included an easy and brief
section on doing just that.
Now. . . let's get on with the general information.
The commands for the disk drive come in several levels of sophisication.
Starting in chapter three. you can learn how the commands that allow you to
save and load programs with the disk work. Chapter four teaches you how
commands are sent to the disk, and introduces the disk maintenance commands.
Chapter five tells you how to work with sequential data files. These arl
very similar to their counterparts on tape (but much faster). Chapter sif
introduces the commands that allow you to work with random files, access any
piece of data on the' disk, and how you organize the diskette into tracks and
blocks. Chapter seven describes the special relative files. Relative files are the
best method of storing data bases, especially when they are used along with
sequential files.
Chapter eight describes methods for programming the disk controller
circuits at the machine language level. And the final chapter shows you how to
3
change the disk device number. by "cutting" a line inside the drive unit or
through software.
Remember, you don't really need to learn everything in this book all at
once. The first four chapters are enough to get you going, and the next couple
are enough for most operations. Getting to know your disk drive will reward you
in many ways-speed of operation, reliability, and much more flexibility in your
data processing capabilities.
Specifications
This disk drive allows you to store up to 144 different programs and/or
data files on a single mini-floppy diskette, for a maximum of over 174,000 bytes
worth of information storage.
Included in the drive is circuitry for both the disk controller and a
complete disk operating system, a total of 16K of ROM and 2K of RAM
memory. This circuitry makes your Commodore 1541 disk drive an "intelligent"
device. This means it does its own processing without taking any memory away
from your Commodore 64 or VIC 20 computer. The disk uses a "pipeline"
software system. The "pipeline" makes the disk abot to process commands while
the computer is performing other jobs. This dramatically improves the overall
throughput (input and output) of the system.
Diskettes that you create in this disk drive are read and write compatible
with Commodore 4040 and 2031 disk drives. Therefore, diskettes can be used
interchangeably on any of these systems. In addition, this drive can read
programs created on the older Commodore 2040 drives.
The 1541 disk drive contains a dual "serial bus" interface. This bus was
specially created by Commodore. The signals of this bus resemble the parallel
IEEE-488 interface used on Commodore PET computers, except that only one
wire is used to communicate data instead of eight. The two ports at the rear of
the drive allows more than one device to share the serial bus at the same time.
This is accomplished by "daisy-chaining" the devices together, each plugged into
the next. Up to five disk drives and one printer can share the bus simultaneously.
4
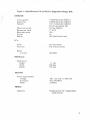
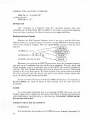
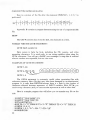
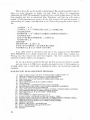
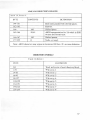
Figure 1.1 Specifications VIC 1540/1541 Single Drive Floppy Disk
STORAGE
Total capacity
Sequential
Relative
Directory entries
Sectors per track
Bytes per sector
Tracks
Blocks
174848 bytes per diskette
168656 bytes per diskette
167132 bytes per diskette
65535 records per file
144 per diskette
17 to 21
256
35
683 (664 blocks free)
lC's:
6502
6522 (2)
microprocessor
I/O. internal timers
Buffer
2114 (4)
2K RAM
PHYSCIAL:
Dimensions
Height
Width
Depth
97mm
200 mm
374 mm
Electrical:
Power requirements
Voltage
Frequency
Power
I O, 120,220, or 240 VAC
5 or 60 Herts
2~ Watts
MEDIA:
Diskettes
Standard mini 5\4", single sided,
single density
5
2.
UNPACKING AND CONNECTING
Contents of Box
Included with the 1541 disk drive unit, you should find a gray
power cable, black serial bus cable, this manual, and a demonstration diskette.
The power cable has a connection for the back of the disk drive on one end, and
for a grounded (three-prong) electrical outlet on the other. The serial bus cable is
exactly the same on both ends. It has a 6-pin DIN plug which attaches to the
VIC 20, Commodore 64 or another disk drive.
Please, don't hook up anything until you've completed the following
section!
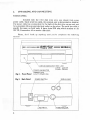
(: commodare_
_
POWER
(GREEN
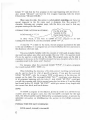
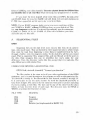
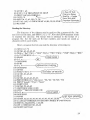
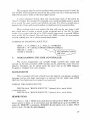
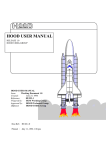
Fig 1. Front Panel
Fig2. BackPanel
6
single
floppy
drive
disk
~
,
VIC. 541
DRIVE INDICATER (RED LED)
LIGHT: ACTIVE
FLASH: ERROR
INDICATER
LED)
LIGHT:POWERON
POWER
SWITCH
SERIAL BUS
Connection of Cables
Your first step is to take the power cable and insert it into the back of the
disk drive (see figure 2.2). It won't go in if you try to put in in upside down.
Once it's in the drive, plug the other end into the electrical outlet. if the disk
drive makes any sound at this time, please turn it off using the switch on the
back! Don't plug any other cables into the disk drive if the power is on.
Next. take the serial bus cable and attach it to either one of the serial bus
sockets in the rear of the drive. Turn off the computer, and plug the other end
of the cable into the back of the computer. That's all there is to it!
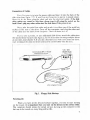
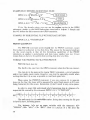
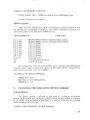
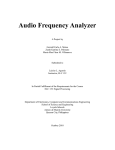
If you have a printer, or any additional disk drives, attach the cables into
the second serial bus port (see figure 2.3). For directions on using multiple drives
at one time, read chapter 8. If you are a first-time user with more than one drive,
start working with only one drive until you're comfortable with the unit.
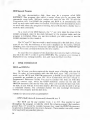
---_.--_.-.---._-_..
r u
--- ..---.--.
Commodore 64 or VIC20
Personal Computer
I
VIC 1541
Single Drive
Floppy Disk
lI
i
VIC Graphic Printer
Fig 3. Floppy Disk Hookup
Powering On
When you have all the devices hooked together, it's time to start turning
on the power. It is important that you turn on the devices in the correct order.
The computer should always be turned on last. As long as the computer is the
last one to be turned on, everything will be OK.
7.
First, make sure that you've removed all diskettes from the disk drives
before powering on.
After all the other deviceshave been turned on, only then is it safe to turn
on the computer. All the other devices will go through their starting sequences.
The printer's motor goes on, with the print head moving halfway across the line
and back again. The 1541 disk drive will have its red error light on, and then the
green drive light will blink, while your TV screen forms the starting picture.
Once all the lights have stopped flashing on the drive, it is safe to begin
working with it.
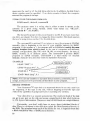
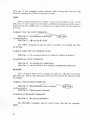
Z
In
m
:c
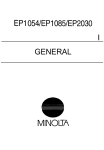
WRITE
PROTECT
NOTCH
~
WHEN COVERED. DISKETTE
CONTENTS CANNOT BE
AL TERED
~
=
'-I
z
-I
o
o
:c
<:
m
Fig.4. Position for Diskette Insertion
Insertion of Diskette
To open the door on the drive, simply press the door catch lightly, and the
door will pop open. If there is a diskette in the drive, it is ejected by a small
spring. Take the diskette to be inserted, and place it in the drive face-up with the
large opening going in first and the write-protect notch to the left (covered with
tape in the demonstration disk) (see figure 2.4).
Press it in gently, and when the diskette is in all the way, you will feel a
click and the diskette will not spring out. Close the drive door by pulling
downward until the latch clicks into place. Now you are ready to begin working
with the diskette.
Remember to always remove the diskette before the drive is turned off or
on. Never remove the diskette when the green drive light is on! Data can be
destroyed by the drive at this time!
Using With a VIC 20 or Commodore 64
The 1541 Disk Drive can work with either the VIC 20 or Commodore 64
8
computers. However, each computer has different requirements for speed of
incoming data. Therefore, there is a software seitch for selecting which
computer's speed to use. The drive starts out ready for a Commodore 64. To
switch to VIC 20 speed, the foIlowing command must be sent after the drive is
started (power-on or through software):
OPEN 15,8,15, "UI-": CLOSE 15
To return the disk drive to Commodore 64 speed, use this command:
OPEN 15,8, 15, "UI+": CLOSE 15
More about using this type of command is in chapter 4, with a detailed
explanation of the U (user) commands in chapter 7.
3.
USING PROGRAMS
LOADINGPREPACKAGED PROGRAMS
For those of you interested in using only prepackaged programs available
on cartridges, cassette, or disk, here's all you have to do:
Using your disk drive, carefully insert the preprogrammed disk so that the
label on the disk is facing up and is closest to you. Look for a little notch on the
disk (it might be covered with a little piece of tape). If you're inserting the disk
properly, the notch will be on the left side. Once the disk is inside, close the
protective gate by pushing in on the lever. Now type LOAD "PROGRAM
NAME", 8 and hit the .~U"IU~~.
key. The disk will make noise and your
screen will say:
When the READY comes on and the:~:is on, just type RUN, and your
prepackaged software is ready to use.
LOAD
The BASIC commands used with programs on the disk drive are the same
as the commands used on the Commodore DatassetteTM recorder. There are a
few extra commands available for use with disks, however. First of all, the
program name must be given with each command. On a Datassette, you could
omit the program name in order to just LOAD the firs program there. On disk,
since there are many different programs that are equally accessible, the program
9
name must be used to tell the disk drive what to do. In addition, the disk drive's
device number must be specified. If no device number is listed, the computer
assumes the program is on tape.
FORMAT FOR THE LOAD COMMAND:
LOAD name$ , device# , command#
The program name is a string, that is, either a name in quotes or the
contents of a given string variable. Some valid names are: "HELLO",
"PROGRAM #1", A$, NAME$.
The device# is preset on the circuit board to be #8. If you have more than
one drive, see chapter 8 on how to change the device number. This book assumes
that you're using device number 8 for the disk drive.
The command# is optional. If not given, or zero, the program is LOADed
normally, that is, beginning at the start of your available memory for BASIC
programs. If the number is I, the program will be LOADed at exactly the same
memory locations from which it came. In the case of computers with different
memory configurations, like VICs with 5K, 8K, or more memory, the start of
BASIC memory is in different places. The command# 0 permits BASIC
programs to LOAD normally. Command# I is used mainly for machine
language, character sets, and other memory dependent functions.
EXAMPLES
LOAD "TEST",
8
LOAD "Mach Lang", 8, I
NOTE: You can use variables to represent device numbers, commands, and
strings, as long as you've previously defined them in your program.
Directory of Diskette
Your Datassette™ tape deck is a sequential device. It can only read from
the beginning of the tape to the end, without skipping around the tape and
without the capability of going backward or recording over old data.
Your disk drive is a random access device. The read/write head of the disk
can go to any spot on the disk and access a single block of data which holds up
to 256 bytes of information. There are a total of 683 blocks on a single diskette.
. Fortunately, you don't really have to worry about individual blocks of
data. There is a program in the disk drive called the Disk Operating System, or
the DOS. This program keeps track of the blocks for you. It organizes them into
a Block Availability Map, or BAM,and a directory.
10
The Block Availability Map is simply a checklist of all 683 blocks on the
disk. It is stored in the middle of the diskette, halfway between the center hub
and the outer rim. Every time a program is SAVEd or a data file is CLOSEd, the
BAMis updated with the list of blocks used up.
The directory is a list of all programs and other files stored on the disk. It
is physically located right next to the BAM. There are 144 entries available in
the directory, consisting of information like file name and type, a list of blocks
used, and the starting block. The directory is automatically updated every time a
program is SAVEd or a file is OPENed for writing. Beware: the BAM isn't
updated until the file is CLOSEd, even though the directory changes right away.
If a file isn't CLOSEd properly, all data in that me will probably be lost.
The directory can be LOADed into your memory just like a BASIC
program. Place the diskette in the drive, and type the following command:
LOAD "$",8
The computer responds with:
Now the directory is in your computer's memory. Type LIST, and you'll
see the directory displayed on the screen. To print the directory on your printer,
type the following command line (in this example your printer is plugged in as
device# 4):
OPEN 4, 8,4: CMD4: LIST
NOTE: When using CMD, the file must be closed using the command
PRINT# 4: CLOSE 4. See the VIC 1525/1515 printer manual for detailed
explanation.
To read the directory without LOADing it into your memory, see the
section later in this chapter on the DOS Support Program. In addition, to
examine the directory from inside a BASICprogram. see the section in chapter 5
that deals with the GET# statement.
Pattern Matching and Wild Cards
When using the tape deck, you can LOAD any program starting with
certain letters just by leaving off any following letters. Thus, the command
11
LOAD "T" will find the first program on the tape beginning with the letter T.
And LOAD "HELLO" will find the first program beginning with the letters
HELLO, like "HELLO THERE."
When using the disk, this option is called pattern matching, and there is a
special character in the file name used to designate this. The asterisk (*)
character following any program name tells the drive you want to find any
program starting with that name.
FORMAT FOR PATTERN MATCHING:
LOAD name$ + "*", 8
Can Be A String
Variable Or The
Name Inside Quotes
In other words, if you want to LOAD the first program on the disk
starting with the letter T, use the command LOAD "T*", 8.
If only the "* is used for the name, the last program accessed on the disk
is the one LOADed. If no program has yet been LOADed, the first one listed in
the directory is the one used.
You are probably familiar with the concept of wild cards in poker where
one card can replace any other card needed. ,On your 1541, the question mark
(?) can be. used as a wild .card on the disk. The program name on the disk is
compared to the name in the LOAD command, but any characters where there is
a questionmark in the namearen't checked.
'
For instance, when the command LOAD "T?NT", 8 is given, programs
that match include TINT, TENT, etc.
When LOADing the directory of the disk, pattern matching and wild cards
can be used to check for a list of specific programs. If you gave the command
LOAD "$O:TEST", only the program TEST would appear in the directory (if
present on the disk). The command LOAD "$O:t*" would give you a directory
of aU programs beginning with the letter T. And LOAD "$O:T?ST" would give
you all the programs with 4-letter names having the first letter of T and the third
and fourth letters ST. LOAD "$O:T?ST*" would give names of any length with
the correct first, third, and fourth letters.
SAVE
To SAVE a program to the diskette, all that is needed is to add the device
number after the program name. Just like the SAVE command for the tape
deck, the device number can be folJowed by a command number, to prevent the
automatic re-Iocation on LOADing (see the section on the LOAD 'command,
above).
FORMAT FOR THE SAVE COMMAND:
SAVE name$, device#, command#
12
See the LOAD ~ommal1d (pages
parameters device# and command#.
&
) for an explanation of the
When you tell the disk drive to SAVE a program, the DOS must take
several steps. First, it looks at the directory to see if a program with that name
already exists. Next it ~he~ks to see that there is a directory entry available for
the name. Then it che~ks the BAMto see if there are enough blocks in which to
store the program. If everything is OK up to this point, the program is stored. If
not, the error light will flash.
SAVE and Replace
If a program already exists on the disk, it is often necessary to make a
~hange and re-SAVE it onto the disk. In this case, it would be inconvenient to
have to erase the old version of the program and then SAVE it.
If the first characters of the program name are the "(aP'sign followed by a
o and a colon (:), the DOS knows to replace any old program that has that name
with the program that is now in the computer's memory. The drive checks the
directory to find the old program, then it marks that entry as deleted, and it
next creates a new entry with' the same name. Finally, the program is stored
normally.
FORMAT FOR SAVE WITH REPLACE:
SAVE "=0:" + nameS, device#, command#
For example, if a file was called TEST, the SAVE and replace command
would be SAVE "(u,O:TESr,8.
The reason for the 0: is to keep compatibility with other Commodore disk
drive units which have more than one drive built in. In that case, the number 0
or 1 is used to specify which drive is being used.
VERIFY
The VERIFY command works to check the program currently in memory
against the program on disk. You must include a device# with the VERIFY
command. The computer does a byte-by-byte comparison of the program,
including line links-which may be different for different memory configurations. For instance, if a program was SAVEd to disk from a 5K VIC 20, and
re-LOADed on an 8K machine, it wouldn"t VERIFY properly because the links
point to different memory locations.
FORMAT FOR VERIFY COMMAND:
VERIFY name$, device#
I3
____
DOS Support Program
On your demonstration disk, there may be a program called DOS
SUPPORT.This program, also called a wedge,allowsyou to use many disk
commands more easily (different wedges are used for the VIC 20 and the
Commodore 64). Just LOAD the program and RUN it. It automatically sets
itself up and erases itself when it's finished. You'll have a few hundred less bytes
to work with when this program is running, but you'll also have a handy way to
send the disk commands.
As a result of the DOS Support, the "/" key now takes the place of the
LOAD command. Just hit the slash followed by the program name, and the
program is LOADed. When you use this method, you don't need to use the
LOAD command or the comma 8.
Thc"(Q)"and ">" keys are used to send commands to the disk drive. If you
type (a$ (or >$), the directory of the disk is displayed on the screen, without
LOADinginto your memory! Thesekeysalsotake the placeof the PRINT# (see
chapter 4) to send commands listed in the next chapter.
To read the error channel of the disk (when the red error light is blinking),
just hit either the (a'or the> and hit RETURN. The complete error message is
displayed to you: messagenumber, text, and track and block numbers.
4:
DISK COMMANDS
OPEN and PRlNT#
Up 'til now, you have explored the simple ways of dealing with the disk
drive. In order to communicate with the disk drive more fully, you have to
touch on the OPEN and PRINT# statements in BASIC (more details of these
commands are available in your VIC 20 or Commodore 64 User's Guide or
Programmer's Reference Guide). You may be familiar with their use with data
files on cassette tape, where the OPEN statement creates the file and the
PRINT# statement fills the file with data. They can be used the same way with
the disk, as you will see in the next chapter. But they can also be used to set up
a command channel. The command channel lets you exchange information
between the computer and the disk drive.
FORMAT FOR THE OPEN STATEMENT:
OPENfile#, device#, (command) channel#, text $
The file# can be any number from I to 255. This number is used
throughout the program to identify which file is being accessed. But numbers
greater than 127 should be avoided, because they cause the PRINT# statement
to generate a line feed after the return character. These numbers are really meant
to be used with non-standard printers.
14
The device# of the disk is usually 8.
The channel # can be any number from 2 to 15. These refer to a channel
used to communicate with the disk, and channels numbered a and I are reserved
for the operating system to use for LOADing and SAVEing. Channels::: through
14 can be used for data to files, and 15 is the command channel.
The text$ is a string that is PRINTed to the file, as if with a PRINT#
statement. This is handy for sending a single command to the channel.
EXAMPLES OF OPEN STATEMENTS:
~
~
OPEN 15,8, IS
OPEN2, 8. 2 C--
DEViCE-#~\
~~
~
OPENA;B,C,ZL
The PRINT# command works exactly like a PRINT statement, except
that the data goes to a device other than the screen, in this case to the disk drive.
When used with a data channel, the PRINT# sends information into a buffer in
the disk drive, which LOADs it onto the diskette. When PRINT# is used with
the command channel, it sends commands to the disk drive.
FORMAT FOR SENDING DISK COMMANDS:
OPEN 15, 8, IS. command$
or
PRINT# IS, command$
NEW
This command is necessary when using a diskette for the first time. The
NEW command erases the entire diskette, it puts timing and block markers on
the diskette and creates the directory and BAM.The NEWcommand can also be
used to clear out the directory of an already.formatted diskette. This is faster
than re-formatting the whole disk.
FORMAT FOR THE NEWCOMMANDTO FORMAT DISK:
PRINT#15,
or abbreviated
as "NEW~~'
PRINT#15, "N~:name,id"
FORMAT FOR THE NEW COMMAND TO CLEAR DIRECTORY:
PRINT#
15, "N~:name"
The name goes in the directory as the name of the entire disk. This only
appears when the directory is listed. The ID code is any 2 characters, and they
are placed not only on the directory but on every block throughout the diskette.
15
That way, if you carelessly replace diskettes while writing data, the drive will
know by checking the ID that something is wrong.
COpy
This command allows you to make a copy of any program or file on the
disk drive. It won't copy from one drive to a different one (except in the case of
dual drives like the 4040), but it can duplicate a program under another name on
the drive.
FORMAT FOR THE COPY COMMAND:
~
"'"
PRINT# 15, "COPY~:newfile=~:oldfile"
or abbreviated as
PRINT# 15, "c~:newfile=~:oldfile"
The COpy command can also be used to combine two through four flles
on the disk.
FORMAT FOR COpy TO COMBINE FILES:
PRINT#15,
"CO: newfile=O: old file I ,0:0Idfile2,0:0Idfile3
,0:0Idfile4"
EXAMPLES OF COPY COMMAND:
PRINT# 15, "CO:BACKUP=O:ORIGINAL"
PRINT#15, "CO:MASTERFILE=O:NAME,O:ADDRESS,O:PHONES"
RENAME
This command allows you to change the name of a file once it is in the
disk directory. This is a fast operation, since only the name in the directory must
be changed.
FORMAT FOR RENAME COMMAND:
~-~
PRINT# as
IS, "RENAME~:newname=oldname"
or abbreviated
PRINT# IS, "R~:newname=oldname"
~
EXAMPLE OF RENAME COMMAND:
PRINT#
15, "RO:MYRA=MYRON"
The RENAME command will not work on any files that are currently
OPEN.
16
SCRATCH
This command allows you to erase unwanted files and programs from the
disk, which then makes the blocks available for new information. You can erase
programs one at a time or in groups by using pattern matching and/or wild cards.
FORMAT FOR SCRATCHCOMMAND
PRINT# as
15, "SCRATCH~:~
or abbreviated
PRINT# 15, "S~:name"
If you check the error channel after a scratch operation (see below), the
number usually reserved for the track number now tells you how many files
were scratched. For example, if your directory contains the programs KNOW
and GNAW, and you use the command PRINT# 15, "SO:?N?W", you will
scratch both programs. If the directory contains TEST, TRAIN, TRUCK, and
TAIL, and you command the disk to PRINT# 15, "SO:T*", you will erase all
four of these programs.
INITIALIZE
At times, an error condition on the disk will prevent you from performing
some operation yo~ want to do. The INITIALIZE command returns the disk
drive to the same state as when powered up. You must be careful to re-match
the drive to the computer (see chapter 2).
FORMAT FOR INITIALIZE COMMAND:
PRINT# 15, "INITIALIZE"
or abbreviated as
PRINT# 15, ''!''
VALIDATE
After a diskette has been in use for some time, the directory can become
disorganized. When programs have been repeatedly SAVEd and SCRATCHed,
they may leave numerous small gaps on the disk, a block here and a few blocks
there. These blocks never get used because they are too small to be useful. The
VALIDATE command will go in and re-organize your diskette so that you can
get the most from the available space.
Also, there may be data files that were OPENed but never properly
CLOSEd. This command will collect all blocks taken by such files and make
them available to the drive, since the files are unusable at that point.
There is a danger in using this command. When using random files (see
chapter 6), blocks allocated will be de-allocated by this command. Therefore,
this command should never be used with a diskette that uses random files.
17
FORMAT
FOR VALIDATE COMMAND:
PRINT# 15, "VALIDATE"
or abbreviated as
PRINT# 15, "V"
DUPLICATE
This command is a hangover from the operating systems that were
contained on the dual drives like the 4040. It was used to copy entire diskettes
from one drive to another, but has no function on a single disk drive.
Reading the Error Channel
Without the DOS Support Program, there is no way to read the disk error
channel without a program, since you need to use the INPUT# command which
won't work outside a program. Here is a simple BASIC routine to read the error
channel:
IOOPENI5,8,15
/'
~E
20 INPUT# 15,A$, B$,C~
30 PRINT A$, B$, C$, D$
~
Whenever you perform an INPUT# operation from the command channel,
you read up to 4 variables that describe the error condition. The first, third, and
fourth variables come in as numbers, and can be INPUT into numeric variables if
you like. The first variable describes the error #, where 0 is no error. The second
variable is the error description. The third variable is the track number on which
the error occurred, and the fourth and final is the block number inside that
track. (A block is also known as a sector)
Errors on track 18 have to do with the BAMand directory. For example, a
READ ERROR on track 18 block 0 may indicate that the disk was never
formatted.
CLOSE
It is extremely important that you properly CLOSE files once you are
finished using them. Closing the file causes the DOS to properly allocate blocks
in the BAMand to finish the entry in the directory. If you don't CLOSE the fde,
aDyour data will be lost!
FORMAT FOR CLOSE STATEMENT:
CLOSE file#
You should also be careful not to CLOSE the error channel (channel# 15)
18
before CLOSEing your data channels. The error channel should be OPENed iust
and CLOSEd last of all your files! That will keep your programs out of trouble.
If you close the error channel while other files are OPEN, the disk drive
will CLOSE them for you, but BASIC will still think they are open (unless you
CLOSE them properly), and let you to try to write to them.
NOTE: If your BASIC program leads you into an error condition, all files
are CLOSEd in BASIC, without CLOSEing them on your disk drive! This
is a very dangerous condition. You should immediately type the statement
CLOSE 15: OPEN 15, 8, 15: CLOSE 15. This will re-initialize your drive
and make all your files safe.
5.
SEQUENTIAL FILES
OPEN
Sequential files on the disk drive work exactly like they do on cassette
tape, only much faster. They are limited by their sequential nature, which means
they must be read from beginning to end. Data is transferred byte by byte,
through a buffer, onto the magnetic media. To the disk drive all files are created
equal. That is, sequential files, program files, and user files all work the same on
the disk. Only program files can be LOADed, but that's really the only
difference. Even the directory works like this, except that it is read-only. The
only difference is with relative files.
FORMAT FOR OPENING A SEQUENTIAL
FILE:
OPEN file#, device#, channel#, "O:name,type,direction"
The file number is the same as in all your other applications of the OPEN
statement, and it is used throughout the program to refer to this particular file.
The device# is usually 8. The channel # is a data channel, number 2 through 14.
It is convenient to use the same number for both the channel# and file#, to
keep them straight. The name is the file name (no wild cards or pattern matching
if you're creating a write file). The type can be any of the ones from the chart
below, at least the first letter of each type. The direction must be READ or
WRITE, or at least the first letter of each.
FILE TYPE
PRG
SEQ
USR
REL
MEANING
Program
Sequential
User
Relative (not implemented in BASIC2.0)
19
EXAMPLES OF OPENING SEQUENTIAL FILES:
If the me already exists, you can use the replace option in the OPEN
statement, similarto the SAVE-and-replacedescribedin chapter 3. Simplyadd
the (0'0:beforethe file'snamein the OPENstatement.
EXAMPLE OF SEQUENTIAL
FILE WITH REPLACE OPTION:
OPEN 2, 8, 2, "(Q?():DATA,S,W"
PRINT# and INPUT# .
The PRINT# command works exactly like the PRINT statement, except
that output is re-directed to the disk drive. The reason for the special emphasis
on the word exactly is that all the formatting capabilities of the PRINT
statement, as applies to punctuation and data types, applies here too. It just
means that you have to be careful when putting data into your files.
FORMAT FOR WRITING TO FILE WITH PRINT#:
PRINT# file#, data list
The file# is the one from the OPEN statement when the file was created.
The data list is the same as the regular PRINT statement-a list of variables
and/or text inside quote marks. However, you must be especially careful when
writing data that it is as easy as possible to read back again later.
When using the PRINT# statement, if you use commas (,) to separate
items on the line, the items will be separated by some blank spaces, as if it were
being formatted for the screen. Semicolons (;) don't result in any extra spaces.
In order to more fully understand what's happening, here is a diagram of a
sequential file created by the statement OPEN 5, 8, 5, "O:TEST,S,W":
char
The eof stands for the end-of-me marker. String data entering the file goes
in byte by byte, including spaces.
For instance, let's set up some variables with the statement A$=
"HELLO"; B$= "ALL": C$= "BYE". Here is a picture of a me after the
20
statement PRINT# 5, A$; B$; C$:
char
CR stands for the CRR$ code of 13, the carriage return, which is PRINTed
at the end of every PRINT or PRINT# statement unless there is a comma or
semicolon at the end of the line.
NOTE: Do not leave a space between PRINT and #, and do not try to
abbreviate the command as ?#. See the appendixes in the user manual for
the correct abbreviation.
FORMAT FOR INPUT#STATEMENT:
INPUT# file#, variable list
When using the INPUT# to read this data in, there is no way to tell that
it's not supposed to be one long string. You need something in the file to act as a
separator. Characters to use as separators include the CR, a comma or a
semicolon. The CR can be added easily by just uSingone variable per line on the
PRINT# statement, and the system pUts one there automatically. The statement
PRINT# 5, A$: PRINT# 5, B$: PRINT# 5, C$ puts a CR after every variable
being written, providing the proper separation for a statement like INPUT#5,
AS, B$, C$. Or else a line like Z$= ..,": PRINT# 5, A$ Z$ B$ Z$ C$ will do the
job as well, and in less space. The file after that line looks like this:
char
Putting commas between variables results in lots of extra space on the disk
being used. A statement like PRINT# 5, A$, B$ makes a file that looks like:
char
You can see that much of the space in the file is wasted.
The moral of all this is: take care when using PRINT# so your data will be
in order for reading back in.
Numeric data written in the file takes the form of a string, as if the STR$
function had been performed on it before writing it out. The first character will
be a blank space if the number is positive, and a minus sign (-) if the number is
negative. Then comes the number,and the last character is the cursor right
character. This format provides enough information for the INPUT# statement
to read them in as separate numbers if several are written with no other special
separators. It is somewhat wasteful of space, since there can be two unused
21
characters if the numbers are positive.
Here is a picture of the file after the statement PRlNT# 5, I; 3; 5; 7 is
performed:
char
fIle.
IS
Appendix B contains a program demonstrating the use of a sequential disk
GET#
The GET# retrieves data from the disk, one character at a time.
FORMAT FOR THE GET# STATEMENT:
GET# f1le#, variable list
Data comes in byte by byte, including the CR, comma, and other
separating characters. It is much safer to use string variables when using the
GET# statement. You will get a BASIC error message if string data is received
where a number was requested, but not vice-versa.
EXAMPLES OF GET#STATEMENT:
GET# 5, A$
You can get more than I character at a time
GETS 5, A
The GET# statement is extremely useful when examining files with
unknown contents, like a file that may have been damaged by an experimental
program. It is safer than INPUT# because there is a limit to the number of
characters allowed between separators of INPUT variable.s.With GET#, you
receive every character, and you can examine separators as well as other data.
Here is a sample program that will allow you to examine any file on the
disk:
10 INPUT "FILE NAME"; F$
20 INPUT "FILE TYPE";T$
30 T$=LEFTS(TS,1)
40 IF TS < > "s" THEN IF T$ < > "P" THEN IF T$ < > "u" THEN 20
45 OPEN 15,8,15
50 OPEN 5,8,5, "0:" + F$+ ","+ T$+ ",R"
60 GOSUB 200
22
70 GET# 5, A$
In CaseOf Null
Character Being
Read In - Causes
Error With ASC
Function Otherwise!
80 IF ST < > 0 THEN PRINT ST: STOP
90 PRINT ASC(A$+CHR$.l0) );
100 GOTO 70
200 INPUT# 15, A$, B$, C$, 0$
210 IF VAL (A$) > 0 THEN PRINT A$,B$,C$;O$:STOP
220 RETURN
Reading the Directory
The directory of the diskette may be read just like a sequential file. lust
use $ for the file name, and OPEN 5, 8, 5, "$". Now the GET# statement works
to examine the directory. The format here is identical to the format of a
program file: the file sizes are the line numbers, and names are stored as
characters within quote marks.
Here's a program that lets you read the directory of the diskette:
100PENl,8,2,"S
20 GET#I,A$,A$,A$,A$
30 T$(O)
= "Del":T$(1)
401=17:GOSUBSOO
601=2
(
50N$=B$
70 GOSUB500
801$=B$
901=2 (
= "SEQ":T$(2) = "PRG":T$(3)
~~
= "USR":T$(4) ="REL"
ID
@)
~
( OPERATINGSYSTEM
100 GOSUB500
1100$=B$
120FORL=IT073(
(GET RESTOFBLOCK
130GET#I,A$,A$,A$
140NEXT
150GET#I,A$,A$,A$,A$,A$
160PRINTCHR$(147)"Diskname:"N$,"ID: "I$,"OS: "0$
161 PRINT" Length" ,"Type" ,"Name"
165 FORP=IT08
170 GET#l ,T$,A$,A$
175IFSTTHENCLOSEl:END
180IFT$=""THENT$=CHR$(128)
1901=15 (
200 GOSUB500
210N$=B$
220 GET#1,A$,A$,A$,A$,A$,A$,A$,A$,A$,A$,U,H$
225 L=ASC(U+CHR$(0))+25 6*ASC(H$+CHR$(0):IFL=OTHEN250
230 PRINTL,T$(ASC(T$)-128),N$
250 IFP < 8THENGET#1 ,A$,A$
260 NEXTP:GOTOI65
~
~
~
23
500 B$=""
510 FORL=OTOJ
520 GET#I,A$
BUILD A
530 IFA$ < > CHR$(96)THENIFA$ < > CHR$(160)THENB$=B$+A$f STRING
540 NEXT
~SUBROUTINE
550 RETURN
j
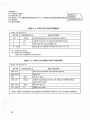
Table 5.1: 1540{1541 BAM FORMAT
Track 18, Sector O.
BYTE CONTENTS
0,1
2
3
4-143
...
18,01
65
0
DEFINITION
Track and sectOr of first directory block
ASCII character A indicating 4040 format.
Null flag for future OOS use.
Bit map of available blocks for trac so1-35.
1 =available block
o = block not available
(each bit represents one block)
Table 5.2: 1540/1541 DIRECTORY HEADER
Track 18, Sector O.
BYTE
144-161
162-163
CONTENTS
DEFINITION
Disk name padded with shifted spaces.
Disk lD.
164
160
165,166
50,65
166-167
160
171-255
0
Shifted space.
ASCII representation for 2A which is DOS version
and format type.
Shifted spaces.
Nulls, not used.
Note: ASCII characters may appear in locations 180 thru 191 on some diskettes.
24
Table 5.3: DIRECTORY FORMAT
Track 18,Sector 1 for 4040
Track 39, Sector 1 for 8050
BYTE
DEFINITION
0,1
2-31
34-63
66-95
Track and sector of next directory block.
*File entry 1
98-127
130-159
162-191
194-223
226-255
*File entry 4
*File entry 5
*File entry 6
*File entry 2
*File entry 3
*File entry 7
*File entry 8
*STRUCTURE
BYTE
0
CONTENTS
128+type
OF SINGLE DIRECTORY ENTRY
DEFINITION
File type OR'ed with $80 to indicate properly closed
file.
TYPES:
0= DELeted
I = SEQential
2 = PROGram
3 = USER
4 = RELative
1,2
3-18
Track and sector of 1st data block.
19,20
File name padded with shifted spaces.
Relative file only: track and sector for first side sector
block.
21
22-25
Relative file only: Record size.
Unused.
26,27
Track and sector of replacement file when OPEN(a)is in
effect.
28,29
Number of blocks in file: low byte, high byte.
25
Table 5.4: SEQUENTIAL
BYTE
FORMAT
DEFINITION
0,1
Track and sector of next sequential data block.
2-256
254 bytes of data with carriage returns as record terminators.
Table 5.5: PROGRAM FILE FORMAT
BYTE
0,1
2-256
6.
DEFINITION
Track and sector of next block in program me.
254 bytes of program info stored in CBM memory format (with
key words tokenized). End of file is marked by three zero bytes.
RANDOMFILES
Sequential files are fine when you're just working with a continuous
stream of data, but some jobs require more than that. For example, with a large
mailing list, you would not want to have to scan through the entire list to find a
person's record. For this you need some kind of random access method, some
way to get to any record inside a file without having to read through the entire
fIle first.
There are actually two different types of random access files on the
Commodore disk drive. The relative files discussed in the next chapter are more
convenient for data handling operations, although the random files in this
chapter have uses of their own, especially when working with machine language.
Random files on the Commodore disk drive reach the individual 256.byte
blocks of data stored on the disk. As was mentioned in the first chapter, there
are a total of 683 blocks on the diskette, of which 664 are free on a blank
diskette. Each block of data really means I Track and sector of the same name.
The diskette is divided into tracks, which are laid out as concentric circles
on the surface of the diskette. There are 35 different tracks, starting with track I
at the outside of the diskette to track 35 at the center. Track 18 is used for the
directory, and the DOS fills up the diskette from the center outward.
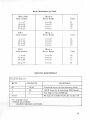
Each track is subdivided into sectors. Because there is more room on the
outer tracks, there are more sectors there. The outer tracks contain 21 sectors
each, while the inner ones only have 17 blocks each. The table below shows the
number of sectors per track.
26
TRACK NUMBER
I to [7
18 to 24
25 to 30
31 to 35
SECTORRANGE
TOTAL SECTORS
21
19
18
17
o to 20
o to 18
o to 17
o to 16
The DOS contains commands for reading and writing directly to any track
and sector on the diskette. There are also commands for checking to see which
blocks (tracks & sectors) are available, and for marking off used blocks.
These commands are transmitted through the command channel
(channe[# 15), and tell the disk what to do with the data. The data must be read
later through one of the open data channels.
Opening a Data Channel for Random Access
When working with random access files, you need to have 2 channels open
to the disk: one for the commands, and the other for the data. The command
channel is OPENed to channel 15, just like other disk commands you've
encountered so far. The data channel for random access files is OPENed by
selecting the pound sign (#) as the file name.
FORMAT FOR OPEN STATEMENTFOR RANDOMACCESSDATA:
OPEN file#, device#, channel#,
or optionally
OPEN file#, device#, channel#,
"#"
"# buffer#"
EXAMPLES OF OPENING RANDOM ACCESS DATA CHANNEL:
OPEN 5, 8, 5, "#"
DON'T CARE WHICH BUFFER
OPENA.B.C,"#~
BLOCK-READ
FORMAT FOR BLOCK-READ COMMAND:
PRINT# file#, "BLOCK-READ:" channel, drive, track, block
or abbreviatedas
.
PRINT# file#, "B-R:" channel, drive, track, block
This command will move one block of data from the diskette into the
selected channel. Once this operation has been performed, the INPUT# and
GET# statements can read the information.
27
SAMPLE PROGRAM TO READ BLOCK 2 FROM TRACK 18: (stores contents
in B$)
10 OPEN 15,8,15
20 OPEN 5, 8,5,"#"
~ ~
~
30PRINT# 15, "B.R:" 5,0, 18,2
B$ ""
40=
50 FOR L=OTO 255
~
~
}
-B
- LOCK
60 GET# 5, A$
70 IF ST=OTHEN B$= B$+ A$: NEXT L
80 PRINT "FINISHED"
90 CLOSE 5: CLOSE 15
COLLECT ENTIRE BLOCK,
BYTE BY BYTE
BLOCK-WRITE
The BLOCK-WRITEcommand is the exact opposite of the BLOCK-READ
command. First you must fill up a data buffer with your information, then you
write that buffer to the correct location on the disk.
FORMAT FOR BLOCK-WRITE COMMAND:
PRINT# file#, "BLOCK-WRITE:" drive, channel, track, block
or abbreviated as
PRINT# file, "B-W:" drive, channel, track, block
When the data is being put into the buffer, a pointer in the DOS keeps
track of how many characters there are. When you perform the BLOCK-WRITE
operation, that pointer is recorded on the disk. That is the reason for the ST
check in line 70 of the program above: the ST will become non-zero when you
try to read past the end-of-file marker within thr record.
SAMPLE PROGRAM TO WRITE DATA ON TRACK 1, SECTOR I:
10 OPEN 15,8, IS
20 OPEN 5, 8, 5, "#"
30FOR L=I to 50
40 PRINT#5, "TEST"
50 NEXT
60 PRINT# 15, "B-W:" 5,0, I, I
70 CLOSE 5: CLOSE 15
28
BLOCK.ALLOCAIE
In order to safely use random files along with regular files, your programs
must check the BAM to find available blocks, and change the BAM to reflect
that you've used them. Once you update the BAM, your random tiles will be
safe-at least unless you perform the VALIDATE command (see chapter 3).
FORMAT FOR THE BLOCK-ALLOCATE
COMMAND:
PRINT# file#, "BLOCK.ALLOCATE:" drive, track, block
How do you know which blocks are available to use? If you try a block
that isn't available, the DOS will set the error message to number 65, NO
BLOCK, and set the track and block numbers to the next available track and
block number. Therefore, any time you attempt to write a block to the disk,
you must first try to allocate that block. If that block isn't available, read the
next block available from the error channel and then allocate that block.
EXAMPLE OF PROCEDURE TO ALLOCATE BLOCK:
10 OPEN15.8,15
20 OPEN5,8,5, "#
30PRINT#5,"DATA"
40T=I:S=1
DRIVE
/
~
~
~
50 PRINT#15, "B-A:" 0, T, S~
60 INPUT#15, A, B$, C, D
70 IF A=65 THEN T=C: S=D: GOTO 50
80 PRINT# 15, "B.W:" 5,0, T, S
BLOCK-FREE
The BLOCK.FREE command is the opposite of BLOCK.ALLOCATE, in
that it frees a block that you don't want to use anymore for use by the system.
It is vaguely similar to the SCRATCH command for files, since it doesn't really
erase any data from the disk-just frees the entry, in this casejust in the BAM.
FORMAT FOR BLOCK.FREE COMMAND:
PRINT# f1le#, "BLOCK-FREE:" drive, track, block
or abbreviated as
PRINT# file#, "B.F:" drive, track, block
Using Random Files
The only problem with what you've learned about random fIles so far is
29
that you have no way of keeping track of which blocks on the disk you used.
After all, you can't tell one used block on the BAMfrom another. You can't tell
whether it contains your random file, just part of a program, or even sequential
or relative meso
To keep track, the most common method is to build up a sequential file to
go with each random file. Use this file to keep just a list of record, track, and
block locations. This means that there are 3 channels open to the disk for each
random me: one for the command channel, one for the random data, and the
other for the sequential data. This also means that there are 2 buffers that you're
filling up at the same time!
SAMPLE PROGRAM WRITING 10 RANDOM-ACCESS BLOCKS WITH
SEQUENTIALFILE:
.
10 OPEN 15,8,15
20 OPEN 5, 8, 5, "#
30 OPEN 4,8,4, "@O:KEYS,S,W"
40 A$= "Record Contents #"
50 FOR R=l TO 10
70 PRINT# 5, A$ "," R
90 T=I: S=1
100 PRINT# 15, "B-A:" 0, T, S
110 INPUT# 15, A, B$, C, D
120 IF A=65 THEN T=C: S=D: GOTO 100
130 PRINT# 15, "B-W:" 5, 0, T, S
140 PRINT# 4, T "," S
150 NEXT R
160 CLOSE 4: CLOSE 5: CLOSE 15
SAMPLE PROGRAM READING BACK 10 RANDOM-ACCESS BLOCKS WITH
SEQUENTIAL FILE:
10 OPEN 15,8,15
20 OPEN 5, 8, 5, "#"
30 OPEN 4, 8, 4, "KEYS,S,R"
40 FOR R=1 TO 10
~
50 INPUT# 4, T, S
60 PRINT# 15, "B-R:" 5, 0, T, S
30
Finds Next Track
& Sector Used
80 INPUT# 5, A$, X
90 IF A$ < > "Record Contents #" OR X < > R THEN STOP
110 PRINT# 15, "B-F:" 0, T, S
120 NEXT R
130 CLOSE 4: CLOSE 5
"'"
Checks To Make
Sure Data Is OK
140 PRINT# IS, "S0:KEYS"
150 CLOSE 15
BUFFER-POINTER
The buffer pointer keeps track of where the last piece of data was written.
It also is the pointer for where the next piece of data is to be read. By changing
the buffer pointer's location within the buffer, you can get random access to the
individual bytes within a block. This way, you can subdivide each block into
records.
For example, let's take a hypothetical mailing list. The information such as
name, address, etc., will take up a total of 64 characters maximum. We could
divide each block of the random access file into 4 separate records, and by
knowing the track, sector, and record numbers, we can access that individual
record.
FORMAT FOR BUFFER-POINTER COMMAND:
PRINT# file#, "BUFFER-POINTER:" channel, location
or abbreviated as
PRINT# file#, "B-P:" channel, location
EXAMPLE OF SETTING POINTER TO 64TH CHARACTER OF BUFFER:
PRINT#
15, "B-P:" 5, 64
Here are versions of the random access wwiting and reading programs
shown above, modified to work with records within blocks:
SAMPLE PROGRAM WRITING 10 RANDOM-ACCESSBLOCKS WITH 4
RECORDSEACH:
10 OPEN 15,8,15
20 OPEN 5, 8, 5, "#
30 OPEN 4, 8,4, "KEYS,S,W"
40 A$= "Record Contents #"
50 FOR R=1 TO 10
60 FOR L=1 TO 4
31
70 PRINT# IS, "B-P:" 5: (L-I)'" 64
80 PRINT# 5, AS "," L
\. P~sition to 0, 64, 128, or 192
90 NEXT L
100T=I: S=I
110 PR]NT# IS, "B-A:" 0; T; S
120 ]NPUT# IS, A, BS, C, D
s.
]30 IF A=65 THEN T=C: S=D: GOTO ] 10
140 PR]NT# IS, "B-W:" 5; 0; T; S
150 PRINT# 4, T "," S
160 NEXT R
170 CLOSE 4: CLOSE 5: CLOSE 15
SAMPLE PROGRAM READING BACK 10 RANDOM-ACCESS BLOCKS W]TH
4 RECORDS EACH:
10 OPEN IS, 8, 15
20 OPEN 5, 8, 5, "#
30 OPEN 4, 8,4, "KEYS,S,R"
40 FOR R=I TO 10
50 ]NPUT#4, T, S
60 PRINT# ] 5, "B-R:" 5; 0; T; S
70 FOR L=1 TO 4
80 PR]NT# ]5, "B-P:" 5; (L-l)* 64
85 ]NPUT# 5, AS, X
90 IF AS < > "Record Contents #" OR X=L THEN STOP
100 NEXT L
110 PRINT# IS, "B-F:" 0; T; S
120 NEXT R
130 CLOSE 4: CLOSE 5
140PRINT# 15, "SO:KEYS"
150 CLOSE 15
USERl and USER2
The user commands are generally designed to work with machine language
(see the next chapter for more on this). The USERI and USER2 commands are
special versions of the BLOCK-READand BLOCK-WRITEcommands, but. . .
32
with an important difference: the way USERl and USER2 work with the
buffer-pointer.
The BLOCK-READ command reads up to 256 characters, but stops
reading when the buffer-pointer stored with the block says that block is finished.
The USERI command performs the BLOCK-READ operation, but first forces
the pointer to 255 in order to read the entire block of data from the disk.
FORMAT FOR USERl COMMAND:
PRINT# file#, "VI :,. channel, drive, track, block
or
PRINT# file#, "VA;" channel, drive, track, block
There is no difference between the VI and VA designations for this
. command.
The BLOCK-WRITEcommand writes the contents of the buffer to the
block on the disk along with the value of the buffer-pointer. The USER2
command writes the buffer without disturbing the buffer-pointer value already
stored on that block of the diskette. This is useful when a block is to be read in
with BLOCK.READ, updated through the BUFFER-POINTER and PRINT#
statements, and then written back to the diskette with USER2.
FORMAT FOR VSER2 COMMAND:
PRINT# file#, "V2;" channel, drive, track, block
or
PRINT# file#, "VB:" channel, drive, track, block
For a more complex sample program, see appendix B.
7.
RELATIVE FILES
Relative files allow you to easily zero in on exactly the piece of data that
you want from the file. It is more convenient for data handling because it allows
you to structure your files into records, and into fields within those records.
The DOS keeps track of the tracks and sectors used, and even allows
records to overlap from one block to the next. It is able to do this because it
establishes side sectors, a series of pointers for the beginning of each record.
Each side sector can point to up to 120 records, and there may be 6 side sectors
in a file. There can be up to 720 records in a file, and each record can be up to
254 characters, so the file could be as large as the entire diskette.
33
Creating a Relative File
When a relative file is first to be used, the OPEN statement will create that
file; after that, that same file will be used. The replaceoption (withthe @) sign)
does not erase and re-create the file. The file can be expanded, read, and written
into.
FORMAT FOR THE OPENSTATEMENTTO CREATE RELATIVE FILE:
OPEN file#, device#, channel#, "name,L,"
+ CHR$(record
length)
EXAMPLES OF OPEN STATEMENT CREATING RELATIVE FILES:
OPEN 2, 8, 2, "FILE,L,"+CHR$(lOO)
OPEN F, 8, F, A$+ ",L,"+ CHR$(Q)
Record Length
OPEN A, B, C, "TEST,L,"+ CHR$(33)
Table 7.1 RELATIVE FILE FORMAT
DATA BLOCK
BYTE
0,1
2-256
DEFINITION
Track and sectorof next datablock.
254 bytes of data. Empty records contain FF (all binary ones)
in the first byte followed by 00 (binary all zeros) to the end of
the record. Partially filled records are padded with nulls (00).
SIDE SECTORBLOCK
BYTE
0,1
2
3
4,5
6,7
8,9
34
DEFINITION
Track and sector of next side sector block.
Side sector number. (0-5)
Record length.
Track and sector of first side sector (number 0)
Track and sector of second side sector (number 1)
Track and sector of third side sector (number 2)
10,11
Track and sector of fourth side sector (number 3)
12,13
Track and sector of fifth side sector (number 4)
14,15
16-256
Track andsector of sicth side sector (number 5)
Track and sectorpointersto 120data blocks.
Upon execution, the DOSfirst checks to see if the file exists. If it does,
then nothing happens. The only way to erase an old relative file is by using the
SCRATCHcommand (see chapter 4), but not by using the replace option.
Using Relative Files
In order to OPEN a relative file once it exists, the format is simpler.
FORMAT FOR OPENING AN EXISTING RELATIVE FILE:
OPEN file#, device#, channel#,
"name"
In this case, the DOS automatically knows that it is a relative file. This
syntax, and the one shown in the above section, both allow either reading or
writing to the file.
In order to read or write, you must, before any operation, position the file
pointer to the correct record position.
FORMAT FOR POSITION COMMAND:
PRINT# file#, "P" CHRS(channel#) CHR$(rec# 10) CHR$(rec# hi)
or optionally as
PRlNT#file#, "P" CHR$(channel#) CHR$(rec#lo) CHR$(rec#hi) CHR$(position)
EXAMPLES OF POSITION COMMAND:
PRINT# IS, "P" CHR$(2 CHR$(I) CHR$(O)
PRINT#
~
15, "P" CHR$(CH) CHR$(Rl) CHR$(R2)
PRINT#
15, "P" CHR$(4) CHR$(R{fCHR$(R2)
~
~R$(P)
The 2.byte format for the record number is needed because one byte can
only hold 256 different numbers, and we can have over 700 records in the file.
The rec# 10 contains the least significant part of the address, and the rec# hi is
the most significant part. This could be translated to the actual record number
by the"formula REC#= REC HI * 256 + REC LO.
Let's assume we have a mailing list. The list consists of 8 pieces of data,
according to this chart:
Field Name
Length
first name
last name
address line 1
address line 2
city
12
15
20
20
12
state
zip code
phone number
2
9
10
---------TOTAL
100
35
This is how the record lel1gth is determined. We would probably want to
allow an extra character in length for each field, to allow for separations;
otherwise the INPUT# command would pick up a much longer piece of the file
than needed, just like in sequential files. Therefore, we'll set up a file with a
length of 108 characters per record. In the first record, we'll put the number 1,
representing the largest record# used so far. Here is the program as described so
far:
10 OPEN I, 8, 15
20 OPEN 2, 8, 3, "O:MAILING LlST,L,"+CHR$(108)
30 GOSUB 900
40 PRINT# I, "p" CHR$(3) (CHR$(l) CHR$(O) CHRS(l)
50 GOSUB 900
60 IF E=50 THEN PRINT#2, I: GOTO 40
70 INPUT# 2, X
300 STOP
900 INPUT# I, E, B$, C, D
910 IF (E=50) OR(E < 20) THEN RETURN
920 PRINT A; B; C; D: STOP: RETURN
Error #50 which is checked in line 60 of the program is the RECORD
NOT PRESENT error, which means that the record hadn't been created yet.
Writing into the record will solve the proglem. This error condition must be
watched carefully within your programs.
So far, all it does is create the file and the first record, but doesn't actually
put any data in it. Below is a greatly expanded version of the program, to
actually allow you to work with a mailing list where the records are coded by
numbers.
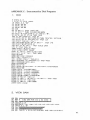
MAILING LIST READ AND WRITE PROGRAM:
5
10
20
30
40
50
60
70
80
90
100
110
200
210
215
220
230
240
245
250
900
910
920
930
=
A(I) 12:A(2) = 15:A(3) =20:A(4) = 20:A(5) = 12:A(6) =2:A(7) =9:A(8) = 10
OPENI,8,15:0PEN2,8.3,"0:Mailing
List,l ,"+CHRS(108):GOSUB900
PRINT#I ,"p"CHRS(3)CHRS(I) CHRS(O) CHRS(1 ):INPUT#2,X
INPUT'Read, Writ., or End..JS:IFJS=
THENCLOSE2:CLOSEI:END
IFJS="w"THEN200
PRINT:INPUT"R.cord #":R:IFR<00RR>XTHEN50
IFR<2THEN30
RI=R:R2=0:IFRI > 256THENR2=INT(RI/256):RI=RI.256°R2
RESTORE:DA TI,FI RST NAME,14,LAST NAME,30,ADDRESSI ,51 ,ADDRESS2
DATA72,CITY ,85,5T ATE.88.ZIP.98.PHONE#
FORL=I T08:READA,AS:PRlNT#1 ,"p"CHRS(IJ) CHRS(RI) CHRS(R2) CHRS(A):GOSUB900
ONA/50GOT050:INPUT#2,ZS:PRlNTAS,ZS:NEXT:GOT050
PRlNT:INPUT'R.cord
#":R:IFR<OORR>5000TlIEN200
IFR<2THEN30
IFR> XTHENR=X+ I :PRINT:PRINT"Record# "R
RI=R:R2=0:IFRI >256THENR2=INT(RI/256)
:RI=RI
256°R2
RESTORE: FORL= 1T08: READA,AS:PRlNT#I, "p"CHRS(3) CHRS(RI) CHRS(R2) CHRS(A)
PRINTA$,:INPUTZ$:IFLEN(ZS) > A(L)THENZS=LEFT$(ZS.A(L»
PRlNT#2,ZS:NEXT:X=R:PRINT#1
,"p"CHRS(3) CHRS(I) CHRS(O)
PRlNT#2,X:GOT0200
INPUT#I ,A,BS,C.D:IF A < 20THENRETURN
IF A < > 50THENPRINT A:BS,C;D:STOP: RETURN
IFJS="r"THENPRINTBS
RETURN
-
36
" ..
This program asks for record numbers when retrieving records. It won't let
you retrieve from beyond the end of the file, and if you try to write beyond the
end it forces you to write on the next higher record.
A more advanced version than this would keep track of the items by
"keys", to index the records. For example, you would probably want to search
for a record by name, or print out labels by zip code. For this you would need a
separate list of keys and record numbers, probably stored in sequential files.
When working with a new relative file that will soon be very large, it will
save much time to create a record at the projected end of the file. In other
words, if you expect the file to be 1000 records long, create a record# 1000 as
soon as the file is created. This will force the DOS to create all intermediate
records, making later use of those records much faster.
EXAMPLEOF CREATING LARGE FILE:
OPEN 1,8, IS: OPEN 2, 8, 2, "REL,L,"+ CHR$(60)
PRINT# I, "P" CHR$(2) CHR$(O)CHR$(4) CHR$(I)
PRINT# 2, "END"
CLOSE 2: CLOSE I
8.
PROGRAMMING THE DISK CONTROLLER
The expert programmer can actually design routines that reside and
operate on the disk controller. DOS routines can be added that come from the
diskette. Routines can be added much the same way as the DOS Support
Program is "wedged" into your memory.
BLOCK.EXECUTE
This command will load a block from the diskette containing a machine
language routine, and begin executing it at location 0 in the buffer until aRTS
(ReTurn from Subroutine) command is encountered.
FORMAT FOR BLOCK-EXECUTE:
PRINT# file#, "BLOCK-EXECUTE:" channel, drive, track, block
or abbreviated as
PRINT# file#, "BLOCK-EXECUTE:" channel, drive, track, block
MEMORY.READ
There is 16K of ROM in the disk drive as well as 2K of RAM. You can get
direct access to these, or to the buffers that the DOS has set up in the RAM, by
using the MEMORY commands. MEMORY-READ allows you to select which
byte to read, through the error channel.
37
FORMAT FOR MEMORY-READ:
PRINT# file#, "M-R:" CHR$(low byte of address) CHR$(high byte)
(no abbreviation!)
The next byte read using the GET# statement through channel# IS, the
error channel, will be from that address in the disk controller's memory, and
successivebytes will be from successivememory locations.
Any INPUT# to the error channel will give peculiar results when you're
using this command. This can be cleared up by any other command to the disk
(besides a memory command).
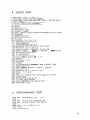
PROGRAM TO READ THE DISK CONTROLLER'S MEMORY:
10 OPEN15,8,15
20 INPUT "LOCATION PLEASE"; A
30 AI= INT(A/2S6): A2= A- Al *256
40 PRINT# IS, "M-R:" CHR$(A2) CHR$(AI)
SOFOR L=I TO 5
60 GET# IS, A$
70 PRINT ASC(A$+CHR$(O));
80 NEXT
90 INPUT "CONTINUE";A$
100 IF LEFT$(A$,I) ="Y" THEN SO
110 GOTO 20
MEMORY-WRITE
The MEMORY-WRITEcommandallowsyou to write up to 34 bytesat a
time into the disk controller's memory. The MEMORY-EXECUTEand USER
commands can be used to run this code.
FORMAT FOR MEMORY-WRITE:
PRINT# file#, "M-W:" CHR$(low address byte) CHR$(high address byte)
#-of-characters; byte data
PROGRAM TO WRITE A "RTS" TO DISK:
I 0 OPENIS, 8, IS. "M-W:" CHR$(O)CHR$(S); I; CHR$(96)
20 PRINT# IS, "M-E:" CHR$(O) CHR$(I 9): REM JUMPSTO BYTE, RETURNS
30 CLOSE IS
MEMORY-EXECUTE
Any routine in the DOS memory, RAM or ROM, can be executed with the
MEMORY-EXECUTEcommand.
38
FORMAT FOR MEMORY-EXECUTE:
PRINT# file#, "M-E:" CHR$(1ow address byte) CHR$(high byte)
See line 20 above for an example.
USER Commands
Aside from the USERI and USER2 commands discussed in chapter 6, and
the UI+ and UI- commands in chapter 2, the USER commands are jumps to a
table of locations in the disk drive's RAM memory.
USER COMMAND
UI or UA
U2 or UB
03 or UC
U4 or UD
US or UE
U6 or UF
U7 or UC
U8 or UH
U9 or VI
U; or UJ
VI+
VI-
FUNCTION
BLOCK-READwithout changing buffer-pointer
BLOCK-WRITEwithout changing buffer-pointer
jump to $0500
jump to $0503
jump to $0506
jump to $0509
jump to $050C
jump to $050F
jump to $FFF A
power-up vector
set Commodore 64 speed
set VIC 20 speed
By loading these locationswith anotherjump command,likeJMP$0520,
you can create longer routines that operate in the disk's memory along with an
easy-to-usejump table-even from BASIC!
EXAMPLES OF USER COMMAMDS:
PRINT# 15,"03"
PRINT# 15, "U"+ CHR$(50+Q)
PRINT# 15, "VI"
9.
CHANGING THE DISK DRIVE DEVICE NUMBER
Software Method
The device number is selected by the drive by looking at a hardware
jumper on the board and writing the number based on that jumper in a section
of its RAM. Once operation is underway, it is easy to write over the previous
device number with a new one.
FORMAT FOR CHANGING DEVICE NUMBER:
39
PRlNT# file#, "M-W:" CHR$(119) CHR$(O) CHR$(2) CHR$(address+32)
CHR$(address+64)
EXAMPLE OF CHANGING DEVICE NUMBER:
PRINT# 15, "M-W:" CHR$(l19) CHR$(O) CHR$(2) CHR$(9+32) CHR$(9+64)
PRlNT# Q, "M-W:" CHR$(119) CHR$(O)CHR$(2) CHR$(R+32) CHR$(R+64)
If you have more than one drive, it's sensible to change the address
through hardware (see below). If you must, the procedure is easy. Just plug in
the drives one at a time, and change their numbers to the desired new values.
That way you won't have any conflicts.
Hardware Method
It's an easy job to permanently change the device number of your drive for
use in multiple drive systems. The tools needed is a phillips-head screwdriver and
a knife.
STEPS TO CHANGING DEVICE NUMBER ON HARDWARE:
1.
Disconnect all cables from drive, including power.
2.
3.
4.
Turn drive upside down on a flat, steady surface.
Remove 4 screws holding drive box together.
Carefully tum drive right side up, and remove case top.
S.
6.
Remove 2 screws on side of metal housing.
Remove housing.
7.
Locate device number jumpers. If facing the front of the drive, it's
on the left edge in the middle of the board.
Cut either or both of jumpers 1 and 2.
Replace housing and 2 screws, and case top and 4 screws.
Re-connect cables and power up.
8.
9.
10.
The jumper number is added to the old device number (8) when cut. In
other words, jumper 1 adds 1, and jumper 2 adds 2, to the device number. If
none are cut, the number is 8, if 1 is cut it goes up to 9, and if only 2 is cut the
number is 10. If both I and 2 are cut, the number is 11.
40
Appendix A: Disk Command Summary
General Format: PRINT# file#, command
COMMAND
NEW
COpy
NAME
SCRATCH
INITIALIZE
VALIDA TE
DUPLICATE
BLOCK-READ
BLOCK-WRITE
BLOCK-ALLOCATE
BLOCK-FREE
BUFFER-POINTER
USERl. and USER2
POSITION
BLOCK.EXECUTE
MEMORY-READ
MEMORY-WRITE
MEMORY-EXECUTE
USER Commands
COMMAND FORMAT
"N
"CO:new file=O:originalfile
"RO:new name=O:old name
"SO:file name
"I
"V
not for single drives
"B-R:" channel; drive; track; block
"B-W:" channel; drive; track; block
"B-A:" drive; track; block
"B-F:" drive; track; block
"B.P:" channel; position
"Un:" channel; drive; track; block
"P" CHR$(channel#) CHR$(rec# 10)CHR$(rec# hi)
CHR$(position)
"B-E:" channel; drive; track; block
"M-R:" CHR$(address 10)CHR$(address hi)
"M-W:" CHR$(address 10) CHR$(address hi) CHR$
(# chars) "data"
"M-E:" CHR$(address 10)CHR$(address hi)
"Un:"
41
Appendix B: Summary of CBM Floppy ErrorMessages
o
I
2-19
20
21
22
23
24
25
26
27
28
29
30
31
32
33
34
39
50
51
52
60
61
62
63
64
65
66
67
70
71
72
73
74
42
OK, no error exists.
Files scratched response. Not an error condition.
Unused error messages: should be ignored.
Block header not found on disk.
Sync character not found.
Data block not present.
Checksum error in data.
Byte decoding error.
Write-verifyerror.
Attempt to write with write protect on.
Checksum error in header.
Data extends into next block.
Disk id mismatch.
General syntax error.
Invalid command.
Long line.
Invalid filename.
No file given.
Command me not found.
Record not present.
Overflow in record.
File too large.
File open for write.
File not open.
File not found.
File exists.
File type mismatch.
No block.
Illegal track or sector.
Illegal system track or sector.
No channels available.
Directory error.
Disk full or directory full.
Power up message,or write attempt with DOS Mismatch.
Drive not ready. (8050 only)
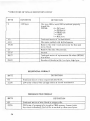
DESCRIPTIONOF DOS ERROR MESSAGES
NOTE: Error message numbers less than 20 ~hould be ignored with the
exception of 01 which gives information about the number of files scratched
with the SCRATCHcommand.
20:
READ ERROR (block header not found)
The disk controller is unable to locate the header of the requested data
block. Caused by an illegal sector number, or the header has been
destroyed.
21:
READ ERROR (no sync character)
The disk controller is unable to detect a sync mark on the desired track.
Caused by misalignment of the read/write head, no diskette is present, or
unformatted or improperly seated diskette. Can also indicate a hardware
failure.
22:
READ ERROR (data block not present)
The disk controller has been requested to read or verify a data block that
was not properly written. This error message occurs in conjunction with
the BLOCK commands and indicates an illegal track and/or sector request.
23:
READ ERROR (checksum error in data block)
This error message indicates that there is an error in one or more of the
data bytes. The data has been read into the DOS memory, but the
checksum over the data is in error. This message may also indicate
grounding problems.
24:
READ ERROR (byte decoding error)
The data or header has been read into the DOS memory, but a hardware
error has been created due to an invalid bit pattern in the data byte. This
message may also indicate grounding problems.
25:
WRITE ERROR (write-verify error)
This message is generated if the controller detects a mismatch between the
written data and the data in the DOS memory.
26:
WRITE PROTECT ON
This message is generated when the controller has been requested to write
a data block while the write protect switch is depressed. Typically, this is
caused by using a diskette with a write protect tab over the notch.
27:
READ ERROR (checksum error in header)
The controller has detected an error in the header of the requested data
block. The block has not been read into the DOS memory. This message
may also indicate grounding problems.
43
28:
WRITE ERROR (long data block)
The controller attempts to detect the sync mark of the next header after
writing a data block. If the sync mark does not appear within a
pre-determined time, the error message is generated. The error is caused by
a bad diskette format (the data extends into the next block), or by
hardware failure.
29:
DISK ID MISMATCH
This message is generated when the controller has been requested to access
a diskette which has not been initialized. The message can also occur if a
diskette has a bad header.
30:
SYNTAX ERROR (general syntax)
The DOS cannot interpret the command sent to the command channel.
Typically, this is caused by an illegal number of file names, or patterns are
illegally used. For example, two file names may appear on the left side of
the COPY command.
31 :
SYNTAX ERROR (invalid command)
The DOS does not recognize the command. The command must start in
the first position.
32:
SYNTAX ERROR (long line)
The command sent is longer than 58 characters.
33:
SYNTAX ERROR (invalid file name)
Pattern matching is invalidly used in the OPEN or SAVE command.
34:
SYNTAX ERROR (no file given)
The file name was left out of a command or the DOS does not recognize it
as such. Typically, a colon (:) has been left out of the command.
39:
SYNTAX ERROR (invalid command)
This error may result if the command sent to command channel
(secondary address IS) is unrecognizable by the DOS.
50:
RECORD NOT PRESENT
Result of disk reading past the last record through INPUT#, or GET#
commands. This message will also occur after positioning to a record
beyond end of file in a relative file. If the intent is to expand the file by
adding the new record (with a PRlNT# command), the error messagemay
be ignored. INPUT or GET should not be attempted after this error is
detected without first repositioning.
51:
OVERFLOW IN RECORD
PRINT# statement exceeds record boundary. hiformation is truncated.
Since the carriage return which is sent as a record terminator is counted in
the record size, this message will occur if the total characters in the record
(including the final carriage return) exceeds the defined size.
44
52:
FILE TOO LARGE
Record position within a relative file indicates that disk overflow will
result .
60:
WRITE FILE OPEN
This message is generated when a write file that has not been closed is
being opened for reading.
61 :
FILE NOT OPEN
This message is generated when a file is being accessed that has not been
opened in the DOS. Sometimes, in this case, a message is not generated;
the request is simply ignored.
..
6 '").
FILE NOT FOUND
The requested file does not exist on the indicated drive.
63:
FILE EXISTS
The file name of the file being created already exists on the diskette.
64:
FILE TYPE MISMATCH
The file type does not match the file type in the directory entry for the
requested file.
65:
I
NO BLOCK
This message occurs in conju»ction with the B-A command. It indicates
that the block to be allocated has been previously allocated. The
parameters indicate the track and sector available with the next highest
number. If the parameters are zero (0), then all blocks higher in number
are in use.
66:
ILLEGAL TRACK AND SECTOR
The DOS has attempted to access a track or sector which does not exist in
the format being used. This may indicate a problem reading the pointer to
the next block.
67:
ILLEGAL SYSTEM T OR S
This special error message indicates an illegal system track or sector.
70:
NO CHANNEL (available)
The requested channel is not available, or all channels are in use. A
maximum of five sequential files may be opened at one time to the DOS.
Direct access channels may have six opened files.
71 :
DIRECTORY ERROR
The BAM does not match the internal count. There is a problem in the
BAM allocation or the BAM has been overwritten in DOS memory. To
correct this problem, reinitialize the diskette to restore the BAM in
memory. Some active files may be terminated by the corrective action.
NOTE: BAM
= Block
Availability
Map
45
72:
DISK FULL
Either the blocks on the diskette are used or the directory is at its limit of
152 entries for the 2040, 3040, and 4040 or 243 entries for the 8050.
DISK FULL is sent when two blocks are available on the 8050 to allow
the current me to be closed.
73:
DOS MISMATCH(73, CBM DOS V2.5 8050)
(73, CBMDOS V2) for 4040
DOS I and 2 are read compatible but not write compatible. Disks may be
interchangeably read with either DOS, but a disk formatted on one version
cannot be written upon with the other version because the format is
different. This error is displayed whenever an attempt is made to write
upon a disk which has been formatted in a non-compatible format. (A
utility routine is available to assist in converting from one format to
another.) This message may also appear after power up.
74:
46
DRIVE NOT READY
An attempt has been made to access the 8050 Dual Drive Floppy Disk
without any diskettes present in either drive.
APPENDIX C: Demonstration Disk Programs
1. D/R
4 OPEN2.. 8,15
5 PRINT":1":GOTO
1121121121121
1101 OPENL8..e,
"$101"
2121 GETlll,A$,B$
313 GETIIL A$, B$
413 GETIIL A$, B$
5101 C=!!I
60 IF A$()""
THEN C=ASC(A$)
713 IF B$()""
THEN C=C+ASC(B$)i!!256
8101 PRINT" ~"MID$(STR$(C),
2); TAB(3);
"~";
913 GETlll,B$:IF
ST(>e
THEN 11211313
lee IF B$(>CHR$(34)
THEN 9121
11121 GETlll,B$:IF
B$(>CHR$(34)THEN
PRINTB$;
: GOT011121
12121 GETlll,B$:IF
B$=CHR$(32)
THEN 12121
13121 PRINT
TAB<l8);
: C$=""
14121C$=C$+B$:GETlIl,B$:
IF B$(>""
THEN 14121
15121 PRINT"~"LEFT$(C$,3)
16121 GET T$: IF T$O""
THEN GOSUB 21210121
17121 IF ST~12I THEN 3121
1121121121
PRINT"
BLOCKS FREE"
11211121
CLOSE1:GOTO
1121121121121
213121121
IF T$="Q"
THEN.CLOSE1:END
21211121GET T$: IF T$=""
THEN 212113121
2132121 RETURN
413121121
REM DISK COMMAND
4131121 C$="":PRINT")";
412111 GETB$: I FB$=""
THEN412111
412112 PRINTB$;
:IF
B$=CHR$(13)
THEN 41212121
412113 C$=C$+B$:OOTO
412111
41212121PRHITII2,
C$
5121121121
PRINT"~".:
51211121GETII2,A$:PRINTA$;
:IF
A$(>CHR$(13)GOT051211121
51212121PRINT"~"
11211210121
PRINT
"D-DIRECTOR'T"
11211211121
PRINT
")-DISK
COMMAND"
10020
PRINT
"Q-QUIT
PROGRAM"
101213121PRINT
"S-DISK
STATUS
"
11211121121
GETA$:IFA$=""THENl1211121121
102121121IF A$="D"
THEN 1121
112131210IF A$="."
OR A$=")"
OR A$=">"
THEN 4121121121
112131121IF A$="Q"
THEN END
112132121IF A$="S"
THEN 5121121121
1121999 GOTO 11211121121
2. VIEW SAM
1121121
REM
10.1 REM.
102 REM
************.*.*.*..*.*...
VI~W BAM FOR VIC & 64 DISK
,..........................
*
1121:5 OPEN15,S,15
11121 PRINTII15,"II2I":NU$="N/A
N/A N/A N/A N/A":Z4=1
12121 OPEN2,S,2,"II"
13121 'T$~" j:!)roll)lnal!lwt~tljl)jll~l)q'a.aIQ)'OO)II~J"
14121 X$="
"
15121 DEF FNS(Z)
= 2f(S-INT(S/S)i!!S)
AND (SB(INT(S/S»)
47
1613
17121
PRINTiI5."Ul:";2;0;18;a
PRINTiI5."B-P";2;1
18121PRINT":'1";
19121
¥=22:X=I:GOSUB43a
2130 FORI=0T020:PRINT:PRINT":T1"RIGHT$(STR$(I>+"
21121GET#2,A$
220 GEHI2. A$
23121GET#2., A$
240 TS=0
25121FORT=lTOI7:GOSUB450
26121 Y=22:X=T+4:GOSUB43e:GOSUB54a:NEXT
270 FORI=lT02a0a:NEXT:PRINT":'1"
28121Y=22:X=I:GOSUB430
29121FORI"0T02a:
PRUIT: PRINT":T1"RIGHT$(STR$(
31210FORT=18T035
31121
I)+"
".3);
: NEXT
".3);:
NEXT
GOSUB450
32121Y=22:X=T-13:GOSUB43a:GOSUB~4a:NEXT
330 FORI=lT0100a:NEXT
34121PRINT"~"
350 PRIt~T#15. "B-P"; 2; 144
36121N$="":FORI=IT020:GET#2,A$:N$=N$+A$:NEXT
37121PRINT" "N$" "TS-17;"BLOCKS
FREE"
38121FORI=IT04aaa:NEXT
3913 PRUIT":,]"
400 INPUT" J.MdIJFI~IOTHER DISKETTE t~I..I".: A$
410 IFA$="Y"THENRUN
42121 IFA$O"¥"THENEND
43121PRINTLEFT$(Y$. Y)LEFT$(X$. >0 "II";
44121RETURH
45121GET#2.SC$:SC=ASC(RIGHT$(CHR$(0)+SC$.1»
460 TS=TS+SC
47121GET#2.A$:IFA$=""THENA$=CHR$(0)
480 SB(0)=ASC(A$)
4913 GET#2,A$:IFA$=""THENA$=CHR$(a)
51210 SB(I)=ASC(A$)
51121GET#2., A$: I FA$= '''' THEHA$=CHR$ (.,)
52121SB(2)=ASC(A$)
530 RETUR~I
54121PRIHT"QI"RIGHT$(STR$(T).
1); "1m";
55121REM PRUITT"
"SC"
"SB(a)"
"SB( 1)" "SB(2)=CHR$(e)
56121 IFT>24AHDS=18THEH:PRINTMID$(NU$.Z4,1);
:GOT066121
5713 FORS=0T020
58121 IFT<18THEN62121
590 IFT>30AHDS=17THEN:PRINTMID$(NU$.Z4.1);
:GOT066e
:GOT066e
6121121
IFT)24AHDS=18THEN:PRINTMID$(NU$.Z4.1);
61121 IFT)24AHDS=19THENPRINTMID$(NU$,Z4.1);
:GOT066a
6213 IFT>17AHDS=2aTHENPRINTMID$(NU$,Z4.1);
:24=24+1:GOT066a
6313 PR It~T" ::I".:
64121 I F F~IS(S) =121THEN PR HIT" +".: : GOT066a
6513 PRIt~T"!!!+".: : REt1RIGHT$(STR$(S).
1); 24.1).: : GOT072
6613 PRU~T""I!!!";
6713 NEXT
6813 RETUR~I
48
3. DISPLAYT & S
lee REM"'''''..'*'
lIe
1213
1313
1413
1513
1613
165
'
*-.
REt1'" DI SPLA'T' A~JY TRACK $ SECTOR '"
REM. ON THE DISK TO THE SCREEN .
REM. OR THE PRINTER
*REM"'''''''''''''''''''''''''''''''''''''''''''*'''''''''*'''**'''''''''''''''..
PRHH":'IIIiIIl
PRHIT"DISPLA'T' BLOCK COtnENTS"
PRINT"
":
1713REM
*
"''''.'''.'''.........
1813 REM'" SET PROORAM CONSTANT
1913REM..".'."".."
"'......_._.
...
21313 SP$=" ": NL$=CHR$(e) : H7~$="eI23456789ABCDEF"
2113 FS$="":FORI=64
TO 95:FS$=FS$+"~"+CHR$(I)+"!!":NEXT
I
2213 SS$="
":FOR 1=192 TO 223:SS$=SS$+"~"+CHR$(I)+"!!":NEXT
2413 DIM A$(15),NB(2)
251 D$="0"
253 PRINT"
~!!!J;REENQ.DI..II.8)R
QI:P!!RINTER"
254 GETJJ$: IF JJ$=""
THEN254
255 IF JJ$="S"THE~IPRHIT"
)1~CREEN!!"
256 IF JJ$="P"THENPRINT"
)1:PRINTER!!"
2613 OPEN15.8.15."I"+D$:GOSUB
6513
265 OPEN4.4
2713 OPEN 2,8,2,
"#":OOSUB 650
2813 REM."'
",,,,...*...,,,
*,,,,,,.,,,***,,,
2913 REM'" LOAD TRACK AND SECTOR
*
31313 REM... INTO DISK BUFFER
.
3113 REt1"'.************"'**
*............
3213 INPUT" :ODITRACK, SECTOR".: T .' S
3313 IF T=e OR T>35 THEN PRINT#15."I"D$:CLOSE2:CLOSE4:CLOSE15:PRINT"END":E~1D
3413 IF JJ$="S"
THEN PRINT":ODITRACK"T" SECTOR"S")1"
341 IF JJ$="P"
THEN PRINT#4:PRINT#4."TRACK"T"
SECTOR"S:PRINT#4
3513 PRINT#15."Ul:2,"D$;T;S:GOSUB650
3613 REM
***
**
"' *
*............
3713 REM. READ BYTE 13 OF DISK BUFFER ...
3913 REM................................................
4013 PRINT#15,"B-P:2,1"
4113 PRINT#15, "M-R"CHR$(e)CHR$(5)
4213 GET#15,A$(e):IFA$(e)=""THENA$(e)=NL$
428 IF JJ$="S"THEN43e
4313 IF JJ$="P"THE~146e
431 REM
*
'''
433 REM'"REST OF THE DISK BUFFER
...
432
434
436
438
4413
442
444
446
448
4~e
452
454
458
"'...** "'''''''*******'''
REM* READ & CRT DISPLAY
...
REM................................................................
K=l:NB(l)=ASC(A$(13»
FOR J=e TO 63: IF J=32 THEN GOSUB 7H): IF Z$="N"THEN
FOR I=K TO 3
GET#2, A$( 1) : IF A$( 1)=''''
THEN A$( 1)=t.jL$
IF K=l AND 1(2 THEN NB(2)=ASC(A$(I»
NEXT I: K=0
A$="":B$=":":N-J.4:00SUB
7ge:A$=A$+":"
FOR 1=0 TO 3:N=ASC(A$(I»:GOSUB
790
C$=A$(I):GOSUB
8513:B$=B$+C$
NEXT I:IF
JJ$="S"
THEN PRINTA$B$
NEXT J:GOT0571
J=80:00TO
458
49
4613
462
464
REM******************************
REM* READ & PRINTER DISPLAY
*
REM********************_**_******
K~l:NB(l)=A$C(A$(e»
FOR J=0 TO 15
FOR I=K TO 15
GETII2, A$<I): IF A$( I)="" THEN A$( I)=NL$
IF K=l AND 1<2 THEN NB(2)=ASC(A$(I»
NEXT I: K=0
A$="":B$=":":N=J*16:GOSUB
790:A$=A$+":"
FOR I-a TO 15:N=ASC(A$(I»:GOSUB
7913: IF Z$="N"THEN
C$=A$(I):GOSUB
sse:B$=B$+C$
NEXT I
IF JJ$="P"
THEN PRINT#4,A$B$
NEXT J:00T0571
466
468
4713
472
474
476
476
4813
462
4S4
486
488
571 REM*_****_*_*********************
572 REM* NEXT TRACK AND SECTOR
573
575
560
5913
6013
6113
_
REM*_***_**_*****_***************
PRINT"NEXT
TRACK AND SECTOR"NB(1)NB(2)
"II"
PRINT"DO YOU WANT NEXT TRACK AND SECTOR"
GET 2$:IF 2$=""
THEN598
IF 2$="Y"
THEN T=NB(1):S=NB(2):GOT0330
IF 2$="N"
THEN 3213
6213 OOTO 5913
6313 REM********************_*********
6413 REM* SUBROUTINES
_
6513
REM******__****_**************__*
6613REM* ERROR ROUTINE
*
6713 REM***_**************************
6813 INPUTII15,EN,EM$,ET,ES:IF
EN=0 THEN
690
PRINT"=rDISK
ERROR!!!"EN,EM$,ET,ES
7013
RETURN
END
7113 REM****************************_*
_
7213 REM* SCREEN CONTINUE MESSAOE
7313 REM_*_***_*_*****************__*_
7413 PRINT"
CONTINUE(Yt'N)"
7513
OET2$:IF Z$="" THEN 750
7613 IF 2$="N"
THEN RETURN
7713 IF 2$O"Y" THEN 7513
7813 PRINT":'1TRACK" T " SECTOR"S
":']":RETURN
7913 REM*_****_*************__*_***.._
81313REM_ DISK BYTE TO HEX PRINT
_
8113 REM*********.**.*****************
8213
Al=INT(Nt'16):A$=A$+MID$(HX$,Al+l,1)
8313
A2=INT(N-16*A1):A$=A$+MID$(HX$,A2+1,1)
8413
A$=A$+SP$:RETURN
8513
REM******************************
8613 REM* DISK BYTE TO ASC DISPLAY
6713REM* CHARACTER
sse
REM******************************
*
*
89121 IF ASC(C$)<:32
THEN C$="
":RETURN
THEN RETURN
9113 IF ASC(C$)(128 OR ASC(C$»159
920 C$=MID$(SS$,3*(ASC(C$)-127),:3):RETURN
50
J=4e:00TO
571
4. CHECK DISK
1 REM CHECK DISK -- VER 1.4
2 DN=8:REM
FLOPP~
DEVICE
NUMBER
5 DIMT(laa):DIMS(laa):REM
BAD TRACK,
"
51 PRINT":'MWOO
113 PRINT"
CHECK DISK PROGRAM"
12 PRINT"
213 D$="a"
313 OPEN15,DN,15
35 PRHITII15,"V"D$
45 N~=RND(TI)*255
513 A$= ''"':FOR
I= 1 T0255
:A$=A$+CHR$
SECTOR
(255AND
6a GOSUBSlaa
713 OPEN2,DN,2,
"II"
813 PRINT:PRINT#2,A$;
85 T=l: 5=13
913 PRINTII15, "B-A: "D$; T.:$
11313INPUTII15,EN,EM$,ET,ES
1113 IFEN=aTHEN13a
115 IFET=aTHEN2aa:REM
END
1213 PRINTII15, "B-A: "D$.:ET; ES: T=ET: S=ES
1313 PRINTII15."U2:2,"D$;T;$
134 NB=NB+l:PRINT"
CHECKED
BLOCKS"NB
135 PRINT" TRACK
IIIII"T;" SECTOR
1413 INPUT#15.EN,EM$.ES,ET
150 IF EN=0THEN85
1613 T(J)=T:S(J)=S:J=J+l
165 PRINT"~AD
BLOCK: III",T; 5''"'
1713 GOT085
21313PRINTII15,"I"D$
2113 G05UBSla13
(1 +Nr.»
ARRA~
:NEXT
11111" S ":11"
212 CLOSE2
215 IFJ=aTHENPRINT"mlD..tlO
BAD BLOCKS!":END
2170PEN2.DN,2."#"
218 PRINT"~AD
BLOCKS","TRACK","SECTOR"
2213 FORI=aTOJ-l
2313 PRINTII15,"B-A:";D$,T(I);S(I)
2413PRINT"T(I>.S(I)
.
2513 NEXT
2613
PRINT":.I"J"BAD
BLOCKS
HAVE
BEEN
ALLOCATED"
2713 CLOSE2:END
511313
INPUT#15.EN,EM$,ET,ES
9113 IF EN=a THEN RETURN
$1213PRINT":.lERROR
9313 PRINTII15,"I"D$
5.
!!"EN, EI1$;ET; E5''"'
PERFORMANCE TEST
1131313
REM
PERFORMANCE
TEST
2.13
113113
113213REM
VIC-2a
AND COMMODORE
64
113313REM
SINGLE
FLOPP~
DISK DRIVE
113413
113513OPEN 1,S,15:0PEN15,S,15
113613LT=35
113713LT$=STR$(LT>
51
1"'81:1
\1390
NT=30
!>!>.IN,'':N
~~1%~~i~~':,
?ERFQR\~~HCE
,I::S,"
1121:1 PRINT
1131:1 PRINT"
INSERT SCRATCH"
1.1413 PRINT
1150 PRINT"
DISKETTE IN DRIVE"
11613 PRINT
11713 PRHIT"~
PRESS ~ETURN!!!"
1180 PRINT
1Ige PRINT"
WHEN READ'r'JII"
1200 FOR 1=0 TO 50:GET A$:NEXT
12110 GET A$:IF A$()CHR$(13)
THEN 1210
'220
1230
1240 TI $=" 000000"
1250 TT=18
1260 PRINT#I, "N0:TEST DISK,e0"
12713 Cl$="
DISK NEW COMMAND "+CHR$( 13)
1280 C2$="JII WAIT ABOUT 80 SECONDS"
1290 CC$=Cl$+C2$:GOSUB
1840
131313 IF TI(NTTHENI37e
13113 PRINT"~'r'STEM
IS"
1320 PRINT"~
NOT RESPONDING"
13313 PRH~T" CORRECTL'r' TO COMMANDS"
13410 GOSUB 18813
1358
13613
13713 PRINT":.IDRIVE PASS"
13813 PRINT"
MECHANICAL TESTJII"
13913 TT=21
141313OPEN 2.8,2,
"0:TEST FILE,S,W"
1410 CC$="OPEN WRITE FILE"
:GOSUB 18413
1.420 CH=2:CC$="WRITE
DATA"
:GOSUB 19313
1430 CC$="CLOSE "+CC$
: GOSUB 18413
14413 OPEN 2.8,2,
"13: TEST FILE,S,R"
14513 CC$="OPEN READ FILE"
: GOSUB 1840
1460 CH=2:GOSUB 1990
1470 PRINT#l, "S0: TEST FILE"
1488 CC$="SCRATCH FILEJII":TT=1
:GOSUB 1848
14913
15013
15113 TT=21
15213 OPEN 4.8,4,"#"
15313 N~I~=( 1+RND(T I ) .254+NN~) AND255 : PR I NTIT1 , "B-P" ; 4; NN~
15413 NN$="":FOR
1=1 TO 255:NN$=NN$+CHR$(I):NEXT
1550 PRINT# 4,NN$;
15613 PRINT# 1,"U2:";4;8;LT;13
15713 CC$="WRITE TRACK"+LTS:GOSUB 18413
15813 PRINT#I,"U2:";4;13;I;e
15913 CC$="WRITE TRACK 1"
:GOSUB 1840
161313 PRINT#I,"Ul:";4;e;LT;e
16113 CC$="READ TRACK"+LTS
:GOSUB 18413
16213 PRINT#I,"Ul:";4;e;I;13
16313 CC$=" READ TRACK 1"
: GOSUB 18413
16413 CLOSE 4
16513 :
!
16613 :
52
167121PRINT"J.1 UNIT HAS PASSED"
168121PRINT"
PERFORMANCE TEST!"
16913 PRINT")) PULL DISKETTE FROM"
171313PRINT"))
DRIVE BEFORE TURNING"
1713 PRINT"
POI~ER OFF."
172121END
1730
17413 :
175121 PRINT"
J.1CONTINUE (.../N)?";
17613 FOR 1=13 TO 50:GET A$:NEXT
17713 GET A$: IF A$="" THEt~ 177121
178121PRINT A$"JII"
17913 IF Af="N" THEN END
181313 IF A$=""''' THEN RETURN
18110 GOTO 17613
18210
183121
18413 PRIm
CC$
18513 INPUT# 1,EN,EM$,ET,ES
18613 PRUITTAB( 12)" "EN; Et1$; ET; ES; ""
187121 IF EN<2 THEN RETURN
18813 PRINT"JII UNIT IS FAILING"
18913 PRINT"JII
PERFORMANCE TEST"
191313 TM$=TI$:GOSUB 175e:TI$=TM$:RETURN
19113
19213
19313 PRINT"WRITING DATA"
1940 FOR 1=1131310TO 2ee13:PRINT#CH,I:NEXT
19513 GOSUB185e
19613 CLOSE CH:RETURN
19713
19813
19910 PRun"READum DATA"
21300 GETA$
20113 FOR 1=1131313TO 213130
21320 INPun
CH,J
ERROR:!!!":GOSUB
20313 IF JOI
THEN PRItn"~EAD
2040 t.IEXT
2050 GOSUB 18513
212160
CLOSE
18513
CH: RETUR~I
53
APPENDIX D: DISK FORMATS
NOTE
Not to scale
1540/1541 Format: Expanded View of a Single Sector
54
Block Distribution by Track
Block or
Sector Range
2040,3040
Track number
I to
18 to
25 to
31 to
17
24
30
25
o to
o to
o to
o to
Block or
Sector Range
4040
Track number
1 to
18 to
25 to
31 to
20
19
17
16
o to
o to
o to
o to
17
24
30
35
20
18
17
16
Total
21
20
18
17
Total
21
19
18
17
8050
Track number
Block or
Sector Range
1 to 39
40 to 53
54 to 64
o to 28
o to 26
o to 24
29
27
25
65 to 77
o to 22
23
1540/1541
Total
BAM FORMAT
Track 18, Sector O.
BYTE
0,1
2
3
CONTENTS
18,01
65
0
4-143
DEFINITION
Track and sector of first directory block.
ASCII character A indicating 4040 format.
Null flag for future DOS use.
Bit map of available blocks for tracks 1.35.
*1 =available block
O=block not available
(each bit represents one block)
55
* STRUCTURE
OF SINGLE DIRECTORY ENTRY
BYTE
CONTENTS
0
128+type
DEFINITION
File type OR'ed with $80 to indicate properly
closed file.
TYPES:
0= DEleted
I = SEQential
2 = PROGram
1-2
3-18
19-20
3 = USER
4 = RELative
Track and sector of Ist data block.
File name padded with shifted spaces.
Relative file only: track and sector for first side
sector block.
21
22-25
Relative file only: Record size.
Unused.
26-27
Track and sector of replacement file when OPEN@
is in effect.
28-29
Number of blocks in file: low byte, high byte.
SEQUENTIAL FORMAT
BYTE
DEFINITION
0.1
Track and sector of next sequential data block.
2-256
254 bytes of data with carriage return as record terminators.
PROGRAM FILE FORMAT
BYTE
0,1
2-256
56
DEFINITION
Track and sector of next block in program me.
254 bytes of program info stored in CBMmemory format (with
key words tokenized). End of file is marked by three zero bytes.
1540/1541 DIRECTORY HEADER
Track 18, Sector O.
BYTE
CONTENTS
144-161
DEFINITION
Disk name padded with shifted spaces.
Disk 10.
162-163
164
160
Shifted space.
165-166
50,65
166-167
177-255
160
ASCII representation for 2A which is DOS
version and format type.
Shifted spaces.
Nulls, not used.
0
Note: ASCII characters may appear in locations 180 thru 191 on some diskettes.
DIRECTORY FORMAT
Track 18, Sector 1
BYTE
0-1
2-31
34-63
66-95
98-127
130-159
162-191
194-123
226-255
DEFINITION
Track and sector of next directory block.
*File entry 1
*File entry 2
*File entry 3
*File entry 4
*File entry 5
*File entry 6
*File entry 7
*File entry 8
57
RELATIVEFILE FORMAT
DATA BLOCK
DEFINITION
BYTE
0,1
2-256
Track and sector of next data block.
254 bytes of data. Empty records contain FF (all binary ones) in
the first byte followed by 00 (binary all zeros) to the end of the
record. Partially filled records are padded with nulls (00).
SIDE SECTOR BLOCK
BYTE
DEFINITION
0-1
Track and sector of next side sector block.
2
3
4-5
Side sector number (0-5)
Record length
6-7
8-9
10-11
Track and sector of first side sector (number 0)
Track and sector of second side sector (number 1)
Track and sector of third side sector (number 2)
Track and sector of fourth side sector (number 3)
12.13
14-15
16-256
Track and sector of fifth side sector (number 4)
Track and sector of sixth side sector (number 5)
Track and sector pointers to 120 data blocks
58
VIC-1541 User's Manual Errata Sheet.
INTRODUCTION
Commodore is constantly trying to bripg you the most efficient and reliable
computer in the world today. Along wit~ the hardware improvements that come
from practical applications of the 154i disk drive in the marketplace, the documentation should also reflect any changes and/or improvements that occur.
This is the most up-to-date information available for your 1541 disk drive. The
changes listed here s~ould be used to replace the comparable information in
your User's Manual..~Future updates will normally be available through the
Commodore User's Magazines(COMMODOREand POWER PLAY) as well as
the COMMODOREINFORMAT~ONN~TWORKon CompuServe.
The format ofthis update is as follows:
A.
1. Page and Paragraph or Section ofthe VIC-1541 User's Guide.
2. Old information.
3. New information.
Example:
A.
1. P.3, INTRODUCTION,paragraph 5
2.
3.
... use your Commander 64 or VIC 20 User's Guides. . .
... use your Commodore 64 or VIC 20 User's Guides. . .
The following listing is performed in numerical order by page.
A.
1. P. 3, INTRODUCTION,paragraph 5
2. ... use your Commander 64 or VIC 20 User's Guides. . .
3. ... use your Commodore 64 or VIC 20 User's Guides. . .
B.
1. P. 4, SPECIFICATIONS,paragraph 2, line 6
2.
3.
C.
The "pipeline" makes the disk abot to process commands. . .
The "pipeline" makes the disk able to process commands. . .
1. P. 7, CONNECTIONOF CABLES,paragraph 3, line 3
2. ... at one time, read chapter 8 . . .
3. ... at one time, read chapter 9 . . .
-
D.
1. P. 9, USINGWITHA VIC 20 OR COMMODORE64, last paragraph
2. . . . explanation of the U (user) commands in chapter 7.
3. . . . explanation of the U (user) commands in chapter 8.
E.
1. P. 10, EXAMPLES,example 3
2. LOAD A$, J K
3. LOAD A$, J, K
F.
1. P. 13, FORMAT FOR THE SAVE COMMAND,first paragraph, line 1
See the LOAD command (pages & ) for an explanation. . .
See the LOAD command (page 10) for an explanation. . .
2.
3.
G.
1. P. 13, FORMAT FOR SAVEWITHREPLACE:, example
SAVE "=0:" + name$, device#, command#
SAVE "@O:" + name$, device#, command#
2.
3.
H.
1. P.14, FORMAT FOR THE OPEN STATEMENT:,example
2. OPEN ftle#, device#, (command) channel#, text $
3. OPEN ftle#, device#, channel#, text $
I.
1. P. 15, paragraph after EXAMPLESOF OPEN STATEMENTS:,line 4
2. . . . the disk drive, which LOADsit onto the diskette.
3. . . . the disk drive, from which it goesto the diskette.
J.
1. P. 19, CLOSE-- NOTE: (paragraph 3 on p. 19), line 4
2. CLOSE 15: OPEN 15,8,15: CLOSE 15.
3. OPEN 15,8,15, "I".
K.
1. P. 20, EXAMPLESOF OPENINGSEQUENTIALFILES:
2. OPEN 2,8,2, "ODATA, S, W"
3. OPEN2, 8, 2, "O:DATA, S, W"
L.
1. P. 20, EXAMPLESOF OPENINGSEQUENTIALFILES:
2. OPEN 8, 8, 8, "OProgram,P, R"
3. OPEN 8, 8, 8, "O:PROGRAM,P, R"
M.
1. P. 23, READINGTHE DIRECTORY, sample program, line 10
2. 10 OPEN 1, 8, 2, "s
3.
N.
O.
10 OPEN 1,8,2, "$
1. P.24,TABLE5.1,line4-143
2.
4-143
Bit map of availableblocks for trace 1-35
3.
4-143 * Bit map of availableblocks for trace 1-35
1. P. 27, TABLETOP OF PAGE 27
2.
3.
Table 6.1 TRACK AND BLOCKFORMAT
P.
1. P. 30, SAMPLEPROGRAMWRITING 10 RANDOM-ACCESS.. . ,
lines 40, 90, 100, 120, 130, 140
2. 40 A$="Record Contents #"
90 T=l : S=1
100 PRINT# 15, "B-A:" 0, T, S
120 IF A=65 THENT=C: S=D: GOTO 100
130PRINT#15, "B-W:" 5,0, T,S
140 PRINT#4, T "," S
3. 40 A$="RECORD CONTENTS#"
90 T=1: B=1
100 PRINT# 15, "B-A:" 0, T, B
120 IF A=65 THEN T=C: B=D: GOTO 100
130 PRINT# 15, "B-W:" 5,0, T, B
140 PRINT#4, T;B
Q.
1. P. 31-32 SAMPLE PROGRAM WRITING 10 RANDOMACCESS..., lines 40, 100, 110, 130, 140, 150
2. 40 A$="Record Contents #"
100 T=1 : S=1
110 PRINT# 15, "B-A:" 0 ;T;S
130 IF A=65 THEN T=C : S=D: GOTO 110
140 PRINT# 15, "B-W:" 5,0, T; S
150 PRINT# 4, T " ," S
3. 40 A$="RECORD CONTENTS#"
100 T=1 : B=1
110 PRINT# 15, "B-A:" 0; T; B
130 IF A=65THEN T=C: B=D: GOTO 110
140 PRINT# 15, "B-W:" 5; 0; T; B
150 PRINT#4, T; B
R.
1. P. 41, APPENDIXA: DISKCOMMAND
SUMMARY,
line 3
"RO:new name. . .
2. NAME
3. RENAME "RO:newname. . .
S.
1. P. 46, 72: DISKFULL,lines2-3
2. . . . 152entriesfor the 2040, 3040,and4040or 243 entriesfor the
8050 . . . . whentwo blocksareavailableon the 8050to . . .
3. . . . 144 entries for the 1541 . . . . when two blocks are availableon
the 1541to . ..
T.
1. P. 46, 73: DOSMISMATCH,
title line
2. DOSMISMATCH
(73, CBMDOSV2.5 8050)
(73, CBMDOSV2) for 4040
3. DOSMISMATCH
(73, CBMDOSV2.6 1541)
U.
1. P. 46, 74: DRIVENOTREADY,line 1
2. Anattempthasbeenmadeto accessthe 8050DualDriveFloppyDisk.
3. An attempthasbeenmadeaccessthe 1541SingleDrive. . .