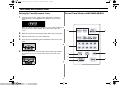
1
htj[W_WhhUGGwGXGGm SGuGZWSGYWW^GG`aZ]Ght Microwave Oven Owner’s Manual AMC4080AAB/W/Q AMC4080AAS AMC4080AAB/W/Q AMC4080AAS Part No. : W10177943 htj[W_WhhUGGwGYGGm SGuGZWSGYWW^GG`aZ]Ght Safety IMPORTANT SAFETY INSTRUCTIONS PRECAUTIONS TO AVOID POSSIBLE EXPOSURE TO EXCESSIVE MICROWAVE ENERGY: (a) Do not attempt to operate this oven with the door open When using any electrical appliance, basic safety precautions should be followed, including the following: WARNING To reduce risk of burns, electric shock, fire, personal injury or exposure to excessive microwave energy: since open-door operation can result in harmful exposure to microwave energy. It is important not to defeat or tamper with the safety interlocks. (b) Do not place any object between the front face of the oven and the door or allow soil or cleaner residue to accumulate on sealing surfaces. (c) Do not operate the oven if it is damaged. It is particularly important that the oven door close properly and that there is no damage to the 1) Door (bent or dented), 2) Hinges and latches (broken or loosened), 3) Door seals and sealing surfaces. (d) The oven should not be adjusted or repaired by anyone except properly qualified service personnel. • Read all safety instructions before using the appliance. • Read and follow the specific “PRECAUTIONS TO AVOID POSSIBLE EXPOSURE TO EXCESSIVE MICROWAVE ENERGY” on this page. • This appliance must be grounded. Connect only to properly grounded outlets. See “IMPORTANT GROUNDING INSTRUCTIONS” on page 3 of this manual. • Install or place this appliance only in accordance with the installation instructions provided. • Some items, like whole eggs and food in sealed containers, may explode if heated in this oven. • Use this appliance only for its intended use as described in the manual. Do not use corrosive chemicals or vapors in this appliance. This type of oven is specifically designed to heat, cook, or dry food. It is not designed for industrial or laboratory use. WARNING Always observe Safety Precautions when using your oven. Never try to repair the oven on your own – there is dangerous voltage inside. If the oven needs to be repaired, call 1-800-843-0304 U. S. A, 1-800-807-6777 CANADA for the name of an authorized service center near you. SAVE THESE INSTRUCTIONS 2 htj[W_WhhUGGwGZGGm SGuGZWSGYWW^GG`aZ]Ght Safety Important Safety Instructions, continued • Do not defrost frozen beverages in narrow-necked bottles. The containers can break. • Dishes and containers can become hot. Handle with care. • Carefully remove container coverings, directing steam away from hands and face. • Remove lids from baby food before reheating. After heating baby food, stir well and test temperature by tasting before serving. • A short power-supply cord is provided to reduce the risk of becoming entangled in or tripping over a longer cord. Longer cord sets or extension cords are available and may be used with caution. • Do not operate any other heating or cooking appliance beneath this appliance. • Do not mount unit over or near any portion of a heating or cooking appliance. • Do not mount over a sink. • Do not store anything directly on top of the appliance when it is in operation. • As with any appliance, close supervision is necessary when used by children. • Do not operate this appliance if it has a damaged cord or plug, if it is not working properly, or if it has been damaged. • This appliance should be serviced only by qualified service personnel. Contact the nearest authorized service facility for examination, repair, or adjustment. • Do not cover or block any of the openings on this appliance. • Do not store this appliance outdoors. Do not use near water – for example, near a kitchen sink, in a wet basement, or near a swimming pool, etc. • Keep the inside of the oven clean. Food particles or spattered oils stuck to the oven walls or floor can cause paint damage and reduce the efficiency of the oven. • Do not immerse cord or plug in water. • Keep cord away from heated surfaces. • Do not let cord hang over edge of table or counter. • When cleaning door and oven surfaces, use only mild, nonabrasive soaps or detergents applied with a sponge or soft cloth. • To reduce the risk of fire in the oven: a. Do not overcook food. Watch appliance carefully if paper, plastic, or other combustible materials are inside. b. Remove wire twist-ties from plastic cooking bags before placing bags in oven. c. If materials inside the oven ignite, keep the oven door closed, turn the oven off, disconnect the power cord, or shut off the power at the fuse or circuit breaker panel. d. Do not use the oven compartment for storage purposes. Do not leave paper products, cooking utensils, or food in the oven when not in use. • Do not try to preheat oven or operate while empty. • Do not cook without the glass tray in place on the oven floor. Food will not cook properly without the tray. IMPORTANT GROUNDING INSTRUCTIONS This appliance must be grounded. In the event of an electrical short circuit, grounding reduces the risk of electric shock by providing an escape wire for the electrical current. This appliance is equipped with a cord that includes a grounding wire and a grounding plug. The plug must be plugged into an outlet that is properly installed and grounded. Plug the three-prong power cord into a properly grounded outlet of standard 115-120 voltage, 60 Hz. Your oven should be the only appliance on this circuit. SAVE THESE INSTRUCTIONS 3 htj[W_WhhUGGwG[GGm SGuGZWSGYWW^GG`aZ]Ght Safety WARNING WARNING Improper use of the grounding plug can result in a risk of electric shock. Consult a qualified electrician or servicer if you do not understand the grounding instructions or if you are not sure if the appliance is properly grounded. Do not cut or remove the third (ground) prong from the power cord under any circumstances. Liquids, such as water, coffee, or tea are able to be overheated beyond the boiling point without appearing to be boiling. Visible bubbling or boiling when the container is removed from the microwave oven is not always present. THIS COULD RESULT IN VERY HOT LIQUIDS SUDDENLY BOILING OVER WHEN THE CONTAINER IS DISTURBED OR A SPOON OR OTHER UTENSIL IS INSERTED INTO THE LIQUID. Use of Extension Cords A short power-supply cord is provided to reduce the risk of becoming entangled in or tripping over a longer cord. Longer cord sets or extension cords are available and may be used if care is exercised in their use. If a long cord or extension cord is used: 1. The marked electrical rating of the cord set or extension cord should be at least as great as the electrical rating of the appliance. 2. The extension cord must be a grounding-type 3-wire cord and it must be plugged into a 3-slot outlet. 3. The longer cord should be arranged so that it will not drape over the counter top or tabletop where it can be pulled on by children or tripped over accidentally. If you use an extension cord, the interior light may flicker and the blower may vary when the microwave oven is on. Cooking times may be longer, too. To reduce the risk of injury to persons: 1. 2. 3. 4. Do not overheat the liquid. Stir the liquid both before and halfway through heating it. Do not use straight-sided containers with narrow necks. After heating, allow the container to stand in the microwave oven for a short time before removing the container. 5. Use extreme care when inserting a spoon or other utensil into the container. SAVE THESE INSTRUCTIONS 4 htj[W_WhhUGGwG\GGm SGuGZWSGYWW^GG`aZ]Ght Your New Microwave oven Checking Parts Table of Contents Unpack your microwave oven and check to make sure that you have all the parts shown here. If any part is missing or broken, call your dealer. Safety ...........................................................................................2 Your New Microwave oven .........................................................5 Checking Parts ...........................................................................5 Setting Up Your Microwave Oven ..............................................6 Control Panel Buttons AMC4080AAB/W/Q ................................6 Control Panel Buttons AMC4080AAS ........................................7 Operation .....................................................................................8 Setting the Clock ........................................................................8 Using the Pause/Cancel Button .................................................8 Using the Instant Cook Buttons..................................................8 Instant Cook Chart .....................................................................9 Using the One Minute+ Button ...................................................9 Defrosting Automatically.............................................................9 Setting Cooking Times & Power Levels ...................................10 One-stage Cooking ..................................................................10 Multi-stage Cooking..................................................................10 Cooking Instructions ................................................................11 Cooking Utensils ......................................................................11 Testing Utensils........................................................................11 Cooking Techniques.................................................................12 General Tips.............................................................................12 Cooking Guide..........................................................................13 Auto Defrosting Guide ..............................................................15 Recipes ....................................................................................16 Appendix ....................................................................................18 Troubleshooting Guide .............................................................18 Care and Cleaning ...................................................................18 Specifications ...........................................................................19 AMANA® MAJOR APPLIANCE WARRANTY ............................20 Quick Reference ....................................................... Back Cover microwave oven roller guide ring registration card template utc kit 5 glass tray instruction manual installation manual htj[W_WhhUGGwG]GGm SGuGZWSGYWW^GG`aZ]Ght Your New Microwave oven Setting Up Your Microwave Oven 1 Control Panel Buttons AMC4080AAB/W/Q Place the oven on a flat, sturdy surface and plug the cord into a grounded outlet. Once plugged in, the display on your oven will show: Make sure there is adequate ventilation for your oven by leaving at least four inches of space behind, above, and to the side of the oven. 2 3 4 2 1 Open the oven door by pressing the button below the control panel. Wipe the inside of the oven with a damp cloth. Place the pre-assembled ring in the indentation in the center of the oven. 3 5 Place the glass tray on top of the ring so that the three glass tabs in the center of the tray fit securely into the tabs on the floor of the oven. 4 6 5 7 6 8 htj[W_WhhUGGwG^GGm SGuGZWSGYWW^GG`aZ]Ght Your New Microwave oven Control Panel Buttons AMC4080AAS 1. One Minute+ p.9 Press once for every minute of cooking at High power. 2. Instant Cook Buttons p.8 Instant settings to cook popular foods. 3. Number buttons Sets cooking times. 4. Power Level p.10 Sets power to level other than high. 5. Auto Defrost Sets weight of the food to be defrosted. 1 6. Clock 2 Press to pause oven or correct a mistake. 8. Start Press to start cooking. 3 6 5 7 p.8 Sets current time. 7. Pause/Cancel 4 p.9 8 7 p.8 htj[W_WhhUGGwG_GGm SGuGZWSGYWW^GG`aZ]Ght Operation Setting the Clock Using the Instant Cook Buttons 1 Press the Clock button. The display will show: 1 Use the Number buttons to enter the current time. You must press at least three numbers to set the clock. If the current time is 5:00 enter, 5,0,0 2 2 3 Press the Instant Cook button corresponding to the food you are cooking (Popcorn, for example). The display shows the first serving size: Press the button repeatedly to select the serving size you want. The display will cycle through all available serving sizes. Once you select the correct serving size, the microwave will begin cooking automatically. Press Clock again. A colon will blink, indicating that the time is set. • See next page for Instant Cook Guide. If there is a power interruption, you will need to reset the clock. You can check the current time while cooking is in progress by pressing the Clock button. Using the Pause/Cancel Button The Pause/Cancel button allows you to clear instructions you have entered. It also allows you to pause the oven’s cooking cycle, so that you can check the food. • To pause the oven during cooking: press Pause/Cancel once. To restart, press Start. • To stop cooking, erase instructions, and return the oven display to the time of day: press Pause/Cancel twice. • To Correct a mistake you have just entered: press Pause/Cancel once, then re-enter the instructions. 8 htj[W_WhhUGGwG`GGm SGuGZWSGYWW^GG`aZ]Ght Operation Instant Cook Chart Item Weight Popcorn 3.5 oz 3.0-3.5 oz • • • Fresh Vegetable 1 cup 2 cups 3 cups 4 cups • Frozen Dinner 8-10 oz 10-12 oz • Potato 1 EA 2 EA 3 EA 4 EA • • • • • Beverage The cooking time of 3.0 oz. microwave-popcorn depends on the content of butter and brands. Remarks • Pizza Reheat Note: 1 Slice 2 Slices 3 Slices • ½ cup 1 cup 2 cups • • • • • Cooking time is adjustable for desired taste with numeric pads following package instructions. Use one microwave-only bag of popcorn. Use caution when removing and opening hot bag from oven To help prevent the popcorn bag from getting stuck in the oven, fold each end of the bag up one inch ( ) before placing the bag in the center of the oven. If it still gets stuck, open the door and reposition the bag, close the door and press start. Using the One Minute+ Button This button offers a convenient way to heat food in one-minute increments at the High power level. 1 Place the vegetable into a casserole and add some water. Cover during cooking and stir before standing. Press the One Minute+ button once for each minute you wish to cook the food. For example, press it twice for two minutes. The time will display, and the oven starts automatically. Add minutes to a program in progress by pressing the One Minute+ button for each minute you want to add. Remove package from outerwrapping and follow package instructions for covering and standing. After cooking, let stand 1-3 min. Defrosting Automatically To thaw frozen food, set the weight of the food and the microwave automatically sets the defrosting time, power level and standing time. Prick each potato several times with fork. Place on turntable in spoke-like fashion. Remove from oven, wrap in foil and let stand 3-5 min. Once during cooking, the oven will beep to let you know to turn the food over. 1 2 Put the pizza on a microwave-safe plate with wide end of slice towards the outside edge of the plate. Do not let slices overlap. Do not cover. Before serving, let stand 1-2 min. 3 4 Use measuring cup or mug ; do not cover. Place the beverage in the oven. After heating, stir well. Press the Auto Defrost button. The display shows “0.5 lbs.” (0.2Kg if you have set your oven for metric measure). To set the weight of your food, press the Auto Defrost button repeatedly. This increases the weight by 0.5 lb increments, up to 6.0 lbs (The Auto Defrost button will increase the weight by 0.2Kg up to 2.6kg if you are using metric measurement). You can also use the number buttons to enter the weight of the food directly. The oven calculates the defrosting time and starts automatically. Twice during defrosting, the oven will beep to let you know to turn the food over. Press the Pause/Cancel button, open the oven door, and turn the food over. Press the Start button to resume defrosting. See page 15 for the Defrosting Guide. 9 htj[W_WhhUGGwGXWGGm SGuGZWSGYWW^GG`aZ]Ght Operation Setting Cooking Times & Power Levels Multi-stage Cooking Your microwave allows you to set up to two different stages of cooking, each with its own time length and power level. The power level button lets you control the heating intensity from Warm (1) to High (0). 1 When entering more than one cooking stage, the Power Level button must be pressed before the second cooking stage can be entered. One-stage Cooking To set the power level at High for a stage of cooking, press the Power Level button twice. For simple one-stage cooking, you only need to set a cooking time. The power level is automatically set to High. If you want to set the power to any other level, you must set it using the Power Level button. 1 2 2 3 Use the number buttons to set a cooking time. You can set a time from one second to 99 minutes, 99 seconds. To set a time over one minute, enter the seconds too. For example, to set 20 minutes, enter 2, 0, 0, 0 . 4 Power Levels: (Warm) (Low) (Defrost) (Medium Low) (Medium) 6 = PL:60 7 = PL:70 8 = PL:80 9 = PL:90 0 = PL:Hi Use the number buttons to set a second cooking time. Press the Power Level button, then use the number buttons to set the power level of the second stage of cooking. Press Start to begin cooking. You can check the Power Level while cooking is in progress by pressing the Power Level button. If you want to set the power level to something other than High, press the Power Level button, then use the number buttons to enter a power level. 1 = PL:10 2 = PL:20 3 = PL:30 4 = PL:40 5 = PL:50 Follow steps 1 and 2 in the “One-Stage Cooking” section on the previous page. (Simmer) (Medium High) (Reheat) (Sauté) (High) 3 Press the Start button to begin cooking. If you want to change the power level, press Pause/Cancel before you press Start, and reenter all of the instructions. Some recipes require different stages of cooking at different temperatures. You can set multiple stages of cooking with your microwave. 10 htj[W_WhhUGGwGXXGGm SGuGZWSGYWW^GG`aZ]Ght Cooking Instructions Cooking Utensils Not Recommended • Recommended Use • • • • • • • • Glass and glass-ceramic bowls and dishes — Use for heating or cooking. Microwave browning dish — Use to brown the exterior of small items such as steaks, chops, or pancakes. Follow the directions provided with your browning dish. Microwavable plastic wrap — Use to retain steam. Leave a small opening for some steam to escape and avoid placing it directly on the food. Wax paper — Use as a cover to prevent spattering. Paper towels and napkins — Use for short-term heating and covering; they absorb excess moisture and prevent spattering. Do not use recycled paper towels, which may contain metal and can catch fire. Paper plates and cups — Use for short-term heating at low temperatures. Do not use recycled paper, which may contain metal and can catch fire. Thermometers — Use only those labeled “Microwave Safe” and follow all directions. Check the food in several places. Conventional thermometers may be used once the food has been removed from the oven. • • • Glass jars and bottles — Regular glass is too thin to be used in a microwave, and can shatter. Paper bags — These are a fire hazard, except for popcorn bags that are designed for microwave use. Styrofoam plates and cups — These can melt and leave an unhealthy residue on food. Plastic storage and food containers — Containers such as margarine tubs can melt in the microwave. Metal utensils — These can damage your oven. Remove all metal before cooking. Testing Utensils If you are not sure whether a dish is microwave-safe or not, you can perform this test: 1 Fill a 1 cup glass measuring cup with water and put it inside your oven, next to the dish you want to test. Limited Use • • • • Aluminum foil — Use narrow strips of foil to prevent overcooking of exposed areas. Using too much foil can damage your oven, so be careful. Ceramic, porcelain, and stoneware — Use these if they are labeled “Microwave Safe.” If they are not labeled, test them to make sure they can be used safely. Never use dishes with metallic trim. Plastic — Use only if labeled “Microwave Safe.” Other plastics can melt. Straw, wicker, and wood — Use only for short-term heating, as they can be flammable. 2 Press the One Minute+ button once to heat them for one minute at High power. The water should be warm and the dish you are testing should be cool. If the dish is warm, then it is absorbing microwave energy and is not acceptable for use in the microwave. 11 htj[W_WhhUGGwGXYGGm SGuGZWSGYWW^GG`aZ]Ght Cooking Instructions Cooking Techniques Adding Moisture Microwave energy is attracted to water molecules. Food that is uneven in moisture content should be covered or allowed to stand so that the heat disperses evenly. Add a small amount of water to dry food to help it cook. Stirring Stir foods such as casseroles and vegetables while cooking to distribute heat evenly. Food at the outside of the dish absorbs more energy and heats more quickly, so stir from the outside to the center. The oven will turn off when you open the door to stir your food. General Tips Arrangement Arrange unevenly shaped foods, such as chicken pieces or chops, with the thicker, meatier parts toward the outside of the turntable where they receive more microwave energy. To prevent overcooking, place thin or delicate parts toward the center of the turntable. • • Shielding Shield food with narrow strips of aluminum foil to prevent overcooking. Areas that need shielding include poultry wing-tips, the ends of poultry legs, and corners of square baking dishes. Use only small amounts of aluminum foil. Larger amounts can damage your oven. • Turning • Turn foods over midway through cooking to expose all parts to microwave energy. This is especially important with large items such as roasts. • • Standing Foods cooked in the microwave build up internal heat and continue to cook for a few minutes after the oven stops. Let foods stand to complete cooking, especially foods such as roasts and whole vegetables. Roasts need this time to complete cooking in the center without overcooking the outer areas. All liquids, such as soup or hot chocolate, should be shaken or stirred when cooking is complete. Let liquids stand a moment before serving. When heating baby food, stir well and test the temperature before serving. • 12 Dense foods, such as potatoes, take longer to heat than lighter foods. Foods with a delicate texture should be heated at a low power level to avoid becoming tough. Altitude and the type of cookware you are using can affect cooking time. When using a new recipe, use the minimum cooking time and check the food occasionally to prevent overcooking. Foods with a non-porous skin or shell, such as potatoes, eggs, or hot dogs, should be pierced to prevent bursting. Frying with heating oil or fat is not recommended. Fat and oil can suddenly boil over and cause severe burns. Some ingredients heat faster than others. For example, the jelly inside a jelly doughnut will be hotter than the dough. Keep this in mind to avoid burns. Home canning in the microwave oven is not recommended because all harmful bacteria may not be destroyed by the microwave heating process. Although microwaves do not heat the cookware, the heat is often transferred to the cookware. Always use pot holders when removing food from the microwave and instruct children to do the same. htj[W_WhhUGGwGXZGGm SGuGZWSGYWW^GG`aZ]Ght Cooking Instructions Cooking Guide GUIDE for Cooking Meat in Your Microwave • • • • GUIDE for Cooking Poultry in Your Microwave Place meat on a microwave-safe roasting rack in a microwave-safe dish. Start meat fat-side down. Use narrow strips of aluminum foil to shield any bone tips or thin meat areas. Check the temperature in several places before letting the meat stand the recommended time. The following temperatures are removal temperatures. The temperature of the food will rise during the standing time. Food Cook Time/Power Level Roast Beef Cooking Time: 7-10 min. / lb. for 115° F Boneless Rare Up to 4 lbs. 8-11 min. / lb. for 120° F Medium 9-14 min. / lb. for 145° F Well Done • • • • Food Directions Cooking Time: 8-12 min. / lb. for 160° F Well Done Up to 4 lbs. Power Level: High(Hi) for first 5 min., then Medium(50). Bacon Cooking Time: 2 slices: 1½- 2 min. 4 slices: 2½- 3½ min. 6 slices: 4-5½ min. Power Level: High(Hi). 2-6 slices Cook Time/Power Level Whole Cooking Time: Chicken 8-11 min. / lb. 170° -180°F Place roast fat-side down on roasting rack. Cover with wax paper. Turn over when cooking time is half up. Let stand 10 min. Up to 4 lbs. Power Level: High(Hi). Chicken Cooking Time: 6-9 min. / lb. Pieces 180°F dark meat 170°F light meat Up to 2 Power Level: High(Hi). lbs. Power Level: High(Hi) for first 5 min., then Medium(50). Pork Boneless or bone-in Place poultry on a microwave-safe roasting rack in a microwave-safe dish. Cover poultry with wax paper to prevent spattering. Use aluminum foil to shield bone tips, thin meat areas, or areas that start to overcook. Check the temperature in several places before letting the poultry stand the recommended time. Place roast fat-side down on roasting rack. Cover with vented plastic wrap. Turn over when cooking time is half up. Let stand 10 min. Arrange slices on roasting rack or a dish lined with papertowel. Cover with paper towel. Microwave until crisp. 13 Directions Place chicken breast-side down on roasting rack. Cover with wax paper. Turn over when cooking time is half up. Cook until juices run clear and meat near the bone is no longer pink. Let stand 5-10 min. Place chicken bone-side down on dish, with the thickest portions towards the outside of the dish. Cover with wax paper. Turn over when cooking time is half up. Cook until juices run clear and meat near the bone is no longer pink. Let stand 5-10 min. htj[W_WhhUGGwGX[GGm SGuGZWSGYWW^GG`aZ]Ght Cooking Instructions Guide for Cooking Seafood in Your Microwave Guide for Cooking Eggs in Your Microwave • • • • • Cook fish until it flakes easily with a fork. Place fish on a microwave-safe roasting rack in a microwave-safe dish. Use a tight cover to steam fish. A lighter cover of wax paper or paper towel provides less steaming. Do not overcook fish; check it at minimum cooking time. • • Never cook eggs in the shell, and never warm hard-cooked eggs in the shell; they can explode. Always pierce whole eggs to keep them from bursting. Cook eggs just until set; they become tough if overcooked. Guide for Cooking Vegetables in Your Microwave Food Steaks Up to 1.5 lbs. Fillets Up to 1.5 lbs. Cook Time/Power Level Cooking Time: 6-9 min. / lb. Power Level: MediumHigh(70). Cooking Time: 3-7 min. / lb Power Level: High(Hi). Shrimp Cooking Time: 3-6 min. / lb. Up to 1.5 lbs. Power Level: High(Hi). • Directions Arrange steaks on roasting rack with meaty portions towards the outside of rack. Cover with wax paper. Turn over and rearrange when cooking time is half up. Cook until fish flakes easily with a fork. Let stand 3-5 min. • • • Arrange fillets in a baking dish, turning any thin pieces under. Cover with wax paper. If over 1/2 inch thick, turn over and rearrange when cooking time is half up. Cook until fish flakes easily with a fork. Let stand 2-3 min. • • • Arrange shrimp in a baking dish without overlapping or layering. Cover with wax paper. Cook until firm and opaque, stirring 2 or 3 times. Let stand 5 min. • 14 Vegetables should be washed just before cooking. Often, no extra water is needed. If dense vegetables such as potatoes, carrots and green beans are being cooked, add about ¼ cup water. Small vegetables (sliced carrots, peas, lima beans, etc.) will cook faster than larger ones. Whole vegetables, such as potatoes, acorn squash or corn on the cob, should be arranged in a circle on the turntable before cooking. They will cook more evenly if turned over after half the cooking time. Always place vegetables like asparagus and broccoli with the stem ends pointing towards the edge of the dish and the tips toward the center. When cooking cut vegetables, always cover the dish with a lid or vented microwavable plastic wrap. Whole, unpeeled vegetables such as potatoes, squash, eggplant, etc., should have their skin pricked in several spots before cooking to prevent them from bursting. For more even cooking, stir or rearrange whole vegetables halfway through the cooking time. Generally, the denser the food, the longer the standing time. (Standing time refers to the time necessary for dense, large foods and vegetables to finish cooking after they come out of the oven.) A baked potato can stand on the counter for five minutes before cooking is completed, while a dish of peas can be served immediately. htj[W_WhhUGGwGX\GGm SGuGZWSGYWW^GG`aZ]Ght Cooking Instructions Auto Defrosting Guide • Notes Check foods when the oven signals. After the final stage, small sections may still be icy; let them stand to continue thawing. Do not defrost until all ice crystals have thawed. Shielding roasts and steaks with small pieces of foil prevents the edges from cooking before the center of the food has defrosted. Use narrow, flat, smooth strips of aluminum foil to cover the edges and thinner sections of the food. Follow the instructions below when defrosting different types of food. Food Standard Amount Procedure Roast 2.5-6.0 lbs. Beef, Pork Start with the food placed fat side down. After each stage, turn the food over and shield any warm portions with narrow strips of aluminum foil. Steaks, Chops, Fish 0.5-3.0 lbs. After each stage, rearrange the food. If there are any warm or thawed portions of food, shield them with narrow flat pieces of aluminum foil. Remove any pieces of food that are nearly defrosted. Let stand, covered, for 510 minutes. Ground Meat 0.5-3.0 lbs. After each stage, remove any pieces of food that are nearly defrosted. Let stand, covered with foil, for 5-10 minutes. Whole Chicken 2.5-6.0 lbs. Remove giblets before freezing poultry. Start defrosting with the breast side down. After the first stage, turn the chicken over and shield any warm portions with narrow strips of aluminum foil. After the second stage, again shield any warm portions with narrow strips of aluminum foil. Let stand, covered, for 30-60 minutes in the refrigerator. Chicken Pieces 0.5-3.0 lbs. After each stage, rearrange or remove any pieces of food that are nearly defrosted. Let stand for 10-20 minutes. 15 htj[W_WhhUGGwGX]GGm SGuGZWSGYWW^GG`aZ]Ght Cooking Instructions Recipes Beef and Barley Stew Broccoli and Cheese Casserole 1½ lbs. beef stew cubes, cut into ½-inch pieces ½ cup chopped onion 2 Tbs. all-purpose flour 1 Tbs. Worcestershire sauce 1 can (13.75-14.5 oz.) beef broth 2 medium carrots, cut into ½-inch slices (about 1 cup) ½ cup barley 1 bay leaf ¼ tsp. pepper 1 pkg. (9-10 oz.) frozen peas, thawed ¼ cup butter or margarine ¼ cup chopped onion 1½ Tbs. flour ½ tsp. salt ¼ tsp. dry mustard 1/8 tsp. pepper 1½ cups milk ¼ cup chopped red pepper 8 oz. (2 cups) cheddar cheese, shredded 1 pkg. (9-10 oz.) frozen chopped broccoli, thawed 4 cups cooked spiral shaped pasta (8 oz. dry) 1. In a 2-quart casserole, combine beef, onion, flour, and Worcestershire; mix well. Cover with lid. Cook at High for 6 to 8 minutes until beef is no longer pink, stirring once. 2. Stir in beef broth, carrots, barley, bay leaf, and pepper. Cover with lid. Cook at Medium for 45 to 50 minutes until carrots and beef are tender, stirring 2 to 3 times. 3. Stir in peas. Cover with lid. Cook at Medium for 10 minutes. Let stand for 10 minutes. Remove bay leaf before serving. Makes 6 servings. 1. In a 2-quart casserole, cook butter and onion at High for 2 to 3 minutes until onion is soft, stirring once. 2. Add flour, salt, mustard, and pepper; mix well. Cook at High for 60 to 90 seconds until mixture boils. Stir in milk until smooth. 3. Stir in red pepper. Cook at High for 2 to 3 minutes until mixture boils and thickens slightly, stirring twice. Stir in cheese until melted. 4. Add broccoli and pasta, mix well. Cover with lid. Cook at High for 4 to 6 minutes until heated through, stirring once. Stir before serving. Makes 6 servings. 16 htj[W_WhhUGGwGX^GGm SGuGZWSGYWW^GG`aZ]Ght Cooking Instructions Warm Potato Salad Black Bean Soup 2 lbs. small red potatoes, cut into ½-inch pieces 4 slices bacon (uncooked), cut into ½-inch pieces ¼ cup chopped onion 2 tsp. sugar 1 tsp. salt 1 tsp. flour ½ tsp. celery seed 1/8 tsp. pepper 2½ Tbs. apple cider vinegar 1 cup chopped onion 1 clove garlic, minced 2 cans (15 oz. each) black beans, drained 1 can (14-16 oz.) stewed tomatoes, chopped 1 can (13.75-14.5 oz.) chicken broth 1 can (7-8.5 oz.) corn 1 can (4 oz.) chopped green chilies 1-2 tsp. ground cumin, or to taste 1. Place onion and garlic in a 3-quart casserole. Cover with lid. Cook at High for 3 to 5 minutes until tender. 2. Add one can of beans, mash beans with a fork. Add remaining ingredients; mix well. 3. Cook uncovered, at High for 10 minutes; stir. Reduce power to Medium and cook for 5 minutes. Stir before serving. Makes about 2 quarts. 1. In a 2-quart casserole, combine potatoes and ¼ cup water. Cover with lid. Cook at High until potatoes are tender (10-12 min.); stir twice. Drain and set aside to cool slightly. 2. In a medium bowl, cook bacon at High until crisp (3-5 min.); stir once. Place bacon on a paper towel. Reserve 1 Tbs. drippings. 3. Combine drippings and onion. Cover with plastic wrap; turn back a corner to vent steam. Cook at High until tender (3-4 min.); stir once. 4. Stir in sugar, salt, flour, celery seed, and pepper. Cook at High until mixture boils (30-40 sec.). Stir in vinegar and ½ cup water. Cook at High until liquid boils and thickens slightly (1-2 min.); stir once. Add bacon to dressing. Pour dressing over potatoes. Stir well. Makes 6 servings. 17 htj[W_WhhUGGwGX_GGm SGuGZWSGYWW^GG`aZ]Ght Appendix Troubleshooting Guide Note : Before you call a repair person for your oven, check this list of possible problems and solutions. If the oven is set more than 25 minutes at 80, 90 or 100 percent power level, after the first 25 minutes the power level will automatically adjust itself to 70 percent power to avoid overcooking. Neither the oven’s display nor the oven operate. • • • • • • Properly insert the plug into a grounded outlet. If the outlet is controlled by a wall switch, make sure the wall switch is turned on. Remove the plug from the outlet, wait ten seconds, then plug it in again. Reset the circuit breaker or replace any blown fuse. Plug another appliance into the outlet; if the other appliance doesn’t work, have a qualified electrician repair the outlet. Plug the oven into a different outlet. Care and Cleaning Follow these instructions to clean and care for your oven. • Keep the inside of the oven clean. Food particles and spilled liquids can stick to the oven walls, causing the oven to work less efficiently. • Wipe up spills immediately. Use a damp cloth and mild soap. Do not use harsh detergents or abrasives. • To help loosen baked on food particles or liquids, heat two cups of water (add the juice of one lemon if you desire to keep the oven fresh) in a four-cup measuring glass at High power for five minutes or until boiling. Let stand in the oven for one or two minutes. • Remove the glass tray from the oven when cleaning the oven or tray. To prevent the tray from breaking, handle it carefully and do not put it in water immediately after cooking. Wash the tray carefully in warm sudsy water or in the dishwasher. • Clean the outside surface of the oven with soap and a damp cloth. Dry with a soft cloth. To prevent damage to the operating parts of the oven, don’t let water seep into the openings. • Wash the door window with very mild soap and water. Be sure to use a soft cloth to avoid scratching. • If steam accumulates inside or outside the oven door, wipe with a soft cloth. Steam can accumulate when operating the oven in high humidity and in no way indicates microwave leakage. • Never operate the oven without food in it; this can damage the magnetron tube or glass tray. You may wish to leave a cup of water in the oven when it is not in use to prevent damage if the oven is accidentally turned on. The oven’s display works, but the power won’t come on. • • • • Make sure the door is closed securely. Check to see if packing material or other material is stuck to the door seal. Check for door damage. Press Cancel twice and re-enter all cooking instructions. The power goes off before the set time has elapsed. • • If there has not been a power outage, remove the plug from the outlet, wait ten seconds, then plug it in again. If there was a power outage, the time indicator will display “88:88” Reset the clock and any cooking instructions. Reset the circuit breaker or replace any blown fuse. The food is cooking too slowly. • Make sure the oven is on its own 15 amp circuit line. Operating another appliance on the same circuit can cause a voltage drop. If necessary, move the oven to its own circuit. You see sparks or arcing. • Remove any metallic utensils, cookware, or metal ties. If using foil, use only narrow strips and allow at least one inch between the foil and interior oven walls. If you have a problem you cannot solve, please call our service line: The turntable makes noises or sticks. • • Clean the turntable, roller ring and oven floor. Make sure the turntable and roller ring are positioned correctly. (1-800-843-0304 U. S. A) (1-800-807-6777 CANADA) Using your microwave causes TV or radio interference. • This is similar to the interference caused by other small appliances, such as hair dryers. Move your microwave further away from other appliances, like your TV or radio. 18 htj[W_WhhUGGwGX`GGm SGuGZWSGYWW^GG`aZ]Ght Appendix Specifications Model Number AMC4080AAB/W/Q Oven Cavity 0.8 cu.ft Controls 10 power levels, including defrost Timer 99 minutes, 99 seconds Power Source 120 VAC, 60 Hz Power Output 800 Watts Outside Dimensions 19 1/4”(W) X 10 13/16”(H) X 13 27/32”(D) Oven Cavity Dimensions 13”(W) X 7 29/32”(H) X 13”(D) Net/Gross Weight 26.5/28.5 lbs Model Number AMC4080AAS Oven Cavity 0.8 cu.ft Controls 10 power levels, including defrost Timer 99 minutes, 99 seconds Power Source 120 VAC, 60 Hz Power Output 800 Watts Outside Dimensions 19 1/4”(W) X 10 13/16”(H) X 15 2/25”(D) Oven Cavity Dimensions 13”(W) X 7 29/32”(H) X 13”(D) Net/Gross Weight 27.2/29.4 lbs 19 htj[W_WhhUGGwGYWGGm SGuGZWSGYWW^GG`aZ]Ght AMANA® MAJOR APPLIANCE WARRANTY LIMITED WARRANTY For one year from the date of purchase, when this major appliance is operated and maintained according to instructions attached to or furnished with the product, Amana brand of Whirlpool Corporation or Whirlpool Canada LP (hereafter “Amana”) will pay for factory specified parts and repair labor to correct defects in materials or workmanship. Service must be provided by a Amana designated service company. This limited warranty is valid only in the United States or Canada and applies only when the major appliance is used in the country in which it was purchased. Outside the 50 United States and Canada, this limited warranty does not apply. Proof of original purchase date is required to obtain service under this limited warranty. ITEMS EXCLUDED FROM WARRANTY This limited warranty does not cover: 1. Service calls to correct the installation of your major appliance, to instruct you on how to use your major appliance, to replace or repair house fuses, or to correct house wiring or plumbing. 2. Service calls to repair or replace appliance light bulbs, air filters or water filters. Consumable parts are excluded from warranty coverage. 3. Repairs when your major appliance is used for other than normal, single-family household use or when it is used in a manner that is contrary to published user or operator instructions and/or installation instructions. 4. Damage resulting from accident, alteration, misuse, abuse, fire, flood, acts of God, improper installation, installation not in accordance with electrical or plumbing codes, or use of consumables or cleaning products not approved by Amana. 5. Cosmetic damage, including scratches, dents, chips or other damage to the finish of your major appliance, unless such damage results from defects in materials or workmanship and is reported to Amana within 30 days from the date of purchase. 6. Any food loss due to refrigerator or freezer product failures. 7. Costs associated with the removal from your home of your major appliance for repairs. This major appliance is designed to be repaired in the home and only in-home service is covered by this warranty. 8. Repairs to parts or systems resulting from unauthorized modifications made to the appliance. 9. Expenses for travel and transportation for product service if your major appliance is located in a remote area where service by an authorized Amana servicer is not available. 10. The removal and reinstallation of your major appliance if it is installed in an inaccessible location or is not installed in accordance with published installation instructions. 11. Major appliances with original model/serial numbers that have been removed, altered or cannot be easily determined. This warranty is void if the factory applied serial number has been altered or removed from your major appliance. The cost of repair or replacement under these excluded circumstances shall be borne by the customer. DISCLAIMER OF IMPLIED WARRANTIES; LIMITATION OF REMEDIES CUSTOMER'S SOLE AND EXCLUSIVE REMEDY UNDER THIS LIMITED WARRANTY SHALL BE PRODUCT REPAIR AS PROVIDED HEREIN. IMPLIED WARRANTIES, INCLUDING WARRANTIES OF MERCHANTABILITY OR FITNESS FOR A PARTICULAR PURPOSE, ARE LIMITED TO ONE YEAR OR THE SHORTEST PERIOD ALLOWED BY LAW. AMANA SHALL NOT BE LIABLE FOR INCIDENTAL OR CONSEQUENTIAL DAMAGES. SOME STATES AND PROVINCES DO NOT ALLOW THE EXCLUSION OR LIMITATION OF INCIDENTAL OR CONSEQUENTIAL DAMAGES, OR LIMITATIONS ON THE DURATION OF IMPLIED WARRANTIES OF MERCHANTABILITY OR FITNESS, SO THESE EXCLUSIONS OR LIMITATIONS MAY NOT APPLY TO YOU. THIS WARRANTY GIVES YOU SPECIFIC LEGAL RIGHTS, AND YOU MAY ALSO HAVE OTHER RIGHTS WHICH VARY FROM STATE TO STATE OR PROVINCE TO PROVINCE. If outside the 50 United States and Canada, contact your authorized Amana dealer to determine if another warranty applies. If you need service, first see the “Troubleshooting” section of the Use & Care Guide. After checking “Troubleshooting,” you may find additional help by checking the “Assistance or Service” section or by calling Amana. In the U.S.A., call 1-800-843-0304. In Canada, call 1-800-807-6777. 20 htj[W_WhhUGGwGYXGGm SGuGZWSGYWW^GG`aZ]Ght Note 21 htj[W_WhhUGGwGYYGGm SGuGZWSGYWW^GG`aZ]Ght Quick Reference Feature Operation Set Clock 1. Press CLOCK. 2. Use the Number buttons to enter the current time. 3. Press CLOCK again. One Minute+ Cooking 1. Press the ONE MINUTE + button once for each minute of cooking. 2. The time will display and the oven will start. Instant Cook Buttons 1. Press button that corresponds to the food you are cooking (for example, POPCORN). 2. Press the button repeatedly to select serving size. Auto Defrost 1. Press AUTO DEFROST. 2. Enter weight of food by pressing AUTO DEFROST button repeatedly or using the number buttons. 3. When the oven beeps, press PAUSE/CANCEL button and turn food over. Press START to resume defrosting cycle. Set Cooking Time and Power Levels 1. Use NUMBER buttons to set cooking time. 2. Press the POWER LEVEL button. If you want to set the power level to something other than High, press the POWER LEVEL button repeatedly. 3. Press START to begin cooking. DE68-02901B 12/07 Printed in Malaysia Samsung Electronics Co., Ltd. htj[W_WhhUGGwGXGGm SGuGZWSGYWW^GG`aZ^Ght Horno microondas Manual del usuario AMC4080AAB/W/Q AMC4080AAS AMC4080AAB/W/Q AMC4080AAS Part No.: W10177943 htj[W_WhhUGGwGYGGm SGuGZWSGYWW^GG`aZ^Ght Seguridad Servicio autorizado cerca de usted. (1-800-843-0304 U. S. A, 1-800-807-6777 CANADA) PRECAUCIONES PARA INSTRUCCIONES IMPORTANTES DE EVITAR UNA POSIBLE EGURIDAD EXPOSICION EXCESIVA A LA SCuando se usa cualquier aparato eléctrico, se deben seguir ENERGIA DE MICROONDAS precauciones básicas de seguridad incluyendo las siguientes: (a) No trate de operar este horno con la puerta abierta ya que ADVERTENCIA la operación con la puerta abierta puede resultar en exposición dañina a la energía de microondas. Es importante el no anular o jugar con los entrecierres de seguridad. (b) No coloque ningún objeto entre la cara frontal del horno y la puerta, tampoco permita que la suciedad o los residuos de limpiadores se acumulen sobre las superficies que sellan. (c) No opere el horno si está dañado. Es particularmente importante que la puerta del horno cierre apropiadamente y que no haya daño en: 1) La puerta (torcida o abollada), 2) Bisagras y seguros (rotos o flojos), 3) Sellos de la puerta u superficies que sellan. (d) El horno no debe ser ajustado o reparado por ninguna persona excepto por el personal de servicio apropiadamente calificado. Para reducir el riesgo de quemaduras, choque eléctrico, fuego, lesiones personales o exposición excesiva a la energía de microondas: • Lea todas las instrucciones de seguridad antes de utilizar el aparato. • Lea y siga las “PRECAUCIONES PARA EVITAR LA POSIBLE EXPOSICIÓN A UNA DOSIS EXCESIVA DE ENERGÍA DE MICROONDAS”, en esta página. • El aparato debe estar conectado a tierra. Conéctelo sólo a tomas de corriente puestas a tierra. Véase “INSTRUCCIONES IMPORTANTES PARA LA CONEXIÓN A TIERRA” en la página 3 de este manual. • Instale o coloque este aparato siguiendo las instrucciones de instalación proporcionadas. • Algunos productos, como huevos enteros o comida en recipientes herméticos, pueden explotar si se calientan en el horno. • Utilice este aparato sólo para las funciones propias que se describen en este manual. No use vapores ni productos químicos corrosivos en este aparato. Este tipo de horno está diseñado especialmente para calentar, cocinar o secar comida. No ha sido diseñado para uso industrial ni de laboratorio. ADVERTENCIA Siempre acate precauciones de seguridad cuando use su horno. Nunca trate de reparar su horno usted mismo: hay voltaje peligroso en el interior. Si el horno necesita ser reparado, entonces llame a un Centro de CONSERVE ESTAS INSTRUCCIONES 2 htj[W_WhhUGGwGZGGm SGuGZWSGYWW^GG`aZ^Ght Seguridad Instrucciones importantes sobre seguridad (continuación) • No descongele bebidas en botellas de cuello estrecho. Los recipientes pueden romperse. • Los platos y recipientes pueden calentarse demasiado. Manipúlelos con precaución. • Retire con cuidado las tapas de los recipientes y evite que el vapor vaya directamente a la cara o las manos. • Quite la tapa de los alimentos para bebés antes de calentarlos. Una vez calentado, y antes de dar de comer al niño, remuévalo bien y pruébelo para comprobar que la temperatura sea correcta. • Se suministra un cable eléctrico corto para reducir el riesgo de que se enrede o enganche, inherente a los cables más largos. Están disponibles cables más largos y alargadores, aunque deben utilizarse con precaución • No maneje ningún otro aparato para calentar o cocinar que esté situado debajo de éste. • No monte la unidad colocándola parcialmente sobre un aparato calefactor o para cocinar, ni tampoco próxima a él. • No monte la unidad sobre un fregadero. • No almacene nada directamente sobre el aparato cuando esté en funcionamiento. • Como ocurre con todos los aparatos eléctricos, si lo utiliza un niño debe estar sometido a estrecha vigilancia. • No utilice este aparato si el cable o el enchufe están estropeados, si no funciona adecuadamente o si ha sufrido algún daño. • El aparato debe ser reparado sólo por personal técnico cualificado. Contacte con el servicio técnico autorizado más cercano para que lo examinen o reparen, o para que realicen los ajustes necesarios. • No tape ni bloquee las ranuras del aparato. • No almacene este aparato al aire libre. No lo utilice cerca del agua (por ejemplo junto al fregadero, sobre el suelo mojado o al lado de una piscina). • Mantenga limpio el interior del horno. Las partículas de comida o el aceite salpicado que se hayan adherido a las paredes o a la base del horno pueden dañar la pintura y reducir su eficacia. • No sumerja en agua ni el cable ni el enchufe. • Mantenga el cable apartado de las superficies calientes. • No deje que el cable cuelgue por el borde de la mesa o mostrador. • Utilice sólo jabones o detergentes neutros no abrasivos, aplicados con una esponja o paño suave, para limpiar la puerta y las superficies del horno. • Para reducir el riesgo de que se incendie el horno: a. No cueza demasiado los alimentos. Inspeccione cuidadosamente el interior del aparato por si hubiera restos de papel, plástico u otro material combustible. b. Quite las partes metálicas de las bolsas de plástico para cocinar antes de colocarlas en el horno. c. Si los materiales del interior del horno se inflaman, mantenga cerrada la puerta, apague el horno, desconecte el cable de alimentación eléctrica o corte la corriente en la caja de fusibles. d. No utilice el compartimiento del horno para almacenar objetos. No deje objetos de papel, utensilios de cocina o comida en el horno mientras no lo utiliza. • No precaliente el horno ni lo ponga en funcionamiento en vacío. • No cocine sin colocar primero la bandeja de cristal sobre la base del horno. Los alimentos no se cocerán adecuadamente sin esta bandeja. INSTRUCCIONES IMPORTANTES DE CONEXIÓN A TIERRA Este aparato debe estar conectado a tierra. En el caso de un corto circuito eléctrico, la conexión a tierra reduce el riesgo de sufrir un choque eléctrico proporcionando un cable de escape para la corriente eléctrica. Este aparato está equipado con un cordón eléctrico que incluye un cable de tierra y una clavija para conexión a tierra. La clavija debe conectarse dentro de un contacto que esté apropiadamente instalado y aterrizado. Conecte el cordón eléctrico de tres cables en un contacto apropiadamente aterrizado que proporcione un voltaje de 120 Volts y 60 Hertz. Su horno debe ser el único aparato conectado en este circuito. CONSERVE ESTAS INSTRUCCIONES 3 htj[W_WhhUGGwG[GGm SGuGZWSGYWW^GG`aZ^Ght Seguridad ADVERTENCIA ADVERTENCIA El uso inapropiado de la clavija puede resultar en el riesgo de sufrir un choque eléctrico. Consulte a un electricista calificado o a una persona del servicio si usted no entiende las instrucciones de conexión a tierra o si no está seguro de que el aparato esté apropiadamente aterrizado. Bajo ninguna circunstancia corte o retire la tercera para(de conexión a tierra) de la clavija. Los líquidos como agua, café o té pueden sobrecalentarse por encima del punto de ebullición sin que parezca que hierven. No siempre se produce el burbujeo característico cuando el recipiente se extrae del horno microondas. ESTO PODRÍA PROVOCAR EL HERVOR SÚBITO DE LÍQUIDOS MUY CALIENTES AL AGITAR EL RECIPIENTE O AL INSERTAR EN EL LÍQUIDO UNA CUCHARA U OTRO TIPO DE UTENSILIO. Uso de extensiones eléctricas Se proporciona un cordón eléctrico corto para reducir el riesgo de enredarse o de tropezarse con un cordón eléctrico más largo. Hay disponibles juegos de cordones eléctricos largos o extensiones eléctricas y pueden usarse si se ejercita cuidado en su uso. Si se usa un cordón eléctrico largo o una extensión eléctrica: 1. La clasificación eléctrica marcada del cordón eléctrico o de la extensión eléctrica debe ser por lo menos tan grande como la clasificación eléctrica del aparato. 2. La extensión eléctrica debe ser de tipo conexión a tierra de tres conductores y debe conectarse en un contacto de 3 ranuras. 3. El cordón eléctrico más largo debe ser arreglado de manera que no cuelgue sobre la cubierta de la cocina o de la mesa en donde puede ser jalado por los niños o en donde puede causar un tropiezo accidental. Si usted usa una extensión eléctrica, entonces la luz interior puede fluctuar y el ventilador puede variar cuando el horno de microondas está encendido. Los tiempos de cocción pueden alargarse también. Para reducir el riesgo de daños personales: 1. 2. 3. 4. No sobre caliente líquidos Remueva el líquido antes y durante el calentamiento No use recipientes planos con entradas muy delgadas Después de calentar, deje reposar el recipiente en el horno de microondas por un lapso pequeño antes de retirarlo 5. Sea cuidadoso cuando inserte una cuchara o algún otro utensilio dentro del recipiente. CONSERVE ESTAS INSTRUCCIONES 4 htj[W_WhhUGGwG\GGm SGuGZWSGYWW^GG`aZ^Ght Su nuevo horno microondas Tabla de Contenido Verificando las partes Desempaque su horno de microondas y verifique para asegurarse que todas las partes están contenidas. Si alguna de las partes llegara a faltar o esta rota, llame a su distribuidor Seguridad ....................................................................................2 Su Nuevo Horno de Microondas ................................................5 Verificando las partes.................................................................5 Instalación del horno microondas ..............................................6 Botones del panel de control AMC4080AAB/W/Q ....................6 Botones del panel de control AMC4080AAS .............................7 Funcionamiento ..........................................................................8 Ajuste del Clock(Reloj) ...............................................................8 Uso del botón Pause/Cancel(Pausa/Cancelar) .........................8 Uso de los botones de Instant Cook(Cocción Inmediata ..........8 Diagrama de cocción inmediata ................................................9 Uso del botón One Minute +(Un minuto +).................................9 Descongelación automática ......................................................9 Ajuste del tiempo de cocción y los Power Levels ....................10 Cocinado de una etapa ...........................................................10 Cocinado de varias Etapas .....................................................10 Instrucciones de cocción .........................................................11 Utensilios de cocción ...............................................................11 Prueba de utensilios ................................................................11 Técnicas de cocción ................................................................12 Consejos generales .................................................................12 Guía de cocción ......................................................................13 Guía de descongelación automática .......................................15 Recetas ...................................................................................16 Apéndice ....................................................................................18 Guía para la solución de problemas ........................................18 Cuidado y limpieza ..................................................................18 Especificaciones ......................................................................19 Horno microondas aro de guía giratorio tarjeta de registro GARANTÍA DE LOS ELECTRODOMÉSTICOS PRINCIPALES DE AMANA® ..............................................................................20 Plantilla Referencia rápida ...................................................Parte Trasera Kit de utc 5 bandeja de cristal manual de instrucciones Instrucciones de instalación htj[W_WhhUGGwG]GGm SGuGZWSGYWW^GG`aZ^Ght Su nuevo horno microondas Instalación del horno microondas 1 Botones del panel de control AMC4080AAB/W/Q Ponga el horno sobre una superficie plana y resistente y enchufe el cable de alimentación en una toma de corriente puesta a tierra. Una vez enchufado, en el visor del horno aparecerá: Para que el horno tenga una ventilación adecuada, deje por lo menos un espacio de diez centímetros detrás, encima y a cada lado del horno. 2 3 4 2 1 Abra la puerta del horno apretando el botón situado debajo del panel de control. Limpie el interior del horno con un paño húmedo. Coloque el aro premontado en la ranura del centro del horno. 3 5 4 Ponga la bandeja de vidrio encima del aro, de manera que las tres lengüetas de vidrio del centro de la bandeja encajen con las de la base del horno. 6 5 7 6 8 htj[W_WhhUGGwG^GGm SGuGZWSGYWW^GG`aZ^Ght Su nuevo horno microondas Botones del panel de control AMC4080AAS 1. One Minute+(Un minuto +) p9 Presione la tecla una vez por cada minuto de cocción a la potencia alta. 2. Instant Cook Buttons (Botones de cocción inmediata) p8 Opciones instantáneas para cocinar alimentos habituales. 3. Number Buttons(Botones numéricos) Para fijar los tiempos de cocción. 4. Power Level(Nivel de potencia) p10 Para establecer otros niveles de potencia distintos del máximo. 1 5. Auto Defrost(Descongelación automática) p9 Para indicar el peso de los alimentos que van a ser descongelados. 2 6. Clock(Reloj) p8 Para ajustar la hora. 7. Pause/Cancel(Pausa/Cancelar) Púlselo para interrumpir el funcionamiento del horno o para corregir un error. 3 8. Start(Inicio) Púlselo para iniciar la cocción. 4 6 5 7 p8 8 7 htj[W_WhhUGGwG_GGm SGuGZWSGYWW^GG`aZ^Ght Funcionamiento Ajuste del Clock(Reloj) 1 2 3 Uso de los botones de Instant Cook(Cocción Inmediata) Pulse el botón Clock(Reloj). El visor mostrará: 1 Use los botones Numéricos para introducir la hora actual. Para ajustar el reloj debe pulsar al menos tres números. Si la hora es 5:00 escriba 5,0,0 2 Presione Clock (Reloj) de nuevo. Dos puntos aparecerán parpadeando, indicando que la hora está ajustada. Si hay una interrupción en el funcionamiento eléctrico, tendrá que reajustar el reloj. Pulse el botón Instant Cook(cocción inmediata) que corresponda al alimento que esté cocinando (por ejemplo, Palomitas). El visor muestra el tamaño de la primera ración Pulse el botón varias veces para seleccionar el tamaño de la ración que desea. El visor alternará entre todos los tamaños de ración disponibles. Cuando haya seleccionado el tamaño de ración correcto, el microondas se pondrá en marcha automáticamente. • Consulte la página siguiente si desea información sobre la Guía de cocción instantánea. Puede verificar la hora exacta mientras la cocción esté en proceso presionando la función de Clock (Reloj). Uso del botón Pause/Cancel(Pausa/Cancelar) El botón Pause/Cancel(Pausa/Cancelar) le permite anular las instrucciones que se han introducido. También le permite realizar una pausa en el ciclo de cocción del horno para que pueda vigilar la comida. • Para que el horno realice una pausa durante la cocción: pulse Pause/ Cancel(Pausa/Cancelar) una vez. Para reiniciar, pulse Start(Inicio). • Para detener la cocción, borrar las instrucciones y que el visor del horno vuelva a mostrar la hora: pulse Pause/Cancel(Pausa/Cancelar) dos veces. • Si desea corregir un error que acaba de introducir: pulse Pause/ Cancel(Pausa/Cancelar) una vez, luego vuelva a introducir las instrucciones. 8 htj[W_WhhUGGwG`GGm SGuGZWSGYWW^GG`aZ^Ght Funcionamiento Diagrama de cocción inmediata Elemento Palomitas Peso • 99,22 g 85,04-99,22 • g • 1 taza 2 tazas 3 tazas 4 tazas • Cenas congeladas 227 283,50 g 283,5 340,19 g • Desenvuelva el paquete del envoltorio exterior y siga las instrucciones del envase. Después de la cocción, deje reposar de 1 a 3 minutos. Patata 1 uds 2 uds 3 uds 4 uds • Pinche cada patata varias veces con un tenedor. Colóquelas en el plato giratorio de forma ordenada. Retire del horno, envuelva en papel y deje reposar de 3 a 5 minutos. Durante la cocción, el horno emite pitidos para informarle de que debe girar la comida. • • • • • • • Bebida ½ taza 1 taza 2 tazas • • • El tiempo de cocción se puede ajustar con el teclado numérico, con el fin de conseguir el sabor deseado, siguiendo las instrucciones suministradas. Use sólo una bolsa de palomitas para microondas. Tenga cuidado cuando retire del horno y abra una bolsa caliente. Si desea evitar que la bolsa de palomitas se quede atascada en el horno, doble hacia arriba 2,5 cm de cada uno de los extremos de la bolsa ( ) antes de colocarla en el centro del horno. Si todavía se atasca, abra la puerta y recoloque la bolsa, cierre la puerta y pulse Start. Vegetales frescos 1 loncha 2 lonchas 3 lonchas El tiempo de cocción de 85 g de palomitas para microondas depende de la marca y de la composición de la mantequilla. Comentarios • Recalentar pizza Nota: Uso del botón One Minute + (Un minuto +) Este botón permite aumentar el tiempo de cocción cómodamente en incrementos de un minuto a potencia alta. 1 Coloque las verduras en una cacerola y añada algo de agua. Tape durante la cocción y remueva antes de dejar reposar. Pulse el botón One Minute+ (Un minuto +) una vez por cada minuto adicional que desee cocinar el alimento. Por ejemplo, púlselo dos veces para dos minutos. Se mostrará el tiempo y el horno comenzará automáticamente. Agregue minutos a un programa en marcha pulsando el botón One Minute+ (Un minuto +) por cada minuto que desee añadir. Descongelación automática Para descongelar alimentos, ajuste el peso de éstos y el microondas calculará automáticamente el tiempo de descongelación, el nivel de potencia y el tiempo de espera. Pulse el botón Auto Defrost(Descongleación automática). El visor muestra "0,5 lbs." (0,2 Kg si ha ajustado su horno al sistema métrico). 1 2 Ponga la pizza en un plato apto para microondas con su extremo ancho orientado hacia el borde exterior del plato. No monte unos trozos sobre otros. No los cubra. Antes de servir, deje reposar de 1 a 2 minutos. 3 4 Utilice una taza o una jarra para medir; no la cubra. Coloque la bebida en el horno. Después de calentarla, agítela bien. Para ajustar el peso de los alimentos, pulse el botón Auto Defrost(Descongleación automática) varias veces. De este modo se aumenta el peso en unidades de 0,5 lb, hasta las 6 (el botón de descongelación automática aumenta el peso en unidades de 200 g hasta los 2,7 Kg si utiliza el sistema métrico). También puede usar los botones numéricos para introducir el peso del alimento directamente. El horno calcula el tiempo de descongelación y se pone en marcha automáticamente. En dos ocasiones durante la descongelación, el horno emite pitidos para informarle de que debe girar la comida. Pulse el botón Pause/Cancel(Pausa/Cancelar), abra la puerta y gire el alimento. Pulse el botón Start(Inicio) para que continúe la descongelación. Consulte en la página 15 la guía de descongelación 9 htj[W_WhhUGGwGXWGGm SGuGZWSGYWW^GG`aZ^Ght Funcionamiento Ajuste del tiempo de cocción y los Power Levels Cocinado de varias Etapas Su microondas le permite seleccionar hasta dos diferentes grados de cocción, cada una con su propia duración de tiempo y nivel de potencia. La función de Power level (Nivel de Potencia) le permite controlar la intensidad de calor desde caliente (1) hasta alto (0). 1 Cocinado de una etapa Para el cocinado simple de una etapa, usted solo necesita ajustar un tiempo de cocción. El nivel de potencia está automáticamente seleccionado en “alto”. Si usted desea seleccionar cualquier otro nivel, usted tiene que ajustarlo utilizando la función de Power Level (Nivel de Potencia). 1 2 2 3 Utilice las funciones Numéricas para seleccionar el tiempo de cocción. Usted puede ajustar el tiempo desde un segundo hasta 99 minutos, 99 segundos. Para ajustar el tiempo mayor a un minuto, introduzca también los segundos. Por ejemplo, para ajustar a 20 minutos, introduzca 2, 0, 0, 0. 4 Niveles de Potencia: (Caliente) (Bajo) (Descongelar) (Medio-bajo) (Medio) 6 = PL : 60 7 = PL : 70 8 = PL : 80 9 = PL : 90 0 = PL : Hi Utilice las funciones Numéricas para ajustar el segundo tiempo de cocción. Presione la función de Power Level (Nivel de Potencia), luego utilice las funciones numéricas para ajustar el nivel de potencia de la segunda etapa de cocción. Presione Start (Inicio) para empezar la cocción. Usted puede verificar el nivel de potencia mientras la cocción esté en proceso, presionando la función de Power Level (Nivel de Potencia). Si usted quiere ajustar el nivel de potencia a uno diferente de “alto”, presione la función de Power Level (Nivel de Potencia), y luego utilice los funciones numéricas para introducir el nivel de potencia. 1 = PL : 10 2 = PL : 20 3 = PL : 30 4 = PL : 40 5 = PL : 50 Siga los pasos 1 y 2 del “Cocinado de una etapa” sección de la página anterior. Cuando introduzca mas de una etapa de cocción, la función de Power Level (Nivel de Potencia) debe ser presionado antes de que la segunda etapa de cocción sea introducida. Para ajustar el nivel de potencia a uno más alto para una etapa de cocción, presione la función de Power Level (Nivel de Potencia) dos veces. (Lento) (Medio-alto) (Recalentar) (Freir) (Alto) 3 Presione la función de Start (Inicio) para empezar la cocción. Si usted desea cambiar el nivel de potencia, presione Pause/Cancel(Pausa/ Cancelar) antes de presionar Start (Inicio), y reingrese todas las instrucciones. Algunas recetas requieren diferentes grados de cocción a diferentes temperaturas. Usted puede ajustar diferentes grados de cocción con su microondas. 10 htj[W_WhhUGGwGXXGGm SGuGZWSGYWW^GG`aZ^Ght Instrucciones de cocción Utensilios de cocción No recomendados Uso recomendado • • • • • • • • • Cuencos y platos de vidrio y cerámica vitrificada: Úselos para calentar o cocinar. Platos para gratinar al microondas: Úselos para dorar la parte exterior de piezas pequeñas tales como filetes, chuletas o crepes. Siga las instrucciones que se proporcionan con el plato para gratinar. Envolturas de plástico para microondas: Úselas para retener el vapor. Deje una pequeña abertura para permitir que escape algo de vapor y evitar que se deposite directamente en el alimento. Papel encerado : Úselo como tapadera para evitar salpicaduras. Servilletas de papel y papel absorbente: Úselo para tapar alimentos en calentamientos cortos; absorbe el exceso de humedad y previene las salpicaduras. No utilice papel reciclado, ya que podría contener metales y provocar un incendio. Platos y tazas de papel: Úselos para calentamientos cortos a bajas temperaturas. No utilice papel reciclado, ya que podría contener metales y provocar un incendio. Termómetros: Use solo los etiquetados como "aptos para microondas" y siga las instrucciones del fabricante. Compruebe la temperatura del alimento en diferentes partes. Los termómetros convencionales pueden utilizarse después de que se haya sacado el alimento del microondas. • • • Tarros y botellas de vidrio: El vidrio corriente es demasiado delgado para ser usado en el microondas y puede hacerse añicos. Bolsas de papel: Son inflamables, a excepción de las bolsas para palomitas, que están diseñadas para su uso en microondas. Platos y copas de poliestireno: Pueden fundirse y dejar en los alimentos residuos perniciosos para la salud. Recipientes de plástico de los alimentos: Recipientes tales como las tarrinas de margarina pueden fundirse en el microondas. Utensilios de metal: Pueden estropear el horno. Retire todas las piezas de metal antes de la cocción. Prueba de utensilios Si no está seguro de si un plato es apto para microondas o no, puede realizar la siguiente prueba: 1 Llene una taza de vidrio con agua y colóquela en el horno, al lado del palto que quiere comprobar. Uso limitado • • • • Papel de aluminio: Use tiras estrechas de papel para prevenir la sobrecocción de las partes más expuestas. Tenga cuidado, ya que si utiliza excesivo papel puede estropear el horno. Cerámica, porcelana, y gres: Use estos materiales sólo si están etiquetados como “aptos para microondas”. Si no llevan la etiqueta, compruébelos para asegurarse de que puedan usarse con seguridad. No utilice en ningún caso platos con adornos metálicos. Plástico: Úselo sólo si está etiquetado como "apto para microondas". Otros tipos de plástico pueden contener metales. Paja, mimbre y madera: Use estos materiales sólo para calentamientos cortos, ya que pueden inflamarse. 2 Apriete el botón One Minute+ (Un Minuto+) para calentar durante un minuto a la potencia alta. El agua debería calentarse mientras el plato que está comprobando debería permanecer frío. Si el plato se calienta, indica que está absorbiendo energía de microondas y no es adecuado para su uso en este tipo de hornos. 11 htj[W_WhhUGGwGXYGGm SGuGZWSGYWW^GG`aZ^Ght Instrucciones de cocción Técnicas de cocción Aumento de la humedad Removido Las moléculas de agua atraen la energía de las microondas. Los alimentos con una distribución desigual de la humedad deben cubrirse o dejarse reposar para que el calor se disperse uniformemente. Añada una pequeña cantidad de agua a los alimentos secos para ayudar a su cocción. Mezcle los alimentos, como por ejemplo guisos o verduras, mientras se cocinan para distribuir el calor uniformemente. Los alimentos situados en la parte exterior del plato absorben más energía y se calientan más rápidamente, por ello se debe remover desde fuera hacia el centro. El horno se apagará al abrir la puerta para remover los alimentos. Colocación Consejos generales Distribuya los alimentos cortados en porciones, como los trozos de pollo o las chuletas, de manera que las partes más gruesas y sustanciosas queden orientadas hacia el exterior del plato giratorio, donde recibirán más energía de microondas. Para prevenir la sobrecocción, coloque las partes más finas y delicadas dirigidas hacia el centro de la bandeja giratoria. • • Protección • Proteja los alimentos con tiras estrechas de papel de aluminio para prevenir la sobrecocción. Algunas de las partes que necesitan protección son las puntas de las alas o las patas de las aves y las esquinas de los recipientes cuadrados. Utilice pequeñas cantidades de papel de aluminio. Las cantidades grandes pueden estropear el horno. • • Volteado Dele la vuelta a los alimentos a mitad de la cocción para exponer todas sus partes a la energía de las microndas. Esto es especialmente importante en el caso de piezas de gran tamaño, como los asados. • Espera • Los alimentos cocinados en el microondas acumulan calor interno y continúan cociéndose durante unos minutos después de apagar el horno. Deje que los alimentos completen la cocción, especialmente si se trata de asados o vegetales enteros. Los asados necesitan este tiempo para completar la cocción en su parte central sin sobrecocer las partes externas. Los alimentos líquidos, como sopas o chocolate caliente, deben agitarse o removerse al terminar la cocción. Déjelos reposar un momento antes de servir. Después de calentar alimentos para bebés, remuévalos bien y compruebe la temperatura probándolos antes de servirlos. 12 Los alimentos densos, como las patatas, tardan más tiempo en calentarse que los alimentos ligeros. Los alimentos con una textura delicada deben calentarse a un nivel de potencia bajo para evitar que se pongan duros. La altitud y el tipo de vajilla que utilice pueden afectar al tiempo de cocción. Cuando siga una nueva receta, aplique el tiempo de cocinado mínimo y vigile la comida de vez en cuando para prevenir la sobrecocción. Los alimentos con piel o cáscara no porosa, como patatas, huevos o salchichas, deben pincharse previamente para que no estallen. No se recomienda freír con aceites o grasas calientes. El aceite o la grasa puede romper a hervir bruscamente y provocar serias quemaduras. Algunos ingredientes se calientan antes que otros. Por ejemplo, la jalea del interior de un buñuelo estará más caliente que la masa. Téngalo en cuenta para evitar quemarse. No se recomienda esterilizar las conservas caseras en el horno microondas puesto que el proceso de calentamiento mediante microondas no garantiza la destrucción de todas las bacterias perjudiciales. Aunque las microondas no calientan la vajilla, ésta puede recibir el calor transmitido por los alimentos. Utilice agarraderas cuando saque la comida del microondas y advierta a los niños de que deben hacer lo mismo. htj[W_WhhUGGwGXZGGm SGuGZWSGYWW^GG`aZ^Ght Instrucciones de cocción Guía de cocción Guía para cocinar carne en el microondas Guía para cocinar aves en el microondas • • • • • Ponga la carne en un plato apto para microondas, en una parrilla de asado también apta para microondas. Comience colocando la parte grasa de la carne hacia abajo. Utilice tiras estrechas de papel de aluminio para proteger las puntas de los huesos o las partes delgadas de la carne. Tome la temperatura en varias partes antes de dejar reposar la carne el tiempo recomendado. Las temperaturas de extracción se detallan en la tabla siguiente. La temperatura del alimento aumentará durante el tiempo de reposo. Alimento Rosbif sin hueso Hasta 2 kg Tiempo de cocción/ Nivel de potencia Indicaciones Tiempo de cocción: 7-10 min/500 g, a 46 ºC Poco hecho 8-11 min/500 g, a 49 ºC Medio 9-14 min/500 g, a 62 ºC Muy hecho Coloque la pieza, con la parte grasa hacia abajo, en una parrilla de asado. Cúbralas con papel encerado. Dele la vuelta una vez transcurrida la mitad del tiempo de cocción. Déjelos reposar durante 10 minuto. • • • Aliment o Nivel de potencia: Alto (Hi) los primeros 5 min, después medio (50). Cerdo con o sin hueso Tiempo de cocción: 8-12 min/500 g, a 71 ºC Muy hecho Hasta 2 kg Nivel de potencia: Alto (Hi) los primeros 5 min, después medio (50). Panceta Tiempo de cocción: 2 lonchas: 1½-2 min 2-6 lonchas 4 lonchas: 2½- 3½ min 6 lonchas: 4-5½ min Nivel de potencia: Alto (Hi). Ponga la carne de ave en un plato apto para microondas, en una parrilla de asado también apta para microondas. Cúbrala con papel encerado para evitar salpicaduras. Utilice papel de aluminio para proteger las puntas de los huesos o las partes delgadas de la carne, o aquellas zonas que comiencen a cocerse demasiado. Tome la temperatura en varias partes antes de dejar reposar la carne de ave el tiempo recomendado. Coloque la pieza, con la parte grasa hacia abajo, en una parrilla de asado. Cúbrala con una envoltura de plástico ventilada. Dele la vuelta una vez transcurrida la mitad del tiempo de cocción. Déjelos reposar durante 10 minuto. Pollo entero Tiempo de cocción: 8-11 min/500 g, a 77-82 ºC Hasta 2 kg Nivel de potencia: Alto (Hi). Trozos de pollo Tiempo de cocción: 6-9 min/500 g 180° ºC, carne de color oscuro 170° ºC, carne de color claro Nivel de potencia: Alto (Hi). Hasta 1 kg Coloque las lonchas en una parrilla de asado o un plato, alineadas con papel absorbente. Cúbralas con papel absorbente. Cuézalo en el microondas hasta que esté crujiente. 13 Tiempo de cocción/Nivel de potencia Indicaciones Coloque el pollo, con la pechuga hacia abajo, en una parrilla de asado. Cúbralas con papel encerado. Dele la vuelta una vez transcurrida la mitad del tiempo de cocción. Cocínelo hasta que los jugos salgan limpios y la carne que toca al hueso pierda el color rosa. Déjelo reposar durante 5 a 10 minutos. Coloque el pollo en el plato, con el lado del hueso hacia abajo y con las partes más gruesas dirigidas hacia el exterior. Cúbralas con papel encerado. Dele la vuelta una vez transcurrida la mitad del tiempo de cocción. Cocínelo hasta que los jugos salgan limpios y la carne que toca al hueso pierda el color rosa. Déjelo reposar durante 5 a 10 minutos. htj[W_WhhUGGwGX[GGm SGuGZWSGYWW^GG`aZ^Ght Instrucciones de cocción Guía para cocinar pescado en el microondas Guía para cocinar huevos en el microondas • • • • • Cueza el pescado hasta que sea fácil separar su carne en láminas con un tenedor. Ponga el pescado en un plato apto para microondas, en una parrilla de asado también apta para microondas. Utilice una tapa ajustada para conservar el vapor del pescado. Una cobertura ligera de papel encerado o papel absorbente evitará que se pierda el vapor. No cocine demasiado el pescado: pruebe con el tiempo de cocción mínimo. Aliment o Tiempo de cocción/ Nivel de potencia Supre mas Tiempo de cocción: 6-9 min/500 g Hasta 750 g Nivel de potencia: Medio-alto (70). Filetes Hasta 750 g Tiempo de cocción: 3-7 min/500 g Nivel de potencia: Alto (Hi). Gamba Tiempo de cocción: s 3-6 min/500 g Hasta 750 g Nivel de potencia: Alto (Hi). • • No cocine nunca los huevos con la cáscara ni caliente los huevos cocidos con su cáscara, ya que podrían explotar. Perfore siempre los huevos enteros para evitar que estallen. Cocine los huevos en su punto exacto: se vuelven muy duros si se cuecen demasiado. Guía para cocinar vegetales en el microondas • Indicaciones • Coloque las supremas en la parrilla de asado con las porciones más gruesas orientadas hacia el exterior. Cúbralas con papel encerado. Deles la vuelta y colóquelas de nuevo una vez transcurrida la mitad del tiempo de cocción. Cueza el pescado hasta que sea fácil separar su carne en láminas con un tenedor. Déjelo reposar durante 3 a 5 minutos. • • • • Disponga los filetes en una bandeja de horno, colocando las piezas delgadas debajo. Cúbralas con papel encerado. Si tienen un grosor mayor de 1,5 cm, deles la vuelta una vez transcurrida la mitad del tiempo de cocción. Cueza el pescado hasta que sea fácil separar su carne en láminas con un tenedor. Déjelo reposar durante 2 a 3 minutos. • • Coloque las gambas en una bandeja de horno, en una sola capa y sin que queden montadas unas sobre otras. Cúbralas con papel encerado. Cocínelas hasta que la carne quede firme y opaca, moviéndolas dos o tres veces. Déjelos reposar durante 5 minuto. 14 Los vegetales se deben lavar justo antes de cocinarlos. Con frecuencia no se necesita agua extra. Al cocer vegetales densos, como patatas, zanahorias y judías verdes, añada ¼ de taza de agua. Las verdura de pequeño tamaño (zanahorias en rodajas, guisantes, habas, etc.) se cocerán más deprisa que las grandes. Los vegetales enteros, como patatas, calabaza amarilla o mazorcas de maíz, deben colocarse en círculo en el plato giratorio antes de cocinarse. Se cocerán más uniformemente si se dan la vuelta una vez transcurrida la mitad del tiempo de cocción. Coloque siempre las verduras como espárragos o brócoli con los extremos de los tallos apuntando hacia el borde del plato y las puntas hacia el centro. Cuando cocine vegetales cortados, cubra siempre el plato con una tapa o una envoltura de plástico para microondas ventilada. Antes de cocinarlas, se debe perforar en varios puntos la piel de las verduras enteras y sin pelar, como patatas, calabazas, berenjenas, etc., para evitar que estallen. Para una cocción más uniforme, remueva o reorganice los vegetales enteros cuando haya transcurrido la mitad del tiempo de cocción. Por regla general, cuanto más denso es el alimento mayor es el tiempo de espera. (Por tiempo de espera se entiende el tiempo necesario para que los alimentos vegetales densos y grandes terminen de cocerse después de sacarlos del horno.) Una patata asada puede necesitar una espera de cinco minutos antes de que su cocción sea completa, mientras que un plato de guisantes puede servirse inmediatamente. htj[W_WhhUGGwGX\GGm SGuGZWSGYWW^GG`aZ^Ght Instrucciones de cocción Guía de descongelación automática • Notas Compruebe el alimento según las señales del horno. Después de la etapa final, algunas pequeñas secciones pueden haber quedado sin descongelar; deje reposar el alimento para que se complete la descongelación. La descongelación no finaliza hasta que todos los cristales de hielo se han fundido. Al cubrir los asados o filetes con pequeñas piezas de papel de aluminio se evita que los bordes se cuezan antes de que el centro del alimento esté descongelado. Use tiras estrechas, planas y lisas de papel de aluminio para cubrir dichos bordes, así como las partes más delgadas del alimento. Siga las instrucciones que se facilitan a continuación cuando descongele diferentes tipos de alimentos. Alimento Estándar Cantidad Procedimiento Rosbif, cerdo 1-3 kg Comience colocando la parte grasa hacia abajo. Después de cada etapa, dele la vuelta al alimento y cubra las porciones calientes con tiras estrechas de papel de aluminio. Filetes, chuletas, pescado 250 g-1,5 kg Después de cada etapa, cambie la colocación del alimento. Si hay alguna porción caliente o descongelada, cúbrala con tiras estrechas de papel de aluminio. Retire las porciones que estén casi descongeladas. Déjelo reposar, cubierto, durante 5-10 minutos. Carne picada 250 g-1,5 kg Después de cada etapa, retire las porciones que estén casi descongeladas. Déjelo reposar, cubierto, durante 5-10 minutos. Pollo entero 1-3 kg Retire las vísceras del pollo antes de congelarlo. Comience a descongelarlo colocando la pechuga hacia abajo. Después de la primera etapa, dele la vuelta al pollo y cubra las partes calientes con tiras estrechas de papel de aluminio. Después de la segunda etapa, cubra de nuevo las porciones calientes con tiras estrechas de papel de aluminio. Déjelo reposar, cubierto, durante 30-60 minutos en el refrigerador. Trozos de pollo 250 g-1,5 kg Después de cada etapa, reorganice o retire las porciones que estén casi descongeladas. Déjelo reposar durante 10 a 20 minutos. 15 htj[W_WhhUGGwGX]GGm SGuGZWSGYWW^GG`aZ^Ght Instrucciones de cocción Recetas Estofado de buey y cebada Cazuela de brócoli y queso 750 g de estofado de buey partido en trozos de 1,5 cm ½ taza de cebolla picada 2 cucharadas de harina 1 cucharada de salsa Worcestershire 1 bote (unos 400 g) de caldo de buey 2 zanahorias medianas, cortadas en rodajas de 1 cm (aprox. 1 taza) ½ taza de cebada 1 hoja de laurel ¼ de cucharadita de pimienta 1 paquete (unos 275 g) de guisantes congelados, previamente descongelados ¼ de taza de mantequilla o margarina ¼ de taza de cebolla picada 1½ cucharadas de harina ½ cucharadita de sal ¼ de cucharadita de mostaza en polvo 1 /8 de cucharadita de pimienta 1½ tazas de leche ¼ de taza de pimiento rojo picado 225 g (2 tazas) de queso cheddar cortado a pedacitos 1 paquete (unos 275 g) de brócoli troceada congelada, previamente descongelada 4 tazas de espirales de pasta cocidas (225 g en seco) 1. En una cacerola de 2,25 litros poner el buey, la cebolla, la harina y la salsa Worcestershire; mezclar bien. Cubrir con una tapa. Cocer a potencia alta durante 6 a 8 minutos hasta que el buey pierda el color rosa, removiendo una vez. 2. Mezclar con el caldo de buey, las zanahorias, la cebada, el laurel y la pimienta. Cubrir con una tapa. Cocer a potencia media durante 45 a 50 minutos, hasta que el buey y las zanahorias estén tiernos, removiendo dos o tres veces. 3. Añadir los guisantes. Cubrir con una tapa. Cocer a potencia media durante 10 minutos. Dejar reposar durante 10 minutos más. Retirar el laurel antes de servir. Salen seis raciones. 1. En una cacerola de 2,25 litros, cocer la cebolla y la mantequilla a potencia alta durante 2 o 3 minutos, hasta que la cebolla esté tierna, removiendo una vez. 2. Añadir la harina, la sal, la mostaza y la pimienta; mezclar bien. Cocer a potencia alta durante 60 a 90 segundos, hasta que la mezcla comience a hervir. Añadir la leche y remover hasta formar una masa fina. 3. Añadir el pimiento rojo. Cocer a potencia alta durante 2 a 3 minutos hasta que la mezcla hierva y espese ligeramente, removiendo dos veces. Añadir el queso y remover hasta que se funda. 4. Agregar el brócoli y la pasta; mezclar bien. Cubrir con una tapa. Cocer a potencia alta durante 4 a 6 minutos hasta que se caliente por completo, removiendo una vez. Remover antes de servir. Salen seis raciones. 16 htj[W_WhhUGGwGX^GGm SGuGZWSGYWW^GG`aZ^Ght Instrucciones de cocción Ensalada templada de patatas Sopa de judías negras 500 g de patatas rojas pequeñas partidas en trozos de 1,5 cm 4 lonchas de panceta (cruda) partidas en trozos de 1,5 cm ¼ de taza de cebolla picada 2 cucharaditas de azúcar 1 cucharadita de sal 1 cucharadita de harina ½ cucharadita de semillas de apio 1 /8 de cucharadita de pimienta 2½ cucharadas de vinagre de sidra 1 taza de cebolla picada 1 diente de ajo picado 2 botes (425 g cada uno) de judías negras escurridas 1 lata (400-450 g) de tomates dulces picados 1 bote (unos 400 g) de caldo de pollo 1 lata (200-250 g) de maíz 1 lata (100 g) de chilis verdes picados 1-3 cucharaditas de comino molido, o según el gusto 1. Poner la cebolla y el ajo en una cacerola de 3,5 litros. Cubrir con una tapa. Cocer a potencia alta durante 3 a 5 minutos, hasta que estén tiernos. 2. Añadir uno de los botes de judías; machacar las judías con un tenedor. Agregar los restantes ingredientes; mezclar bien. 3. Cocer, sin cubrir, a potencia alta durante 10 minutos; remover. Reducir a potencia media y cocer otros 5 minutos. Remover antes de servir. Salen unos dos litros. 1. En una cacerola de 2,25 litros poner las patatas junto con ¼ de taza de agua. Cubrir con una tapa. Cocer a potencia alta hasta que las patatas estén tiernas (10-12 min); remover dos veces. Escurrir y reservar hasta que se enfríen ligeramente. 2. En un cuenco mediano, cocer la panceta a potencia alta hasta que esté crujiente (3-5 min); remover una vez. Colocar la panceta sobre papel absorbente. Reservar 1 cucharada de la grasa. 3. Mezclar la grasa con la cebolla. Cubrir con envoltura de plástico; destapar una esquina para que se escape el vapor. Cocer a potencia alta hasta que esté tierna (3-4 min); remover una vez. 4. Mezclar el azúcar, la sal, la harina, las semillas de apio y la pimienta. Cocer a potencia alta hasta que la mezcla hierva (30-40 s). Añadir el vinagre y ½ taza de agua. Cocer a potencia alta hasta que la mezcla hierva y espese ligeramente (1-2 min); remover una vez. Agregar la panceta. Verter la mezcla sobre las patatas. Remover bien. Salen seis raciones. 17 htj[W_WhhUGGwGX_GGm SGuGZWSGYWW^GG`aZ^Ght Apéndice Guía para la solución de problemas El uso del microondas provoca interferencias en el televisor o en la radio. Antes de ponerse en contacto con un técnico para que repare el horno, compruebe esta lista de posibles problemas y soluciones. • Ni la pantalla ni el horno funcionan. • • • • • • Nota: Conecte adecuadamente el enchufe a la toma de red puesta a tierra. Si la toma de red se controla desde un interruptor en la pared, asegúrese de que esté accionado. Saque el enchufe de la toma de red, espere diez segundos y vuelva a enchufarlo. Reajuste los fusibles o sustituya los que estén fundidos. Enchufe otro electrodoméstico en la toma de red; si este otro aparato no funciona, póngase en contacto con un electricista para que repare la toma. Conecte el horno a una toma eléctrica diferente. Si el horno está más de 25 minutos a 80, 90 o al 100 por cien de su potencia, pasados 25 minutos el nivel de potencia se ajusta automáticamente al 70 por ciento, con el fin de evitar la sobrecocción. Cuidado y limpieza Siga estas instrucciones para limpiar y mantener el horno. • Mantenga limpio el interior del horno. Los restos de comida y las salpicaduras de los líquidos pueden adherirse a las paredes del horno, con lo cual se provoca una merma en su funcionamiento. • Limpie inmediatamente las salpicaduras. Use un paño humedecido y detergente suave. No utilice detergentes agresivos ni abrasivos. • Si desea separar los restos quemados de comida o de líquido, caliente dos tazas de agua (añada el jugo de un limón si desea mantener el horno fresco) en un vaso que equivalga a cuatro tazas, a la máxima potencia durante cinco minutos o hasta que hierva. Deje reposar el horno durante uno o dos minutos. • Retire la bandeja de cristal del horno cuando limpie el horno o la bandeja. Si desea evitar la rotura de la bandeja, manéjela con cuidado y no la coloque en agua inmediatamente después de cocinar. Lave la bandeja con cuidado en agua jabonosa tibia o en el lavaplatos. • Limpie la superficie exterior del horno con jabón y un paño humedecido. Séquela con un paño suave. Si desea evitar daños en las piezas de funcionamiento del horno, no deje que el agua se introduzca por los orificios. • Lave la ventana de la puerta con agua y detergente muy suave. Asegúrese de usar un paño suave con el fin de evitar arañazos. • Si el vapor se acumula en el interior o en el exterior de la puerta del horno, límpielo con un paño suave. El vapor se puede acumular si se usa el horno con una alta humedad y no muestra goteo de ningún tipo. • No utilice nunca el horno sin comida en el interior, ya que de este modo se puede dañar el tubo de magnetrón o la bandeja de cristal. Si lo desea puede dejar una taza de agua en el horno cuando no esté en uso, para evitar daños si el horno se enciende accidentalmente. El visor del horno funciona, pero el aparato no acaba de funcionar. • • • • Asegúrese de que la puerta esté bien cerrada. Compruebe que no haya material de embalaje ni de otro tipo pegado al cierre de la puerta. Compruebe que la puerta no esté dañada. Pulse Cancel dos veces y vuelva a introducir todas las instrucciones para la cocción. El aparato se apaga antes de que haya transcurrido el tiempo fijado. • • Si no ha habido un corte de luz, quite el enchufe de la toma de corriente, espere diez segundos y vuelva a enchufarlo. Si ha habido un corte de luz, el indicador de tiempo muestra “88:88”. Reinicie el reloj y las instrucciones de cocción. Reajuste los fusibles o sustituya los que estén fundidos. La cocción de los alimentos es demasiado lenta. • Compruebe que el horno se encuentre en su propio circuito de 15 amperios. El funcionamiento de otro electrodoméstico en el mismo circuito puede provocar una caída en el voltaje. Si fuera necesario, mueva el horno a su propio circuito. Ve chispas o arcos eléctricos. • Retire los utensilios metálicos, accesorios de cocina o hilos metálicos. Si utiliza papel de aluminio, utilice solamente bandas estrechas y deje al menos una pulgada entre el papel de aluminio y las paredes interiores del horno. Si tiene un problema que no pueda solucionar, llame a nuestra línea de servicios: El plato giratorio hace ruidos o golpecitos. • • Estas interferencias son similares a las producidas por otros pequeños electrodomésticos, como los secadores de pelo. Aleje el microondas de otros electrodomésticos, por ejemplo del televisor o de la radio. Limpie el plato giratorio, el aro giratorio y la superficie inferior del horno. Asegúrese de que el plato giratorio y el aro giratorio estén colocados correctamente. (1-800-843-0304 EE.UU.) (1-800-807-6777 CANADÁ) 18 htj[W_WhhUGGwGX`GGm SGuGZWSGYWW^GG`aZ^Ght Apéndice Especificaciones Número de modelo AMC4080AAB/W/Q Cavidad del horno 22,5 cm3 Controles 10 niveles de potencia, incluida la descongelación Temporizador 99 minutos, 99 segundos Fuente de alimentación 120 V CA, 60 Hz Salida de potencia 800 vatios Dimensiones exteriores 48,9 cm (An) X 26,25 cm (Al) X 33,75 cm (Pr) Dimensiones de la cavidad del horno 33 cm (An) X 18,5 cm (Al) X 33 cm (Pr) Pesto neto/bruto 12/13 kg Número de modelo AMC4080AAS Cavidad del horno 22,5 cm3 Controles 10 niveles de potencia, incluida la descongelación Temporizador 99 minutos, 99 segundos Fuente de alimentación 120 V CA, 60 Hz Salida de potencia 800 vatios Dimensiones exteriores 48,9 cm (An) X 26,25 cm (Al) X 38,30 cm (Pr) Dimensiones de la cavidad del horno 33 cm (An) X 18,5 cm (Al) X 33 cm (Pr) Pesto neto/bruto 12,5/13,5 kg 19 htj[W_WhhUGGwGYWGGm SGuGZWSGYWW^GG`aZ^Ght GARANTÍA DE LOS ELECTRODOMÉSTICOS PRINCIPALES DE AMANA® GARANTÍA LIMITADA Durante un año a partir de la fecha de compra, siempre y cuando se dé a este electrodoméstico principal un uso y mantenimiento de conformidad con las instrucciones adjuntas o provistas con el producto, la marca Amana de Whirlpool Corporation o Whirlpool Canada LP (en lo sucesivo denominado “Amana”) se hará cargo del costo de las piezas especificadas de fábrica y del trabajo de reparación para corregir defectos en los materiales o en la mano de obra. El servicio deberá ser suministrado por una compañía de servicio designada por Amana. Esta garantía limitada es válida solamente en Estados Unidos o en Canadá, y se aplica solamente cuando el electrodoméstico principal se use en el país en el que se ha comprado. Esta garantía limitada no tiene vigor fuera de los cincuenta Estados Unidos y Canadá. Se requiere una prueba de la fecha de compra original para obtener servicio bajo esta garantía limitada. EXCLUSIONES DE LA GARANTÍA Esta garantía limitada no cubre: 1. Visitas de servicio técnico para corregir la instalación de su electrodoméstico principal, para enseñarle a usar su electrodoméstico principal, para cambiar o reparar fusibles domésticos o para corregir la instalación eléctrica o de la tubería de la casa. 2. Visitas de servicio técnico para reparar o reemplazar focos para electrodomésticos, filtros de aire o filtros de agua. Estas piezas de consumo están excluidas de la cobertura de la garantía. 3. Reparaciones cuando su electrodoméstico principal se use de un modo diferente al doméstico normal de una familia, o cuando se use de un modo contrario a las instrucciones publicadas para el usuario u operador y/o las instrucciones de instalación. 4. Daños causados por accidente, alteración, uso indebido, abuso, incendio, inundación, actos fortuitos, instalación incorrecta, instalación que no esté de acuerdo con los códigos eléctricos o de plomería, o el empleo de artículos de consumo o productos de limpieza no aprobados por Amana. 5. Daños estéticos, incluyendo rayaduras, abolladuras, desportilladuras u otro daño al acabado de su electrodoméstico principal, a menos que el mismo sea debido a defectos en los materiales o la mano de obra y se le informe a Amana en un lapso de 30 días a partir de la fecha de compra. 6. Cualquier pérdida de comida debido a fallas del refrigerador o del congelador. 7. Costos relativos a la remoción de su electrodoméstico principal desde su hogar para obtener reparaciones. Este electrodoméstico principal está diseñado para ser reparado en el hogar y únicamente el servicio de reparación en el hogar está cubierto bajo esta garantía. 8. Reparaciones de piezas o sistemas como resultado de modificaciones no autorizadas que se hayan efectuado en el electrodoméstico. 9. Gastos de viaje y transporte para obtener servicio para el producto, si su electrodoméstico principal está ubicado en un lugar remoto en el cual no haya disponible un técnico de servicio autorizado por Amana. 10. La remoción y reinstalación de su electrodoméstico principal, si estuviera instalado en un lugar inaccesible o si no estuviera instalado de conformidad con las instrucciones de instalación publicadas. 11. Electrodomésticos principales con números de modelo/serie que se hayan removido, alterado o que no puedan ser identificados con facilidad. Esta garantía se anulará si el número de serie aplicado en la fábrica ha sido alterado o removido de su electrodoméstico principal. El costo de la reparación o el reemplazo bajo estas circunstancias excluidas, correrá por cuenta del cliente. EXCLUSIÓN DE GARANTÍAS IMPLÍCITAS; LIMITACIÓN DE RECURSOS EL ÚNICO Y EXCLUSIVO RECURSO DEL CLIENTE SEGÚN LOS TÉRMINOS DE ESTA GARANTÍA LIMITADA SERÁ EL DE REPARAR EL PRODUCTO SEGÚN SE ESTIPULA EN LA PRESENTE. LAS GARANTÍAS IMPLÍCITAS, INCLUYENDO LAS GARANTÍAS DE COMERCIABILIDAD O DE CAPACIDAD PARA UN PROPÓSITO PARTICULAR, SERÁN LIMITADAS A UN AÑO O AL PERÍODO MÁS CORTO PERMITIDO POR LEY. AMANA NO SE RESPONSABILIZARÁ POR DAÑOS INCIDENTALES O CONSECUENTES. ALGUNOS ESTADOS Y PROVINCIAS NO PERMITEN LAS EXCLUSIONES O LIMITACIONES POR DAÑOS INCIDENTALES O CONSECUENTES, O LIMITACIONES ACERCA DE CUÁNTO DEBE DURAR UNA GARANTÍA IMPLÍCITA DE COMERCIABILIDAD O CAPACIDAD, DE MODO QUE LAS LIMITACIONES O EXCLUSIONES ARRIBA MENCIONADAS PUEDEN NO APLICARSE EN SU CASO. ESTA GARANTÍA LE OTORGA DERECHOS LEGALES ESPECÍFICOS Y ES POSIBLE QUE USTED TENGA TAMBIÉN OTROS DERECHOS QUE PUEDEN VARIAR DE UN ESTADO A OTRO O DE UNA PROVINCIA A OTRA. Si usted se encuentra fuera de los cincuenta Estados Unidos y Canadá, póngase en contacto con su distribuidor autorizado de Amana para determinar si corresponde otra garantía. Si necesita servicio, consulte primero la sección “Solución de problemas” del Manual de uso y cuidado. Después de consultar la sección “Solución de problemas”, puede encontrar ayuda adicional en la sección “Ayuda o servicio técnico,” o llamando a Amana. En EE.UU., llame al 1-800-843-0304. En Canadá, llame al 1-800-8076777. 20 htj[W_WhhUGGwGYXGGm SGuGZWSGYWW^GG`aZ^Ght Nota 21 htj[W_WhhUGGwGYYGGm SGuGZWSGYWW^GG`aZ^Ght Referencia rápida Característica Ajuste del reloj Funcionamiento 1. Pulse CLOCK 2. Use los botones numéricos para introducir la hora actual. 3. Pulse de nuevo CLOCK. Cocción con One 1. Pulse el botón ONE MINUTE+ una vez por Minute+ cada minuto de cocción. 2. Se muestra el tiempo y el horno comienza a funcionar. Botones de cocción instantáneos 1. Pulse el botón que corresponda al alimento que esté cocinando (por ejemplo POPCORN). 2. Pulse varias veces el botón para seleccionar el tamaño de la ración. Auto Defrost (Auto Descongelado) 1. Presione AUTO DEFROST (AUTO DESCONGELADO). 2. Ingrese el peso del alimento presionando el botón de AUTO DEFROST (AUTO DESCONGELADO) repetidamente o con los botones numéricos. 3. Después de medio tiempo, presione Pause/ Cancel(PAUSA/CANCELAR) voltee el alimento, y presiones START (INICIO) para re iniciar. Defina el tiempo de cocción y los niveles de potencia 1. Use los botones numéricos para introducir el tiempo de cocción. 2. Pulse el botón POWER LEVEL. Si desea que el nivel de potencia sea diferente de High, pulse el botón POWER LEVEL varias veces. 3. Pulse START para comenzar la cocción. DE68-02901B 12/07 Impreso en Malasia Samsung Electronics Co., Ltd.