1
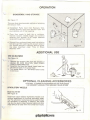
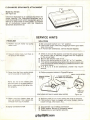
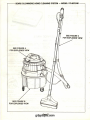
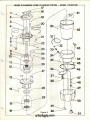
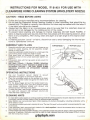
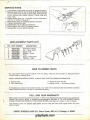
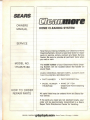
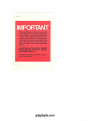
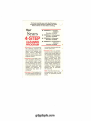
PDFaid.Com
#1 Pdf Solutions
OWNERS
MANUAL
HOME
CLEANING
SYSTEM
MODEL NO.
175.8575180
CAUTION:
Read Instructions
and Rules for
Safe Operation
Carefully
SAVE THIS
MANUAL FOR
FUTURE REFERENCE
HOME CLEANING SYSTEM
•
•
•
•
•
Introduction
Assembly
Operation
Service Hints
Repair Parts
SEARS, ROEBUCK AND CO., Dept. 698/731A, Sears Tower, Chicago, IL 60684
660300-038
(0685)
PRINTED IN U.S.A.
TABLE OF CONTENTS
1.
2.
3.
4.
5.
6.
7.
8.
Warranty
Rules For Safe Operation
Introduction
Assembly
Operation
Accessories
Service Hints
Exploded Views and Parts List
Page 2
Page 2
Page 3
Page 4
Pages 5-9
Pages 9-11
Page 11
Pages 12-16
FULL ONE YEAR WARRANTY
When used for private household purposes, if within one year from the date of purchase, this cleaner
fails due to defect in material or workmanship, RETURN IT TO THE NEAREST SEARS STORE OR
SERVICE CENTER IN THE UNITED STATES, and Sears will repair it, free of charge.
This warranty gives you specific legal rights, and you may also have other rights, which vary from
state to state.
SEARS, ROEBUCK AND CO., DEPT. 698/731 A, SEARS TOWER, CHICAGO, IL 60684
RULES FOR SAFE OPERATION
1.
READ ALL INSTRUCTIONS. WARNING: Do not attempt to operate until you have read thoroughly
and understand completely all instructions, rules, etc. contained in this manual. Failure to comply
can result in accidents. Save Owners Manual and review frequently for continuing safe operation
and instructing possible third-party user.
2.
WARNING - TO AVOID ELECTRICAL SHOCK, DO NOT EXPOSE TO RAIN -
3.
This cleaner should be operated only on 100 or 120 volts at 60 cycles.
4.
RECOMMENDED GROUNDING METHOD.
DO NOT, UNDER ANY CIRCUMSTANCES, REMOVE THE POWER SUPPLY CORD GROUND
PRONG. For your personal safety, this appliance must be grounded. This appliance is equipped
with a power supply cord having a 3-prong grounding plug. To minimize possible shock hazard it
must be plugged into a mating 3-prong grounding type wall receptacle, grounded in accordance
with the National Electrical Code and local codes and ordinances. If a mating wall receptacle is
not available, it is the personal responsibility and obligation of the customer to have a properly
grounded 3-prong wall receptacle installed by a qualified electrician.
5.
The power cord should always be disconnected from the electrical outlet before the recovery tank
is emptied, the solution tank is refilled or the cleaner is serviced in any way.
6.
DO NOT store this cleaner in an area which may reach freezing temperatures. Should this occur.
DO NOT operate this cleaner until it has been at room temperature for at least (2) hours.
7.
DO NOT use any cleaning solution or chemicals other than those discussed in this manual.
8.
DO NOT pick up combustible materials such as gasoline, solvents, hot coals, or live sparks.
9.
NEVER allow children to operate cleaner, nor should they play with cleaner as a toy.
STORE INDOORS.
10. This cleaner contains a suds-sensitive float system which shuts off the suction when the water or
suds picked up by the cleaner reaches a certain level in the upper container. When the suction is
shut o f f , to continue your cleaning, turn off the cleaner, empty upper container, wipe suds from
float system and continue cleaning. When a highly sudsy solution is being vacuumed up, the
float system will activate by the suds level and not the water level; therefore, if the amount of
water in the container does not appear to be a large quantity, do not be alarmed, the float is
working properly. The use of Formula #2 (defoamer) will reduce or eliminate this condition.
11.
If your cleaner is accidently turned over while you are cleaning, the float may activate and shut
off the suction. If this occurs, set the cleaner upright, turn the power switch "off" and let motor
come to a complete stop: then turn switch back "on" to continue cleaning.
12.
For maximum efficiency, empty container frequently and keep inside of hose, wands, nozzle and
container clean.
13.
DO NOT overwet carpet or upholstery. If three or more cleaning strokes are required, let the
carpet or upholstery material dry and then repeat cleaning process.
14
SAVE THESE INSTRUCTIONS.
Page 2
_
INTRODUCTION
Your New Cleanmore Home Cleaning System is a deluxe high performance cleaner, designed for today's
cleaning requirements.
With proper care and maintenance, it should provide you with years of service. It is important that you
read this manual to fully understand the cleaner's capabilities as well as providing you with the essentials
regarding maintenance and safety. A complete list of operating parts and features are shown below in
Figure 1.
See Figure 1.
-
ANGLED WAND
RECOVERY TANK POWER HEAD
2 SPEED PUMP SWITCH
RECOVERY TANK
STAINLESS STEEL WANDS
VACUUM HOSE
SOLUTION TANK
SOLUTION TUBING
FLOOR NOZZLE
Figure 1
Page3
ASSEMBLY
ASSEMBLY OF HOSE, WANDS, NOZZLE
AND SOLUTION TUBE.
See Figure 2.
SOLUTION TUBE NUT
1. Assemble the two Straight Wands.
2. Assemble Angled Wand to upper Straight Wand.
3. Assemble Floor Nozzle to lower Straight Wand.
NOTE: Be sure locking button engages properly
when assembling straight wands, angled wand, and
floor nozzle.
See Detail "A" - Figure 2.
STRAIGHT
WANDS
4. Thread Solution Tube Nut onto threads of Trigger
Valve.
5. Snap Solution Tubing into Retaining Clips on the
wands.
FLOOR NOZZLE
Figure 2
RECOVERY
TANK
ASSEMBLY OF RECOVERY TANK AND
SOLUTION TANK.
See Figures 3 and 4.
1. Place Recovery Tank unit into Solution Tank.
(Align word "VACUUM" on recovery tank with
"VACUUM" on solution tank.)
SOLUTION TANK
2. Unwind Power Cord from Power Head.
See Figure 4.
POWER CORD
POWER HEAD
3. Insert plug on cord from Solution Tank into
Receptacle in Recovery Tank Power Head.
Figure 4
Page 4
OPERATION
See Figure 5.
LARGE VACUUM HOSE
4. Attach the large vacuum hose to recovery tank
intake. (Vacuum inlet)
5. Attach solution tubing to solution tank by inserting plastic insert into plastic coupling.
NOTE: To remove plastic insert depress Tab and
gently pull on plastic insert. Be careful not to pull
on tubing as damage may occur.
SOLUTION
TUBiNG
PLASTIC
COUPLING
PLASTIC
INSERT
TAB
— PREPARATIONVACUUM CARPET
Figures
See Figure 6.
1. For best cleaning results it is recommended that
the carpet be vacuumed to remove loose dirt
before using the Cleaner.
PRETREAT CARPET (IF NEEDED)
See Figure 7.
1. To remove stains and ground in soil present in
heavy traffic areas of the carpet, spray or rub
Sears spotter (Formula #3) into carpet before using the cleaner. Follow directions on the bottle.
FILLING CLEANER WITH WATER AND
CLEANING SOLUTION
Figure 7
See Figure 8.
1. Add Sears Formula #1 carpet cleaning solution or
Sears Formula #4 upholstery cleaning solution to
supply tank (depending on type of cleaning to be
performed). Follow directions on label of bottle.
2. Pour clean hot water (from tap) into Filler Opening
in the Supply Tank - use 2 gallons of water.
FILLER
OPENING
SUPPLY TANK
3. Close Filler Opening.
NOTE: This unit may become damaged if boiling
water is used.
Figures
Page 5
OPERATION
ADD DEFOAMER (IF REQUIRED)
POWER HEAD
LATCH
See Figure 9.
1. If carpet has previously been cleaned with regular
shampoo, it may be necessary to add defoamer,
Formula #2, to the recovery tank by raising
Latches and lifting Power Head from the Recovery Tank. Follow directions on bottle.
WTCH-
Figure 9
CARPET CLEANING
POWER CORD
POWER CORD
POWER
See Figure 10.
1. Unwrap Power Cord from Power Head and plug
into electrical outlet.
2. Turn Power Switch on.
Figure 10
PUMP SWITCH
PUMP SWITCH
See Figure 11.
1. Place Pump Switch in either "Hi" or "Lo" position.
NOTE: The "Hi" pump speed is used for normal
cleaning and "lo" pump speed is used for delicate
upholstery or light cleaning.
Figure 11
Page 6
OPERATION
TESTING FOR SOLUTION SPRAY
See Figure 12.
1. Hold Floor Nozzle above floor level.
2. Pull Solution Release Trigger on Angle Wand.
See Detail "A" Figure 12.
3. Observe Floor Nozzle to make sure cleaning
solution is being sprayed evenly from two points.
NOTE: If solution is not being sprayed from both
points, refer to "Service Hint" section of this
manual.
. REIEASE
TRIQQIR
CLEANING THE CARPET
See Figures 13 and 14.
Solution Dispensing Stroke
FLOOR NOZZtf
1. Start at a corner (recommended).
2. Place Floor Nozzle flush with carpet.
3. While exerting light pressure down on floor
nozzle, depress Solution Release Trigger and
slowly pull Floor Nozzle towards you.
NOTE: Do not overwet carpet - See "Rules For Safe
Operation" on page 2, Rule #13.
Solution Recovery Stroke
1. Release Solution Release Trigger.
2. Repeat the pickup stroke one or two times
without spray. To accomplish this, release the
Solution Trigger and lift the Floor Nozzle off
carpet, return Floor Nozzle to point
where you dispensed cleaning solution, and
recover dirty solution.
j
Page 7
OPERATION
WHEN TO EMPTY RECOVERY TANK
_
RECOVERY
TANK
EXHAUST
See Figure 15.
During normal operation, your cleaner may stop
recovering solution from your carpet. When this occurs there are three check points to alert you:
1. An increase in motor noise.
2. No solution visibly being recovered by your floor
nozzle.
3. No air coming from the exhaust part of your
cleaner.
When this occurs:
1. The Recovery Tank is full and the Float Valve in
the recovery tank has been activated.
2. The Recovery Tank has foam in the tank and the
float valve has been activated.
Figure IS
LOCK BUTTON
TAB
LARGE VACUUM HOSE
HOW TO EMPTY RECOVERY TANK
See Figure 16.
1. Turn Power Switch "off".
2. Disconnect Power Cord From The Wall Outlet.
3. Disconnect Pump Cord located between Solution Tank and recovery tank.
4. Disconnect large vacuum hose by depressing
the Lock Button and remove.
5. Push Tab inward on Plastic Coupling and remove
plastic insert and tubing. See Detail "A", Figure
16.
6. Lift Latches on Power Head.
7. Lift Power Head, by Handle, and remove from
recovery tank.
8. Remove Recovery Tank from Solution Tank.
9. Empty Recovery Tank. Note: If foam is observed
in Recovery Tank, add Sears Defoamer (Formula
#2). Follow directions on bottle.
10. Reassemble in the reverse of removal and
resume cleaning.
*»OWEfl HEA0
HANDLE
POWER CORD
PUMP CORD
^
PageS
OPERATION
DISASSEMBLY AND STORAGE
See Figure 17.
There are three recommended methods of emptying
the Solution Tank.
a) Disconnect Pump Cord from Recovery Tank,
remove recovery tank from Solution Tank and
pour solution out of filler opening.
b) Place floor nozzle in bath tub or container.
Depress solution release trigger and continue
spraying until solution is no longer observed
spraying through floor nozzle.
c) Remove floor nozzle and insert wand into solution
tank through filler opening and vacuum solution
out. Discard solution in recovery tank by following steps described under "How to Empty
Recovery Tank".
ADDITIONAL USE
USE AS BLOWER
See Figure 18.
1. Remove the recovery tank from the solution if
desired. BE SURE SOLUTION TANK POWER
CORD IS DISCONNECTED.
Assemble the hose and wands. Insert hose into
the exhaust port of the power head.
Turn power switch "on" and direct hose to area
to be blown.
EXHAUST PORT
Fig. 18
OPTIONAL CLEANING ACCESSORIES
OPTIONAL CLEANING ACCESSORIES MAY BE PURCHASED
OR ORDERED THROUGH YOUR NEAREST SEARS STORE
UPHOLSTERY NOZZLE
Model No.?081451
See Figure 19.
Cleanmore Carpet Cleaner Upholstery Nozzle is an
optional attachment for furniture upholstery cleaning. The upholstery nozzle may also be used to clean
car upholstery or carpeting. In addition, the nozzle
may also be used to clean carpeted stairs and other
areas difficult to clean with the normal floor nozzle.
.
Fig. 19
Page 9
OPTIONAL CLEANING ACCESSORIES (Cont'd.)
HOME/AUTO CLEANING KIT
Model 2081051
See Figure 20.
Key
No.
Part
Number
1
642088-005
Dust Brush
2
641671-013
Crevice Tool
Description
3 642141-007
Upholstery Nozzle (Dry)
4 643737-005
Upholstery Nozzle (Wet)
NOTE: You must use the cloth filter
assembly contained in the kit shown
below when "Dry" Cleaning. See Figure
22.
Fig. 20
SHOP VAC CLEAN-UP KIT
Model No. 2081651
See Figure 21.
Key
Part
No. Number
1 641871-007
Description
6' Hose Assembly
2
641848-002
19-1/2" Wand (2)
3
641870-004
6" All-Purpose Nozzle
4
642620-002
14" Floor Nozzle
5
660424-001
14" Squeegee
6
660425-001
45° Dust Brush
7
642614-002
Crevice Tool
Fig. 21
NOTE: You must use the cloth filter
assembly contained in the kit shown
below when "Dry" cleaning. See Figure 22.
WET/DRY CONVERSION KIT
Model No. 2081851
See Figure 22.
Key
No.
Part
Number
Description
1
643076-004
Floor/Rug Nozzle
2
642458-002
10" Squeegee
3 660408-001
Cloth Filter Assembly
NOTE: Optional Cleaning Accessories
may be purchased or ordered through your
nearest Sears store. A complete set of instructions comes with each attachment
set.
Fig. 22
Page 10
CLEANMORE SPRAYMATE ATTACHMENT
Model No. 2081251
See Figure 23.
Cleanmore Spraymate is an optional attachment for
carpet cleaning. The Cleanmore Spraymate has a
motorized beater brush which is especially good for
difficult to clean areas of heavy traffic. A complete
set of instructions comes with the Cleanmore
Spraymate attachment set.
Fig. 23
SERVICE HINTS
PROBLEM
SOLUTION
1) Neither vacuum motor nor pump
motor runs.
A) Be sure power switch is in "on" position.
B) Check wall outlet. (Check by plugging a known good table
lamp into outlet).
C) If A and B are satisfactory, service may be required.
2) Vacuum motor runs, but there is
no spray at the nozzle.
A) Check to be sure the electric cord from the power head to
the solution tank is securely plugged into the receptacle
on the power head.
B) Be sure the solution tank is full.
C) Be sure the pump switch is in the "Hi" or "Lo" position.
D) If the above are satisfactory, remove the access screws and
clean out ports (2) with a small pin or needle as shown in the
illustration below.
E) If A, B, C, D, & E are satisfactory, cleaner may require
service.
3) Spray from the floor nozzle comes
out of one side of nozzle only.
A) Follow procedure shown in Figure 24 below.
1. REMOVE ACCESS
SCREWS
SMALL PIN OR NEEDLE
2. CLEAN OUT PORTS (2)
WITH SMALL PIN OR NEEDLE
NOTE: Do not let the needle point
touch any part of the spray pad surface or spray pad will not spray solution properly
SPRAY
===v
VIEW SHOWS BOTTOM OF CARPET SPRAY NOZZLE
SPRAY PAD
SURFACE
Figure 24
4) Motor runs but cleaner does not
pick up solution from carpet (No
exhaust from top of cleaner).
A) Recovery tank is full of dirty water and must be emptied.
B) The nozzle or hose is clogged with some foreign material
(carpet strings, shoe laces, etc.).
5) Spray connections leak
A) Disassemble nut at leaking connection.
B) Check washer. Be sure it Is properly seated.
C) Reassemble nut and tighten securely.
Page 11
SEARS CLEANMORE HOME CLEANING SYSTEM - MODEL 175.8575180 —
'
SEE FIGURE C
FOR EXPLODED VIEW
SEE FIGURE A
FOR EXPLODED VIEW
.
SEE FIGURE B
FOR EXPLODED VIEW
Page 12
SEARS CLEANMORE HOME CLEANING SYSTEM - MODEL 175.8575180
Page 13
CLEANING SYSTEM — MODEL 175.8575180
DESCRIPTION
Switch Cap
642315-007
Handle Shroud w/Name Rating Plate
642338-033
Screw-Motor Mtg. (2)
641798-003
PT. NUMBER
643531-005
642339-041
640145-005
643509-001
642367-006
644548-001
3
14
15
16
17
18
19
20
21
22
23
24
25
26
27
28
29
30
31
32
33
34
35
36
37
38
39
40
41
42
43
44
45
46
47
48
49
50
51
642367-004
643909-002
642367-004
641866-031
642409-002
643579-002
642313-000
644147-002
642337-002
642149-001
641843-010
644846-001
643492-003
644802-001
642392-003
642149-001
642406-017
641857-008
643584-000
642405-001
642409-002
644038-003
644773-005
644773-007
644773-008
643561-001
643562-003
643454-003
643583-000
643533-002
643685-001
642447-000
642046-011
643431-006
643565-009
644876-001
640066-005
643535-001
643438-002
643536-000
643566-009
643498-000
Page 14
Pigtail w/Terminal Asm. (Male)
Separator Plate (Incl. 7)
Screw-Sep. PI. to Hdl. Shroud (2)
Switch
Seal-Motor Cover
Cover-Motor Blower
Motor Seal-Upper
Carbon Brush Asm. (2)
Motor Seal-Lower
Cover Asm. (Incl. 28, 29)
Screw-Cover to Separator Plate (4)
Screw-Valve Hsg. to Cover (2)
Sensor Guard
Nameplate-Handle
Screw-Hdl. Shroud to Sep. Plate (2)
Solderless Connector
Cord Set
Slide Switch w/Diode
Pigtail-Female
Screw s/Lk. Washer (Ground)
Lead w/Terminal (Green)
Solderless Connector
Motor Asm.
Latch (2)
Secondary Filter
Float Assembly
Screw-Asm. Baffle (2)
Tubing
Coupling Insert Nut
Coupling Insert
Coupling Body w/Flat & Groove
Retaining Ring
Tubing Asm. (Inc. 34, 35, 48)
Washer (3)
Filter-Solution Tank
Screw-Lwr. Cont. to Upper Cont. (3)
Screw Motor Housing to Cont. (2)
Baffle
Dirt Container Asm. (Inc. 30, 29)
Door-Fill
Upper Container (Incl. 43, 45, 46)
Pin, Bumper (2)
Bumper
Screw-Valve Seat to Lwr. Cont. (2)
Valve Seat
Washer
Lower Container
Caster (3)
SEARS CLEANMORE HOME CLEANING SYSTEM - MODEL 175.8575180
54
_
Figure B
82
81
80
79
78
KEY
PT. N U M B E R
54
55
56
57
58
59
60
61
62
63
64
65
66
67
69
71
72
73
74
75
76
77
78
79
80
81
82
83
84
85
86
87
88
89
90
91
92
643859-201
643875-001
643870-006
643873-002
607182-001
643875-001
643852-001
644051-001
643875-001
643857-001
643875-001
643859-201
643829-007
644307-001
642149-001
888493-304
643531-005
643864-001
644089-007
643851-002
643868-001
642723-004
643874-001
643171-003
643856-001
643866-001
643863-001
660260-001
643685-001
603908-001
642723-004
642723-004
644122-001
643871-001
931744-003
644307-001
931744-003
77
Page 15
76
DESCRIPTION
Bearing Retainer
Screw, Brg. Ret. Mtg. (2)
Armature Complete w/Fan
Brush Assembly (2)
Brush Clamp (2)
Screw, Brush Mtg. (2)
Insulator-Motor Cover
Screw, Ground
Screw, Brg. Ret. Mtg. (2)
Field Strap
Screw, Field Strap Mtg. (2)
Bearing Retainer
Field Core Wound
Self-Aligning Bearing
Solderless Connector
Strain Relief
Pigtail w/Terminals (Male)
Nut-Hex
Pump Motor Complete
Motor/Pump Housing
Washer-Neoprene
Washer-Stainless Stl.
Guard, Outer Magnet
"O" Ring
Shaft-Pump
Washer-Stainless Stl.
Retaining Ring
Impeller/Magnet/Bearing Asm.
Screw, Pump to Container (4)
Retaining Ring-External
Washer
Washer
Hex Nut
Magnet Housing
Washer-Phenolic
Self-Aligning Bearing
Washer-Phenolic
- SbAKS ULtJVNMUHk HUMfc: ULtANI NU
-
/"
/ Q7
aYdiem — MuutL ira.oa/oiw
-
96 98 100 ^ 101 102 103
\ 99\ \
! / /
/
VVL
\L//
^
~^ \
X,
T-r^~-^-^^
v- -;OOn
JK"I —rJ/
^\
^S^.LJL,c*Mi» -&*
95--^><U'T*^
yy
94
^*T
125-^w
W-JP05^^
«rr —
\*^«
^-104 110 ^->.
^j//Jf
y / 11
~~~™™~-\///
^-106
;;AV
x^\\L'
/- 106
112^/POA\ //^(REF)
I X - ^V\\
1^*=-^^
31^__W.
^107 A•M •> 1 V^TV^
,\
| ,~
V
^a
"<&!' 12?
(REF
\ 93
^
114—-r ^X5- 1
\
3 ^*\/^
\ j "^ \
2
33(REF)
--~~^>
-"Oiis-X-V
•
/
116 Figure C
r>^/^ .
.
.
_
109 —-^^
KEY
93
94
95
96
97
9O
99
100
101
102
103
104
105
106
107
108
109
110
111
112
113
114
115
116
125
126
127
128
.
--
T
—*
|
DESCRIPTION
PT. NUMBER
Strap-Tubing (2)
Nut-Ferrule
Lever (Trigger)
"0" Ring
Curved Wand
Washer-Stainless Stl.
Lock Button
Spring Valve
Sleeve-Shut Off
"0" Ring
Washer-Neoprene
Nut w/Valve Seat
Valve Asm. Kit w/95
Tubing
.
Nut-Ferrule
Hose & Wand Asm. Comp.
Straight Wand-S.S. (2)
Nut Ferrule
Nozzle-Upper
Screw (2)
Washer-Neoprene (2)
Nozzle Body Asm.-Lower
Screw-Lower to Upper Nozzle (2)
Nozzle Asm. (Complete w/103, 104, 106, 107)
Swivel Connector 1-1/4" Dia.
Swivel Connector 2-1/2" Dia.
Hose 8'
Operating/Maint. Instr./Parts List
643731-005
644037-002
644152-002
643171-002
644153-004
643445-000
644830-001
643444-000
644151-002
643171-002
643446-000
644162-002
643572-004
644038-001
644037-002
643570-013
643186-007
644037-002
643428-001
640145-007
643454-002
643429-933
643526-002
643571-005
644156-003
644157-003
644163-005
660300-038
••.'-••'
_
.
" . •
-
Page 16
•• '
'
_
INSTRUCTIONS FOR MODEL 20 81451 FOR USE WITH
CLEANMORE HOME CLEANING SYSTEM UPHOLSTERY NOZZLE
CAUTION - READ BEFORE USING
1. Follow the furniture manufacturer's recommendations for cleaning.
2. Do not use the Cleanmore Home Cleaning System to clean upholstery that should be dry
cleaned only. The label on recently manufactured furniture may be marked with the letter S
if the fabric should be dry cleaned.
3. Always test the fabric in an inconspicuous area to be sure that it is colorfast, does not
shrink and is not damaged by the rubbing action of the nozzle.
4. To prevent fabric staining and damage to internal materials, DO NOT SOAK FABRIC. If
fabric is heavily soiled and requires more than two passes with the cleaning solution, allow
fabric to dry completely. After drying, clean area again at a right angle to the original cleaning stroke.
5. If cleaning solution "pools" on fabric, discontinue use to avoid damaging the internal portions of upholstered furniture.
ASSEMBLY AND FILLING
1. Assemble solution tank, recovery tank and hoses as you
would for carpet cleaning. Do not assemble straight
wands or floor nozzle.
2. Assemble upholstery nozzle directly to curved wand. Be
sure locking button snaps into hole in nozzle.
3. Slide spray body on underside of nozzle toward the
threaded portion of the curved wand and tighten nut.
(Figure 1).
4. Fill solution tank with hot tap water as you would for
carpet cleaning.
5. Add Sears Formula 4 (Number 20-8984) Upholstery
Cleaning Solution. Follow directions on bottle for mixing solution. CAUTION - USE ONLY SEARS 20-8984
CLEANING SOLUTION OR UPHOLSTERY DAMAGE
MAY OCCUR.
OPERATING INSTRUCTIONS
•i
1. Use your household vacuum cleaner to vacuum
upholstery thoroughly to remove all loose dirt.
2. Place the upholstery nozzle on the surface to be cleaned. Keep the slotted intake flat against the fabric at all
times. (Figure 2).
3. Pull the spray trigger and pull the nozzle toward you.
Clean a small area at a time, using short slightly overlapping strokes. Additional strokes with vacuum only
without solution will help to dry fabric.
4. To retain the clean "see through" appearance of the nozzle, wash with lukewarm dish detergent solution and
rinse after each cleaning task.
CLEANING HINTS
1. To clean fabric welts (seams or cording) cleaning stroke should be parallel to the welt. Depress to flatten welt.
Thoroughly vacuum on both sides of welt to remove excess moisture.
2. Metal buttons can rust and stain fabric. After cleaning, dry buttons thoroughly, including underside, with a
white towel or cloth.
3. If you get any wooden parts wet, wipe dry at once. The use of a good furniture polish is recommended for care
of the wood.
4. If the upholstery fabric was previously treated with a stain repellant it should be retreated after the fabric has
been cleaned and is completely dry.
5. OTHER USES FOR UPHOLSTERY NOZZLE. The upholstery nozzle may also be used to clean car upholstery or
carpeting. In addition, the nozzle may also be used to clean carpeted stairs and other areas difficult to clean
with the normal floor nozzle.
(0485)
Pt. No. 660300-046
SERVICE HINTS
1. If upholstery nozzle does not spray or sprays unevenly:
A. Remove small nut from end of spray body. Remove brass
tip and washer from recess in spray body. With tweezers
or pin, remove filter inside. (Figure 1) Rinse filter with
clean water.
B. Inspect brass spray tip. If clogged, remove obstruction
with pin or needle. (Figure 2).
C. Reassemble parts by reversing above procedure.
2. If spray connections leak:
A. Disassemble nut at leaking connection.
B. Check washer. Be sure it is properly seated.
C. Reassemble nut and tighten securely.
REPLACEMENT PARTS LIST
KEY PART NUMBER
1
2
3
4
5
6
7
643737-933
643735-002
643736-001
643799-000
643738-001
643737-952
643446-000
DESCRIPTION
Upholstery Nozzle
Nut - Spray Head
Spray Head
Washer - Small
Filter
Conn. & Valve Seat
Washer - Large
HOW TO ORDER PARTS
All parts listed herein may be ordered from any Sears, Roebuck and Company or Simpsons-Sears
Limited retail or catalog store.
WHEN ORDERING REPAIR PARTS, ALWAYS GIVE THE FOLLOWING INFORMATION:
1. Part Number
2. Part Description
3. Model Number 2081451
4. Name of Item — Upholstery Nozzle
If the parts you need are not stocked locally, your order will be electronically transmitted to a Sears
Repair Parts Distribution Center for expedited handling.
FULL ONE YEAR WARRANTY
When used for private household purposes, if within one year from first day of use in your home, this
Cleaner fails due to defect in material or workmanship, RETURN IT TO THE NEAREST SEARS
STORE OR SERVICE CENTER IN THE UNITED STATES, and Sears will repair it, free of charge.
This warranty gives you specific legal rights, and you may also have other rights which vary from
state to state.
^
SEARS, ROEBUCK AND CO., Sears Tower, BSC 41-3, Chicago, IL 60684
NOTES
Page 17
OWNERS
MANUAL
HOME CLEANING SYSTEM
SERVICE
Now that you have purchased your Cleanmore Home
Cleaning System, should a need ever exist for repair
parts or service, simply contact any Sears Service
Center. Be sure to provide all pertinent facts when
you call or visit.
MODEL NO.
175.8575180
The model number of your Cleanmore Home Cleaning System will be located below the handle on
power head.
WHEN ORDERING REPAIR PARTS, ALWAYS GIVE
THE FOLLOWING INFORMATION:
HOW TO ORDER
REPAIR PARTS
• PART NUMBER
PART DESCRIPTION
• MODEL NUMBER
175.8575180
NAME OF ITEM
Cleanmore Home Cleaning
System
All parts listed may be ordered from any Sears Service Center.
If the parts you need are not stocked locally, your
order will be electronically transmitted to a Sears
Repair Parts Distribution Center for handling.
SEARS, ROEBUCK AND CO., Dept. 698/731A, Sears Tower. Chicago. IL 60684
IMPORTANT
This Sears Kenmore Power Spray Carpet and Upholstery Cleaner is designed
to be used with special wet extraction
"steam type" cleaning solutions, such
as those described on the reverse side
of this tag. These products assure maximum cleaning and safety with most
types of carpet fibers and upholstery
fabrics.
DO NOT USE ROTARY BRUSH CARPET
SHAMPOOS OR REGULAR HOUSEHOLD DETERGENTS:
Damage to carpet, upholstery, and machine could result.
J
For best results use only the Kenmore
products listed below available at most
Sears stores or thru Sears catalog.
Your
Sears
4-STEP
• FORMULA #1 Carpet
Cleaner
Number 20-82812
• FORMULA 2 Defoamer
Number 20-82822
• FORMULA #3 Spotter
Number 20-82832
• FORMULA #4 Upholstery
Cleaner
Number 20-82842
CLEANING
PROGRAM .
• Formula #1 is a concentrated cleaning solution designed to break down most
types of dirt, grease, and
grime without damaging
delicate carpet fibers. Also
helps to remove stains and
brighten colors.
• Formula #2 is used to prevent excessive foaming in
the recovery tank in the
power spray carpet cleaner. This foaming can occur
when the carpet has been
cleaned previously with
regular rug shampoo or
vacuuming has been incomplete.
• Formula #3 is designed to
pre-treat stains and groundin soil caused by heavy traf-
fie before cleaning with the
power spray unit.
• Formula #4 is a concentrated solution designed to
break down most types of
dirt, grease and grime without damaging upholstery
fabrics. Formula #4 also
helps remove stains and
brightens colors. Only Formula #4 is to be used with
the Power Spray upholstery
nozzle when cleaning upholstery. Not to be used on
upholstery that requires
special care or specifies
dry cleaning.
Note: Test all products on
inconspicuous area of the"
carpet or upholstery before
using.
•