1
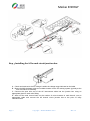
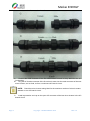
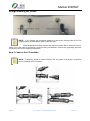
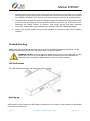
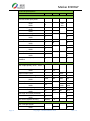
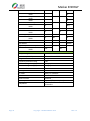
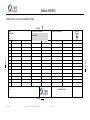
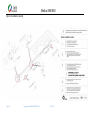
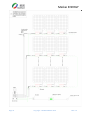
Meikai ENERGY Meikai N220/N300 Micro-Inverter Installation and Operation Manual Version: 1.0 NOTICE: MKSTAR –N270: Pairs with most 60-cell PV modules MKSTAR –N220/N300: Pairs with most 72-cell PV modules Page 1 Copyright MeiKai ENERGY 2012 REV 1.0 Meikai ENERGY Contact Information: Shenzhen Meikai Electronics Stock Co., Ltd Address: Blk B13,Hengfeng Industrial City,Hezhou,Xixiang,Bao’an,Shenzhen,China Tel:+86-0755-86079109 Fax:+86-075586079197 www.meikaienergy.com [email protected] Thanks for choosing Meikai N220/N300 Micro-Inverter. For your own safety and to ensure the operation of the equipment, please read this manual carefully before installation and operation. Page 2 Copyright MeiKai ENERGY 2012 REV 1.0 Meikai ENERGY All rights reserved: Meikai reserves the right to change the product and the content of this manual without WARNING. Users are recommended to visit the company website www.meikai-cn.com for more information about new products and latest versions of user manuals. Page 3 Copyright MeiKai ENERGY 2012 REV 1.0 Meikai ENERGY Table of Contens Table of Contens...................................................................................................................................... 4 Installation and Operation Instructions ................................................................................................ 5 Important Safety Instructions ......................................................................................................... 5 Safety Information............................................................................................................................ 5 Meikai Micro-inverter System ................................................................................................................ 6 Meikai Micro-inverter ....................................................................................................................... 6 System Monitoring ........................................................................................................................... 7 System Reliability ............................................................................................................................ 7 Simplified System Design ............................................................................................................... 7 Electrical Compatibility ................................................................................................................... 7 Meikai Micro-inverter Installation Guide ............................................................................................... 8 Meikai Micro-inverter Installation Kit ............................................................................................. 8 Installation Procedure............................................................................................................................. 8 Step 1-Installing the AC branch circuit junction box ................................................................... 9 Step 2- Attach Meikai Micro-inverter to the racking ................................................................... 10 Step 3-Connect the Meikai micro-inverter to the AC branch cable .......................................... 10 Step 4-Grounding the system ....................................................................................................... 12 Step 5-Connect the PV modules................................................................................................... 12 Step 6-Complete the Meikai Micro-inverter Installation Map .................................................... 13 Commissioning...................................................................................................................................... 13 Commissioning a Meikai Micro-inverter system: ....................................................................... 13 Troubleshooting .................................................................................................................................... 14 LED Indications .............................................................................................................................. 14 Starting up ...................................................................................................................................... 14 Sarting Grid connect indication ................................................................................................... 15 Normal operation indication ......................................................................................................... 15 Communication indication ............................................................................................................ 15 Failure indication ........................................................................................................................... 15 Failure Report ................................................................................................................................. 15 Troubleshooting Procedure .......................................................................................................... 16 Disconnect the micro-inverter from the PV module .......................................................................... 16 Replace a Meikai Micro-inverter .......................................................................................................... 17 Technical Specifications....................................................................................................................... 18 Technical Specifications ............................................................................................................... 18 Appendix ................................................................................................................................................ 21 Meikai Micro-inverter Installation Map......................................................................................... 22 Quick installation Guide ................................................................................................................ 23 Page 4 Copyright MeiKai ENERGY 2012 REV 1.0 Meikai ENERGY Installation and Operation Instructions Important Safety Instructions This manual contains important instructions for equipment installation and maintenance. For your own safety, please follow the safety instructions during the installation and maintenance. Please pay attention of the following safety symbols: WARNING:This indicates a situation where failure to follow instructions may cause personnel danger or serious hardware failure. Use extreme caution when performing this task. NOTE: This indicates information particularly important for optimal operation. Follow these instructions closely. Safety Information WARNING: the Meikai Micro-inverter dissipates heat through its case, the temperature may 15 °C higher than ambient temperature. DO NOT touch the device surface when device is running to avoid burns. Handle the device with caution. The installation of inverter must be performed in full compliance with the National Wiring Rules of Standard AS/NZS 3000 and other relative local standards and regulations. Be aware that only qualified personnel are allowed to maintain Meikai Micro-inverters. DO NOT attempt to repair the Meikai Micro-inverter, it is unrepairable. If it fails, please return the unit to your distributor or Meikai Customer Service for maintenance. Tampering with or opening the Meikai Micro-inverter will void the warranty. Before installing and operating Meikai Micro-inverter, please read all instructions for the inverter and the module. Be aware of the WARNINGs appear in the technical description. Connect the Meikai Micro-inverter to the local electricity utility grid only after receiving prior approval from the utility company. Meikai takes none responsibility for any on-grid system without such approval. DO NOT disconnect the PV module from the Meikai Micro-inverter without disconnecting AC power. Page 5 Copyright MeiKai ENERGY 2012 REV 1.0 Meikai ENERGY Meikai Micro-inverter System Meikai Micro-inverter system is the most advanced and simple distribution solar system. This manual contains detailed instructions for installing and operating the Meikai Micro-inverter. There are three key elements of Meikai Micro-inverter System: Meikai Micro-inverter Meikai Messenger the communication gateway device Megawatt Web-based Monitoring and analysis system The total integrated system maximizes the energy harvest, simplifies the design, installation and management, and greatly improves the system stability. Meikai Micro-inverter The Meikai micro-inverter maximizes the harvest of solar energy. Each Meikai micro-inverter works independently with one PV module,Each PV module has individual Maximum Peak Power Tracking and insures that the maximum power is exported to the utility grid regardless of the performance of the other PV modules in the array. When PV modules in the array are affected by shading, soiling, orientation, or mismatch, the Meikai Micro-inverter insures top performance from all PV modules in the array. The Meikai Micro-inverter is a grid connected device. the Meikai Micro-inverter employs advanced digital control technology to invert DC to AC which has the identical frequency and phase and upload it to the utility grid. The main features of Meikai Micro-inverter are simplified installation, reliability, stability, maximum energy harvest and intelligent monitoring. The completed self-protection functions greatly improve the stability and reliability of the solar system. The Meikai Micro-inverter adopts totally enclosed potting technology to improve its enclosure protection rate to IP65. Page 6 Copyright MeiKai ENERGY 2012 REV 1.0 Meikai ENERGY System Monitoring The user just needs to simply connect the power cable to the indoor socket, and the Ethernet network cable to the computer, the Meikai Messenger will upload the whole operating data of the Micro-inverter to the web server. Both current and historical operating data can be accessed through the Megawatt website. The user will also quickly detect if the system is not running properly. System Reliability It is commonly recognized that Micro-inverter system is more reliable compare to traditional central or string inverters due to its original design concept. The distributional power output Micro-inverter system eliminates single point failure. The Meikai Micro-inverter is designed to operate without power loss when ambient temperature is 65°C. The enclosure protection rating of Meikai Micro-inverter is IP65 to undergo any weather condition. Simplified System Design Meikai Micro-inverter system makes it is extremely simple to plan or design a solar system, no complicated string calculation needed, no certain number, model, tilt demanded, no cumbersome central or string inverter requested, each of the Meikai inverter will be easily mounted on the rack under the module, the DC wire from the module directly connect the Meikai Micro-inverter simply with quick terminals, no risk of 600V or higher voltage electricity shock. Electrical Compatibility At this moment, the Meikai N220/N300 Micro-inverter matches only with most modules with 72 cells with proper voltage and current range. The Meikai Micro-inverter shall be connected to the utility grid with voltage range from 205V to 253V and frequency of 50Hz. Depends on the two different ways of installation, 14 units are allowed in a branch if the N220 Micro-inverters are connected in series, 11 units are allowed in a branch if the N300 Micro-inverters are connected in series, if a busbar is used, the number of units is depending upon the wire diameter. Page 7 Copyright MeiKai ENERGY 2012 REV 1.0 Meikai ENERGY Meikai Micro-inverter Installation Guide Please read the Installation and Operation Manual before installing a Meikai Micro-inverter. WARNING: Perform all electrical installations in accordance with all local electrical codes. WARNING: risk of electricity shock, the grounding line may become live if not grounded properly. Meikai Micro-inverter Installation Kit Major parts: Except the Micro-inverter, module, rack and hardware tools, the following items are needed to establish a system: ·protective caps ·mounting bracket ·AC interconnect cable ·AC junction box Other parts and tools required: ·grounding cable and washer ·hardware tools for mounting modules to the rack ·socket wrenches ·screwdrivers ·torque wrenches Installation Procedure To install a Meikai Micro-inverter system involves 6 key steps as following: 1. check and install the AC branch circuit junction box 2. attach Micro-inverter to the racking 3. connect the Micro-inverter to the AC branch cable 4. grounding the system 5. connect the PV modules 6. Complete the Meikai Micro-inverter installation map. Each of the detailed installation steps in the following sections is numerically referenced in the installation diagram below. WARNING: DO NOT connect the Meikai Micro-inverter to the utility grid until you have completed all of the installation procedures as described in the following sections. Page 8 Copyright MeiKai ENERGY 2012 REV 1.0 Meikai ENERGY Step 1-Installing the AC branch circuit junction box A、Check and make sure the AC voltage is within the voltage range indicated on the label. B、Mount the Meikai adapter plate at a suitable location on the PV racking system (typically at the end of a branch of modules). C、Connect the open wire end of the AC interconnect cable into the junction box using an appropriate gland or strain relief fitting. D、Work out the total current basis on the number of micro-inverters in each branch, use an appropriate cable and connect the AC branch circuit junction box to the point of utility interconnection. Page 9 Copyright MeiKai ENERGY 2012 REV 1.0 Meikai ENERGY Step 2- Attach Meikai Micro-inverter to the racking A. Determine the location with respect to the PV module junction box or any other obstructions. WARNING: Allow a minimum of 15cm between the top of the roof and the bottom of the Micro-inverter. We also recommend that you allow 5cm between the back of the PV module and the top of the inverter. DO NOT mount the micro-inverter in a location that allows exposure to direct sunlight. B. If a grounding washer is used to connect the micro-inverter to the racking, please make sure use only ground washer that is approved by the racking manufacturer. Use a minimum of one grounding washer per micro-inverter. C. Mount one micro-inverter at each of these locations using hardware recommended by your module racking supplier. Step 3-Connect the Meikai micro-inverter to the AC branch cable Each micro-inverter comes with a 15cm AC wire with one 3 pin female connector and a 156cm AC wire with one 3 pin male connector. As indicated in the following picture: Page 10 Copyright MeiKai ENERGY 2012 REV 1.0 Meikai ENERGY Here is the connection method between the branches. A. Connect the male connecter of the first Meikai Micro-inverter in every branch to the AC junction box. B. Plug the AC female connector of the first micro-inverter into the male connector of the next micro-inverter, and so forth, to form a continuous AC branch circuit. NOTE: Check the micro-inverter rating label for the maximum number of micro-inverters allowed on one AC branch circuit. C. Install a protective end cap on the open AC connector of the last micro-inverter in the AC branch circuit. Page 11 Copyright MeiKai ENERGY 2012 REV 1.0 Meikai ENERGY Step 4-Grounding the system NOTE: If you already use grounding washers to ground the micro-inverter to the PV module racking as described in step 1, skip this step. Each Meikai Micro-inverter comes with a ground screw with a diameter of 5mm. Check your local code for grounding conductor sizing requirement. Connect the grounding electrode conductor to the micro-inverter ground screw. Step 5-Connect the PV modules NOTE: Completely install all Micro-inverters and all system inter-wiring connections prior to installing the PV modules. Page 12 Copyright MeiKai ENERGY 2012 REV 1.0 Meikai ENERGY First connect the positive DC wire from the PV module to the negatively marked DC connector (female socket) of the Micro-inverter. Then connect the negative DC wire from the PV module to the positively marked DC connector (male socket) of the Micro-inverter. Repeat for all remaining PV modules using one Micro-inverter for each module. Step 6-Complete the Meikai Micro-inverter Installation Map The Installation Map is a diagram of the physical location of each micro-inverter in your PV installation. You can use the blank map in the Appendix to record micro-inverter placement for your system. When your map is complete, send it to Meikai as described below. Meikai then uses this information to provide you with detailed information about the performance of your PV system and to allow you to see a graphic representation of your PV system on the web-based monitoring and analysis. Feel free to provide your own layout if a larger or more intricate installation map is required. Complete the Meikai Micro-inverter installation map. A. Each Meikai micro-inverter has a removable serial number label located on the mounting plate. Peel off the label and affix it to the respective location on the installation map, which is available at the Appendix section of this manual or Meikai website http://www.meikai-cn.com/. B. Send the installation map to Meikai after completion. Commissioning WARNING: Connect the Meikai Micro-inverter to the electrical utility grid only after receiving prior approval from the utility company. WARNING: Be aware that only qualified personnel must connect the Meikai Micro-inverter to the electrical utility grid. WARNING: Make sure that all AC and DC wiring is correct. Make sure that none of the AC and DC wires are pinched or damaged. Make sure that all junction boxes are properly closed. Make sure the circuit breaker for DC and AC are installed. NOTE: The starting voltage for Meikai micro-inverter is 30V, the Meikai micro-inverter start to operate only after the DC input voltage is 30V or above, the RED LED indicates the Meikai micro-inverter is in normal operation. Commissioning a Meikai Micro-inverter system: 1. Page 13 Connect each micro-inverter to the respective PV module (make sure the module is in normal operation), the RED LED on. Copyright MeiKai ENERGY 2012 REV 1.0 Meikai ENERGY 2. Switch on the circuit break on each AC branch circuit. 3. Switch on the main AC break on the connect point of the utility grid. Your Meikai micro-inverter will feed power to the utility grid after 2 minutes if all the micro-inverters are correctly connected. The GREEN LED blinks in an interval of 4 seconds indicate the system is in normal operation. 4. The Meikai micro-inverter will report the operation data to the Messenger over powerline after 2 minutes if the AC voltage is normal, each data packet in 5 minutes. The LCD screen on the Messenger will display number of inverters, total energy harvest and other important information. Please refer to the installation and operation manual for Meikai Messenger. 5. Logon to the monitor website or use monitor software to check the micro-inverter operating condition. Troubleshooting Safety instructions are described through the manual only qualified personnel are allowed to use the following troubleshooting steps if the PV system does not operate correctly: WARNING: DO NOT attempt to repair the Meikai Micro-inverter, it is unrepairable. If it fails, please return the unit to your distributor or Meikai Customer Service for maintenance. Tampering with or opening the Meikai Micro-inverter will void the warranty. LED Indications The LED indicats red,orange and green three different colors. Starting up With proper DC input voltage, the RED light on indicates the PV module is output power and the Meikai micro-inverter is staring up. Page 14 Copyright MeiKai ENERGY 2012 REV 1.0 Meikai ENERGY Note: the starting voltage for Meikai micro-inverter is 30V, the Meikai micro-inverter start to operate only after the DC input voltage is 30V or above, the RED LED indicates the Meikai micro-inverter is in normal operation. Sarting Grid connect indication After startup, if the utility grid voltage and the PV module energy output are normal in 20 seconds,the micro-inverter will start to connect to the utility grid, three short Orange blinks shows the micro-inverter is attempting to connect to the grid,after the blinks,the micro-inverter start producing power and the Green LED still on. Normal operation indication After 4 seconds the Green LED off and the micro-inverter enter MPP Tracking operation the Green LED stay on with long interval blink. Communication indication When operats normaly, the micro-inverter reports operation data to the Messenger every 5 minutes, at this moment, the Green LED will blink quickly until the reporting completed. Failure indication N220/N300 is designed with 9 different kind of failure protections, all will spark the RED LED and stay on until the failure is maintained. NOTE: Only for low voltage protection, the recovery time is variable, for other situation the recovery time is 20s. The initial recovery time for low voltage protection is 2 minutes;it varies if the low voltage situation continues. The recovery time return back to 2 minutes if the MPP Tracking starts working and the GREEN LED blinks in long interval. Failure Report There are 9 protections for N220/N300 Micro-Inverter and all failure information reported to the Messenger, please refer to the installation and operation manual for details. The operation status can be directly detected. The 9 protections are as following: Over high input voltage Over low input voltage Over high BUS voltage Over low BUS voltage Utility grid voltage Over low Utility grid voltage Over high Utlity grid current Over high Micro-inverter temperature over high Page 15 Copyright MeiKai ENERGY 2012 REV 1.0 Meikai ENERGY Grounding Fault WARNING: Be aware that only qualified personnel should troubleshoot the Micro-inverter. WARNING: DO NOT disconnect the PV module from the Meikai Micro-inverter without disconnecting AC power. WARNING: Never disconnect the DC wire connectors under load. Make sure that no current is flowing in the DC wires prior to disconnecting. WARNING: N220/N300micro-inverter is powered by DC power, when you reconnect the DC wire after disconnect make sure the RED LED is on. Trouble shooting Procedure When PV module is operating normally and the power output is 40W or more,if the RED LED stays on, indicates the micro-inverter is not operating correctly. To troubleshoot an inoperable micro-inverter,please follow the steps in the order shown: 1. 2. 3. 4. 5. 6. 7. Check and verify the utility voltage and frequency are within allowable ranges shown in the Technical Data section on page 16 of this manual. Check the connection to the utility grid.disconnect the AC wire prior to didconnect DC wires. Never disconnect the DC wires while the Micro-inverter is producing power.check if the RED lED is on after reconnect the DC wires,check if the micro-inverter is attempting to connect to the utility geid after reconnect the AC wires. Check the connection between the micro-inverters in the AC branch, verify the utility grid is operating normally. Verify all the AC circuit breakers are functiong normally and closed. Check the DC connection between the micro-inverters and the PV modules. Verify the PV module DC voltage is within the allowable range shown in the Technical Data section on page 16 of this manual. Please call customer support at Meikai if the problem persists. WARNING: DO NOT attempt to repair the Meikai Micro-inverter, it is unrepairable. If it fails, please return the unit to your distributor or Meikai Customer Service for maintenance or replacement. Disconnect the micro-inverter from the PV module 1. 2. 3. Page 16 Disconnect the micro-inverter from the PV module follow the steps in the order shown open the AC circuit breaker. Disconnect the First connector in the AC branch. Copyright MeiKai ENERGY 2012 REV 1.0 Meikai ENERGY 4. 5. 6. 7. Cover the module with an opaque cover. Using a DC current probe, verify there is no current flowing in the DC wires between the PV module and the Micro-inverter(make sure the current probe works correctly). Disconnect the PV module DC wire connectors from the Micro-inverter. Remove the Micro-inverter from the PV array racking. Replace a Meikai Micro-inverter Replace a Meikai micro-inverter follow the steps in the order shown 1. Disconnect the micro-inverter from the PV module follow the foresaid steps. 2. Install a new Meikai micro-inverter to the racking. 3. Connect the AC connectors of the new micro-inverter to the next micro-inverters; connect the DC connectors to the PV module. Remove the opaque cover on the module and complete the connection. 4. Close the AC circuit breaker to verify the operation status. WARNING :Residual voltage exists in the inverter; the inverter cannot be maintained within 5 minutes until the capacitor is fully discharged. Page 17 Copyright MeiKai ENERGY 2012 REV 1.0 Meikai ENERGY Technical Specifications Note: The output voltage and current of the PV module depend upon several factors such as the number, size and temperature of the cell, and is influenced by the intensity of sunlight. The highest voltage of a PV module is output when the cell is at the lowest temperature and circuit is open. The short circuit current must less than or equal to the maximum DC input current of the micro-inverter. Please make sure the output voltage and current of the PV module match with the Meikai micro-inverter. A list of compatible PV modules is maintained on the Meikai website (http://www.meikai-cn.com). WARNING: The maximum open circuit voltage of the PV module must not exceed the specified maximum input voltage of the Meikai Micro-inverter. WARNING: The maximum open circuit voltage of the PV module must not exceed the specified maximum input voltage of the Meikai Micro-inverter. Electrical Connection The inverter is compatible with RCD and RCM. The DC component may produce electricity; as a result, a residual current operated protective (RCD) or monitoring device (RCM) will be used for protection in case of direct or indirect contact, only Type B RCD/RCM is allowed to be connected to the supply side of the product. Depiction Size A External diameter of the wire 12mm-25m m B Sectional area of conducting materials 4-6mm2 C Length of bare wire Approx.10m m If you choose the models without DC switch an external disconnection device should be used. It should be multi-pole switch-disconnector(all poles disconnected simultaneously), which has been approved according to standard IEC/EN 60947-3. The rated current should be between 20A and 25A. Besides, AC breaker is also needed between inverter and Grid. The rated current should be over AC output current, One branch AC breaker should be over 15A. Technical Specifications Page 18 Copyright MeiKai ENERGY 2012 REV 1.0 Meikai ENERGY Technical Specifications Item / Model unit min. normal Max. DC Input Data Recommended input power N220 N300 220 300 W MPPT voltage range N220 N300 Max. input DC voltage N220 N300 Starting DC voltage N220 N300 Max. short circuit DC current N220 N300 Max. input DC current N220 N300 V 30 40 V V input point to input point current feedback 55 30 55 A 15 A 10 12 A 0 AC Output Data Max. output power(-40℃~+65℃) N220 N300 Output Power Factor W Nominal AC voltage range N220 N300 Max. output AC current N220 N300 Nominal frequency/range N220 N300 Over high AC current protection N220 N300 Min. time of system recovery Vrms 200 270 205 mA Hz 49.5 A Minutes 0.99 1 230 253 900 1200 1100 1400 50 50.5 15 2 other working specifications Page 19 Max. units per branch N220 1 N300 1 Copyright MeiKai ENERGY 2012 14 11 REV 1.0 Meikai ENERGY Peak inverter efficiency N220 N300 European efficiency N220 N300 Nominal MPP Tracking N220 N300 Total Harmonic Distortion N220 N300 Operating temperature N220 N300 Relative humidity % 95 95 % 94 94 % 99% % ℃ 3 5 -40 65 0 100% Site altitude 2000m Nighttime power consumption N220 N300 mW 20 other features Compatibility Pairs with most 72-cell PV moudles Dimensions(LxWxH) 228mm*136mm*33.7mm Weight 2.5kg Enclosure protection rating IP65 AC Over voltage category Category III DC Over voltage category Category II Protective Class Class I Cooling Natural Convection AC cable H05VV-F 3*2.5mm² DC cable PV1-F 1*4.0mm² communication powerline Warranty 15 years (25 years optional) AS 4777.2 AS4777.3 AS3100 EN 62109-1 Compliance Page 20 Copyright MeiKai ENERGY 2012 REV 1.0 Meikai ENERGY Appendix Page 21 Copyright MeiKai ENERGY 2012 REV 1.0 Meikai ENERGY Meikai Micro-inverter Installation Map To Sheet Customer information Array: Orientation: Tilt: Form / Installer information N/S/E/W (circle) Serial No.: 1 2 3 4 5 6 7 A B C D F To Sheet To Sheet E G H I J K L M Version Fax Installation Map To Sheet Page 22 Copyright MeiKai ENERGY 2012 REV 1.0 Meikai ENERGY Quick installation Guide Page 23 Copyright MeiKai ENERGY 2012 REV 1.0 Meikai ENERGY Page 24 Copyright MeiKai ENERGY 2012 REV 1.0