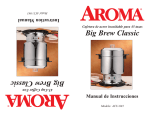
1
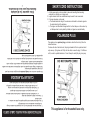
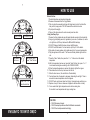
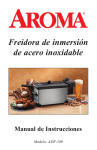
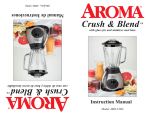
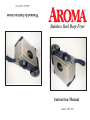
Modelo: ADF-196
Manual de Instrucciones
Stainless Steel Deep Fryer
Instruction Manual
Model ADF-196
Congratulations!
Your
Stainless Steel Deep Fryer will give your kitchen a
professional look, while providing you with delicious meals night after night.
Please read the following instructions carefully before your first use.
© 2005 Aroma Housewares Company
Aroma Housewares Co.
6469 Flanders Drive
San Diego, CA 92121
EE.UU.A.
www.aromaco.com
Publicado por:
Published By:
Aroma Housewares Co.
6469 Flanders Drive
San Diego, CA 92121
U.S.A.
1-800-276-6286
www.aromaco.com
© 2005 Aroma Housewares Company All rights reserved.
¡Felicidades!
IMPORTANTES INSTRUCCIONES DE SEGURIDAD
1
Siga siempre las precauciones básicas de seguridad al usar cualquier aparato
eléctrico, incluyendo las siguientes:
SAVE THESE INSTRUCTIONS
GUARDE ESTAS INSTRUCCIONES
Basic safety precautions should always be followed when using electrical appliances,
including the following:
1. Read all Instructions.
2. Do not touch hot surfaces. Use handles or knobs.
3. To protect against electrical shock, do not immerse cord, plugs or appliance in
water or other liquid.
4. This appliance is not intended to be used by children. Close supervision is
necessary when the appliance is used near children.
5. Do not leave appliance unattended while in use.
6. Unplug from outlet when not in use and before cleaning. Allow to cool before
putting on or taking off parts, and before cleaning the appliance.
7. Do not operate any appliance with a damaged cord or plug or after the appliance
malfunctions or has been damaged in any manner. Return appliance to the
nearest authorized service facility for examination, repair or adjustment.
8. The use of accessoriy attachments not recommended by the appliance
manufacturer may cause injuries.
9. Do not use outdoors.
10. Do not let cord hang over the edge of counter or table, or touch hot surfaces.
11. Do not place on or near a hot gas or electric burner, or in a heated oven.
12. Extreme caution must be used when using or moving an appliance containing hot
oil or other hot liquids.
13. Always attach plug to appliance first, then plug cord into the wall outlet. To
disconnect, turn any control to “off”, then remove plug from wall outlet.
14. Do not use appliance for other than intended use.
15. Use only metal cooking utensils in the fryer as rubber or plastic utensils will
become damaged from the hot oil. Do not leave metal utensils in the fryer as they
will become HOT and may cause injuries.
16. Never plug in the power cord without having oil in the oil pot, otherwise, damage to
the heating element may occur.
17. Do not put oversized food in the deep fryer as the oil might overflow and create a fire.
18. Water or ice must never be put into oil, they will cause hot oil splatter and may
cause a fire.
19. Do not place the deep fryer on a damp surface or where there is flammable gas or the like.
1
IMPORTANT SAFEGUARDS
2
This appliance is for household use only.
INSTRUCCIONES PARA USAR EL CABLE CORTO
1. Se proporciona un cable eléctrico corto con el propósito de reducir el riesgo
de tropezarse o enredarse con un cable más largo.
2. Hay cables de extensión más largos disponibles y deben ser usados co
sumo cuidado.
3. Si se usa un cable de extensión más largo:
a. La clasificación eléctrica marcada en el cable de extensión debe ser
por lo menos igual que la clasificación eléctrica del aparato.
b. El cable más largo debe ser colocado de manera que no cuelgu
por el borde del mostrador o mesa en donde pudiera ser jalado por
un niño o alguien pudiera tropezarse con el cable sin querer.
CLAVIJA POLARIZADA
This appliance has a polarized plug (one blade is wider than the other); follow the
instructions below:
To reduce the risk of electric shock, this plug is intended to fit into a polarized outlet
only one way. If plug does not fit fully into the outlet, reverse the plug. If it still does
not fit, contact a qualified electrician. Do not attempt to modify the plug in any way.
Este aparato cuenta con una clavija polarizada (una espiga es más ancha que la
otra); siga las siguientes instrucciones:
Para reducir el riesgo de choque eléctrico, esta clavija debe ser conectada a una salida
o enchufe eléctrico polarizado solamente de una manera. Si la clavija no entra
completamente en el enchufe, voltee la clavija.
Si aún no queda bien en el enchufe, póngase en contacto con un electricista
especializado. No trate de modificar la clavija.
POLARIZED PLUG
1. A short power-supply cord is provided to reduce risk resulting from becoming
entangled in or tripping over a longer cord.
2. Longer extension cords are available and may be used if care is exercised.
3. If a longer extension cord is used:
a. The marked electrical rating of the extension cord should be at least as great as
the electrical rating of the appliance.
b. The longer cord should be arranged so that it will not drape over the counter top
or tabletop where it can be pulled by children or tripped over unintentionally.
SHORT CORD INSTRUCTIONS
Este aparato fue diseñado
Solamente para Uso Doméstico.
2
PARTS IDENTIFICATION
Viewing Window
Heating
Element
Filter
Lid
Removable
Inner Pot
3
Control Panel
Lid Handle
Body Handle
Stainless
Steel Body
Foldable
Basket Handle
Menu Guide
Temperature Indicator
Time Indicator
"Reduce" Key
3
Select Key
"Power" or "Ready"
Indicator Light
"Start" or "Cancel" Key
IDENTIFICACIÓN DE LAS PARTES
Digital Display
"Increase" Key
Basket
HOW TO USE
4
--:
-Digital Flicker
Red Indicator Light
00:00
Time indicator
will turn on
Press "Select" key to
choose "Time" function
12:00
Press "+" or "-" to
select desired time
Before First Use:
1. Read all instructions and important safeguards.
2. Remove all documents from the frying baskets.
3. Pull out control box assembly and clean the frying basket, oil pot, the lid and the
body with hot, soapy water. DO NOT immerse the control box in water.
4. Dry all parts thoroughtly.
5. Place on flat surface where the cord can easily reach an outlet.
Using Your Deep Fryer
1. Remove the frying basket and snap the basket handle securely into the basket clip.
2. Using only good quality peanut oil, vegetable oil, pure corn oil, sunflower oil, canola
oil or light olive oil, fill the pot between the MIN and MAX markings.
3. DO NOT fill beyond the MAX marker or below the MIN marker.
4. DO NOT overfill the basket. For best results, only fill up 2/3 of the basket.
5. Wipe inside of viewing window with a small amount of oil to prevent condensation.
6. Plug the appliance into the outlet. The Power and Ready indicator lights will turn
red.
7. Press the “Select” button, then press the “+” or “-” buttons to set the desired
temperature
8. After the temperature has been set, press the “Select” button, then press “+” or “-”
to set desired cooking time according to the COOKIN G GUIDE.
9. When the desired temperature is reached, the indicator light will turn green.
10. Place basket back in the oil pot and cover with the lid.
11. When the timer runs out, the unit will turn off automatically.
12. Food will cause the oil temperate to decrease, illuminating the red light. There is
no need to increase temperature when this happens.
13. DO NOT touch control panel when food is fying. Escaping steam could burn you.
14. Replace oil every 20 uses or whenever oil appears to become thick or cloudy.
15. For re-cooked food: Higher temperature and a shorter cooking time.
For raw food: Lower temperature and longer cooking time.
CAUTION:
• DO NOT immerse unit in water.
• DO NOT use deep fryer with less oil than the MIN marker recommends.
• DO NOT touch control panel when food is frying.
4
CÓMO USAR SU CAFETERA
HOW TO USE (CONT)
Problem
Release of
unpleasant odors.
Troubleshooting
Potential Causes
The charcoal filter is
saturated.
The oil has deteriorated.
Solution
Replace the filter.
Change the oil every 5 to 6
uses or after 2 weeks.
A little steam release is
Release of steam from
Make sure the lid is
under the edge of the lid. normal. If there is excessive closed properly.
steam, the lid is not closed.
5
After Food is Fried
1. Turn the temperature control knob to the OFF position and unplug the deep fryer.
2. Remove the lid and hang the basket on the pot hook and allow the oil to drip back
into the oil pot. Warning: removing the lid will release hot steam, so use extreme
care in keeping your hands and face clear from where the steam releases.
3. Remove the basket and place the food on a plate. A paper towel on the plate aids
in the absorption of excess oil. Warning: Basket is extremely hot. Only carry
basket by its handle.
4. Place the basket back into the deep fryer.
5. Do not move the deep fryer until everything has completely cooled.
Replacing the Filters
- Your carbon filter should last about 6 months while your oil filter should last about a
year.
1. Unclip and remove the filter cover.
2. Take out both the white and black filter.
3. Place new filters in, making sure that the white filter oil rests on the metal surface
below the carbon activated filter (black filter).
Storing Your Deep Fryer
1. Allow the appliance to fully cool before storing.
2. Store in a dry place.
3. Keep the cord out of child’s reach.
375
Press "Select" key to choose
"Temperature" function
Temperature indicator
will turn on
250
Press "+" or "-" to select
desired temperature
11:35
Press "Start/Cancel" key to start
or cancel cooking process
Food remains soft and is Too much food has been Fry food is smaller
not crispy on the outside. fried at the same time.
quanities (especially
frozen food).
The cut potatoes have not Wash and dry
been washed with clean thoroughtly before frying.
water.
5
CÓMO USAR SU CAFETERA
French fries are
sticking.
HOW TO CLEAN
6
1. Before cleaning, make sure the unit is unplugged and everything is completely
cool. Do not attempt to move the unit when the oil is hot.
2. Remove the lid, basket and control box assembly.
3. Remove the oil pot and pour out remaining oil. If the oil is to be reused, it should
be filtered and placed in an appropriate container.
4. After removing the oil pot, the unit can be disassembled into several parts for easy
cleaning.
5. Wash the oil pot and fryer body with soapy water and a soft sponge or dishcloth.
Be sure to rinse and dry thoroughly.
6. Both filters need to be cleaned before cleaning the lid. To remove the filters, pull
off the plastic lid that covers them. Wash the lid with soapy water and a soft
sponge or dishcloth. Dry thoroughly and replace both filters and the lid that
covered them.
7. The control box assembly should be wiped with a paper towel, then cleaned with a
damp cloth and some mild soap.
8. At the end, use a dry cloth to completely dry the unit.
9. Reassemble the unit, making sure that the control box assembly fits into the
correct position.
6
CÓMO LIMPIAR LA CAFETERA
GARANTÍA LIMITADA
7
Aroma Housewares Company garantiza que este producto esté libre de
defectos de fabricación y en los materiales durante un período de un año de la
fecha comprobable de compra dendro de Los Estados Unidos.
Dentro de este período de garantía, Aroma Housewares Company, a su
opción, reparará o reemplazará gratuitamente cualquier parte que resulte
defectuosa, siempre y cuando el producto sea devuelto a Aroma Housewares
Company, con porte pagado y comprobante de compra y U.S. $8.00 para
gastos de envío y manejo. Sírvase llamar al número telefónico gratuito
que se menciona abajo para obtener un número de autorización de
devolución. Espere entre 2-4 semanas para recibir el aparato
nuevamente.
Esta garantía no cubre la instalación incorrecta, uso indebido, maltrato o
negligencia por parte del usuario. La garantía también es inválida en caso de
que el aparato sea desarmado o se le dé mantenimiento por un centro de
servicio no autorizado.
Esta garantía le ofrece derechos legales específicos, los cuales podrán variar
de un estado a otro y no cubre fuera de Los Estados Unidos.
AROMA HOUSEWARES COMPANY
6469 Flanders Drive
San Diego, California 92121
1-800-276-6286
L-V, 8:30 AM - 5:00 PM, Tiempo del Pacífico
Sitio Web: www.aromaco.com
7
AROMA HOUSEWARES COMPANY
6469 Flanders Drive
San Diego, California 92121
1-800-276-6286
M-F, 8:30 AM - 5:00 PM, Pacific Time
Website: www.aromaco.com
This warranty gives you specific legal rights which may vary from state to state and
does not cover areas outside the United States.
This warranty does not cover improper installation, misuse, abuse or neglect on the
part of the owner. Warranty is also invalid in any case that the product is taken
apart or serviced by an unauthorized service station.
Within this warranty period, Aroma Housewares Company will repair or replace, at
its option, defective parts at no charge, provided the product is returned, freight
prepaid with proof of purchase and U.S. $8.00 for shipping and handling charges
payable to Aroma Housewares Company. Before returning an item, please call the
toll free number below for return authorization number. Allow 2-4 weeks for return
shipping.
Aroma Housewares Company warrants this product free from defects in material
and workmanship for one year from provable date of purchase in the continental
United States.
LIMITED WARRANTY