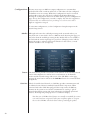
1
Owner’s Manual
Sigma SSP
Surround Sound Preamp/Processor
NOTICE
All of us at Classé take extreme care to ensure that your purchase will remain a prized investment. We are proud to inform you
that all Classé components have been officially approved for the European Community (CE) mark.
This means that your Classé product was subjected to the most rigorous manufacturing and safety tests in the world. The CE
mark certifies that your purchase meets or exceeds all European Community requirements for manufacturing consistency and
consumer safety.
This equipment has been tested and found to comply with the limits for a Class B digital device, pursuant to Part 15 of the
FCC Rules. Operation is subject to the following two conditions: (1) This device may not cause harmful interference, and (2)
This device must accept any interference received, including interference that may cause undesired operation. These limits are
designed to provide reasonable protection against harmful interference in a residential installation. This equipment generates,
uses and can radiate radio frequency energy and, if not installed and used in accordance with the instructions, may cause
harmful interference to radio communications. However, there is no guarantee that interference will not occur in a particular
installation. If this equipment does cause interference to radio or television reception, which can be determined by turning the
equipment on and off, the user is encouraged to try to correct the interference by one or more of the following measures:
•
•
•
•
Reorient or relocate the receiving antenna;
Increase the separation between the equipment and the receiver;
Connect the equipment into an outlet on a circuit different from that to which the receiver is connected;
Consult the dealer or an experienced radio/TV technician for help.
CAUTION: Changes or modifications to this equipment not expressly approved by the manufacturer could void the user’s
authority to operate the equipment.
This product incorporates copyright protection technology that is protected by U.S. patents ad other intellectual property
rights. Reverse engineering or disassembly is prohibited.
The information contained in the manual is subject to change without notice. The most current version of this manual will be
posted on our web site at http://www.classeaudio.com.
Classé marks the “CE” symbol indicating compliance of this device with the EMC (Electromagnetic
Compatibility) and LVD (Low Voltage Directive) standards of the European Community.
Classé complies with the European Parliament and Council Directive 2002/96/EC concerning Waste Electrical
and Electronic Equipment (WEEE). This product must be appropriately recycled or processed in accordance with
these directives. Consult your local waste disposal authority for guidance.
Classé products are designed and manufactured to comply with the Restriction of Hazardous Substances (RoHS)
as stated in the European Parliament and Council Directive 2002/95/EC.
2
Important Safety Instructions
1. Read these instructions.
2. Keep these instructions.
3. Heed all warnings.
4. Follow all instructions.
5. Do not use this apparatus near water
6. Clean only with dry cloth.
7. Do not block any ventilation openings. Install in accordance with the manufacturer’s instructions.
8. Do not install near any heat sources such as radiators, heat registers, stoves, or other apparatus (including amplifiers) that
produce heat.
9. Do not defeat the safety purpose of the polarized or grounding-type plug. A polarized plug has two blades with one wider
than other. A grounding type plug has two blades and a third grounding prong. The wide blade or the third prongs are
provided for your safety. If the provided plug does not fit into your outlet, consult an electrician for replacement of the
obsolete outlet.
10. Protect the power cord from being walked on or pinched particularly at plugs, convenience receptacles and the point
where they exit from the apparatus.
11. Only use attachments/accessories specified by the manufacturer.
12.
Use only with the cart, stand, tripod, bracket, or table specified by the manufacturer or sold with the
apparatus. When a cart is used, use caution when moving the cart/apparatus combination to avoid injury
from tip-over.
13. Unplug this apparatus during lightning storms or when unused for long periods of time.
14. Refer all servicing to qualified service personnel. Servicing is required when the apparatus has been damaged in any
way, such as power-supply cord or plug is damaged, liquid has been spilled or objects have fallen into the apparatus, the
apparatus has been exposed to rain or moisture, does not operate normally, or has been dropped.
15. To completely disconnect this apparatus from the AC mains, disconnect the power supply cord plug from the AC
receptacle.
16. Do not expose this equipment to dripping or splashing and ensure that no objects filled with liquids, such as vases, are
placed on the equipment.
17. The mains plug of the power supply cord shall remain readily operable.
The lightning flash with arrowhead symbol within an equilateral triangle is intended to alert the user to the
presence of uninsulated “dangerous voltage “ within the product’s enclosure that may be of sufficient magnitude
to constitute a risk of electric shock to persons.
The exclamation point within an equilateral triangle is intended to alert the user to the presence of important
operating and maintenance (servicing) instructions in the literature accompanying the product.
18. Batteries shall not be exposed to excessive heat such as sunshine, fire or the like.
WARNING: DO NOT INGEST BATTERY. CHEMICAL BURN HAZARD
The remote control supplied with this product contains a coin/button cell battery. If the coin/button cell battery is
swallowed, it can cause severe internal burns in just 2 hours and can lead to death.
Keep new and used batteries away from children. If the battery compartment does not close securely, stop using the
product and keep it away from children.
If you think batteries might have been swallowed or placed inside any part of the body, seek immediate medical
attention.
3
Contents
Introduction......................................................................................................6
Exceptional Design Features.............................................................................7
versatile connectivity..................................................................................7
superior performance.................................................................................7
clean, dedicated power..............................................................................7
room equalization and speaker control......................................................7
flexible GUI................................................................................................7
network connectivity and streaming audio.................................................7
extraordinary longevity...............................................................................7
Unpacking and Placement................................................................................8
unpacking your SSP....................................................................................8
Sigma SSP placement considerations..........................................................8
Rack-Mounting the Sigma SSP....................................................................9
warm-up/break-in period......................................................................... 10
operating voltage..................................................................................... 10
Front Panel......................................................................................................11
Rear Panel.......................................................................................................14
serial number.......................................................................................... 14
The Remote Control........................................................................................20
Initial Setup.....................................................................................................22
Understanding Surround Sound......................................................................25
how many channels?............................................................................... 25
matrix or discrete?................................................................................... 25
post-processing........................................................................................ 28
Using the Sigma SSP.......................................................................................31
source selection....................................................................................... 31
The Menu System...........................................................................................33
System Setup............................................................................................33
Source Setup........................................................................................... 34
Enable Source................................................................................... 34
Input Connector................................................................................ 34
Source Name.................................................................................... 35
Configuration.................................................................................... 35
Volume............................................................................................. 35
Favorite Mode................................................................................... 35
Pass-Thru.......................................................................................... 36
Digital Bypass................................................................................... 36
Configuration Setup................................................................................ 37
Configuration Name......................................................................... 37
Configure Outputs............................................................................ 37
Auxiliary Channels............................................................................ 38
Display Setup.......................................................................................... 38
Brightness......................................................................................... 38
Timeout............................................................................................. 39
On Screen Display............................................................................ 39
Volume Setup.................................................................................... 40
Max Volume..................................................................................... 41
Startup Volume................................................................................. 41
Mute Setup....................................................................................... 42
EQ Setup........................................................................................... 42
Tone Control Setup.................................................................................. 43
4
Network Setup......................................................................................... 44
Firmware Update via Network................................................................ 44
Remote Fkeys.......................................................................................... 45
Important note on Fkey use..................................................................... 45
Teach IR.................................................................................................. 46
Controls................................................................................................... 46
Tone Control............................................................................................ 47
Dolby Music............................................................................................ 47
Dolby Volume and Late Night................................................................. 48
Balance................................................................................................... 49
DTS Music............................................................................................... 49
Lip Sync.................................................................................................. 49
Video Preview......................................................................................... 49
Configurations......................................................................................... 50
Modes..................................................................................................... 50
Status....................................................................................................... 50
CAN-Bus................................................................................................. 50
features .................................................................................................. 51
hardware setup ...................................................................................... 51
using CAN-Bus........................................................................................ 52
CAN-Bus shared features ........................................................................ 53
configuration........................................................................................... 53
operate.................................................................................................... 53
AC status................................................................................................. 53
status....................................................................................................... 53
name....................................................................................................... 53
global brightness..................................................................................... 54
global standby......................................................................................... 54
CAN-Bus model-specific features............................................................ 54
PlayLink............................................................................................ 54
amp info........................................................................................... 55
event log........................................................................................... 55
Network Sources.............................................................................................55
Apple AirPlay..................................................................................................56
Troubleshooting..............................................................................................58
network/streaming troubleshooting.......................................................... 59
Care & Maintenace ...........................................................................................61
Specifications.....................................................................................................62
Dimensions........................................................................................................64
Installation Worksheet........................................................................................65
5
Introduction
Welcome to the Classé family!
Congratulations on your purchase of the Classé Sigma series Surround Sound
Preamp/Processor. It is the product of decades of design experience; capable of
extracting exceptional performance from a myriad of music and theater sources.
We are sure that you will enjoy it for many years to come.
Classé values its relationship with you and intends on supplying the highest level
of support along with this product. Registering your product will allow us to
keep in touch and will ensure that you are notified regarding any future updates
or options which become available. Furthermore, in the unlikely event that your
product needs service support, a product that is already registered doesn’t need
your original sales slip for proof of warranty.
You can register online at www.classeaudio.com or complete and mail the
registration card located in the separate warranty booklet.
Please take a few moments now to register your new Classé
SSP and record your serial number for future reference.
Please note that your Classé warranty is valid only in the country of purchase.
Alternatively, units may be returned to Classé in Canada for warranty service.
6
Exceptional Design Features
The Sigma SSP is an eight-channel preamp/processor, designed for music lovers
who also demand high performance audio when watching movies, concerts,
sporting events and more. Its connectivity and processing power accommodate
the ever increasing array of digital sources, allowing them to be accessed and
enjoyed without compromise.
versatile connectivity The Sigma SSP supports both balanced and single-ended connections for the
front Left and Right channels, single-ended for all others. A comprehensive set
of analog and digital inputs and control interfaces enable compatibility with
most contemporary audio system equipment.
superior performance Advanced circuit topologies, component parts, and circuit layout techniques
combine for superior audio performance. The analog and digital signal paths
have been optimized to ensure superior performance from every source.
clean, dedicated power A newly developed switch mode power supply employing PFC (Power
Factor Correction) provides the clean, high-current power required for best
performance. With PFC, the Sigma SSP operates at maximum efficiency
without disturbing other audio components sharing the same AC mains.
room equalization All home audio systems are affected by room characteristics. Sound reflections
and speaker control and sound absorption can create dramatic variations in the performance of your
system, particularly in the lower frequencies. The Sigma SSP features a system of
filters which, in the hands of an experienced acoustician, can help optimize the
performance of your system.
flexible GUI The front panel’s LCD touchscreen supports an extremely flexible and
versatile graphical user interface (GUI) while maintaining a clean, uncluttered
appearance. The Sigma SSP provides a range of controls that might otherwise
require dozens of buttons and knobs on the front panel. Despite this power and
flexibility, it remains simple to operate in day-to-day use.
network connectivity A rear panel Ethernet connection allows streaming audio via Apple’s AirPlay and
and streaming audio DLNA as well as full IP control via the Classé App or home automation systems.
extraordinary longevity Because Classé has developed highly refined circuits over many years, we have
vast experience in what works well over the long term. Using this knowledge
base, along with quantitative results derived from highly accelerated life testing
(H.A.L.T.), allows us to select only the most reliable parts. This attention to
detail and design allows us to manufacture products which stand the ultimate
test: time.
Just as past Classé products have done for their owners, we are certain that your
new Sigma SSP will give you many years of continuous enjoyment.
7
Unpacking and Placement
We have taken all precautions, and made every effort to make the Sigma SSP
simple and straightforward to install and use. Still, we recommend that you
take a few minutes to review this manual. Even if you are having the preamp/
processor professionally installed, you will want to know how to efficiently
operate it to its potential.
The Sigma SSP menu system includes features that provide you with a great deal
of fine-tuning. Still, we have no way to evaluate outside variables such as the
acoustical characteristics of your listening space and the associated equipment of
your audio system. Therefore, it is up to you to make the final audio adjustments
for the optimum performance of your system.
For this reason, we strongly encourage you to have your preamp/
processor installed and calibrated by your dealer. The experience,
training, and specialized equipment they have can make a profound
difference in the final performance of your system.
unpacking your SSP Carefully unpack the Sigma SSP according to the supplied instruction sheet. Do
not forget to remove all accessories from the carton.
Important!
Keep all packing materials. Transporting the Sigma SSP
without using the packaging specifically designed for it may
result in damage that is not covered under the warranty.
Sigma SSP placement Before installing your SSP, be sure to read the following placement suggestions.
considerations
• Do not place the SSP directly on the top surface of a conventional
power amplifier or any other heat source. Also keep the unit out of
direct sunlight.
• Place the SSP so that the IR window on the front panel is clearly
visible and not blocked.
• Position the SSP in a central and convenient location for both
visibility and use. The preamp/processor is the hub for all other
component connections and generally your primary interaction point.
In addition, by placing the unit close to the other system components,
you minimize the cable lengths and hence reduce the amount of noise
that is introduced into the system through the cabling.
• Leave adequate clearance behind the SSP for the AC cord and
connecting cables. We suggest six inches (15 cm) of free space to allow
cables sufficient room to bend without crimping or undue strain.
• Allow at least three inches (7.5 cm) of clearance above and to each
side of the SSP for ventilation. Do not obstruct the area around the
unit so that excess heat can dissipate through normal air circulation.
Important!
8
Obey all placement considerations. Not obeying the
placement considerations may result in damage that is not
covered under the warranty.
Rack-Mounting the
Sigma SSP
The Sigma SSP is designed to accommodate rack-mount installation. Professional
installation by an authorized Classe dealer is recommended.
To rack mount the SSP, remove the two side-panel screws, rotate and flip the side
panel to position the rack “ear” along the front of the SSP and re-install the sidepanel screws. Repeat for the side panel on the opposite side. Remove the feet from
the bottom of the SSP.
Carefully install the SSP into the equipment rack using the appropriate screws
for the type of rack. It is easiest if two people perform the installation to avoid
the possibility of dropping the SSP or otherwise causing damage. Please allow for
adequate ventilation, usually two rack spaces above the SSP will suffice.
Magnetically secured rack ear covers, provided in the accessory pack, may be used
to cover the screws and finish off the appearance.
9
warm-up/break-in period Your new Classé SSP delivers outstanding performance immediately. However,
you can expect to hear subtle improvements as it reaches normal operating
temperatures and breaks-in.
In our experience, you can expect the greatest changes within the first 72 hours.
After initial break-in, you’ll enjoy consistent performance levels for years to
come.
operating voltage The operating voltage of your Sigma SSP is 100-240 V, 50/60 Hz.
Important!
Attempting to operate your SSP from an incorrect AC voltage
rating may cause irreparable damage which may not be
covered by your warranty.
If you are not planning to use the preamp/processor for an extended period of
time, for example due to vacation or other travel, we suggest that you disconnect
it from AC power.
Make certain that the SSP is in Standby prior to disconnecting it.
Physically disconnect any and all valuable electronics from AC power during
electrical storms. A lightning strike anywhere near your home can generate a
tremendous surge on the AC mains that can jump across a simple power switch.
A surge from a lightning strike, which may be many thousands of volts, can
cause serious damage to any piece of electronics, no matter how well designed
and protected.
10
1
2
3
4
5
6
7
8
MENU
9
MUTE
SIGMA SSP
Front Panel
The front panel of the Sigma SSP is shown above. The numbers in the drawing
refer to the descriptions that follow.
1
Standby/On Button and Status Indicator LED
Pressing the Standby button toggles the SSP between operate and standby
mode – a low-power state which leaves the preamp/processor and outputs
inactive. If the Wake on LAN feature is enabled (see Network Setup) the
unit will respond to system commands via any of the supported control
protocols (IR input, LAN, CAN-Bus or RS-232) from Standby.
If the unit is already in Standby mode, pressing the Standby button fully
powers up the unit.
• LED On (Red) – the SSP is in Standby mode.
• LED turns cyan, then green, then off – the SSP is in the process
of power-up initialization.
• LED On (Blue), indicates the unit is in the operate mode.
• LED Off – the SSP is not getting AC power or the rear panel power
switch is Off.
NOTE: A power-save feature is enabled that puts the SSP into
standby after 20 minutes without a signal at its input.
2
IR Window
The location of the IR (infrared) transceiver for the remote control is
behind this window. In most cases, there must be a clear path between the
IR window and the remote control in order for the SSP to acknowledge
the remote control commands.
If the IR window is not in view, for example if it’s placed in a cabinet or
closet, then the rear panel IR input can be utilized for remote control. For
more details about this option, see the IR input description in the Rear
Panel section found later in this manual.
In addition to receiving IR commands, the SSP can also transmit IR
commands to third-party learning remote controls. For more details about
this option, refer to the Teach IR description in the Menu System section
found later in this manual.
11
3
Headphone Jack
The 1/4” (6.35mm) Headphone Jack accommodates stereo headphones.
Inserting a headphone plug mutes the main audio outputs.
4
USB Host Connector
The front panel USB connector allows the SSP to work with Apple’s
portable media devices such as iPad™, iPod® and iPhone® which require this
type of connection. The front panel USB connector accepts digital audio
from these devices as well as providing power for recharging them. Limited
control is also available for these devices using the navigation keys on the
SSP remote control.
The front panel USB connector is also used to load firmware updates.
When updates are posted in the software downloads section of the Classé
web site, they may be loaded onto a USB stick and plugged into the front
panel of the SSP. When the power is switched on from the rear panel, the
update will proceed automatically. Near the end of the update you will
be asked to touch the screen in three identified locations for touchscreen
calibration. Once complete, the light on the USB stick will extinguish and
the touchscreen will show the Home page. Remove the USB stick and
continue using the SSP. Remember that any subsequent setup changes are
stored when the SSP is put into standby.
5
HDMI Input
A front panel HDMI connector allows temporary connection to a portable
device such as a camera or laptop. To configure this connection, see Source
Setup in the Menu System section found later in this manual.
6
Menu On/Off Button
Press once to call up the main page of the menu system, which replaces
the normal front page or Home page of the Touchscreen. Press the Menu
button again to revert to the Home page.
The menu system gives you control over operational details including:
system setup options, various display options and custom installation
capabilities so that the Sigma SSP integrates smoothly into the most
complex systems. For more information, see the Menu System later in this
manual.
7Touchscreen
The front panel touchscreen is used for day-to-day operation of the SSP. It
is also used for setup and to display useful information as required.
8
Mute Control
The Mute button reduces the SSP volume by a pre-determined amount.
Pressing it a second time restores the volume to its previous level. This
behavior can be easily customized for very specific user requirements. (See
the section on Volume Setup for more information.)
NOTE: If you increase the volume using either the front panel
volume knob or the remote control while Mute is engaged, the
mute control disengages, and audio adjustments are executed
starting from the muted level. This is a safety measure to prevent
accidentally restoring the volume at unexpectedly high levels.
12
9
Volume Control Knob
The large rotary knob on the right side of the front panel controls the
system volume level. It is also used for adjustments such as balance and
input offset.
The volume knob increases and decreases volume in precise 0.5 dB
increments throughout most of the volume range. At extremely low
volume, the step size is increased somewhat to facilitate moving between
extremely low and normal listening levels. The volume range is from
-93 dB to +14.0 dB.
The volume control expresses the degree of attenuation or amplification
being applied to the incoming signal. Therefore, a setting of -23.0 indicates
that the signal is being attenuated by 23.0 dB. A volume setting of 0.0
indicates that no attenuation or amplification is being applied.
13
12 10
11
15
4
5
6
8
3 14
7
1
2
13
9
16
100-240V~
T2AH250V
CAUTION! TO REDUCE THE RISK OF ELECTRIC SHOCK, GROUNDING
OF THE CENTER PIN OF THIS PLUG MUST BE MAINTAINED
AVIS! POUR RÉDUIRE LE RISQUE DE CHOC ÉLECTRIQUE
LA FICHE CENTRALE DE LA PRISE DOIT ÊTRE
BRANCHÉE POUR MAINTENIR LA MISE À LA TERRE
THIS DEVICE COMPLIES WITH PART 15 OF THE FCC RULES.
OPERATION IS SUBJECT TO THE FOLLOWING TWO CONDITIONS:
(1) THIS DEVICE MAY NOT CAUSE HARMFUL INTERFERENCE, AND
(2) THIS DEVICE MUST ACCEPT ANY INTERFERENCE RECEIVED,
INCLUDING INTERFERENCE THAT MAY CAUSE UNDESIRED OPERATION.
1
HDMI IN
HDMI OUT
234567
GND
COAX 1
DIGITAL I/O & CONTROL
COAX 3
OPT1
OUT
OPT2
USB
ANALOG AUDIO IN
L 2L
ANALOG AUDIO OUT
3
L
C
SL
AUX 1
R
S
SR
AUX 2
ETHERNET
IN
RS 232
CAN BUS
IR
COAX 2
COAX OUT
R1
L1
R2
R3
FR
FL
Rear Panel
The rear panel of the Sigma SSP is shown above. The numbers in the drawing
refer to the descriptions in this section.
serial number You’ll find your SSP serial number adjacent to the AC Power Cord Input, as
shown in the graphic above. Please record this number for future reference.
And since you have found the serial number, please use it to register your
purchase, if you haven’t done so yet. We may use the information to advise you
of any updates or other items of interest. Registration is simple, so please register
online at www.classeaudio.com or fill out the registration card and drop it in the
mail.
1
HDMI Inputs
The Sigma SSP supports seven HDMI inputs, labeled 1 to 7. The SSP is
HDMI v.1.4 enabled, supporting 2D and standard 3D video formats at
resolutions up to 1080p @ 24/50/60 fps, Audio Return Channel (ARC),
Deep Color and x.v.Color (xvYCC).
Various versions of HDMI are used to support the features and
connectivity for many different audio and video standards. The HDMI
1.4 version supports all of the audio formats that the Sigma SSP is capable
of decoding. The Sigma SSP does no scaling or video processing and
passes video through at its native resolution subject to the limits described
above. Should you require higher resolution (e.g. UHD 4K or 8K) video
throughput, use one of the source’s HDMI outputs to connect it directly
to the display, connect the other to the SSP for audio decoding.
14
2
HDMI Output
The Sigma SSP HDMI output supports HDMI v1.4 featuring 2D and
standard 3D video formats at resolutions up to 1080p @ 24/50/60 fps,
Audio Return Channel (ARC), HDMI Ethernet Channel (HEC), Deep
Colour, x.v.Color (xvYCC) and provides a 2-channel SPDIF downmix of
the source material.
NOTE: HDMI is an interactive format, which can occasionally
cause format errors between the source devices and the output
display. If you encounter connectivity problems, troubleshooting
techniques that are effective with ordinary digital and analog
signals, such as bypassing the SSP and connecting the source directly
to the display, are inconclusive with HDMI signals. Consult your
Classé dealer for assistance.
3
Digital Audio Input - USB
The Sigma SSP supports digital audio sources up to 24-bit/192 kHz via
USB. The rear panel USB Device connector mates with a USB Host such
as a PC or Mac.
NOTE: PCs running Windows (All versions) require a special
driver to support the Sigma SSP as an audio output device. This
driver is posted on the Classé website under Service & Support >
Software & Codes.
4
Digital Audio Inputs - Coaxial
The Sigma SSP supports two digital audio inputs, with SPDIF connectors
labeled COAX1 to COAX3. These inputs accept PCM data streams up to
24-bits long and up to 192 kHz sampling frequency. We recommend using
cables that are optimized for digital audio signal transfer and that carry a
75Ω impedance rating. Your Classé dealer can help you with proper cable
selections.
5
Digital Audio Output - Coaxial
The Sigma SSP supports one digital audio coaxial output, with SPDIF
connector labeled COAX OUT. This output can pass PCM data streams
up to 24-bits long and up to 48 kHz sampling frequency.
6
Digital Audio Inputs - Optical
The Sigma SSP supports two digital audio inputs, with optical TOSlink
connectors labeled OPT1 and OPT2. These inputs accept PCM data
streams up to 24-bits long and up to 192 kHz sampling frequency. We
recommend using cables that are optimized for digital audio signal transfer.
Your Classé dealer can help you with proper cable selections.
TM
NOTE: The bandwidth limits of TOSlink™ components are very
much strained at a 192 kHz sampling frequency. For that reason
you may want to limit signals using the TOSlink™ connections to a
maximum rate of 96 kHz.
7
Analog Audio Inputs - Single-Ended
The Sigma SSP supports 2pr of RCA type connectors for single-ended
analog sources. They are labeled R2/L2 and R3/L3. An optional internal
Phono Preamp Module may be installed, converting input R2/L2 for use
as a phono input.
15
8
Analog Audio Inputs - Balanced
The Sigma SSP supports 1pr of XLR type connectors for balanced analog
sources. They are labeled R1/L1.
NOTE: This input conforms to the AES (Audio Engineering
Society) “pin 2 = hot” convention. The pin assignments of these
XLR-type female output connectors are:
Pin 1: Signal ground
Pin 2: Signal + (non-inverting)
Pin 3: Signal – (inverting)
Connector ground lug: chassis ground
Verify that the source components are compliant with this
convention (Classé components are compliant). If not compliant,
contact your Classé dealer for assistance.
NOTE: The Balanced and Single-Ended 2-channel analog audio
inputs can be set for either digital bypass mode (all DSP processing
switched off) or converted to digital format to allow multichannel
processing, bass management, tone control and/or equalization.
If no processing is applied, analog signals remain in the analog
domain, even if not specifically set to digital bypass.
9
IR Input
Use the IR input when the front panel IR window does not have a clear
line-of-sight with the remote control, for instance, when the Sigma SSP
is installed in a cabinet. Attach this input to an infrared repeater system
to route signals from the remote control to the SSP via a mono mini-jack
(3.5mm phono).
The list of available IR command codes can also be used in macros for
sophisticated remote control systems, facilitating the control of the
SSP in the larger context of the complete system.
10 IR Output
Use the IR output to pass IR commands from an external IR transmitter
through the Sigma SSP to another component, when necessary. The
output uses a mono mini-jack (3.5mm phono) with the same properties as
the diagram in the previous section.
11 RS-232 Port
The primary purpose of the RS-232 port is to support the use of external
commands to allow remote control of the Sigma SSP by such systems as
AMX , Control 4, Creston and Savant®. For more information about
these systems, contact your Classé dealer.
®
16
TM
For more information, please contact your dealer and ask about home
automation systems.
RJ-45 - DB9 female adaptor
If your RS-232 control system uses a cable with a male DB9 connector,
you will need to buy or build an adaptor to convert the RJ-45 female to a
DB9 female. Standard RJ45-to-DB9 female connectors come with RJ-45
pins and connections as below. Wire the DB9 adaptor according to this
diagram and table.
RJ-45
Pin-1 = DSR
Pin-2 = DTR
Pin-3 = CTS
Pin-4 = GND
Pin-5 = RXD
Pin-6 = TXD
Pin-7 = N/C
Pin-8 = Power Input
DB9
Pin-1 = N/C
Pin-2 = RXD
Pin-3 = TXD
Pin-4 = DTR
Pin-5 = GND
Pin-6 = DSR
Pin-7 = N/C
Pin-8 = CTS
Pin-9 = Power Input
Remarks: The Cat 5 cable that plugs into this adaptor and then into the
rear panel RJ-45 port must use pin-to-pin wiring (pin one to pin one, two
to two and so on).
12 CAN-Bus Input and Output
CAN-Bus (Controller Area Network) allows several Classé components to
be connected together for simultaneous operation, such as switching from
On to Standby. Using the CAN-Bus IN and OUT connectors, the Classé
components can be daisy chained together and controlled via the CANBus interface.
NOTE: The final component in the daisy chain MUST have a
termination plug inserted into the CAN-Bus output.
For more information, refer to the CAN-Bus section found later in this
manual.
17
13 7.1-Channel Analog Outputs
The Sigma SSP supports eight channels of analog audio output, with both
balanced (XLR) and single-ended (RCA) connections available for the
Front Left and Front Right channels. Connect the FR or R and FL or L
outputs to the Right and Left amplifier channels respectively. Connect C
to the Center channel, S to the Subwoofer and SL and SR to the Surround
Left and Surround Right channels respectively.
The AUX 1 and 2 outputs are configurable and can be used for the
following purposes:
• Rear channels in a 7.1 channel system where AUX 1 is the Rear
Left and AUX 2 is the Rear Right channel;
NOTE: The Rear L/R connectors are only active when the SSP
output is setup for a 7.1-channel surround system and the audio
stream or the selected surround processing mode are providing
Rear channel signals.
• Height Channels where AUX 1 is Height L and AUX 2 is Height R;
NOTE: The Height L/R connectors are only active when the SSP
output is setup for a multichannel system where the audio stream
or the selected surround processing mode are providing Height
channel signals.
• Two-Channel down-mix of the source for use by another system
where AUX 1 is the Left and AUX 2 is Right channel.
• Assigned to mirror the Front L/R speakers for use in a power
biamplification arrangement where AUX 1 is the Left channel
and AUX 2 is the Right channel.
For additional details on setting up the Auxiliary channels, see the
Configuration Setup description in the Menu System section found later in
this manual.
NOTE: The Balanced (XLR) Output pin assignments adhere to
the AES (Audio Engineering Society) “Pin 2 = hot” standard. The
XLR male outputs carry the following pin assignments:
Pin 1: Signal ground
Pin 2: Signal + (non-inverting)
Pin 3: Signal – (inverting)
Connector ground lug: chassis ground
Refer to the operating manuals of your balanced-input power
amplifiers to verify that the pin assignments of their input
connectors adhere to this standard (Classé power amplifiers are
compliant). If your amplifiers are not compliant, it may not pose a
problem, but ask your Classé dealer for assistance.
18
14 Ethernet Connector
The Ethernet connection is used to enable streaming of audio using Apple’s
AirPlay or DLNA. This connection also supports IP control for using the
Classé App with an iOS device such as an iPad, iPhone or iPod touch,
and/or home automation system to control the Sigma SSP via your home
Network.
15 Main Power On/Off Switch
This switch connects and disconnects the Sigma SSP from AC.
16 AC Power Cord Input
The detachable three-conductor AC power cord and the socket into
which it connects conform to rigorous standards developed by the IEC
(International Electrotechnical Commission).
Danger!
Your Sigma SSP contains potentially dangerous voltages and
current capabilities. Do not attempt to open it! There are no
user-serviceable parts inside. All service must be referred to a
qualified authorized Classé dealer or distributor.
19
The Remote Control
1
Your Sigma SSP includes a remote control for the most basic operation of
the SSP and transport control of USB and Network-connected devices. The
remote control is shown on the left. The numbers in the drawing refer to the
descriptions that follow.
1
3
2
F1
F2
• Mute reduces the audio output of the SSP to the preset mute
level. See the Mute Setup description in the Menu System
section found later in the manual for further instructions.
• Source Select steps sequentially through the available enabled
sources.
• Standby switches the SSP between the Standby and Operate
states.
F3
4
20
Basic Functions
The three buttons along at the top of the remote control groups the
following basic control functions:
2
+ and - Buttons
The + and - buttons function normally as Volume Control buttons when
the SSP is on the home page but serve as up/down navigation commands
when using the remote to navigate the Menu system. You can customize
selected features of the volume level. Refer to the Volume Setup description
in the Menu System section found later in the manual for further
instructions.
3
Transport Control Buttons
The remote control contains three centrally located buttons, providing
basic transport controls to USB- and Network-connected sources. These
buttons perform the familiar play/pause, scan/skip forward and scan/skip
backward commands.
4
Function Keys (F1 to F3)
The last three buttons on the remote control are the Function buttons,
or Fkeys, which provide additional flexibility to the Sigma SSP remote
control. Think of them as “favorite” buttons that provide direct access to
specific functions or commands not covered by the other buttons. Refer to
the Remote Fkeys description in the Menu System section found later in
the manual for more information.
5
Using the Remote and Accessing the Battery
The IR Remote ships with a battery already installed. This battery
CR2032, 3V is covered by a protective film that prevents it from
discharging during storage. To use the remote for the first time, open the
cover by inserting a large paperclip or similar tool into the hole on the
back cover at an angle to depress the button and release the catch. While
holding the button depressed, slide the rear cover relative to the front
cover as shown. Remove the protective film and slide the two halves of the
remote back together.
21
Initial Setup
Your Sigma SSP Stereo Preamp/Processor is delivered with default factory
settings to facilitate initial setup. But we highly recommend that you work with
your Classé dealer for the final setup of the preamp/processor. Your dealer’s
knowledge and experience with Classé products will ensure that your audio
system is optimized for your listening space.
However, if you can’t wait to get started, this section is designed to assist you in
setting up and becoming familiar with the Sigma SSP hardware. Once the initial
setup is complete, be sure to read the rest of this manual to familiarize yourself
with the daily operation and customizable features of your SSP.
Step 1 Connect the SSP and all system components to AC power.
Important!
Make sure everything–especially your power amplifier(s)–is
turned off before connecting power!
Connecting all system components to AC power, before making any
interconnections between components, ensures that every component has a solid
connection to ground. This lessens the chances of a static discharge that may
damage delicate electronics or your loudspeakers.
Step 2 Choose the appropriate cables.
Before you start connecting components together, let’s take a minute to discuss
the cables you will be using. The audio outputs available on the rear panel
include both balanced XLR connectors and unbalanced, or single-ended, RCA
connectors.
Single-ended RCA audio connections are the most popular means of
transmitting audio in consumer electronics. As long as you use high quality, low
capacitance cables, single-ended connections can provide excellent results.
If implemented properly, balanced audio connections between components can
provide the best analog signal connection because they effectively double the
signal strength. More importantly, as compared to single-ended connections,
they significantly improve resistance to common mode noise, therefore
enhancing audio transparency, detail, and dynamics. For this reason, the
Left and Right channel outputs of the Sigma SSP are available in a properly
implemented balanced configuration, allowing you to maximize performance
for these critical channels with both two-channel music and multichannel audio
sources. To fully realize these potential benefits, high quality interconnect cables
are required.
Please consult your local Classé dealer for advice on which cables are best suited
for your system.
22
Step 3 Connect source components to the SSP rear panel.
If necessary, refer to the Rear Panel section in this manual for a detailed
description of each connector found on the rear panel. Your local Classé dealer
can also provide useful suggestions for what source components you should add
to your system and guidance in setting them up.
Make sure you keep a detailed record of the rear panel
connectors that you used while connecting the source
components!
You’ll need to know what connector(s) each source is attached to when you enter
the setup menus. An Installation Worksheet is included at the end of this manual
to assist you.
NOTE: In the Sigma SSP default settings, eighteen input
connectors are associated with corresponding source selections
within the Source Setup menu. Since most users will have fewer
sources connected, the Source Selection page(s) can be simplified by
unchecking the Enable Source box for each unused input. Doing so
removes the corresponding Source button from the Source Selection
page. See the Menu System section for details.
Step 4 Connect the power amplifier(s) to the Sigma SSP rear panel.
Important!
Verify that the power amplifier(s) is plugged in but powered
OFF before connecting to the SSP!
For the Front Left and Right channels, we recommend using high quality cables
with XLR connectors.
NOTE: These pin assignments are consistent with the standards
adopted by the Audio Engineering Society. Refer to the operating
manuals of your balanced-input power amplifiers to verify that the
pin assignments of their input connectors correspond to the Sigma
SSP. If you are using Classé amplifiers, this note does not apply.
If needed, the pin assignments of the XLR-type male output
connectors are:
Pin 1: Signal ground
Pin 2: Signal + (non-inverting)
Pin 3: Signal – (inverting)
Connector ground lug: chassis ground
23
Connect the FL & FR Outputs, either RCA or XLR, from the rear panel of
the SSP to the corresponding inputs on your amplifier(s). Connect Center,
Surround Left and Surround Right channels to the corresponding inputs on
your amplifier(s).
• If you are using a subwoofer, connect the SSP subwoofer output to
the input of the designated amplifier or powered subwoofer.
NOTE: Make sure connections from the subwoofer output go only to an
amplifier connected to a subwoofer or a powered subwoofer, as low frequency
signals can damage a small speaker not designed for high output bass
reproduction.
When connecting a cable, make sure the cable has a good connection and is
firmly attached to the rear panel connectors on both the amplifier and the
SSP.
The Sigma SSP also provides two Auxiliary analog audio outputs. See the
section on Configuration Setup for more details about the Auxiliary outputs. If
used, connect the AUX output(s) to its corresponding amplifier(s).
Step 5 Connect the loudspeakers to the amplifiers.
Important!
Verify that the power amplifier(s) is plugged in but powered
OFF before connecting to the SSP.
Connect each loudspeaker to its designated amplifier channel. Pay close
attention to the phase of the speaker connections – always connect an amplifier’s
red (+) terminals to the red (+) terminals of the loudspeaker. Likewise, connect black
(–) terminals to black (–) terminals.
Step 6 Power up the system!
Now you are ready to power up your Sigma SSP and your audio system.
• Turn the rear panel power switch of the SSP to ON. The Standby
LED will turn red.
• Press the standby button containing the LED. The initial power-up
cycle of the SSP only takes a few seconds.
• When the power-up cycle is complete, the SSP enters Operate mode
and the touchscreen becomes active.
• Press the Standby button to toggle the SSP into and out of Standby.
The physical setup of the Sigma SSP and system components is complete.
24
Understanding Surround Sound
Today’s sophisticated surround sound systems have spawned a bewildering array
of technologies and acronyms. In this section, we’ll give you a basic overview of
what all that jargon means. As a result, you’ll be better equipped to use your SSP
and associated source components to their best advantage.
how many channels? Although formats with even more channel options will become increasingly
available, today’s home entertainment systems typically reproduce soundtracks
that include anything from one to eight separate channels of information.
Examples include:
• Watching mono movies, such as Casablanca or The Wizard of
Oz, having only a single channel of audio information in the
soundtrack.
• Listening to a music CD, which is typically stereo or 2-channel
sound.
• Watching the original Star Wars in the original Dolby Surround
Pro Logic format, which is four channels of information derived
from two channels.
• Watching a recent movie or TV show in a 5.1-channel or
7.1-channel surround format, which identifies that the source
material has either five or seven full-range signals for the front,
surround, and in a 7.1 recording, rear speakers, plus the .1
signal for the Low Frequency Effects, also referred to as the LFE
channel, for the subwoofer.
Your SSP handles all of these tasks with ease, switching to an appropriate
processing mode automatically upon sensing the nature of the incoming signal.
However, you may still have to select from the available choices. For example,
disc-based media often contains multiple soundtracks with varying numbers of
channels and even different languages. Because you may have to choose the one
you want to hear using the menu of the media itself, you should know what
jargon you’ll likely see.
matrix or discrete? When movie-makers first wanted to expand beyond simple stereo (left and right
audio channels), they had a problem - the entire infrastructure on which they
depended was stereo.
®
Dolby Laboratories solved that problem with a system called Dolby Surround
that embedded two extra channels of audio sound into the existing stereo pair
so that specialized circuitry could retrieve the extra information with reasonable
accuracy. This technique, whereby channels are mixed together with the
intention of separating them later, is called matrix encoding and decoding.
The disadvantage, as you might expect, is that it is difficult to completely and
perfectly separate two channels that have been mixed together.
25
By contrast, modern soundtracks use discrete digital channels of information.
That is, each speaker has a distinct signal that is completely independent of every
other channel. This approach is clearly more desirable, since it gives the moviemakers more creative control over the quality of your experience. Musicians also
prefer discrete formats, since it allows them to place their instruments and voices
with greater precision, to create the musical effects they desire.
There are many multichannel signal types and processing modes available.
Table1, below, identifies the most common signal formats and further down
Table 2 provides descriptions of the various processing modes available on the
SSP to help you sort out some of the possibilities.
Table 1: Common audio signal formats encountered in a multichannel system
26
Name
# Chs
Matrix/Discrete
Comments
Analog
1 or 2
Discrete
Mono or Stereo available from most
sources as a secondary output; With
the exceptions of Turntables and
SACD players, sources should typically
be connected to the SSP by means of a
digital connection.
Dolby Surround
Pro Logic
4
Matrix
The original matrix decoding system
designed to squeeze four channels into
two and then retrieve them.
Dolby Digital
(formerly AC-3)
Up to 5.1
Discrete
The most common modern digital
signal type, used in HDTV, DVD,
etc. It forms the core audio portion
of the higher performance Dolby
Digital signal/stream types. Up to 5.1
channels at 48 kHz.
Dolby Digital
EX
6.1
Discrete
Same as Dolby Digital but with an
extra or 7th channel recorded onto
the media; used to create a rear center
channel or two mono rear channels in
systems configured for 7.1 channels.
EX decoding is normally applied
automatically but must be selected
manually for EX recordings made prior
to late 2001.
Dolby Digital
Plus
up to 7.1*
Discrete
An expansion of the Dolby Digital
core, the Dolby Digital Plus codec
supports higher bit rates, limited
to 7.1 channels at 48 kHz by the
Blu-ray Disc format* while still
remaining compatible with older
5.1 formats. This is often used when
there is not enough room on the disc
to accommodate a Dolby TrueHD
soundtrack.
Dolby TrueHD
up to 7.1*
Discrete
A true High Definition audio codec,
where the audio is bit-for-bit identical
to the high resolution studio master,
supporting sample rates up to 192
kHz per channel. Similar to Dolby
Digital Plus, the track contains a 5.1
code for backward compatibility.
DTS
up to 5.1
Discrete
Similar to Dolby Digital in practice
though it uses different technology
and requires a somewhat higher bit
rate. Modern SSPs and AVRs are
equipped to decode both.
DTS-ES Matrix
6.1
Mostly Discrete A center rear channel is matrix
encoded into the L&R Surround
channels. All other channels are
discrete.
DTS-ES
Discrete
6.1
Discrete
All 6.1 channels including the rear
channel are discrete. For 7.1 channel
configurations the two rear channels
share the same signal.
DTS-HD High
Resolution
Audio
up to 7.1
Discrete
An expansion of the DTS core
audio, provides for higher bit
rates for up to 7.1 channels. This
is typically used when there is
not enough space on the disc to
accommodate a DTS-HD Master
Audio soundtrack.
DTS-HD
Master Audio
up to 7.1
Discrete
A true High Definition audio
codec, where the audio is bitfor-bit identical to the high
resolution studio master, supporting
sample rates up to 192 kHz per
channel. Similar to DTS-HD
High Resolution Audio, the track
contains a 5.1 code for backward
compatibility.
LPCM
up to 7.1
Discrete
This format is used on stereo CD
and DVD-A 5.1 channel recordings
as well other other sources including
many uncompressed music files. It
supports true, uncompressed high
definition recordings up to 24-bit /
192 kHz.
27
post-processing The first thing the Surround Sound Preamp/Processor does is recover the various
channels delivered by your source with accuracy and fidelity. This might be a
single-channel mono signal, a Dolby True HD soundtrack with 7.1 channels, or
anything in between. The signal may have been delivered via satellite receiver,
cable set-top box, Blu-ray Disc, or even downloaded from the Internet.
Once the SSP has decoded the selected signal, various time delay and level
offset adjustments are made to optimize the signal for playback on your system.
These are the most basic kinds of post processing. Others include tone control
and equalization as well as a variety of special post-processing modes the SSP
makes available. These additional post processing modes are particularly useful
for utilizing additional surround speakers with limited audio track sources. For
instance, processing a
2-channel stereo source with Dolby Pro Logic IIx can generate a 7.1-channel
output so that you can enjoy the audio source in full surround sound.
Note: Many movie soundtracks are recorded with 5.1 discrete channels, so post
processing is required in order for playback in a 7.1 channel system to utilize all
of the channels. Choosing Dolby PLIIx or DTS Neo6, for example, will generate
the extra rear channel signals necessary. Without post processing applied, only the
original 5.1 channels will play, leaving the rear channels silent.
Table 2: Modes
28
Name
# Channels
Comments
Mono
1
Combines all channels to a single
Monaural channel for playback
through the Center speaker or,
lacking a Center, a mono signal
shared equally between Front Left
& Right.
Stereo
2
Combines all left channel signals
into a single left channel signal for
playback from the Front Left and
similarly combines all right channel
signals for playback from the Front
Right. The center channel signal is
divided equally between Front L
& R.
Party
up to 7.1
Combines all channels for playback
from all speakers in the selected
configuration. This mode is
intended to more or less evenly fill
the room with sound for situations
where no sweet-spot listening is
required.
Mono Plus
up to 7.1
Combines all channels to a single
Monaural channel for playback
through all channels in the selected
configuration. Levels are adjusted
for each speaker group (surrounds,
rears, center) to create a balanced
playback mix.
Movie Plus
up to 7.1
Takes 2-channel sources and creates
multichannel playback for up
to 7.1 channels with the relative
speaker levels balanced for surround
envelopment appropriate to movies.
Music Plus
up to 7.1
Takes 2-channel sources and creates
multichannel playback for up
to 7.1 channels with the relative
speaker levels balanced for surround
envelopment appropriate to music.
In practice, the result is a more
forward-balanced soundfield than
the Movie Plus mode.
Dolby PLII
up to 5.1
Takes 2-channel sources and creates
multichannel playback for up to 5.1
channels.
Dolby PLIIx/
PLIIz Music
up to 7.1
An expansion of the original PLII
decoder; In the SSP, creates up to
7.1 channels from a two-channel
source with either rear channels
(PLIIx) or height channels (PLIIz)
enabled. The channel balance
algorithm is optimized for Music
playback. May be customized
by adjusting parameters such as
Dimension and Center Width, and
enabling Panorama mode.
Dolby PLIIx/
PLIIz Movie
up to 7.1
An expansion of the original PLII
decoder; In the SSP, creates up to
7.1 channels from a two-channel
source with either rear channels
(PLIIx) or height channels (PLIIz)
enabled. The channel balance
algorithm is optimized for Movie
playback.
Dolby PLIIx/
PLIIz Matrix
up to 7.1
An expansion of the original PLII
decoder; In the SSP, creates up to
7.1 channels from a two-channel
source with either rear channels
(PLIIx) or height channels (PLIIz)
enabled. Matrix mode forgoes the
steering part of the PLIIx/PLIIz
algorithm to improve performance
with certain source material (e.g.
choral music).
Dolby PLIIx/
PLIIz Game
up to 7.1
An expansion of the original PLII
decoder; In the SSP, creates up to
7.1 channels from a two-channel
source with either rear channels
(PLIIx) or height channels (PLIIz)
enabled. The channel balance
algorithm is optimized for Games.
29
30
Neo6
up to 6.1
Creates up to 6.1 channels from
a two-channel source. The sixth
channel is used for Center Rear but
my also play as two mono channels
in systems configured with L&R
Rear speakers.
Neo6 Music
up to 6.1
Creates up to 6.1 channels from
a two-channel source. The sixth
channel is used for Center Rear
but my also play as two mono
channels in systems configured with
L&R Rear speakers. The channel
balance algorithm is optimized for
music playback. A Center Width
adjustment is available to change
the relative balance of the Center
channel relative to the Left and
Right.
Neo6 Cinema
up to 6.1
Creates up to 6.1 channels from
a two-channel source. The sixth
channel is used for Center Rear but
my also play as two mono channels
in systems configured with L&R
Rear speakers. The channel balance
algorithm is optimized for movie
playback.
Discrete
up to 7.1
Sometimes thought of as a purist
mode, only the number of channels
present in the original signal are
played back with their relative
balance and delays preserved. In
practice, this will mean that a 5.1
channel Blu-ray Disc soundtrack
will play back only those 5.1
channels, so a system configured
with rear or height channels will
produce no sound from those
speakers.
Dolby EX
up to 6.1
Generally applied to a 5.1 channel
signal to generate a rear channel
signal; For 7.1 channel systems with
rear channels configured, the extra
channel is played in both Rear Left
and Rear Right channels.
Neo6 MusicES
up to 6.1
Similar in concept to Dolby EX,
but with channel balance altered to
enhance playback for music sources.
Neo6
CinemaES
up to 6.1
Similar in concept to Dolby EX,
but with channel balance altered to
enhance playback for movie sources.
Using the Sigma SSP
The Sigma SSP’s versatile touchscreen LCD supports your day-to-day operations
and provides access to a flexible menu system for controls and setup functions
that aren’t accessed as often. This section of the owner’s manual outlines the use
of the touchscreen in routine operation of the system.
When you bring the SSP out of Standby mode, the touchscreen displays the
Home page, as shown below.
The Home page displays the volume in large font which is easily visible from
across a room. The selected source appears at the bottom of the screen. At the
bottom center of the screen the format of the incoming signal is displayed.
This displays the sampling frequency of digital sources as well as the file format
(ALAC, WAV, FLAC, etc.) of streaming Network sources or Bypass if so selected
for analog sources. If Pass-Thru is selected for either digital or analog sources, the
volume display will read 0.0 and be greyed out (since the volume control is not
active in this mode). This page can be quickly accessed at any time by pressing
the Home icon on the touchscreen display.
Source Selection Touching the screen when on the Home page brings up the Source Selection
page. The number of source buttons appearing here corresponds to the number
of inputs that have been set up and are “enabled.” A maximum of nine sources
may appear on one page. If more are enabled, they will be available on the next
page by touching the
button in the upper right corner of the page. See
the section on source setup in the Menu System. The Sigma SSP has up to 18
selectable source buttons which are all interchangeable.
31
Touch any source button on the touchscreen to select it as the current source.
The selected source button is shaded. If the source you want to choose is not on
this screen (and you have more than nine source buttons enabled), press the
button for the next page of sources. Or, press the
button to return to the
previous page.
The Sigma SSP comes from the factory with eighteen source buttons labeled and
enabled. To change the default settings and labels or to disable unused buttons,
see the Menu System.
32
The Menu System
The comprehensive menu system provides setup and configuration controls for
the Sigma SSP. These installation-specific features let you customize how the SSP
works within the context of your particular system. Changes are made on-the-fly,
which allows you to quickly set up and modify settings without constantly being
asked if you’re sure you want to make the change and pressing enter to save. The
SSP stores settings in non-volatile memory whenever it is put into standby, so
it’s a good practice to put the unit into standby after making changes. In normal
daily operation this happens anyway, but if you want to be sure a loss of power
doesn’t erase your changes, putting the SSP into standby will give you extra
assurance.
Pressing the Menu button on the front panel (or if an Fkey on the remote
control has been programmed to perform the Menu command) will open the
main Menu page, which is divided into six sections as shown below.
At the top right of the menu pages you may find a
button which uses the
arrow icon when additional menu options are available, and/or a Home button
for returning to the Home page. When on the main Menu page, pressing the
Menu button returns to the Home page. If you are on a page within the Menu
System, pressing the Menu button returns you to the main Menu page. When
you navigate beyond the main Menu page a return or back button using the
icon appears on the upper left corner of the page. This returns you to the
previous page.
System Setup Touching the System Setup button on the main Menu page opens the System
Setup page, which contains ten setup options, the first nine of which are shown
below, with Teach IR located on the next page.
33
From the System Setup menu, you can:
•
•
•
•
•
•
•
•
•
tailor your inputs to your particular source components
configure the system to take best advantage of your loudspeakers
tailor the display to your preferences
set volume control parameters
enable and setup the Parametric EQ
setup Tone Control parameters
view the unit’s Network IP address/status and settings
choose Remote F key functions
teach IR commands
Source Setup Each of the 18 source buttons supported by your Sigma SSP can be customized
in several ways to enhance system performance or to simplify operation. The
source select page is dynamic in that it shows up to nine sources on a single page.
If six or fewer are enabled, then the page shows six somewhat larger buttons
and if three or fewer are enabled, it shows only three large buttons. Press the
button for the source you want to set up. The setup page for that source includes
buttons for assigning the input connector(s) and naming the source, choosing
a default speaker configuration, setting an input offset, selecting the Pass-Thru
feature or choosing the Digital Bypass path.
Enable Source This check box activates/deactivates source buttons. If the Enable Source box is
checked, then the source is enabled. If the Enable Source box is NOT checked,
then the source is considered not enabled and is so identified on the Source
Selection page.
Disabling unused sources is a good way to simplify source selection. The
Source Selection page is dynamic, adjusting the number and size of buttons to
correspond to the number that are actually being used or enabled. The buttons
arrange themselves into groups of either three, six or nine buttons on the Source
Selection page.
Input Connector Choose the input connector(s) to be associated with this source button. Any
source button may be associated with any input connector(s). Also, multiple
source buttons may be assigned to the same connector(s).
34
Source Name The Source Name button provides a way to customize the names of the sources
as displayed on the Source Selection screen(s). For example, if you have an
outboard phono stage plugged into the R2/L2 RCA analog inputs, you might
want to rename the source button Phono to make it easier to remember.
To change source names, use the keyboard on the touchscreen. Note that the
size of the source buttons varies depending whether you have 1-3, 4-6 or 7-9+
sources enabled, so the length of name that may be fully displayed on the button
will likewise vary.
After entering the source name, press Enter on the keyboard to save the change.
Configuration The Configuration button allows you to assign one of the up to six
configuration options (see Configuration Setup) as the default for the source
button being set up. Whenever this source is selected, that configuration will be
employed. You might set up one source such as a disc player to have a default
configuration with a subwoofer crossed over at 80 Hz for movies. You may then
set up another source button for the same disc player with a different default
configuration, perhaps one with a subwoofer crossed over at 40 Hz, for music.
Configurations are speaker setups, and are discussed in more detail later in this
section.
NOTE: The default Configuration assignment can be temporarily
overridden from the Configurations button on the main Menu page. See
the section, Configurations, later in this manual, for more details.
Volume Two features are included that relate to the playback level of each source.
Input Offset is used to ensure that all sources playback at comparable level.
There can be significant differences in output levels, especially among analog
sources, which can lead to unexpected changes in volume when switching
among them. The Sigma SSP provides an input offset adjustment range from
-10 to +10 dB.
Dolby Volume may be enabled to be engaged independently for each source
whenever that source is selected. For more information on Dolby Volume, see
the description later in this manual in the section on Controls.
Favorite Mode The Sigma SSP offers many levels of customization, designed to make everyday
operation easy and uncomplicated. The Favorite Mode feature is just such an
example. Each source button may be setup to automatically choose which mode
the SSP uses to process signals arriving at its input connector. A source used
for watching movies may have a different Favorite Mode assigned than one
used primarily for music listening, for example. In this way, mode selection is
not required as a separate step every time a source is changed. Just choose the
source and the pre-assigned Favorite Mode is automatically selected for it. A
two-channel music source might have stereo as its Favorite Mode while a Blu-ray
player is more likely to have a multichannel surround mode assigned.
35
Choosing Discrete as the Favorite Mode will output whatever number of
channels the original signal contains. Note that for 7.1 channel systems with a
7.1 channel configuration selected, using Discrete mode may result in only 5.1
channels playing if only 5.1 channels are present on the original media. You
might think of this as a purest mode, but most users who have 7.1 channels
installed want to have sound from all of them, at least when listening to
multichannel. For this reason, post processing modes like Dolby EX or Neo6
Cinema may be chosen as Favorite Modes since they will generate information
for the additional channels whenever they are not present in the original media.
If the signal happens to be a 7.1 channel discrete format, then the SSP will
process it that way.
Pass-Thru Selecting Pass-Thru locks the volume at 0.0 dB for this source and passes the
signal through the preamp without changing its level. This feature is useful
to avoid having two volume controls active such as when the preamp sits
between a whole house digital music server system and the home theater system
amplifiers. Note that the Pass-Thru mode is available for digital as well as analog
sources.
Digital Bypass Digital Bypass is available for sources associated with analog input connectors.
Choosing Digital Bypass will switch off all digital signal processing circuitry and
leave the signal entirely in the analog domain. When Digital Bypass has been
selected, DSP features are not available. These features include Tone Control,
PEQ, Mono and the Bass Management (subwoofer output). If a configuration
with a subwoofer enabled is called, the Digital Bypass setting will override the
bass management settings in the configuration, leaving the L&R signals analog
and full range with no subwoofer output. If Digital Bypass is NOT selected,
analog signals remain in the analog domain unless a feature that requires DSP is
called.
NOTE: It is possible to generate a subwoofer output for an analog source without
converting that source to digital. If Digital Bypass is NOT selected, the HP Filter
is NOT selected in the configuration and no other DSP functions are called, then
L&R signals will remain in the analog domain while a subwoofer output is generated
according to the crossover and slope settings for that configuration.
36
Configuration Setup The Configuration Setup page allows you to define up to six different speaker
configurations. Touch the button for the specific configuration you want to set
up to open its configuration setup menu. The page contains buttons for naming
the configuration and enabling balanced (XLR) and single-ended (RCA) outputs
for Front L&R, and independently enabling Center, Subwoofer, Surround and
Auxiliary outputs. Choosing a subwoofer output causes a Bass Management
button to appear. The same menu is used to set up each configuration.
Configuration Name As with naming sources, press the Configuration Name button to access the
keyboard used for customizing the configuration name. Press Enter after making
your changes to save the new name.
Configure Outputs Choose the output connectors you want enabled with this configuration. If
a subwoofer is used, a Bass Management button appears, allowing you to set
crossover frequency and slope.
If you also want to High-Pass Filter any of the main output channels, check the
box for HP Filter corresponding to the speaker group for which you want the
HP filter setting to apply. The crossover will pass the higher frequencies and
correctly direct the low frequencies to the subwoofer(s) based on your frequency
and slope settings. If this box is unchecked, the corresponding channels’ signals
will pass full range.
37
Auxiliary Channels The Sigma SSP has two auxiliary channels that can be utilized for bi-amping
the L&R speakers, adding Rear channels, adding Height channels for the Dolby
PLIIz mode or providing a two-channel down-mix for an analog recorder or
another system.
If the Aux channel outputs are enabled in bi-amp mode, (technically, this is
called power-biamping), you will be using separate amplifier channels for the
high and low frequency drivers of your loudspeaker, but the passive crossovers in
the speaker will do the work of filtering low and high frequency signals. In this
mode, the two auxiliary channels produce the same output as the Front Left and
Right channels.
NOTE: When bi-amping the Aux channel output levels may be
trimmed up or down relative to the Front L&R outputs in order
to account for amplifiers with different gain. This will be necessary
to get the respective high- and low-frequency speakers to produce
the correct, matching output levels. Note that using the balanced
output for Front L&R will require a +6 dB adjustment of the
Aux channels to match output levels for high- and low-frequency
amps having the same gain. All Classé Sigma, Delta and CT series
amplifiers have the same gain and may be used in any combination
for bi-amping.
When used for two-channel down-mix, the Aux channels may be configured for
either fixed or variable output. If variable is selected, the output level tacks with
the Front L&R channel volume.
Display Setup The Display Setup menu page, shown below, allows you to configure the
brightness and display timeout used for the touchscreen display.
Brightness The Brightness setting of the Sigma SSP touchscreen has three possible values:
low, medium, and high. Select the setting you prefer. A high brightness setting
usually works best in brightly-lit rooms; you may find that a lower setting is less
visually intrusive under more subdued lighting conditions.
38
Timeout If you prefer listening to music in a dimly-lit or darkened room or the SSP is in
your field of vision while watching movies, you may find even the low brightness
setting of the display somewhat distracting. You can essentially turn off the
touchscreen by reducing the timeout value of the backlighting so as to turn
it off entirely after a period of inactivity that you may select. In this context,
activity refers to any use of the user interface. This includes hard buttons, the
touchscreen, and the remote control.
For example, if you reduce the timeout to its minimum setting, the backlighting
illuminates the display as soon as you interact with any of the SSP controls, and
remains lit for only three seconds – just long enough for you to check a setting.
If you continue to use any of the controls (at least once every three seconds), the
display remains lit. After three seconds of inactivity on your part, the backlight
extinguishes itself, essentially turning off the touchscreen.
If you prefer the display of the SSP to remain on whenever not in Standby
mode, select the Never timeout option. The lamp in the touchscreen display is
designed for harsh automotive environments and will give you many years of
reliable operation. If you plan to leave the unit on continuously, however, we
recommend that you keep the timeout delay set to less than one minute.
NOTE: setting the brightness to a lower setting does not increase
the life of the lamp.
On Screen Display The On Screen Display (OSD) appears whenever the MENU button is pressed.
When in the MENU system, the MAIN OSD shows the full screen image as it
appears on the touchscreen. In normal operation, when changes occur such as
volume, source selection, stream type, etc., a smaller, temporary OSD appears
momentarily to identify and confirm that the change has occurred. Each of
these OSD events may be individually enabled and disabled by accessing the
OSD Control page (press the more arrow on the OSD selection page). You may,
for example, wish to know when a stream type has changed but not want the
temporary OSD to appear every time you adjust volume. This page allows you
to customize the operation of the OSD to suit your requirements.
39
The position of the temporary OSD image may be adjusted to accommodate
different video resolution and screen aspect ratios. A 1080p signal on a 2.35:1
screen, for example, may place the OSD image partially below the screen, so an
OSD shift adjustment allows you to address this. By accessing the OSD Shift
page (press the more arrow on the OSD Control page) you may shift the OSD
vertical position of the image in 15 pixel increments. Press “save” to remember
this setting for the current video signal resolution. If you want to move the OSD
toward the top of the screen this can be done by stepping the OSD to the top
of the range (six steps), pressing “save” and stepping the OSD up again from its
current position, then pressing “save” again when you have it in the position you
want.
Volume Setup Touching the Volume Setup button in the System Setup menu opens the
Volume Setup page, as shown below. The volume knob is used to make all
volume setup adjustments.
Volume Setup allows you to:
• set a maximum volume level;
• choose an initial volume level for the system whenever the SSP is brought
out of Standby;
• customize the behavior of the mute control.
40
Max Volume The Max Volume page allows you to establish a maximum volume setting for
your system. This scale runs from -93.0 to +14.0, with +14.0 dB indicating
that you do not want any artificial limit placed on the maximum gain your
Sigma SSP can provide. This setting is interactive. It is easiest to play the system
at increasing levels until you reach the volume which you want to use as the
maximum for the system. Using the volume knob, enter that value on the Max
Volume page.
Startup Volume Touching the Startup Volume button allows you to set up a preferred volume
level for when the SSP wakes out of standby.
• The factory default is for a startup volume set to -30.0.
41
Mute Setup The Mute Setup page allows you to choose how the Mute button functions. The
options for mute control are:
• specific - allows you to select the exact value to which the volume is
attenuated. If the current volume is already below that level when muting
is engaged, the volume remains unchanged. The factory default is - - -,
which is fully muted.
• dampening - reduces the current listening level by a specified amount (e.g.
-25.0 dB).
EQ Setup The Sigma SSP’s Parametric EQ capability allows you to build very precise
digital audio filters to help compensate for fixed sonic irregularities defined
by the location and characteristics of your speakers, your room and your
listening position in the room. These filters should be constructed based
upon audio measurements made by a well-qualified acoustical engineer. These
powerful filters are made available in a completely manual fashion to help your
professional installer give you the best listening experience possible.
As many as nine filters can be built for each speaker channel. An Aux channel
used in bi-amp mode assumes the same filters as defined for its Left or Right
channel partner.
In order to define the PEQ filters, select EQ Setup from the System Setup
menu, Check the box to enable the EQ. Choose which channel you wish to
adjust, select a band and enable its filter, then tune it with the appropriate center
frequency, gain, and Q.
42
You do not need to have all or even any filters enabled for every channel. The
installer need only make the adjustments to the channels necessary to correct
for the room’s interaction. We encourage you to consult with your authorized Classé
dealer to properly calibrate the Parametric EQ function.
NOTE: a discrete IR command or Fkey may be used to toggle the
EQ on and off to easily compare before and after from the listening
position. When the EQ is enabled, EQ appears on the Home page.
Tone Control Setup The Tone Control may be configured as conventional bass and treble controls
or used as what is sometimes called a tilt control. In either configuration the
maximum boost and cut is 6.0 dB.
The default setting configures the Tone Control as a tilt control with low- and
high-frequency 3 dB points at 200 Hz and 2,000 Hz respectively. These values
are user adjustable, allowing customization of the frequency ranges manipulated
by the tilt control. The tilt control will adjust frequencies above and below
these inflection points by tilting the tonal balance in one direction or the
other, stepping the higher frequency range up or down in 0.5 dB steps while
simultaneously stepping the lower frequency range in the opposite direction,
down or up, leaving the frequencies in between unchanged.
If conventional bass and treble controls are desired, select that option and
choose the frequencies below which the bass control works and above which
the treble control works. The bass and treble controls may be accessed from
the touchscreen (Menu> Tone Control) or by assigning the Tone command
to one of the F keys on the remote. Use the navigation buttons on the remote
or the touchscreen buttons to increase or decrease the level of bass and treble
independently. The Tone Control is activated and deactivated by successively
issuing the Tone command via IR with a remote control or selecting and
deselecting the Enable box on the touchscreen.
43
Network Setup The Network Setup page displays the IP address of the Sigma SSP and the
Network status.
Pressing the Restore Network Defaults button on this page re-enables DHCP
mode. In DHCP mode the SSP obtains an IP address from a device on the
Network (usually the Wireless AP).
UKEC version units are shipped with the Wake on LAN feature disabled. When
in standby, they will not respond to commands from control interfaces via the
Network such as CAN Bus, RS-232, IP Control and the Classé App. Contact
your dealer to determine the best means of bringing your SSP out of standby. In
most cases, this can be done using automation options that make the function
seamless and transparent.
The Sigma SSP includes a built-in web interface that can be used to configure
the system name, Network settings or update the SSP software. To access the
interface, type the IP address displayed on the Network Setup page in the
URL line of your browser (e.g. 192.168.1.0) and hit return. Alternately if you
are using Safari on the Mac, you can “Show All Bookmarks” (See: Bookmarks
menu) and click on Bonjour and double click on your Sigma SSP device listed
in the Webpage’s folder.
On the web page: Status Information will show the System Name and the
Firmware Version number.
Configuration will allow you to personalize the system name and configure the
unit’s IP address manually. It is strongly recommended to use DHCP rather than
attempt to assign a static IP address, but if one is required, an IT professional
should be involved in the installation.
Firmware Update As an alternative to the standard USB stick method of updating the unit’s
via Network firmware, updates may be initiated from the Sigma SSP web interface page. First
go to the Software Downloads area of the Classé website and download the latest
firmware located in the Sigma SSP Update via LAN folder. Using the Firmware
tab on the SSP web page, confirm that the firmware version currently installed
is not the latest and click on the System restart button. Follow the prompts to
complete the update.
44
Remote Fkeys The remote control supplied with the Sigma SSP has three function keys
(Fkeys), each of which can give you instant access to specific system functions.
For example, if you want direct access to particular sources or configurations,
you may want to consider programming some of the Fkeys to directly access
them. By assigning them as Fkey functions, you do not need to use the arrow
keys to scroll through the active sources or configurations looking for them.
The remote control F1 to F3 buttons correspond to the Function Keys displayed
on the touchscreen. Select the Function Key that you would like to assign, then
scroll through the list and choose the specific function you want that Fkey to
perform. Although the remote control is limited to three Fkeys, the Sigma SSP
can respond to as many as eight different Fkey commands. Certain other Classé
remote controls and aftermarket learning remotes are capable of utilizing these
additional commands.
Important note on Fkey use All Classé Sigma, Delta and CT series remote controls provide at least three
Fkeys. Commands F1-F3 on every Classé remote send the same IR signals as
F1-F3 on every other Classé remote, so you do not need to worry about which
remote you’ve picked up. Thus F1 on the SSP remote control sends the same
infrared signal as F1 on a CDP-502’s remote control and so on.
While this is intended to minimize confusion amongst different remotes (since
this aspect of them will all perform identically), you should take care when
assigning different functions on different components to the same Fkey. Doing
so can result in two components doing two different things at once, in response
to a single press of a button on the remote control. This can sometimes be
useful. As an example, F1 could set the SSP to the CD Player input, and also set
the CD player to Play, both from the press of a single Fkey.
45
Teach IR The complete list of Sigma SSP discrete infrared (IR) command codes extends
beyond what is practical for any one handheld remote control. However, many
of these functions are critical if you plan to create a customized remote control
with macros that take command of your entire system. Without these discrete
codes, many of the macros you might want to create simply won’t work reliably.
The Teach IR page displays a scrolling list of all the available IR codes in the SSP.
Simply scroll to the command you want your learning remote to learn and touch
the Send IR Code button. The SSP continuously sends that command code via
the front panel - as long as the button is pressed – until your third-party remote
control has learned it.
For more information on control systems, we recommend you speak with your
authorized Classé dealer.
Controls The Controls page gives access to settings that are independent of those found in
System Setup and more likely to be changed or used only temporarily.
46
Tone Control Setting up the Tone Control involves choosing high- and low-frequency
inflection points, and relative cut or boost for them. The factory default settings
create what is called a tilt control, which tilts the tonal balance either toward
more high and less low frequency for a leaner, crisper sound, or the opposite
direction toward a warmer, fuller sound.
NOTE: To change these parameters, press MENU, then System
Setup, Tone Control Setup.
If conventional bass and treble controls are preferred they may be configured
using the Tone Control Setup page as described in the Menu System section.
Press MENU then Tone Control on the touchscreen or an Fkey on the remote
programmed to send the Tone command to access the tone control. The
Tone Control is activated by selecting the Enable box on the touchscreen.
Alternatively, pressing and Fkey programmed for Tone on the remote control
switches to the Tone Control screen and each subsequent press toggles the
control on and off. When the Tone Control is enabled, Tone appears in a box on
the Home page. The Volume up/down buttons on the remote and the volume
knob on the unit are used to increase or decrease the effect of the Tone Control
when in tilt mode. When used as conventional bass and treble controls, the
Boost and Cut buttons on the touchscreen are used for increasing or decreasing
the corresponding Tone Control levels. These controls may also be accessed by
pressing an Fkey programmed for Tone on the remote control and using the
navigation keys. The adjustment range is +/- 6 dB in 0.5 dB increments.
Dolby Music Parameters for playback in the Dolby PLIIx/PLIIz Music mode may be modified
to tailor your listening experience to your tastes. The Dimension control acts like
a front/rear fader whereby increasing the Dimension shifts the balance toward
the surround channels. The Center Width control adjusts the center versus left/
right channel balance to control how wide the center image is. Increasing the
number moves the balance toward the left and right channels and away from the
center. Panorama expands the front stereo image toward the surrounds to create
a more enveloping, wrap-around effect.
47
Dolby Volume and
Late Night Dolby Volume and Late Night are two related but different modes that
are mutually exclusive. Dolby Volume is available to address some of the
most common problems associated with real-world theater use. Modern
film soundtracks have a wide dynamic range, meaning the softest sounds
are quite a bit softer than the loudest sounds. With the volume turned up
loud enough to hear quiet whispers of dialogue, a thundering explosion
might be too loud to comfortably tolerate. There are also times when
watching a TV show where a highly compressed commercial comes on
and nearly blasts you from the room. These abrupt changes in level can
have you diving for your remote control, constantly turning the volume
up and down as the source signals vary.
The Dolby Volume Leveler uses advanced algorithms to detect these
changes and make adjustments so you can set the volume at a comfortable
level and leave it. The algorithm preserves dynamic range in a way that
simple compression techniques cannot. It may be set for Low or High,
depending on how aggressive you want the algorithm to be in keeping the
level within a reasonable range.
The Dolby Volume Modeler may be enabled to provide dynamic
compensation for the way in which human hearing changes at different
volume levels. With the Modeler enabled, an increasing amount of lowand high-frequency compensation is applied as the playback volume is
reduced. The result is full and natural sound at any playback level.
Dolby Volume may be enabled on a per source basis choosing the Volume
button from the Setup Source page. You may elect to use it with your set
top box but not your Blu-ray player, for example. When accessed from the
Controls page, the Dolby Volume Leveler and Modeler functions may be
selected manually. When changing sources to one without Dolby Volume
enabled or, Dolby Volume will be switched off.
Dolby Late Night mode, not available when Dolby Volume is active,
provides a means of compressing the signal to reduce the difference
between the loudest and softest passages. As the name implies, it can be
useful late at night when you want to watch a movie without worrying
that the loudest passages will wake the kids (or mom and dad!). Some
recordings offer the author the option of engaging the Late Night mode
automatically. If this flag is detected in the bitstream and Auto Night is
enabled, the feature will engage automatically.
48
Balance To adjust the L/R Balance, when on the Balance page, use the volume knob or
the volume up/down keys of the remote control. Balance is adjusted in 0.5 dB
increments by alternately boosting and cutting 0.5 dB from each channel. In this
way, the overall level stays roughly the same as the balance shifts. The Balance
control works by making adjustments with the master volume control, so no
additional circuitry enters the signal path when balance adjustments are made.
Adjustments to the balance affect all active Left and Right channel outputs
equally.
The Balance control offers a range of +/- 10.0 dB and moving the control to
either extreme turns off the opposite channel (used mostly for troubleshooting).
NOTE: Your L & R speakers may not produce the exact same
output for a given input, or their location in the room or relative
to your listening position may contribute to a perceived imbalance
of up to a few dB. To compensate for this, play a simple vocal
recording and put the SSP in Mono (press Menu, then Mono).
Open the Balance control page and using the volume control
on remote, adjust the balance until the sound image is perfectly
centered. If you close your eyes and do this a few times, you will
find that one number, (e.g. Right 1.5 dB) may appear consistently.
If so, you know that is the adjustment your system requires. Leave
the setting there, return to normal stereo operation and then forget
all about the balance control.
DTS Music Similar to the Dolby PLIIx/PLIIz Music mode, the DTS Neo6 Music mode
provides the option of changing the Center Width setting. The Center Width
control adjusts the center versus left/right channel balance to control how wide
the center image is. Increasing the number moves the balance toward the left and
right channels and away from the center.
Lip Sync The Lip Sync function allows temporary adjustment of audio delay. This is
sometimes necessary due to a problem with the media or as a result of video
processing somewhere in the signal chain causing a video delay. Lip sync allows
a corresponding audio delay to be added to synchronize audio with video. Lip
Sync is a temporary function which is reset to zero upon change of source or
going into/out of standby.
Video Preview Choosing Video Preview will show the incoming video signal on the
touchscreen. This can be helpful when the SSP is not located in the same room
as the theater, giving a view of the video signal without requiring a local monitor.
It is also a useful troubleshooting tool to determine if a signal is in fact arriving
from the source. Some people just like how it looks, so it may be selected as a
display timeout option (MENU>System Setup>Display Setup). Touching the
display will cause it to revert to touchscreen control. If chosen as a timeout
option, the preview screen will appear after the timeout period has expired.
49
Configurations You may create up to six different output configurations to accommodate
preferences like with or without subwoofer, or with subwoofer but configured
for different crossover settings. While these configurations may be associated
with specific sources, they may also be called from the Main Menu page.
Pressing the Configurations button in the Main Menu opens the Configurations
page. Choose the configuration you wish to employ. Note that this configuration
selection will be over-ridden whenever you change or re-select a source with a
different configuration assigned.
To customize configurations, see the Configuration Setup description in the
System Setup section.
Modes Although each source has a default processing mode associated with it, you
may from time to time wish to choose a different mode. By using this page you
may select from the available processing modes. Modes that are not available to
be used with the current signal type are greyed out. Changing sources will also
change the mode to whatever the Favorite Mode is for that source, so mode
selection should be seen as temporary.
Status The Status screen provides several items of information on the currently selected
source and configuration as well as access to information on the firmware
used in and the internal settings and sensors of the SSP. While on this page,
pressing the more button will access the CAN-Bus features for connected Classé
components.
CAN-Bus Classé’s Controller Area Network, or CAN-Bus, provides communication and
coordinated control between similarly featured Classé components. When
connected with other CAN-Bus-equipped Classé components, the different
elements in the system are in constant communication, creating a “global”
network that delivers system wide status information and shared operational
features, all through the preamp/processor’s touchscreen display.
Note that some CAN-Bus related features are initially not available for certain
new models and some components will require a software update to recognize
them on the CAN-Bus. Check the Classé website periodically for updates.
50
features CAN-Bus will allow a Classé touchscreen to:
• Display status information for every connected unit, including amplifiers
which do not have a touchscreen display.
• Create a “PlayLink” that allows an SSP or Preamp to automatically switch
to the correct input when a Delta series source component starts playback.
• Adjust the global system brightness.
• Configure the entire system to go in and out of standby at the touch of a
button and also bring individual components in and out of standby.*
• Mute any connected unit.
hardware setup 1
Classé CAN-Bus Equipped Products
Two or more Classé CAN-Bus equipped products are required, at least one of
which must have a touchscreen display.
2
Category 5 Network Cables
These are ordinary network cables, commonly used for broadband Internet
connections. They should be typical “straight through” cables not the “crossed
over” type, and the total required will be one less than the total number of
CAN-Bus equipped components in your system.
3
CAN-Bus Terminator
A single CAN-Bus Terminator may be required. It is inserted into the
CAN-Bus OUT connector of the last component in the CAN-Bus
daisy chain. One is included in the accesories box. They are also available
free of charge from your nearest Classé Customer Support Centre.
http://www.Classeaudio.com/support/service.htm
4
SSP-300 & 600 CAN-Bus Interface Box
Systems that include an SSP-600 or SSP-300 will also require an
SSP-300/600 CAN-Bus Interface Box. These are included with the products or
available free of charge from your nearest Classé Customer Support Centre.
http://www.Classeaudio.com/support/service.htm
*
UKEC version Sigma series units require alternate means of being
brought out of standby.
51
The diagrams below illustrate how to connect the CAN-Bus hardware.
Any combination of models in any order.
CAN-BUS
IN
OUT
CAN-BUS
IN
OUT
CAN-BUS
IN
OUT
CAN-BUS
IN
OUT
For any system with SSP-300 or SSP-600.
CAN-BUS
IN
OUT
CAN-BUS
IN
OUT
CAN-BUS
IN
OUT
CAN-BUS
IN
OUT
NOTE: Daisy chain may need to be terminated with CAN-Bus Terminator.
using CAN-Bus CAN-Bus is controlled via the touchscreen of any Classé component that is
so equipped. There is no master component, so Classé series systems where
two or more units have a touchscreen can be controlled through any of the
touchscreens. However, it is probably easiest to start using CAN-Bus through
just one.
CAN-Bus is accessed by pressing the menu button on the face of the unit or
remote, then the status button, followed by the more or
button.
52
The touchscreen will then display the CAN-Bus devices screen, which lists
connected components by model & serial number.
Highlighting a unit on the CAN-Bus devices screen identifies it as the target
unit. The front panel LEDs of the target unit will start flashing (unless you
highlight the unit that you are using to access CAN-Bus).
Once you have chosen the target unit press select. The target unit’s LEDs will
stop flashing and the touch screen will list the CAN-Bus features available to it.
Some CAN-Bus features are shared by all models, some are specific to individual
models.
CAN-Bus shared features The following CAN-Bus features are shared by all models.
configuration Selecting configuration will present the CAN-Bus configuration screen
allowing access to name, global brightness, and global standby features.
operate The operate settings allow you to bring the target unit in and out of standby, or
mute. This key will be disabled for the unit whose touchscreen you are using to
access CAN-Bus. **
AC status The AC status screen displays information from the target unit’s electrical supply
sensors. Two screens are available, the second can be accessed by selecting more.
status The status screen is the simplest way to access essential information about
the target unit. It displays the target unit’s model number, software version,
operational status and serial number.
name You can set the name that this component will be listed under in the CAN-Bus
devices screen. The name will appear next to the unit model and serial number,
and facilitate the identification of units in large systems.
**
UKEC version Sigma series units require alternate means of being
brought out of standby.
53
global brightness By setting all your components to global brightness you can adjust the
touchscreen and LED brightness for your entire system by changing the
brightness of a single touchscreen. All CAN-Bus software updates automatically
set the updated unit to Global Brightness. If you want a particular unit to be
excluded from Global Brightness, deselect Global Brightness for that unit.
global standby By setting all your components to global standby you can bring your entire
system in and out of standby by pressing the standby button of any unit or
remote. All CAN-Bus software updates automatically set the updated unit to
global standby. If you want a particular unit to be excluded from global standby,
deselect global standby for that unit. ***
CAN-Bus model- The following CAN-Bus features are model specific.
specific features
PlayLink This feature is exclusive to Delta series disc players and will only function if
the disc player is connected to a CAN-Bus enabled preamp or surround sound
processor.
When PlayLink is active, pressing play on the disc player will also automatically
switch the preamp/processor to a specified input. This means that you can listen
to a CD or watch a DVD literally at the touch of a button.
The first step in using PlayLink is to choose the input you wish to be selected
when play is pressed on the disc player. Press the PlayLink icon, then select the
correct input from the list.
Once you have selected the input, press back, then select configuration.
PlayLink is activated and disabled through the PlayLink icon on the CAN-Bus
configuration screen.
PlayLink is automatically active after a software update, and the PlayLink icon
will only appear on the CAN-Bus configuration screen of a Delta series disc
player.
PlayLink can only select a single input per disc player. It is therefore
not designed for users who regularly play both CDs and DVDs through
different inputs from a single disc player. When PlayLink is active the disc
player will default to the same input every time play is pressed, regardless
of whether it is playing CD or DVD.
***
54
UKEC version Sigma series units require alternate means of being
brought out of standby.
amp info Available for amplifiers only, this screen displays the data provided by the
heatsink and AC Module temperature sensors.
NOTE: This feature is only accessible when the target amplifier is on.
event log Reserved for amplifiers, this feature is a protection circuitry event log which can
only be accessed when the target amplifier is in standby. The protection circuit
shuts down the amplifier or channel if it overheats or if its output could damage
your speakers. The event log details the circumstances surrounding the amp
going into protection and should be referred to in situations that require the
intervention of your dealer or Classé customer support.
The log can report the following events interpreted as follows:
• +ve slow blo trip & -ve slow blo trip — The average current has reached
the safe operating limit.
• +ve fast blo trip & -ve fast blo trip — The peak current has reached the
safe operating limit.
• over temperature trip — The unit temperature has reached the safe
operating limit.
• DC Output trip — (Does not apply to Sigma series or CA-D200
amplifiers) The DC output level has reached the safe operating limit.
• Communication failure — There has been a loss of communication
between the amp’s system monitoring sensors.
• AC line trip — (Does not apply to Sigma series or CA-D200 amplifiers)
The power supply has reached the limits of the amp’s safe operating range.
• Air intake filter — (Does not apply to Sigma series or CA-D200
amplifiers) The intake filter is constricting airflow and should be cleaned.
This “event” is also triggered after every 2,000 hours of operation, even if
the sensors do not yet detect constricted airflow. The unit will continue to
operate with its standby LED flashing until the filter is checked and the
unit reset by pressing and holding the standby button for 3 seconds.
Events are rare and generally occur due to issues that are external to the amp.
They should be interpreted positively. The amp is doing what it’s designed to do.
Network Sources Network sources are those which stream audio to the Sigma SSP using its rear
panel Ethernet connection. The SSP is equipped with a hard-wired Ethernet
connection because it provides a more reliable and higher speed connection than
is typically available over WiFi. If it is not possible or practical to run a direct
Ethernet connection from your router to the SSP, various solutions are available.
A powerline Ethernet adaptor, such as those offered by Netgear and others may
be used or a wireless bridge such as Apple’s Airport Express provides the local
Ethernet cable (called LAN or Local Area Network) connection required by the
SSP and connects to the Network router via WiFi.
55
Apple AirPlay The Sigma SSP is AirPlay certified; it can render audio content from Apple
iPhone, iPad or iPod touch devices or from iTunes on a Mac or PC.
To play content on the SSP:
1. Connect your device to the same Network as the SSP.
2. Open iTunes or the Music App on your iPhone, iPad or iPod touch.
3. Locate and tap the AirPlay icon
and select the Sigma SSP from the
menu (if attempting to AirPlay video content from Safari or Videos, begin
playback first).
4. Press play.
When you play content over AirPlay the source will automaticaly change to the
Network source. If your SSP has multiple sources that select the Network input,
the system will select the most recently used (Network input) source.
The home page shows stream status including the clock status and file format.
The Sigma SSP supports the Apple AirPlay protocol for streaming audio
through a Network using wired (Ethernet) or wireless (WiFi) connections,
or a combination of the two. AirPlay lets you stream audio from your WiFi
Network-connected iPad, iPhone or iPod touch, or using iTunes, stream from a
(WiFi or Ethernet) Network-connected Mac or PC. Working within the Apple
ecosystem, AirPlay allows a wide range of file formats and data rates up to full
CD quality. A list of the AirPlay-supported formats and rates appears in the
specifications section of this manual.
To use AirPlay, make sure a source button to use the Network connection has
been enabled.
Note: When your Ethernet connection is active, the green and amber lights
on the Ethernet connector will be illuminated and the Network Setup page
will show the status: “Connected.” If no connection is present, the front panel
display will show the words “Not Connected” when the Network source is
selected and also appear highlighted in red when viewing the Network Setup
page.
Open iTunes on your Network-connected Mac or PC and look for the AirPlay
icon
. Click on the icon to see the list of AirPlay capable “speakers” available
on your Network. Select your Sigma SSP from this list. Choose the music you
want to hear and click play. The Network input will be automatically selected
and music will begin playing through your system. It’s that simple.
56
The SSP display will show the status of the audio stream, so when using AirPlay,
it will show the sampling frequency of the signal as well as its format (ALAC
is the format AirPlay streams use). You may adjust the volume in iTunes or if
using Apple’s free Remote App, change volume and choose and manage music
files from your iOS device (iPad, iPhone, iPod touch). Volume changes happen
within the Sigma SSP, which uses a high-quality analog volume control to avoid
the loss of resolution associated with digital domain attenuation. If you press
pause or stop, the display will indicate AirPlay - Stopped.
Using an iOS device for AirPlay works the same way. Choose the Music App
icon, tap the AirPlay icon, select the Sigma SSP from the list of AirPlay speakers,
choose your music and play. Volume is likewise adjusted in the SSP by using the
volume control on the device.
DLNA
If you have chosen a Media Player other than iTunes and/or wish to stream
higher bit-rate files (up to 192 kHz), the Network connection will use the
DLNA protocol. You can stream audio over this connection whether DLNA or
AirPlay, so you only need to enable a single Network connection to have access
to streaming audio from multiple sources.
DLNA is structured around three basic elements: a Media Player, a Renderer and
a File Server. The Media Player is your control interface. It is a program or App
that could reside on a smartphone, tablet or computer and its job is to allow you
to access your music files and control their playback. Examples of popular Media
Players include JRiver, Twonky and Media Monkey. A File Server is where your
audio data files are stored. Your Mac or PC could be the file server or it could
be an outboard storage device such as a NAS (Network Attached Storage) drive.
When called to be played, the data transit the Network from the file server,
through the Ethernet cable into the Sigma SSP, which is a Renderer. It decodes
the file, performs any DSP functions you require and converts the audio from
digital data to an analog waveform. It then sets the playback volume and outputs
the signal to your amplifier(s).
The setup of a system for using DLNA can become more complex than an
iTunes/AirPlay system and because of the nearly endless combinations of
hardware and software that may be involved, it is beyond the scope of this
manual. You will need to supply and configure the software for your chosen
DLNA Media Player and DLNA server(s). If you need assistance, your Classé
dealer should be able to help.
57
Troubleshooting
Always refer any service problems to your Classé dealer. However, if you run into
a problem, we recommend referring to this section first as sometimes an error is
not a malfunctioning product, but simply an oversight in the proper setup of the
component. This section provides suggested solutions to potential problems.
If none of these solutions work, please consult your Classé dealer for assistance.
There are no user-serviceable parts inside the Sigma SSP.
Important!
Verify that the power amplifier(s) connected to the SSP is
powered off before checking any cable connections and
before power cycling the unit.
58
1
Everything appears to be powered on, but there is no sound.
PAdjust the volume control to a moderate level - audible but not
excessive (e.g. -35.0 dB).
PMake sure that the selected source component is powered on,
not in Standby mode, that it is playing an audio track and not in
pause mode.
PEnsure that the proper connector has been selected for the
current source.
PVerify that the Mute control is NOT engaged. This also applies
to sources such as USB connected devices. For example, muting
iTunes will result in no output even though the SSP is setup and
operating properly.
PEnsure that the amplifier is powered up and not in Standby
mode.
PCheck the Menu -> Status page to verify an audio signal is being
received.
PVerify that all cables are securely connected to the proper inputs
and outputs, with no kinks or stress points.
PIf using a Windows PC via USB, verify that the audio driver has
been properly installed and the SSP has been selected from the
list of playback devices.
2
There is no sound and neither the Standby LED/Status
Indicator nor the touchscreen is lit.
PEnsure that the SSP is properly connected to the electrical outlet
- the AC cord is positioned firmly in the AC mains receptacle in
the rear panel and the power switch is in the ON position.
PIf the SSP is properly plugged in and the power from the
electrical outlet is at the proper level, try the following: Put the
SSP in Standby mode, switch off the main power switch on the
rear panel, and unplug the unit for at least thirty seconds. Then
plug the cord back in and try powering up again. Sometimes, a
brown-out (short-term power loss/drop) can activate a protection
mode, which requires a power cycle to reset the SSP to its normal
operating mode.
PRemove the AC cord from the unit, and open the fuse holder
adjacent to the AC cord inlet. If the fuse is blown (best verified
using an ohm meter), contact your qualified Classé dealer.
3
One speaker or subwoofer seems not to be playing.
PIf the problem occurs with all inputs, check the interconnecting
cables between the preamp and the power amp. Also check the
speaker wires for secure connections.
PCheck the balance control setting by pressing MENU on the
front panel, and then verify the balance control setting is not
turning one channel off or reducing it’s output.
PIf the problem occurs for a subwoofer, make sure it is enabled on
the configuration assigned to this source button.
PCheck the interconnect cables between the source component
and the SSP.
4
The IR remote control does not seem to function.
PIf this is the first time you are using the remote, check to see
that the protective film has been removed from the battery. (See
Using the Remote and Accessing the Battery).
PEnsure that there are no obstacles between the IR remote and the
IR sensor, located on the lower left corner of the front panel.
PCheck the orientation and if necessary, replace the batteries in
the remote control.
5
There is a hum coming out of the speakers.
PIf the noise is coming from channels using single-ended
interconnects, make sure they are not placed alongside any
AC power or communications cables such as CAN Bus. Also
make sure that they are not too long – long single-ended
interconnecting cables have a natural tendency to pick up noise
even when shielded.
PIf any source components are connected to cable TV, try
disconnecting the cable television line from the source
component. If the hum goes away, you need an isolation device
between your cable TV converter and the source component. Your Classé dealer can help you obtain one of these inexpensive
devices.
network/streaming 1
troubleshooting
The Network Status page shows Not Connected and there are
no green and amber lights illuminated on the Ethernet cable
connector on the rear panel.
PCheck that the Ethernet cable is connected to an active Network.
PTry substituting the Ethernet cable to confirm whether the cable
itself is functioning.
PIf using a wireless bridge, make sure it is connected to your
wireless Network and that you are using the correct connector
(labeled <...> on an Airport Express).
2
The Network status indicates Connected but the SSP does not
appear on your list of devices in AirPlay or on your DLNA
Media Player.
PRestart all participating components one at a time until the
problem is resolved. First the Media Player, then the SSP (cycle
the power off and on) and then your router. If the problem
persists verify that you have a valid IP address. If your address
is “Limited Auto IP” then the SSP has auto assigned itself an
address and this indicates that your DHCP IP address server is
not working.
59
60
3
Streaming audio drops out frequently.
PUsually a problem associated with wireless networks, if you
are using a wireless bridge, make sure the signal strength from
your wireless router is good (they may need to be located closer
together) and devices that cause interference such as microwave
ovens are not in use.
PYour router may not have sufficient bandwidth to consistently
handle the data rate of the audio stream. A higher-performance
router may be required.
4
The SSP sometimes switches to a Network or USB source
unexpectedly.
PThis is likely caused by “sounds” (e.g. mouse clicks, new mail
notifications, etc.) generated by your computer activating the
auto select feature for your Network or USB connection. Disable
the sounds to eliminate the unwanted behavior.
5
The SSP will not respond to control commands (RS-232, IP
Control, AirPlay, DLNA streaming) when in Standby.
PWhen in Standby the SSP is in a deep power save mode and only
responds to the front panel Standby button and IR commands.
Contact your dealer for alternate means of automating the power
up sequence.
6
The SSP sometimes seems to put itself into standby.
PWhen no signal is present for 20 minutes, the SSP enters a
power-saving mode called auto standby
Care & Maintenance
To remove dust from the cabinet of your Sigma SSP, use a feather duster or a
lint-free soft cloth. To remove dirt and fingerprints, we recommend isopropyl
alcohol and a soft cloth.
Dampen the cloth with alcohol first and then lightly clean the surface of the SSP
with the cloth.
Caution!
Power down and remove the AC power cord from the
SSP before performing maintenance. At no time should liquid
cleaners be applied directly to the unit.
61
Specifications
All specifications are accurate at the time of printing. Classé reserves the right to
make improvements without notice.
nUSB audio
up to 24-bit/192 kHz
nUSB (Host)
charging capability 2 Amps
nAirPlay supported formats
AAC (8 to 320 kbps),
Protected AAC (from iTunes Store),
HE-AAC, MP3 (8 to 320 kbps),
MP3 VBR, Audible (formats 2, 3, 4) Audible Enhanced Audio
(AAX and AAX+), Apple Lossless, AIFF, and WAV
nDLNA supported formats
Apple Lossless (ALAC), mp3, FLAC,
AIFF, WAV, Ogg Vorbis, WMA, AAC
nFrequency response
8 Hz - 200 kHz < 1 dB, stereo digital bypass
8 Hz - 20 kHz < 0.5 dB, all other sources
nChannel Matching (Left to Right)
better than 0.05 dB
nDistortion (THD+noise) 0.0005%, digital source/bypassed analog source
.002%, processed analog source
nMaximum input level (single-ended) 2 Vrms (DSP), 4.5Vrms (bypass)
nMaximum input level (balanced)
4 Vrms (DSP), 9 Vrms (bypass)
nMaximum output level (single-ended)
9 Vrms
nMaximum output level (balanced)
18 Vrms
nGain Range
-93 dB to +14 dB
nInput impedance (single-ended)
100 kΩ (single-ended)
nInput impedance (balanced)
50 kΩ (Balanced)
nOutput impedance (single-ended)
100 Ω
nOutput impedance (balanced)
300 Ω
nSignal-to-noise ratio (ref. 4Vrms input, unweighted)
104 dB, bypassed analog source
101 dB, processed analog source
(re. full-scale input, unweighted) 105 dB, digital source
nChannel separation
better than 100 dB
nChannel matching (left to right)
>0.05 dB
nCrosstalk (any input to any output)
better than -130 dB @ 1 kHz
nStandby power consumption
.3W @ 230 V
nRated power consumption
35 W
nMains voltage
100-240 V, 50/60 Hz
nOverall dimensions
Width: 17.0” (433mm)
Depth (excluding connectors): 14.57” (370mm)
Height: 3.75” (95mm)
nNet weight
18lb ( 8.21 kg)
nShipping weight
25lb (11.34 kg)
Continued
Made for:
n iPod touch (5th generation)
n iPod touch (4th generation)
n iPod touch (3rd generation)
n iPod touch (2nd generation)
n iPod touch (1st generation)
62
n
n
n
n
n
iPod nano (7th generation)
iPod nano (6th generation)
iPod nano (5th generation)
iPod nano (4th generation)
iPod nano (3rd generation)
Made for:
n iPhone 5S
n iPhone 5
n iPhone 4S
n iPhone 4
Made for:
n iPad mini (with Retina display)
n iPad Air
n iPad (4th generation)
n iPad mini
n
n
n
n
n
n
iPhone 3GS
iPhone 3G
iPhone
iPad (3rd generation)
iPad 2
iPad
AirPlay:
AirPlay works with iPhone, iPod, and iPod touch with iOS 4.3.3 or later,
Mac with OS X Mountain Lion, and Mac and PC with iTunes 10.2.2 or later.
Classé and the Classé logo are trademarks of B&W Group Ltd. of Lachine, Canada. All rights reserved.
AMX® is a registered trademark of AMX Corporation of Richardson, TX. All rights reserved.
Crestron™ is a trademark of Crestron Electronics, Inc. of Rockleigh, NJ. All rights reserved.
Control 4™ is a trademark of Control 4 Corporation of Saltlake City UT. All rights reserved.
Savant® is a registered trademark of Savant Systems, LLC of Hyannis, MA.
HDMI, the HDMI Logo and High-Definition Multimedia Interface are trademarks or registered trademarks of HDMI
Licensing LLC.
Manufactured under license from Dolby Laboratories. Dolby, Pro Logic, and the double-D symbol are trademarks of Dolby Laboratories.
Manufactured under license under U.S. Patent #’s: 5,451,942; 5,956,674; 5,974,380; 5,978,762; 6,226,616; 6,487,535; 7,212,872;
7,333,929; 7,392,195; 7,272,567 & other U.S. and worldwide patents issued & pending. DTS and the Symbol are registered
trademarks, & DTS-HD, DTS-HD Master Audio and the DTS logos are trademarks of DTS, Inc. Product includes software.
© DTS, Inc. All Rights Reserved.
“Made for iPod,” “Made for iPhone,” and “Made for iPad” mean that an electronic accessory has been designed
to connect specifically to iPod, iPhone, or iPad, respectively, and has been certified by the developer to meet
Apple performance standards. Apple is not responsible for the operation of this device or its compliance with
safety and regulatory standards. Please note that the use of this accessory with iPod, iPhone, or iPad may affect
wireless performance.
iTunes, AirPlay, iPad, iPhone, iPod nano, and iPod touch are trademarks of Apple Inc., registered in the U.S.
and other countries.
63
Dimensions
17.00”
(433.00)
3.45”
(88.00)
3.75”
(95.00)
17.00”
(433.00)
13.39”
(340.00)
2.10”
(53.59)
9.65”
(245.80)
14.57”
(370.00)
14.88”
(378.70)
64
Installation Worksheet
Source:.______________________________________________________________
Audio Connector:______________________________________________________
Input:_______________________________________________________________
Source:.______________________________________________________________
Audio Connector:______________________________________________________
Input:_______________________________________________________________
Source:.______________________________________________________________
Audio Connector:______________________________________________________
Input:_______________________________________________________________
Source:.______________________________________________________________
Audio Connector:______________________________________________________
Input:_______________________________________________________________
Source:.______________________________________________________________
Audio Connector:______________________________________________________
Input:_______________________________________________________________
Source:.______________________________________________________________
Audio Connector:______________________________________________________
Input:_______________________________________________________________
Source:.______________________________________________________________
Audio Connector:______________________________________________________
Input:_______________________________________________________________
65
B&W Group, Ltd.
5070 François Cusson
Lachine, Quebec
Canada H8T 1B3
+1 (514) 636-6384
+1 (514) 636-1428 (fax)
http://www.classeaudio.com
North America: (514) 636-6384
email: [email protected]
Europe: 44 (0) 1903 221 700
email: [email protected]
Asia: (852) 2790 8903
email: [email protected]
All Others: +1 514 636 6384
email: [email protected]
Copyright © 2015 B&W Group Ltd.
V 1.6
051215