1
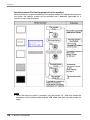
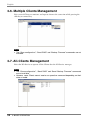
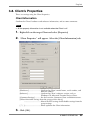
User’s Manual
Network Administrator
Utility software for ThinClient
Important
Please read this User's Manual carefully to familiarize yourself with safe
and effective usage procedures. Please retain this manual for future
reference.
ABOUT THIS MANUAL
This manual explains about the features or usage of Network Administrator (Utility Software for
ThinClient). Please consult your system administrator for assistance if anything unclear.
Copyright© 2004 by EIZO NANAO CORPORATION. All rights reserved. No part of this
manual may be reproduced, stored in a retrieval system, or transmitted, in any form or by any
means, electronic, mechanical, or otherwise, without the prior written permission of EIZO
NANAO CORPORATION.
EIZO NANAO CORPORATION. is under no obligation to hold any submitted material or
information confidential unless prior arrangements are made pursuant to EIZO NANAO
CORPORATION.'s receipt of said information. Although every effort has been made to ensure
that this manual provides up-to-date information, please note that EIZO monitor specifications
are subject to change without notice.
Microsoft and Windows are registered trademarks of Microsoft Corporation.
EIZO and eClient are trademarks or registered trademarks of EIZO NANAO CORPORATION..
English
TABLE OF CONTENTS
1. INTRODUCTION ..................................................................................... 4
1-1. General Description ......................................................................................4
1-2. Features ........................................................................................................5
1-3. Basic System Structure ..................................................................................5
2. INSTALLATION ....................................................................................... 8
2-1. Basic Installation ..........................................................................................8
2-2. How to Start/Exit .......................................................................................10
2-3. Microsoft Remote Boot Server Installation .................................................12
2-4. Microsoft Remote Boot Service and DHCPService Setup............................13
3. BASIC OPERATION.............................................................................. 15
3-1. Client Terminal’s Settings............................................................................15
3-2. Finding target Client(s) ...............................................................................16
3-3. Main Console Window...............................................................................17
3-4. Client Management ....................................................................................19
3-5. Monitor Control.........................................................................................28
3-6. Multiple Clients Management ....................................................................32
3-7. All-Clients Management .............................................................................32
3-8. Client’s Properties .......................................................................................33
3-9. Monitor Properties .....................................................................................35
3-10. About Event Log.......................................................................................36
3-11. Adding/Deleting Clients ............................................................................37
4. ADVANCED OPERATION..................................................................... 38
4-1. Group Setting .............................................................................................38
4-2. Scheduling Control .....................................................................................41
5. LARGE SCALE MANAGEMENT .......................................................... 44
5-1. Managing Clients on Multiple Network Segments .....................................44
5-2. Multiple NA Services Control by a Console ...............................................46
5-3. Control by two or more administrators ......................................................52
6. TROUBLESHOOTING........................................................................... 54
TABLE OF CONTENTS
3
English
1. INTRODUCTION
Thank you very much for downloading the Network Administrator Version 3.0.
1-1. General Description
The Network Administrator is the software, which unifies management of the EIZO
client terminals and EIZO monitors connected to them. (*EIZO monitor(s)’s remote
control is available when the EIZO monitor is connected via USB.)
The Network Administrator can store necessary management information to each Client
on the network, and can also control things such as settings, startup, shutdown or
restart for Clients individually or all at once.
Also, the Network Administrator saves the configuration information (RDP/ICA
terminal server settings, hardware settings and network settings) of a particular Client in
a FTP server on the network, and distributes it to the other Clients so that several
Clients can be set up at a time. The firmware installed in the Clients can also be
updated at this time.
Network Administrator consists of [Network Administrator Console snap in (Console)],
which supports the Microsoft Management Console (MMC) and [Network
Administrator Service (NA Service)], which resides in the Server PC. It is operated easily
with GUI, which can be integrated with the standard management tool for Windows.
Moreover, it provides the scheduling function, which automates advanced grouped
functions and various controls in large-scale operations and supports the TCO
curtailment of Client management.
A series of operations such as Startup→Firmware Update→Shutdown can be performed
automatically at night or on holidays.
4
1. INTRODUCTION
English
1-2. Features
• Controls several Clients on the network from one Console.
• The Network Administrator supports MMC snap-in and can be integrated with the
standard management tool for Windows.
• Clients can be managed by the hierarchized group.
• With schedule setup, the startup of Client, the shutdown, the restart, the
configuration distribution of Clients as well as firmware distribution can be
performed on the specified time and day of the week.
• Since two or more NA Services can be controlled by one Console, distributed
processing on a large-scale network is easy.
• Since the conjugate control of the NA Service is available with two or more Consoles,
several administrators can manage it easily.
• NA Services record the operating state and history of Clients on an event log.
• Operation analysis and extension with various tools are available, supporting the
standard event log for Windows.
• Manages the EIZO monitor with remote control function connected via USB with the
Client.
1-3. Basic System Structure
The systems you need in order to use the Network Administrator are as follows:
(The NA Service can only be installed only to the computers that have a server OS
installed. The server computer, each server and the Network Administrator can be
executed in the same server computer if the server computer is efficient enough.)
Server Computer
Console
FTP Service
NA Service
Remote Boot
Service
Command
USB Cable
Monitor
DHCP
Service
Terminal
Server
Ethernet
USB Cable
Monitor
Clients
1. INTRODUCTION
5
English
Server PC
Network
Administrator
Console
NA Service
Remote Boot Service
FTP service
DHCP service
Terminal Server
Clients
Clients
EIZO monitors
Sets commands and sends them to the NA
Service.
Receives the commands from the Console, and
manages the Clients.
Remote Boot Service is used to store or distribute
the Firmware of Windows XPe-Embedded based
Client(s). Install the Remote Boot Service into the
same computer with the NA service. (p.12)
Stores the Client configuration file(s) and the
firmware file(s), and sends these files to the
Client(s).
Allocates IP addresses to the Clients with DHCP
or sends the configuration to the Clients. (The
Clients are set to refer to the DHCP server and
allocate IP addresses at the factory default or right
after firmware update. If not using the DHCP
service, IP addresses must be set up in each
Client directly.)
When using the Remote Boot Service, the Client
requires the DHCP service. (Client, DHCP service
and Remote Boot Service communicate mutually.)
Is required when a user operates a Client. Must
be logged off from the Clients when operating the
Terminal Server (Client setup and management).
Set up and managed by the Network
Administrator.
Must have equipped Client setup management
tool client software.
There are Windows CE-based Client(s) and
Windows XPe-based Clients(s) (p.19).
Set up and managed by the Network
Administrator.
Supports the remote monitor control (the EIZO
monitors equipped with USB upstream port) and
must be connected to stand type eClients via
USB.
The Amount of Manageable Clients
Up to 1000 Clients can be managed in one NA Service. Install several NA Services if
managing more than 1000 Clients.
6
1. INTRODUCTION
English
System Requirements
NA Service
Console
CPU
Satisfy the OS requirements
Memory
256 MB or greater (Satisfy the OS requirements) -- 32 MB or greater RAM is
required for console software operation
(64 MB or greater RAM is recommended).
NOTE
• When the used memory is more than the amount of installed memory,
additional memory is required.
HDD
OS
1 MB or greater available hard disk space
• Microsoft Windows 2000 Server
• Microsoft Windows 2000 Server
• Microsoft Windows 2000
• Microsoft Windows 2000 Advanced
(Service Pack 4 or later)
Advanced Server (Service Pack 4
or later)
• Microsoft Windows 2000
Datacenter Server (Service Pack
4 or later)
• Microsoft Windows Server 2003,
Standard Edition
• Microsoft Windows Server 2003,
Enterprise Edition
• Microsoft Windows Server 2003,
Datacenter Edition
(Service Pack 4 or later)
Server (Service Pack 4 or later)
• Microsoft Windows 2000 Datacenter
Server (Service Pack 4 or later)
• Microsoft Windows 2000
Professional
(Service Pack 4 or later)
• Microsoft Windows Server 2003,
Standard Edition
• Microsoft Windows Server 2003,
Enterprise Edition
• Microsoft Windows Server 2003,
Datacenter Edition
• Microsoft Windows XP Professional
(Service Pack 1)
Resolution
-
1024 dots x 768 lines or higher
Network
LAN (TCP/IP protocol)
Others
The server should be operating 24
hours a day.
Microsoft Management Console
(MMC) 1.2 or later should be installed.
NOTE
• It is possible to install the Console to another server computer. (See p.52.)
• Microsoft Windows 2000 Professional and Microsoft Windows XP Professional can
be used for Console only.
1. INTRODUCTION
7
English
2. INSTALLATION
2-1. Basic Installation
- Installing the Console/NA Service both into the same
computer
This chapter shows how to install the NA Service and the Console in one computer
(The NA Service and the Console can be installed to server computers separately.).
After installation, the Console will be registered in the Microsoft Management Console
as a snap-in, and the NA Service will be registered on the Windows Server as a service
and start up.
NOTE
• Uninstall the previous version of the Network Administrator beforehand.
• The contents of the zip file are as follows.
File Name
Setup.exe
Windows XP Embedded
Remote Boot Server.msi
Rbm.sdi
1.
2.
3.
File Type
Executable file of Network
Administrator 3.0
Install package file of
Microsoft Remote Boot
Service
Remote Boot Image File
Reference
p.8
p.12
p.12
Close all the displayed Windows.
Save the file “Network Administrator Version 3.0” that was
downloaded from the EIZO web site and decompressed, into the
hardware drive of the Console/NA service computer.
Execute the file.
Network Administrator Version 3.0 Setup Wizard will start. Follow
the instruction to install the wizard.
Check both [Console] and [Service] when the selection window of the setup type is
displayed.
8
2. INSTALLATION
English
4.
After installation, EIZO Network Administrator Version 3.0 will be
installed in [Program]-[EIZO]-[Network Administrator].
NOTE
• The Shortcut to Network Administrator Version 3.0 will be appeared on the
desktop.
NA Service
The NA Service operates on the Windows Server as a service all the time. Confirm
if the NA Service is installed into [Control Panel]-[Administrative Tools]-[Services]
as the [Network Administrator Service] is “Started”.
NOTE
• Uninstall the Network Administrator
1) Close all the displayed Windows.
2) Click the [Start] button on the Windows and select [Settings]-[Control Panel].
3) Double-click [Add/Remove Programs] on the [Control Panel]. ([Add/Remove
Applications] in the windows 2000)
4) Select the Network Administrator from the list and click [Change/Remove].
5) After running the Network Administrator setup, select [Remove], click [Finish]
and uninstall the Network Administrator.
2. INSTALLATION
9
English
2-2. How to Start/Exit
How to start
1.
2.
10
Click the [Start] button. Select [Program]-[EIZO]-[Network
Administrator]-[EIZO Network Administrator 3.0]. (Or double-click
[Network Administrator 3.0] on the desktop.)
The Console main window appears as the Network Administrator
starts.
2. INSTALLATION
English
Connection Timeout
If the Console does not operate for a certain time, the following message will appear
and it will be disconnected. Click [OK] to re-connect.
[Timeout Settings]
(1) Select [NA Service (Local)]. Then, select [Action]-[Properties] on the menu bar,
or right-click and select [Properties].
(2) “NA Service (Local) Properties” will appear. Select the [Service Setting] tab.
[Connection Timeout]
...................................Set the Console connection time (5 to 99 minutes).
(3) Click [OK].
How to exit
Click [x] on the right upper corner of the window.
NOTE
• Exiting a Console does not close the NA Service. The NA Service operates all the
time as long as the server computer is in operation even though the console exits.
(See p.9.)
2. INSTALLATION
11
English
2-3. Microsoft Remote Boot Server Installation
The Microsoft Remote Boot Server is used to store or to update the firmware of
Windows XPe-based Client Terminals.
When using the Windows XPe-based Client Terminals, follow the instructions below to
install the Microsoft Remote Boot Server to the same computer as the NA service.
1.
2.
3.
4.
Save the install package file (Windows XP Embedded Remote Boot
Server.msi) to the local hardware drive where the NA service is.
Double click the Install package file.
Windows XP Embedded Remote Boot Server Setup Wizard will start.
Follow the instructions on the wizard to install the program.
After installation, the Remote Boot Manager will be installed in
[Program Files]-[Microsoft Windows Embedded Studio].
Copy the Remote Boot Image file (rbm.sdi) to the folder where the
Microsoft Remote Boot Server has been installed.
Ex) c:\Program Files\Windows Embedded\Remote Boot Service\
Downloads\rbm.sdi
NOTE
• Refer to p.13 about Microsoft Remote Boot Service Setup.
• Uninstall Remote Boot Manager
1) Close all the displayed Windows.
2) Click [Start] button on Windows and select [Settings]-[Control Panel].
3) Double-click [Add/Remove Programs] on the [Control Panel].
4) Select the Windows XP Embedded Remote Boot Server from the list and click
[Remove].
12
2. INSTALLATION
English
2-4. Microsoft Remote Boot Service and DHCP
Service Setup
Microsoft Remote Boot Service and DHCP Service must be set up, depending on a
system structure.
Microsoft Remote Boot Service Setup
1.
2.
3.
4.
Click [Start] button. Pointing [Program]-[EIZO]-[EIZO Network
Administrator] and select [EIZO Network Administrator Version
3.0]. (Or double-click [Network Administrator 3.0] on the
desktop.)
The Console main window will appear as the Network
Administrator Version 3.0 starts.
Select [NA Service (Local)].
Select [Action]-[Properties] on the menu bar, or right-click and select
[Properties].
2. INSTALLATION
13
English
[Remote Boot Manager]
................................... When Microsoft remote Boot Service and DHCP service are
operating on different computers, check on ‘Use DHCP
port’. If not, check on ‘Not use DHCP port’.
NOTE
• When the [Remote Boot Manager] is displayed in gray (not selectable), the
Microsoft Remote Boot Service has not been installed.
DHCP Service Setup
When the Microsoft Remote Boot Service and DHCP Service are operating on the same
computer, the DHCP option (server option 60) must be set up in advance.
(When Microsoft Remote Boot Service and DHCP Service are operating on different
computers, confirm that the DHCP option (server option 60) is not set up.
The instructions below are example commands to add server option 60 to the DHCP
service.
1.
Log on to the computer where the DHCP server is operating with
administrator authority.
2.
Start the command prompt.
3.
Execute the following commands.
C:\WINDOWS\system32>netsh
Netsh>dhcp
netsh dhcp>server \\<server machine name > *
netsh dhcp>add optiondef 60 PXEClient String 0 comment=PXE support
netsh dhcp>set option value 60 STRING PXEClient
netsh dhcp>exit
*”localhost” is also acceptable when the computer is a local computer.
NOTE
• When installing several NA services (Microsoft Remote Boot Service), install the
DHCP service and NA services (Microsoft Remote Boot Service) on different
computers.
14
2. INSTALLATION
English
3. BASIC OPERATION
This chapter shows how to find the target Client(s) and to operate basic commands.
3-1. Client Terminal’s Settings
Enter the NA Service’s IP address in each Client(s) before searching for a Client(s).
See the Client Terminal’s user’s manual for system integrators to set up the
[Administration Console].
(Example; eClient SC1)
[Administration Console]....Enter the IP address of a server PC with the NA
Service.
NOTE
• It is impossible to control the Client Terminal using any other NA Services besides
the one in the PC with the entered IP address.
• If the IP address is not entered, the Client Terminal will not send any messages to
the NA Service. (See p.18)
3. BASIC OPERATION
15
English
3-2. Finding target Client(s)
The NA Service finds the target Client(s). Please confirm the following cautions before
finding the Clients.
Cautions for the target Client(s)
•
•
•
•
•
•
1.
2.
16
Be sure to turn on the Client(s), or Client(s) may not be found correctly.
Click [Terminal Properties]-[Security] (or [System]) of the target Client(s) and see if
an IP address is entered in the [Administration Console]. Enter an IP address of a
server PC with NA Service in the blank (See 3-1. Client Terminal’s Settings, p.15).
Obtain an IP address from the DHCP server (If the DHCP server does not exist on
the network, specify an IP address to each Client).
Log off from the terminal server.
Do not turn off or operate the Client(s) during update.
Clients must be on the same network segment as the NA Service’s (See p.44 for
multiple network segments management.)
Select NA Service. Right-click and select [Find client(s)].
The target Client(s) is found and shown on the main Console
Window.
3. BASIC OPERATION
English
3-3. Main Console Window
(1)
(2)
(3)
(4)
(1) NA Service
The NA Service connected with a Console
Under the NA Service, manageable Client(s)s and EIZO
monitor(s) are displayed. The downed Client(s) and EIZO
monitor(s) are indicated with black icon.
Group the Clients and display the group name. (p.38)
Manageable EIZO monitor are displayed in group
(2) Group
(3) Monitor group
(4) Status Bar
Client
[Client Name] .....................Client’s name
[IP Address] ........................Client’s IP address
[Ethernet Address] ..............Client’s Ethernet address
[Model]...............................Client’s model name
[Serial Number] ..................Client’s serial number
[Status]................................Client’s operation status (see p.18)
EIZO monitors
[Model Name] ....................Monitor model name
[Client Name] .....................Monitor connecting Client name
[Serial Number] ..................Monitor’s serial number
[Usage Time].......................Monitor’s usage time
[Group]...............................Monitor’s group name
[Power] ...............................Monitor’s power status
NOTE
• Click [View]-[Customize] to display/nondisplay the items on the Console window.
• Click [Display]-[Add/Remove Columns] to set display items /the display order on the
status bar.
3. BASIC OPERATION
17
English
Client’s Power Status
Client status indication on the main Console Window depends on the Client Terminal’s
IP address setting (p.15).
[Client Assigned with IP Address of a Server PC with NA Service]
The Clients send the result of the action, [Start], [Restart], and [Shut down], to the NA
Service. The latest status automatically appears on the main Console Window even if the
NA Service does not need to [Find] to show the result on the main Console Window.
[Client Assigned without an IP Address of a Server PC with NA Service]
The Clients do not send the result of the action to the NA Service: The NA Service
needs to [Find] the action results and show the result on the main Console Window (for
example, If shutdown the Client itself after finding, Client is “Up” the status of Console
window).
18
3. BASIC OPERATION
English
3-4. Client Management
NOTE
• Each management command can be executed by selecting the object and click
[Action] on the menu, or right-click on the object.
• Refer to the table below about the commands available with Windows CE-based
Client and Windows XPe-based Client
Commands
OS
Send PING
Restart
Shut down
Wake on LAN
Send Message
Backup Configuration
Store Configuration
Backup Firmware
Store Firmware
Windows CE
Windows XPe
OK
OK
OK
OK
OK
OK
OK
OK
OK
OK
OK
-
OK
-
-
OK
OK
OK
Send PING Command
PING is sent to each Client to confirm the network condition.
1.
2.
Right-click on the target Client and select [Client]-[Send PING].
The result of the action appears. If the target Client receives PING
(target Client is powered on), the following message appears.
3. BASIC OPERATION
19
English
Restart Client Command
Restart the Client(s).
1.
Right-click on the target Client(s) and select [Client]-[Restart].
2.
The target Client(s) will restart.
Shut down Command
Shut down the Client(s).
1.
Right-click on the target Client(s) and select [Client]-[Shut down].
2.
The target Client(s) is shut down.
Wake on LAN Command
Start Client(s).
20
1.
Right-click on the target Client(s) and select [Client]-[Wake on LAN].
2.
The target Client(s) is started.
3. BASIC OPERATION
English
Send message Command
Send the message to the target Client monitor(s) from the server software. The message
is displayed on the monitor.
1.
Right-click on the target Client(s) and select [Client]-[Send Message].
2.
[Send Message] is displayed.
[Message]....................Input the message to send the Client(s) (within 255
characters).
3.
Click [Send] to send the message.
NOTE
• When the sent message does not appear on the Client monitor, check the software
version of the Client Terminal. If new firmware is available, update and retry the
‘Send Message’ command. (How to update the firmware, see ‘Store Firmware
Command, p. 26)
3. BASIC OPERATION
21
English
Configuration Command Backup (Windows CE-based
Client Terminal)
Backs up the configuration of the primary Client and save as a file format to the FTP
server.
1.
2.
Right-click on the target Client and select [Client]-[Backup
Configuration].
The “Back Up Configuration from Client” dialog box will appear.
[File Name] .........................Enter the backup file name to the FTP server.
(Configuration file has no compatibility between
Client models. File names are recommended to have
each Client model name. Follow the FTP server
naming rules when naming configuration file names.)
[Server] ...............................Enter the FTP server name or FTP server IP address to
save the file.
[User Name]........................Enter the user’s name to log on to the FTP server.
[Password] ..........................Enter the password for the user’s name to log on to the
FTP server.
3.
Click [OK].
The configuration file will be saved to the FTP server.
NOTE
• Do not modify stored configuration file in the FTP server.
22
3. BASIC OPERATION
English
Configuration Distribution (Windows CE-based Client
Terminal)
Distributes the same configuration settings to the Client terminals that selected the
Client configuration file saved in the FTP server in order to update their configuration.
Client hardware settings ([Calibration] in the models with Contrast/Brightness and
TouchPanel) are not included. All those settings must be adjusted/set up in each Client
individually. Items set in [Comment Setting] will not be updated.
NOTE
• Carefully confirm that the configuration file is the same model /language as the
Client when distributing the configuration file.
An error message will appear and the configuration will not be updated if a
configuration file with a different model and language is distributed.
1.
2.
Right-click on the target Client and select [Client]-[Store
Configuration].
The “Store Configuration to Client(s)” dialog box appears.
[File Name] .........................Enter the configuration file name to store the selected
Client. (Be sure to enter the correct file name, which
meets the selected Client.)
[Server] ...............................Enter the full domain name or FTP server IP address to
send the file to the Client(s).
[User Name]........................Enter the user’s name to log on to the FTP server.
[Password] ..........................Enter the password to the user’s name to logon to the
FTP server.
[Mask the network settings.]
...................................Click the check box to avoid storing the network
settings.
[Restart the Client after storing the configuration.]
...................................Click the check box to restart the Client after storing
the configuration file.
3. BASIC OPERATION
23
English
NOTE
• Restart Clients after storing the configuration to update all the settings.
3.
Click [OK].
4.
The following message appears.
Click [Yes].
The configuration file will be stored in the selected Client terminal(s).
Firmware Command Backup (Windows XPe-based Client
Terminal)
Backs up the firmware information of the primary Client and saves as a file format to
the FTP server.
1.
2.
24
Right-click on the target Client and select [Client]-[Backup
Firmware].
The “Backup Firmware” dialog box will appear.
3. BASIC OPERATION
English
[FTP Setting] ...............Enter the firmware information file name to store the
selected Client, Server name, User Name, etc. (The firmware
information file has no compatibility between Client models.
File names are recommended to have each Client model
name. Follow the FTP server naming rules when naming
configuration file names.)
[Local Administrator] .Enter the Administrator’s password
[Account to join the domain]
...................................Enter the user’s name and password to log on the domain.
[Check password by the client before execution]
...................................Click the check box to confirm the password on the client
before the backup.
3.
Click [OK].
The Client restarts automatically and remote boots.
The configuration file will be stored on the FTP server. The Client restarts
automatically.
NOTE
• Do not change the firmware file contents on the FTP server.
3. BASIC OPERATION
25
English
Store Firmware Command
Store the firmware file in all selected Client terminals from the FTP server and update
the firmware.
NOTE
• Copy the firmware file to the FTP server before storing. Please satisfy the FTP
server naming rules when renaming firmware file names.
• Firmware file has no compatibility between each Client model. Be sure to store the
correct file to meet the selected Client(s) model. If the file of other model is sent,
Client responds the error message and the firmware file is not stored in it.
1.
Right-click on the target Client and select [Client]-[Store Firmware].
2.
The “Store Firmware to Clients” dialog box will appear.
[File Name] .........................Enter the firmware file name to store the selected
Client(s). (Configuration file has no compatibility
between Client models. File names are recommended
to have each Client model name. Follow the FTP
server naming rules when naming configuration file
names.)
[Server] ...............................Enter the full domain name or FTP server IP address to
send the file to the Client(s).
[User Name]........................Enter the user’s name to log on to the FTP server.
[Password] ..........................Enter the password to the user’s name to log on to the
FTP server.
[Check if the network environment is suitable for download the firmware.]
...................................Click the check box if you would like to check the
network environment.
[Restart the Client after storing the firmware.]
...................................Click the check box if you would like to restart the
Client(s) after storing the firmware.
26
3. BASIC OPERATION
English
3.
4.
Click the [Check if the network environment is suitable for
downloading the firmware.] check box to check the network
environment.
Click [OK].
NOTE
• The status of the selected Client(s) becomes “Processing” while checking the
network environment, and returns to “Up” after Client(s) receives the firmware.
An error message will appear if the network communication has trouble.
5.
6.
Right-click on the target Client and select [Client]-[Store Firmware]
again.
If restarting the Client(s) after storing, click the check box of [Restart
the Client after storing the firmware].
NOTE
• If the Client(s) doesn’t restart after storing the firmware, the firmware has not
been updated.
• The Windows XPe-based Client Terminal restarts 3 times automatically. Then,
the stored firmware file will be enabled.
7.
Click [OK]. The following warning message will appear.
Click [Yes] to store the firmware in the selected Client Terminal(s).
NOTE
• Follow the warning message if the firmware has not been stored. The wrong
operation will prevent the Client(s) from restarting.
• After the firmware has been updated, restarting the Client(s) causes the IP address
to return to the default. When a DHCP server is not used, any command from
Network Administrator cannot be controlled until an IP address is specified to each
Client directly.
3. BASIC OPERATION
27
English
3-5. Monitor Control
The NA service manages the target Client monitor.
Auto Adjustment
Perform the automatic screen adjustment of the target Client monitor(s) (only when the
analog signal is connected)
1.
2.
Right-click on the target monitor and select [Monitor]-[Auto
Adjustment].
Auto Adjustment will occur on the target monitor.
NOTE
• In case of a digital connected monitor, the auto adjustment command is not
required.
• When the monitor is in power-save mode, this command will not work correctly.
Power ON/OFF
Turn the target monitor(s) ON or OFF (Power button OFF status).
1.
2.
Right-click on the target monitor and select [Monitor]-[Power
ON/Power OFF].
The monitor(s) will turn on or off.
Security ON/OFF
A security function is assigned to the target Client monitor(s). When the Client monitor
is disconnected from the network without appropriate settings on the Console
(disconnecting of a USB cable, starting stop of SA service, etc.), the security system will
be activated and it becomes impossible for the monitor to use it (5 minutes after turning
the monitor on, the power supply is automatically shut off).
NOTE
• Refer to “Operation of Security”(p.29).
28
3. BASIC OPERATION
English
Procedure
1.
Right-click on the target monitor and select [Monitor]-[Security ON].
2.
The security function will be ON.
NOTE
• When disconnecting the monitor from the network, quit the security system on the
Network Administrator. The security system cannot be different from the monitor.
Cancel procedure
When disconnecting the monitor from the network, quit the security system on the
Network Administrator. Quitting security does not display a security-warning message.
1.
2.
Right-click on the target monitor and select [Monitor]-[Security
OFF].
The security function will be canceled.
3. BASIC OPERATION
29
English
Security system (The flow by power off of the monitor)
When the monitor is disconnected from the network without the appropriate setting on
the server, the security system will be activated and it becomes impossible for a
monitor to use it after 5 minutes.
NOTE
• When the security system is activated, turn the monitor off. After that, check the
connection of the network cable and the USB cable, and then turn the monitor on
again.
30
3. BASIC OPERATION
English
Adjustment lock ON/OFF
Turning the Client monitor(s)’s adjustment function from locked or unlocked.
1.
2.
Right-click on the target monitor and select [Monitor]-[Adjustment
Lock ON /OFF].
The Client monitor(s) will be locked or unlocked.
3. BASIC OPERATION
31
English
3-6. Multiple Clients Management
Select several Clients or monitors and operate them at the same time while pressing the
shift key or control key.
NOTE
• The “Store configuration”, “Send PING” and “Backup Firmware” commands are not
available.
3-7. All-Clients Management
Select the NA Service to operate all the Clients that the NA Service manages.
NOTE
• The “Store configuration”, “Send PING” and “Send “Backup Firmware” commands
are not available.
• However, some Clients cannot receive an operation command depending on their
state or model.
32
3. BASIC OPERATION
English
3-8. Client’s Properties
There are settings using the Client Properties.
Client Information
Confirm the Client’s hardware and software information, and set some comments.
NOTE
• All the property information is not available when the Client is off.
1.
Right-click on the target Client and select [Properties]
2.
“Client Properties” will appear. Select the [Client Information] tab.
[Hardware] .........................Confirm the Client’s model name, serial number, and
Ethernet address
[Software] ...........................Confirm the Client’s software version, such as
Windows CE, Microsoft Terminal Server Client.
[Comment Settings] ............Set the Location, Comment, Note and Administrator.
[Allow inheritable settings from the parent to this object]
...................................Inherit the FTP settings and Schedule settings from the
group settings.
[↑↓]..................................Move up/down the Client information.
3.
Click [OK].
3. BASIC OPERATION
33
English
Network Settings
Name the Client’s used on the network.
1.
Right-click on the target Client and select [Properties].
2.
“Client Properties” will appear. Select the [Network Setting] tab.
[Client Name] .....................Assign a name to recognize the selected Client from
the others.
[ICA Client Name]..............Assign a name to recognize the selected Client from
the others.
[Obtain an IP Address from the DHCP server]
..................................Select if obtaining an IP address from the DHCP server.
[Specify an IP Address] .......Select how to receive an IP address.
[Enable DNS], [Enable WINS]
...................................Click the [Enable DNS] check box or [Enable WINS] if
using DNS or WINS.
[↑↓]..................................Move up/down the Client information.
3.
34
Click [OK].
3. BASIC OPERATION
English
3-9. Monitor Properties
There are settings using the Monitor Properties.
Monitor Information
Confirm the monitor’s information and set comments.
1.
Right-click on the target monitor and select [Properties].
2.
“Monitor Properties” will appear.
[Client]................................Confirm the connected Client’s name and IP address
[Monitor]............................Confirm the information, such as the monitor’s model
name, serial number, operating time and resolution.
[Comment Settings] ............Set the Location, Comment, Note and Administrator.
[Allow inheritable settings from the parent to this object]
...................................Inherit the FTP settings and Schedule settings from the
group settings.
3. BASIC OPERATION
35
English
3-10. About Event Log
NA Service reports some operating logs as Windows Server application logs. Click
[Administration Tool]-[Event Viewer] to confirm the logs on the control panel.
NOTE
• Set up event logs in a group from the NA service properties to output.
[Output Log Type]..............Select the event log type to output.
36
3. BASIC OPERATION
English
3-11. Adding/Deleting Clients
Add Clients on the Network
When adding new Clients on the network, follow one of the directions below to add
them to the NA Service.
[Find the Target Clients]
Follow “3-2. Finding target Client(s)” to re-find the target Clients on the network. Then
additional Clients will appear on the NA Service list.
[Set the Administrator Console IP Address at the Clients]
Set the PC’s IP address of the NA Service at the Clients, and the Clients will be added to
the NA Service automatically.
Delete Clients on the Network
The registration of the Clients that are once found will stay at the NA Service even
though they are deleted on the network. Follow the directions below to delete the
Clients.
1.
Right-click on the Client to delete and select [Delete].
2.
The target Client will be deleted.
NOTE
• Only the [Down] Clients can be deleted.
• The monitors connected to the deleted Clients will also be deleted.
• Only the monitors cannot be deleted.
3. BASIC OPERATION
37
English
4. ADVANCED OPERATION
Clients can be grouped and operated at a time. Each command can be scheduled and
performed.
4-1. Group Setting
Groups can be created on the Console window and arbitrary Client(s) can be controlled
collectively.
Generate a new group
1.
Right-click on the NA Service or a group, and select [New]-[Group].
2.
New group will be generated.
You can simply make a group like making a new folder in the Windows Explorer
by class without limit.
38
4. ADVANCED OPERATION
English
Inheritable settings between objects (NA Service, Group,
and Cleint(s))
If the [Allow an inheritable setting from parent to propagate to this object] check box
on each object property is checked, the settings (FTP Setting and Schedule Settings) of
the direct higher-class object will be inherited.
[Allow an inheritable setting from parent to propagate to this object]
...................................An inheritable setup among the NA Service (FTP
Setting and Schedule Settings) is inherited in a group.
Add the Client(s) to the group
Select the target Client(s) or group and drag it into the group on the Main Console
window.
Delete the group
Right-click the target group and select [Delete]. The Client(s) located on the group are
moved to parent group.
4. ADVANCED OPERATION
39
English
Collective Control by Group Menu
1.
2.
40
Right-click the target group and select [Client] or [Monitor].
All Clients or monitors in a group can be controlled collectively by
the following commands.
4. ADVANCED OPERATION
English
4-2. Scheduling Control
Set schedules to send the commands automatically to Client(s) on schedule.
Schedule Settings
1.
Right-click on the target object and select [Properties].
2.
The properties of the object will appear.
3.
Click the [Schedule Settings] tab.
(Ex. Group Properties)
[Add Schedule]....................Selectable commands on this tab vary depending on
the selected action.
[Action]...............................Select the command from the pull-down menu.
[File Name] .........................Enter the configuration/firmware file name to store to
the selected Client(s).
[Retry] ................................Enter the number of the retries if the command fails to
send.
[Restart the Client after storing the file.]
...................................Click the check box to restart the Clients after storing
the configuration/firmware file.
[Mask the network settings]
...................................Click the check box to avoid overwriting the network
settings when storing the configuration file.
[Day/Time]..........................Set the day and time for sending the command.
4. ADVANCED OPERATION
41
English
4.
Click [Add]. The set command will be listed on the list box.
5.
Click [OK].
NOTE
• Schedule Settings are not available (gray out) when [Allow an inheritable setting
from parent to propagate to this object] at the Properties of the current setting
Group or Client.
• When releasing the check box, the Schedule Settings of the direct higher rank
object will be copied to the current setting tab. Please reset the schedule to the
current object.
42
4. ADVANCED OPERATION
English
FTP Setting
FTP server setting for scheduling control is available on the FTP setting tab.
1.
Right-click on the target object and select [Properties].
2.
The properties of the object will appear. Select the [FTP Setting] tab.
(Ex. Group Properties)
[Server] ...............................Enter the IP address or the full domain name of the
FTP server.
[User Name]........................Enter the user’s name to gain access to the FTP server.
[Password] ..........................Enter the password to gain access to the FTP server.
3.
Click [OK].
4. ADVANCED OPERATION
43
English
5. LARGE SCALE
MANAGEMENT
5-1. Managing Clients on Multiple Network
Segments
A Large-scale Client management on multiple network segments requires the Network
Administrator to set the network range.
Directed Broadcast
Set the network range controlled by the NA Service. The NA Service sends broadcast
packets while finding and starting up the Clients. Specifying the network segment range
to send out broadcast packets when managing the Clients on other network segments.
44
1.
Right-click on the NA Service and select [Properties].
2.
The [NA Service (local) Properties] properties will appear.
5. LARGE SCALE MANAGEMENT
English
[Directed Broadcast] ...........Enter the Broadcast address directly when the target
Client(s) does not exist on the same network segment
as the NA Service’s. In this case, the bit number of all
the Host IDs should be one. For example, if the
Network ID type is ‘xxx.xxx.xxx’ (the Class C
network), enter the Broadcast address
“xxx.xxx.xxx.255”.
[Disable to broadcast to the address of “255.255.255.255”]
...................................Click this check box when you do not want to send
any broadcast packets to the network segment where
the server PC with the NA Service is in. This prevents
the NA Service from managing Clients on the same
network segment.
Watching Client(s) Status by Sending PING
• In the following cases, the NA Service does not show the newest status of the Clients
unless you click [Find client(s)].
• When the Administration Console in the Clients is not set (See Client’s Properties at
page 15.)
• At unexpected power down
• When a network communication error occurs
Right-click on the NA Service and select [Properties]-[Service Setting]. Click [Enable to
detects Client disconnection]. The NA Service will send PING periodically to the Up
status Client(s) to detect the Client(s) disconnection.
NOTE
• The quantity of the Clients, and the interval sending each PING may affect the
server PC’s loading extremely.
5. LARGE SCALE MANAGEMENT
45
English
5-2. Multiple NA Services Control by a Console
When managing many Clients on the multiple network segments, management by one
NA Service could cause problems on the server PC’s capability, or network traffic.
In this case, solve the problem by installing the NA Service to multiple server PCs to
divide Clients by segment. It is possible to operate and connect all the NA Services from
a Console in use of multiple NA Services.
1.
Plan how your NA Service should be distributed.
The target Clients should be distributed by a network segment. Arrange the server
PCs that operate the NA Service, considering the network condition or the
bandwidth.
NOTE
• Basic distribution is that Clients are arranged per network segment.
2.
Arrange the Console PC for usual use.
This Console connects to all the NA Services.
3.
Install the Network Administrator into each server PC.
4.
Set the NA Service Properties in each server PC.
Enter the Console IP address at [The Console IP address(es) which permits the
connection with this server]. (See “The Console IP Address Permitted to Connect
with the NA Service” on the next page.)
5.
46
Connect to each NA Service in the server PC from the Console in the
Console PC.
5. LARGE SCALE MANAGEMENT
English
The Console IP Address Permitted to Connect with the
NA Service
The NA Service of the default settings allows to control itself only from the Console on
the same Server PC as the NA Service’s (local PC). Connecting to the NA Service from
the Console on another server PC, enter the server PC’s IP address at [Service Setting] of
the NA Service.
[Console IP Address(es) permitted to connect with this Service]
...................................Enter an IP address(es) of a server PC with the Console
to connect.
NOTE
• Even after the Console IP address(es) setting, it is always possible to connect to the
Console on the local PC.
5. LARGE SCALE MANAGEMENT
47
English
Switching the NA Service Connection
It is possible to switch the connection to the NA Service on another server PC.
1.
2.
3.
Right-click on the NA Service and select [Connect another NA
Service…].
Select [Another computer] and enter the IP address of another server
PC with NA Service.
Click [OK].
The Console connects to the selected server PC, shows the information on the operated
NA Service, and manages the Clients.
NOTE
• Before switching the NA Service connection, enter the IP address of the Console at
[NA Service Properties]-[Service Setting]-[Console IP Address(es) which are
permitted to connect to this service] (p. 47).
48
5. LARGE SCALE MANAGEMENT
English
Adding NA Services into Console
When controlling multiple NA Services by a Console, other NA Services can be shown
in the Console by adding another Console snap-in.
[MMC Snap-in]
1.
2.
Click the Windows start menu, select [Run], enter [mmc] and click
[OK].
Select [Console]-[Add/Remove Snap-in].
5. LARGE SCALE MANAGEMENT
49
English
50
3.
Click [Add].
4.
Select [Network Administrator] from the snap-in list, and click [Add].
5. LARGE SCALE MANAGEMENT
English
5.
6.
Select a local or another computer. When selecting another computer,
enter the IP address of the server PC that is operating the NA Service.
Click [Finish].
When you add another NA Service, repeat the step 4 and 5 at the [Add Standalone
Snap-in] dialog box.
7.
8.
Click [Close] at the [Add Standalone Snap-in]
Click [OK] at the [Add/Remove Snap-in]. The NA Service of each
server PC will appear on the left pane of the Console.
NOTE
• Before adding the NA Service connection, enter the IP address of the Console at
[NA Service Properties]-[Service Setting]-[Console IP Address(es) which are
permitted to connect to this service]. See page 47.
5. LARGE SCALE MANAGEMENT
51
English
5-3. Control by two or more administrators
-A service controlled by two or more ConsolesOne NA Service can make a connection from two or more Consoles. If needed,
administrators can start Consoles in their own PC, and can share use of one NA Service.
Installation of Console only
It is possible to install Console only for the Network Administrator. Administrator
who uses Windows 2000 Professional on the server PC can control the system by
Console.
1.
2.
Save the download the executable file from the EIZO homepage a to
the local hardware drive.
Execute the saved file. Network Administrator Version 3.0 Setup
Wizard will start. Follow the wizard to install the program.
Select [Console] only at the Setup type page.
3.
After installation, EIZO Network Administrator Version 3.0 will be
installed in [Program]-[EIZO]-[Network Administrator].
Connect to the NA Service
1.
2.
3.
52
Click [Start] button. Click [Program]-[EIZO]-[EIZO Network
Administrator] and select [EIZO Network Administrator Version
3.0].
The main window of the Console will appear as the Network
Administrator starts.
Right-click on the NA Service and select [Connect another service].
5. LARGE SCALE MANAGEMENT
English
4.
5.
Select [Another computer], and enter an IP Address of server PC with
the NA Service on the blank.
Click [OK].
NOTE
• Before connecting to the NA Service, enter an IP address of the Administrator’s PC
on the [NA Service Properties]-[Service Settings]-[Console IP Address(es) which
are permitted to connect to this service] of the target PC with NA Service (See page
51).
Exclusion Control and Console Timeout
When one NA Service has a connection demand from two or more Consoles
simultaneously, the right of control is prior to the previously connected Console.
Read-only connection is available for the later connected Console.
[Switching the Access Right]
If the Console is not used for the specified time, the connection will be timeout from the
NA Service (See p.12).
Access right switches to other Console, which is firstly connected to the service after
timeout.
NOTE
• Reconnect to the NA Service if the Console is in the read-only connection.
[Timeout Settings]
Refer to p.12.
5. LARGE SCALE MANAGEMENT
53
English
6. TROUBLESHOOTING
Contact the EIZO dealer or the EIZO support if problems cannot be solved with the following
methods.
Problems
1.
Client(s) is not found when
clicking [Find client(s)].
2.
The response message from the
Client(s) does not appear when
sending the command.
3.
[Properties] window of Client is
gray out and cannot be changed.
4.
The Client will not appear on the
main console window list when
connecting another Client.
5.
The console and the NA Service
are disconnected frequently.
54
6. TROUBLESHOOTING
Points to check with possible solutions
Check if the cables (ex. network cable) are
connected properly.
Check if the main power switch of the target
client is ON.
Check if PING replies correctly. (Refer to page
19)
Check if the [Administration Console] of Client
is set properly. See ‘3-1. Client Terminal’s
Settings (p.15).
Confirm if the Clients is on the same subnet
mask as the NA Service. See Directed Broadcast
(p.44).
The Terminal Client is logged in if it has
Windows XPe.
Check if the [Administration Console] of Client
is set properly. See ‘3-1. Client Terminal’s
Settings (p.15).
Confirm the [Timeout Settings] (Refer to 11).
English
Problems
6.
Configuration Backups / Store
Configurations / Backup Firmware
/Store Firmware commands do not
work.
Points to check with possible solutions
Check if the [Administration Console] of Client
is set properly. See ‘3-1. Client Terminal’s
Settings (p.15).
Confirm the access to the FTP server.
The FTP server access may not be available for
writing.
Follow the FTP server naming rules according to
the naming configuration file names and
firmware file name.
Check the followings if the FTP server name
cannot be solved.
• Check if the DNS server name in each Client is
correct.
• Check if the DNS server name in the DHCP
server is correct when the DNS server obtaining
an IP address from the DHCP server.
7.
The Clients on a different network
cannot be found.
Make sure the FTP server settings and
determination of the network range are set
properly (p.43).
Confirm if the Clients is on the same network
segment as the NA Service (p.44).
8. The [Status] in the main Console
Window remains “Up” after turning
off the Client itself.
Check if the [Administration Console] of Client
is set properly. See ‘3-1. Client Terminal’s
Settings (p.15).
9. The Remote Boot Manager Setting
can not be selected on the NA
service property.
Check if the Microsoft Remote Boot Service is
installed.
Restart the NA Service. The NA Service can be
restrated from [Control Panel]-[Control Tool][Service].
10. Firmware backups and Store
Fimware commands do not work.
Check if the Microsoft Remote Boot Service is
installed. (p.12)
Check in the DHCP Service is operating on the
network.
The FTP server access may not be available for
writing.
Follow the FTP server naming rules according to
the naming configuration file names and
firmware file name.
Check if the Ethernet Address of Windows XPe
Client Terminal has been changed on the
terminal. Return to the default setting.
6. TROUBLESHOOTING
55
English
Problems
Points to check with possible solutions
11. The Client specified in the startup
command does not work.
Check if the Ethernet Address of Windows XPe
Client Terminal has been changed on the
terminal. Return to the default setting.
12. The monitor(s) cannot be found
when clicking [Find client(s)]
Check if the cables (network cable or USB cable)
are properly connected.
Check if the monitor power switch is ON.
13. The monitor image is dark.
The monitor power is OFF.
Check if the monitor’s secuity is ON. If ON,
change the setting to OFF.
Connect the monitor and Client Termina; with
the USB cable. Then connect the Client
Terminal to the network correctly.
Check if the NA service is running correctly.
14. The sent message does not appear
on the Client.
Check the software version of the Client
Terminal. If the new firmware is available,
upgrade and retry the ‘send message’. (About the
software version of the Client Terminal, refer to
the user’s manual for the system administrator.)
Refer to ‘Store Firmware Command’ (p.26)
56
6. TROUBLESHOOTING