1
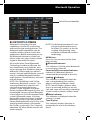
Bluetooth Operation
In - Dash Navigation Radio
Introduction
Congratulations on your purchase of the In-Dash Navigation Radio. Please read
the instruction manual for this product before using. The documentation provided
will allow you to fully enjoy all the Bluetooth features this unit has to offer. Please
save this manual for future reference.
Bluetooth® is a trade mark of Bluetooth Special Interest Group (SIG) Inc.
WARNING!
Never install this unit where
operation and viewing could interfere
with safe driving conditions.
WARNING!
To reduce the risk of a traffic accident
(except when using for rear view video
camera) never use the video display
function while driving the vehicle.
This is a violation of federal law.
WARNING!
To prevent injury from shock or
fire, never expose this unit to
moisture or water.
2
WARNING!
Never disassemble the unit.
WARNING!
Never use irregular discs.
WARNING!
To prevent damage to the mechanism
inside this unit, avoid impact
to the unit’s monitor.
WARNING!
Using an improper fuse may cause
damage to the unit and result in a fire.
Contents
INTRODUCTION������������������������������������������������������������������������������������������������������������������������������ 2
CONTENTS���������������������������������������������������������������������������������������������������������������������������������������� 3
BLUETOOTH OPERATION ���������������������������������������������������������������������������������������������������������� 5
Bluetooth Screen������������������������������������������������������������������������������������������������������������������ 5
To Adjust Your Call’s Volume������������������������������������������������������������������������������������ 6
Pairing Your Wireless Phone���������������������������������������������������������������������������������������������� 7
To Pair a Wireless Phone to the Unit���������������������������������������������������������������������� 7
To Pair the Unit to a Wireless Phone���������������������������������������������������������������������� 8
To Delete Paired Wireless Phones�������������������������������������������������������������������������� 9
Making Outgoing Calls�������������������������������������������������������������������������������������������������������� 9
To Dial Directly�������������������������������������������������������������������������������������������������������������� 9
To Make an Outgoing Call Using Your Contact List����������������������������������������10
Managing Incoming Calls������������������������������������������������������������������������������������������������10
To Answer an Incoming Call ����������������������������������������������������������������������������������10
To Reject an Incoming Call��������������������������������������������������������������������������������������10
Call Waiting����������������������������������������������������������������������������������������������������������������������������11
Device Screen ����������������������������������������������������������������������������������������������������������������������11
Bluetooth Settings Screen�����������������������������������������������������������������������������������������������12
PIN Code Setting Screen��������������������������������������������������������������������������������������������������12
Contacts List Screen ����������������������������������������������������������������������������������������������������������12
Contacts Keyboard Screen����������������������������������������������������������������������������������������������12
Call Log Screen��������������������������������������������������������������������������������������������������������������������13
Bluetooth Music Function������������������������������������������������������������������������������������������������14
NOTES ����������������������������������������������������������������������������������������������������������������������������������������������15
3
This page is intentionally left blank.
4
Bluetooth Operation
Paired Device Identifier
BLUETOOTH SCREEN
Bluetooth® technology has the
capability to wirelessly synchronize
and transfer data among devices. The
Bluetooth audio capabilities can be
used for wireless phones hands free
applications. Before attempting to use
the Bluetooth functions on the unit,
please make sure your wireless phone
supports Bluetooth functions.
We use the latest Parrot Bluetooth
Technology in order to offer you the
best connection, most features, and
easiest pairing, but all phones operate
differently. Please read your phone’s
owner’s manual and familiarize yourself
with its available Bluetooth features
and functions. Not all features will work
with all phones.
NOTE: For GM Vehicles with OnStar
and factory Bluetooth systems – The
steering wheel/voice controls will
continue to operate the factory
systems. If you continue to use the
factory equipped Bluetooth System, we
recommend you turn off the Bluetooth
in the Advent In-Dash Navigation Radio
system’s Bluetooth menu so it does
not conflict with your factory installed
Bluetooth system. If you do not have
factory Bluetooth but have OnStar, your
steering wheel controls will operate
the OnStar system only. This is normal
operation. All other Audio controls will
work normally.
NOTE: The distance between this unit
and your cellular phone must
be 8 feet (2.4 meters) or less for
sending and receiving voice
and data via Bluetooth wireless
technology.
MENU Icon:
Press this icon to return to the Main
Menu Screen.
Bluetooth Indicator
This indicator is lit blue when Bluetooth
is on and gray when off.
Connected/Disconnected Indicator.
Indicates if a Bluetooth device is
connected/disconnected to the unit.
Loading Indicator
This indicator is displayed when the
unit is downloading your wireless
phone’s call log and address book.
NOTE: Not all wireless phones allow
access to received, dialed, or missed
calls and some will not allow uploading
of your wireless phone’s address book.
Mute Indicator:
This indicator is displayed when the
volume is muted.
Time Display:
This indicator displays the time as
entered by the user in the Settings
Menu.
5
Device Icon:
Press this icon to access the Device
Screen.
Transfer Icon:
Press this icon while talking to transfer
audio from the unit back to the wireless
phone. You can only transfer a call after
it has been answered. Press the icon
again to return the audio from the
wireless phone to the unit.
Contacts Icon:
Press this icon to access the Contacts
List Screen. The contacts feature is
enabled only when paired with a
wireless phone.
Call Log Icon:
Press this icon to access the Call Log
Screen. The call log feature is enabled
only when paired with a wireless phone.
Bluetooth On Icon:
Press this icon to turn on the autopair
function. The unit will automatically
search for a device in the discover
mode.
A2DP Icon:
The Bluetooth Music feature is enabled
only when paired with a wireless phone.
Press the MUSIC icon and four control
functions will appear if the function is
supported by the wireless phone. These
are Previous, Next, Play/Pause and Stop.
Push-to-Talk Icon:
Press this icon to activate your wireless
phone’s voice commands (if equipped).
NOTE: Your vehicle’s steering wheel
controls (if equipped) will also
activate your wireless phone’s
voice commands.
6
Dial Icon:
Press this icon to dial to phone number
that you entered.
Hang Up Icon:
Press this icon to end a call or reject an
incoming call.
Microphone Gain Icon:
Press the
or
icons to decrease
or increase the desired microphone
gain setting by one increment.
TO ADJUST YOUR CALL’S VOLUME
To adjust the volume while in a call,
rotate the volume control knob. The call
will remain at this volume for all future
calls and return to your previous source
volume when your call ends.
NOTE: If your volume seems too low,
make sure your phone’s volume
is turned up to full while in a
Bluetooth call. If it is not full, it
will result in a low volume level.
All phones operate differently;
you may need to consult your
phone’s owner’s manual.
Bluetooth Operation
PAIRING YOUR WIRELESS PHONE
Before using Bluetooth functions, you
must pair your wireless phone and the
unit. Pairing is a special process used
when two devices connect for the first
time. The pairing process is used to generate a link key that is used for authentication purposes for future Bluetooth
connections between devices. The unit
can pair five Bluetooth devices.
Your wireless phone can be paired
with the unit in two manners. The unit
can initiate the search for compatible
devices and pair to the wireless phone
or the wireless phone can initiate
the search and pair to the unit. The
following paragraphs describe both
methods.
NOTE: The following procedures are
generic. Procedures for pairing
wireless phones vary slightly
from phone manufacturer to
phone manufacturer.
To Pair a Wireless Phone to the Unit:
1. Press the front panel PHONE button
or press the Main Menu Bluetooth
icon to access the Bluetooth Screen.
2. Turn Bluetooth on.
3. Access the wireless phone Bluetooth
function and set the Bluetooth
function to on. (Please refer to
the wireless phone’s instruction
manual to enter Bluetooth setup,
turn Bluetooth on/off, and perform
pairing).
4. Use the wireless phone’s add a new
device feature. A device or devices
will appear on your wireless phone
display.
5. A prompt to pair should appear on
your wireless phone. Accept the
request and initiate the process.
6. A prompt to enter a PIN number or
passkey for the unit should appear.
The default passkey for the unit is
“1234”.
7. At this point a prompt stating
pairing successful should appear.
The paired device identifier appears
on the Bluetooth Screen. The
wireless phone and the unit have
paired.
7
To Pair the Unit to a Wireless Phone:
1. Access the wireless phone Bluetooth
function and set the Bluetooth
function to on. (Please refer to
the wireless phone’s instruction
manual to enter Bluetooth setup,
turn Bluetooth on/off, and perform
pairing).
2. Set your wireless phone Bluetooth
discovery mode to on.
NOTE: S ome discovery modes have
a time limit before they are
automatically turned off.
3. Press the front panel PHONE button
or press the Main Menu Bluetooth
icon to access the Bluetooth Screen.
4. Turn Bluetooth on.
5. On the unit’s Bluetooth Screen,
press the Device icon. An Inquiry
screen appears. The unit will search
for devices. Press the Search icon
to look for new phones if yours is
not discovered by the unit. Upon
completion of the search, the
following screen appears:
8
6. P
ress the Search icon. The following
screen appears:
7. P
ress the wireless phone identifier
that you want to pair. The following
screen appears:
8. E nter the passkey for the unit. The
default passkey for the unit is “1234”.
Press the Enter (
) icon.
9. At this point the wireless phone
will ask you to respond to a prompt
similar to “Pairing request from
_______ Accept? Yes or No “. You
should answer Yes to the request.
10.Enter the passkey for the unit. The
default passkey for the unit is “1234”.
The wireless phone and the unit
should pair.
Bluetooth Operation
To Delete Paired Wireless Phone(s):
1. Press the front panel PHONE button
or press the Main Menu Bluetooth
icon to access the Bluetooth Screen.
2. On the Bluetooth Screen, press the
Device icon. The following screen
appears:
3. T o delete a single device, press the
Delete icon adjacent to the device,
or
4. To delete all devices, press the
Delete All icon. The following screen
appears:
MAKING OUTGOING CALLS
Outgoing calls can be performed in
two manners. The outgoing call can
be direct dialed using the front panel
keypad or the by pressing the Contacts
icon, selecting a name and pressing the
phone number.
To Dial Directly:
1. Press the front panel PHONE button
or press the Main Menu Bluetooth
icon to access the Bluetooth Screen.
The Bluetooth Screen appears:
2. U
se the 0-9, */+, and # buttons
to input the phone number. If
necessary press the
icon to
clear the last digit or the entire
number and start over.
3. After entering the phone number,
press the Dial ( ) icon to dial the
call. The Dial Frame Screen appears:
3. Press the Yes icon. The wireless
phones are deleted from the unit.
4. T o end the call, press the
Hang Up (
) icon.
9
To Make an Outgoing Call Using Your
Contact List:
1. Press the front panel PHONE button
or press the Main Menu Bluetooth
icon to access the Bluetooth Screen.
The Bluetooth Screen appears:
2. P
ress the Contacts icon. The
following screen appears:
3. P
ress the Scroll Up ( ) or Scroll
Down ( ) icons to navigate to
your desired contact or press
the Keyboard icon to search
alphabetically through the contact
list.
4. Press the contact to be dialed. A
list displaying the contact’s phone
number(s) appears.
5. Press the desired phone number
icon. The Bluetooth Screen appears.
6. Press the Dial ( ) icon to dial the
call. The Dial Frame appears.
7. To end the call, press the
Hang Up (
) icon.
10
MANAGING INCOMING CALLS
When connected to a Bluetooth
phone, the unit will mute audio output,
pause DVD/CD play, and change to
the Bluetooth Screen when a call is
received.
The incoming phone number or
assigned name for that number will
appear in the middle of the screen. An
audible tone will sound from the unit
and a graphic display will appear on the
front panel. If the incoming call has no
caller ID, the unit will display “Private
Caller”.
To Answer an Incoming Call:
1. To answer a call, press the
Dial ( ) icon.
2. For best reception, speak loudly
and clearly into the hand-free
microphone.The hands-free
microphone is installed in your
vehicle in an accessible location that
provides optimum voice reception.
3. To end the conversation, press the
Hang Up (
) icon.
To Reject an Incoming Call:
Press the Hang Up (
) icon to reject
an incoming call. The call will revert
to your wireless phone and be left for
voice mail.
Bluetooth Operation
CALL WAITING
DEVICE SCREEN
Call Waiting lets you know when
another caller is trying to reach you
while you are already on a call. You may
put one call on hold while you answer
the second one, then alternate between
the two calls. The second caller or call
on hold is identified in the upper left
corner of the screen.
1. When a second call is received, the
Call Waiting Screen appears.
This Device Screen is used to discover
and add or delete paired devices from
the unit.
Back Icon:
Press this icon to return to the previous
screen.
Delete Icons:
Press this icon to delete individual
Bluetooth devices
Settings Icon:
2. Press the Dial ( ) icon to transfer
Press this icon to view the Bluetooth
to the second call.
Settings Screen.
3. Press the the Dial ( ) icon at any
time to transfer back to the first call. Delete All Icon:
Press this icon to delete all Bluetooth
Press the Hang Up (
) icon to
terminate the second call and return devices from the unit.
Search Icon:
to the first call.
Press this icon to search for Bluetooth
devices.
11
BLUETOOTH SETTINGS SCREEN
CONTACTS LIST SCREEN
The Bluetooth Settings screen allows
you to configure Bluetooth settings.
Back Icon:
Press this icon to return to the previous
screen.
Auto Connect Setting:
The Auto Connect setting will allow
the unit to automatically connect to
a previously paired Bluetooth device
when it is in range. When Auto Connect
option is set to off, you must initiate
the pairing process with your wireless
phone.
Pin Code Setting:
Press the Set PIN icon to to view the PIN
Code Settings Screen.
PIN CODE SETTINGS SCREEN
The Contacts List Screen is a copy
of the contact list on your wireless
phone which contains a listing of
your important names and phone
numbers. The list is usually arranged in
alphabetical order.
Back Icon:
Press this icon to return to the previous
screen.
Scroll Up ( ) and Scroll Down ( )
icons
Press the Scroll Up ( ) or
Scroll Down ( ) icons to navigate to
next or previous page of the list in
groups of five.
Keyboard Icon:
Press this icon to view the Contacts
Keyboard Screen.
CONTACTS KEYBOARD SCREEN
The PIN Code can be changed with up
to any eight digits. Use the keyboard to
select the digits and press
. Once
the digits are selected and confirmed
the new PIN Code will appear in the PIN
Code on the Bluetooth Settings screen.
The default Pin Code is 1234.
12
The Contacts List Screen is used is
to search alphabetically through the
contacts list. The contact list can hold
up to 2000 names and numbers from
any phone.
Bluetooth Operation
CALL LOG SCREEN
Missed Calls Icon
Press the this icon to view the Missed
Calls List. The Missed Calls List retrieves
the list of missed numbers from your
wireless phone. The last missed number
is the first number on the list.
The Call Log Screen consists of received
calls, dialed calls or missed calls.
NOTE: N
ot all wireless phones allow
access to received, dialed, or
missed calls and some will not
allow uploading of your wireless
phone’s address book.
Back Icon:
Press this icon to return to the previous
screen.
Scroll Up ( ) and Scroll Down ( )
icons
Press the Scroll Up ( ) or
Scroll Down ( ) icons to navigate to
next or previous page of the list in
groups of five.
Received Calls Icon
Press the this icon to view the Received
Calls List. The Received Calls List
retrieves the list of received numbers
from your wireless phone. The last
received number is the first number on
the list.
Dialed Calls Icon
Press the this icon to view the Dialed
Calls List. The Dialed Calls List retrieves
the list of dialed numbers from your
wireless phone. The last dialed number
is the first number on the list.
13
BLUETOOTH MUSIC FUNCTION
NOTE: Song information (e.g. elapsed
playing time, song title, song
index, etc.) cannot be displayed
on this unit. Since there are a
number of Bluetooth audio
players available on the market,
operations with your Bluetooth
audio player using this unit
vary greatly. Please refer to the
instruction manual that came
with your Bluetooth audio player.
Bluetooth provides an Advanced Audio
When
there
is an incoming call, the
Distribution Profile (A2DP) profile for
song
will
be
paused. After the incoming
streaming music from a wireless phone
call
is
finished,
the screen will return to
or a Portable Multimedia Player (PMP),
the music function screen and playback
sometimes referred to as a MP3 player.
will continue.
The unit allows you to play back audio
Back Icon:
files from your wireless phone or a
PMP using a Bluetooth connection.
Press this icon to return to the previous
Before using an audio player, it may be
screen.
necessary to enter the default passkey
EQ - Equalizer Icon:
into the unit. The default passkey for
Press this icon to access the equalizer
the unit is “1234”.
controls.
NOTE: P
lease quit A2DP mode before
Audio Icon:
attempting to make a phone call,
Press this icon to access the audio
as unexpected results may occur
controls.
depending on your wireless
Previous Icon:
phone model.
Press
this icon to play the previous
The unit can control a Bluetooth audio
song.
player via Audio/Video Remote Control
Play/Pause Icon:
Profile (AVRCP). Bluetooth audio players
(or Bluetooth adapters) compatible with Press this icon to begin playback. Press
these profiles can be connected to this
this icon again to pause playback.
unit. Functionality varies depending on
Next Icon:
the profile used.
Press this icon to play the next song.
•A2DP: Stream audio from your BlueStop Icon:
tooth compatible audio player and
Press this icon to stop playback.
listen to the music through the unit.
•AVRCP: Play back, pause, select songs,
etc. while streaming audio from your
Bluetooth compatible audio player to
the unit.
14
Notes
NOTES
15
If technical support is required, please contact
Advent Technical Support at 1-800-323-4815.
www.adventproducts.com
© 2011 Audiovox Electronics Corp., Hauppauge, NY 11788
128-8969a