1
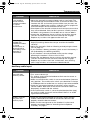
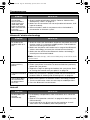
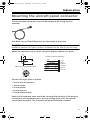
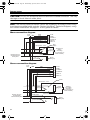
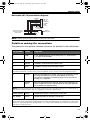
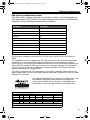
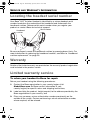
Covers.fm Page 1 Wednesday, April 25, 2012 10:38 AM
A20 AVIATION HEADSET
®
©2012 Bose Corporation, The Mountain,
Framingham, MA 01701-9168 USA
AM325453 Rev.07
Owner’s Guide
00_Cavu.book Page i Wednesday, April 25, 2012 10:10 AM
Tab 8, 16
Tab 7, 15
Tab 6, 14
Tab 5, 13
Tab 4, 12
Tab 3, 11
Tab2, 10
English
SAFETY INFORMATION
NOTE: This equipment has been tested and
found to comply with the limits for a Class B
digital device, pursuant to Part 15 of the
FCC Rules. These limits are designed to
provide reasonable protection against
harmful interference in a residential
installation. This equipment generates, uses,
and can radiate radio frequency energy and,
if not installed and used in accordance with
the instructions, may cause harmful
interference to radio communications.
However, there is no guarantee that
interference will not occur in a particular
installation. If this equipment does cause
harmful interference to radio or television
reception, which can be determined by
turning this equipment off and on, the user is
encouraged to try to correct the interference
by one or more of the following measures:
– Re-orient or relocate the receiving
antenna.
– Increase the separation between this
equipment and receiver.
– Connect this equipment into an outlet on
a circuit different from that to which the
receiver is connected.
– Consult Bose or an experienced radio/TV
technician for help.
Changes or modifications not expressly
approved by Bose Corporation could void
the user’s authority to operate this
equipment.
Operation is subject to the following two
conditions: (1) This device may not cause
harmful interference, and (2) this device
must accept any interference received,
including interference that may cause
undesired operation.
This device complies with FCC and Industry
Canada RF radiation exposure limits for
general population. It must not be collocated
or operating in conjunction with any other
antenna or transmitter.
Bose Corporation hereby declares
that this product is in compliance
with the essential requirements
and other relevant provisions of
Directive 1999/5/EC and all other
applicable EU directive
requirements. The complete
declaration of conformity
can be found at:
www.Bose.com/compliance.
Operate this product within the temperature
range of 5°F to 131°F (-15°C to 55°C) only.
i
Important Safety Instructions
•
Please read these instructions carefully
and completely before using the headset.
•
Keep these instructions and make these
instructions easily accessible to all users
at all times. Always include these
instructions when passing the headset
on to third parties.
•
During flight operations, do not use the
headset for telephone calls.
•
It is the responsibility of each aircraft
operator or pilot in command to
determine that any and all portable
devices will be free of any interference
with the navigation or communication
system of the aircraft. In addition, it is
their responsibility to determine the
suitability of the performance of portable
devices in relation to the use of the
Bose® A20® Aviation Headset.
•
The headset is capable of producing
sound pressure levels exceeding
85dB(A). In many countries 85dB(A) is
the maximum legally permissible level for
continuous noise exposure during the
working day. Exposure to sounds of
higher volume levels or longer durations
can permanently damage your hearing.
•
Never repair or attempt to repair a
defective headset yourself. Contact
Bose® Technical Support. Refer to
“Contact information” on page 37.
•
Do not immerse the headphones in water
or any other liquid. See “Cleaning the
headset” on page 23 for cleaning
instructions.
•
Warning: Choking
hazard. Keep the
batteries away from
children.
•
Danger of explosion if
batteries are incorrectly replaced.
Replace only with AA alkaline
batteries. Do not use any other
battery chemistries.
Batteries may cause a fire or chemical
burn if mishandled. Do not recharge,
disassemble, heat, or incinerate.
Dispose of used batteries properly.
00_Cavu.book Page ii Wednesday, April 25, 2012 10:10 AM
English
Tab 2, 10
Tab 3, 11
Tab 4, 12
Tab 5, 13
Tab 6, 14
Tab 7, 15
Tab 8, 16
CONTENTS
ADVISORIES
1
Operational advisory . . . . . . . . . . . . . . . . . . . . . . . . . . . . . . . . . . . . . . . . .
Hearing safety . . . . . . . . . . . . . . . . . . . . . . . . . . . . . . . . . . . . . . . . . . . . . .
Volume control . . . . . . . . . . . . . . . . . . . . . . . . . . . . . . . . . . . . . . . . . . . . .
Recognizing aircraft sounds . . . . . . . . . . . . . . . . . . . . . . . . . . . . . . . . . . .
Using audio sources . . . . . . . . . . . . . . . . . . . . . . . . . . . . . . . . . . . . . . . . .
Headset earcup requirements . . . . . . . . . . . . . . . . . . . . . . . . . . . . . . . . .
Earcup inner screen . . . . . . . . . . . . . . . . . . . . . . . . . . . . . . . . . . . . . . . . .
INTRODUCTION
4
What’s included . . . . . . . . . . . . . . . . . . . . . . . . . . . . . . . . . . . . . . . . . . . . .
What’s in the carton . . . . . . . . . . . . . . . . . . . . . . . . . . . . . . . . . . . . . . . . .
Control module variations . . . . . . . . . . . . . . . . . . . . . . . . . . . . . . . . . . . . .
Power and cable variations . . . . . . . . . . . . . . . . . . . . . . . . . . . . . . . . . . .
PREPARING THE HEADSET FOR USE
1
2
2
2
2
3
3
4
5
6
7
8
The microphone assembly . . . . . . . . . . . . . . . . . . . . . . . . . . . . . . . . . . . . . 8
Attaching the microphone assembly . . . . . . . . . . . . . . . . . . . . . . . . . . . . 8
The battery compartment . . . . . . . . . . . . . . . . . . . . . . . . . . . . . . . . . . . . . 9
Opening the battery compartment . . . . . . . . . . . . . . . . . . . . . . . . . . . . . . 9
The operation switches . . . . . . . . . . . . . . . . . . . . . . . . . . . . . . . . . . . . . . . 9
Inserting and replacing the batteries . . . . . . . . . . . . . . . . . . . . . . . . . . . 10
Connecting the headset to the aircraft . . . . . . . . . . . . . . . . . . . . . . . . . . . 11
Using the 6-pin plug . . . . . . . . . . . . . . . . . . . . . . . . . . . . . . . . . . . . . . . . 11
Using the dual general aviation plugs . . . . . . . . . . . . . . . . . . . . . . . . . . . 12
Using other plug types . . . . . . . . . . . . . . . . . . . . . . . . . . . . . . . . . . . . . . 12
USING THE HEADSET
Wearing and adjusting the headset . . . . . . . . . . . . . . . . . . . . . . . . . . . . . .
Conditions related to fit . . . . . . . . . . . . . . . . . . . . . . . . . . . . . . . . . . . . .
Microphone placement . . . . . . . . . . . . . . . . . . . . . . . . . . . . . . . . . . . . . .
Clothing clips . . . . . . . . . . . . . . . . . . . . . . . . . . . . . . . . . . . . . . . . . . . . .
Using the control module . . . . . . . . . . . . . . . . . . . . . . . . . . . . . . . . . . . . . .
Power button . . . . . . . . . . . . . . . . . . . . . . . . . . . . . . . . . . . . . . . . . . . . .
Volume control . . . . . . . . . . . . . . . . . . . . . . . . . . . . . . . . . . . . . . . . . . . .
Power indicator . . . . . . . . . . . . . . . . . . . . . . . . . . . . . . . . . . . . . . . . . . . .
Auxiliary (AUX) audio input . . . . . . . . . . . . . . . . . . . . . . . . . . . . . . . . . . .
Audio priority . . . . . . . . . . . . . . . . . . . . . . . . . . . . . . . . . . . . . . . . . . . . . .
Using the headset with a Bluetooth®-enabled phone . . . . . . . . . . . . . . . .
Pairing the headset with your phone . . . . . . . . . . . . . . . . . . . . . . . . . . .
Bluetooth® volume control . . . . . . . . . . . . . . . . . . . . . . . . . . . . . . . . . . .
Making and answering calls . . . . . . . . . . . . . . . . . . . . . . . . . . . . . . . . .
13
13
13
13
14
15
15
16
16
17
17
19
19
21
22
ii
00_Cavu.book Page iii Wednesday, April 25, 2012 10:10 AM
Tab 8, 16
Tab 7, 15
Tab 6, 14
Tab 5, 13
Tab 4, 12
Tab 3, 11
Tab2, 10
English
CONTENTS
HEADSET CARE AND MAINTENANCE
Instructions for continued airworthiness . . . . . . . . . . . . . . . . . . . . . . . . .
Cleaning the headset . . . . . . . . . . . . . . . . . . . . . . . . . . . . . . . . . . . . . . . .
General cleaning . . . . . . . . . . . . . . . . . . . . . . . . . . . . . . . . . . . . . . . . . .
Headset earcup openings . . . . . . . . . . . . . . . . . . . . . . . . . . . . . . . . . . .
Microphone windscreen . . . . . . . . . . . . . . . . . . . . . . . . . . . . . . . . . . . .
Earcup inner screen . . . . . . . . . . . . . . . . . . . . . . . . . . . . . . . . . . . . . . .
Headband cushion . . . . . . . . . . . . . . . . . . . . . . . . . . . . . . . . . . . . . . . .
Replacing parts . . . . . . . . . . . . . . . . . . . . . . . . . . . . . . . . . . . . . . . . . . . . .
Microphone windscreen replacement . . . . . . . . . . . . . . . . . . . . . . . . . .
Ear cushion replacement . . . . . . . . . . . . . . . . . . . . . . . . . . . . . . . . . . . .
Battery replacement . . . . . . . . . . . . . . . . . . . . . . . . . . . . . . . . . . . . . . .
Headband cushion replacement . . . . . . . . . . . . . . . . . . . . . . . . . . . . . .
Microphone assembly or access cover replacement . . . . . . . . . . . . . .
Storage . . . . . . . . . . . . . . . . . . . . . . . . . . . . . . . . . . . . . . . . . . . . . . . . . . .
TROUBLESHOOTING
23
23
23
23
23
24
24
24
24
24
25
25
26
26
26
27
In case of difficulty . . . . . . . . . . . . . . . . . . . . . . . . . . . . . . . . . . . . . . . . . . 27
INSTALLATION
31
Mounting the aircraft panel connector . . . . . . . . . . . . . . . . . . . . . . . . . . . 31
Details on making the connections . . . . . . . . . . . . . . . . . . . . . . . . . . . . 33
TECHNICAL INFORMATION
34
SERVICE AND WARRANTY INFORMATION
36
Locating the headset serial number . . . . . . . . . . . . . . . . . . . . . . . . . . . . .
Warranty period . . . . . . . . . . . . . . . . . . . . . . . . . . . . . . . . . . . . . . . . . . . .
Limited warranty service . . . . . . . . . . . . . . . . . . . . . . . . . . . . . . . . . . . . . .
To return your headset to Bose for repair . . . . . . . . . . . . . . . . . . . . . . .
Contact information . . . . . . . . . . . . . . . . . . . . . . . . . . . . . . . . . . . . . . . .
Ordering parts and accessories . . . . . . . . . . . . . . . . . . . . . . . . . . . . . .
iii
36
36
36
36
37
37
00_Cavu.book Page 1 Wednesday, April 25, 2012 10:10 AM
English
Tab 2, 10
Tab 3, 11
Tab 4, 12
Tab 5, 13
Tab 6, 14
Tab 7, 15
Tab 8, 16
ADVISORIES
Operational advisory
The Bose® A20® Aviation Headset incorporates Acoustic Noise Cancelling®
technology. As with any complex electronic device, it is possible for this
headset to fail during operation. Symptoms of failure may include loud tones,
distortion, and loss of communications signal in the headset when used in the
Acoustic Noise Cancelling mode.
Note: The headset includes redundant circuitry to reduce the effects of such failures
and to allow for continued use of the headset in the passive noise reducing mode.
In passive noise reducing mode, the volume controls on the control module will
automatically be set to maximum volume. If additional volume control is
needed, you can use the intercom or radio volume control.
Acoustic Noise Cancelling mode is active when the headset control module is
powered on (power indicator is lit). The headset is in the passive mode when
the power is off (power indicator is not lit). See “Control module variations” on
page 6.
If your headset is aircraft powered, connect the headset to the aircraft power
sources only as described in “Connecting the headset to the aircraft” on
page 11. The headset will not operate properly if used with any battery source
other than the Bose A20 Aviation Headset control module.
Note: In the unlikely event of a headset issue, we suggest that you switch to an
alternate communications method and use standard cockpit resource
management skills to minimize distractions.
1
00_Cavu.book Page 2 Wednesday, April 25, 2012 10:10 AM
Tab 8, 16
Tab 7, 15
Tab 6, 14
Tab 5, 13
Tab 4, 12
Tab 3, 11
Tab2, 10
English
ADVISORIES
Hearing safety
The headset is intended for use with the Acoustic Noise Cancelling® mode
turned on. Noise reduction and communications performance are reduced with
Acoustic Noise Cancelling mode turned off.
Volume control
Make sure your aircraft communications system volume control is easily
accessible. This control affects the strength of the communications signal
coming into the headset.
As pilot in command, you must be sure you can understand critical
communications even with Acoustic Noise Cancelling mode turned off. In this
case, you may need to turn up the aircraft communications system volume.
Avoid setting the volume controls at levels high enough to impair your hearing
during extended periods of headset use.
Recognizing aircraft sounds
With the headset’s active and passive noise reduction, typical aircraft sounds
(such as engines, propellers, warning alarms, and other sound sources) may
not sound familiar. We strongly advise you to make sure you can hear and
recognize these sounds when using the Bose® A20® Aviation Headset while
operating any aircraft.
Using audio sources
When listening to in-flight entertainment, or a portable audio source through a
Bose A20 Aviation Headset, be sure to limit the volume to safe levels that do
not interfere with your ability to hear informational sounds and warning alarms,
such as stall warnings or gear up, while piloting.
2
00_Cavu.book Page 3 Wednesday, April 25, 2012 10:10 AM
English
Tab 2, 10
Tab 3, 11
Tab 4, 12
Tab 5, 13
Tab 6, 14
Tab 7, 15
Tab 8, 16
ADVISORIES
Headset earcup requirements
Proper headset operation requires that the headset TriPort® openings on the
earcup are kept free of debris. The headset TriPort openings are located on the
outside of each earcup and include two holes and a screen.
TriPort
opening
Microphone
opening
Earcup inner screen
The protective inner screen is critical to the headset’s performance.
Earcup
inner screen
Do not attempt to remove, replace, or repair this screen. If screen replacement
seems necessary, contact Bose® Technical Support. See “Contact information”
on page 37.
If the screen gets wet or any foreign objects become lodged on or adjacent to
it, follow the instructions in “Headset Care and Maintenance” on page 23.
3
00_Cavu.book Page 4 Wednesday, April 25, 2012 10:10 AM
Tab 8, 16
Tab 7, 15
Tab 6, 14
Tab 5, 13
Tab 4, 12
Tab 3, 11
Tab2, 10
English
INTRODUCTION
Congratulations on your purchase of a Bose® A20® Aviation Headset. The Bose
A20 Aviation Headset is our most advanced aviation headset yet. It delivers
significantly increased noise reduction and provides a more comfortable fit,
without compromising the clear audio you expect from Bose. Plus, it offers
auxiliary audio input and is available with Bluetooth® wireless technology.
What’s included
Each Bose A20 Aviation Headset is supplied with a control module, cable, and
carrying case. The type of control module and end-plug configuration depends
on the options you chose for your headset.
There are two options for the control module:
• Control module with Bluetooth wireless technology
• Conventional control module
There are several end-plug configurations for the headset. Your headset falls
into one of two general categories:
• Battery powered: Operates with battery power only.
• Dual powered: Operates with either aircraft or battery power. No battery
needed when connected to aircraft power.
4
00_Cavu.book Page 5 Wednesday, April 25, 2012 10:10 AM
English
Tab 2, 10
Tab 3, 11
Tab 4, 12
Tab 5, 13
Tab 6, 14
Tab 7, 15
Tab 8, 16
INTRODUCTION
What’s in the carton
Headset assembly:
Accessories:
Headphones
Carrying case
Clothing clip
Control module
See “Control module
variations” on page 6
for options.
Second clothing clip
2 AA alkaline
batteries*
3.5 mm adapter cable
Cable connector (varies)
Note: Cable connector types will vary based on model of headset. See “Power
and cable variations” on page 7.
Note: *Replace batteries with alkaline batteries only. Do not use any other battery
chemistries.
5
00_Cavu.book Page 6 Wednesday, April 25, 2012 10:10 AM
Tab 8, 16
Tab 7, 15
Tab 6, 14
Tab 5, 13
Tab 4, 12
Tab 3, 11
Tab2, 10
English
INTRODUCTION
Control module variations
If you opted for Bluetooth® wireless technology, you received the control
module featuring Bluetooth technology. If not, you received the conventional
control module.
Bluetooth control module
Conventional control module
Left/Right volume controls*
Power indicator
Power button
Bluetooth
indicator
Bluetooth
function button
Multifunction
switch:
Top
Intercom
prioritized
Middle
Intercom
mixed
Bottom
Intercom
only
*Control the intercom volume
6
Bluetooth
Volume Up button
Bluetooth
Volume Down button
Auxiliary (AUX)
audio input
Audio Priority
switch:
Top
Intercom
prioritized
Middle
Intercom
mixed
Bottom
Intercom
only
00_Cavu.book Page 7 Wednesday, April 25, 2012 10:10 AM
English
Tab 2, 10
Tab 3, 11
Tab 4, 12
Tab 5, 13
Tab 6, 14
Tab 7, 15
Tab 8, 16
INTRODUCTION
Power and cable variations
The Bose® A20® Aviation Headset is available for purchase in different standard
aircraft connector options, including:
Battery powered options
Dual powered options
Operate with battery power only
Operate with either aircraft or battery power
No battery needed when connected to aircraft power
Dual G/A
U174
U384
6-pin*
5-pin XLR
8-pin
* An adapter is available from Bose to convert a 6-pin connector to a dual G/A or U174 plug
for additional connection flexibility. Other configurations require the purchase of a cable
assembly.
7
00_Cavu.book Page 8 Wednesday, April 25, 2012 10:10 AM
Tab 8, 16
Tab 7, 15
PREPARING
Tab 6, 14
THE
Tab 5, 13
HEADSET
Tab 4, 12
FOR
Tab 3, 11
Tab2, 10
English
USE
The microphone assembly
Your headset may be shipped with the microphone assembly (boom microphone
and cable) attached to the left earcup. If your headset is shipped with the
microphone assembly packed separately, you can attach it to either earcup.
Attaching the microphone assembly
Choose the earcup (L or R) to receive the microphone assembly. Also, make
sure that the earcup connector pins are clean and free of debris.
1. Use a Phillips screwdriver to loosen the two screws on the terminator cover
near the bottom of the earcup where you want to attach the
microphone assembly.
2. Remove the terminator cover to reveal the connector pins on the earcup.
3. Carefully line up the microphone assembly to the small connector socket
on the earcup.
4. Slide the connector into the socket until it reaches the stop.
L for left
Terminator
cover
Connector
pins
Microphone assembly
Connector pins
CAUTION: Do not force the connector into the socket, or earcup damage may
occur.
5. Tighten the screws to secure the assembly.
6. Attach the terminator cover to the earcup that does not have the microphone
assembly attached. Insert the screws, then align and tighten them.
Note: The headset will not work without the terminator cover installed.
CAUTION: Be sure to try the headset and fully test its operation before flight.
8
00_Cavu.book Page 9 Wednesday, April 25, 2012 10:10 AM
English
Tab 2, 10
Tab 3, 11
Tab 4, 12
Tab 5, 13
Tab 6, 14
Tab 7, 15
Tab 8, 16
PREPARING THE HEADSET FOR USE
The battery compartment
The Bose® A20® Aviation Headset is shipped with factory-set operation defaults.
If you want to alter these defaults, you can change the operation switches
located inside the control module battery compartment. If you do not want to
change any of the operation switches, skip ahead to “Inserting and replacing
the batteries” on page 10.
Note: For aircraft-powered versions (5-pin XLR, 6-pin, 8-pin) batteries are not
required for operation.
Opening the battery compartment
You must open the battery compartment to access the operation switches.
Press down firmly on the battery compartment cover finger indent and slide the
cover down. The cover is tethered to the module. Do not attempt to detach it.
Note: The battery compartment cover is designed to remain securely closed. You
may need to use additional force when pressing down and releasing cover.
The operation switches
The operation switches control the Auto Off and Stereo/Mono functions.
Operation switches
To change the operation switches
1. Open the battery compartment.
2. If batteries are installed, remove them. In the battery compartment, you can
observe and change the switch positions.
9
00_Cavu.book Page 10 Wednesday, April 25, 2012 10:10 AM
Tab 8, 16
Tab 7, 15
Tab 6, 14
Tab 5, 13
Tab 4, 12
Tab 3, 11
Tab2, 10
English
PREPARING THE HEADSET FOR USE
3. To change a switch position, use a pen or a small, flat-tipped screwdriver to
gently move the switch.
This table shows possible positions, default setting, and purpose for each switch.
Switch
Options
Purpose
1.
ON, OFF
Set at the factory to enable the Auto Off function. The headset
will turn off after 3 to 9 minutes of inactivity. To disable Auto
Off, set the switch to OFF. With the switch in OFF position, the
Acoustic Noise Cancelling® system will not turn off until you
press and hold the power button for at least one second.
Auto Off
function
Default: ON
2.
Mono/
Mono, Stereo
For most configurations, set at the factory for mono audio
Stereo
systems (to provide audio in both ears). Set it to stereo (ST)
selection Default: MONO if your aircraft has a stereo intercom.
Auto Off functionality
The Auto Off feature detects when the headset is not in use and shuts it off after
several minutes to preserve battery power. The exact time it takes to shut off
varies and can range between 3 to 9 minutes after you stop using the headset.
When the headset is running on battery power only and is not plugged in to an
intercom, it will shut off even when there is an auxiliary input present.
If you are on a phone call and unplugged from an intercom, the headset will
allow you to complete your call, then it will turn off approximately three seconds
after the call is terminated.
Note: To use the headset when unplugged from the intercom to listen to auxiliary
input audio or as a Bluetooth® wireless technology-enabled headset to make or receive
calls, we recommend you disable the Auto Off feature for uninterrupted functionality.
Inserting and replacing the batteries
CAUTION: If the batteries do not fit correctly, do not force them in. Forcing an
improper connection will cause permanent damage to the control module.
To insert or replace the batteries
1. Turn off headset power.
2. Press down firmly on the battery compartment cover and slide the cover to
release. The battery door is tethered. Do not detach the door from module.
3. Insert the two supplied alkaline AA batteries into the control module,
observing proper polarity.
4. Replace the battery compartment cover.
Note: Replace batteries with alkaline batteries only. Do not use any other battery
chemistries.
10
00_Cavu.book Page 11 Wednesday, April 25, 2012 10:10 AM
English
Tab 2, 10
Tab 3, 11
Tab 4, 12
Tab 5, 13
Tab 6, 14
Tab 7, 15
Tab 8, 16
PREPARING THE HEADSET FOR USE
Connecting the headset to the aircraft
The Bose® A20® Aviation Headset can be configured to either plug into aircraft
power or rely entirely on battery power.
Using the 6-pin plug
A single 6-pin plug inserted into the 6-pin connector provides the headset with
aircraft power and intercom audio.
If your headset is aircraft-powered, a 6-pin connector must be installed and
mounted to an aircraft panel. See “Mounting the aircraft panel connector” on
page 31.
Note: An adapter is available from Bose to convert a 6-pin connector to a dual
G/A or U174 plug for additional connection flexibility.
To connect the headset
1. Align the 6-pin plug to the connector keyway by matching the narrow bar
on the plug to the slot on the connector.
2. Firmly press the plug into the connector jack.
Align keyway
Push plug in
To disconnect the headset
1. Pull back on the sleeve near the end of the 6-pin plug.
2. Gently continue pulling back to remove the plug from the connector.
CAUTION: Do not pull the connector out without first pulling back the sleeve.
Forcing the connector out will damage the cable and/or the aircraft instrument panel.
Pull sleeve back, then pull plug out
Sleeve
11
00_Cavu.book Page 12 Wednesday, April 25, 2012 10:10 AM
Tab 8, 16
Tab 7, 15
Tab 6, 14
Tab 5, 13
Tab 4, 12
Tab 3, 11
Tab2, 10
English
PREPARING THE HEADSET FOR USE
Using the dual general aviation plugs
The most common battery powered (only) version of the headset has two
general aviation (G/A) plugs that connect to the aircraft audio. Although the
plugs look similar, the microphone plug is shorter, thinner, and has a slightly
different shape than the intercom plug.
Insert the thicker intercom plug in first. It will only fit into one of the jacks.
Then insert the thinner microphone plug into the other jack.
Microphone
Intercom/Audio
Using other plug types
The Bose® A20® Aviation Headset is also available with other types of plugs for
connecting to various aircraft audio jacks. These single-plug connectors should
be inserted into the appropriate jack on your aircraft control panel. Refer to
“Power and cable variations” on page 7.
12
00_Cavu.book Page 13 Wednesday, April 25, 2012 10:10 AM
English
Tab 2, 10
Tab 3, 11
Tab 4, 12
Tab 5, 13
Tab 6, 14
Tab 7, 15
Tab 8, 16
USING THE HEADSET
Wearing and adjusting the headset
Proper fit on your head is important both for comfort and optimal noise
reduction performance. Here are a few guidelines:
• Use the left (L) and right (R) markings above the earcups to orient the headset
properly.
R
L
• As you put the headset on, lightly grasp each earcup and adjust it so its
cushion is completely over your ear. You should feel an even, gentle pressure
all around each ear.
• Adjust the headband so it rests gently on top of your head.
Make your final adjustments with the headset powered on in a noisy
environment.
In very loud conditions, such as during takeoff, you may experience a brief
reduction in Acoustic Noise Cancelling® as the headset compensates for a
momentary pressure change. If the problem continues when the sound level
returns to normal, see “In case of difficulty” on page 27. If the problem persists,
contact Bose® Technical Support for assistance.
Conditions related to fit
A low rumbling sound or frequent, brief losses of Acoustic Noise Cancelling
noise reduction may indicate an improper fit or blocked earcup ports. See
“Headset earcup openings” on page 23 for instructions on removing
blockages.
During a long flight, you may feel a slight pressure point, which can be relieved
by adjusting the headband position. Your experience with using the headset will
help establish a sense of how it should sound and feel.
Microphone placement
Microphone placement is important for clear communications. With the
headset on your head, make these adjustments:
13
00_Cavu.book Page 14 Wednesday, April 25, 2012 10:10 AM
Tab 8, 16
Tab 7, 15
Tab 6, 14
Tab 5, 13
Tab 4, 12
Tab 3, 11
Tab2, 10
English
USING THE HEADSET
1. Grasp the boom with your fingers and move the microphone up or down so
it is level with your mouth.
2. Pull the microphone in toward your lips. Position the microphone with its
talk side facing in. Though it will be slightly off center, the microphone
should be 1/ inch from the opening of your lips.
2
Mic label
Mic is 1/2 inch
from mouth
Mic is too far
away
Mic label is
not facing
mouth
3. Make sure the talk side of the microphone is facing your lips. Do not purse
your lips.
Clothing clips
The control module cable is fitted with two clothing clips. Use the clips to
attach the headset cable to your clothing, a safety harness, or an aircraft door
pocket.
Press to open clip
Press to release and reposition
clip along the cable
14
00_Cavu.book Page 15 Wednesday, April 25, 2012 10:10 AM
English
Tab 2, 10
Tab 3, 11
Tab 4, 12
Tab 5, 13
Tab 6, 14
Tab 7, 15
Tab 8, 16
USING THE HEADSET
Using the control module
Use the control module to control the headset functions. There are two
variations of the module; one featuring Bluetooth® wireless technology and one
that has basic functions only.
Bluetooth control module
Conventional control module
Left/Right volume controls*
Power indicator
Power button
Bluetooth
indicator
Bluetooth
function button
Multifunction
switch:
Top
Intercom
prioritized
Middle
Intercom
mixed
Bottom
Intercom
only
Bluetooth
Volume Up button
Bluetooth
Volume Down button
Auxiliary (AUX)
audio input
Audio Priority
switch:
Top
Intercom
prioritized
Middle
Intercom
mixed
Bottom
Intercom
only
*Control the intercom volume
Power button
Use the power button to turn Acoustic Noise Cancelling® on or off, and control
indicator brightness.
• Press the power button once to turn on Acoustic Noise Cancelling noise
reduction.
• Press and hold the power button for 1-2 seconds to turn off Acoustic Noise
Cancelling noise reduction.
Note: Repeated pressing of the power button will not hasten the power off event.
If the unit does not power off, wait 3 seconds and press the power button again.
15
00_Cavu.book Page 16 Wednesday, April 25, 2012 10:10 AM
Tab 8, 16
Tab 7, 15
Tab 6, 14
Tab 5, 13
Tab 4, 12
Tab 3, 11
Tab2, 10
English
USING THE HEADSET
• Double-click the power button to dim the power and Bluetooth® wireless
technology indicators. To toggle the indicators between dim and bright,
rapidly press the power button twice.
Volume control
The left and right volume control wheels on the control module adjust the
volume of the corresponding earcup. With Acoustic Noise Cancelling® off,
volume control will be set to the maximum level.
CAUTION: Avoid setting the volume levels too high. Exposure to loud sounds may
cause hearing damage.
Holding the control module upright and facing you:
• Use the left wheel to adjust volume of the left earcup.
• Use the right wheel to adjust volume of the right earcup.
Overall headset volume control requires adjustments at both the aircraft
intercom or radio and at the headset control module. Even at its lowest setting,
neither volume control wheel can completely turn off the volume.
Power indicator
New alkaline AA batteries will generally supply at least 45 hours of power for
the headset. Battery life varies with the ambient noise level of the aircraft,
temperature, ear cushion condition, use of the Bluetooth feature, and age of
the batteries. The power indicator changes color to indicate the power status,
as follows:
Indicator color
Power source Type of light Indicates
Green
Aircraft
Slow flashing
Power ON
Green
Battery
Flashing
Power ON and batteries good
Amber
Battery
Fast flashing
Power ON, but batteries low
(8 hours or less remaining)
Red
Battery
Faster flashing Power ON, but batteries very low*
(2 hours or less remaining)
Off
None
None
Power OFF or batteries depleted
Note: Replace batteries with alkaline batteries only. Do not use any other battery
chemistries.
* Bluetooth wireless technology is disabled to conserve the remaining power once the battery
reaches this level.
16
00_Cavu.book Page 17 Wednesday, April 25, 2012 10:10 AM
English
Tab 2, 10
Tab 3, 11
Tab 4, 12
Tab 5, 13
Tab 6, 14
Tab 7, 15
Tab 8, 16
USING THE HEADSET
Auxiliary (AUX) audio input
The Bose® A20® Aviation Headset provides a 1/8 inch (3.5 mm) AUX audio input
that allows you to use your headset with an external audio source such as a
portable GPS or a portable audio device. The connector is located at the
bottom end of the control module as shown.
AUX audio
input
Your headset includes a 1/8 inch (3.5 mm) adapter cable to connect your
external audio device. Plug one end of the adapter cable into the headphone
plug on your device and the opposite end into the headset AUX audio input.
Note: None of the functions of a connected audio source are controlled by the
control module.
Note: This feature will not work unless the multifunction switch is turned on.
Note: When the headset is running on battery power only, and it is not plugged
into an intercom, it will shut off even when there is an auxiliary audio input signal
present. To use the headset when unplugged from the intercom to listen to
auxiliary input audio or as a Bluetooth® wireless technology headset to make or
receive calls, we recommend you disable the Auto Off feature for uninterrupted
functionality.
Audio priority
The Bose A20 Aviation Headset allows you to decide the priority of the audio
sources you want to hear while using the headset. On the Bluetooth control
module, the audio priority is controlled by the multifunction switch. On the
conventional control module, the audio priority is controlled by the audio
priority switch.
17
00_Cavu.book Page 18 Wednesday, April 25, 2012 10:10 AM
Tab 8, 16
Tab 7, 15
Tab 6, 14
Tab 5, 13
Tab 4, 12
Tab 3, 11
Tab2, 10
English
USING THE HEADSET
Multifunction/Audio priority switch
The multifunction/audio priority switch has three positions:
Position
Function
Operation
Top
Intercom prioritized
over AUX
When the switch is in the top position and an
intercom signal is detected, AUX audio is muted.
Middle
Intercom mixed with
AUX
When the switch is in the middle position and an
intercom signal is detected, AUX audio is mixed
with the intercom audio.
Bottom
Intercom only
When the switch is in the bottom position, only
intercom audio is active.
Note: On the Bluetooth® control module, when a Bluetooth wireless technology call
is present, the audio from the call mutes the signal on the AUX audio input. In either
the top or middle position of the multifunction switch, both the intercom and the
Bluetooth wireless technology signal are heard as mixed.
18
00_Cavu.book Page 19 Wednesday, April 25, 2012 10:10 AM
English
Tab 2, 10
Tab 3, 11
Tab 4, 12
Tab 5, 13
Tab 6, 14
Tab 7, 15
Tab 8, 16
USING THE HEADSET
Using the headset
with a Bluetooth®-enabled phone
Pairing the headset with your phone
Pairing entails having the Bose A20® Aviation Headset in pairing mode, setting
your Bluetooth-enabled phone to “discover” the headset, then confirming the
connection on the phone. Before you use your Bose® A20 Aviation Headset
with your mobile phone, you must pair the two devices.
1. Turn on the headset and make sure the multifunction switch is in the top or
middle position, NOT in the emergency off position.
Power
indicator light
Multifunction Switch
Power button
Top position
Middle position
The power indicator light glows green or yellow, depending on the charge
level of the battery. If the light is red, the battery is low and needs replacing.
2. Press the Bluetooth function button (to activate Bluetooth.
If this is the first time you’ve activated or are attempting
to pair Bluetooth, the Bluetooth indicator will flash at a
slow rate alternating with the Power indicator. This
indicates that the headset is in “discoverable” mode
and ready to be paired to a cell phone.
Bluetooth
indicator
If the Bluetooth indicator does not flash alternately with the Power indicator
flash or you are trying to pair a headset that has previously been paired with
another phone, you will need to press and hold the Bluetooth function
button for 5 seconds in order to put the headset into “discoverable” mode.
3. With your Bluetooth-enabled phone turned on, locate the Bluetooth feature,
usually under Tools, Connect, or Bluetooth Devices. (Refer to the owner’s
instructions that came with your phone for further details.)
4. Set the phone to “discover” or “add” a Bluetooth device. When Bose A20
appears in the list of devices, select and confirm this choice.
5. If you are asked for a passkey or PIN, enter the digits 0000.
The control module Bluetooth and power indicators flash together to confirm
successful pairing.
If pairing is unsuccessful, repeat steps 3 - 5 above.
19
00_Cavu.book Page 20 Wednesday, April 25, 2012 10:10 AM
Tab 8, 16
Tab 7, 15
Tab 6, 14
Tab 5, 13
Tab 4, 12
Tab 3, 11
Tab2, 10
English
USING THE HEADSET
Note: The Bose A20® Aviation Headset will automatically exit pairing mode after
five minutes of inactivity.
Bluetooth® indicator light status
The Bluetooth indicator is a blue light on the control module. It shows the status
of Bluetooth functions, as follows:
Appearance
Indication
Flashes slowly, alternating with the power indicator.
Headset is discoverable or is pairing.
Flashes twice quickly with each power indicator
flash.
Bluetooth technology is ON but not
connected to a phone.
Flashes at the same rate with the power indicator
(green or amber).
Bluetooth technology is ON and
connected to phone.
Flashes once quickly with each power indicator flash. Headset is in an active phone call.
No light
Bluetooth technology is not enabled.
Reconnecting to a previously connected phone
To reconnect the headset to a previously connected phone or other Bluetooth
wireless technology device, briefly press the Bluetooth function button on the
headset control module.
The headset control module attempts to connect with the last connected
Bluetooth wireless technology device.
Note: The Bose® A20® Aviation Headset can only be connected to one Bluetooth
wireless technology device at a time. If you press the Bluetooth function button on
the headset control module for more than five seconds, the currently connected
Bluetooth wireless technology device is disconnected and the control module
enters pairing mode.
Recovering a lost connection
When a connected Bluetooth wireless technology device moves out of range
and the connection is lost, the Bose A20 Aviation Headset automatically
attempts to reconnect. If a connection still does not exist after five minutes, the
Bluetooth wireless technology receiver in the control module remains on, but
not connected. The Bluetooth indicator on the Bose A20 Aviation Headset
control module will exhibit a fast double flash initiated at each power indicator
flash.
Disconnecting a Bluetooth technology-enabled phone
If you use a connected phone to end a Bluetooth wireless technology
connection, the Bluetooth technology receiver in the headset control module
remains on, but no longer attempts to connect. A Bluetooth wireless
technology connection is ended by turning the phone off, ending the current
call, or discontinuing the wireless connection.
20
00_Cavu.book Page 21 Wednesday, April 25, 2012 10:10 AM
English
Tab 2, 10
Tab 3, 11
Tab 4, 12
Tab 5, 13
Tab 6, 14
Tab 7, 15
Tab 8, 16
USING THE HEADSET
If you turn the headset control module off, the control module Bluetooth
wireless technology receiver also turns off, ending the connection to the
Bluetooth technology-enabled phone.
Bluetooth® volume control
The Bluetooth volume control increases or decreases the volume of the mobile
phone that is paired to the Bose® A20® Aviation Headset. The Bluetooth volume
control is located on the right side of the control module. You can only adjust
the Bluetooth technology volume during an active phone call. To change the
volume, press the volume up or volume down button.
volume down
volume up
Each time you press a Bluetooth volume button, the volume increases or
decreases one level.
Note: Pressing and holding the volume button changes the volume continuously.
Note: When Bluetooth wireless technology is active, you cannot mute the sound
using the Bluetooth volume buttons.
To clear pairing device history from the headset
With Bluetooth technology enabled and on (Bluetooth indicator light flashing)
while not on a call, press and hold both Bluetooth volume up and Bluetooth
volume down buttons at the same time for 8 seconds. After 8 seconds, cycle
the Bluetooth power using the multifunction switch.
21
00_Cavu.book Page 22 Wednesday, April 25, 2012 10:10 AM
Tab 8, 16
Tab 7, 15
Tab 6, 14
Tab 5, 13
Tab 4, 12
Tab 3, 11
Tab2, 10
English
USING THE HEADSET
Making and answering calls
To make a call
Dial from your mobile phone, and the call will automatically transfer to the
headset. If your phone has voice-activated dialing, press the Bluetooth®
function button and wait for the phone voice prompts.
To activate voice dialing (if your phone provides this feature)
When there are no active or incoming calls, briefly press the Bluetooth function
button.
To answer a call
Briefly press the Bluetooth function button. You should hear a short beep in the
headphones before you hear the incoming call.
To end a call
Briefly press the Bluetooth function button. You should hear two short beeps in
the headphones to indicate that the call has been ended.
To reject an incoming call
Press the Bluetooth function button for three seconds.
Note: To avoid putting the control module into pairing mode, do not press the
Bluetooth function button for more than five seconds.
To redial the last number
When there are no active or incoming calls, press the Bluetooth function button
twice in quick succession.
Note: Whether or not you can reject an incoming call, activate voice dialing, or
redial the last number, depends on the capabilities of your phone. Please
check your phone user guide for further details.
To transfer the audio to the mobile phone
When you are on a call, press the Bluetooth function button for three to four
seconds. This transfers the audio to the mobile phone handset while the
Bluetooth wireless technology connection remains active.
Note: If you are on a call and unplugged from an intercom, the headset will allow
you to complete your call, then it will turn off approximately three seconds after the
call is terminated. To use the headset when unplugged from the intercom to listen
to auxiliary input audio, or as a standalone Bluetooth technology headset to make
or receive calls, we recommend you disable the Auto Off feature for uninterrupted
functionality.
22
00_Cavu.book Page 23 Wednesday, April 25, 2012 10:10 AM
English
Tab 2, 10
Tab 3, 11
Tab 4, 12
Tab 5, 13
Tab 6, 14
HEADSET CARE
AND
Tab 7, 15
Tab 8, 16
MAINTENANCE
Instructions for continued airworthiness
Bose recommends following the general care and maintenance instructions in
this guide. With normal use, items such as windscreens and ear cushions may
require periodic replacement. If cleaning or replacement of these items is
needed, follow the recommendations on the following pages. All other care and
maintenance, in and out of the warranty period, must be performed by Bose or
an authorized repair facility.
CAUTION: Do not immerse the headset in water or any other liquid. If the
headset is immersed in liquid, do not use it. Contact Bose® Technical Support for
assistance.
Cleaning the headset
General cleaning
Gently wipe the outside surfaces of the headband, connectors, plastic parts,
and headband cushion, using a soft cloth moistened with water and mild soap.
Take special care when cleaning the ear cushions and the outside surfaces of
the earcups. Do not immerse ear cushions in water or any other liquid.
Headset earcup openings
The TriPort® headset opening and the microphone opening must remain clean
and free of debris. Check to ensure that the openings on each earcup are clean
before each flight.
TriPort headset
opening
Microphone
opening
When wiping down the headset earcups, be sure not to force any dirt or debris
into the openings. Carefully use tweezers, if necessary, to remove foreign
matter that may be lodged in the openings. Do not blow air into or vacuum
the openings as this may damage the headset.
23
00_Cavu.book Page 24 Wednesday, April 25, 2012 10:10 AM
Tab 8, 16
Tab 7, 15
Tab 6, 14
Tab 5, 13
Tab 4, 12
Tab 3, 11
Tab2, 10
English
HEADSET CARE AND MAINTENANCE
Microphone windscreen
Remove the windscreen from the microphone as described in “Microphone
windscreen replacement,” below.
Rinse and air dry the windscreen. Make sure the windscreen is completely dry,
then reattach.
Earcup inner screen
Do not attempt to remove, replace, repair, or clean this component. Located
inside the earcup, the inner screen is critical to proper headset operation. If the
screen appears to be damaged or worn out, contact Bose.
If the inner screen becomes damp from environmental moisture such as light
rain, dew, perspiration, or condensation, allow it to air dry only. Do not use
electric heaters, blowers, or hairdryer-type devices to dry the inner screen.
Headband cushion
1. Remove the cushion as described in “Headband cushion replacement” on
page 26.
2. Place the cushion in a solution of water and a mild detergent.
3. Allow the cushion to air dry, then reattach.
Replacing parts
Through normal use, parts like windscreens and ear cushions may require
periodic replacement. Replacement parts can be ordered directly from Bose
Corporation. Please refer to “Contact information” on page 37.
Microphone windscreen replacement
1. Roll the band that secures the windscreen off the tip of the microphone and
dispose of it.
2. Gently slide the windscreen off the microphone.
3. Slide the replacement windscreen on and make sure it fits completely over
the microphone.
4. Roll the new band onto the microphone tip, to about 1/ inch from the end of
the windscreen, to secure it.
4
24
00_Cavu.book Page 25 Wednesday, April 25, 2012 10:10 AM
English
Tab 2, 10
Tab 3, 11
Tab 4, 12
Tab 5, 13
Tab 6, 14
Tab 7, 15
Tab 8, 16
HEADSET CARE AND MAINTENANCE
Ear cushion replacement
As a general rule, ear cushions should be replaced every six months or every
350 hours of use, depending on how often you fly. You may have to replace
them more often, if you:
• Have a full beard or heavy whiskers.
• Subject the headsets to severe temperature extremes such as parking your
airplane outside in severe cold or heat.
• Put excess strain on the cushions because of improper storage.
Indications that the ear cushions need replacing include:
• Flaking of the outer covering.
• Cuts or tears.
• Flattening of the cushion, reducing the effectiveness of the seal.
To extend the life of the ear cushions, perform regular cleaning as described in
“General cleaning” on page 23.
Replacing the ear cushions
1. Grasp the ear cushion skirt where it folds into the slot on the earcup.
2. Gently pull the ear cushion skirt up and away from the earcup.
3. Properly align the replacement ear cushion with the earcup.
4. Tuck an edge of the ear cushion skirt into the slot behind the ear cushion
flange. Be careful not to fold the skirt over.
5. Gently stretch the cushion around the earcup, working the skirt into the slot
as you go.
6. Grasp the ear cushion and adjust its position to remove any folds in the
skirt and wrinkles in the cushion.
Battery replacement
Refer to “Inserting and replacing the batteries” on page 10.
25
00_Cavu.book Page 26 Wednesday, April 25, 2012 10:10 AM
Tab 8, 16
Tab 7, 15
Tab 6, 14
Tab 5, 13
Tab 4, 12
Tab 3, 11
Tab2, 10
English
HEADSET CARE AND MAINTENANCE
Headband cushion replacement
The headband cushion is designed to give the maximum level of comfort to
your headset.
Bose recommends that you replace the cushion after regular care and
maintenance fails to restore the wool pile to its original size and shape.
To replace the cushion:
1. On a protected surface, turn the headset upside down. Remove the old
cushion from the headband.
2. While still holding the headband open, align the center of the new cushion
with the center of the headband and press firmly from the center toward
the outside.
Headband cushion
Microphone assembly or access cover replacement
Replace the microphone assembly or connector access cover as described in
“Attaching the microphone assembly” on page 8.
Storage
Store the headset in a ventilated area away from direct sunlight. Remove the
batteries before storing the headset for extended periods.
26
00_Cavu.book Page 27 Wednesday, April 25, 2012 10:10 AM
English
Tab 2, 10
Tab 3, 11
Tab 4, 12
Tab 5, 13
Tab 6, 14
Tab 7, 15
Tab 8, 16
TROUBLESHOOTING
In case of difficulty
Look for the problem in the left column of the table, then follow the “What to
do” instructions in the right column. If the problem persists, contact Bose using
the contact information on page 37 of this guide for assistance.
CAUTION: Do not attempt to disassemble or service the inside of the earcups or
other parts of the headset. Only the boom microphone cable, access cover, batteries, windscreen, headband cushion, and ear cushions are replaceable by the
user. For instructions on how to care for and maintain the headset, see “Headset
Care and Maintenance” on page 23.
Noise Reduction
Problem
Communication,
but no Acoustic
Noise Cancelling®
noise reduction in
either ear.
What to do
• Make sure the headset is turned on.
• Press the power button to turn the headset on.
• Check the power indicator. See page 16 for a description of the
power indicator.
• If using aircraft power, check the aircraft fuse or circuit breaker.
• If using battery power, make sure the batteries are fresh and
correctly installed.
Note: Replace batteries with alkaline batteries only. Do not use any
other battery chemistries.
No active Acoustic
Noise Cancelling
noise reduction and
no communication.
• Make sure the headphone plugs are securely inserted into the
panel connectors.
• Try using the headset in a different seat location.
• Remove the microphone assembly from the headset and check
for damage to the connector or pins. See “The microphone
assembly” on page 8.
Communications
Problem
Acoustic Noise
Cancelling noise
reduction, but no
incoming audio.
What to do
• Check to see if the volume controls are set too low. See “Volume
control” on page 16 for instructions on volume adjustment.
• Check the volume setting of intercom/radio.
• Make sure the headphone plugs are securely inserted into the panel
connectors.
• Try a different seat location in the aircraft.
27
00_Cavu.book Page 28 Wednesday, April 25, 2012 10:10 AM
Tab 8, 16
Tab 7, 15
Tab 6, 14
Tab 5, 13
Tab 4, 12
Tab 3, 11
Tab2, 10
English
TROUBLESHOOTING
Problem
What to do
Low volume of
incoming
communications.
• Check to see if the volume controls are set too low.
Refer to “Volume control” on page 16 for instructions on
volume adjustment.
• Ensure that the stereo/mono switch is correctly set for your
intercom system.
• Check that all headsets sharing the intercom have the
stereo/mono switch in the correct position.
• Unplug all other headsets and see if the volume can be adjusted
to an acceptable level.
Intermittent
communication.
• Check that the connection to the aircraft panel is not loose.
• Try the headset in a different seat location.
Reduced volume in
one ear only.
• Check to see if the volume control is set too low.
Refer to “Volume control” on page 16 for instructions on
volume adjustment.
• Check the stereo/mono configuration switch.
Refer to “The operation switches” on page 9
No stereo
separation or
communications in
one ear only.
• If your aircraft has a mono audio system, verify that the
stereo/mono configuration switch is set to mono. Refer to “The
operation switches” on page 9. Depending on how your audio
jacks are wired, there may be only one channel of audio supplied
to the headphone jack. If the stereo/mono switch is set to stereo
and you only hear communications on one side, setting the
switch to mono plays audio on both sides.
Audio
Problem
What to do
Reduced Acoustic
Noise Cancelling®
noise reduction,
intermittent clicking
sounds, or
communication
distortion in a loud
environment.
• Check the TriPort® headset openings on the outside of each
earcup to ensure that they are not blocked. If dust or dirt is
present, carefully remove the debris using tweezers. Do not
vacuum or blow out debris.
• Make sure there are no air gaps around the ear cushion seals.
If ear cushions appear worn, they should be replaced. Refer to
“Ear cushion replacement” on page 25.
Squealing or
whistling sound
when the headset is
turned on.
• Ensure the headset orientation is correct. Use the Left (L) and
Right (R) markings above the earcups to orient the
headset correctly.
• Inspect the seal between the ear cushion skirt and the earcup.
The skirt should fit into the slot on the earcup with no gaps.
Replace any cushions that appear to be worn out.
• Adjust the earcup fit to create a better seal on your head.
The headset’s low-force design makes it sensitive to items that
interfere with the seal around your ear. Make sure your ears are
completely inside the ear cushions, and that a hat or eyeglasses
with thick temples do not interfere with the seal.
28
00_Cavu.book Page 29 Wednesday, April 25, 2012 10:10 AM
English
Tab 2, 10
Tab 3, 11
Tab 4, 12
Tab 5, 13
Tab 6, 14
Tab 7, 15
Tab 8, 16
TROUBLESHOOTING
Problem
What to do
Low rumbling
sound with the
headset turned on
in a quiet
environment.
• Adjust the earcup fit to create a better seal on your head. The
low-force design of the headset makes it sensitive to items that
interfere with the seal around your ear. Make sure your ears are
completely inside the ear cushions, and that a hat or eyeglasses
with thick temples do not interfere with the seal.
• Check ports at the outside surface of each earcup to ensure that
they are not blocked. If dust or dirt is present, carefully remove
the debris using tweezers. Do not blow out or vacuum debris.
• Inspect the seal between the ear cushion skirt and the earcup.
The skirt should fit into the slot on the earcup with no gaps.
Replace any cushions that appear to be worn out.
Crackling sound
audible with
headset turned on
in a loud
environment, or
Acoustic Noise
Cancelling® noise
reduction is
intermittent.
• Ensure the headset orientation is correct. Use the Left (L) and
Right (R) markings above the earcups to orient the headset
correctly.
• Adjust the earcup fit. Refer to “Wearing and adjusting the headset” on page 13.
• If your headset is battery-powered, check to see if the battery is
low (indicated by fast blinking red LED).
• If your headset is aircraft powered, make sure the voltage
powering the headset is no less than 10 VDC.
• Inspect the seal between the ear cushion skirt and the earcup.
The skirt should fit into the slot on the earcup with no gaps.
Replace any cushions that have surface tears, torn stitching
joints, large wrinkles, or have become dried and stiff.
Auxiliary audio input
Problem
What to do
No audio from
auxiliary source.
• Turn source volume up.
• Try another source with the headset to eliminate the source as
the possible problem.
• Make sure multifunction switch is not set to the bottom (intercom
only) position. The multifunction switch must be either in the top
or middle position for audio from an auxiliary input to be enabled.
• Check the connection between the auxiliary source and the
control module. Both ends of the AUX IN connector cable must
be properly seated inside the sockets.
• If the multifunction switch is set to the prioritized position (top),
the auxiliary audio source will not be heard if there is an audio
signal from the intercom.
Audio in one ear
only from the
auxiliary input.
• Check the connection between the auxiliary source and the
module. Both ends of the AUX IN connector cable must be
properly seated inside the sockets.
• Make sure the earcup cover on the headset is in place and
properly connected. Refer to “Attaching the microphone
assembly” on page 8.
29
00_Cavu.book Page 30 Wednesday, April 25, 2012 10:10 AM
Tab 8, 16
Tab 7, 15
Tab 6, 14
Tab 5, 13
Tab 4, 12
Tab 3, 11
Tab2, 10
English
TROUBLESHOOTING
Problem
What to do
Cannot hear
communications
while listening to
audio from AUX
input or AUX input
does not mute with
incoming
communications.
• Check headset prioritization settings. Refer to “Multifunction/
Audio priority switch” on page 18.
• Make sure all connections are secure (headset to intercom, AUX
input to headset).
• Communications audio is not present unless the headset is
connected to an intercom system.
Bluetooth® wireless technology
Problem
What to do
No audio to the
headset while on a
call.
• Check to make sure the headset and phone are paired, the multifunction switch is in the top or middle position, and the devices
are communicating with each other.
• Make sure the phone and headset are in range of the Bluetooth
wireless technology (no more than 30 feet from each other).
• Make sure the volume of the Bluetooth wireless technology is
turned up on the control module.
Note: On initial start-up, a 20-second delay may occur before audio
can be heard.
The headset is not
pairing with my
phone.
• Turn the headset off, then on again.
• Follow your phone instructions to remove all devices previously
paired with your phone.
• Repeat the steps for pairing the headset with your phone. Refer
to “Pairing the headset with your phone” on page 19.
I cannot answer/end
a call.
• Make sure your phone is properly paired and connected to the
headset. Refer to “Making and answering calls” on page 22.
The headset does
not reconnect to
my phone when I
turn it on.
• Make sure the phone has Bluetooth wireless technology enabled.
• Turn the multifunction switch on to the top or middle positions.
• Press the Bluetooth function button.
Auto off
Problem
Headset does not
shut off
automatically.
30
What to do
• In the battery compartment, make sure Switch #1 is set to ON
(default).
• Refer to “The operation switches” on page 9 for details on Auto
Off functionality.
• It may take up to nine (9) minutes for the headset to shut off
when not in use immediately after initial power up.
00_Cavu.book Page 31 Wednesday, April 25, 2012 10:10 AM
English
Tab 2, 10
Tab 3, 11
Tab 4, 12
Tab 5, 13
Tab 6, 14
Tab 7, 15
Tab 8, 16
INSTALLATION
Mounting the aircraft panel connector
The aircraft panel connector is part of the optional 6-pin wiring harness
assembly.
Visit Bose.com or Global.Bose.com for information or purchase.
CAUTION: The aircraft panel connector must be mounted by a technician who is
qualified to perform this type of avionics installation for the aircraft you are using.
Mount the connector into a cutout, using the diagrams below as a guide.
12.5mm
.49"
AIRCRAFT INTERFACE SCHEMATIC
14.0mm
.55"
RED
BLK
WHT
BLK/WH
BLU
RECEPTACLE - PINOUT (FRONT VIEW)
Pin 6
WHT
WH/BLU
BLK/WH
• 1 V+IN
• 2 GND
• 3 COMM L
• 4 COMM R
• 5 MIC HI
• 6 MIC LO
Pin 1
Connect the eight wires as follows:
•
•
•
•
•
Two for the microphone
Two for audio
One for power
One for ground
Two for audio shields
Audio and microphone wires should be connected to the back of the existing
microphone and headphone jacks, leaving existing jacks intact for use with
conventional headsets. This is usually the fastest installation method.
31
00_Cavu.book Page 32 Wednesday, April 25, 2012 10:10 AM
Tab 8, 16
Tab 7, 15
Tab 6, 14
Tab 5, 13
Tab 4, 12
Tab 3, 11
Tab2, 10
English
INSTALLATION
CAUTION: Do not use excessive force or bend the installed connector. This may
damage or break internal solder joints.
Note: The aircraft panel connector cannot be installed in an audio system using
transformer-coupled audio outputs. Contact the Bose® Technical Support, using
the contact information on page 37 of this guide for details.
Mono connection diagram
10-32
V DC 1/2A
RED
BLK
WHT BLK/WH
BLU
WHT
WHT/BLU
BLK/WH
1V+IN
2 GND
3 COMM L
4 COMM R
5 MIC HI
6 MIC LO
Ring
(audio)
Microphone - Jack
TPP
(PTT)
Barrel
(gnd)
Existing PTT
switch
and wiring
(no connection to
Bose headset)
Headphone - Jack
Existing wiring to
aircraft intercom/
audio panel
Tip
(phone audio)
Barrel
(audio gnd)
Stereo connection diagram
10-32
V DC
RED
1/2A
1V+IN
BLK
BLK/WH
WHT
BLU
WHT
2 GND
3 COMM L
4 COMM R
5 MIC HI
WHT/BLU
6 MIC LO
BLK/WH
Audio
Microphone - Jack
Barrel
(gnd)
TPP
(PTT)
Existing wiring to
aircraft stereo
intercom/audio panel
Phone
audio (right)
Tip
(phone audio left)
32
Existing
PTT switch
and wiring
(no connection to
Bose headset)
Stereo Headphone - Jack
Barrel
(audio gnd)
00_Cavu.book Page 33 Wednesday, April 25, 2012 10:10 AM
English
Tab 2, 10
Tab 3, 11
Tab 4, 12
Tab 5, 13
Tab 6, 14
Tab 7, 15
Tab 8, 16
INSTALLATION
Helicopter (U174) connection diagram
WHT/BLU
6
MIC LO
WHT
5
MIC HI
BLU
4
COMM R
WHT
3
COMM L
BLK
2
GND
10-32 RED
1
V+IN
V DC 1/2A
Existing single 4prong jack
Existing wiring to
helicopter intercom/
audio panel
Barrel
(audio gnd)
Note: Barrel ground (gnd) refers to aircraft grounds.
Details on making the connections
The pinouts for the optional installed connector are detailed in the table below:
Pin number
Color
Purpose
1
Red
V+IN: Headset power (10-32 VDC). Use a 1/4 amp fuse or
a 1/2 amp circuit breaker.
2
Black
GND: System ground. Connect to the existing audio ground.
3
White
COMM L: Phone communication: Left.
4
Blue
COMM R: Phone communication: Right.
Note: For stereo operation, connect the left and right channels to their respective positions. For
monaural operation, connect pins 3 and 4 together, and to the tip of the existing phone jack.
5
White
MIC HI: Microphone/Hi-audio. Connect to the portion of the
existing microphone jack that corresponds to the ring
position of a headset microphone plug. Do not connect to
the tip (PTT) segment.
6
White/
Blue
MIC LO: Microphone/Lo-ground. Connect to the portion of
the microphone jack that corresponds to the barrel position
of a headset microphone plug.
Note: If the microphone works on radio transmit but not through the intercom, check pin 6. It
may be incorrectly wired to the PTT segment of the microphone jack.
Comm Shield
Black
Shield from Comm L and Comm R wire pair.
Mic Shield
Black
Shield from Mic Hi and Mic Lo wire pair.
Note: The wires connecting pins 3 and 4 and pins 5 and 6 are shielded, twisted pairs with a
black wire shield termination exiting each pair. If the existing wiring is not shielded, connect the
shields to the existing audio wiring shields, or connect the shield from Comm L and Comm R
wire pair to audio ground.
33
00_Cavu.book Page 34 Wednesday, April 25, 2012 10:10 AM
Tab 8, 16
Tab 7, 15
Tab 6, 14
Tab 5, 13
Tab 4, 12
Tab 3, 11
Tab2, 10
English
TECHNICAL INFORMATION
Headphone
Damage could occur to avionics equipment that is
intended for use only with 600 Ohm headsets. If in doubt,
consult the avionics equipment manufacturer.
Impedance
Monaural mode: 160 Ohms ON and OFF
Stereo mode: 320 Ohms ON and OFF
Frequency response
15 Hz to 15 kHz
Sensitivity: 92 dB SPL typical, measured at 1 mw,
1 kHz, full volume on a KEMAR ear simulator.
Microphone (Electret)
Bias required: 8 to 16 VDC through 220 to 2200 Ohms.
Sensitivity: Varies depending on bias and AC radio input
impedance. Typical output is 600 mV at 114 dB SPL. To
assure proper modulation of the radio, it is recommended
that an avionics technician adjusts its input to match the
output of the microphone.
Microphone (Dynamic)
Impedance: 5 Ohm or 150 Ohm dynamic mic
Sensitivity: Equivalent to M-87/M-101
Maximum ambient noise level 115 dBC SPL for full active noise reduction performance
Power source
Battery-powered: Two (2) AA alkaline
Aircraft-powered: 10 to 32 VDC
Voltage
Battery-powered: Two (2) AA alkaline batteries
Aircraft-powered: 10 to 32 VDC
Battery life
Alkaline battery life: At least 45 hours in typical general
aviation aircraft noise. Duration varies with battery age,
ambient noise levels, temperature, ear cushion seal, and
use of the Bluetooth® feature.
Current
Operating: 25 mA in typical aircraft noise
Fuse/breaker recommended
1
/4 amp, fast-blow fuse (AGC 1/4 amp fuse) or 1/2 amp
circuit breaker
Headset weight
12 ounces
Headset size range
Slider not extended:
8.425" (214mm) H x 6.34" (161mm) W x 3.15" (80mm) D
Slider extended:
10.2" (259mm) H x 6.6" (168mm) W x 3.15" (80mm) D
Control module dimensions
1.5" (38.1mm) H x 1.5" (38.1mm) W x 4.92" (125mm) D
Temperature and Altitude
(Category A)
Operating: 5 to 131°F (-15 to 55°C)
Storage: -67 to 158°F (-55 to 70°C)
Altitude: 15,000 feet maximum pressure altitude for
full cancellation
Bluetooth wireless technology
Hands-free profile, Bluetooth 2.1
Bluetooth technology QD ID
Bose® A20® Aviation Headset: B016487
34
00_Cavu.book Page 35 Wednesday, April 25, 2012 10:10 AM
English
Tab 2, 10
Tab 3, 11
Tab 4, 12
Tab 5, 13
Tab 6, 14
Tab 7, 15
Tab 8, 16
TECHNICAL INFORMATION
FAA Technical Standards Order
The Bose® A20® Aviation Headset, its interface, cables, and microphones are
FAA approved to TSO C139. It has been designed to function in or withstand
exposure to the following environmental conditions:
Condition
Category
Altitude and temperature
A1
Salt fog
S
AF conducted susceptibility
B
Humidity
B
Magnetic effect
Z
Power input
B
RF susceptibility
T
Temperature and altitude
A1
Vibration
S, R, and U
Voltage spike
A
Shock drop
12 times, 1 m onto concrete
Environmental categories cited refer to RTCA/DO-160F and RTCA/DO-214 (March 2,
1993).
The conditions and tests required for TSO approval of this are minimum performance
standards. It is the responsibility of those installing this article either on or within a
specific type or class of aircraft to determine that the aircraft installation conditions are
within the TSO standards. TSO articles must have separate approval for installation in
aircraft. The article may be installed only if performed under 14 CFR part 43 or the
applicable airworthiness requirements.
This device complies with FCC and Industry Canada RF radiation exposure limits for
general population. It must not be collocated or operating in conjunction with any other
antenna or transmitter.
Este equipamento opera em caráter secundário, isto é, não
tem direito a proteção contra interferência prejudicial,
mesmo de estações do mesmo tipo, e não pode causar
interferência a sistemas operando em caráter primário.
Names and Contents of Toxic or Hazardous Substances or Elements
Toxic or Hazardous Substances and Elements
Part Name
Lead (Pb)
Metal parts
Mercury (Hg)
Cadmium (Cd)
Hexavalent (CR(VI))
Polybrominated Biphenyl (PBB)
Polybrominated
diphenylether (PBDE)
X
0
0
0
0
0
Plastic parts
0
0
0
0
0
0
Speakers
X
0
0
0
0
0
Cables
X
0
0
0
0
0
O: Indicates that this toxic or hazardous substance contained in all of the homogeneous materials for this part is below the limit requirement in SJ/T
11363-2006.
X: Indicates that this toxic or hazardous substance contained in at least one of the homogeneous materials used for this part is above the limit requirement in SJ/T 11363-2006.
35
00_Cavu.book Page 36 Wednesday, April 25, 2012 10:10 AM
Tab 8, 16
Tab 7, 15
SERVICE
AND
Tab 6, 14
Tab 5, 13
Tab 4, 12
Tab 3, 11
Tab2, 10
English
WARRANTY INFORMATION
Locating the headset serial number
Your Bose® A20® Aviation Headset is identified by a unique headset serial
number located on the underside of the headband and underneath the
headband cushion. Reference this serial number when you register your
product or contact Bose for technical support.
Serial number
Headband
cushion
Be sure to properly reseat the headband cushion by pressing down firmly. For
more information on replacing the headband cushion, see Refer to “Headband
cushion replacement” on page 26.
Warranty
Details of the limited warranty are provided on the warranty/product registration
card included in the product carton.
Limited warranty service
To return your headset to Bose for repair
Return your headset using the following procedures:
1. Contact the Bose organization in your country/region (visit
Global.Bose.com for Bose contact information in your
country/region) for specific return and shipping instructions;
2. Label and ship the product, freight prepaid, to the address provided by the
Bose organization in your country; and
3. Place any necessary return authorization number prominently on the
outside of the carton. Cartons not bearing a return authorization number,
where required, will be refused.
36
00_Cavu.book Page 37 Wednesday, April 25, 2012 10:10 AM
English
Tab 2, 10
Tab 3, 11
Tab 4, 12
Tab 5, 13
Tab 6, 14
Tab 7, 15
Tab 8, 16
SERVICE AND WARRANTY INFORMATION
Contact information
Contact Bose for:
•
•
•
•
Spare parts and accessories
Technical advice
Installation information
Warranty and repair information
In North America:
Bose® Technical Support
145 Pennsylvania Avenue
Framingham, MA 01701-9168 USA
TEL: 1-800-233-4416 (US); 508-879-7330, ext. 62006 (outside U.S.)
FAX: 1-508-766-5997
E-MAIL: [email protected]
In Europe:
Noise Reduction Technology Group
Nijverheidstraat 8 NL-1135 GE Edam
TEL: +31(0)299-390777
FAX: +31(0)299-390109
E-MAIL: [email protected]
World Wide Web: www.Bose.com
Ordering parts and accessories
The following accessories and customer-replaceable parts can be purchased
directly from Bose. See the contact information above.
• Additional control module cable
- Specify: Bluetooth® technology or conventional module
- Specify: connector type
• Ear cushion kit
• Headband cushion kit
• Carrying case
• Microphone windscreen
• Clothing clip
• Earcup access cover
• 6-pin connector to dual G/A plug cable adapter
• 6-pin connector to U174 plug cable adapter
• Service kit (includes ear cushion kit, microphone windscreen, and headband
cushion kit)
• Aircraft panel connector installation kit
• Aircraft panel installation kit cover plate
37
00_Cavu.book Page 38 Wednesday, April 25, 2012 10:10 AM
Tab 8, 16
Tab 7, 15
Tab 6, 14
Tab 5, 13
SERVICE AND WARRANTY INFORMATION
38
Tab 4, 12
Tab 3, 11
Tab2, 10
English
00_Cavu.book Page 39 Wednesday, April 25, 2012 10:10 AM
English
Tab 2, 10
Tab 3, 11
Tab 4, 12
Tab 5, 13
Tab 6, 14
Tab 7, 15
Tab 8, 16
The Bluetooth® word mark and logos are registered trademarks owned by Bluetooth SIG, Inc.,
and any such use by Bose Corporation is under license. All other marks are property of
Bose Corporation.
39
Covers.fm Page 1 Wednesday, April 25, 2012 10:38 AM
A20 AVIATION HEADSET
®
©2012 Bose Corporation, The Mountain,
Framingham, MA 01701-9168 USA
AM325453 Rev.07
Owner’s Guide