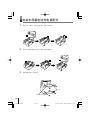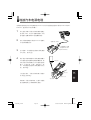
1
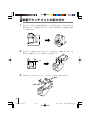
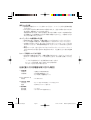
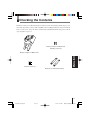
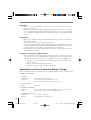
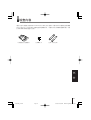
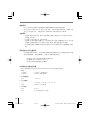
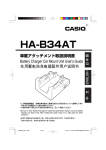
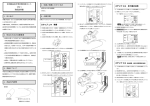
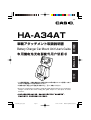
JEC
中 文
ENGLISH
車載アタッチメント取扱説明書
Battery Charger Car Mount Unit User's Guide
日本語
HA-A34AT
• この取扱説明書は、本機の基本的なご使用方法および取り扱いについて説明してあり
ますのでご使用前にひと通りお読みください。
• ご使用の前に
「安全上のご注意」
をお読みの上、正しくお使いください。
• Be sure to read “Safety Precautions” inside this guide before trying to use your Battery
Charger Car Mount Unit. After reading this guide, keep it in a safe place for future
reference.
HA-A34AT_hyo1_4.p65
Page 3
04.4.21, 5:12 PM
Adobe PageMaker 6.5J/PPC
•本書の内容に関しては、将来予告なしに変更することがあります。
•本書の内容については万全を期して作成いたしましたが、万一ご不審な点
や誤りなど、お気づきのことがありましたらご連絡ください。
•本書の一部または全部を無断で複写することは禁止されています。また、
個人としてご利用になるほかは、著作権法上、当社に無断では使用できま
せんのでご注意ください。
•本書および本機使用により生じた損害、逸失利益または第三者からのいか
なる請求につきましても、当社では一切その責任を負えませんので、あら
かじめご了承ください。
• CASIO COMPUTER CO., LTD. assumes no responsibility for any damages or
loss resulting from the uses of these product and guide.
• The contents of this guide are subject to change without notice.
• No part of this guide may be reproduced in any form without the express
written consent of CASIO COMPUTER CO., LTD.
2
HA-A34AT_P02-08.p65
Page 2
04.4.21, 5:13 PM
Adobe PageMaker 6.5J/PPC
安全上のご注意
このたびは本機をお買上げいただきまして、誠にありがとうございます。ご使用になる前
に、必ずこの「安全上のご注意」をよくお読みの上、正しくお使いください。
本書は、お読みになったあとは、いつでも見られる場所に保管してください。
記号は
「してはいけないこと」
を
意味しています(左の例は分解禁
止)。
警告
● 記号は
「しなければならないこと」
を意味しています
(左の例は電源プ
ラグをコンセントから抜く)
。
この表示を無視して誤った取り扱いをすると、人が死亡または重傷を負う可
能性が想定される内容を示しています。
交通事故防止のために
• 自動車の運転中におけるご使用はしないでください。ご使用になる場合は
日本語
絵表示の例
必ず安全な場所に車を停車させて行ってください。
• 本機を、前方の視界を妨げる場所やステアリング、シフトレバー、ブレー
キペダル等の運転操作を妨げる場所など運転に支障をきたす場所、同乗者
に危険を及ぼす場所には置かないでください。交通事故や怪我の原因とな
ります。
• コード類は、取扱説明書に従い、運転操作の妨げとならないよう、まとめ
ておくなどしてください。ステアリングやシフトレバー、ブレーキペダル
などに巻き付くと危険です。
異常の発生時
• 万一、異物が入った、水がかかった、煙が出る、変なにおいがするなどの
異常が起こりましたら、直ちに使用を中止し、必ず、お買上げの販売店ま
たはカシオテクノ・サービスステーションにご相談ください。そのままご
使用になると事故、火災、感電の原因となります。
• 電源がONしなかったり、表示がつかないなどの故障状態で使用しないでく
ださい。事故、火災、感電の原因となります。
分解・改造をしない
• 本機を分解したり、改造したりしないでください。事故、火災、感電の原
因となります。
カーバッテリーご使用時
• 本機はDC12/24Vマイナスアース車専用です。
• 本機のコードが傷んだら(芯線の露出、断線など)販売店またはカシオテク
注意
ノ・サービスステーションに修理をご依頼ください。そのまま使用すると
火災、感電の原因となります。
• 本機を使用するときは、必ず専用のカープラグコードをお使いください。
専用品以外のカープラグコードを使用すると、火災・感電の原因となりま
す。
3
HA-A34AT_P02-08.p65
Page 3
04.4.21, 5:13 PM
Adobe PageMaker 6.5J/PPC
警告
この表示を無視して誤った取り扱いをすると、人が死亡または重傷を負う可
能性が想定される内容を示しています。
水や金属が入らないように
• 本体に水が入ったり、ぬらさないようにご注意ください。火災、感電の原
因となります。
• 万一異物や水が本体の内部に入った場合は、すぐにシガレットライターソ
ケットから抜き、本体を取り外して販売店またはカシオテクノ・サービス
ステーションにご連絡ください。そのまま使用すると火災、感電の原因と
なります。
注意
この表示を無視して誤った取り扱いをすると、人が傷害を負う可能性
が想定される内容および物的損害のみの発生が想定される内容を示し
ています。
車から降りるとき
• 車から降りるときは、必ず本機の電源をOFFにしてください。車のバッテ
リーがあがることがあります。
車の中で安全にお使いいただくために
• 車のエンジンを停止した状態で長時間ご使用になると、車のバッテリーが
消耗しますので、ご注意ください。
• 濡れた手で電源プラグに触れないでください。感電の原因となることがあ
ります。
本機を取り付けるとき
• エアバッグ(SRS AIRBAG)が装着されている車両に取り付ける場合は、絶
対にエアバッグのカバー部分および作動時の妨げになるような場所に取り
付けないでください。
• 振動の激しい場所、不安定な場所、湿気・ほこりの多い場所には設置しな
いでください。
• しっかりと取り付けてください。
その他のご使用上の注意
• 極端な温度下や日差しの強い場所※には設置しないでください。また、ハンディターミナル本体
は車内に放置しないでください。本機やカープラグコードの変形や、故障の原因になります。
※ 直射日光の当たるところ、暖房器具の近くなど
• 使用後は本機の電源をOFFにして、差し込みプラグをシガレットライターソケットからはずし
てください。車の故障の原因や、バッテリーがあがる原因になります。
• 本書に記載されている使用温度範囲でご使用ください。
• お手入れにはベンジンなど化学薬品は使わないでください。
ケースが変質したり、塗料がはがれたりします。汚れのひどいときは柔らかな布を薄い中性洗
剤に浸し、固く絞って拭いてください。
• お手入れの際は安全のため、差し込みプラグをシガレットライターソケットからはずして行っ
てください。
• 落としたり、強いショックを与えないでください。
4
HA-A34AT_P02-08.p65
Page 4
04.4.21, 5:13 PM
Adobe PageMaker 6.5J/PPC
内容品の確認
本部品は置くだけ充電器
(HA-A30CHG)
に取り付けて使用します。取り付け後は車載充
電器として、自動車のシガレットライターの電源を使用し、DT-950に取り付けた電池を
車載アタッチメント取り付けネジ 4本
車載アタッチメント
ブラケット用ネジ 4本
日本語
充電することができます。
ブラケット 2個(取り付け金具)
5
HA-A34AT_P02-08.p65
Page 5
04.4.21, 5:13 PM
Adobe PageMaker 6.5J/PPC
車載アタッチメントの取り付け
1
図のように、置くだけ充電器を横向きにして○印の部分を持ち、矢印の方向に力を
加えて取り外して、脱落防止アタッチメント取り付け部に置くだけ充電器に同梱の
シールを貼ります。
2
図のように、底面のネジを外して卓上ユニットを取り外し、車載アタッチメントを
取り付けて車載アタッチメント取付けネジで固定します。
ネジ
3
必要に応じて、図のようにブラケットをブラケット用ネジで取り付けます。
内側の穴
内側の穴
6
HA-A34AT_P02-08.p65
Page 6
04.4.21, 5:13 PM
Adobe PageMaker 6.5J/PPC
電源の取り付け方と接続
電源は別売の専用カープラグコード(DT-827CAC)
を使用してください。
1
本体の電源スイッチがOFFであることを
確認してから背面のACアダプタジャッ
クにカープラグコードを差し込みます。
2
カープラグコードのプラグをDC 12/
24Vの車のシガレットライターソケット
3
日本語
に差し込みます。
電源スイッチをONにします。本機の電
2
源表示用LEDが、赤色に点灯します。
取り外しボタン
4
ハンディターミナル底面の給電端子と本
1
機の給電端子を合わせ、カチッと音がす
るまで押し込みます。本機の電源表示用
給電端子
LEDが、緑色に点灯します。
充電が完了すると、ハンディターミナル
電源スイッチ
(ON)
POWER
のインジケータが赤色から緑色に変わり
電源表示用LED
ます。
ハンディターミナルを取り外すときは、
本機の左右にある取り外しボタンを押し
てください。
7
HA-A34AT_P02-08.p65
Page 7
04.4.21, 5:13 PM
Adobe PageMaker 6.5J/PPC
使用上のご注意
• 給電端子は絶対にショートさせないでください。ショートさせると故障の原因
となります。
• HA-A34AT及びDT-827CACのご利用にあたり、当社では取り付けにかかわ
るご相談、実務等行うことはできません。
本製品の取り付け方法、取り付け強度、取り付け作業につきましては専門の取り
付け業者もしくはお客様にて充分なご検討ご検証いただいた上、ご運用いただけ
ますようお願い申し上げます。
カーバッテリーを使用時のご注意
• 配線を抜き差しする際は、本機の電源スイッチをOFFにして行ってください。
• エンジンを始動する場合は、本機の電源スイッチをOFFにして行ってください。
• ご使用にならないときは、差し込みプラグをシガレットライターソケットから必
ずはずしてください。車の故障の原因になったりバッテリーがあがることがあり
ます。
• 車種によっては、差し込みプラグのサイズがシガレットライターソケット
(DC12/24V)
の口径に合わない場合があります。ご注意ください
(特に外国車
など)。
ヒューズ交換についてのご注意
• 定格を超える電流が流れると、本機を保護するためにカープラグコードのプラグ
内のヒューズが切れます。ヒューズが切れたときは、次の手順で交換してくださ
い。
1. プラグの先端のカバーを反時計回りに回して外す。
2. ヒューズ(SOC製 TSC 125V 4A)を交換する。
3. カバーを元のように取り付ける。
仕様
(置くだけ充電器を取り付けた場合)
1. 充電仕様
充電方式
充電時間
:定電圧方式(電流制限付き)
:約5時間(標準電池パック)
:約10時間(大容量電池パック)
2. カープラグコード
規格名
:DT-827CAC
3. 外形寸法・重量
外形寸法
重量
:約111(幅)×243(奥行)×104(高さ)mm
:約840g(ブラケット含まず)
4. 動作環境
動作温度
動作湿度
:0∼40℃
:30∼80%RH(結露なきこと)
8
HA-A34AT_P02-08.p65
Page 8
04.4.21, 5:13 PM
Adobe PageMaker 6.5J/PPC
Safety Precautions
Congratulations upon your selection of this CASIO product. Be sure to read the following Safety
Precautions before trying to use it for the first time. Keep this guide in a safe place for future reference.
Markings and Symbols
A diagonal line indicates something you should not do. The symbol
shown here indicates you should not
try to take the unit apart.
Warning
● A black circle indicates something you should do. The symbol
shown here indicates you should unplug the unit from the wall outlet.
This symbol indicates information that, if ignored or applied incorrectly, creates the possibility of death or serious personal injury.
• Never use your Battery Charger Car Mount Unit while operating a motor vehicle.
Park your vehicle in a safe place before performing any operation.
• Never locate the Battery Charger Car Mount Unit where it might interfere with
proper operation of the vehicle, such as locations where it hinders the forward or
back vision of the driver, steering, or proper operation of the shift lever, brake
pedal, or other vehicle controls, or in any location where it might endanger passengers. Such locations create the risk of automotive accident and personal injury.
• Locate connecting cables as instructed by the manual, avoiding locations that can
interfere with driving operations. Winding a cable around the steering column,
shift lever, brake pedal, or other controller is very dangerous. Also, take care that
the Battery Charger Car Mount Unit is located where it does not hinder driving.
Abnormal Conditions
• Continued use of the Battery Charger Car Mount Unit while it is emitting smoke or
strange odor creates the risk of fire and electric shock. Immediately stop using the
Battery Charger Car Mount Unit and contact your original dealer or an authorized
CASIO service provider to request servicing.
• Do not try to use the Battery Charger Car Mount Unit if it fails to turn on, if the
indicators do not light when the power is turned on, or when any other malfunction
is evident. Continued use under such conditions creates the risk of fire and electric
shock.
ENGLISH
Avoiding Traffic Accidents
Disassembly and Modification
• Never try to take the Battery Charger Car Mount Unit apart or modify it in any
way. Doing so creates the risk of fire and electric shock.
Car Battery Power
• This Battery Charger Car Mount Unit is intended for use with a 12/24V DC minus
ground vehicle only.
• Should the Car Power Cable ever become seriously damaged (exposed or broken
wiring, etc.), contact your original dealer or an authorized CASIO service provider
to request servicing. Continued use of a seriously damaged cable creates the risk of
fire and electric shock.
• Always make sure to use the Car Power Cable (DT-827CAC) when using this
Battery Charger Car Mount Unit. The use of a cord other than the specified one can
cause a fire or electric shock.
9
HA-A34AT_P09-14.p65
Page 9
04.4.21, 5:13 PM
Adobe PageMaker 6.5J/PPC
Warning
This symbol indicates information that, if ignored or applied incorrectly, creates the possibility of death or serious personal injury.
Water and Foreign Matter
• Never let water get into the Battery Charger Car Mount Unit and take care to keep
it from getting wet. Moisture creates the risk of fire and electric shock.
• Should any foreign matter or moisture ever get into the Battery Charger Car Mount
Unit, immediately unplug the Car Power Cable (DT-827CAC) from the vehicle’s
cigarette lighter socket and disconnect it from the Car Mounted Battery Charger.
Contact your original dealer or an authorized CASIO service provider to request
servicing. Continued use of the Battery Charger Car Mount Unit creates the risk of
fire and electric shock.
Caution
Leaving Your Vehicle
• Whenever leaving your vehicle, be sure to unplug the Car Power Cable (DT827CAC) from the cigarette lighter socket. Leaving the Battery Charger Car Mount
Unit plugged in can run down your vehicle’s battery.
Car Safety
• Using the Battery Charger Car Mount Unit for a long time with your vehicle’s
engine turned off can run down your vehicle’s battery.
• Do not handle the Car Power Cable with wet hands. This can create the risk of
electric shock.
When Installing the Car Mounted Battery Charger
• When installing in a vehicle equipped with an airbag (SRS airbag), never install
the Battery Charger Car Mount Unit on the airbag cover or in a location that may
obstruct the airbag when it is deployed.
• Do not install the Battery Charger Car Mount Unit in locations subjected to strong vibrations, unstable locations or locations subjected to high levels of humidity and dust.
• Install the Battery Charger Car Mount Unit securely.
Other Precautions
• Do not install the Battery Charger Car Mount Unit in locations subjected to extreme temperatures or
strong direct sunlight*. In addition, do not leave the Handheld Terminal in the vehicle. Doing so creates
the risk of physical damage or malfunction to the Battery Charger Car Mount Unit or Car Power Cable.
* Including locations subjected to strong direct sunlight and locations near heating devices.
• After you are finished using the Battery Charger Car Mount Unit, turn off the power and unplug the Car
Power Cable from the cigarette lighter socket. Leaving the Battery Charger Car Mount Unit plugged in
creates the risk of damage to your vehicle or rundown of the vehicle’s battery.
• Use the Battery Charger Car Mount Unit only under temperatures within the operating temperature
range specified in this guide.
• Never use benzene or any other chemical agents to clean the Battery Charger Car Mount Unit. Such
agents can remove case markings or cause physical damage to the case. For sever soiling, wipe with a
soft cloth moistened with a weak solution of water and a mild neutral detergent. Wring out all excess
moisture from the cloth before wiping.
• When cleaning the Battery Charger Car Mount Unit, always make sure to first unplug the Car Power
Cable from the cigarette lighter socket for safety reasons.
• Avoid dropping the Battery Charger Car Mount Unit and Handheld Terminal or otherwise subjecting them
to strong impact.
10
HA-A34AT_P09-14.p65
Page 10
04.4.21, 5:13 PM
Adobe PageMaker 6.5J/PPC
Checking the Contents
This Battery Charger Car Mount Unit (HA-A34AT) is used by intercharging with the upper part of
the Cradle-Type Battery Charger (HA-A30CHG). After installing this Battery Charger Car Mount
Unit, it can be used to charge the battery installed in the Handheld Terminal using power from the
cigarette lighter in your car.
Battery Charger Car Mount Unit
mounting screws (4)
ENGLISH
Battery Charger Car Mount Unit
Bracket screws (4)
Brackets (2) (mounting brackets)
11
HA-A34AT_P09-14.p65
Page 11
04.4.21, 5:13 PM
Adobe PageMaker 6.5J/PPC
Installing the Battery Charger Car Mount Unit
1
While placing the Cradle-Type Battery Charger on its side as shown in the illustration, grab
onto the circled portion and apply force in the direction of the arrow to remove, and then affix
the seal included with the Cradle-Type Battery Charger to the location where the Fall
Protector is installed.
2
Remove the desktop unit by removing the bottom screws as shown in the illustration, and then
fasten the Battery Charger Car Mount Unit with the Battery Charger Car Mount Unit
mounting screws.
Screws
3
Attach the brackets with the bracket screws as shown in the illustration as necessary.
Inner side holes
Inner side holes
12
HA-A34AT_P09-14.p65
Page 12
04.4.21, 5:13 PM
Adobe PageMaker 6.5J/PPC
Connecting the Car Power Cable
Use the dedicated Car Power Cable (DT-827CAC) sold separately for connecting the Car Mounted
Battery Charger (HA-A30CHG with HA-A34AT installed) to the cigarette lighter in your car.
1
After first checking to make sure the power
of the Handheld Terminal is OFF, plug the
Car Power Cable into the AC Adaptor jack on
the back of the Car Mounted Battery Charger.
2
Plug the Car Power Cable into the cigarette
lighter socket of a 12/24 V DC vehicle.
Turn on the power. The power indicator lamp
on the Car Mounted Battery Charger lights in
Power Switch(OFF)
red.
4
The power contacts on the bottom of the
2
Handhled Terminal are in contact with the
power contacts of the Car Mounted Battery
Removal Buttons
Charger, and place the Handheld Terminal on
the Car Mounted Battery Charger it clicks
ENGLISH
3
1
into place. This causes the power indicator on
Power Contacts
the Car Mounted Battery Charger to light in
Power Switch (ON)
green.
POWER
The indicator on the Handheld Terminal
Power Indicator Lamp
changes from red to green when charging is
complete.
When removing the Handheld Terminal,
press the removal buttons on the left and right
sides of the Car Mounted Battery Charger.
13
HA-A34AT_P09-14.p65
Page 13
04.4.21, 5:13 PM
Adobe PageMaker 6.5J/PPC
Important!
• Take care to avoid allowing the power contacts to become connected to each other,
which creates a short.
• Regarding the installation of HA-A34AT and DT-827CAC in your car, no technical
advice is available from CASIO. Consult with automotive parts store or specialized
store regarding the installation method and mounting strength of the products installed
in your car.
Precautions
• Make sure your Battery Charger Car Mount Unit is turned off before connecting or
disconnecting cables.
• Turn off the power before starting your vehicle engine.
• After you are finished using the Car Mounted Battery Charger, unplug it from the vehicle’s
cigarette lighter socket. Leaving the Car Mounted Battery Charger plugged in creates
the risk of damage to your vehicle or rundown of the vehicle’s battery.
• The Car Power Cable cigarette lighter plug may not fit the cigarette lighter sockets of
certain 12/24V DC vehicles.
Precautions during Fuse Replacement
• The fuse within the Car Power Cable blows out when current exceeding the rated current flows to protect the Car Mounted Battery Charger from excessively high current.
When the fuse has blown out, replace it by following the procedure described below.
1. Turn the cover on the end of the Power Cable plug in the counter-clockwise direction and remove.
2. Replace the fuse (SOC Type TSC 125V 4A).
3. Return the cover to the end of the Power Cable plug.
Specifications of the Car Mounted Battery Charger
Each specification listed below is valid only for the Car Mounted Battery Charger consisted of HAA30CHG and HA-A34AT.
1. Charging
Charging System
Charge time
2. Car Power Cable
Model
: Fixed-voltage (with current limiter)
: Approximately 8 hours (standard battery pack)
: Approximately 10 hours (large-capacity battery pack)
: DT-827CAC
3. Dimensions and Weight
Dimensions
: Approximately 111(W) × 243(D) × 104(H)mm (43/8"W × 99/16"D × 41/8"H)
Weight
: Approximately 840g (29.43oz) (not including brackets)
4. Operating Environment
Temperature
: 0°C to 40°C (32°F to 104°F)
Humidity
:30% to 80% RH (non-condensation)
14
HA-A34AT_P09-14.p65
Page 14
04.4.21, 5:13 PM
Adobe PageMaker 6.5J/PPC
安全防护措施
恭贺阁下选购本卡西欧产品。在初次使用本产品前,请务必阅读以下安全防护措施。请妥善
保存本说明书以备今后查阅。
标记和符号
斜线表明不应做的事情。此处所
示的符号表明,不应拆开本设备。
警告
●黑圈表明应该做的事情。此处所示
的符号表明,应从墙壁的插座上拔下
本设备的电源线。
该符号表明,如果忽略或使用不当,有可能造成死亡或严重的人身
伤害。
避免交通事故
• 切勿在操作汽车时使用车用蓄电池充电器配件。应在进行任何操作前将汽车停
于安全的地方。
• 切勿将车用蓄电池充电器配件置于可能会干扰汽车正常操作的地方,如阻碍驾
驶员前后视线,转向,或变速杆、刹车踏板或其他汽车控制部件的正常操作,
或任何可能危及乘客安全的地方。这些地方存在交通事故和人身伤害的隐患。
• 应按说明书中的说明安置连接电缆,并避开可能会干扰驾驶操作的地方。将电
缆卷绕在转向柱、变速杆、刹车踏板或其他控制部件上的做法非常危险。此
外,还应注意将车用蓄电池充电器配件置于不妨碍驾驶的地方。
• 如果在车用蓄电池充电器配件冒烟或发出异味的情况下继续使用,会造成火灾
和触电的危险。如果出现这种情况,应立即停止使用车用蓄电池充电器配件,
并与原始经销商或经授权的卡西欧服务供应商联系以寻求帮助。
• 如果电源没有打开,或电源虽已打开而指示灯没有亮起,或出现任何其他明显
的故障,请勿使用车用蓄电池充电器配件。如果在这些情况下继续使用,会造
成火灾和触电的危险。
拆卸和改装
• 切勿以任何方式拆卸或改装车用蓄电池充电器配件,否则会造成火灾和触电的
危险。
中 文
异常情况
汽车蓄电池电源
• 该车用蓄电池充电器配件仅能与使用12/24V DC电源的陆上汽车一同使用。
• 如果车用蓄电池充电器配件的电源电缆受损(裸露或破裂),请用新电缆进行
更换。继续使用受损严重的电缆,会造成火灾和触电的危险。
• 在使用该车用蓄电池充电器配件时,应始终确认使用汽车电源电缆 (DT827CAC)。使用非指定的汽车电源电缆可能会造成火灾或触电。
15
HA-B34AT_P15-23
Page 15
4/14/04, 10:08 PM
Adobe PageMaker 6.5J/PPC
警告
该符号表明,如果忽略或使用不当,有可能造成死亡或严重的人身
伤害。
水和异物
• 切勿使水进入车用蓄电池充电器配件并小心防止充电器受潮。湿气可能会造成
火灾和触电的危险。
• 如有异物或湿气进入车用蓄电池充电器配件,应立即将汽车电源电缆 (DT827CAC) 的插头从汽车的点烟器插座上拔出并断开车用蓄电池充电器配件。请
与原始经销商或经授权的卡西欧服务供应商联系以寻求帮助。继续使用车用蓄
电池充电器配件会造成火灾和触电的危险。
注意
离开汽车
• 无论何时离开汽车,应务必将汽车电源电缆 (DT-827CAC) 的插头从点烟器插
座上拔下。将车用蓄电池充电器配件留在插座上会耗尽蓄电池的电量。
汽车安全
• 在发动机关闭的情况下,长时间使用车用蓄电池充电器配件会耗尽汽车蓄电池
的电量。
• 不要用湿手操作汽车电源电缆,否则会有触电的危险。
安装车用蓄电池充电器配件时
• 当安装在配备安全气囊(SRS气囊)的汽车上时,切勿将车用蓄电池充电器配
件安装在安全气囊的盖子上或可能妨碍安全气囊展开的地方。
• 请勿将车用蓄电池充电器配件安装在会受强烈振动的地方、不稳定的地方或高
湿、多尘的地方。
• 牢固安装车用蓄电池充电器配件。
其他注意事项
• 请勿将车用蓄电池充电器配件安装在极热或极冷处或受强烈阳光直晒的地方*。此外,请勿将手持
打印机终端留在车内。否则可能导致车用蓄电池充电器配件或汽车电源电缆的有形损坏。
* 包括受强烈阳光直晒的地方和靠近热源的地方。
• 在使用完车用蓄电池充电器配件之后,应关闭电源并将汽车电源电缆插头从点烟器插座上拔下。
将车用蓄电池充电器配件留在插座上会造成汽车损坏或蓄电池电量耗尽的危险。
• 请仅在本说明书所规定的操作温度范围内使用车用蓄电池充电器配件。
• 切勿使用苯或其他化学试剂清洁车用蓄电池充电器配件。此类试剂会去除外壳上的标识或造成外
壳的有形损坏。如果脏污严重,可用蘸有水和中性洗涤剂的稀溶液擦拭。擦拭前应拧干所有多余
的水分。
• 清洁车用蓄电池充电器配件时,应务必先将汽车电源电缆插头从点烟器的插座上拔下以确保安全。
• 应避免摔落车用蓄电池充电器配件和手持打印机终端,或使其遭受强烈的撞击。
16
HA-B34AT_P15-23
Page 16
4/14/04, 10:08 PM
Adobe PageMaker 6.5J/PPC
检查内容
通过与座式蓄电池充电器 (HA-B30CHG) 的上部交互充电的方式使用该车用蓄电池充电器配
件 (HA-B34AT)。在安装该车用蓄电池充电器配件后,可使用车内点烟器的电源给装于手持
打印机终端中的电池进行充电。
托架螺钉 (4)
托架(安装托架)
中 文
车用蓄电池充电器配件
17
HA-B34AT_P15-23
Page 17
4/14/04, 10:08 PM
Adobe PageMaker 6.5J/PPC
安装车用蓄电池充电器配件
1
按图示拆下螺钉,将座式蓄电池充电器的上部拆下。
1
2
2
3
按图示用随附的螺钉安装车用蓄电池充电器配件。
2
3
1
1
3
根据需要按图示安装托架。
右孔
左孔
18
HA-B34AT_P15-23
Page 18
4/14/04, 10:08 PM
Adobe PageMaker 6.5J/PPC
连接汽车电源电缆
用单独出售的指定的汽车电源电缆 (DT-827CAC) 将车用蓄电池充电器(装有HA-B34AT的HAB30CHG)连接到汽车的点烟器上。
1
2
首先检查并确认手持打印机终端的电源已
经关闭 (OFF),将汽车电源电缆插入车用
蓄电池充电器背面的AC适配器的插孔。
将汽车电源电缆插入使用12/24V DC电源汽
车的点烟器插座中。
电源开关 (OFF)
车用蓄电池充电器
(装有HA-B34AT
4
的HA-B30CHG)
打开电源。车用蓄电池充电器上的电源指
示灯点亮,显示红色。
使手持打印机终端底部上的电源接触器与
车用蓄电池充电器的电源接触器接触,然
后将手持打印机终端置于车用蓄电池充电
器上,直至听到“咔嗒”的就位声。此
时,车用蓄电池充电器上的电源指示灯点
亮,显示绿色。
电源指示灯
POWER
取出按钮
当充电完成时,手持打印机终端上的指示
灯由红色变为绿色。
电源开关 (ON)
电源接触器
中 文
3
如要取下手持打印机终端,应按车用蓄电
池充电器配件左右两侧的取出按钮。
19
HA-B34AT_P15-23
Page 19
4/14/04, 10:08 PM
Adobe PageMaker 6.5J/PPC
重要事项!
• 应小心勿使车用蓄电池充电器配件的电源接触器相互接触而造成短路。
• 有关HA-B34AT和DT-827CAC在汽车上的安装,卡西欧不提供技术建议。请就该产品
在汽车上的安装方法、安装强度向汽车零部件公司或其他专业公司咨询。
注意事项
• 在连接或断开电缆之前,确认车用蓄电池充电器(装有HA-B34AT的HA-B30CHG)
的电源已经关闭。
• 在启动汽车发动机之前,应断开电源。
• 在使用完车用蓄电池充电器之后,应将其插头从汽车的点烟器插座上拔下。将车用
蓄电池充电器留在插座上会造成汽车损坏或汽车蓄电池电量耗尽的危险。
• 汽车电源电缆的点烟器插头可能与某些使用12/24V DC电源汽车的点烟器插座不相匹
配。
更换保险丝时的注意事项
• 当电流超过额定电流时,汽车电源电缆中的保险丝熔断以防止过高的电流流向车用蓄
电池充电器配件。保险丝熔断时,请按下述步骤更换保险丝。
1. 沿逆时针方向打开电源电缆插头端部的盖子。
2. 更换保险丝(SOC型TSC 125V 4A)。
3. 将盖子装回电源电缆插头的端部。
车用蓄电池充电器的规格
下列每一规格仅适用于包含HA-B30CHG和HA-B34AT的车用蓄电池充电器。
1. 充电
充电系统
充电时间
: 固定电压(带有限流器)
: 约8小时(标准电池板)
2. 汽车电源电缆
型号
: DT-827CAC
3. 尺寸和重量
尺寸
重量
: 约130(宽)× 206(深)× 104(高)mm
: 约700克 (不包括托架)
4. 工作环境
温度:
湿度:
0° C-40° C
30%-80%相对湿度(无结露)
20
HA-B34AT_P15-23
Page 20
4/14/04, 10:08 PM
Adobe PageMaker 6.5J/PPC
MEMO
21
HA-B34AT_P15-23.p65
Page 21
04.4.5, 11:52 AM
Adobe PageMaker 6.5J/PPC
MEMO
22
HA-B34AT_P15-23.p65
Page 22
04.4.5, 11:52 AM
Adobe PageMaker 6.5J/PPC
MEMO
23
HA-B34AT_P15-23.p65
Page 23
04.4.5, 11:52 AM
Adobe PageMaker 6.5J/PPC
〒151-8543 東京都渋谷区本町1-6-2
03-5334-4638(代)
☎
MO0404-A
HA-A34AT_hyo1_4.p65
Page 2
04.4.21, 5:12 PM
PN410390-001
Printed in Malaysia
Adobe PageMaker 6.5J/PPC