1
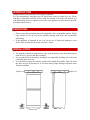
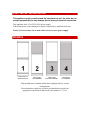
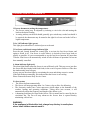
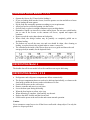
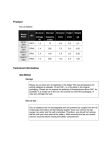
Owner’s
Manual
REFRIDGERATORS AND FREEZERS
CONTENTS
TOP FREEZERS
BOTTOM FREEZERS
2 Introduction
FROST FREE
2 Unpacking and Installation
FREEZERS AND
3 Electrical installation
REFRIDGERATORS
3 Models
4 Operating the Refrigerator
5 Operation of Freezer
6 Freezing guide
6 Defrosting the freezer
7 Cleaning
7 Maintenance
8 Service
www.defy.co.za
INTRODUCTION
Congratulations on the purchase of this quality appliance.
We, the manufacturer, trust that you will enjoy many years of trouble free use. Please
read these instructions carefully before using the product. This book will provide you
with information on how to operate and care for your appliance in order that you gain the
maximum benefit from it.
UNPACKING
•
•
Please ensure that packaging material is disposed of in a responsible manner. Plastic
bags should be cut up to prevent children playing with them and accidentally
suffocating.
If the appliance is damaged in any way, do not use it. Report the damage to your
dealer, who will take the necessary corrective action.
INSTALLATION
•
•
•
The appliance should be positioned in a dry, well aired place away from heat sources
such as stoves, geysers and direct sunlight.
It is essential to level the unit by turning the two adjustable levelling feet at the front
of the unit either in or out.
It is advisable to adjust the cabinet so that it tilts slightly backwards. This will assist
the doors to close by themselves. It will also ensure proper drainage of defrost water
from the cold plate
Spirit Level
Spirit Level
Front View
Side View
ELECTRICAL INSTALLATION
This appliance must be earthed and the manufacturer and the seller do not
accept responsibility for any damage due to incorrect electrical connection.
This appliance uses a 220-250V/50 Hz power supply.
If the mains power cord is damaged, it must be replaced by a qualified electrician.
Frost Free freezers may not be used with a battery inverter power supply.
MODELS
TWO DOOR ALL
REFRIGERATOR
TWO DOOR
TOP FREEZER
TWO DOOR
BOTTOM FREEZER
TWO DOOR
ALL FREEZER
Defy manufactures a number double door upright models in various
configurations.
Please determine which type you have purchased and read only the
appropriate instructions as indicated by the numbers 1,2,3 or 4
OPERATING THE REFRIDGERATOR – Models 1 2 3
Switching on and setting the temperature
• Push the 15-amp plug into an earthed wall socket and switch on the power.
• Ensure that the thermostat (located at the interior lamp housing) is not in the OFF
position.
• A setting midway on the dial should generally give satisfactory results.
• Should it be required, the thermostat may be turned to the right for a lower and to the
left for a higher temperature.
Storage guide
• Do not cover the shelves with paper or anything which could prevent airflow between
the shelves.
• The shelves may be adjusted up or down depending on storage requirements. Pull the
shelf forwards and out.
• Reposition at a different level.
• Avoid placing food wrapped in paper against the cold plate at the back of the
refrigerator. The paper could freeze to the plate and later, during defrosting, slide into
and block the defrost water drain located in the trough below the cold plate.
• Foods with strong aromas should be stored in sealed containers to prevent flavour
transfer to other foods.
• Separate vegetable crispers enable non-compatible foods to be stored without one
tainting the other.
WARNING:
If the appliance is fitted with a lock, always keep the key in a safe place
where small children cannot reach it.
OPERATION OF FREEZER 4
1 Freezer thermostat (setting the temperature).
• The freezer setting may be adjusted by inserting a coin in the slot and turning the
knob to the desired setting
• A setting midway on the dial should generally give satisfactory results but should it
be required, the thermostat may be turned to the right for a lower and to the left for a
higher temperature.
2 On / Off indicator light (green).
This light glows when there is electrical power to the unit.
3 Fast freeze switch and orange indicator light
Press the pad, located beneath the central light, to activate the fast freeze feature and
again to switch it off. Fast freeze is useful when it is desired to freeze large loads as
quickly as possible. It is not recommended to use the fast freeze function for more than
12 hours. Fast freeze will automatically switch off after 48 hours of operation if it has not
been manually cancelled.
4 Alarm indicator light (red).
The alarm light flashes when the freezer is not sufficiently cold. This may occur just after
the freezer has been loaded with fresh foods, in the event of a power failure or if the door
has inadvertently been left open.
Always react to the alarm light by ascertaining the cause and taking corrective action.
If the light flashes permanently, this indicates that the freezer is not cooling.
Please contact the nearest Defy Service Centre.
No frost system
•
The freezer defrosts automatically.
• The freezer will stop operating about 1 to 3 times a day to allow for defrosting.
• The electronic control has a micro-processor which adapts to the demands of the
weather, loading and operating conditions. Taking these into account, it will
automatically adjust the frequency and length of the defrost cycle.
• A humming sound may be heard in the freezer. This is normal and is caused by the air
circulation fan. The fan will stop whenever the freezer door is opened thereby
minimising cold air loss.
WARNING:
If the appliance is fitted with a lock, always keep the key in a safe place
where small children cannot reach it.
FREEZING GUIDE Models 1 2 3 4
•
•
•
•
•
•
•
•
•
•
Operate the freezer for 12 hours before loading it.
If you are loading bulk into the freezer, load one quarter at a time and allow to freeze
before loading the next quarter.
Divide food into reasonable portions according to your requirements.
Allow hot food to cool before putting it in the freezer.
Seal all foods, or place in airtight containers to prevent dehydration.
Remember, liquids can increase in volume when frozen. Do not store sealed bottles,
jars or cans in the freezer as the contents will freeze, expand and rupture the
container.
Do not exceed the expiry date shown on food packs.
Where fitted, the storage baskets may be partially or completely pulled out to
facilitate loading.
The baskets are not all the same size and care should be taken, after cleaning or
loading, to replace them in the original order to ensure a correct fit.
The calendar on the inside of the freezer door serves as a guide and shows the safe
storage period (in months) for the depicted foods.
DEFROSTING Model 4
The double door all freezer model is frost free and does not require defrosting.
DEFROSTING Models 1 2 3 4
•
•
•
•
•
•
•
•
•
Refrigerators and refrigerator compartments defrost automatically.
The freezer compartment however needs to be defrosted periodically, or whenever the
frost build up inside the freezer reaches a thickness of 4 mm.
Switch off the power at the wall socket.
Remove contents and store in a cool place.
Leave the door open during defrosting.
When the frost begins to soften, wipe it up
When defrosting is complete, clean and dry out the unit.
Replace the shelf / baskets and the frozen food.
Switch on the power at the wall socket and resume normal operation.
Caution
Never attempt to scrape frost or ice off the freezer walls with a sharp object. Use only the
plastic ice scraper provided.
CLEANING
•
•
•
•
•
•
•
•
•
Always disconnect the plug from the mains socket before cleaning the appliance.
Remember that turning the thermostat to “0” does not switch the power off to the
unit.
Clean the inside of the appliance whenever necessary using a solution of warm water
and Bicarbonate of Soda. (1 table spoon to every 2 litres of water).
Dry with a soft cloth.
Do not use pot scourers or abrasive powders to clean the appliance.
Spillages, especially citric and acidic juices, must be wiped up immediately as they
could stain the product.
Always ensure that the defrost drain, below the cold plate in the refrigerator
compartment, is clean and free of obstructions.
Shelves and freezer baskets, where fitted, may be removed for cleaning purposes.
The back of the unit may be vacuumed or dusted using a soft bristle brush.
A mild furniture polish may be used on the exterior cabinet to add lustre and protect
against finger marks.
Moisture formation
• If the refrigerator or freezer is located in a hot and humid area, and the door is opened
frequently, water droplets or dew may form on the interior walls of the appliance.
• This has no effect on the performance and the water may simply be wiped up using an
absorbent cloth
Replacing the lamp bulb.
• Unplug the power cord at the wall socket.
• Unclip the light cover by gently pulling the rear edge forward.
• Unscrew the bulb and replace it with a new bulb (not exceeding 15 watts).
• Replace the light cover by inserting the clip on its front edge into the slot of the
thermostat housing and then snapping in the clip on the rear edge.
MAINTENANCE
Owner’s responsibility
Since the following are not factory faults they are the owners responsibility:
• Damage to the exterior finish.
• Breakage of glass and other components.
• Replacement of light bulbs.
• Damage caused through improper use of the appliance.
• Damage caused by moving the appliance.
• Blocked defrost drain (refrigerator section).
SERVICE
Before calling a service technician to assist with a problem, please check:
• Is the thermostat in the OFF position? The thermostat should be set to an
ON
position.
• Is the power switched OFF? The power should be ON.
• Has a house fuse blown or a circuit tripped out? Repair or re-set as necessary.
• Is the 15-amp plug pushed firmly into the wall socket? Check another appliance such
as a toaster or kettle in the same socket.
• Has the door been left open for a long time? Close the door and monitor performance.
• Is the drain hole below the cold plate blocked? Clean out the hole with a suitable
flexible wire and then pour a small quantity of Bicarbonate of Soda and water
solution down the hole to rinse away any remaining debris.
Remember that you may be charged for a service call, even during the warranty
period, if the fault is caused by any of the above
If you have followed the instructions and still have a problem, contact the
nearest Defy Service Centre. They will be able to advise you on any aspect
of the machine or send a qualified technician to repair it.
The Manufacturer strives for continuous improvements. For this reason, the text and
illustrations in this book are subject to change without notice.
Part Number 2561 505