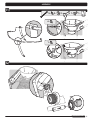
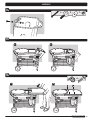
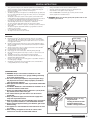
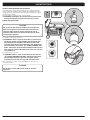
1
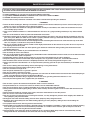
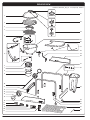
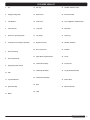
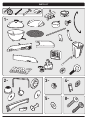
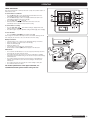
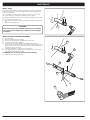
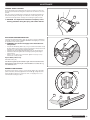
PEcRFORMER pPLATINUM
®
Charcoal Grill Owner’s Guide
#54789
YOU MUST READ THIS OWNERS GUIDE
BEFORE OPERATING YOUR GAS GRILL
m DANGER
If you smell gas:
1. Shut off gas to the appliance.
2. Extinguish any open flames.
3. Open lid.
4. If odor continues, keep away from the
appliance and immediately call your gas
supplier or your fire department.
Leaking gas may cause a fire or explosion
which can cause serious bodily injury or
death, or damage to property.
m WARNING
1. Do not store spare liquid propane gas
cylinder within 10 feet (3m) of this
appliance.
2. Do not store or use petrol or other
flammable liquids or vapors within 25
feet (8m) of this appliance.
mWARNING: Follow all leak-check
procedures carefully in this manual prior
to barbecue operation. Do this even if the
barbecue was dealer-assembled.
NOTICE TO INSTALLER: These instructions
must be left with the owner and the owner
should keep them for future use.
THIS GAS APPLIANCE IS DESIGNED FOR
OUTDOOR USE ONLY.
mWARNING: Do not try to light this
appliance without reading the Ignition
Instructions section of this manual.
mFailure to follow these instructions could
result in fire or explosion which could
cause property damage, personal injury
or death.
54789 AU 08/08/12
DANGERS AND WARNINGS
FAILURE TO HEED THESE DANGER, WARNING AND CAUTION STATEMENTS MAY CAUSE SERIOUS BODILY INJURY OR DEATH,
OR A FIRE OR EXPLOSION RESULTING IN DAMAGE TO PROPERTY.
m SAFETY SYMBOLS ( m ) will alert you to important SAFETY information.
m Signal Words DANGER, WARNING, or CAUTION will be used with the SAFETY SYMBOL.
m DANGER will identify the most serious hazard.
m Please read all safety information contained in this Owner’s Guide before operating this barbecue.
m DANGERS
mFailure to follow the Dangers, Warnings and Cautions contained in this Owner’s Manual may result in serious bodily injury or
death, or in a fire or an explosion causing damage to property.
mDo not use indoors! This barbecue is designed for outdoor use only. If used indoors, toxic fumes will accumulate and cause
serious bodily injury or death.
mOnly use this barbecue outdoors in a well-ventilated area. Do not use in a garage, building, breezeway or any other enclosed
area.
mDo not use this barbecue under any overhead combustible construction.
mImproper assembly may be dangerous. Please follow the assembly instructions in this manual. Do not use barbecue unless all
parts are in place. Make sure either the ash catcher is properly attached to the legs underneath the bowl of the barbecue, or the
high capacity ash catcher is in place, before lighting the grill.
mDo not add charcoal starter fluid or charcoal impregnated with charcoal lighter fluid to hot or warm charcoal. Cap starter fluid
after use, and place a safe distance away from the barbecue.
mDo not use gasoline, liquid fire starter, alcohol or other highly volatile fluids on the charcoal at any time. Do not use any form of
self-lighting charcoal at any time.
mYou should exercise reasonable care when operating your barbecue. It will be hot during cooking and should never be left
unattended during use.
mDo not leave infants, children or pets unattended near a hot barbecue.
mDo not attempt to move a hot barbecue.
mDo not use this barbecue within five feet of any combustible material. Combustible materials include, but are not limited to wood
or treated wood decks, patios and porches.
mCombustible materials should never be within 24 in. (61cm) of the top, bottom, back or sides of barbecue.
mKeep the cooking area clear of flammable vapor and liquids, such as gasoline, alcohol, etc., and combustible material.
mDo not remove ashes until all charcoal is completely burned out and are fully extinguished and grill is cool.
mAlways put charcoal in Char-Baskets™ or on top of the lower (charcoal) grate. Do not put charcoal directly in the bottom of the
bowl.
mDo not wear clothing with loose flowing sleeves while lighting or using the barbecue.
mNever lean over the barbecue when lighting the gas burner.
mDo not use barbecue in high winds.
mDo not operate the barbecue if a gas leak is present.
mDo not use a flame to check for gas leaks.
mShould the burner go out at any time during operation, turn tank valve off. Remove lid and wait five minutes before attempting to
relight, using the lighting instructions outlined in this Manual.
mDo not attempt to disconnect the gas regulator from the tank or any gas fitting while the barbecue is in use.
mUse only the LPG regulator that is supplied with your barbecue.
m WARNINGS
mDo not store a spare or disconnected LPG cylinder under or near this barbecue.
mKeep the barbecue on a secure, level surface at all times, clear of combustible materials.
mDo not put a barbecue cover or anything flammable on or in the storage area under the barbecue
mAlways remove the lid before lighting the gas burner, either manually or with the igniter. Lid must remain OFF until charcoal is
fully ignited.
mNever touch the cooking or charcoal grates, ashes, charcoal or the barbecue to see if they are hot.
mDo not use lava or char rocks in this barbecue.
mDo not use water to control flare-ups or to extinguish charcoal, as it may damage the porcelain finish. Slightly close bottom air
vents (dampers) and place lid on bowl.
mExtinguish coals when finished cooking. Close all vents (dampers) after putting lid on bowl.
mBarbecue mitts should always be worn while cooking, adjusting air vents (dampers), adding charcoal and handling the
thermometer or lid.
mUse proper barbecue tools, with long, heat-resistant handles.
mSome models may include the Tuck-Away™ lid holder feature. The Tuck-Away™ lid holder is used to store the lid while checking
on or turning your food. Do not use the Tuck-Away™ lid holder as a handle to lift or move the grill. Do not place a hot lid on
carpeting or grass. Do not hang the lid on the bowl handle.
mNever dump hot coals where they might be stepped on or be a fire hazard. Never dump ashes or coals before they are fully
extinguished. Do not store barbecue until ashes and coals are fully extinguished.
2
DANGERS AND WARNINGS (CONT’D)
m WARNINGS (cont’d)
mHandle and store hot electric starters carefully.
mKeep electrical wires and cords away from the hot surfaces of the barbecue and away from high traffic areas.
m After a period of storage and/or nonuse, check for gas leaks and burner obstructions before using. See instructions in this
manual for correct procedures.
m The conversion or attempted use of natural gas in this barbecue is dangerous and will void your warranty.
m A dented or rusty LPG cylinder may be hazardous and should be checked by your liquid propane gas supplier. Do not use an
LPG cylinder with a damaged valve.
m Although your LPG cylinder may appear to be empty, it may still contain gas. The tank should be transported and stored
accordingly.
m Combustion by-products produced when using this product contain chemicals known to the State of California to cause
cancer, birth defects or other reproductive harm.
m PROP 65 WARNING: Handling the brass material on this product exposes you to lead, a chemical known to the State of
California to cause cancer, and birth defects and other reproductive harm. Wash hands after handling this product.
m If you see, smell or hear gas escaping from the LPG cylinder:
1. Get away from the LPG cylinder.
2. Do not attempt to correct the problem yourself.
3. Call your Fire Department.
m CAUTIONS
m Lining the bowl with aluminum foil will obstruct the air flow. Instead, use a drip pan to catch drippings from meat when cooking
by the Indirect Method.
m Using sharp objects to clean the cooking grate or remove ashes will damage the finish.
m Using abrasive cleaners on the cooking grates or the barbecue itself will damage the finish.
m The barbecue should be thoroughly cleaned on a regular basis.
WARRANTY
Weber-Stephen Products LLC (Weber) hereby warrants to the ORIGINAL PURCHASER of this Weber®
gas grill that it will be free of defects in material and workmanship from the date of purchase as follows:
Cooking / Charcoal grates
Aluminized Steel One-Touch® Cleaning System
Stainless Steel One-Touch® Cleaning System
Bowl and lid against rust / burn-through
Nylon handles
Thermoplastic/Thermoset Parts(Performer®)
All remaining parts
2 years
5 years
10 years
10 years
10 years
10 years
excluding fading
2 years
when assembled and operated in accordance with the printed instructions accompanying it. Weber may
require reasonable proof of your date of purchase. THEREFORE, YOU SHOULD RETAIN YOUR SALES
SLIP OR INVOICE.
Our goods come with guarantees that cannot be excluded under the Australian Consumer Law. You are
entitled to a replacement or refund for a major failure and for compensation for any other reasonably
foreseeable loss or damage. You are also entitled to have the goods repaired or replaced if the goods
fail to be of acceptable quality and the failure does not amount to a major failure.
The benefits given under this Limited Warranty are in addition to other rights and remedies you have
under the Australian Consumer Law in relation to this Weber® gas barbecue.
This Limited Warranty shall be limited to the repair or replacement of parts that prove defective under
normal use and service and which on examination shall indicate, to Weber’s satisfaction, they are
defective. Before returning any parts, contact the Customer Service Representative in your area using
the contact information on our website. If Weber confirms the defect and approves the claim, Weber will
elect to replace such parts without charge. If you are required to return defective parts, transportation
charges must be prepaid. Weber will return parts to the purchaser, freight or postage prepaid.
This Limited Warranty does not cover any failures or operating difficulties due to accident, abuse,
misuse, alteration, misapplication, vandalism, improper installation or improper maintenance or service,
or failure to perform normal and routine maintenance, including but not limited to damage caused by
insects within the burner tubes, as set out in this owner’s manual.
Deterioration or damage due to severe weather conditions such as hail, hurricanes, earthquakes
or tornadoes, discoloration due to exposure to chemicals either directly or in the atmosphere, is not
covered by this Limited Warranty.
There are no other express warrants except as set forth herein and any applicable implied warranties
of merchantability and fitness are limited in duration to the period of coverage of this express written
Limited Warranty. Some regions do not allow limitation on how long an implied warranty lasts, so this
limitation may not apply to you.
Weber is not liable for any special, indirect or consequential damages. Some regions do not allow the
exclusion or limitation of incidental or consequential damages, so this limitation or exclusion may not
apply to you.
Weber does not authorize any person or company to assume for it any other obligation or liability in
connection with the sale, installation, use, removal, return, or replacement of its equipment; and no
such representations are binding on Weber.
This Limited Warranty applies only to products sold at retail.
WEBER-STEPHEN PRODUCTS LLC
R. McDonald Co. PTY.LTD.
A.C.N., 007 905 384
104 South Terrace
Adelaide, SA 5000
61.8.8221.6111
WEBER-STEPHEN PRODUCTS LLC
6 Maurice Road
Penrose
Auckland, 1061
New Zealand
Visit www.weber.com®, select your country of origin, and register your
barbecue today. ◆
REPLACEMENT HOSE AND REGULATOR
Country
Part #
Hose/Reg Australia
78788
m IMPORTANT NOTICE: We recommend that you replace
the gas hose on your Weber gas grill every 5 years.
Some countries may have requirements that the gas
hose be replaced in less than 5 years, thus that country’s
requirement would take precedent.
Minimum cylinder capacity - Primus 430g
www.weber.com®
3
EXPLODED VIEW
Performer Platinum_AU_LP - 22 1/2 (57cm) 072012
22
1
2
23
3
4
24
5
25
26
27
28
6
29
30
31
5
7
32
8
9
10
11
33
12
13
14
15
16
17
18
19
20
21
4
34
35
36
37
38
EXPLODED VIEW LIST
1.
Lid
14. Hub Cap
27. CharBin™ Retention Chain
2.
Hinged Cooking Grate
15. Wheel Cover
28. Burner Assembly
3.
Char-Baskets™
16. Front Panel
29. Hose & Regulator with Orifice Clip
4.
Charcoal Grate
17. Logo Plate
30. Rear Panel
5.
One Touch™ Cleaning System
18. Tool Holder
31. Frame Leg
6.
Lid Holder & Lower Support Assembly
19. Digital Cook Timer
32. CharBin™ Hardware
20. Gas Control Cover
33. CharBin™
7.
Ash Catcher Ring
21. Igniter Button / Igniter Module
34. Caster
8.
Ash Catcher Handle
22. Lid Handle Assembly
35. Caster Insert
9.
High Capacity Ash Catcher
23. Lid Damper Assembly
36. Leg Frame Bracket Clamp
10. Axle
24. Thermometer Assembly
11. Leg Frame Bracket
37. Bottom Rack
25. Bowl
12. Igniter Wire Stay
38. Matchstick Holder
26. Table
13. Wheel
www.weber.com®
5
PARTS LIST
1-
2-
6
3-
4-
5-
8-
ASSEMBLY
1
2
3
4
2-
2-
www.weber.com®
7
ASSEMBLY
5
7
8
4-
6
1-
1-
ASSEMBLY
8
Aa
Aa
Ba
Ba
Ca
Ca
www.weber.com®
9
ASSEMBLY
9
10
10
4-
4-
ASSEMBLY
11
5-
3-
2-
1-
1-
4-
1-
12
www.weber.com®
11
ASSEMBLY
13
1-
A
1
B
m WARNING
Prior to use, pull the gas hose and orifice to make sure that
the retaining clip is in place and that the gas hose and orifice
is securely attached inside the burner tube.
A missing retaining clip can cause the gas hose and orifice to
move out of the burner tube. This can cause a fire resulting in
serious bodily injury or death and damage to property.
m DANGER
Do not use the gas ignition feature if the retaining clip (1)
securing the gas line and orifice into the burner tube is
missing.
A missing retaining clip can cause the gas hose and orifice to
move out of the burner tube. This can cause a fire resulting in
serious bodily injury or death and damage to property.
12
ASSEMBLY
14
1-
2-
1-
15
A
B
16
4A
B
www.weber.com®
13
ASSEMBLY
17
18
1-
mMaximum 30 lbs. / 13.7 kg. bag of charcoal.
The bag of charcoal should be placed
directly in the CharBin™ Storage Container.
19
20
33 lbs. (15Kg) Maximum
Table Load
14
GENERAL INSTRUCTIONS
•
•
•
•
•
•
•
•
•
•
These instructions will give you the minimum requirements for assembling your
Weber® gas barbecue. Please read the instructions carefully before using your
Weber® gas barbecue. Improper assembly can be dangerous.
Not for use by children.
This Weber® gas barbecue is designed for use with liquid propane gas (LPG) only.
Do not use with natural (piped in city) gas. The valves, orifices, hose and regulator
are for LP gas only.
This appliance shall only be used in an above ground, open-air situation with
natural ventilation, without stagnant areas, where gas leakage and other products
of combustion are rapidly dispersed by wind and natural convection.
Check that the area under the control panel and the bottom tray are free from
debris that might obstruct the flow of combustion or ventilation air.
The areas around the LPG cylinder must be free and clear from debris.
Refer to data plate on barbecue for gas type, consumption, pressures and injector
sizing details.
The pressure regulator supplied with the Weber® gas grill must be used. This
regulator is set for 2.75 Kpa.
Use only AGA approved hose assemblies.
The length of hose must not exceed 1.5 meters.
•
•
•
Change the flexible hose when national conditions require it.
Any parts sealed by the manufacturer must not be altered by the user.
Any modification of the appliance may be dangerous.
Refer to AS5601/AG601, local authority, gas, electricity, and other relevant
statutory regulations for installation and use.
mWARNING: Never store an extra (spare) LPG cylinder under or near
the Weber® gas barbecue.
FEATURES:
A)
Exclusive Touch-N-Go™ Gas Ignition System takes the hassle out of lighting
charcoal briquets (1). Simply push a button and the system’s gas burner ignites,
starting the charcoal for you. No dangerous liquid starters to use or store, and no
more liquid starter aftertaste.
B)CharBin™ Storage Container holds a bag of charcoal with a maximum weight of
30 lbs./13.7 kg (2). The bag of charcoal should be placed directly in the CharBin™
Storage Container.
C) Thermoset work surface serves as a great work area and covers the CharBin™
Storage Container to keep briquets dry (3).
D) Convenient bottom rack for storage (4).
E) High-capacity ash catcher locks in place, eliminating blowing ashes (5).
F)One-Touch® Cleaning System easily sweeps out ashes, or opens and closes the
vents (6).
G) Thermometer monitors the cooking temperature inside the grill (7).
H)Tuck-Away™ Lid slides back into the stainless steel lid holder and acts as a
windshield when lighting briquets (8).
I)
Hinged access flaps swing open on cooking grate for easy addition of briquets or
wood chips during cooking (9).
J)Char-Basket™ Fuel Holders allow convenient indirect and concentrated direct
cooking flexibility with wood or charcoal (10).
33 lbs. (15Kg)
Maximum Table Load
7
10
9
3
8
1
5
6
4
2
Operating area
mWARNING: Only use this barbecue outdoors in a wellventilated area. Do not use in a garage, building, breezeway
or any other enclosed area.
mThe use of alcohol, prescription or non-prescription drugs
may impair the consumer’s ability to properly assemble or
safely operate the appliance.
mNever operate the barbecue under any overhead combustible
construction.
m Your Weber® Barbecue is not intended to be installed in or on
recreational vehicles and/or boats.
mDo not use combustible materials within 24 in. (61cm) of the
top, bottom, back or sides of the grill.
mThe entire barbecue gets hot when in use. Do not leave
unattended.
mKeep any electrical supply cord and the fuel supply hose
away from any heated surface.
mKeep the cooking area clear of flammable vapors and liquids,
such as gasoline, alcohol, etc., and combustible materials.
mDo not move the appliance during use. Allow the grill to cool
before moving.
mThis appliance is not intended for and should never be used
as a heater.
mWhen cooking, the appliance must be on a level, stable
surface in an area clear of combustible material.
mMaximum 30 lbs. / 13.7 kg.
bag of charcoal.
The bag of charcoal should
be placed directly in the
CharBin™ Storage Container.
www.weber.com®
15
GAS INSTRUCTIONS
Attach LIQUID Propane GAS Cylinder
Use LPG disposable cartridges with a minimum capacity of 430g and a maximum
capacity of 460g. The cartridge must have a EN417 valve as illustrated. One type of
cartridge that can be used is a Primus model 2202. Push LPG cylinder into regulator
and turn clockwise until tight.
Push LPG cylinder into regulator and turn clockwise until tight.
EN417
mWARNING: Hand tighten only. Using excessive force could
damage the regulator coupling and could cause a leak.
Check for gas leaks:
m DANGER
Do not use an open flame to check for gas leaks. Be sure
there are no sparks or open flames in the area while you
check for leaks. Sparks or flames will result in a fire or
explosion which can cause serious bodily injury or death,
and damage to property.
1
A) Regulator to LPG cylinder connection.
mWARNING: If there is a leak at connection (1), remove LPG
cylinder by turning counterclockwise. Do not operate grill.
Use a different LPG cylinder and recheck for leaks with
soap and water solution. If a leak persists after retightening
the LPG cylinder, turn OFF the gas. DO NOT OPERATE THE
GRILL. Contact the Customer Service Representative in your
area using the contact information on our web site. Log onto
www.weber.com®.
Normal
B) Regulator-to-hose connections.
m WARNING: If there is a leak at connection (2) turn OFF the
gas. DO NOT OPERATE THE GRILL. Contact the Customer
Service Representative in your area using the contact
information on our web site. Log onto www.weber.com®.
When leak checks are complete, turn gas supply OFF at the source and rinse
connections with water.
m DANGER
Do not store a spare LPG cylinder under or near this
appliance.
16
Damaged
2
OPERATING
Lighting
m DANGER
1
Open lid before lighting. Do not use any flammable liquids
such as starting fluid, gasoline, alcohol or any form of
self-lighting charcoal at any time, including when manually
lighting. Failure to do so will cause serious bodily injury or
death.
A)
Remove grill lid before operating gas feature.
mDANGER: Failure to do so can cause a gas build-up that can
cause a fire or explosion which can cause serious bodily
injury or death, or damage to property.
B)
C)
D)
E)
Open bottom bowl dampers (1).
Position charcoal baskets over burner (2).
Push in tabs on gas control cover (3) and lift to open.
Turn gas supply on (counter-clockwise) at least one full turn (4).
mWARNING: Do not lean over open barbecue while lighting.
F)
2
Push igniter button until burner ignites (5).
mCAUTION: Flame may be hard to see on a bright day.
G)
After charcoal has ignited, (approximately 5 minutes), turn gas control OFF
(clockwise) until it is closed.
mCAUTION: Ensure cover is closed completely.
Note - Prolonged tank run time lessens tank life.
H)
You can begin cooking when briquets have a light coating of grey ash
(approximaately 25-30 minutes).
TO EXTINGUISH
Close gas supply by turning gas control clockwise until closed.
3
4
5
www.weber.com®
17
OPERATING
Manual Lighting
1
mWARNING: Do not attempt to light manually without using
the match holder.
m DANGER
Open lid before lighting. Do not use any flammable liquids
such as starting fluid, petrol, alcohol or any form of selflighting charcoal at any time, including when manually
lighting. Failure to do so will cause serious bodily injury or
death.
A)
Remove grill lid before operating gas feature.
mDANGER: Failure to do so can cause a gas build-up that can
cause a fire or explosion which can cause serious bodily
injury or death, or damage to property.
B)
C)
D)
E)
F)
G)
Open bottom bowl dampers (1).
Move Char-Baskets away from the burner (2).
Push in tabs on gas control cover (3) and lift to open.
Put a match in the match holder. Light match.
Turn gas supply on (counter-clockwise) at least one full turn (4).
Position match flame at rear of burner slot (5).
2
mWARNING: Do not hold hand directly above burner when
manually lighting.
mWARNING: Do not lean over open barbecue while lighting.
mCAUTION: Flame may be hard to see on a bright day.
H)
I)
J)
5
Wear barbecue mitts and use tongs to reposition Char-Baskets over burner.
After charcoal has ignited, (approximately 5 minutes), turn gas control OFF
(clockwise) until it is closed.
You can begin cooking when briquets have a light coating of grey ash
(approximately 25-30 minutes).
TO EXTINGUISH
3
Close gas supply by turning gas control clockwise until closed.
4
18
OPERATING
TIMER OPERATION
This water-resistant digital cook timer provides both countup and countdown features in
minutes and seconds.
1
To set the time to countdown:
•
•
•
•
4
Press the MIN button (1) to set the minute digits. Hold the button down to fast
forward digits (maximum setting: 99 minutes (4)).
Press the SEC button (2) to set the second digits. Hold the button down to fast
forward digits (maximum setting: 59 seconds (5)).
Press the Start / Stop:
button (3).
When desired time is reached, the alarm will sound for 30 seconds and
automatically restart countdown from previous time setting.
2
5
3
To set the time to countup:
•
•
Press the Start / Stop:
button. While counting up, display will show the
reading in minute/second format.
Press button again to stop timer. (Maximum setting: 99 minutes (4), 59 seconds (5)).
To clear the time:
•
Press in both MIN and SEC:
buttons simultaneously (1)(2).
Note: If using in an environment that subjects timer to electrostatic discharge, the unit
time setting may be lost. If this occurs, reset unit and re-enter time setting.
Battery installation:
•
•
•
•
•
•
Unlock the battery cover on the back of the timer (6) by turning lock clockwise.
Remove the battery cover from the back of the timer (7).
Replace the AAA battery (8).
Replace the battery cover.
Lock the battery cover by turning lock counter-clockwise. After the battery is installed, (0000)will be displayed on the LCD screen.
Maintenance:
•
•
•
•
•
6
7
8
Do not clean the unit with abrasive or corrosive compound, which may scratch the
unit’s parts and corrode the electronic circuits.
Do not subject the unit to excessive force, shock, dust, temperature or humidity,
which may result in unit malfunctioning, shorter electronic life span, battery damage
and distorted parts.
Do not tamper with the unit's internal components. Doing so will invalidate the
warranty on the unit and may cause unnecessary damage to the battery and
internal parts.
Do not subject the unit to excessive exposure to direct sunlight or heavy rain.
Do not immerse this device in water.
For the best performance of the digital cook timer, it is
recommended to bring timer indoors during non-use.
www.weber.com®
19
TROUBLESHOOTING
Check
Problem
Cure
Burner burns with a yellow or orange flame, in
conjunction with the smell of gas.
Inspect burner for possible obstructions.
Clean burner.
(See Section “Maintenance”)
Burner does not light, or flame is low.
Is LP fuel low or empty?
Replace LP cylinder.
Is fuel hose bent or kinked?
Straighten fuel hose.
Does the burner light with a match?
If you can light the burner with a match, then check the
ignition system.
Is the hose to burner tube connection properly
secured?
Connect the gas hose to the burner tube using the metal
retaining clip provided.
m DANGER: Do not use the gas ignition feature if
the retaining clip is missing. A missing retaining
clip can cause serious bodily injury or death, and
damage to property.
Contact Customer Service for a replacement retainer clip.
Burner flame pattern is erratic.
Is burner clean?
Clean burner.
(See Section “Maintenance”)
Burner does not ignite when you push the igniter
button.
Be sure that there is gas flow to the burners by
attempting to match light your burners. Refer to
“MANUAL IGNITION”.
If match lighting is successful, the problem lies in the
ignition system. Refer to “ELECTRONIC IGNITION
SYSTEM OPERATION”.
Is there a fresh battery installed?
Verify that the battery is in good condition and installed
correctly. Refer to “ELECTRONIC IGNITER INSPECTION”.
Are the wires connected properly to the ignition
module?
Be sure that wires are correctly inserted into terminals on
ignition box. Refer to “ELECTRONIC IGNITION SYSTEM
OPERATION”.
Is there plastic wrapping around the new
battery?
Remove plastic wrapping.
Timer does not work.
Is there a fresh battery installed?
Verify that the battery is in good condition and installed
correctly. Refer to “TIMER OPERATION”.
Inside of lid appears to be “peeling.” (Resembles
paint peeling.)
What you are seeing is baked-on grease that has
turned to carbon and is flaking off.
THIS IS NOT A DEFECT.
Clean thoroughly.
(See Section “Cleaning”)
If problems cannot be corrected by using these methods, please contact the Customer Service Representative in your area using the contact information on our
web site. Log onto www.weber.com®.
20
MAINTENANCE
Maintenance
After a period of nonuse we recommend that you perform the following maintenance
procedures for your safety.
•
Check hose before each use of barbecue for nicks, cracking, abrasions or cuts.
If the hose is found to be unserviceable, do not use the barbecue. Replace using
only Weber® authorized replacement parts. Contact the Customer Service
Representative in your area using the contact information on our web site.
Log onto www.weber.com®.
mCAUTION: If the barbecue gas hose is damaged in any way
or leaking, do not use the barbecue.
•
•
Inspect the burner for the correct flame pattern(see section Burner Flame Patter).
Clean, if necessary, according to the procedures outlined in this section.
Check all gas fittings for leaks. See section “Check For Gas Leaks” .
Periodic Cleaning
1
To remove ashes from the bowl, move control rod (1) side to side so damper blades
sweep ashes through the bowl vents and into the ash catcher.
mCAUTION: Be sure that burner is OFF and barbecue is cool
before cleaning.
Do not enlarge burner slots when cleaning.
To clean burner:
•
Brush the outside of the burner tube (2) and the burner slot (3) section with a wire
brush.
mCAUTION: Do not enlarge the burner slots or the gas orifice
when cleaning.
To clean kettle:
•
•
While lid is warm, wipe the inside with a paper towel to prevent grease buildup.
For outer surfaces use a warm soapy water solution and rinse well with clear
water.
3
For a more thorough cleaning (to be done at least once a year):
A)
B)
C)
Remove ashes after coals are fully extinguished.
Remove the grates and Char-Baskets™.
Wipe out with paper towels. Wash with a mild detergent and water. Rinse well with
clear water and wipe dry.
2
Storage
•
•
•
•
When the Performer Grill is stored indoors, the gas supply must be disconnected
and the LPG cylinder stored outdoors in a well-ventilated space.
LPG cylinders must be stored outdoors in a well-ventilated area out of the reach of
children and must not be stored in a building, garage or any other enclosed area.
After a period of storage and/or nonuse, the barbecue should be checked for
gas leaks and any obstructions in the burner tube before using (see section
“Maintenance”).
Check that the areas around the tank, hose and burner assembly are free from
debris that might obstruct the flow of gas or air before use.
www.weber.com®
21
MAINTENANCE
Insect Alert
Your Performer Grill, as well as any outdoor gas appliance, is a target for spiders and
insects. They can nest in the venturi section (1) of the burner tube causing gas to flow
back out of the air shutter.
This could result in a fire in and around the burner tube under the bowl panel. It can
cause serious damage to your barbecue, rendering it unsafe to operate.
We strongly recommend that you inspect and clean the burner tube at least once a year,
or if any of the following symptoms occur:
A) The smell of gas in conjunction with the burner flames appearing very yellow and
lazy.
B) Burner makes popping noises.
1
m DANGER
Failure to correct these symptoms may result in a fire which
can cause serious bodily injury or death and cause damage
to property.
INSPECTING AND CLEANING THE BURNER
A)
B)
C)
D)
E)
F)
G)
Turn gas to OFF.
Remove the CharBin™ Storage Container.
Remove orifice clip (2) and hose fitting (3) from the burner tube.
Look inside the burner with a flashlight.
Clean the inside of the burner with the wire matchlight holder (provided).
Use the wire to clean the air shutter area, the venturi section, and the burner slots
(4) on the inside of the bowl. Be careful when inserting the burner cleaning tool not
to damage the igniter electrode (5).
Recheck with flashlight to see that there are no obstructions.
If necessary, surface of hose fitting can be cleaned with a brass wire brush. The
orifice (6) can be cleaned with a small pin.
2
3
mCAUTION: Do not enlarge the orifice when cleaning.
H)
Reassemble by reversing steps B and C.
4
5
6
22
MAINTENANCE
PERIODIC QUICK CLEANING
We recommend that you periodically brush the outside of the burner slots with a wire
brush and clean the burner tube through the combustion air vent with the tool we have
provided.
This can be done by locating the burner combustion air vent (1) underneath the bowl
bracket and inserting the tool through each combustion air vent, rotating the tool. Be
careful when inserting the burner cleaning tool not to damage the igniter electrode.
1
mCaution: It is important to increase the frequency of this
cleaning procedure during the spring and summer months.
ELECTRONIC IGNITION INSPECTION
If the Electronic Ignition System fails to ignite, be sure there is gas flow by attempting to
match light your burners. Refer to “MANUAL LIGHTING”. If match lighting is successful,
the problem lies is the electronic ignition.
m WARNING: Gas control and supply valve should be in the
OFF position.
•
•
•
•
3
Verify that the AAA battery (alkaline only) is in good condition and installed correctly
(1). Some batteries have a plastic protective wrap around them. This plastic must be
removed. Do not confuse this plastic with the battery label.
Check that both the white (2) and black (3) ignition wires are attached properly.
Check that the Electronic Ignition button is working by listening and looking for
sparks at burner.
Check to see if the igniter is loose in the frame. Tighten if necessary; see step
“Install” for the correct procedure.
Replace Battery If Necessary
2
AAA alkaline battery only.
If the Electronic Ignition System still fails to light, contact the Customer Service
Representative in your area using the contact information on our web site. Log
onto www.weber.com®. ◆
Burner Flame Pattern
The burner has been factory set for the correct air and gas mixture. The correct flame
pattern should have yellowish tips (4) dark blue in the middle (5), and light blue at the
burner tube (6). If the flames do not appear as shown, or if “popping” noises occur,
follow the burner cleaning procedures.
4
5
6
www.weber.com®
23
WEBER-STEPHEN PRODUCTS LLC
www.weber.com®
© 2012 Designed and engineered by Weber-Stephen Products LLC
a Delaware limited liability company, located at 200 East Daniels Road, Palatine, Illinois 60067 U.S.A.
Printed in U.S.A.