1
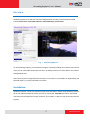
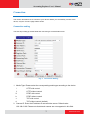
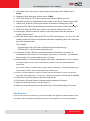
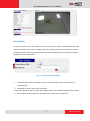
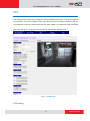
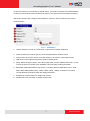
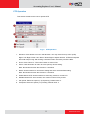
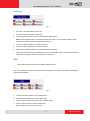
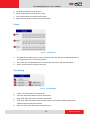
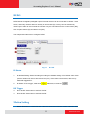
ACTi Streaming Explorer
User’s Manual
Ver 2.1.09
2011/06/24
Streaming Explorer User’s Manual
Overview
Streaming Explorer is a Web tool used to manage devices remotely. The Functions provided
include Connection, PTZ, DI/DO, Motion, Camera Settings and Preview.
Fig. 1
Streaming Explorer
To use streaming explorer, you should first configure connection settings and connect to the device.
Then you can just enable all the other functions, including Preview, PTZ, DIO, Motion and camera
setting adjustments.
Note: Not every device supports all the functions. For functions or commands not supported by the
particular device, you will not be able to use them.
Installation
Streaming Explorer connects to devices through Internet Explorer. Before using Streaming explorer,
be sure to update the ActiveX Control you use by running the setup.bat that comes with the file.
This batch file will register the proper controls to your system, so that you may access the devices
properly.
2
www.acti.com
Streaming Explorer User’s Manual
Connection
This section describes how to connect to your device. Before you successfully connect to the
device, only the „Connect‟ page will be shown.
Connection setting
The first step is filling up all the fields and connecting to camera/video server.
Fig. 2
Connection Setting
1. Media Type: Please select the corresponding media type according to the device.
i.
HTTP with control
ii.
HTTP without control
iii.
RTSP with control
iv.
RTSP without control
v.
TCP with control
vi.
TCP without control (default)
2. Camera IP: Enter the IP address of camera/video server. Default value:
192.168.0.100. Please note that domain names are not supported in this field.
3
www.acti.com
Streaming Explorer User’s Manual
3. User Name: Enter user name to login camera/ video server with. Default value:
Admin
4. Password: Enter password. Default value: 123456
5. HTTP Port: Enter the HTTP port number of the device. Default value: 80
6. Register Port: Enter the Registration port number of the device. Default value: 6000
7. Control Port: Enter the Control port number of the device. Default value: 6001.
8. Streaming Port: Enter the Streaming port number of the device. Default value: 6002.
9. RTSP Port: Enter the RSTP port number of the device. Default value: 7070
10. Channel No: Enter the channel number on the video server that user wishes to
connect. Default value: 1.
11. URI Path: When select media type HTTP or RTSP (media type is 7, 8, 10 or 12), user
needs to enter URI Path to communicate with device especially when user uses other
than ACTi cameras/video.
(For example:
Complete Path: http://192.169.0.100/cgi-bin/videoconfiguration.cgi
URI Path will be: cgi-bin/videoconfiguration.cgi)
12. Connection Timeout: Enter the maximum amount of time before connection is
considered to have timed out. For example: If we set it to 3 seconds, the maximum
timeout value is 3 seconds. Default value: 5 second.
13. Stream Setting: For devices that support dual stream, select Media 1 or 2 to connect
to. Default setting is none, which means that the media to connect is determined by the
Channel No.
If you select media 1 or media 2 from the drop down list, Channel no. will automatically be set
as the stream number, and will be grayed out as read only info.
14. Connect: Click this button to connect to device and start to preview. If user is not currently
connected, then “Disconnect”, “Full screen”, “Mute Off” and “Mute On” BTNs will be disabled
15. Disconnect: Click this button to disconnect with device.
16. Full Screen: Click this button to change preview window to full screen.
17. Mute Off: Click this button to turn the audio on
18. Mute On: Click this button to turn the audio off (It is the default setting of Preview)
Take Snapshot
Once you can connect to the device, you will see Snapshot tab appear and take snapshot for the
live video. Fill in the snapshot saving path and click “Take Snapshot” to execute it immediately.
4
www.acti.com
Streaming Explorer User’s Manual
Save Setting
As you can connect to only one device at a time yet may need to switch connection among several
cameras, we allow you to save the settings. Next time, when you want to connect again, just load
the settings before connecting and you will get all previous settings back, including all connection
settings and PTZ configurations.
Fig. 3
Save Connection Setting
1. Connection Set: When user wants to save connection settings, select one of three set
number to save.
2. Set Name: Enter the name of the connection
If the field is left blank when you click „Save Setting‟ button, the connection setting will be cleared.
3. Save Setting: Click this button to save setting in the selected connection set.
5
www.acti.com
Streaming Explorer User’s Manual
PTZ
This chapter teaches user how to configure PTZ (Pan/Tilt/Zoom) functions. If the device supports
PTZ functions, user has to enable PTZ first. Then all the PTZ functions will be available, such as
PTZ Operation, Iris/Focus, OSD, Preset and Tour. After enable it, you will see the figure as below.
Note: User can click “–“at the left of each button to minimize the setting window
Fig. 4
PTZ Screen
PTZ Setting
6
www.acti.com
Streaming Explorer User’s Manual
To use PTZ function on PTZ devices or speed domes, you need to configure PTZ related settings
or select a protocol file and click “Enable PTZ” button to use PTZ function and advanced setting.
After PTZ is enabled, the settings of PTZ Operation, Iris/Focus, OSD, Preset and Tour will be
shown as below.
Fig. 5
PTZ Setting
1. Vendor: Select the vendor of PTZ devices or speed dome. Default: ACM-8211
2. Protocol: Select the protocol type of PTZ device/speed dome. Default: VISCA
3. Protocol File: Click on the column to invoke explorer to choose the correct protocol file
4. Address ID: Enter address ID by device setting. Default value:1
5. Parity: Select the type of parity. There three types which are N81 (default value), E81, or O81
in the drop down list. Please check hardware manual for parity setting information.
6. Baud Rate: Select Baud Rate of the device. In the drop down list, Baud Rate can be 1200,
2400, 4800, 9600 (default value), 19200, 38400, 57600, 115200, or 230400. You should
consult hardware manual for baud rate setting information.
7. Enable PTZ: click this button to enable PTZ function
8. Disable PTZ: click this button to disable PTZ function
7
www.acti.com
Streaming Explorer User’s Manual
PTZ Operation
This section will teach user how to operate PTZ.
Fig. 6
PTZ Operation
1. Direction: Press button to move in that direction. You may select from Up Left / Up/Up
Right / Left /Right / Down Left / Down / Down Right to adjust direction. PTZ devices/speed
dome will keep moving after clicking a direction button until users put off the BTN.
2. Zoom: Press “Zoom In” /”Zoom Out” button to zoom in/out.
3. Home: Click this button to return to Home point by device setting.
Note: Not all devices have this function or command.
4. Reset: Click this button to clear all the setting and set to device default setting.
Note: Not all devices have this function or command.
5. Enable Mouse PTZ: Click this button to start using mouse to control PTZ
6. Disable Mouse PTZ: Once clicked, user cannot control PTZ by mouse.
7. Pan speed: Select the speed (1~5) of panning. Default value: 3.
8. Tilt Speed: Select the speed (1~5) of tilting. Default value: 3.
8
www.acti.com
Streaming Explorer User’s Manual
Iris/Focus
Fig. 7
1. Iris Open: Click this button to open Iris
2. Iris Close: Click this button to close Iris
3. Auto Iris: Click this button to set as automatically adjusted Iris
Note: It will not switch back to manual iris when click again. If user needs to switch back to
manual Iris, please use web configurator to change it
4. Focus In: Click this button to sharpen the focus
5. Focus Out: Click this button to loosen the focus
6. Auto Focus: Click this button to set as automatically focusing
Note: It will not switch back to manual focus when clicked again. If user needs to switch back to
manual Focus, please use web configurator to change it
OSD
This section teaches users how to operate OSD functions.
Note: Your speed dome must have OSD function to support; Otherwise, you will see nothing after
click buttons as below.
Fig. 8
1. OSD On: Click this button to open OSD menu
2. OSD Off: Click this button to close OSD menu
3. Enter: Click this button to enter function mode to set up
4. Leave: Click this button to leave OSD menu.
Note: Not all devices have this function
9
www.acti.com
Streaming Explorer User’s Manual
5. Up: Click this button to go up in menu
6. Down: Click this button to go down in menu
7. Left: Click this button to select the next option
8. Right: Click this button to select the previous option
Preset
Fig. 9
1.
PTZ Presets
Set: Select the number that you want to set preset point and click the corresponding button to
save the preset point on the current position
2.
Goto: Click the corresponding button of the preset point to go to the defi.ned position.
3.
Clear: Click the button to clear preset point.
Tour Setting
Fig. 10 Tour Settings
1.
Patrol : Click this button to run preset tour
2.
Left Limit: Click this button to set auto scan border
3.
Right Limit: Click this button to set auto scan border
4.
Auto Scan: Click this button to execute device auto scan function. Please set auto scan
borders first before using the function.
5.
Stop Auto Scan: Click the button to stop auto scan.
10
www.acti.com
Streaming Explorer User’s Manual
DI/DO
DI/DO stands for digital input/digital output. External devices can be connected to camera / video
server, and notify cameras about an activity in camera site (DI). Or they can be activated by
camera upon either an event inside the camera or by the command from the control center (DO),
such as panic button (DI) and alarm horn (DO).
This chapter describes how to configure DI/DO
Fig. 11
DI / DO
DI Status
1.
DI Default Setting: Select DI setting according to hardware setting of DI. Default value: 0x03
(device remains off, Device will receive DI input.). If the value is set as 0x00, device is by
default DI triggered on.
2.
DI Status: If DI is trigger, it will show
; Otherwise, it will show
DO Trigger
3.
DO1 On/Off: Click button to set DO1 On/Off
4.
DO2 On/Off: Click button to set DO2 On/Off
Motion Setting
Motion Detection is a useful function. User can set an area to detect motion within the area.
11
www.acti.com
Streaming Explorer User’s Manual
This chapter will teach user how to configure.
Fig. 12 Motion Setting – Getting motion settings
1. Get Motion Setting: Click this button to read current motion detection setting from device.
After clicking this button, the Motion Setup button will appear. User may now see previously
configured motion detection regions if there is motion activity.
2. Motion Setup: Click this button to start setting up motion and PIR detection. After Clicking
Motion Setup button, it will be replaced by an Apply button. It is used to save modified settings
to device. Now, user can start to configure motion and PIR settings.
12
www.acti.com
Streaming Explorer User’s Manual
Fig. 13 Setting up motion detection
1. Motion Enable: Click this check box to enable motion detection.
Note: If user doesn‟t click it, motion activity will not trigger motion detection even though you
may have previous settings memorized.
2. Motion Detection regions 1 – 4 .
I.
Click the check box and the corresponding region will be enabled.
II.
Enter Sensitivity value of the motion detection. The higher the value, the more sensitive
the detection.
III.
Enter Timer value of the motion detection. This value is the amount of time before the
next motion detection can be triggered.
IV.
Click and Drag the red rectangle on the preview screen to set up the area that user wish
to detect motion in.
NOTE: Most devices provide only three motion detection regions. For these devices the
motion detection window number 4 will be disabled.
3. PIR setting:
I.
Click the check box to enable PIR setting
II.
Enter Sensitivity value of PIR detection. The higher the value, the more sensitive the
PIR detection.
III.
Enter Timer value of the PIR detection. The value is the amount of time before the next
PIR can be triggered.
13
www.acti.com
Streaming Explorer User’s Manual
Note: if the device does not support PIR detection, the PIR setting will be disabled.
4. Apply: After finishing Motion and PIR setting, click this button to save settings.
14
www.acti.com