1
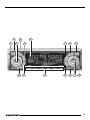
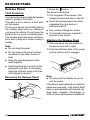
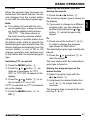
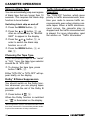
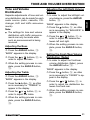
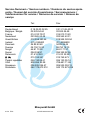
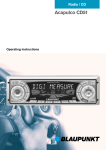
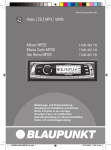
Radio / Cassette
Palm Beach C51
Operating instructions
Bitte aufklappen
Open here
Ouvrir s.v.p.
Aprite la pagina
Hier openslaan a.u.b.
Öppna
Por favor, abrir
Favor abrir
2
NEDERLANDS
5
16 15
7
14
13
8
12 11 10
SVENSKA
3
ESPAÑOL
1
9
ITALIANO
4
PORTUGUÊS
2
FRANÇAIS
6
3
ENGLISH
DEUTSCH
8
>
?
@
ENGLISH
FRANÇAIS
=
ITALIANO
6
7
<
NEDERLANDS
5
:
;
- button for opening the fliprelease panel
Arrow keys
OK - button, for confirmation of
menu entries and for starting the
scan function
DEQ - (Digital Equalizer) button,
for switching the equalizer on
and off
AUD - (Audio) button for adjusting bass, treble, balance and
fader
LD, for switching the loudness
function (hearing-weighted volume adaptation) on and off
Buttons 1 - 6
TRAF - (Traffic) button, for
switching the traffic announcements on and off
CCD•C -button for choosing between tape cassette, CD-changer (if connected) and AUX
SVENSKA
4
9
ESPAÑOL
2
3
- button for unlatching the removable release panel
Volume control
Button for switching the device
on and off and for muting the device
RDS - button, for switching the
RDS (Radio Data System) convenience function on or off
Select display of running texts
BND - (band) button for the selection of the radio source, selection of the FM memory levels
and the MW or LW wavebands
TS starts the Travelstore function
Display
- button for display of the
clock time
DIS, to change the contents of
the display
MENU - button, which calls up
the basic settings menu
PORTUGUÊS
1
DEUTSCH
CONTROLS
31
TABLE OF CONTENTS
Notes and accessories .......... 33
Road Safety .................................. 33
Fitting ............................................ 33
Accessories .................................. 33
Release Panel ........................ 34
Switching On and Off ............. 35
Adjusting the Volume ............. 36
Radio Operation ..................... 38
Switching on Radio Operation ....... 38
RDS Convenience Function
(AF, REG) ..................................... 38
Select Waveband/Memory Level ... 38
Setting the Station ......................... 39
Adjusting the Sensitivity of the
Station Search .............................. 39
Saving a Station ............................ 39
Saving a Station Automatically
(Travelstore) .................................. 40
Activating a Preset Station ............. 40
Scanning through Receivable
Stations (SCAN) ........................... 40
Adjusting the Scan Time ................ 40
Program Type (PTY) ...................... 40
Optimising Radio Reception .......... 42
Select Display of Running Texts ..... 42
Adjusting the Display ..................... 42
Switching the Radio Monitor
On and Off .................................... 45
Skipping Blank Tape ...................... 46
Choosing the Tape Type ................ 46
Dolby* B Noise Suppression ......... 46
Traffic Information with Cassette
Operation ...................................... 46
CD Changer Operation .......... 47
Starting CD Changer Operation .... 47
Selecting a CD .............................. 47
Selecting a Track ........................... 47
Fast Searching (Audible) ............... 47
Changing the Display .................... 47
Repeat Play of Individual Tracks
or Whole CDs (REPEAT) ............... 47
Playing Tracks in Random
Sequence (MIX) ............................ 47
Sampling All Tracks on All CDs
(SCAN) ......................................... 48
Pausing During Play ...................... 48
Naming CDs ................................. 48
Clock - Time ........................... 49
Tone and Volume Distribution 51
Traffic Information .................. 43
Cassette Operation ................ 44
Adjusting the Bass ........................ 51
Adjusting the Treble ....................... 51
Adjusting the Left/
Right Volume Balance .................... 51
Setting the Front/Rear Volume
Distribution (Fader) ........................ 51
Cassette Play ................................ 44
Cassette Ejection .......................... 44
Changing the Direction of Play ...... 44
Skipping Tracks (S-CPS) .............. 44
Playing a Track Repeatedly ............ 44
Sampling All the Tracks on a
Cassette (SCAN) .......................... 44
Changing the Display .................... 45
Resetting the Tape Counter ........... 45
Fast Winding ................................. 45
Pausing During Play ...................... 45
Loudness ................................ 52
Equalizer ................................ 52
External Audio Sources ......... 55
TMC for Dynamic Navigation
Systems ................................. 55
Technical data ........................ 56
Guarantee .............................. 56
Installation instructions ........ 221
32
Fitting
If you want to fit your car radio yourself,
read the fitting and connecting notes at
the end of the guide.
Subwoofer
You have the option of connecting an
active low-frequency loudspeaker (a
subwoofer) to your device.
It is connected via a Blaupunkt cable
(Blaupunkt no. 7 607 609 093), which
you can obtain from your accessory
dealer.
You will find more detailed information
in the fitting instructions later in this
booklet.
33
ENGLISH
FRANÇAIS
CD changer
The following Blaupunkt CD changers
can be connected:
CDC A 06, CDC A 08, CDC A 072 or
IDC A 09.
The use of an adapter cable (Blaupunkt
no. 7 607 889 093) also allows the CDC
A 05 or CDC A 071 CD changers to be
connected.
ITALIANO
Amplifiers
Any Blaupunkt amplifier can be used.
NEDERLANDS
Remote control
The optional RC 08 and RC 10 remote
control units allow you to control your
car radio's basic functions safely and
conveniently from the steering wheel.
SVENSKA
Road safety has the first priority.
Only make adjustments to your car
radio when the traffic conditions allow. Familiarise yourself with the device before you start driving.
You must be able to hear audible
alarms from police vehicles, fire engines or ambulances promptly inside
the vehicle.
You must therefore listen at an appropriate volume when travelling.
Only use accessories approved by Blaupunkt.
ESPAÑOL
Road Safety
Accessories
PORTUGUÊS
Thank you for choosing a Blaupunkt
product. We hope that you will enjoy your
new equipment.
Please read these instructions before
you use if for the first time. The Blaupunkt editors are constantly working to
write usage instructions in a clear and
generally understandable form. If, nevertheless, you have questions about
how to use your equipment, please refer to your dealer or to the telephone
hotline in your country. You will find the
telephone numbers at the back of this
booklet.
DEUTSCH
NOTES AND ACCESSORIES
RELEASE PANEL
button, 1.
Release Panel
➮ Press the
Theft Protection
The panel is unlatched.
Your device has a removable flip-release
panel to protect it from theft.
The radio is of no value to a thief without this panel.
Protect your device from theft by taking
the release panel with you whenever
you leave the vehicle. Do not leave the
panel in the car, even in a hidden place.
The release panel has been constructed is such a way as to make it easy to
handle.
Note:
● Do not drop the panel.
● Do not expose the panel to direct
sunshine or any other source of
heat.
● Keep the operating panel in the
case supplied.
● Avoid touching the contacts on the
panel with your skin. If necessary,
clean the contacts using a lint-free
cloth dipped in alcohol.
Removing the Release Panel
1
34
➮ Pull the panel off the device, first
●
●
●
straight forward and then to the left.
When the release panel has been
separated from the device, it
switches itself off.
Any current settings are saved.
If a cassette has been inserted it
remains in the device.
Attaching the Release Panel
➮ Push the panel into the guides on
the device from left to right.
➮ Push the left hand side of the panel
into the device until it engages.
Note:
● Do not press the display as you insert the panel.
If the device was switched on when the
panel was removed, it will switch itself
back on automatically with the last settings (radio, cassette, CD-changer or
AUX) as soon as the panel is replaced.
➮ Press the main button, 3.
Note:
In order to protect the vehicle battery, the device is automatically
switched off after an hour if the vehicle ignition is off.
●
button, 9.
ENGLISH
➮ press the
The flip-release panel opens.
➮ Insert the cassette with the open
side to the right gently into the
drive until you can sense some resistance.
The cassette is automatically drawn into
the drive.
As the cassette is drawn in, it must neither be held back nor assisted.
➮ Close the panel with gentle pressure until you feel it engage.
The device switches on. Cassette play
starts.
Switching On and Off with the
release panel
SVENSKA
➮ Remove the release panel.
FRANÇAIS
Switching On and Off with the
Vehicle Ignition
If the device is correctly connected to
the vehicle ignition, and has not been
switched off with the main button, 3, it
is switched on and off along with the
ignition.
You can also switch the device on when
the ignition is off:
ITALIANO
The following methods are available for
switching the device on or off:
Switching on by means of cassette
insertion
If there is no cassette in the deck when
the device is switched off,
NEDERLANDS
Switching On and Off
DEUTSCH
SWITCHING ON AND OFF
The device switches off.
➮ Replace the release panel.
ESPAÑOL
The device switches on. The most recent settings (radio, cassette, CDchanger or AUX) are restored.
Switching on and off with button 3
PORTUGUÊS
➮ Press the button, 3, to switch on.
➮ To switch off, hold the button, 3,
pressed for longer than two seconds.
The device switches off.
35
ADJUSTING THE VOLUME
Adjusting the Volume
The volume can be adjusted in steps
from 0 (off) up to 66 (maximum).
➮ To increase the volume, turn the
volume control, 2, to the right.
➮ To reduce the volume, turn the volume control, 2, to the left.
Adjusting the Switch-On Volume
➮ Press the MENU button, 8.
➮ Press the or button, :, as
often as is necessary for “ON VOLUME” to appear in the display.
➮ Adjust the initial volume with the
or button, :.
If you set “0”, then whatever volume was
in use before the device was switched
off will be reactivated.
Risk of serious injury! If the level
of switch-on volume is set to maximum, the volume when switching on
can be very high.
If the volume was set to maximum
before switching off, and the value
for the switch-on volume is set to “0”,
the volume when switching on can
be very high. This can damage the
hearing!
➮ When the setting process is complete, press the MENU button, 8,
or OK, ;.
36
Immediate Volume Reduction
(Mute)
You can reduce the volume immediately (mute) to a level that you have previously set.
➮ Press button 3 briefly.
“MUTE” appears in the display.
Adjust the muted volume.
The muting volume can be adjusted.
➮ Press the MENU button, 8.
➮ Press the or button, :, as
often as is necessary for “MUTE
LEVEL” to appear in the display.
➮ Adjust the mute level with the
or
button, :.
➮ When the setting process is complete, press the MENU button, 8,
or OK, ;.
Telephone Audio/Navigation
Audio
If your car radio is connected to a mobile telephone or to a navigation system, then when the telephone is taken
“off hook”, or when the navigation system is giving speech output, the car radio is muted. The telephone conversation or the speech output are reproduced via the car radio speakers. This
requires the mobile telephone or navigation system to be connected to the
car radio as described in the fitting instructions.
Your Blaupunkt dealer can tell you which
navigation systems can be used with
your car radio.
Automatic Sound
This function adjusts the car radio volume automatically according to the driving speed. This requires your car radio
to be connected as described in the fitting instructions.
This automatic volume increase can be
adjusted to one of six levels (0-5).
With certain functions, if you hold a button pressed for longer than two seconds,
for instance in order to save a station
frequency to a station button, a confirmation tone, or beep, is generated. The
volume level of the beep can be adjusted.
➮ Press the MENU button, 8.
➮ Press the or button, :, as
often as is necessary for “BEEP” to
appear in the display.
➮ Adjust the volume with the or
button, :. “0” means that the beep
is off, while “9” is the maximum
beep volume.
➮ When the setting process is complete, press the MENU button, 8,
or OK, ;.
37
ENGLISH
FRANÇAIS
ITALIANO
Adjusting the Volume of the
Confirmation Tone
NEDERLANDS
Note:
● The best setting for the speed-dependent volume increase depends
on the noise generated by your car.
Find the optimum value for your car
by experiment.
SVENSKA
often as is necessary for “AUTO
SOUND” to appear in the display.
➮ Adjust the volume increase with the
or button, :.
➮ When the setting process is complete, press the MENU button, 8,
or OK, ;.
ESPAÑOL
Note:
● You can adjust the volume level of
telephone calls and of speech output as they are made with the volume control, 2.
➮ Press the MENU button, 8.
➮ Press the or button, :, as
PORTUGUÊS
If a traffic announcement is received
during a telephone call, or while the
navigation system is providing speech
output, the traffic announcement is not
reproduced until the call or the speech
output has finished.
If a call is received or if the navigation
system generates speech output during a traffic announcement, the announcement is reproduced. The telephone call or speech output can be
heard when the traffic announcement
has finished.
The volume level with which the telephone call or navigation output start can
be adjusted.
➮ Press the MENU button, 8.
➮ Press the or button, :, as
often as is necessary for “TEL/
NAVI VOL” to appear in the display.
➮ Adjust the desired volume with the
or button, :.
➮ When the setting process is complete, press the MENU button, 8,
or OK, ;.
DEUTSCH
ADJUSTING THE VOLUME
RADIO OPERATION
Radio Operation
Switching REG on and off
This device is equipped with an RDS
radio receiver. Many of the FM stations
that can be received transmit a signal
in addition to the program itself that contains information such as the name of
the station and the type of program
(PTY).
As soon as it can be received, the name
of the station is shown in the display.
➮ Press the MENU button, 8.
➮ Press the or button, :, as
Switching on Radio Operation
often as is necessary for “REG” to
appear in the display. Either “OFF”
or “ON” is displayed behind “REG”.
➮ To turn REG on or off, press the
or
button, :.
➮ Press the MENU button, 8, or
OK, ;.
If the current operating mode is cassette
or CD-changer,
Switching the RDS convenience
function on and off
➮ press the BND/ TS button, 5.
➮ In order to use the RDS conven-
RDS Convenience Function
(AF, REG)
The RDS convenience functions AF (alternative frequency) and REG (regional) extend your radio's functional power.
● AF: If the RDS convenience function has been activated, the device
automatically switches to the best
frequency on which the chosen
station can be received.
● REG: Some stations divide their
programs at certain times into regional programs with different content. The REG function prevents
the car radio from switching to alternative frequencies that have a
different program content.
Note:
● REG must be separately activated
or deactivated in the menu.
38
ience functions AF and REG, press
the RDS button, 4.
The RDS convenience functions are
active if RDS is illuminated in the display with a symbol. “REG ON” or “REG
OFF” is displayed briefly when the RDS
convenience functions are switched on.
Select Waveband/Memory Level
This radio receives stations in the VHF
(FM) waveband as well as MW and LW
(AM) stations.
Three memory levels are available for
the FM waveband, and one memory
level is available for each of the MW and
LW bands.
Six stations can be stored in each memory level.
➮ Press the BND/TS button, 5,
briefly to switch between the memory levels or wavebands.
Manual station tuning
You can also tune to the station manually.
➮ Press the
or
button, :.
Note:
● Manual station tuning is only possible if the RDS convenience function is deactivated.
Browsing a chain of stations
(FM only)
If a station is providing several programs
it is possible to browse through this
“chain” of stations.
or button, :, in order to change to the next link in the
station chain.
➮ Press the
Note:
● In order to use this function, the
RDS convenience function must be
active.
You can only change in this way to a
station that you have already received
at least once. Use the Scan or Travelstore function for this purpose.
often as is necessary for “SENS” to
appear in the display.
➮ Press the
button, :.
The current value of the sensitivity is
shown on the display. “SENS HI6” indicates maximum sensitivity, and “SENS
LO1” the lowest. If “SENS LO” is chosen, lo appears in the display.
➮ Adjust the desired sensitivity with
the
or
key, :.
➮ When the setting process is complete, press the MENU button, 8,
or OK, ;.
Saving a Station
Saving a Station Manually
➮ Choose the desired memory level
from FM1, FM2, FMT or one of the
other wavebands, MW or LW.
➮ Tune to the station you want.
➮ Choose one of the station buttons
1 - 6, >, on which you want to
store the station, and hold it
pressed for longer than two seconds.
ENGLISH
➮ Press the MENU button, 8.
➮ Press the or button, :, as
FRANÇAIS
button, :.
ITALIANO
or
NEDERLANDS
➮ Press the
The next station that can be received is
tuned in.
You can choose whether to search only
for stations with strong signals, or whether weak stations should be included.
SVENSKA
Automatic station search
Adjusting the Sensitivity of the
Station Search
ESPAÑOL
There are a number of ways to set the
station.
PORTUGUÊS
Setting the Station
DEUTSCH
RADIO OPERATION
39
RADIO OPERATION
Saving a Station Automatically
(Travelstore)
Stop the SCAN, continue listening
to a station
You can also save the six strongest stations in the area automatically (FM only).
This is done in the FMT memory level.
➮ Press the OK button, ;.
Note:
● Any stations previously saved on
this level will be deleted.
Adjusting the Scan Time
➮ Press the MENU button, 8.
➮ Press the or button, :, as
➮ Hold down the BND/TS button, 5,
for longer than two seconds.
Storing starts. “TRAVEL-STORE” appears in the display.
When the procedure is complete, the
station in memory location 1 of the FMT
level is played.
Activating a Preset Station
➮ Select the memory level or waveband.
➮ Press the station key 1 - 6, >, for
the station you want.
Scanning through Receivable
Stations (SCAN)
You can listen to short samples from all
the stations that can currently be received. The length of the samples can
be set, in the menu, to between 5 and
30 seconds.
Starting the SCAN
➮ Hold down the OK button, ;, for
longer than two seconds.
The scanning process starts. “SCAN” is
shown on the display for a short time,
after which the current station name or
the frequency is displayed, flashing.
40
The scanning process is stopped, and
the last tuned station remains active.
often as is necessary for “SCANTIME” to appear in the display.
➮ Adjust the desired sampling time
with the
or
button, :.
➮ When the setting process is complete, press the MENU button, 8,
or OK, ;.
Note:
● The sampling time chosen also applies to scanning procedures under
cassette and CD changer operation.
Program Type (PTY)
As well as the station name itself, some
FM stations also supply information
about the type of program being transmitted. This information can be received
and displayed by your radio.
Examples of these program types could
be:
CULTURE
TRAVEL
JAZZ
SPORT
NEWS
POP
ROCK
CLASSICS
Using the PTY function it is possible to
specifically select stations transmitting
a particular program type.
RADIO OPERATION
Selecting the program type and
starting the search
Note:
● If no station is found with the chosen program type, a beep is sounded, and the display briefly shows
“NO PTY”. . The tuner returns to
the most recently received station.
If the set station, or another station from
the station chain, starts to transmit the
desired program type at a later time, the
device changes automatically from the
current station, or out of CD or CD
changer operation, and switches over
to the station with the desired program
type.
➮ If you want to change to a different
or button, :, in order to switch PTY on or off.
If PTY is switched on, PTY is illuminated on the display.
Or
in order to change the program
type stored for that button.
The selected program type is briefly displayed.
ITALIANO
or buttons, :, to
start the search.
The next station with the selected program type is tuned in.
NEDERLANDS
➮ Press one of the buttons 1 - 6, >,
ENGLISH
program type, you can change to
another by pressing the or
button, :, while the type is displayed.
FRANÇAIS
The current program type is shown on
the display.
➮ Press the
Storing the program type on the
station button
SVENSKA
often as is necessary for “PTY
OFF” or “PTY ON” to appear in the
display.
button, :.
➮ Select a program type with the
or
button, :.
➮ Press the
➮ Hold down the desired station but-
➮ Press the MENU button, 8, or
ton 1 - 6, >, for longer than two
seconds.
The program type is saved at the chosen key 1 - 6, >.
OK, ;.
41
ESPAÑOL
➮ Press the MENU button, 8.
➮ Press the or button, :, as
or
PORTUGUÊS
Switching PTY on and off
➮ Press the
DEUTSCH
PTY-EON
When the program type has been selected and the search started, the device changes from the current station
to one with the selected program type.
RADIO OPERATION
Optimising Radio Reception
Treble cut in the presence of
interference (HICUT)
The HICUT function improves the sound
when radio reception is poor (FM only).
When interference is being received, the
treble is automatically cut, which therefore also reduces the level of interference.
Switching HICUT on and off
➮ Press the MENU button, 8.
➮ Press the or button, :, as
often as is necessary for “HICUT”
to appear in the display.
or button, :, in order to adjust the HICUT.
“HICUT 0” means that the function is
inactive, while “HICUT 3” indicates the
strongest automatic reduction of the treble and the interference.
➮ Press the
➮ Press the MENU button, 8, or
OK, ;.
Bandwidth selection in the
presence of interference (SHARX)
The SHARX function allows you to eliminate interference from neighbouring
stations as far as possible (FM only).
Switch on the SHARX function when
stations are crowded.
Switching SHARX on and off
➮ Press the MENU button, 8.
➮ Press the or button, :, as
often as is necessary for “SHARX”
to appear in the display.
42
or button, :, in order to switch SHARX on or off.
“SHARX OFF” means that the function
is not active, while “SHARX ON” means
that the automatic bandwidth selection
is operating.
➮ Press the
➮ Press the MENU button, 8, or
OK, ;.
Select Display of Running Texts
Some radio stations use the RDS signal to transmit advertising or other information instead of the station name.
These “running texts” are shown on the
display. You can switch off the display of
“running texts”.
➮ Hold the RDS button, 4, pressed
until “NAME FIX” appears on the
display.
➮ In order to enable the display of
“running texts” again, hold the RDS
button, 4, pressed until “NAME
VAR” appears on the display.
Adjusting the Display
Under radio operation it is possible to
choose between continuous display of
the time or continuous display of the station name (or frequency).
/ DIS button, 7,
pressed until the display you want
appears.
➮ Hold the
Note:
You will hear a warning tone
● if you leave the reception area of a
traffic radio station to which you are
listening.
● if, when you are listening to a cassette, you leave the reception area
of the selected traffic radio station,
and the automatic search which
then follows fails to find a new traffic radio station.
● if you change from a traffic radio
station to a station with no traffic
information.
Either switch off the traffic information
priority, or change over to a station with
traffic information.
plete, press the MENU button, 8,
or OK, ;.
Note:
● During a traffic announcement you
can adjust the volume for the duration of the announcement using the
volume control, 2.
Note:
● You can adjust the tone and the
volume distribution for traffic announcements. For more information, read the section on “Tone and
volume distribution”.
ENGLISH
ITALIANO
➮ When the setting process is com-
FRANÇAIS
buttons, :.
NEDERLANDS
Traffic announcement priority is activated if the traffic jam symbol is illuminated.
➮ Adjust the volume with the
SVENSKA
Switching Traffic Information
Priority On and Off
➮ Press the TRAF button, ?.
“TA VOLUME” appears in the display.
ESPAÑOL
This device is equipped with an RDS
EON receiver. EON means Enhanced
Other Network.
Whenever a traffic announcement (TA)
is made, the radio switches automatically from a station that does not broadcast traffic information to one in the
chain of stations that does.
After the traffic announcement, the device returns to the station that was previously tuned in.
Adjusting the Volume for Traffic
Announcements
➮ Press the MENU button, 8.
➮ Press the or button, :, until
PORTUGUÊS
Traffic Information
DEUTSCH
TRAFFIC INFORMATION
43
CASSETTE OPERATION
Cassette Operation
Cassette Play
If there is no cassette in the device
➮ press the button, 9.
The flip-release panel opens to the front.
➮ Insert the cassette into the cassette
slot with the open side to the right.
➮ Close the control unit.
The cassette starts playing with the side
that is facing upwards.
● If there is already a cassette in the
device
➮ Press the CD•C button, @, as
often as is necessary for
“CASSETTE” to appear in the display.
The cassette is played in whichever direction was last selected.
●
Cassette Ejection
➮ Press the button, 9.
The flip-release panel opens to the front
and the cassette is ejected.
➮ Remove the cassette and close the
release panel
or
➮ insert a new cassette.
Changing the Direction of Play
➮ To change between the directions
of play for side A and side B, press
button, >.
the 2
Note:
● The direction of play is automatically reversed at the end of the tape
(auto-reverse).
44
Skipping Tracks (S-CPS)
➮ In order to change to a later track,
press the button, :, one or
more times.
“CPS FF” and the number of tracks to
be skipped appear on the display.
The tape winds fast forwards to the next
track, or the chosen later track.
➮ In order to change one of the previous tracks, press the button, :,
one or more times.
“CPS FR” and the number of tracks to
be skipped appear on the display.
The tape is fast rewound to the start of
the present track or of the appropriate
previous track.
Playing a Track Repeatedly
➮ Press the 4 RPT button, >.
The present track is repeated. RPT illuminates on the display. While the tape
is being rewound after the end of the
track, “REPEAT TRCK” appears in the
display.
➮ To stop repeating the track, press
the 4 RPT button, >, again.
Play continues as normal. RPT on the
display goes out.
Sampling All the Tracks on a
Cassette (SCAN)
➮ Hold down the OK button, ;, for
longer than two seconds.
“CAS SCAN” appears in the display.
Samples from all the tracks on the tape
are played in ascending order.
➮ To halt the scan, press the OK button, ;, a second time.
CASSETTE OPERATION
Stopping the fast wind
Note:
● The duration of the samples can be
adjusted. Refer to the section on
“Adjusting the Sample Time” in the
“Radio Operation” section.
● There must be a pause of at least
three seconds between each of the
tracks on the cassette in order to
use the S-CPS, RPT and SCAN
functions.
Play continues.
Changing the Display
tape, press button 3 , >.
Play is interrupted, and “CAS PAUSE”
appears on the display.
In order to reset the tape counter,
➮ press button, 5 MIX, >.
Fast Winding
Fast forward
➮ Press the
button, :.
“FORWARD” appears in the display.
Switching the Radio Monitor On
and Off
➮ Press the MENU button, 8.
➮ Press the or button, :, as
often as is necessary for “RM ON”
or “RM OFF” to appear in the display.
➮ Press the or button, :, in order to switch the radio monitor on
or off.
➮ Press the MENU button, 8, or
OK, ;.
Fast rewind
➮ Press the
ENGLISH
FRANÇAIS
ITALIANO
, >, again to
continue after the pause.
➮ Press button 3
NEDERLANDS
Pausing During Play
➮ In order to interrupt the playing of a
SVENSKA
Resetting the Tape Counter
Note:
● While the tape is being fast wound,
it is possible to hear the radio station that was most recently tuned
in. This requires the “Radio monitor” function to be switched on.
ESPAÑOL
/ DIS button, 7,
one or more times for longer than
two seconds, until the display you
want appears.
➮ hold down the
➮ Press the OK button, ;.
PORTUGUÊS
In order to change between the display
of tape direction, tape counter, elapsed
play time, remaining play time or clock
time:
DEUTSCH
The track that is currently being sampled will continue to be played.
button, :.
“REWIND” appears in the display.
45
CASSETTE OPERATION
Skipping Blank Tape
You can automatically jump over regions
of blank tape that are longer than 10
seconds. This requires the blank skip
function to be activated.
Switching blank skip on and off
➮ Press the MENU button, 8.
➮ Press the or button, :, as
often as is necessary for “BLANK
SKIP” to appear in the display.
or button, :, in
order to switch the blank skip
function on or off.
➮ Press the
➮ Press the MENU button, 8, or
OK, ;.
Choosing the Tape Type
If you are playing a tape of the “metal”
or “CrO2” type, the tape type selector
should be at “MTL ON”.
➮ To choose the tape type, press
button 1 MTL, >.
Either “MTL ON” or “MTL OFF” will appear briefly on the display.
Dolby* B Noise Suppression
You should switch on the Dolby function whenever you are playing tapes
recorded with the aid of the Dolby B
process.
➮ Press button 6
, >.
When the Dolby function is switched
on, “ ” is illuminated on the display.
*Noise suppression system manufactured under licence
from Dolby Laboratories. The word Dolby and the doubleD symbol are trademarks of Dolby Laboratories.
46
Traffic Information with Cassette
Operation
The “TRAFFIC” function, which gives
priority to traffic announcements, enables your radio to receive traffic announcements even when playing cassette tapes. When a traffic announcement comes, the cassette play is
stopped and the traffic announcement
is played. For more information, read
the section on “Traffic Information”.
ent CD, press the
or
:, one or more times.
button,
Selecting a Track
➮ To change up or down to a different track on the current CD, press
the or button, :, one or more
times.
Fast Searching (Audible)
In order to search rapidly backwards
or forwards
➮ Hold down one of the
or
button, :, until the fast search backwards of forwards starts.
Changing the Display
➮ To change the display between
track number and play time, track
number and clock time, track
number and CD number or track
ENGLISH
FRANÇAIS
the 4 RPT button, >, again.
“REPEAT DISC” appears briefly on the
display, and RPT is illuminated.
ITALIANO
Selecting a CD
➮ To change up or down to a differ-
➮ To repeat the current CD, press
Stopping REPEAT
NEDERLANDS
ten as is necessary for “CHANGER” to appear in the display. .
Play will start with the first CD that the
CD changer recognises.
track, press button 4 RPT, >,
briefly.
“REPEAT TRCK” appears briefly on the
display, and RPT is illuminated.
➮ To cancel the repetition of the
current track or CD, press button
4 RPT, >, until “REPEAT OFF”
briefly appears and RPT goes out
from the display.
Playing Tracks in Random
Sequence (MIX)
➮ To play the tracks on the current
CD in a random sequence, briefly
press button 5 MIX, >.
“MIX CD” appears briefly on the display, and MIX is illuminated.
➮ To play the tracks on all the inserted CDs in a random sequence,
press button 5 MIX, >, again.
“MIX ALL” appears briefly on the display, and MIX is illuminated.
47
SVENSKA
Starting CD Changer Operation
➮ Press the CD•C button, @, as of-
Repeat Play of Individual Tracks
or Whole CDs (REPEAT)
➮ In order to repeat the current
ESPAÑOL
Note:
● The operating instructions for
your CD changer will provide information about handling CDs, inserting them and operating the
CD changer.
number and CD name, press the
/ DIS button, 7, one or more
times for longer than two seconds, until the desired display
type appears.
PORTUGUÊS
CD Changer Operation
DEUTSCH
CD CHANGER OPERATION
CD CHANGER OPERATION
Note:
● The CDC A 08 and the IDC A 09
will make random selections from
all the CDs in the changer. All other changers will first play through
all the tracks of one CD at random
before moving on to the next CD
in the changer.
Ending MIX
➮ Press button 5 MIX, >, until “MIX
OFF” is briefly displayed, and MIX
on the display goes out.
Sampling All Tracks on All CDs
(SCAN)
➮ In order to listen to short samples
from all the tracks of all the inserted CDs in ascending order, hold
down the OK button, ;, for longer than two seconds.
“SCAN” appears in the display.
Ending SCAN
➮ To halt the scan, briefly press the
OK button, ;.
The track that is currently being sampled will continue to be played.
Note:
● The duration of the samples can
be adjusted. For information on
setting the sampling duration, read
the paragraphs on “Adjusting the
Sample Time” in the “Radio Operation” section.
Pausing During Play
➮ Press the button 3 , >.
“PAUSE” appears in the display.
48
Continuing after the pause
➮ Press button 3
, >, during the
pause.
Play continues.
Naming CDs
In order to recognise your CDs more
effectively, the car radio allows you to
give individual names to up to 99 CDs.
The names may have up to seven characters.
If you attempt to assign more than 99
names, the display will show “FULL”.
Entering and changing CD names
➮ Press the MENU button, 8.
➮ Use the or button, :, to select “CDC NAME”.
➮ Press the or button, :.
The device is now in selection mode.
➮ Choose the CD that you want to
button, :.
name with the or
➮ Press the or button, :.
The device enters edit mode. If your
chosen CD is not yet named, seven
underscores appear in the display.
➮ The current entry location blinks.
➮ Use the or button, :, to select your characters. If a location
is to remain empty, select the underscore.
or
button, :, to
change the input location.
➮ Use the
➮ To save the name, press the
MENU button, 8, or OK, ;.
The clock time can be automatically set
by means of the RDS signal. If you
cannot receive an RDS station, or if the
RDS station to which you are listening
does not support this function, it is also
possible to set the time manually.
Setting the time automatically
➮ In order to have the time set automatically, press the MENU button,
8.
or
key, :, as often as necessary for “CLOCK
MAN” (manual) or “CLOCK AUTO”
(automatic) to appear in the display.
➮ Press the
button, :, as often
as is necessary for “CLOCK
AUTO” to appear in the display.
➮ Press the
➮ When the setting process is complete, press the MENU button, 8,
or OK, ;, twice.
When a station with the RDS clock
function (RDS-CT) is received, the
time is automatically set.
49
ITALIANO
Setting the Time
FRANÇAIS
ENGLISH
/ DIS button, 7.
NEDERLANDS
the
DEUTSCH
Briefly Displaying the Clock
Time
➮ In order to display the time, press
SVENSKA
Deleting all CD names
All the stored CD names are cleared.
➮ Listen to a CD.
➮ Press the MENU button, 8.
➮ Use the or button, :, to select “CDC NAME”.
➮ Press the or button, :.
➮ Hold down the MENU button, 8.
After four seconds a beep is
heard, and “DELETE NAME” appears on the display. Continue to
hold the MENU button, 8, until a
second beep is heard, and “DELETE ALL” appears in the display.
➮ Release the MENU button, 8.
All CD names in the CD changer have
been cleared.
➮ By pressing the OK button, ;,
you return to the menu.
CLOCK - Time
ESPAÑOL
Deleting a CD name
➮ Listen to the CD whose name is to
be deleted.
➮ Press the MENU button, 8.
➮ Use the or button, :, to select “CDC NAME”.
➮ Press the or button, :.
➮ Hold down the MENU button, 8.
After four seconds a beep is
heard, and “DELETE NAME” appears on the display.
➮ Release the MENU button, 8.
The CD name has been deleted.
➮ By pressing the OK button, ;,
you return to the menu.
CLOCK - TIME
PORTUGUÊS
CD CHANGER OPERATION
CLOCK - TIME
Setting the time manually
➮ In order to adjust the time, press
the MENU button, 8.
or
button, :, as
often as is necessary for
“CLOCKSET” to appear in the
display.
➮ Press the
➮ Press the
button, :.
The time is shown on the display. The
minutes are blinking, and can be adjusted.
➮ Adjust the minutes with the
or
button, :.
➮ When the minutes have been set,
press the
blink.
button, :. The hours
➮ Adjust the hours with the
button, :.
➮ Press the MENU button, 8, or
OK, ;.
Having the time displayed
constantly when the device is
switched off but the ignition on
➮ If you want the time to be displayed when the device is
switched off but the ignition is
switched on, press the MENU
button 8.
“MENU” appears in the display.
➮ Press the or button, :, as
often as is necessary for “CLK
DISP OFF” or “CLK DISP ON” to
appear in the display.
or
button, :, to
switch the display between ON
and OFF.
➮ Press the
➮ When the setting process is complete, press the MENU button, 8,
or OK, ;.
Displaying the time briefly when
the device is switched off
Choosing 12/24 hour clock
mode
➮ Press the MENU button, 8.
To display the time briefly when the
device is switched off
“MENU” appears in the display.
The time is shown on the display for
eight seconds.
or
button, :,
as often as is necessary for
“24 H MODE” or “12 H MODE” to
appear in the display.
➮ Press the
or
button, :, to
switch between the modes.
➮ Press the
➮ When the setting process is complete, press the MENU button, 8,
or OK, ;.
50
➮ press the
/ DIS button, 7.
“BASS” appears in the display.
or
buttons, :, in
order to adjust the bass.
➮ Press the
➮ When the setting process is complete, press the AUD/LD button,
=.
Adjusting the Treble
➮ Press the AUD/LD button, =.
“BASS” appears in the display.
button, :, as often
as is necessary for “TREBLE” to
appear in the display.
➮ Press the
or
button, :, in
order to adjust the treble.
➮ Press the
➮ When the setting process is complete, press the AUD/LD button,
=.
Setting the Front/Rear Volume
Distribution (Fader)
➮ In order to adjust the front/rear
volume distribution (fader), press
the AUD/LD button, =.
“BASS” appears in the display.
button, :, as often
as is necessary for “FADER” to appear in the display.
➮ Press the
or
button, :, in
order to adjust the distribution between front and rear.
➮ Press the
➮ When the setting process is complete, press the AUD/LD button,
=.
➮ When the setting process is complete, press the AUD/LD button,
=.
51
ENGLISH
FRANÇAIS
ITALIANO
or
button, :, in
order to adjust the balance between left and right.
➮ Press the
NEDERLANDS
Adjusting the Bass
➮ Press the AUD/LD button, =.
button, :, as often
as is necessary for “BALANCE” to
appear in the display.
➮ Press the
SVENSKA
Note:
● The settings for tone and volume
distribution with traffic announcements can only be made while
such an announcement is being
received.
ume balance, press the AUD/LD
button, =.
“BASS” appears in the display.
ESPAÑOL
Separate adjustments of tone and volume distribution can be made for each
audio source (radio, cassette, CDchanger, AUX and traffic announcements).
Adjusting the Left/Right Volume
Balance
➮ In order to adjust the left/right vol-
PORTUGUÊS
Tone and Volume
Distribution
DEUTSCH
TONE AND VOLUME DISTRIBUTION
LOUDNESS
Switching the Loudness On
and Off
Loudness refers to boosting the bass
and treble at low volume levels to
match the ear's sensitivity.
➮ Press the AUD/LD button, =, for
about two seconds.
If loudness is switched on, LD is illuminated on the display.
Setting the Loudness Intensity
The loudness boost can be set in steps
from one to six.
➮ Press the MENU button, 8.
“MENU” appears in the display.
or
button, :,
as often as is necessary for
“LOUDNESS” to appear in the
display.
➮ Press the
or button, :, in
order to adjust the boost.
➮ Press the
➮ When the setting process is complete, press the MENU button, 8,
or OK, ;.
52
EQUALIZER
Equalizer
This device has a parametric digital
equalizer. In this case, parametric
means that in each of the five filters,
one individual frequency can be emphasised or reduced (with a gain of +8
to -8).
The following filters are available:
● SUB LOW EQ
32 - 50 Hz
● LOW EQ
63 - 250 Hz
● MID EQ
315 - 1,250 Hz
● MID/HIGH EQ
1,600 - 6,300 Hz
● HIGH EQ
8,000 - 12,500 Hz
These filters can be set without using
any measuring instruments. You can
use them to make a significant difference to the quality of the sound in the
vehicle.
Adjustment Instructions
We recommend that you use a cassette
with which you are familiar, or a CD if a
CD changer is connected, for the purposes of this adjustment.
Zero the tone settings and deactivate
the loudness before making any adjustments to the equalizer. Read the section on “Tone and volume” for more
information about this.
➮ Listen to the cassette or CD.
➮ Compare the sound you hear with
how you feel it should be.
➮ Now consult the “Equalizer Adjustment Guide” table for “Tone Impression”.
➮ Adjust the equalizer values as described under “Action”.
➮
➮
➮
➮
➮
or
➮ Press the DEQ button, <, or OK,
;.
Selecting the Vehicle Preset
or
button, :.
Select the filter with the or
button, :.
Press the or button, :.
To select the frequency, press the
button, :.
Adjust the level with the or
key, :.
In order to select the next filter, first
press the OK button, ;, then the
or button, :.
When you have completed all the
settings, press the DEQ button, <.
Select the Preset Tones
It is also possible to select preset tones
for the following general types of music.
● CLASSICS
● POP
● JAZZ
● ROCK
● TECHNO
● SPEECH
To improve the quality of sound in your
vehicle further, you can set one of the
following vehicle types.
● COMPACT
● LIMOUSINE
● VAN
● ROADSTER
● MINI
● TRUCK
Settings for these vehicles have already
been programmed.
➮ Press the DEQ button, <.
➮ Press the or button, :, as
often as is necessary for “CAR
PRESET” to appear in the display.
➮ Select the desired preset tone with
the
or
button, :.
➮ Press the DEQ button, <, or OK,
;.
53
ENGLISH
button, :.
FRANÇAIS
the
ITALIANO
➮ Select the desired preset tone with
NEDERLANDS
➮
often as is necessary for “SOUND
PRESET” to appear in the display.
SVENSKA
Adjusting the Equalizer
➮ Press the DEQ button, <.
➮ Select “DIGITAL EQ” with the
➮ Press the DEQ button, <.
➮ Press the or button, :, as
ESPAÑOL
down the DEQ button, <, until EQ
is illuminated on the display and
“EQ ON” briefly appears.
➮ To switch the equalizer off, hold
down the DEQ button, <, until EQ
goes out on the display and “EQ
OFF” briefly appears.
Settings for these styles have already
been programmed.
PORTUGUÊS
Switching the Equalizer On and
Off
➮ To switch the equalizer on, hold
DEUTSCH
EQUALIZER
EQUALIZER
Adjusting the Level Indicator
Selecting the spectrometer type
The level indicator, or spectrometer, on
your display temporarily provides a symbolic indication of the volume, the tone
control settings and the equalizer settings while you make the adjustments.
When adjustments are not being made,
the spectrometer displays the car radio's
output level.
In the menu you can choose the type of
the spectrometer.
Two types are available.
➮ Press the MENU button, 8.
“MENU” appears in the display.
button, :, as often
as is necessary for “EQ DISPLAY”
to appear in the display.
➮ Press the
or button, :, to select one of these displays: “SPECTRUM 1”, “SPECTRUM 2” or “EQ
DISP OFF”.
➮ Press the
➮ When the setting process is complete, press the MENU button, 8,
or OK, ;.
Equalizer Adjustment Guide
Start the settings with the middle and treble ranges, and finish with the bass tones.
Tone impression/problem
Action
Bass too quiet
Boost the bass with
Frequency: 50 to 100 Hz
Level: +4 to +6
Bass sounds muddy
Booming tone
Unpleasant pressure
Reduce lower middle tones with
Frequency: 125 to 400 Hz
Level: approx. -4
Tone lacks depth,
is aggressive, no stereo effect.
Reduce middle tones with
Frequency: 1,000 to 2,500 Hz
Level: -4 to -6
Muffled tone
Lack of clarity
Instruments have no brightness
Boost the treble range with
Frequency: approx. 12,500 Hz
Level: +2 to +4
54
Switching the AUX input on and
off
➮ Press the MENU button, 8.
“MENU” appears in the display.
or button, :, as
often as is necessary for “AUX-IN-1
OFF” or “AUX-IN-1 ON” to appear
in the display.
Instead of the “1”, the second AUX input has a “2”. If a CD-changer is connected it is only possible to select input
“2”.
DEUTSCH
ESPAÑOL
SVENSKA
➮ Press the
ENGLISH
TMC means “Traffic Message Channel”.
TMC is used to transmit traffic announcements digitally, and can therefore be used for route planning by suitable navigation systems. Your car radio
has a TMC output that can be connected to Blaupunkt navigation systems.
Your Blaupunkt dealer can tell you which
navigation systems can be used with
your car radio.
If a navigation system is connected and
a TMC station is received, TMC will light
up in the display.
If dynamic route guidance is active, a
TMC station will be tuned in automatically.
FRANÇAIS
In addition to the CD-changer you can
connect an external audio source that
has a line output.
Such sources might be a portable CD
player, a MiniDisc player or an MP3 player.
If no CD-changer is connected, two external audio sources can be attached.
The AUX input must be switched on in
the menu.
You need an adapter cable to connect
an external audio source.
You can obtain such a cable from your
authorised Blaupunkt dealer.
TMC for Dynamic
Navigation Systems
ITALIANO
External Audio Sources
TMC
NEDERLANDS
EXTERNAL AUDIO SOURCES
or button, :, in order to switch AUX on or off.
➮ Press the
PORTUGUÊS
➮ When the setting process is complete, press the MENU button, 8,
or OK, ;.
Note:
● If the AUX input is switched on it
can be selected with the CD•C button, @.
55
TECHNICAL DATA
GUARANTEE
Technical data
Guarantee
Amplifier
The extent of the guarantee depends
on the statutory conditions applicable
in the country where the device was
bought.
If there should be a fault in your device,
please refer to your dealer, providing
proof of purchase.
If the statutory minimum guarantee period in your country is less than 12
months, Blaupunkt provide a 12 month
manufacturer's guarantee. Damage
caused by wear, incorrect use or use
for commercial purposes are excluded
from this guarantee.
In order to make a claim on the basis of
Blaupunkt's manufacturer's guarantee,
please send the faulty device together
with proof of purchase to the central
Blaupunkt customer service depot in
your country.
You can obtain the nearest address from
the telephone hotline at the back of this
booklet. Blaupunkt reserve the right to
carry out a repair or to provide a substitute device.
Output power:
4 x 25 Watt sine
wave according
to DIN 45 324
at 14.4 V
4 x 45 Watt max.
power
Tuner
Wavebands:
VHF (FM) :
MW
:
LW
:
87.5 – 108 MHz
531 – 1,602 kHz
153 – 279 kHz
FM frequency response:
20 - 16,000 Hz
Cassette tape
Frequency response:
30 - 18,000 Hz
Pre-amp out
4 channels:
4V
Input sensitivities:
AUX1 input:
AUX2 input:
2 V/ 6 kΩ
775 mV/ 10 kΩ
Tel./Nav. input:
10 V/ 560 Ω
Subject to technical change!
56
Service-Nummern / Service numbers / Numéros du service aprèsvente / Numeri del servizio di assistenza / Servicenummers /
Telefonnummer för service / Números de servicio / Número de
serviço
Deutschland
Belgique / België
France
Nederland
Great Britain
Ireland
Danmark
Sverige
Norge
Suomi
Österreich
EÏÏ¿˜
âeská republika
USA
Singapore
Slovensko
Tel.:
Fax:
0 18 05 00 02 25
02.525.54.44
014 010 70 07
023 565 63 48
018 958 383 66
(01) 4149400
44 89 83 60
08 750 15 00
66 81 70 00
094 359 91
01 610 39 0
015 762 241
026 130 04 41
800-266 25 28
006 535 054 47
042 175 873 212
0 51 21 49 40 02
02.525.54.48
014 010 73 20
023 565 63 31
018 958 383 94
(01) 4598830
44 89 86 44
08 750 18 10
66 81 71 57
094 359 92 36
01 610 39 391
015 769 473
026 130 05 14
708-681 71 88
006 535 053 12
042 175 873 229
Blaupunkt GmbH
01/01 TRO
K7/VKD 8 622 402 726