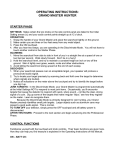
1
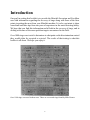
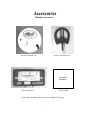
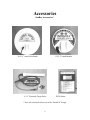
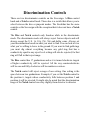
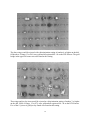
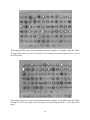
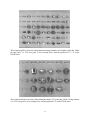
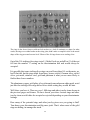
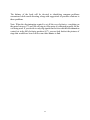
Finding Rings with the Minelab Sovereign and Excalibur along with other hints and tips... A Study of the Minelab Broad Band Spectrum Technology in use... Mike Keener & Otto Feiler Copyright © 1997 Mike Keener and Otto Feiler All Rights Reserved. This book may not be reproduced in whole or in part or in any form without written permission of the publisher. Otto Feiler 1003 Comfort Drive Forney, TX 75126-5076 First Edition First Printing October, 1997 Second Printing May, 2004 Table of Contents Introduction 4 About The Writers 5 A Little History Lesson 5 Accessories 7 Set-Up Options 9 Discrimination Controls 10 Ready Set Go 11 Advanced Tuning 13 Ring Guide To Discrimination 14 Sumary of Discriminator and DTI-II Meter Readings 26 Detecting Problems And Possible Solutions 27 Techniques And Methods 30 Closing Thoughts 33 Code of Ethics 34 Introduction Our goal in writing this booklet is to provide the Minelab Sovereign and Excalibur user with information regarding the recovery of rings along with some of the finer points in getting the most from your Minelab machine. It is also our intent to share some hints and other tips from our years of experience in the metal detecting hobby. We hope that you find this information useful both in the recovery of rings, and in dealing with some of the more problem targets encountered in the field. Over 1000 rings were tested to determine at what point on the discrimination control they would either be accepted or rejected. The results of that testing is what this booklet is all about. We hope you enjoy it. Over 1100 rings were used in these tests. These are excavated rings found by Mike Keener. 4 About the Writers Mike Keener and Otto Feiler together have more than 45 years of experience in metal detecting. Mike has been a Sovereign user since they were first introduced in 1991 and during that time has watched the machine evolve into a top contender in the race for the best. Otto has only been using the Minelab Broad Band Spectrum technology since May of 1996 but has found a winner in these new and exciting detectors. After using many brands since first getting interested in the hobby in 1972, Otto has been completely won over by this remarkable breakthrough. A Little History Lesson The first Sovereign, introduced in 1991, had the new technology called BBS “Broad Band Spectrum” where the metal detector transmits 17 different frequencies simultaneously from 1.5 khz to 25.5 khz at 1.5 khz increments. This was also the only Sovereign to have full rubber covers on the switches. The second generation Sovereign had only a slight modification in that the toggle switches no longer had the rubber covers that were on the first generation since they wore out quickly, and the switches were a little beefier on the second generation from the first. The third generation Sovereign, and currently available unit as of the printing of this book, had a control panel facelift that included the removal of the normal/iron mask switch and the set/fixed/pin-point switch. The iron mask feature provided better depth and allowed better detection in close proximity to iron targets and was rarely turned off by the user. The Set/Fixed/Pinpoint switch was replaced with a single All-Metal/Pinpoint switch. The Set/Fixed mode was a carry-over from the gold machine first offered. A volume control was added for the first time and the iron mask was built-in as the default setting. This was the beginning of the Sovereign XS for eXtra Sensitivity. Almost anything mentioned regarding the Sovereign goes for the Excalibur as well. After all, the Excalibur is basically a submersible Sovereign without notch control. 5 The responses to a target sounds the same on both machines. It does take time to get used to the sounds and to learn the way the detector “talks” to you and what it is “saying”. Once you do, you will find they have a lot to say. You will also like the fact that you don’t have to ground balance these machines and they also are not an “automatic” ground balance machine either. Instead, they take a kind of “snapshot” of what the ground “looks” like. Then they use that as a “background” in which to “look” for interruptions that represent a metallic object. This guide can be useful to help determine what levels of discrimination you want to use or where to set your notch control. If you want to find all of the rings your searchcoil goes over you must dig every target response the detector makes. There is no secret formula for finding all rings without digging all targets, both good and bad and that’s all there is to it. 6 Accessories Minelab Accessories * 8 inch Coinsearch coil 8 inch Seasearch coil no picture available Sovereign Meter 11 inch round * Note: All searchcoils shown are of the “Double-D” design. 7 Accessories SunRay Accessories * S-12 12” round Ultra Depth S-5 5.5” round Intruder S-1 1” Electronic Target Probe DTI-II Meter * Note: All searchcoils shown are of the “Double-D” design. 8 Set-Up Options The Sovereign XS has two dealer set internal setup options. 1) Silent or audible threshold in the discriminate mode. This is a matter of personal preference but Minelab recommends using an audible threshold and so do we. Threshold is explained in more detail in the Techniques & Methods section of this book. 2) Single or Multiple Tone Target ID. Minelab recommends using a Multiple Tone Target ID as do we. This system has the audio increase in tone as the targets increase in conductivity. Rejected targets produce no sound or a broken audio. Also the threshold will be that of the last object detected until a new object is found. The tone can be reset to a medium tone by momentarily switching from discriminate to all-metal and then back to discriminate. This system requires the operator to learn which of the various pitches or tones to associate with certain desirable targets and will also free the operator from constant meter watching for the target ID. Some operators can literally hear what is in the ground before they dig it and when used with a visual target ID meter the operator becomes extremely accurate in guessing what the detector is saying. The variable tone frequencies starts with the low tone of about 80 Hz to the high tone of about 300 Hz. The Single Tone option emits a constant tone for any target detected and the threshold also will be one tone (pitch). Assumptions The writers assume that you are using the Sovereign XS or Excalibur in the factory default mode settings. i.e.: The machine is set to the threshold search mode. The multi-tone target ID mode is in effect. The user is using the SunRay DTI-II meter if meter equipped. You have read the owner's manual. 9 Discrimination Controls There are two discriminator controls on the Sovereign. A Disc control knob and a Notch control knob. There also is a switch that allows you to select between the disc or pinpoint modes. The Excalibur has the same controls as the Sovereign with the exception that it does not have a Notch control. The Disc and Notch controls only function while in the discriminate mode. The discriminate mode will always reject ferrous objects and will always accept the U.S. 1¢, 10¢, 25¢, 50¢ and dollar coins. Always set your discrimination based on what you want to find. You can look at it as what you’re willing to leave in the ground. If you want to find gold rings you must dig almost everything because any gold ring that has a conductivity equal to any reject level setting will also be rejected, for that ring will fall in that reject range. The Disc control has 17 graduations and as it is turned clockwise targets of higher conductivity will be rejected. All the way counterclockwise will be one and fully clockwise will be number seventeen. The Notch control will reject a range of one setting. One setting is the space between two graduations. Example, if you set the Notch control to the position 6, targets whose conductivity falls between position 5 and position 6 will be rejected. It might also be noted that the discrimination range of the Notch control can vary slightly from detector to detector. 10 Ready Set Go You would be wise to read your owner’s manual several times. As you hunt and then read the manual you will pick up more of the information needed to really become proficient with these units. Although you really need to sit down in a quiet place and read your manual. We have included a couple of fast and easy set-up options to get you out the door in a hurry. We assume that you are using the Sovereign XS or Excalibur in the factory default mode settings. i.e.: The machine is set to the threshold search mode. The multi-tone target ID mode is in effect. The SunRay DTI-II meter is being used, if meter equipped. You have read the owner’s manual. Basic Set-Up and Go: Set the Disc control to the third mark clockwise from the left. Number 3 on an Excalibur. If hunting in the water and you are going to dig everything, set this control full counter-clockwise for minimum discrimination. Set the Notch control all the way counter-clockwise. Excalibur users ignore this step. Set the Sensitivity control full counter-clockwise to Auto. Set the all-metal/discriminate switch to discriminate. For Excalibur users, it’s the disc/pinpoint switch and should be set to disc. For Sovereign users, turn the Volume/On-Off control full clockwise and adjust the Threshold control for a slight sound. 11 For Excalibur users, turn the Volume control full clockwise and turn the Threshold/On-Off control clockwise and adjust for a slight sound. Don’t forget to always wear headphones. Adjust Volume to a comfortable level, if needed, keeping in mind that you could fail to hear faint signals if the volume is too low. Sweep the searchcoil as close to, or touching, the ground at all times while sweeping side to side at about 1 to 1.5 seconds per foot. After a target is found, use the all-metal/discriminate switch in the all-metal position for pinpointing. Excalibur users, use the disc/pinpoint switch in the pinpoint position for pinpointing. Dig any signal that gives a repeatable, solid, positive response. Listen to the tones of the various targets you dig and concentrate on learning to associate the tones with the targets dug. It’s that simple. Don’t forget to get permission to hunt. Advanced Set-Up and Go: Modify the Basic Set-Up and Go instructions to include the following: Set the sensitivity control either to Auto or a manual setting. We recommend the highest counter-clockwise manual setting that still gives a stable operation without too much falsing. Threshold almost silent, just barely able to hear it. Your choice of discrimination and notch settings. You are ready to go. Don’t forget to fill your holes. 12 Advanced Tuning We recommend that new users learn the basics of their machine before attempting to use the advanced tuning techniques. Set the Disc and Notch controls to your desired settings. Set the all-metal/discriminate switch to all-metal. Pinpoint on the Excalibur. Turn the Volume control all the way clockwise. Set the Threshold control to a slight hum. Slowly sweep the search coil on the ground, side to side, while keeping the searchcoil as close to the ground as possible. Find a patch of ground with no metal in it that is large enough to sweep your coil without hearing a metal target. Place the coil on the ground and hold the coil still. Switch the all-metal/discriminate switch to discriminate. Disc on the Excalibur. Turn the sensitivity control all the way clockwise. While slowly sweeping the coil over the ground previously checked for no metal, turn the sensitivity control as far counter-clockwise as possible, without going into “Auto”, until falsing occurs. While continuing to sweep slowly, turn the sensitivity control back slightly clockwise to eliminate the falsing. To the best of our knowledge, the above setting is about as close to maximum sensitivity that you can set this machine . If you don’t like the sweeping method, you can also find a metal free spot just the size of the searchcoil. Hold the coil still and turn the sensitivity control just off of Auto. If falsing occurs, turn the control clockwise until the falsing stops. Then turn back slightly counter-clockwise for a positive setting. Please note that when using the advanced tuning option, you are maximizing your sensitivity for depth and some falsing may occur. If you have too much falsing or the falsing is irritating, you can reduce your sensitivity slightly more to eliminate it. The 20 rings in this frame are made of iron and, of course, registered as iron. They also read -495 to -497 on the SunRay DTI-II meter and gave a negative (silent) audio response. Just another example of having to dig it all to get it all. 13 Ring Guide To Discrimination The rings that we hunt for are made from various metals and are found in a variety of shapes and sizes. Because of the variety of rings, they do not display any consistent pattern of conductivity. Factors such as metal and alloy content, diameter, metallic surface and shape, and the orientation of the ring in the ground crosses the entire conductive and non-conductive range of metal. To find all the different kinds of rings you must dig all targets and junk with no discrimination or minimal discrimination. Also by hunting this way you find many targets that are indicated as trash but are not trash at all... Nickel 3¢ i.d. as foil...$5 gold i.d. as square pulltabs... copper/nickel Indian pennies and $2½ gold coins i.d. as round pulltabs... jewelry other than rings range the entire scale of non-ferrous targets... etc. This book is primarily about rings. We hope this picture guide will help you decide on how much discrimination is needed if you want to find rings of all types. Here we go. The 20 rings in this frame are made of iron and, of course, registered as iron. They also read -495 to -497 on the SunRay DTI-II meter and gave a negative (silent) audio response. Just another example of having to dig it all to get it all. 14 A couple of notes: Other than the rings that registered iron in the previous frame, no rings were found that would have been rejected with a discriminator setting from all the way counter-clockwise, or 1, to number 3 on the control. In other words, with your discriminator set to 3 or less, all of the rings would have been found. The rings that registered iron in the previous frame were found by digging signals that made the threshold go silent. These rings and jewelry items would be rejected at a discrimination setting of number 5 or higher on the dial. Of the 66 rings in this frame, 22 or 33% of these were gold and all registered up to 79 on the DTI-II meter. Some gold pendants also lock on in this range. Six of the 15 pieces of gold jewelry found were found with this setting. 15 The above rings would be rejected with a discrimination setting of number 6 or higher on the dial. Of the above 28 rings, 13 or 46% were gold and all registered 80 - 89 on the DTI-II meter. The gold bridge in the upper left corner was also found at this setting. These rings and jewelry items would be rejected at a discrimination setting of number 7 or higher on the dial. Of the 18 rings, 12 or 67% were gold and all registered 90 - 98 on the DTI-II meter. Five of the 15 pieces of gold jewelry found were found at this setting. 16 These rings would be rejected at a discrimination setting of 8 or higher on the dial. Of the 25 rings in this frame, 14 or 56% were gold and all registered 99 - 106 on the DTI-II meter. No other gold jewelry was found at this setting. These rings and pendant would be rejected at a discrimination setting of number 9 or higher on the dial. Of the 38 rings, 16 or 42% were gold and all registered 107 - 116 on the DTI-II meter. The gold pendent was found at this setting 17 These rings would be rejected at a discrimination setting of 10 or higher on the dial. Of the 34 rings, 16 or 47% were gold and all registered 117 - 125 on the DTI-II meter. One more piece of gold jewelry was found at this setting. These rings would be rejected at a discrimination setting of 11 or higher on the dial. Of the 38 rings, 9 or 24% were gold and all registered 126 - 136 on the DTI-II meter. No other gold jewelry was found at this setting. 18 These rings would be rejected at a discrimination setting of 12 or higher on the dial. Of the 49 rings, 16 or 33% were gold and all registered 137 - 144 on the DTI-II meter. One other piece of gold jewelry was found at this setting and the first sterling silver ring These rings would be rejected at a discrimination setting of 13 or higher on the dial. Of the 51 rings, 16 or 31% were gold and all registered 145 - 153 on the DTI-II meter. One more sterling silver ring was found at this setting. . 19 These rings would be rejected at a discrimination setting of number 14 or higher on the dial. Of the 78 rings in this frame, 16 or 21% were gold, 3 were sterling silver and all registered 154 - 160 on the DTI-II meter. These rings would be rejected at a discrimination setting of number 15 or higher on the dial. Of the 89 rings, 20 or 22% were gold, 10 were sterling silver, and all registered 161 - 169 on the DTI-II meter. 20 These rings would be rejected at a discrimination setting of number 16 or higher on the dial. Of the 60 rings, only 7 or 12% were gold, 12 were sterling silver, and all registered 170 - 171 on the DTI-II meter. These rings would be rejected at a discrimination setting of 17 on the dial. Of the 16 rings shown, 2 or 13% were gold, 4 were sterling silver, and all registered 172 on the DTI-II meter. 21 These rings and the rings on the following page, were accepted at a discrimination setting of 17 on the dial. Of the 410 rings shown on these two pages, 9 or 2% were gold, 268 were sterling silver and all registered 173 - 180 on the DTI-II meter. 22 Of the 1069 rings tested, the 410 rings found with the discrimination setting all the way clockwise represent 38% of all the rings found. 23 The rings in the above frame would not lock-on due to a lack of continuity or shape. In other words, the rings were either broken at the sizing joint, didn’t make a complete circle or the actual shape of the ring prevented a meter lock. Fifteen of the 49 rings shown were sterling silver. Out of the 314 sterling silver rings tested, 15 didn’t lock-on, and all but 31 of the rest fell into the number 17 setting on the discrimination dial and would always be accepted. It is possible that some sterling silver rings can read lower than 161 on the meter, we had 5 that did, but the rings made from brass, bronze, nickel, German silver, nickel silver, pot metal, stainless steel, gold and platinum is what you are more likely to find in those lower numbers. The aluminum, copper, gold plate, silver plate and some unknown white metal, acted just like the sterling silver rings did as far as which setting they would fall into. Well, there you have it. There are over 1,000 rings and other jewelry items shown in the previous pages and frames. We have shown you where various rings and other jewelry items would either be accepted or rejected depending on your discriminator settings. How many of the potential rings and other jewelry pieces are you going to find? Turn down your discrimination and dig more junk. That’s where most of the gold rings are hiding, in amongst the trash. 24 The balance of the book will be devoted to identifying common problems encountered while metal detecting, along with suggestions of possible solutions to these problems. Note: When the discrimination control is set all the way clockwise, everything on the meter between 173 and 180 will ring in if the meter is calibrated properly for the coil being used. If you decide to only dig signals that lock in with the discrimination control set in the full clockwise position (#17), you can look back at the pictures of rings that would have been left for some other hunter to find. 25 Summary of Discriminator and DTI-II Meter Readings 47% of all rings found were either Gold or Sterling Silver. 70% of all the rings, 46% of all the Gold rings, and 95% of all the Sterling Silver rings would be found if you just keep your discriminator control set no higher than 12 on the dial. 26 Detecting Problems And Possible Solutions No matter how good you get, sometimes you will have a questionable target signal that turns out to be good while you have a good signal that turns out to be junk (like an iron nail). Then there's the target you can't find, it's there but nevertheless you can't find it, but it's still there. How about the one that's there then it's not. Why do these errors occur when we're using such a good machine? Sometimes we can blame it on the salt or mineralization, too much moisture or not enough moisture in the ground, or maybe it's a large amount of electrical interference. Most of the time there is an explanation that's none of the above. Case 1: You have a deep coin signal. Sometimes it's a good repeatable signal and sometimes it isn't always repeatable on each sweep. It's something you do decide to dig. You've dug down 7 or 8 inches and still can't find the target where you have pinpointed it. Case 1 Solution: You will find a nail or a piece of elongated iron heavy with corrosion on the side of the hole sometimes up to 6 inches away from the pinpoint center. The rust and oxidation creates a halo that exhibits both nonconductive and conductive properties at the same time, a good signal. When the halo is disturbed the good signal can disappear. Most nails and elongated iron is bent or on an angle in the ground causing the pinpointing to also be in error and why you normally will find it on the perimeter of the hole. Perhaps the target is a coin on an angle causing the pinpointing to be in error and you will find it on the side of the hole. Sometimes the coin will fall into the hole and the signal will disappear because the target is now out of detection range of the unit. Sometimes after the user recovers the target after falling into the hole, they tend to believe that they just found the target at unbelievable depth when it really fell out of the side of the hole at some shallower depth. A coin on angle is easiest to damage during recovery because you don't have an accurate location of the target. Another solution could be that the target is a large metal object that is real deep. In a plowed field where Mike had permission to use a shovel, he dug a civil war canteen 27 at 3 feet, a large piece of a cast iron stove at 4 feet, and a larger piece of tin sheet metal at 4 1/2 feet using the standard 8 inch Coinsearch coil. Sometimes all a person has to do is go another inch deeper to find the target. Case 2: You have a signal that seems contradictory, having both good and bad characteristics. Sometimes the target mimics a partially rejected trash target, or is clipped, broken, or ragged sounding depending on how fast you swing your coil or from which direction you come at the target. A questionable dig. Solution to case 2: It's usually a good target next to one or more bad targets. Most of the time just by going very slow over the target will produce two signals. One good and one bad. Sometimes it takes a ninety degree turn to produce the good & bad signal using a slow coil sweep speed. You may have to dig the trash first because it is the strongest pinpoint signal or you may try to pinpoint by staying in the discriminate mode and sweep slowly one way then 90 degrees the other way. Another possible solution is that it's trash but you won't know that until you dig it up. Case 3: You ID a penny or better in conductivity but when you dig you find a nickel instead. Solution to case 3: The nickel had been in the ground a long time creating a halo effect that makes the nickel register in a higher conductivity range. Another possible solution is that the nickel is laying on top of another target of higher conductivity. Don’t forget to double check the hole after recovering the nickel. Case 4: You get what appears to be two good coin signals close together. When you sweep the target 90 degrees you get one weaker coin signal. You pinpoint two coin signals close to each other. You dig and find nothing in either hole. 28 Solution to case 4: Usually it's a coin on edge or perpendicular to the coil and will be found between the two holes. If you swing the coil back and forth and the coin edge is going perpendicular to your sweep path, the audio response will be two closely spaced beeps. The coin on angle will have a pinpoint error and will be found in the middle of those two beeps. Case 5: You get a weak but positive response and a lock-on with good tone while searching in the discriminate mode. When you switch to all-metal to pinpoint you get no signal from where you got the hit in discriminate, but you receive a strong all-metal response inches away, which turns out to be a trash target, or sometimes more than one trash target. What happened to the good positive signal? Solution to case 5: The positive signal was masked by a trash target too close to the surface, or the target is a larger piece of trash and overpowers the good signal nearby. You must dig and remove the trash target first in order to find the good target. Another solution is that you can get a good response on a piece of iron that has a rust halo. When you dig and remove this iron you will find the good signal is gone. The Minelab units can be fooled by some rusty iron, especially if you are running the sensitivity too high. Case 6: You are hunting using a Notch setting and you get these weird, clipped, or partial kind of sounds. You find the target in all-metal but when you switch back to disc, you get nothing. Solution to case 6: When using Notch there is a gray area on either side of the Notch setting where some targets can be partially notched out. When not directly over these “fringe” targets, they will ring in as a broken sound. If you use a Notch setting that is too close to a desirable target, the good target could also be notched out. 29 Techniques and Methods You can obtain an additional 1 to 3 inches more depth by turning the sensitivity control to just off the auto position while detecting over lightly mineralized soil or sand. This might cause the detector to become unstable and produce false signals. The detector will also have a tendency to ID more nails and elongated iron as good targets. If this occurs try following the steps outlined in the Advanced Tuning section. You can make a fairly accurate judgment on how deep a coin size target is by first bench testing a dime or a penny to find the distance from the coil they produce a good but faint signal. Say for example your air test produces a faint signal at eight inches. At a park you find a probable penny target and when you raise your coil 3 inches you receive and hear that faint air test signal. Your target is probably 5 inches deep if it's a penny sized object. However, if you had to raise the coil 10 inches above the ground to hear that same air test signal, you will find that the target isn't a penny but an object much larger in size. If you are using the default multi-tone option then this next technique might be helpful. All targets cause the pitch of the threshold to change to the pitch of the target encountered. For example if you pass a nickel across the coil the threshold hum will change it's pitch to that of the nickel. Keep the threshold audio hum low but still loud enough to hear all pitch changes. On rejected targets the threshold will go silent. When you are in a concentration of junk the silent threshold is a sign for you to slow down that searchcoil sweep speed or switch to a smaller coil. A real deep coin target may not have enough volume to produce a positive signal but the threshold pitch will change to that of the coin target until the next target changes it again. These kinds of changes should be investigated further as they can indicate a good target that’s very deep. Be aware that not hearing a threshold hum may cause you to miss targets. So when that threshold goes silent remember to really slow down to a crawl to get the threshold back. One fellow says he has slowed down to 6 seconds per sweep and found Indian heads etc. that were simply missed because of the masking of the iron trash. Searchcoil covers can and do accumulate dirt and water if they aren't sealed in some fashion. You can keep the dirt and moisture out by wrapping electrical tape around the coil and cover at the joint. This will also make removing the cover in the future an easier task. 30 Make sure that when you run into an area that is producing a number of deep coins (6 inches or greater), to make a second search at a different direction from the first to get good coverage. One of the hardest techniques to explain is what a really deep target sounds like. It is the most important target to learn but the hardest to describe. To just say a deep target is weaker in sound than targets on the surface will not produce the really deep coins all the time. Experience is the best teacher and very deep targets will often sound like something not worth digging to a beginner. The descriptions below assume that you are using discrimination, you have the sensitivity set on your own setting, (not using Auto), and you are using a SunRay meter with the Sovereign XS. A good target on or close to the surface normally will always give a good broad positive response provided there is no trash on top of or right next to the target. The beginner should know the sound of a good positive response, and dig these when the meter also locks onto this sound. Now the deeper the target is the weaker the sound gets. When a coin target is around 5" or so the sound becomes a very short positive signal. The meter will lock on and you should always dig this target sound. When you are using your sensitivity in the manual setting, auto off, there are some very deep targets that will produce a positive short and weak wavering type of response. A sound where the tone or pitch will oscillate up and down. It doesn't sound like a good target because of the up and down oscillation. If the questionable target causes the meter to bounce around mostly in the positive numbers, you may want to dig it. Sometimes the up and down oscillation can be so wide and fast between a negative and positive response that it will have a broken sound. There is a metal object in the ground when you hear this sound but it may not be a good target. To prevent a lot of trash from being dug on these questionable targets, you might want to try the following. First only be interested in the very weak, deep sounding signals. Get the coil over the target and watch the meter. A good target will cause the meter to bounce around in an area generally of positive numbers and produce a positive sound each time you pass the coil over the target. A bad target will generally null out with no sound or a very broken sound will occur. Be aware that on these types of signals the bad to good target ratio is going to be high. Checking the target from a different direction can help identify a good target from a bad one. Another thing to remember is that if the first thing recovered from the hole is a trash item, make sure that you recheck the hole. We have found pulltabs, foil, and iron trash in the same hole along with good targets that gave the good response in the first place. 31 The blip, broken, burp or odd sounds that happen when you are just walking along and swinging your coil is a sound that your machine makes to let you know that there is a metal object but you were probably swinging to fast or you just barely got the object on the overlap. You need to slow down your swing, and get the coil on the top of the target. By doing this the target will have either a positive response, a negative or null response, or a questionable wavering or broken response. Here is a technique for those areas where you can or want to dig everything. You start out hunting in the all-metal mode and for each target you switch to the discriminate mode for ID. If the target nulls out in discriminate, and you have the discriminate control set all the way counter-clockwise, the target is most likely iron. When you switch from all metal to discriminate and get no change in threshold or you get a positive response, you will have a target that's deep or a small non-ferrous item like a gold chain that doesn't respond well in discriminate but also doesn't null out. It is commonly known that on any metal detector, using discrimination reduces depth. One way to maximize depth is to set the discrimination control to the full counter-clockwise position, number 1. When hunting this way, you can ID using tone however, the DTI-II Meter will give you a better reference to ID with when using minimum discrimination. 32 Closing Thoughts This ring guide to the Sovereign and Excalibur has been written from our own experiences in using both machines. It is the culmination of what we have learned and theorized about how these particular machines work and how to get treasure that has been left behind by not only others, but ourselves. We hope that this guide has been of interest and a help to both new and experienced users alike. Hopefully, many of you will have the same experiences and successes with these machines as we have. The ring guide can be useful to determine what ring finds would be lost by using too much discrimination or if you decide not to dig certain notch areas. If you want to find all the rings you must dig all targets. Sometimes you just can't dig everything because of time constraints or other reasons. At least you’ll have some idea of what may be left in the ground. We both have a fair amount of experience in the use of these units, however we don’t claim to be experts in the use of the Sovereign and Excalibur. We continue to learn a little more each time out. All we hope is that you will become more successful in your search for treasure and in using your Sovereign or Excalibur by improving on our suggestions and techniques. Remember, good research, good luck, and learning your machine will make you successful. Good Luck and Good Hunting! 33 Code of Ethics I Will respect private property and do no treasure hunting without the owner’s permission. I Will fill all excavations. I Will appreciate and protect our heritage of natural resources, wildlife, and private property. I Will use thoughtfulness, consideration, and courtesy at all times. I Will build fires in designated or safe places only. I Will leave gates as found. I Will remove and properly dispose of any trash that I find. I Will Not litter. I Will Not destroy property, buildings, or what is left of ghost towns and deserted structures. I Will Not tamper with signs, structural facilities, or equipment. 34